ノート:
- このチュートリアルでは、Oracle Cloudへのアクセスが必要です。無料アカウントにサインアップするには、Oracle Cloud Infrastructure Free Tierの開始を参照してください。
- Oracle Cloud Infrastructureの資格証明、テナンシおよびコンパートメントに例の値を使用します。演習を終える際は、これらの値をクラウド環境に固有の値に置き換えてください。
Ruby on Rails Webアプリケーションを使用したプログラムによるOCI生成AIサービスへのアクセス
イントロダクション
Oracle Cloud Infrastructure Generative AI(OCI Generative AI)は、革新的な新しい人工知能ツールであり、テクノロジーとのやり取り方法を変革する可能性があります。大規模な言語モデルであり、大量のテキストデータに基づいてトレーニングされ、その前に来た単語に基づいてシーケンス内の次の単語を予測することを学びます。これにより、OCI Generative AIは、テキスト・プロンプトに対する人間のような応答を生成できるため、自然音響言語を作成するための非常に強力なツールとなります。
OCI Generative AIの最も印象的な機能の1つは、複雑なトピックを理解し、詳細な説明と回答を提供できることです。最近では、すべての組織がジェネレーティブAIの力をアプリケーション内で活用し、顧客向けの革新的な製品を作りたいと考えています。
このチュートリアルでは、OCIが世界中の組織がOCIでジェネレーティブAIの力を活用するためにどのようにOCIが役立つかについて説明し、理解します。このチュートリアルでは、開発フレームワークとしてRuby on Rails (RoR)を使用し、Rubyプログラミング言語に基づいてOCI Generative AI APIを呼び出します。
目的
-
GitLabエージェントがOCIテナンシに接続する基準に基づいて、ユーザーのOCI APIキーを設定します。
-
コンピュート・インスタンスをRoR開発に使用できるように作成および構成します。
-
RoRアプリケーションを設定し、OCI生成AIサービスをコールおよび表示するための適切なコードを記述します。
前提条件
-
Oracle Cloud Infrastructure Identity and Access Management (OCI IAM)で許可されているOCIおよびポリシーへのアクセス。ユーザーは、Terraformコードを使用して作成または更新する対応するリソースにアクセスできる必要があります。
-
Ruby、RoR、およびModel View Controller (MVC) Webアプリケーション開発に基づくその動作方法に関する知識。
-
ソフトウェア開発のアジャイル手法に関する基本的な理解
タスク1: Oracle Cloud Infrastructure APIキーの設定
-
サービス・アカウントまたは管理ユーザーを使用してOCIテナンシにログインし、ユーザー設定に移動します。
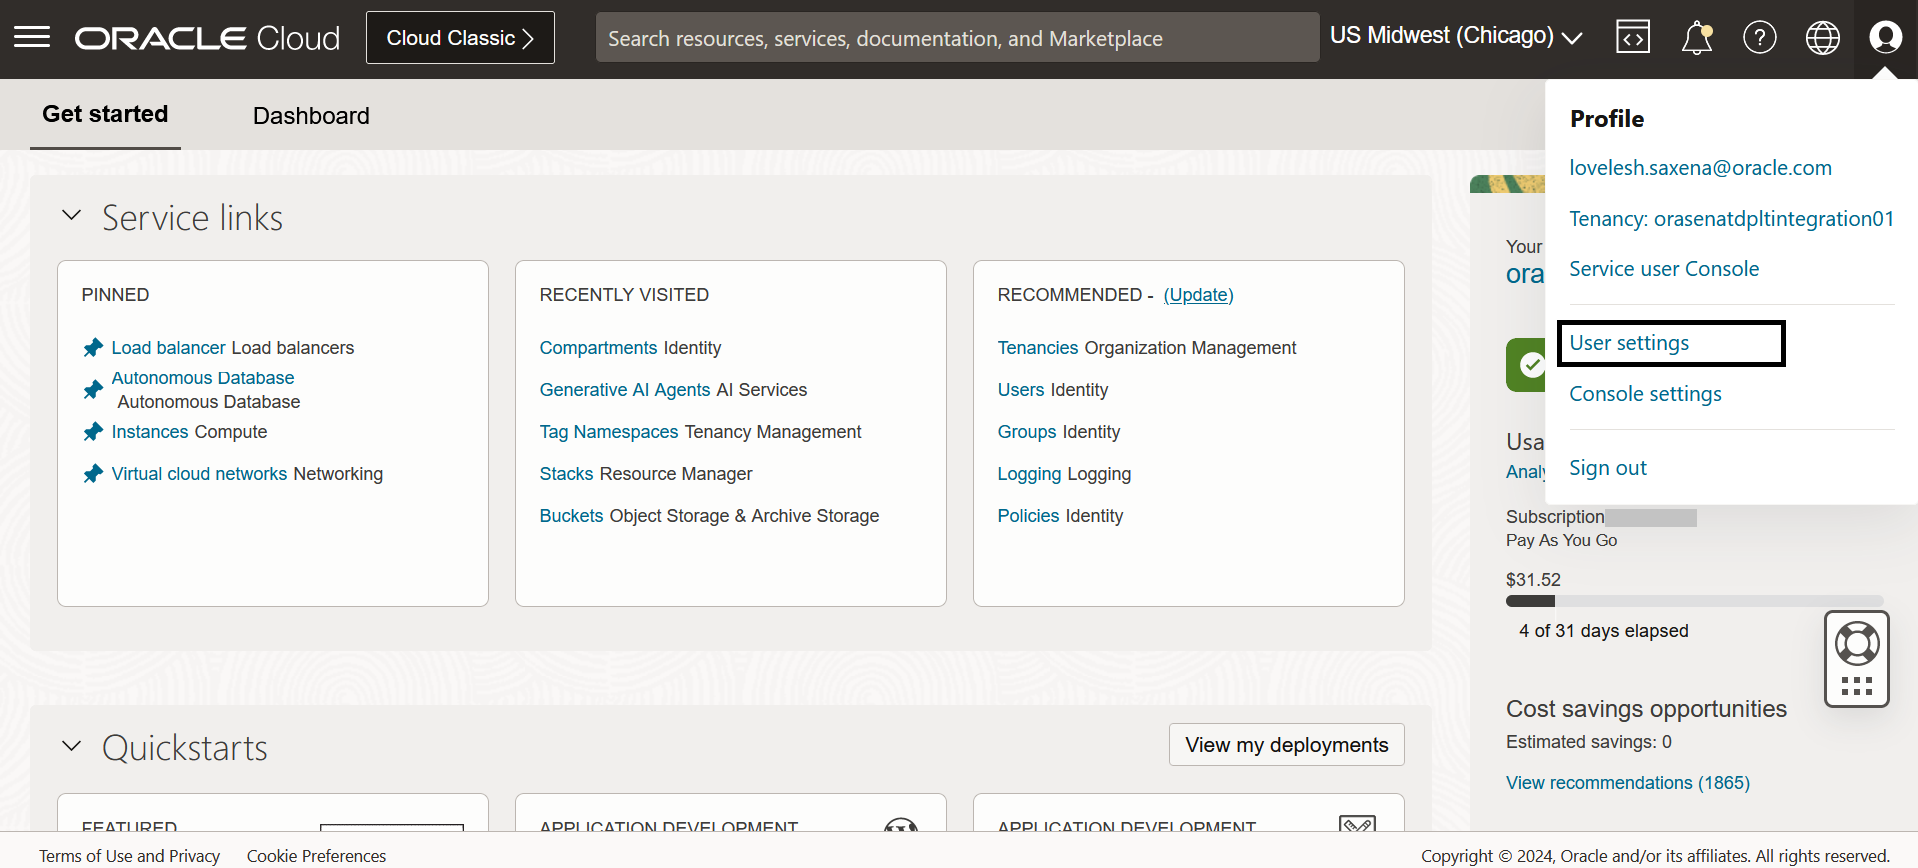
または
OCI IAMコンソールからユーザーに移動します。OCIでインフラストラクチャを作成および更新するために必要なすべてのアクセス権がユーザーに付与されていることを確認します。
-
ユーザーの「リソース」セクションに移動し、「APIキー」および「APIキーの追加」をクリックします。新しい公開キーと秘密キーをダウンロードするか、公開キーをアップロードするか、公開キーを貼り付けます。

-
鍵を便利な場所に保存し、次のページに示すように構成ファイルを保存します。Ruby SDKを使用してテナンシに接続する場合は、この構成ファイルと秘密キーが必要になります。
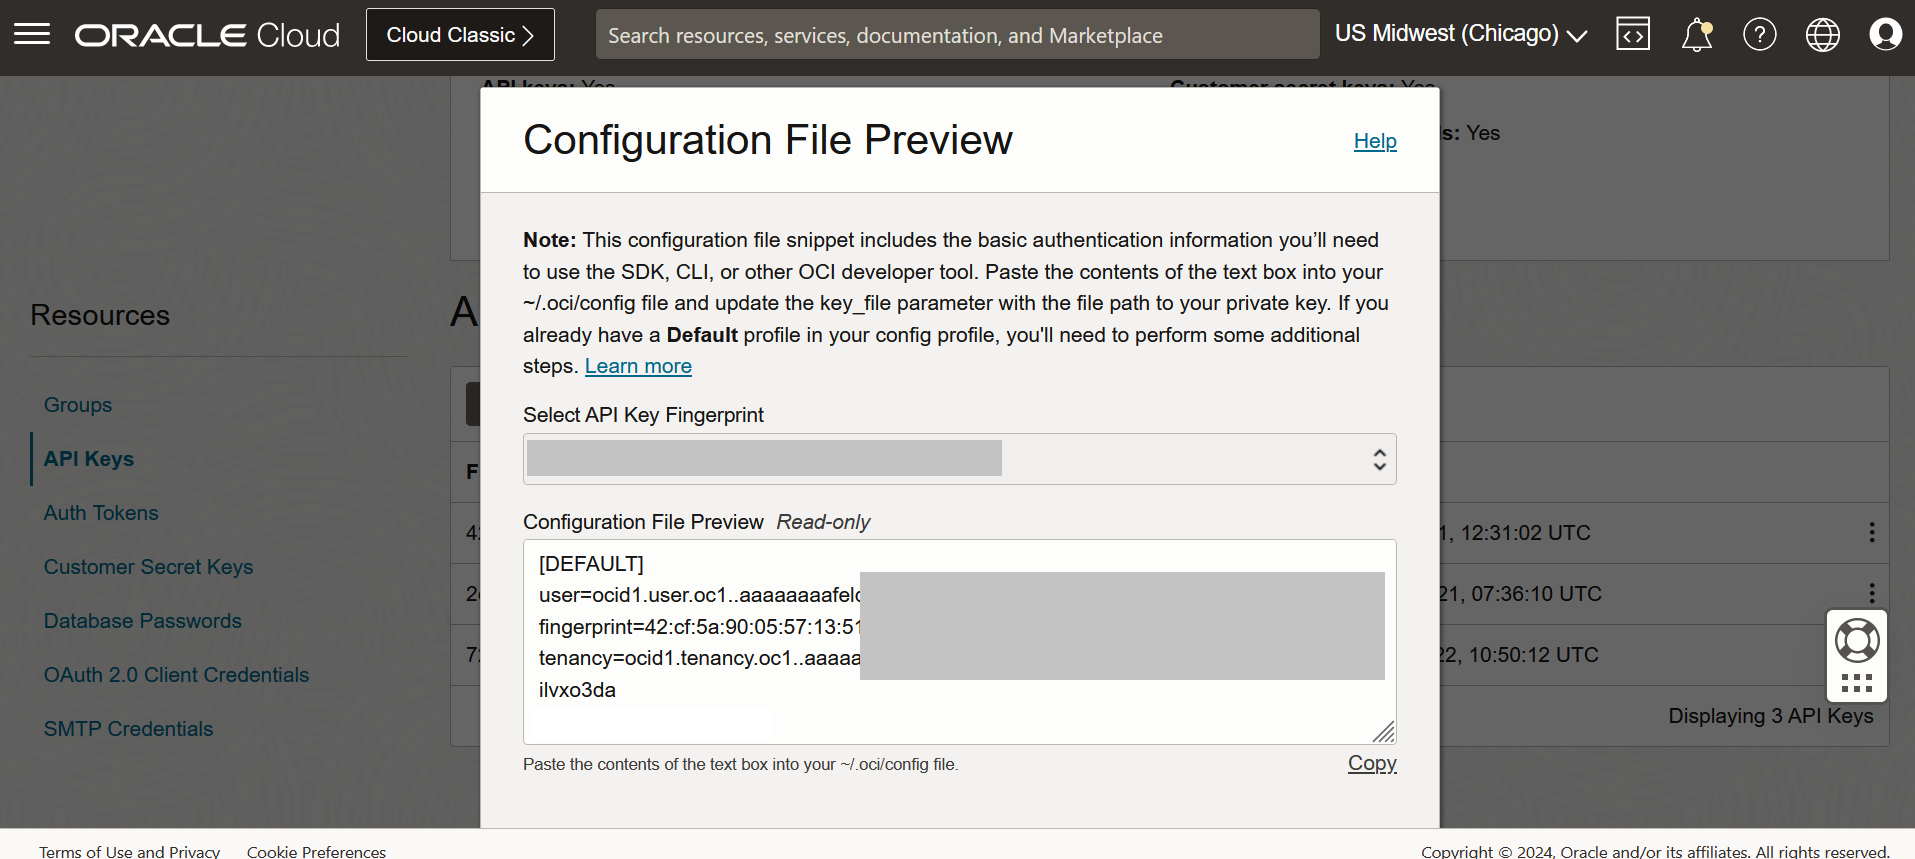
ノート:
-
OCIは、現在、
US-CHICAGO-1リージョンでジェネレーティブAIサービスをサポートしています。そのため、必ずテナンシでこのリージョンを有効にしてサブスクライブしてください。 -
OCIコンピュート・インスタンスからOCIサービスを呼び出すために、OCIはインスタンス・プリンシパルを使用してより安全な方法を提供します。ユーザーAPIキーをベスト・プラクティスとして使用しないでください。詳細は、インスタンスからのサービスのコールを参照してください。
-
タスク2: RoR開発に使用するOCIコンピュート・インスタンスの作成と構成
-
「OCIでのWindowsインスタンスの起動」に移動して、OCIにWindowsコンピュート・インスタンスを作成します。
-
Windowsインスタンスが作成されたら、次のスクリーンショットに示すように、初期パスワードを使用してログインします。
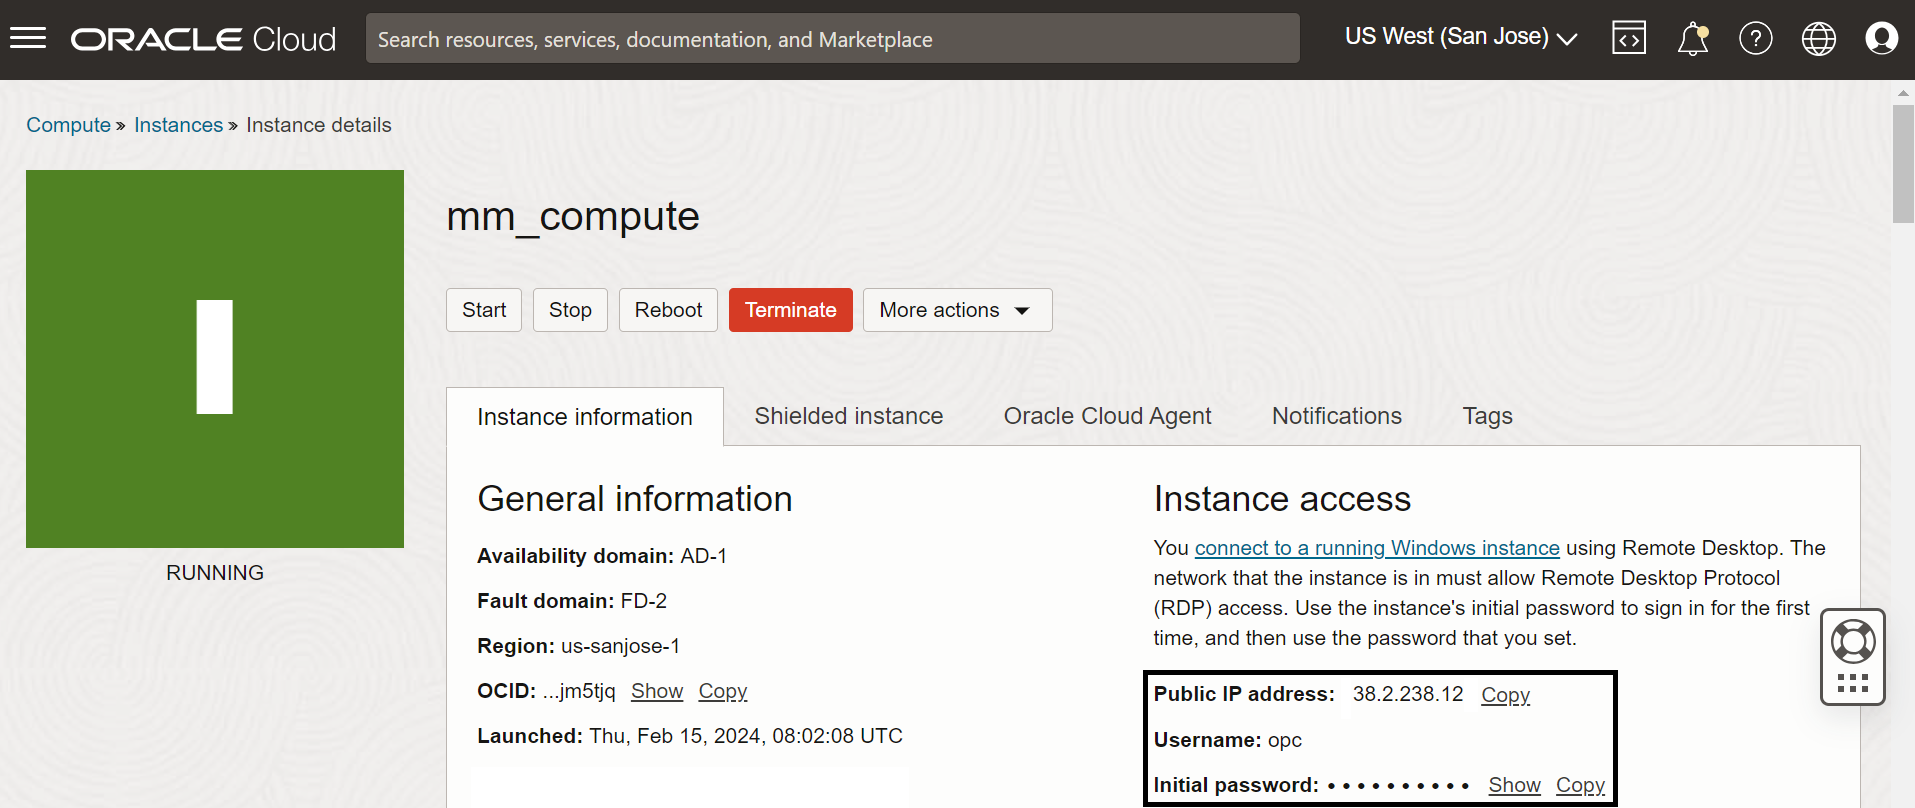
-
Windowsコンピュート・インスタンスにログインした後、Ruby、Ruby on Railsをインストールおよび構成し、railsコマンドを使用して新しいアプリケーションを作成します。
rails new GenAIAppアプリケーション・ディレクトリに移動し、次のコマンドを実行して、レール・アプリケーション・サーバーを起動して実行します。
http://127.0.0.1:3000のデフォルトのRailsアプリケーションにアクセスできるはずです。cd GenAIApp rails server -b 0.0.0.0 -
ユーザーのホーム・ディレクトリ(
c:/users/opc)に移動し、Ruby SDK用のconfigファイルを作成します。タスク1.3でダウンロードしたとおりに構成ファイルを構成し、ダウンロードした秘密キー・ファイルも配置します。詳細は、Oracle Cloud Infrastructure Ruby SDKを参照してください。ノート:
-
OCIコンピュート・インスタンスにログインするには、まずWindowsパスワードをリセットする必要があります。次回からログインするには新しいパスワードを覚えておいてください。
-
ネットワークの外からRailsアプリケーションにアクセスするには、ポート
3000を開き、作成されたコンピュート・インスタンスからWindowsファイアウォールをオフにする必要があります。
-
タスク3: RoRアプリケーションの設定、OCI生成AIサービスの呼出しと表示に適したコードの記述
-
Railsアプリを実行し、ローカルおよび必要なネットワークからアクセスできるようになったら、まずアプリケーションに必要な宝石を設定します。次のコード・スニペットに示すように、
Gemfileを開き、その内容を更新します。Gemfile:source 'https://rubygems.org' git_source(:github) { |repo| "https://github.com/#{repo}.git" } ruby '3.2.3' # Bundle edge Rails instead: gem 'rails', github: 'rails/rails', branch: 'main' gem 'rails', '~> 6.1.4', '>= 6.1.4.1' # Gem for OCI SDK gem 'oci' # Use sqlite3 as the database for Active Record gem 'sqlite3', '~> 1.4' # Use Puma as the app server gem 'puma', '~> 5.0' # Use SCSS for stylesheets gem 'sass-rails', '>= 6' # Transpile app-like JavaScript. Read more: https://github.com/rails/webpacker gem 'webpacker', '~> 5.0' # Turbolinks makes navigating your web application faster. Read more: https://github.com/turbolinks/turbolinks gem 'turbolinks', '~> 5' # Build JSON APIs with ease. Read more: https://github.com/rails/jbuilder gem 'jbuilder', '~> 2.7' # Use Redis adapter to run Action Cable in production # gem 'redis', '~> 4.0' # Use Active Model has_secure_password # gem 'bcrypt', '~> 3.1.7' gem 'tzinfo-data' # Use Active Storage variant # gem 'image_processing', '~> 1.2' # Reduces boot times through caching; required in config/boot.rb gem 'bootsnap', '>= 1.4.4', require: false group :development, :test do # Call 'byebug' anywhere in the code to stop execution and get a debugger console gem 'byebug', platforms: [:mri, :mingw, :x64_mingw] end group :development do # Access an interactive console on exception pages or by calling 'console' anywhere in the code. gem 'web-console', '>= 4.1.0' # Display performance information such as SQL time and flame graphs for each request in your browser. # Can be configured to work on production as well see: https://github.com/MiniProfiler/rack-mini-profiler/blob/master/README.md gem 'rack-mini-profiler', '~> 2.0' end group :test do # Adds support for Capybara system testing and selenium driver gem 'capybara', '>= 3.26' gem 'selenium-webdriver' # Easy installation and use of web drivers to run system tests with browsers gem 'webdrivers' end # Windows does not include zoneinfo files, so bundle the tzinfo-data gem gem 'tzinfo-data', platforms: [:mingw, :mswin, :x64_mingw, :jruby] -
bundle installコマンドを実行して、すべてのパッケージをインストールします。bundle installバンドルのインストールでは、次の図に示すように出力が表示されます。
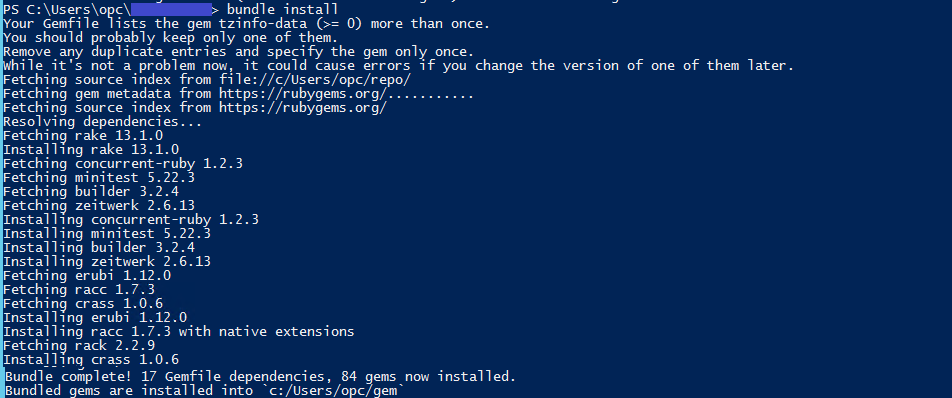
-
バンドルのインストールが完了したら、
routes.rbファイルにルートを追加します。これにより、アプリケーションに公開されているAPIが提供され、コール時にアクションを実行する必要があります。config/routes.rb:Rails.application.routes.draw do root "genai_app#checkin" get "/checkin", to: "genai_app#checkin" post "/checkin", to: "genai_app#checkinpost" end -
次に示すように、アプリケーション
controllerファイルのコードを開発する必要があります。これは、アプリケーションを使用してOCI生成AI APIをコールしたときに実行されるメイン・コードです。app/controller/genai_app_controller.rb:require 'oci' class GenAIAppController < ApplicationController def checkin lines = File.readlines("C:/Users/opc/GenAIApp/app/controllers/chatlog.txt") @chatLines = lines end def checkinpost File.open("C:/Users/opc/GenAIApp/app/controllers/chatlog.txt", "a") { |f| f.write "\nusr::#{params[:message]}" } if params[:message].include? "AskAI:" fullMessage = params[:message].split("AskAI:")[1].strip() region = 'us-chicago-1' gen_ai_inference_client = OCI::GenerativeAiInference::GenerativeAiInferenceClient.new(region: region) compartment_id = 'ocid1.compartment.oc1..aaaaaaaasdk6oyucuqzcaixwxtnxzlt6xxxxxxxxxxuzrm6vmdqgh6wipa' # compartmentId that has policies grant permissions for using Generative AI Service model_id = 'cohere.command' prompt = params[:message].split("AskAI:")[1].strip() max_tokens = 500 temperature = 0.75 frequency_penalty = 1.0 top_p = 0.7 details = OCI::GenerativeAiInference::Models::GenerateTextDetails.new('compartment_id': compartment_id, 'serving_mode': OCI::GenerativeAiInference::Models::OnDemandServingMode.new( 'model_id': model_id ), 'inference_request': OCI::GenerativeAiInference::Models:: CohereLlmInferenceRequest.new( 'prompt': prompt, 'is_stream': false, 'max_tokens': max_tokens, 'temperature': temperature, 'top_p': top_p, 'frequency_penalty': frequency_penalty )) response = gen_ai_inference_client.generate_text(details) text_response = response.data.to_s[170...-150] File.open("C:/Users/opc/GenAIApp/app/controllers/chatlog.txt", "a") { |f| f.write "\nnex::#{text_response}" } print(text_response) end redirect_to("/checkin") end end -
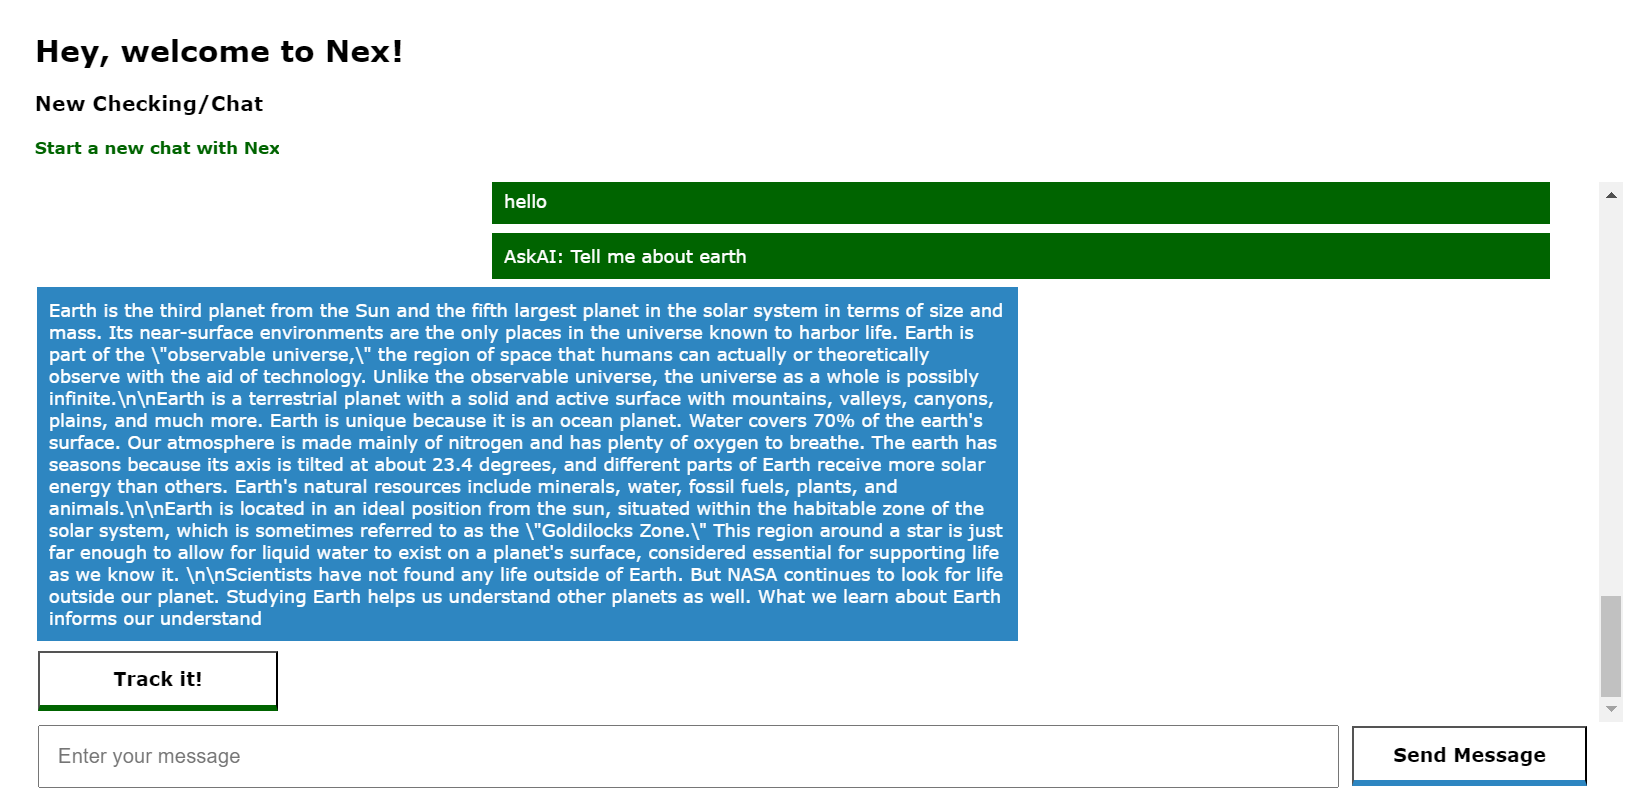
ビュー・ファイルのコンテンツを更新します。これは、UIを表示し、アプリケーションでGetおよびPost APIコールをコールするために使用されます。このUIページは、ユーザーがアプリと対話するために使用されます。
app/view/checkin.html.erb:<style> .greenB { background-color: white; color: black; font-size: 16px; border-bottom: 5px solid darkgreen; text-decoration: none; font-family:verdana; font-weight:bold; width: 100%; height: 50px; display: inline-block; display:flex;/*CSS3*/ align-items:center;/*Vertical align*/ justify-content:center;/*horizontal align*/ } .blueB { background-color: white; color: black; font-size: 16px; border-bottom: 5px solid #2E86C1; text-decoration: none; font-family:verdana; font-weight:bold; width: 100%; height: 50px; display: inline-block; display:flex;/*CSS3*/ align-items:center;/*Vertical align*/ justify-content:center;/*horizontal align*/ } .greenB:hover {background-color: darkgreen; color: white} .blueB:hover {background-color: #2E86C1; color: white} </style> </br> <table width=100%> <tr> <td width=2%> </td> <td width=98%> <div style="color:black;font-family:verdana;font-size:25px;"> <b>Hey, welcome to Nex!</b> </div> </br> <div style="color:black;font-family:verdana;font-size:17px;"> <b>New Checking/Chat</b> </div> </br> <div style="color:darkgreen;font-family:verdana;font-size:14px;padding-bottom:20px;"> <b> Start a new chat with Nex </b> </div> </br> <div style="font-family:verdana;font-size:15px;display:block;height:450px;overflow:auto;"> <% for line in @chatLines do %> <% if line.include? "nex::" %> <table width=90%> <tr> <td width=70% style="color:white;background-color:#2E86C1;padding:10px;"> <%= line.split("nex::")[1] %> </td> <td width=30%> </td> </tr><tr height=2px></tr> </table> <% end %> <% if line.include? "usr::" %> <table width=97%> <tr> <td width=30%> </td> <td width=70% style="color:white;background-color:darkgreen;padding:10px;"> <%= line.split("usr::")[1] %> </td> </tr><tr height=2px></tr> </table> <% end %> <% end %> <table width=90%> <tr> <td width=70%> <%= submit_tag 'Track it!', name: nil, class: "greenB", :style => "width: 200px;" %> </td> <td width=30%> </td> </tr><tr height=5px></tr> </table> </div> <%= form_tag({:controller=>"genai_app", :action=>"checkinpost"}, method: :post) do %> <table width=100%> <tr> <td width=80%> <%= text_field_tag :message, "", :placeholder => "Enter your message", :style => "width: 100%; font-size:17px; padding:15px;" %> </td> <td width=3%> </td> <td width=15%> <%= submit_tag 'Send Message', name: nil, class: "blueB" %> </td> <td width=3%> </td> </tr> </table> <% end %> </td> </tr> </table>これらすべての変更を行った後、更新されたアプリケーションを表示でき、プロンプトに質問してOCI生成AIを起動できる必要があります。
ノート:
-
構成に応じて
Gemfileのバージョンを更新する必要がある場合があるため、すべての宝石とそのバージョンを処理する必要があります。 -
Rubyがインスタンスから必要なgemプロバイダに接続して必要なgemをダウンロードできるように、ネットワーキングを処理します。
-
関連リンク
承認
- 著者 - Lovelesh Saxena(プリンシパル・ソフトウェア・エンジニアリング・アーキテクト)
その他の学習リソース
docs.oracle.com/learnの他のラボをご覧いただくか、Oracle Learning YouTubeチャネルで無料のラーニング・コンテンツにアクセスしてください。また、education.oracle.com/learning-explorerにアクセスして、Oracle Learning Explorerになります。
製品ドキュメントは、Oracle Help Centerを参照してください。
Access OCI Generative AI Service Programmatically using Ruby on Rails Web Application
F96226-01
April 2024