ノート:
- このチュートリアルでは、Oracle Cloudへのアクセスが必要です。無料アカウントにサインアップするには、Oracle Cloud Infrastructure Free Tierの開始を参照してください。
- Oracle Cloud Infrastructureの資格証明、テナンシおよびコンパートメントの値の例を使用します。演習を完了するときに、これらの値をクラウド環境に固有の値に置き換えます。
Oracle Cloud InfrastructureでのTerraformの開始
イントロダクション
Terraformは、Hashicorpが開発したInfrastructure as Code (IaC)ツールで、Terraform言語構文HCLを使用して、複数のクラウド・プロバイダにわたってインフラストラクチャを定義、プロビジョニングおよび管理できます。Terraformを使用すると、クラウド・インフラストラクチャのライフサイクル全体を自動化できるため、一貫性のある再現可能な方法でリソースを簡単に構築、更新およびスケーリングできます。Terraformは、DevOpsチームがクラウド・リソースの管理、インフラストラクチャの効率性の向上、手動エラーの削減、クラウド・リソースのバージョン管理に広く使用されています。
このチュートリアルでは、クラウド・インフラストラクチャをデプロイおよび管理するためにIaCを利用するジャーニーを開始するのに役立ちます。
Terraformのアーキテクチャのワークフロー

目的
- MacOSおよびWindows用のOracle Cloud Infrastructure (OCI)でTerraformをインストール、構成および使用します。OCIネットワーキングおよびコンピュート・リソースのデプロイ例を順を追って説明します。
前提条件
-
OCIテナンシへのアクセス。
-
OCIサービスおよびリソースにアクセスする権限を持つユーザー・アカウント。
-
次の依存関係をインストールします。
-
MacOSの場合: HomeBrewパッケージ・マネージャおよびTerraformをインストールします。
-
HomeBrewサイトに移動します。
-
端末で次のインストールコマンドをコピーします。
Command: /bin/bash -c "$(curl -fsSL https://raw.githubusercontent.com/Homebrew/install/HEAD/install.sh)" -
sudo権限のパスワードを入力すると、インストールが行われます。


-
次のコマンドを実行して、brewのインストールを完了します。
Command 1: (echo; echo 'eval "$(/opt/homebrew/bin/brew shellenv)"') >> /Users/{username}/.zprofile Command 2: eval "$(/opt/homebrew/bin/brew shellenv)" -
brew helpコマンドを実行して、インストールが成功したかどうかを確認します。 -
次のコマンドを実行して、terraformをインストールします。
Command 1: brew tap hashicorp/tap
Command 2: brew install hashicorp/tap/terraform
-
terraform -helpコマンドを実行して、インストールが成功したかどうかを確認します。
-
-
Windowsの場合:
-
「Terraformのインストール」からterraformの
.exeファイルをダウンロードします。ユーザーのWindows OSアーキテクチャに基づいてx86または64を使用します。ダウンロードされたterraformファイルを解凍し、パスをコピーします。パス例:C:\Users\useradmin\Downloads\terraform_1.7.5_windows_amd64。 -
Windows 10または11で「システム環境変数」を検索し、「環境変数」をクリックして編集します。
-
「システム変数」で、パスを選択し、「編集」をクリックします。
-
「環境変数の編集」で、「新規」を選択し、terraformファイルにコピーされたパスを入力します。
-
新しいエントリを更新するには、3つすべてのウィンドウで「OK」をクリックします。

-
コマンド・プロンプトを開き、次のコマンドを実行します。
terraform versionノート: Windowsラップトップまたは仮想マシン(VM)で、terraformで認識できないエラーが発生した場合は、システムを再起動または再起動する必要があります。これにより、新しいシステム環境変数のセットがWindowsマシンに反映されます。
-
タスク1: プロバイダの宣言
Terraformプロバイダとは、特定のタイプのインフラストラクチャまたはサービスの理解と対話を担当するプラグインを指します。プロバイダは、Terraformと、管理するサービスまたはプラットフォームのAPI間のブリッジです。プロバイダを使用すると、Terraformはクラウド・プラットフォームと効果的に通信および対話できます。つまり、Terraformプロバイダは、Terraformが様々なクラウド・サービスやシステムと通信できるようにする翻訳者のようなもので、仮想マシン、データベース、ネットワークなどのリソースを作成、管理、削除できます。
各プロバイダは通常、特定のクラウド・プラットフォーム(OCI、AWS、Azure、GCPなど)またはインフラストラクチャ・サービス(Kubernetes、Dockerなど)に対応します。
-
terraform-beginners-demoという名前のフォルダを作成し、VS Codeで開きます。 -
VS CodeにHashiCorp Terraform拡張機能をインストールします。
-
terraform-beginners-demoフォルダの下にprovider.tfおよびvariables.tfファイルを作成します。 -
provider.tfファイルに次のコードをコピーします。terraform { required_providers { oci = { source = "oracle/oci" version = "5.30.0" } } } provider "oci" { tenancy_ocid = var.tenancy_id user_ocid = var.user_id fingerprint = var.api_fingerprint private_key_path = var.api_private_key_path region = var.region }ノート:公式のTerraformレジストリ・ページのコードを使用しました。詳細は、Oracle Cloud Infrastructureプロバイダおよび最新バージョン(5.30.0)を参照してください。
タスク2: OCI構成の作成
プロバイダを構成するには、OCI User Oracle Cloud Identifier (OCID)、テナンシOCID、コンパートメントOCIDが必要です。
-
OCIコンソールにログインします。
-
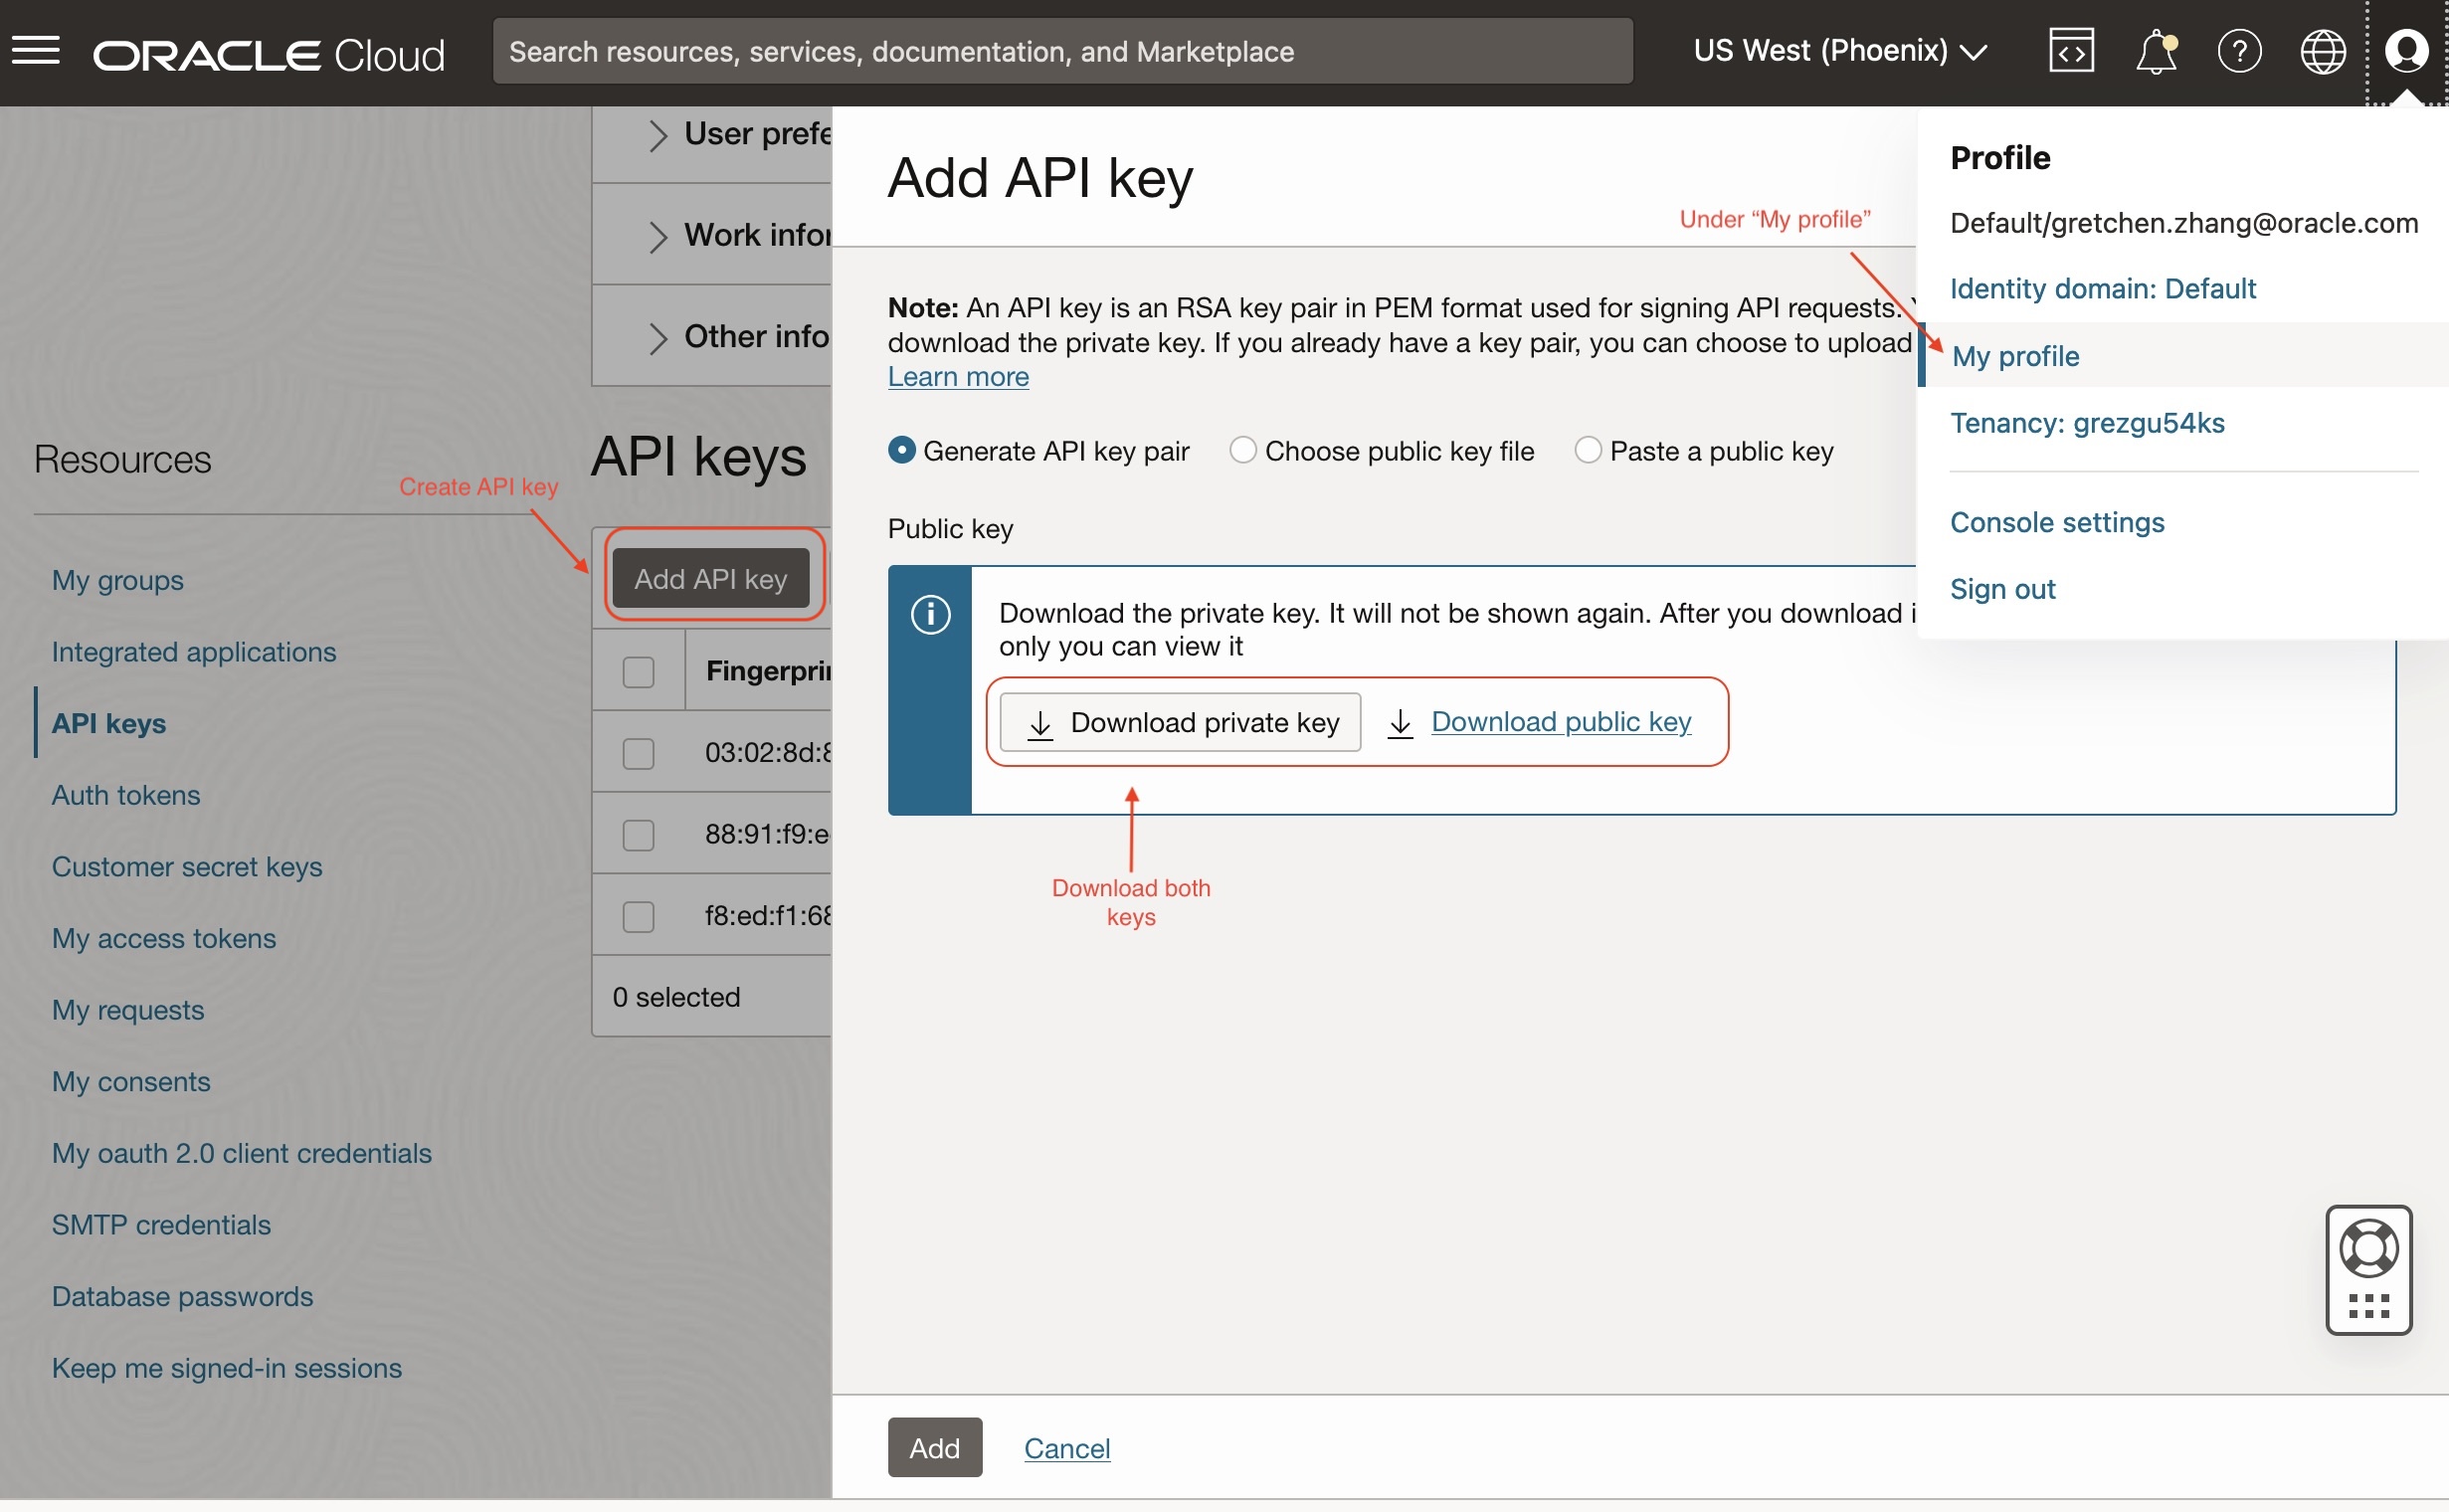
ユーザー・プロファイル・アイコンをクリックし、「マイ・プロファイル」を選択します。
-
APIキー・ペアを取得するには、次のステップを実行します。
-
「リソース」で、「APIキー」を選択し、「APIキーの追加」をクリックします。
-
新しいAPIキー・ペアを生成することも、既存の公開キーを使用してAPIキー・ペアを生成することもできます。「APIキー・ペアの生成」を選択します。必ず秘密キーと公開キーをダウンロードしてください。
-
「追加」をクリックします。構成ファイルのプレビュー・ボックスが表示されます。

-
構成ファイルのプレビューで提供される詳細をコピーして、どこかに保存します。これは、
variables.tfファイルで使用されます。次のように表示されます。
[DEFAULT] user=ocid1.user.oc1..xxxxxxxxxxx fingerprint=xx:xx:xx:xx:xx tenancy=ocid1.tenancy.oc1..xxxxxxxxx region=us-phoenix-1 # your region ID key_file=<path to your private keyfile> # TODO -
「閉じる」をクリックします。
または、次の操作を実行します。
APIキー・ペアを取得するには、OCIコンソールでのAPIキー構成の生成を参照してください。
-
タスク3: OCI資格証明を使用したTerraform環境の構成
-
VSコード・エディタに移動し、
terraform-beginners-demoフォルダの下にvariables.tfという名前の新しいファイルを作成し、次のコードを貼り付けます。variable "api_fingerprint" { description = "Fingerprint of OCI API private key for Tenancy" type = string } variable "api_private_key_path" { description = "Path to OCI API private key used for Tenancy" type = string } variable "tenancy_id" { description = "Tenancy ID where to create resources for Tenancy" type = string } variable "user_id" { description = "User ID that Terraform will use to create resources for Tenancy" type = string } variable "region" { description = "OCI region where resources will be created for Tenancy" type = string } -
terraform.tfvarsという名前の新しいファイルを作成し、次のコードを貼り付けます。タスク2.3の構成ファイル値を使用して、variables.tfから各変数を定義します。# Identity and access parameters api_fingerprint = "REPLACE_BY_YOUR_FINGERPRINT" # Fingerprint of OCI API private key for Tenancy api_private_key_path = "~/.oci/oci_api_key.pem" # Path to OCI API private key used for Tenancy region = "us-phoenix-1" # OCI region where resources will be created for Tenancy tenancy_id = "REPLACE_YOUR_TENACY_OCID" # Tenancy ID where to create resources user_id = "REPLACE_BY_YOUR_USER_OCID" # Path to OCI API private key used for Tenancyノート:本番環境では、
terraform.tfvarsファイルを使用してterraform変数を定義し、セキュリティおよびスケーラビリティを促進することがベスト・プラクティスとなります。詳細は、Variable Definitions (.tfvars) Filesを参照してください。
タスク4: OCIテナンシを使用したTerraform接続のテスト
-
terraform-beginners-demoフォルダの下にdata_source.tfという名前の新しいファイルを作成し、次のコードをコピーします。data "oci_identity_availability_domains" "ad" { #Required compartment_id = var.tenancy_id } -
terraform-beginners-demoフォルダの下にoutput.tfという名前の新しいファイルを作成し、次のコードをコピーします。output "list_ads" { value = data.oci_identity_availability_domains.ad.availability_domains } -
VS Codeで新しい端末を開き、次のコマンドを実行してterraformスクリプトを実行します。
Command 1: terraform init

Command 2: terraform plan #to view your deployments what is going to be created

Command 3: terraform apply #then type "yes" once prompted alternatively run "apply -auto-approve
これで、アベイラビリティ・ドメインのリストと、それに関連付けられているコンパートメントを出力の下に表示できるようになります。

これで、Terraform内のOCIテナンシにリソースをデプロイするようにシステムを正常に構成しました。変数を渡しましたが、テナンシに変更を加えていません。Terraformを使用してリソースを追加、連鎖および破棄するプロセスをよりよく理解するために、いくつかのサンプルを順を追って説明します。
タスク5: (例) Terraformを使用したOCIコンピュート・インスタンスのデプロイ
ここでは、ネットワーキングおよびコンピュート・リソースをデプロイするために、前のタスクで作成したものの上に構築します。
-
networking.tfという名前のファイルを作成し、次のコードをコピーします。resource "oci_core_vcn" "test_vcn" { count = (var.create_new_vcn) ? 1 : 0 #Required compartment_id = var.compartment_id cidr_block = var.vcn_cidr_block display_name = var.vcn_display_name dns_label = var.vcn_dns_label }ノート:追加構成でのcore-vcn変数の詳細は、oci_core_vcnを参照してください。
-
variables.tfファイルを編集し、次の変数を追加します。#VCN specific variables variable "create_new_vcn" { description = "Boolean variable to specify whether to create a new VCN or to reuse an existing one." type = bool } variable "compartment_id" { description = "OCI compartment where resources will be created" type = string } variable "vcn_cidr_block" { description = "The list of IPv4 CIDR blocks the VCN will use" type = string } variable "vcn_display_name" { description = "provide a descriptive name for the VCN - this is what you will see displayed in the OCI console" type = string } variable "vcn_dns_label" { description = "provide a descriptive alphanumeric name for the DNS - this is what you will see displayed in the OCI console" type = string } variable "vcn_id" { description = "provide your existing VCN OCID if create_new_vcn = false" type = string } variable "private_subnet_id" { description = "provide existing private subnet OCID" type = string } variable "public_subnet_id" { description = "provide existing public subnet OCID" type = string } -
terraform.tfvarsに新しい変数を追加し、テナンシ構成に従って各変数を定義します。# VCN specific variables create_new_vcn = true # Set this to true if you want terraform to crearte the network for you, otherwise set it to false. compartment_id = "REPLACE_BY_YOUR_COMPARTMENT_OCID" # add your own compartment id where the vcn will be created vcn_cidr_block = "10.0.0.0/16" # The list of IPv4 CIDR blocks the VCN will use vcn_display_name = "terraform_vcn_example" # provide a descriptive name for the VCN - this is what you will see displayed in the OCI console vcn_dns_label = "terraformvcn" # provide a descriptive alphanumeric name for the DNS - this is what you will see displayed in the OCI console # Configure CIDR Blocks, Subnet(Public, Private) OCIDS for an existing VCN. # vcn_id = "REPLACE_BY_YOUR_VCN_OCID" #ADD WITH YOUR VCN OCID private_subnet_id = "REPLACE_BY_YOUR__PRIVATE_SUBNET_OCID" #ADD WITH YOUR PRIVATE SUBNET public_subnet_id = "REPLACE_BY_YOUR_PUBLIC_SUBNET__OCID" #AA WITH YOUR PUBLIC SUBNETノート:既存のVCNがすでにある場合は、
create_new_vcnをfalseに設定し、vcn_id、private_subnet_idおよびpublic_subnet_id変数を変更します。 -
新しいVCNのサブネットを作成します。
-
networking.tfファイルに次のコードを追加して、パブリック・サブネットとプライベート・サブネットを作成します。resource "oci_core_subnet" "private_subnet" { count = (var.create_new_vcn) ? 1 : 0 #Required cidr_block = var.private_subnet_cidr_block compartment_id = var.compartment_id vcn_id = oci_core_vcn.test_vcn.*.id[0] display_name = var.private_subnet_display_name prohibit_public_ip_on_vnic = var.private_subnet_prohibit_public_ip_on_vnic } resource "oci_core_subnet" "public_subnet" { count = (var.create_new_vcn) ? 1 : 0 #Required cidr_block = var.public_subnet_cidr_block compartment_id = var.compartment_id vcn_id = oci_core_vcn.test_vcn.*.id[0] display_name = var.public_subnet_display_name prohibit_public_ip_on_vnic = var.public_subnet_prohibit_public_ip_on_vnic route_table_id = oci_core_route_table.test_route_table.*.id[0] }ノート:追加構成でのコア・サブネット変数の詳細は、oci_core_subnetを参照してください。
-
次のコードをコピーして、新しいサブネット変数を
variables.tfファイルに追加します。#Private subnet variables variable "private_subnet_cidr_block" { description = "OCI private subnet CIDR block range" type = string } variable "private_subnet_display_name" { description = "provide a descriptive name for the private subnet - this is what you will see displayed in the OCI console" type = string } variable "private_subnet_prohibit_public_ip_on_vnic" { description = "Allow public IP address to the VNIC" type = bool } #Public subnet variables variable "public_subnet_cidr_block" { description = "OCI public subnet CIDR block range" type = string } variable "public_subnet_display_name" { description = "provide a descriptive name for the public subnet - this is what you will see displayed in the OCI console" type = string } variable "public_subnet_prohibit_public_ip_on_vnic" { description = "Allow public IP address to the VNIC" type = bool } -
terrform.tfvarsファイルに新しいサブネット変数を宣言します。#Private subnet variables private_subnet_cidr_block = "10.0.1.0/24" # OCI private subnet CIDR block range private_subnet_display_name = "terraform_private_subnet_example" # provide a descriptive name for the private subnet - this is what you will see displayed in the OCI console private_subnet_prohibit_public_ip_on_vnic = false # Allow public IP address to the VNIC #Public subnet variables public_subnet_cidr_block = "10.0.2.0/24" # OCI public subnet CIDR block range public_subnet_display_name = "terraform_public_subnet_example" # provide a descriptive name for the public subnet - this is what you will see displayed in the OCI console public_subnet_prohibit_public_ip_on_vnic = false
-
-
networking.tfファイルに次のコードを追加して、インターネット・ゲートウェイを作成します。resource "oci_core_internet_gateway" "test_internet_gateway" { count = (var.create_new_vcn) ? 1 : 0 #Required compartment_id = var.compartment_id display_name = "INTERNET_GTWFOR_${var.vcn_display_name}" vcn_id = oci_core_vcn.test_vcn.*.id[0] #route_table_id = oci_core_route_table.test_route_table.id } -
networking.tfに、インターネットへのトラフィックを管理するためのルート表の次のコードを追加します。resource "oci_core_route_table" "test_route_table" { count = (var.create_new_vcn) ? 1 : 0 #Required compartment_id = var.compartment_id vcn_id = oci_core_vcn.test_vcn.*.id[0] route_rules { #Required network_entity_id = oci_core_internet_gateway.test_internet_gateway.*.id[0] description = "route rule internet access for ${var.vcn_display_name}" destination = "0.0.0.0/0" destination_type = "CIDR_BLOCK" } } -
VCNに関連付けられたネットワーク・セキュリティ・グループ(NSG)を作成します。次のコードを
networking.tfファイルにコピーします。resource "oci_core_network_security_group" "test_nsg" { count = (var.create_new_vcn) ? 1 : 0 #Required compartment_id = var.compartment_id vcn_id = oci_core_vcn.test_vcn.*.id[0] display_name = "NETWORK_SECURITY_GROUP_${var.vcn_display_name}" freeform_tags = { "Lab" = "Terraofm 101 Guide" } } -
Linux VMおよびWindows VMをデプロイするために、
compute_linux.tfおよびcompute_windows.tfという2つの新しいファイルを作成します。 -
compute_linux.tfで、次のコードをコピーして、Linux OSでコンピュート・インスタンスを作成します。resource "oci_core_instance" "test_linux_instance" { #Required count = var.create_linux_instance ? 1 : 0 availability_domain = data.oci_identity_availability_domains.ad.availability_domains[0].name compartment_id = var.compartment_id create_vnic_details { assign_public_ip = "true" display_name = var.instance_display_name nsg_ids = [] skip_source_dest_check = "false" subnet_id = var.create_new_vcn ? oci_core_subnet.public_subnet.*.id[0] : var.public_subnet_id } display_name = "${var.instance_display_name}_linux" metadata = { ssh_authorized_keys = "${file(var.public_ssh_key)}" } shape = var.instance_shape shape_config { memory_in_gbs = var.instance_flex_memory_in_gbs ocpus = var.instance_flex_ocpus } launch_options { boot_volume_type = "PARAVIRTUALIZED" firmware = "UEFI_64" is_consistent_volume_naming_enabled = "true" is_pv_encryption_in_transit_enabled = "true" network_type = "PARAVIRTUALIZED" remote_data_volume_type = "PARAVIRTUALIZED" } source_details { #Required source_id = var.linux_image_ocid source_type = "image" } preserve_boot_volume = false } -
compute_windows.tfで、次のコードをコピーします。resource "oci_core_instance" "test_windows_instance" { #Required count = var.create_windows_instance ? 1 : 0 availability_domain = data.oci_identity_availability_domains.ad.availability_domains[0].name compartment_id = var.compartment_id create_vnic_details { assign_public_ip = "true" display_name = var.instance_display_name nsg_ids = [] skip_source_dest_check = "false" subnet_id = var.create_new_vcn ? oci_core_subnet.public_subnet.*.id[0] : var.public_subnet_id } display_name = "${var.instance_display_name}_windows" metadata = { } shape = var.instance_shape shape_config { memory_in_gbs = var.instance_flex_memory_in_gbs ocpus = var.instance_flex_ocpus } launch_options { boot_volume_type = "PARAVIRTUALIZED" firmware = "UEFI_64" is_pv_encryption_in_transit_enabled = "true" network_type = "PARAVIRTUALIZED" remote_data_volume_type = "PARAVIRTUALIZED" } source_details { #Required source_id = var.windows_image_ocid source_type = "image" } preserve_boot_volume = false } -
variables.tfをcompute_linuxおよびcompute_windowsの新しい変数で更新します。#Compute variables variable "instance_shape" { description = "value" type = string } variable "instance_flex_memory_in_gbs" { description = "(Updatable) The total amount of memory available to the instance, in gigabytes." type = number } variable "instance_flex_ocpus" { description = "(Updatable) The total number of OCPUs available to the instance." type = number } variable "instance_create_vnic_details_assign_public_ip" { description = "To allow compute connectivity from internet" type = bool } variable "instance_display_name" { description = "provide a descriptive name for the compute instance - this is what you will see displayed in the OCI console" type = string } variable "public_ssh_key" { description = "Add your public ssh key - for provisioning your compute instance" type = string } variable "private_ssh_key" { description = "Add your private ssh key - for accessing your compute instance after creation" type = string } variable "create_linux_instance" { description = "Boolean variable to specify whether to provision a Linux instances" type = bool } variable "create_windows_instance" { description = "Boolean variable to specify whether to provision a Windows instances" type = bool } variable "windows_image_ocid" { description = "OCID of the Windows image to use" type = string } variable "linux_image_ocid" { description = "OCID of the Linux image to use" type = string } -
terraform.tfvarsに新しい変数を追加して定義します。#Compute variables - Make sure to select a compatible shape (e.g.: VM.Standard.E4.Flex) instance_shape = "VM.Standard.E5.Flex" # Shape of the compute instance instance_flex_memory_in_gbs = 16 # (Updatable) The total amount of memory available to the instance, in gigabytes. instance_flex_ocpus = 1 # (Updatable) The total number of OCPUs available to the instance. instance_create_vnic_details_assign_public_ip = true # To allow compute connectivity from internet instance_display_name = "terraform_compute_example" # provide a descriptive name for the compute instance - this is what you will see displayed in the OCI console #SSH keys https://docs.oracle.com/en/learn/generate_ssh_keys/index.html#introduction public_ssh_key = "~/cloudshellkey.pub" # Add your public ssh key private_ssh_key = "~/cloudshellkey" # Add your private ssh key create_linux_instance = true # if set to true a test linux instance will be created and false no linux instance will be deployed. create_windows_instance = true # # If set to true a test windows instance will be created and false no windows instance will be deployed. linux_image_ocid = "REPLACE_BY_YOUR_REGION_LINUX_IMAGE_OCID" # OCID for chosen image (Oracle Linux 9 example) specific to the test region (us-phoenix-1) windows_image_ocid = "REPLACE_BY_YOUR_REGION_WINDOWS_IMAGE_OCID" # OCID for chosen image (Windows example) specific to each region (us-phoenix-1) # Here are other image OCIDs for popular region (Ashburn, San Jose, Toronto) # Ashburn # Oracle linux image_id = ocid1.image.oc1.iad.aaaaaaaau7uaok7n5qd4nivgiyfatfdddhltmxddtfbyqg3bsg3fxk6z6aqq # Windows image_id = ocid1.image.oc1.iad.aaaaaaaamaaiupezxbrw6fji5ndk3jdujwhjuexcafheqjqf45g6nzyblz6a #San Jose # Oracle linux image_id = ocid1.image.oc1.us-sanjose-1.aaaaaaaabjixxpfouczgpcnpvgny5pcqtgjgi3nincszbfdkd2xr4jvzahua # Windows image_id = ocid1.image.oc1.us-sanjose-1.aaaaaaaatmjlzoqw5gzohjvygzcm5rpugomxyfho5xi6subjchoxnxo4wcfa #Toronto # Oracle linux image_id = ocid1.image.oc1.ca-toronto-1.aaaaaaaai6uhjrtajuuitl5hara5brnvwqvq4aebenmnbehv2cila75xbvzq # Windows image_id = ocid1.image.oc1.ca-toronto-1.aaaaaaaaeged3obrrmmwvyruvknszy23btvb2fqu7vn3c5azeecbj2prm64q # for other image OCIDs: https://docs.oracle.com/en-us/iaas/images/ノート:イメージOCIDsは各リージョンに固有です。前述のコードには、一般的なリージョン用のイメージOCIDsがあり、他のすべてのリージョン用のイメージOCIDsは「すべてのイメージ・ファミリ」にあります。
-
output.tfで、次のコードをコピーします。これにより、端末で作成されたリソースが出力されます。# Regions output "linux_instance_region" { value = oci_core_instance.test_linux_instance.*.region } output "windows_instance_region" { value = oci_core_instance.test_windows_instance.*.region } # Networking output "network_vcn_name" { value = oci_core_vcn.test_vcn.*.display_name } # Compute: Linux Test Instance output "output_linux_instance_display_name" { value = oci_core_instance.test_linux_instance.*.display_name } output "output_linux_instance_public_ip" { value = oci_core_instance.test_linux_instance.*.public_ip } output "output_linux_instance_state" { value = oci_core_instance.test_linux_instance.*.state } # Compute: Windows Test Instance output "output_windows_instance_display_name" { value = oci_core_instance.test_windows_instance.*.display_name } output "output_windows_instance_public_ip" { value = oci_core_instance.test_windows_instance.*.public_ip } output "output_windows_instance_state" { value = oci_core_instance.test_windows_instance.*.state } -
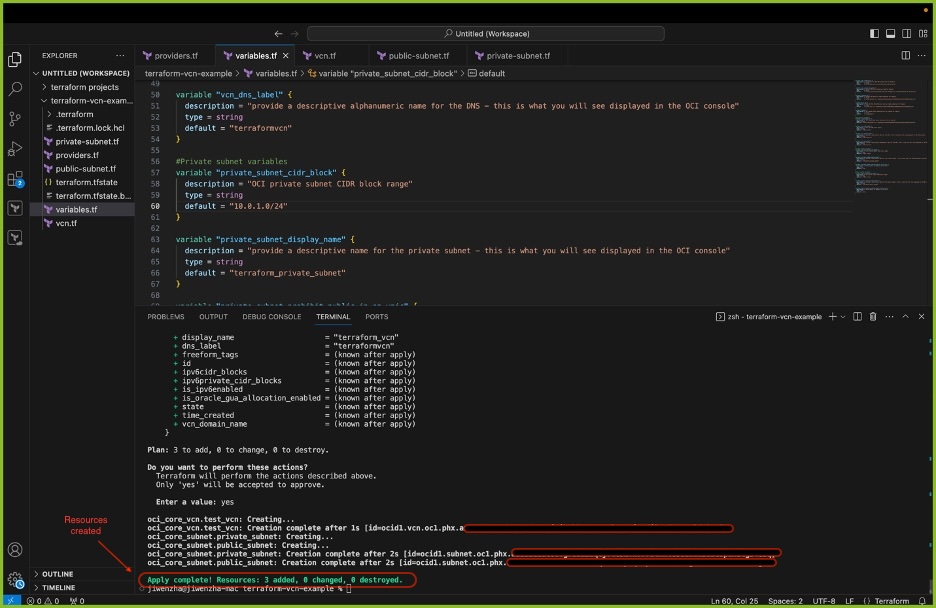
terraform-exampleの新しい端末を開き、次のコマンドを実行します。Command 1: terraform init Command 2: terraform plan Commnad 3: terraform apply (and then respond "yes") OR terraform apply -auto-approve次の出力が表示され、VCN、プライベート・サブネットおよびパブリック・サブネット、ルート表、インターネット・ゲートウェイ、nsg、Linux VMおよびWindows VMを作成する必要があります。

-
Terraformを使用してリソースがデプロイされました。OCIテナンシでリソースの作成を確認したら、次のコマンドを使用してすべてのリソースを破棄します。
Command: terraform destroy
次のステップ
これで、Terraformへの接続が構築され、簡単な例でリソースのデプロイ、更新および破棄が学習されました。OCIでTerraformへの移行を続行し、OCI Architect Professional認定を設定するには、TerraformによるOracle Cloud Infrastructure Architect Professional認定の促進をご覧ください。
私たちは、このチュートリアルを改善し、拡張するために読者からの貢献を歓迎します。あなたの貢献は、将来のTerraform学習者にとってこのリソースを改善することに高い評価を得ています。
関連リンク
承認
- 著者 - Gretchen Zhang (クラウド・エンジニア)、Akarsha I (スタッフ・クラウド・エンジニア)、Mahamat Guiagoussou (マスター・プリンシパル・クラウド・アーキテクト)
その他の学習リソース
docs.oracle.com/learnの他のラボを確認するか、Oracle Learning YouTubeチャネルで無料のラーニング・コンテンツにアクセスしてください。また、education.oracle.com/learning-explorerにアクセスしてOracle Learning Explorerになります。
製品ドキュメントは、Oracle Help Centerを参照してください。
Get Started with Terraform in Oracle Cloud Infrastructure
G18827-01
November 2024