| Oracle® Java ME Embedded Getting Started Guide for the Reference Platform (Freescale FRDM-K64F) Release 8.1 Developer Preview E55005-02 |
|

 Previous |
 Next |
| Oracle® Java ME Embedded Getting Started Guide for the Reference Platform (Freescale FRDM-K64F) Release 8.1 Developer Preview E55005-02 |
|
Previous |
Next |
Beta Draft: 2014-11-14
This chapter describes how to prepare your Freescale FRDM-K64F board and install the Oracle Java ME Embedded 8.1 software on it.
This chapter contains the following sections:
Configuring Windows for Serial Communication with K64F Board
Installing Java ME Embedded 8.1 on Freescale FRDM-K64F Board
The following hardware and software items are required for developing on the Freescale-K64F board:
Freescale FRDM-K64F board
Micro-USB power supply of 0.7 or greater amps, and 5 volts. Note that the power supply must have a micro-USB type B connector, not a regular USB or mini-USB connector.
Micro-USB cable with a micro-USB type B connector (optional, used only for tooling over serial connection)
Micro SD card of 4 GB or less formatted with FAT32
|
Note: You must use only SD cards. Work with SDHC cards is not guaranteed. |
Ethernet cable with an RJ-45 connection, as well as a connection to a network with a DHCP server (optional)
Oracle Java ME Embedded 8.1 software distribution
A terminal emulator program, such as PuTTY.
The executable file putty.exe is directly downloadable from
Ensure that you have the latest firmware on your K64F board.
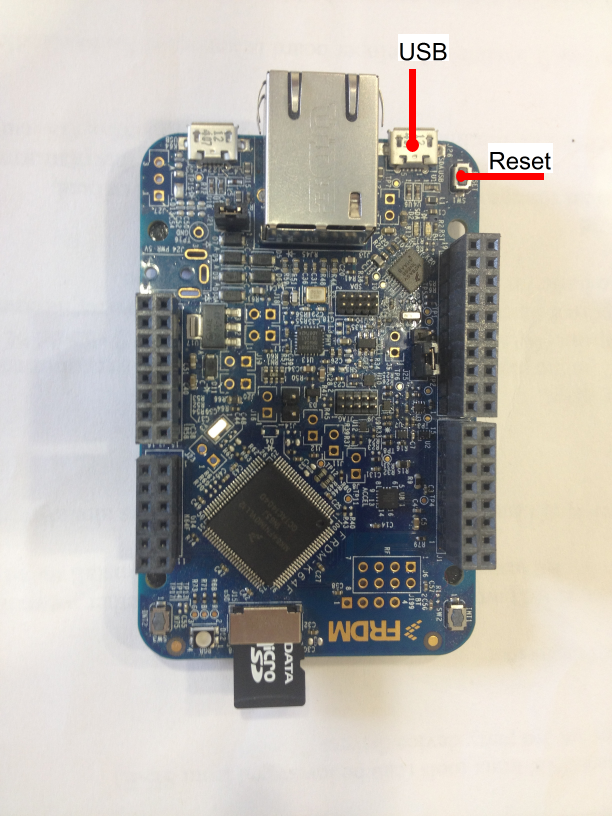
Connect the K64F board to your host computer with a micro-USB cable using the slot marked USB as shown in Figure 1-1. The flashing status light indicates the board has power.
In a few seconds your computer recognizes the mbed microcontroller and displays it as a standard USB drive.
Open the mbed.htm file on your MBED device in a text editor to learn the firmware version.
Open the mbed.htm file in a browser to log in at mbed.org.
If you do not have an mbed user account, click Signup and create the account. Otherwise, login in with your username and password.
Find the latest firmware version and instructions explaining how to upgrade the firmware at
|
Note: Jumper J25 is responsible for the configuration of the Reset button. For a successful firmware update, it is important that jumper J25 connects SDA and SW1 pins. Turn over the board to ensure that the correct pins are connected. |
To enable serial communication with the K64F board on Windows, download and install the mbed Windows serial port driver from
http://mbed.org/handbook/Windows-serial-configuration.
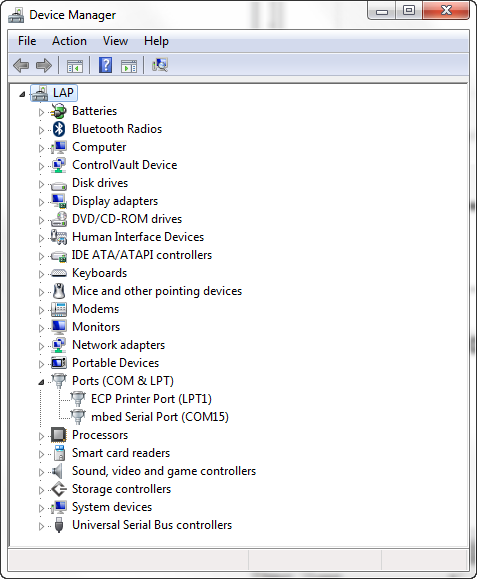
To learn the identity of the serial port, open the Windows Device Manager (by clicking Start then Device Manager) and expand the Ports (COM & LPT) line as shown in Figure 1-2.
Figure 1-2 Windows Device Manager Displaying an mbed Serial Port
The USBSerial interface is used to emulate a serial port over USB. If you want to communicate to your K64F board using this serial port or install the Java ME Embedded software on your board using a feature of the Oracle Java ME SDK called Device Installation Wizard, you need to configure the USBSerial interface.
Connect the K64F board to your host computer with the second USB cable using the slot marked K64F USB. On Windows, perform the following steps.
Download an archive from http://mbed.org/handbook/USBSerial and extract it on your host computer.
Open the serial.inf file and edit the following lines:
[DeviceList]
%DESCRIPTION%=DriverInstall, USB\VID_0472&PID_145A
[DeviceList.NTamd64]
%DESCRIPTION%=DriverInstall, USB\VID_0472&PID_145A
Install the driver using the Windows Device Manager as described at http://mbed.org/handbook/USBSerial.
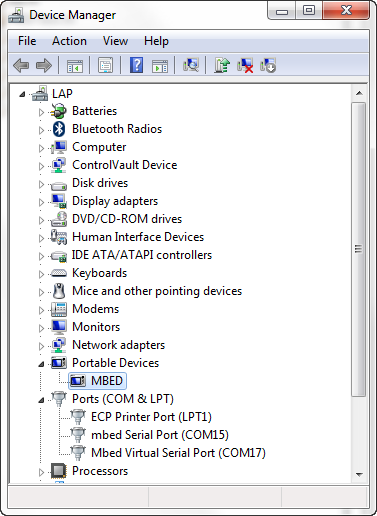
After you successfully installed the driver, the Windows Device Manager displays the Mbed Virtual Serial Port (COM ID) as shown in Figure 1-3.
Figure 1-3 Windows Device Manager Displaying an Mbed Virtual Serial Port
To install Oracle Java ME SDK 8.1 platform, see Oracle Java ME SDK Developer's Guide for complete instructions.
You have two options to install the Java ME Embedded software on the K64Fboard:
Download the binary zip file and install it manually.
Use a feature of the Oracle Java ME SDK called Device Installation Wizard.
This section describes using the Device Installation Wizard to install the Java ME Embedded software.
Ensure that an SD card is inserted into the K64F board, the board is connected to your host computer with two USB cables, and also connected to a network socket with an Ethernet cable.
To install Java ME Embedded software on your K64F board, perform the following steps.
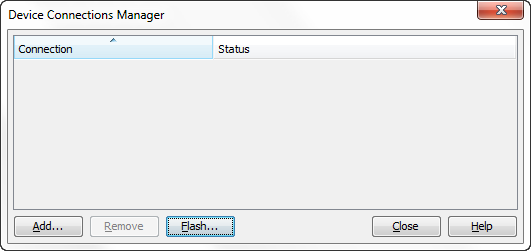
Right-click the Oracle Java ME SDK Device Manager icon on the notification area as shown in Figure 1-4 and choose Manage Device Connections.
Figure 1-4 Oracle Java ME SDK Device Manager Icon
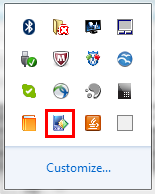
If there is no Device Manager icon, start the Java ME SDK Device Connections Manager located at <SDK Installation Folder>/bin/device-manager.exe
Click Flash. The Flash Devices window opens up.
Select an mbed device and click Flash.
Wait while the Java ME Embedded runtime image is being installed or updated.
Press the Reset button on the board.
The K64F board is now registered, has the Connected status and is ready for work.
If you want to install the Java ME Embedded software on your K64F board manually, perform the following steps:
Download the binary zip file called oracle-jmee-8-1-dp2-fs-k64-mbed-bin.zip from
Extract the contents of the zip in a directory on your computer.
Copy the flash\JavaVM.bin file from the extracted directory onto your MBED drive.
Mount the SD card to your desktop computer and copy the sd_card\java\jwc_properties.ini file from the extracted directory to the java directory on the SD card.
Eject or unmount the SD card from the desktop computer.
After the green light on the board stops blinking, insert the SD card into the K64F board and press the Reset button.
By default the K64F board obtains an IP address from a DHCP server. However, you can setup using a static IP address by modifying the jwc_properties.ini file as follows:
ip_method=static
ip_addr=XXX.XXX.XXX.XXX
ip_netmask=XXX.XXX.XXX.XXX
ip_gateway=XXX.XXX.XXX.XXX
To switch to using the DHCP server, remove the ip_method parameter or set
ip_method=dhcp
By default, the FRDM-K64F board contains the _main.ks file with a dummy certificate. To make SSL/HTTPS connections from the K64F board, import certificates using either of the following procedures.
Create an empty /java/_main.ks file on the SD card and use the mekeytool.exe tool to import appropriate certificates into the K64F board.
Create the _main.ks file by using the MEKeyTool.jar with -version option and copy it in the java directory on the SD card.
For more information about using the mekeytool.exe tool, see Manage Certificates (mekeytool) in the Oracle Java ME SDK Developer's Guide.
|
 Copyright © 2014, Oracle and/or its affiliates. All rights reserved. Legal Notices |
|