| Oracle® Java ME Embedded Getting Started Guide for the Reference Platform (STM32429I-EVAL) Release 8.1 Developer Preview E61129-01 |
|


 Previous |
 Next |
| Oracle® Java ME Embedded Getting Started Guide for the Reference Platform (STM32429I-EVAL) Release 8.1 Developer Preview E61129-01 |
|
Previous |
Next |
Beta Draft: 2015-04-29
Developers can run and debug IMlets on the ST Micro STM32429I-EVAL board directly from the NetBeans IDE 8.0.2, or by using the Oracle Java ME SDK 8.1. This chapter describes how to add the board to the Device Connections Manager of the Oracle Java ME SDK 8.1 as well as how to program an IMlet for the board.
Before developing for the ST Micro STM32429I-EVAL board, a modified version of the Oracle Java ME SDK 8.1 must be installed in two steps.
Install the Oracle Java ME SDK 8.1 distribution.
Install the Oracle Java ME STM Update Package version 8.1 using the Update Manager application of the Oracle Java ME SDK 8.1. You must install this update or the Java ME SDK tools will not be able to communicate with the ST Micro STM32429I-EVAL board using either a TCP/IP or serial connection.
There are two different ways to connect to the STM32429I-EVAL board.
Run NetBeans IDE 8.0.2, which will use the Oracle Java ME SDK. If you wish to use the NetBeans IDE, skip to the Using NetBeans with the STM32429I-EVAL Board below.
Manually start a Developer Agent program on the desktop host and run commands using the Application Management System (AMS) CLI.
The Developer Agent program is a JAR file inside the util directory of the Oracle Java ME Embedded distribution, and is named proxy.jar. You can start the Developer Agent program on the desktop host computer either in a server or a client mode. After the Developer Agent program starts, you can use the AMS CLI to communicate with the board.
The server mode is used by default. In this mode, start the Java runtime on the STM32429I-EVAL board. Then do the following.
Shut down the Oracle Java ME SDK Device Manager, if it is already running.
Change to the util directory on your desktop host and enter the following command. You should see an output similar to the following:
C:\stm\util> java -jar proxy.jar -socket <BOARD IP ADDRESS>
Trying to open socket connection with device: <IP Address>:2201
Connected to the socket Socket[addr=/<IP address>, port=2201, localport=54784]
Open channel 8 with hash 0x390df07e
notifyResponse AVAILABLE_RESPONSE on channel 8
Channel 8 CLOSED -> AVAILABLE
Open channel 9 with hash 0x0
To switch to a client mode connection, perform the following steps.
Edit the jwc_prop.ini file in the bin directory on the SD card of the board as follows:
Set the proxy_connection_mode property to the client value.
Set the proxy.client_connection_address property to the IP address of the host running the Developer Agent program.
Change to the util directory on your desktop host and enter the following command. You should see an output similar to the following:
C:\mydir\util> java -jar proxy.jar
Starting with default parameters: -ServerSocketPort 2200 -jdbport 2801
Channel 8 CLOSED -> AVAILABLE
Waiting for device connections on port 2200
The next step is to make a raw connection to the AMS CLI. Note, however, you must first run the Developer Agent program on the desktop host and the Java runtime on the board as described above, unless the Developer Agent was started automatically by Java ME SDK Device Manager.
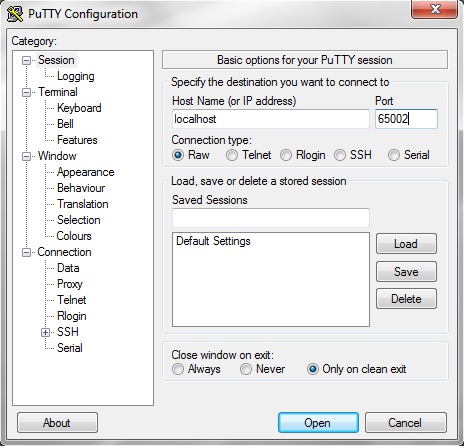
At this point, you can start a PuTTY executable file on your desktop computer. Use this to create Raw socket connections to the IP address of the host running the Developer Agent (typically localhost), and port 65002. For example, a connection to localhost and the port 65002 is shown in Figure 2-1. Be sure that the socket connection type is set to Raw and not SSH.
Figure 2-1 Using PuTTY to Connect to the Command-Line Interface
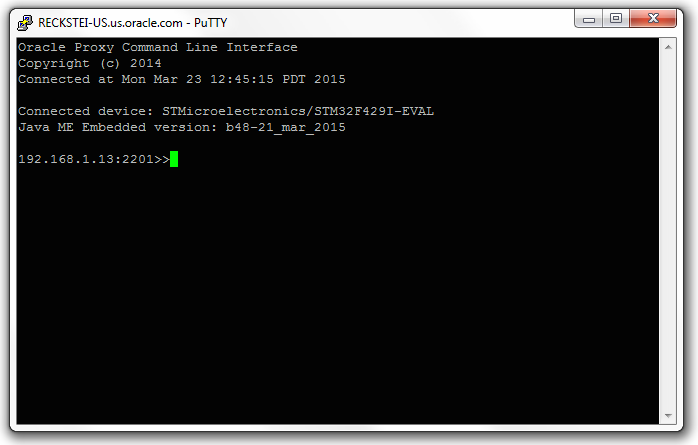
The window from port 65002 provides a CLI as shown in Figure 2-2.
Figure 2-2 Command-Line Interface to STM32429I-EVAL
|
Caution: The CLI feature in this Oracle Java ME Embedded software release is provided only as a concept for your reference. It uses connections that are not secure, without encryption, authentication, or authorization. |
You can use the command-line interface to run the AMS commands shown in Table 2-1. For a complete list of CLI commands, see the Oracle Java ME Embedded Developer's Guide at https://docs.oracle.com/javame/8.1/me-dev-guide/agentconsole.htm#sthref26
Table 2-1 AMS CLI Commands
| Syntax | Description |
|---|---|
|
|
Show information about the installed IMlet. To determine the index of a specific IMlet, use the |
|
|
Install an IMlet using the specified JAR or JAD file, specified as a URL. An optional user name and password can be supplied for login information either in the URL or by using the |
|
|
List all installed IMlet suites and their status or show the detail of a single suite. |
|
|
Remove an installed IMlet. |
|
|
Run the specified IMlet or the default if none is specified. You can specify optional debug parameter to run the IMlet in debug mode. |
|
|
Stop the specified IMlet or the default if none is specified. |
|
|
Update the installed IMlet. An optional user name and password can be supplied for login information by using the |
Here is a typical example of using the AMS to install, list, run, and remove an Oracle Java ME Embedded application on the board:
192.168.1.12:2201>> ams-install file:///C:/some/directory/hello.jar hostdownload
<<ams-install,start install,file:///C:/some/directory/hello.jar
<<ams-install,install status: stage DONE, 0%
<<ams-install,install status: stage DONE, 100%
<<ams-install,OK,Install success

192.168.1.12:2201>> ams-install http://www.example.com/netdemo.jar hostdownload
<<ams-install,start install,http://www.example.com/netdemo.jar
<<ams-install,install status: stage DONE, 0%
<<ams-install,install status: stage DONE, 100%
<<ams-install,OK,Install success

192.168.1.12:2201>> ams-install http://www.example.com/notthere.jar hostdownload
<<ams-install,start install,http://www.example.com/notthere.jar
<<ams-install,install status: stage DONE, 100%
<<ams-install,FAIL,errorCode=JAR_NOT_FOUND, Invalid JAD Exception, reason: 20 (JAR_NOT_FOUND), message: Reason = 20, extra data: http://www.example.com/notthere.jar
Note that the final installation example failed with an error code and matching description.
Similarly, install an additional IMlet: rs232dem. After an IMlet is installed, verify it using the ams-list command. Each IMlet has been assigned a number by the AMS for convenience.
192.168.1.12:2201>> ams-list
<<ams-list,0.hello|Oracle,STOPPED
<<ams-list,1.netdemo|Oracle,STOPPED
<<ams-list,2.rs232dem|Oracle,RUNNING
<<ams-list,OK,3 suites are installed
You can use the ams-remove command to remove any installed IMlet.
192.168.1.12:2201>> ams-remove 0
<<ams-remove,OK,removed
The results can again be verified with the ams-list command.
192.168.1.12:2201>> ams-list
<<ams-list,1.netdemo|Oracle,STOPPED
<<ams-list,2.rs232dem|Oracle,RUNNING
<<ams-list,OK,2 suites are installed
Finally, start the IMlet using the ams-run command. The application can be terminated with the ams-stop command.
192.168.1.12:2201>> ams-run 1
<<ams-run,OK,started
192.168.1.12:2201>> ams-list
<<ams-list,1.netdemo|Oracle,RUNNING
<<ams-list,2.rs232dem|Oracle,RUNNING
<<ams-list,OK,2 suites are installed
You can use the commands summarized in Table 2-2 to modify system properties.
Table 2-2 Security and Properties Commands
| Syntax | Description |
|---|---|
|
|
List the available commands or detailed usages for a single command. |
|
|
Show the list of names of properties which control the Java ME runtime (properties that are set in the |
|
|
Return a value of the property identified by |
|
|
Set a property identified by |
|
|
Save properties to an internal storage. |
|
|
Blacklist clients and applications. |
File system commands are summarized in Table 2-3. Note that the system can only access files inside of the /java/appdb directory, and cannot use relative paths that shift the current location outside of this directory (for example, using ".." in the path).
Table 2-3 File System Commands
| Syntax | Description |
|---|---|
|
|
Change the working directory on the device. |
|
|
Delete a file on the device. |
|
|
Copy a file from the device to the host. |
|
|
Display a list of files and subdirectories in a device directory. In a result listing, subdirectories are marked with a forward slash. |
|
|
Create a directory on the device. |
|
|
Write the current working directory on the device. |
|
|
Copy a local host file to the device. |
|
|
Deletes an empty directory on the device. |
Network commands are shown in Table 2-4.
Table 2-4 Networking Commands
| Syntax | Description |
|---|---|
|
|
Show the networking information of the system. |
|
|
Reconnects the network and reboots Java. |
The CLI supports working with multiple devices. You can use the device commands summarized in Table 2-5.
Table 2-5 Device Commands
| Syntax | Description |
|---|---|
|
|
List all connected devices. |
|
|
Make the specified device current. |
|
|
Perform either a shutdown of the board or a reboot if the |
|
|
Terminate the current CLI session. |
You can use the keystore commands summarized in Table 2-6.
Table 2-6 Keystore Commands
| Syntax | Description |
|---|---|
|
|
Delete a key from a ME store. |
|
|
Import a public key from a JCE keystore into a ME keystore. |
|
|
List the owner and validity period of each key in a ME keystore. |
Running and debugging IMlet projects on the ST Micro STM32429I-EVAL board using the NetBeans IDE 8.0.2 requires the following software:
NetBeans IDE 8.0.2
Oracle Java ME SDK 8.1 with STM32429I-EVAL Update
Oracle Java ME SDK 8.1 plugins for NetBeans
To install the Java ME SDK 8.1 toolkit in NetBeans 8.0.2, follow these instructions:
Select Tools->Plugins, and raise the Plugins dialog. Select the Installed tab, and activate the Java ME plugin.
Extract the Java ME NetBeans plugins from the ZIP file, placing them in their own directory.
Select the Downloaded tab in the Plugins dialog, and press the Add Plugins... button. Browse to the directory containing the NetBeans Java ME plugins, and select all the files with a .nbm extension, press the Open button to choose them, then press the Install button to install each of the plugins. You can safely ignore any warnings about the updates not being digitally signed. After the plugins are installed, restart the IDE.
Follow these steps to add the STM32429I-EVAL board to the Device Connections Manager in Oracle Java ME SDK 8.1:
Ensure that the Developer Agent program is not running on the desktop computer.
Start the Oracle Java ME SDK 8.1 Device Connections Manager (located at <SDK Installation Folder>/bin/device-manager.exe) and click its Device Manager icon in the taskbar. A Device Connections Manager window is shown in Figure 2-3.
Figure 2-3 Device Connections Manager Window
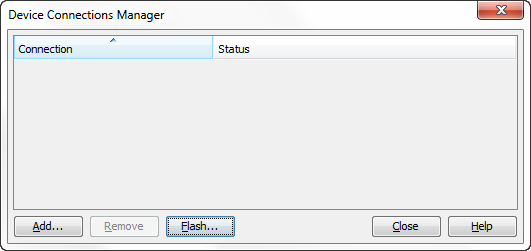
Click the Add button, ensure that the IP Address or Host Name list contains the correct IP address of the ST Micro STM32429I-EVAL board, and click OK. You can verify the current IP address of the board by checking the touchscreen on the STM32429I-EVAL embedded board.
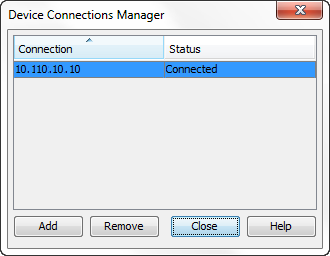
After the STM32429I-EVAL board is registered, its IP address is listed on the Device Connections Manager list and its status is Connected as shown in Figure 2-4.
Figure 2-4 Device Connections Manager Window with STM32429I-EVAL Connected
There are two ways to assign the STM32429I-EVAL board to your project:
Using an existing NetBeans Project with an IMlet you want to run or debug.
Creating a new NetBeans project.
After you assign the board to your project, clicking Run Project in the NetBeans IDE runs your IMlets on the board instead of on the emulator.
If you already have an existing NetBeans project with an IMlet that you want to run or debug on the board, follow these steps:
Right-click your project and select Properties.
Select the Platform category on the properties window.
Select the Platform Type (CLDC) and ensure that Oracle Java(TM) Platform Micro Edition SDK 8.1 is selected in the Java ME Platform list.
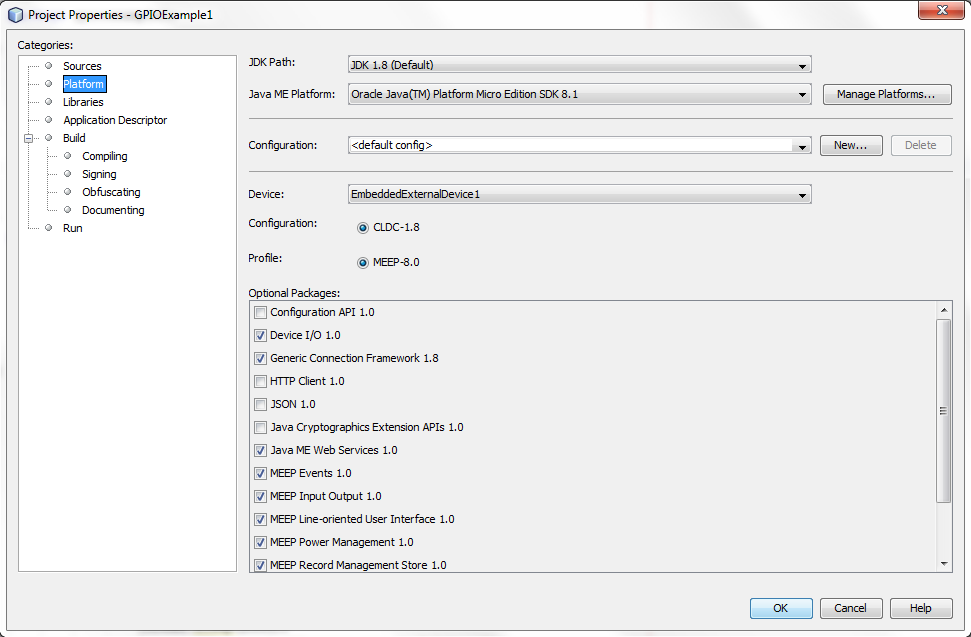
Select EmbeddedExternalDevice1 from the Device drop-down list, as shown in Figure 2-5. Select (or deselect) from the list of Optional Packages as needed for your project, and click OK.
Figure 2-5 Adding a Device to Your Project
If you are creating a new NetBeans project, follow these steps:
Select File then New Project.
Select the Java ME Embedded category and Java ME Embedded Application in Projects pane. Click Next.
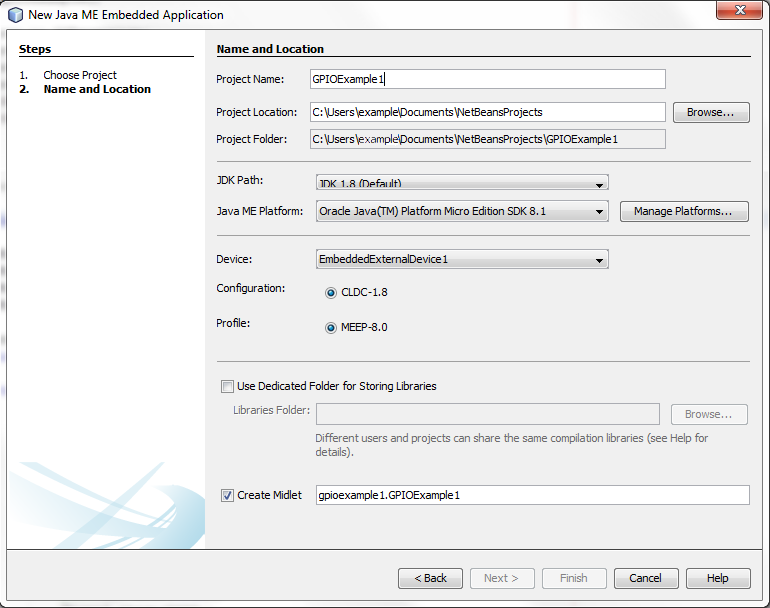
Provide a project name, for example, ME8EmbeddedApplication1. Ensure that the Java ME Platform is Oracle Java(TM) Platform Micro Edition SDK 8.1 and the Create Midlet option is selected.
Select EmbeddedExternalDevice1 from the Device drop-down list and click Finish, as shown in Figure 2-6.
When the new project is created, it is displayed in NetBeans IDE with the name GPIOExample1.
Now you can update the generic project that you created with the sample code shown in the following example. This sample application obtains an object for GPIO pins 1 through 4 (representing four LEDs on the board) from the DeviceManager object, and repeatedly toggles their high/low values.
package gpioexample1;

import java.io.IOException;
import java.util.logging.Level;
import java.util.logging.Logger;
import javax.microedition.midlet.MIDlet;
import jdk.dio.DeviceManager;
import jdk.dio.gpio.GPIOPin;

public class GPIOExample1 extends MIDlet {

    GPIOPin pin1;
    GPIOPin pin2;
    GPIOPin pin3;
    GPIOPin pin4;

    @Override
    public void startApp() {

        try {

            pin1 = (GPIOPin) DeviceManager.open(1);
            pin2 = (GPIOPin) DeviceManager.open(2);
            pin3 = (GPIOPin) DeviceManager.open(3);
            pin4 = (GPIOPin) DeviceManager.open(4);

            for (int i = 0; i < 20; i++) {
                System.out.println("Setting pins to true...");
                pin1.setValue(true);
                pin2.setValue(true);
                pin3.setValue(true);
                pin4.setValue(true);
                Thread.sleep(2000);
                System.out.println("Setting pins to false...");
                pin1.setValue(false);
                pin2.setValue(false);
                pin3.setValue(false);
                pin4.setValue(false);
                Thread.sleep(2000);
            }
        } catch (IOException | InterruptedException ex) {
       Logger.getLogger(GPIOExample1.class.getName()).log(Level.SEVERE, null, ex);
        }
    }

    @Override
    public void pauseApp() {
    }

    @Override
    public void destroyApp(boolean unconditional) {
    }
}
In the NetBeans Projects window, you see the sample project with the file GPIOExample1.java. Follow these steps:
Double-click the GPIOExample1.java file in the Projects window.
Copy the sample code and paste it in the Source window.
Clean and build the GPIOExample1 project by clicking on the hammer-and-broom icon in the NetBeans toolbar or by selecting Run then Clean and Build Project (GPIOExample1).
Before running the example, we must add the appropriate permissions for the Device I/O APIs to access the peripherals.
Applications such as the previous example that require access to Device I/O APIs must request the appropriate permissions. For more information about the various permissions required to access the Device I/O APIs, see the Device I/O API 1.0 specification at:
http://docs.oracle.com/javame/8.0/api/dio/api/index.html
Follow these steps to add the necessary API permissions for the previous example:
In NetBeans, right-click the project name (GPIOExample1 in this example) and select Properties.
Click Application Descriptor, then in the resulting pane, click API Permissions.
Click the Add button, and add the jdk.dio.DeviceMgmtPermission API, as shown in Figure 2-7.
Click OK to close the project properties dialog.
Figure 2-7 Adding API Permissions with NetBeans
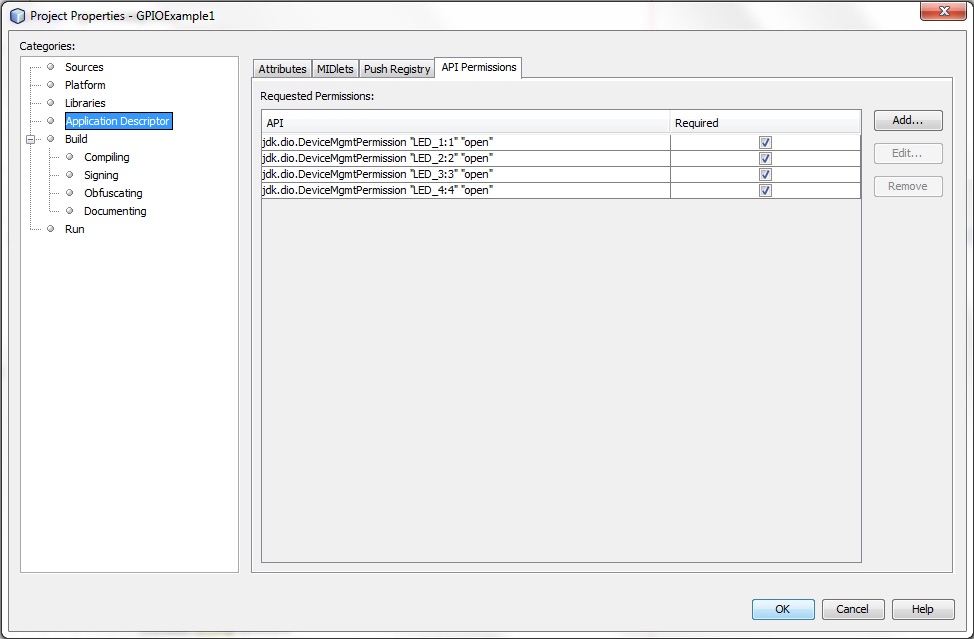
If you are not using an IDE, you can manually modify the application descriptor file to contain the following permissions:
MIDlet-Permission-1: jdk.dio.DeviceMgmtPermission "LED_1:1" "open"
MIDlet-Permission-1: jdk.dio.DeviceMgmtPermission "LED_2:2" "open"
MIDlet-Permission-1: jdk.dio.DeviceMgmtPermission "LED_3:3" "open"
MIDlet-Permission-1: jdk.dio.DeviceMgmtPermission "LED_4:4" "open"
Compile and run the application.
In a production environment, applications must be digitally signed in order to access peripherals. The use of digital signatures requires trusted certificates that are shared between both the NetBeans IDE and the embedded device.
The NetBeans IDE enables developers both to sign the applications with a local certificate and then upload that certificate to the device. Follow these steps:
Right-click the project name and select Properties.
Under the Build category, click Signing.
Select Sign JAR and specify a certificate to sign with as shown in Figure 2-8.
Figure 2-8 Signing Application JAR with NetBeans
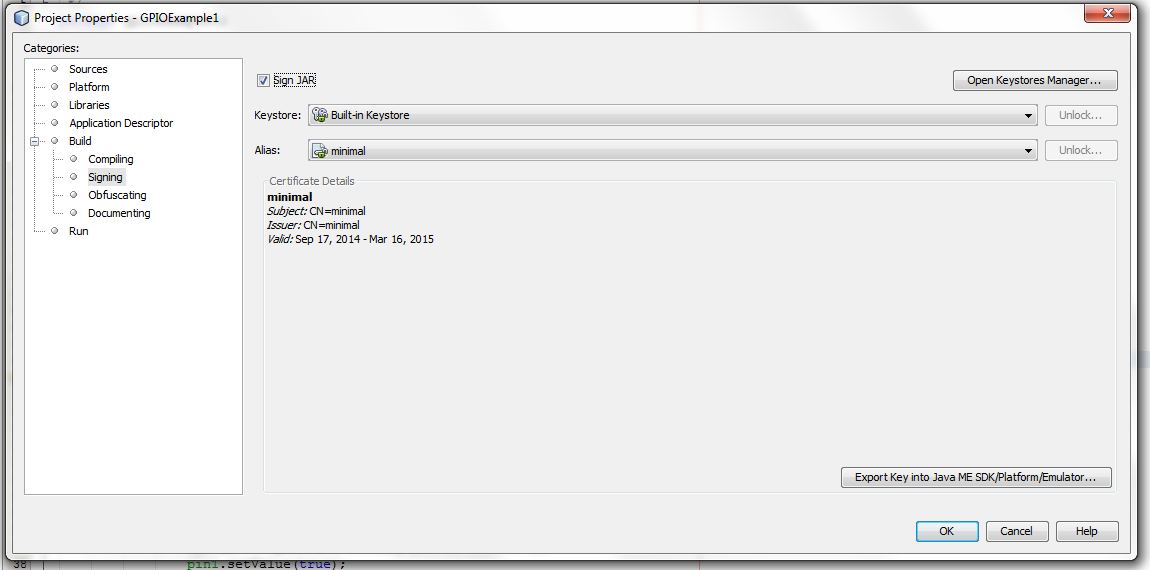
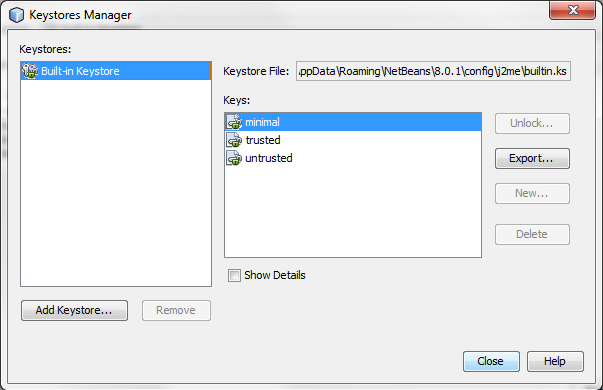
Click Open Keystores Manager.
Select the key and click Export as shown in Figure 2-9.
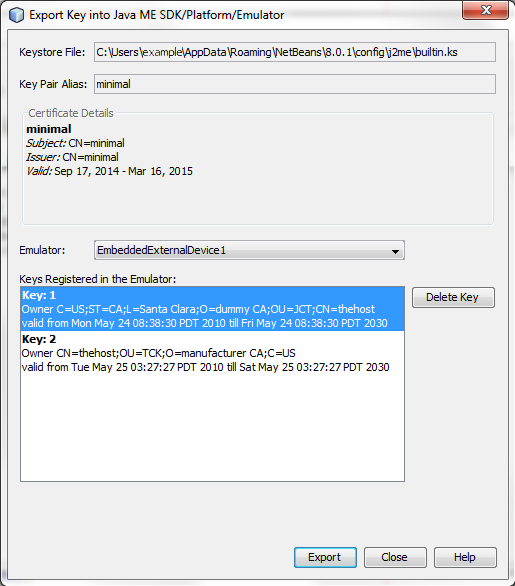
In the Export Key window, select the EmbeddedExternalDevice1 in the Emulator drop-down list, and click Export as shown in Figure 2-10.
Edit the _policy.txt file from the /appdb directory of the SD card on the board and add a section with the client name and a set of permissions. For more information about the policy file format, see the External Client Policy Format section in the Java ME Embedded Profile 8 specification.
Ensure that the certificate with the specified common name (CN) is associated with the client by creating a section with a header that is identical to the certificate that was just uploaded to the board. (Remove the untrusted section once it is working). For example:
client Signed [C=US,O=manufacturer CA,OU=TCK,CN=thehost]
Copy the modified _policy.txt file back to the /appdb directory on the SD card.
If you are not using the NetBeans IDE, then you can sign your IMlet using the command line. Follow the instructions on how to set up a keystore with a local certificate that can be used to sign the applications:
Generate a new self-signed certificate with the following command on the desktop, using the keytool that is shipped with the Oracle Java SE JDK.
keytool -genkey -v -alias mycert -keystore mykeystore.ks -storepass spass -keypass kpass -validity 360 -keyalg rsa -keysize 2048 -dname "CN=thehost"
This command generates a 2048-bit RSA key pair and a self-signed certificate, placing them in a new keystore with a keystore password of spass and a key password of kpass that is valid for 360 days. You can change both passwords as desired.
Perform the following command using the mekeytool.exe command (or alternatively java -jar MEKeyTool.jar... if your distribution contains only that) that ships with the Oracle Java ME SDK 8.1 distribution. Note that the board must be connected and recognized using the Oracle Java ME Device Manager. In this example, it is referred to as ExternalEmbeddedDevice1.
{mekeytool} -import -keystore keystore.ks -Xdevice:ExternalEmbeddedDevice1
This command imports the information in mykeystore.ks that you just created to the device currently connected as ExternalEmbeddedDevice1. See Appendix D in theJava ME Embedded Developers Guide for more information on using the mekeytool.
Alternatively, the user can use the ks-import tool on the CLI to import information into the device keystore.
Modify the _policy.txt file on the SD card so that the AMS on the embedded board will accept the certificate, as in the previous method.
Use the jadtool command to sign your application before deploying it to the STM32429I-EVAL board. If you would like more information about the jadtool command, see Appendix D in theJava ME Embedded Developers Guide .
jadtool -addcert -chainnum 1 -alias myalias -keystore mykeystore.ks -storepass spass -inputkad myjad.jad -outputjad myjad.jad
jadtool -addjarsig -chainnum 1 -jarfile myjar.jar -alias myalias -keystore mykeystore.ks -storepass spass -keypass kpass -inputjad myjad.jad -outputjad myjad.jad