| Oracle® Java Micro Edition Embedded Client Developer's Guide Release 1.1 E20632-02 |
|
 Previous |
 Next |
| Oracle® Java Micro Edition Embedded Client Developer's Guide Release 1.1 E20632-02 |
|
 Previous |
 Next |
This chapter describes compiling an application from the command line or integrated development environment (IDE).
This chapter includes these topics:
You need to compile your application on the development workstation (Linux) to create class files that can then be deployed to the target device. Simple shell scripts and command lines are presented in this section to illustrate simple compilation and compiling for debugging or profiling.
Before compiling, JDK 6.0 must be installed on your development workstation. If you do not yet have it, follow the instructions in Section 2.1.1.1, "Installing the JDK."
Follow these steps to install the JDK.
Download JDK1.6, update 27 from http://www.oracle.com/technetwork/java/javase/downloads/jdk-6u27-download-440405.html.
Open a Linux terminal and cd into the directory where JDK1.6 has been downloaded. After installation, the environment variable JDK_INSTALL_DIR will be set to this directory.
Set file permissions to enable execution with the following command:
sudo chmod a+x jdk-6u27-linux-i586.bin
Run the installer with the following command:
./jdk-6u27-linux-i586.bin
An Oracle Java ME Embedded Client program must comply with the requirements of the Connected Device Configuration (CDC), version 1.1.2. The correct bytecode will be generated for CDC provided that you specify JDK 1.4 at the command line with both the -source and the -target options. Refer to Section 2.1.3, "Compiling an Application" for an example.
On the workstation, cd into the base directory where the source files are located.
Compile with the command
javac -source 1.4 -target 1.4 helloworld/HelloWorld.java
The class file HelloWorld.class will be created in the helloworld directory
|
Note: The value 1.4 must be assigned to the options -source and -target to ensure that the compiled byte codes are compatible with CDC. |
You should make sure that these environment variables are set correctly before running a compiled program on either your development workstation or on the target device.
|
Note: This section uses the bash shell. Make adjustments if you use a different shell. |
CVM_HOMEYou need to set the environment variable CVM_HOME to:
InstallDir/Oracle_JavaME_Embedded_Client/binaries
Where InstallDir is the directory on your Linux workstation where you installed the Oracle Java ME Embedded Client.
PATHYour PATH environment variable should be set to include the location of the javac command.
Edit either of the files ~/.bashrc or ~/.bash_profile,
Append the following lines (for example):
export JAVA_HOME=/home/myname/tools/jdk1.6.0_27
export PATH=/home/myname/tools/jdk1.6.0_27/bin:$PATH
Log out of your Linux account and log back in.
Use the following command to verify that javac can be found:
which java
|
Note: You can avoid setting the |
Make sure the class file is accessible by the target host.
This is typically accomplished by mounting the base directory (where the source and class files are located) as an nfs file system on the device. Or, on devices with less capability, the class file can be copied to a suitable directory on the device with a command such as ftp or scp.
From the workstation, open a terminal window that connects to the target device using a protocol such as ssh or telnet.
Change directory to that containing the cvm executable with the command
cd cvm_install_dir/bin
where cvm_install_dir is the location where Oracle Java ME Embedded Client was installed on the device.
Run the program on the device with the command
./cvm -cp /home/myname/working/HelloWorld helloworld.HelloWorld
assuming the first argument is the working directory on the device containing the class file.
Check the terminal output to validate the result.
If you prefer to work within an IDE such as NetBeans or Eclipse, you can compile an Oracle Java ME Embedded Client application by setting the project type to Java application, and specifying options to make the compiler generate bytecodes compatible with Java 1.4. For NetBeans, this is illustrated in the following steps.
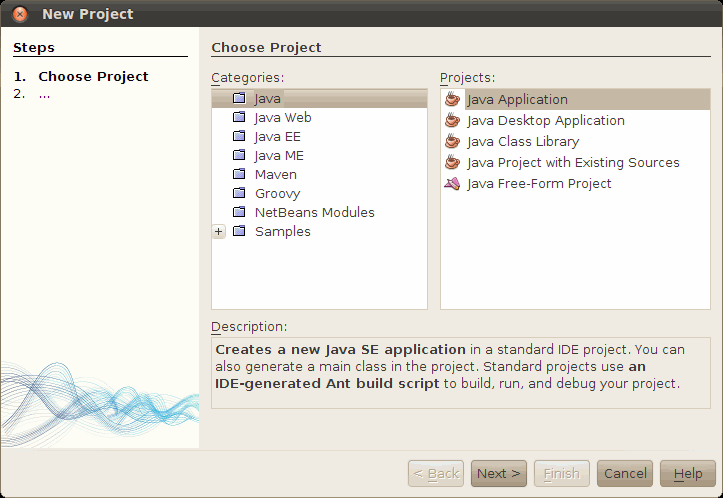
Create a new project in NetBeans. Choose the category Java and project type Java Application, as shown:
Figure 2-1 Create New java Application Project

The newly created project creates a default Main class program.
Since this is a CDC program, you must change the compiler options to generate JDK 1.4 bytecodes. Select your project in the Projects page and right-click to get the Project Properties dialog box.
Under Categories, choose the first item, "Sources." Near the bottom of the dialog, pull down the Source/Binary Format menu, and select JDK 1.4.