| Exit Print View | |
Java Platform Micro Edition Software Development Kit Version 3.0 |

|
Configuring the Web Browser and Proxy Settings
Running MIDP and CLDC Sample Projects
Running the Demos Sample Project
Add Stock Symbols to the Ticker
Viewing and Editing Project Properties
Running Projects in the Emulator
Searching the WURFL Device Database
Finding Files in the Multiple User Environment
CLDC Emulation on a Windows Mobile Device
Installing CLDC Emulation on a Windows Mobile Emulator
JSR 82: Bluetooth and OBEX Support
JSR 135: Mobile Media API Support
JSR 177: Smart Card Security (SATSA)
JSRs 184, 226, and 239: Graphics Capabilities
JSR 205: Wireless Messaging API (WMA) Support
JSR 211: Content Handler API (CHAPI)
JSR 238: Mobile Internationalization API (MIA)
To run a sample project, go to the Start Page tab and single-click a sample project name. The project opens in the Project window and starts running in the emulator.
Note - If you can’t see the Project window choose Window > Projects. To see console output, select Window > Output > Output.
Follow these steps to run a your own projects.
Select File > Open Project, and browse to select a project.
The project is added to the Projects window.
To run a project, right-click the project and select Run from the context menu.
To run the main project (which is shown in bold text in the Projects window), click the green Run button. To set a project as main, right-click the project name and select Set as Main Project.

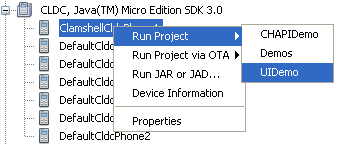
To run the project on a different device, choose the device in the Device Selector window. Right-click on a device and select Run Project from the context menu. Pull right to see a listing of suitable open projects. If the project you want is not listed, select a different device.
The device emulator window opens with the demo application running.
As the sample project runs, you might need to press one of the soft keys below the screen on the left or right side.
You use soft keys to install or launch an application, open a menu, exit, or perform some other action. Some demos include these instructions in the application. For instructions on running samples, see Table 1 or Table 2.
When you are finished viewing the application, go to the emulator’s Application menu and select Exit to close the emulator and stop the execution of the project’s build script.
Note - Once the emulator is launched, it is an independent process. Pressing the red stop button in the Output window terminates the build script, but it does not close the emulator. Likewise, closing the SDK user interface does not affect the emulator. In the emulator, select Application > Exit to ensure that both the emulator process and the project build process close.


|