| C H A P T E R 9 |
|
Writing Runtime Tests |
This chapter describes the basics of writing runtime tests. It contains the following sections:
Test pack development is an iterative, non-linear process that varies according to your local practices and preferences. As you read the following sections, remember that when developing tests you might perform some steps many times, and you might perform the steps in a different sequence than they are described in this chapter. You might also choose to build and test your developing test pack more frequently than this chapter suggests. If you use a source code control system, you might have to modify some instructions, such as “make the file writable.”
Although not required, it is a good practice to create test packages that contain only automated test classes or only interactive test classes. This practice creates a smaller and easier-to-navigate test tree when users create sessions that contain only automated or only interactive tests, because entire packages are removed from the tree. The sample tests in this chapter follow this practice (which also makes it easier for you to find an automated or an interactive test example). However, you can create test packages that contain both automated and interactive test classes.
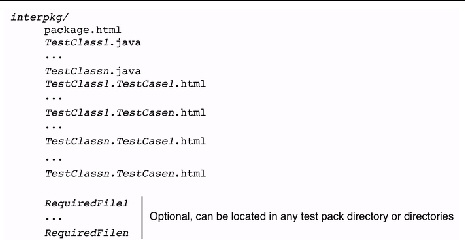
The directory that corresponds to an automated test package contains the files shown in FIGURE 9-1.
FIGURE 9-1 Automated Runtime Test Directory Contents

An automated test implements AutomatedTest, an interface that is documented in devKitHome/docs/testapi/index.html. For a sample automated test, see devKitHome/tests/runtime/src/client/com/sun/samples/automated/SampleAutomatedTest.java.
The directory that corresponds to an interactive test package contains the files shown in FIGURE 9-2. A test package can have any number of classes and a test class can have any number of cases.
FIGURE 9-2 Interactive Runtime Test Directory Contents

An interactive test extends InteractiveTest, an abstract class documented in devKitHome/docs/testapi/testapi/index.html. For a sample interactive test, see devKitHome/tests/runtime/src/client/com/sun/samples/interactive/SampleInteractiveTest.java.
As described in Network Tests, network tests have a client part that runs on the test device and a server part that runs on the Relay. These parts are implemented in different directories.
FIGURE 9-3 shows the directory and files that corresponds to a network client test package.
FIGURE 9-3 Network Client Test Directory Contents

The following sections describe how to create one network client test package containing one test class. Repeat the instructions to create additional packages. Use subsets of the instructions to add classes, or required files, or both to a package. The build process automatically updates the packages.list file.
A network client test implements AutomatedTest, an interface documented in devKitHome/docs/testapi/testapi/index.html. For sample network client tests, see the following:
To launch its server part, a client calls Runner.launchServer(), passing the server implementation class name and arguments that will be passed to the server’s init() method. launchServer() sends an HTTP message to the Relay, which loads the test server. You define the arguments, but one of them is typically the port on which the server listens for messages from the client. The common way to establish this port is to define it as a client property.
The launchServer() method returns an integer. If the return value is greater than 0, it is the server port number. If the returned value is 0 or a negative number it indicates an error code returned by the server. For more information about the error codes, see the following API documentation:
A server implementation extends AbstractTestServer, which is documented in devKitHome/docs/test-server-apis/index.html. For examples of network test servers, see the following:
To obtain the value of a property defined in the testsuite.info file or in a test class source file, use AbstractTestServer.getResourceHelper().getProperty(). If a property is defined in multiple places, the precedence rules described in Chapter 16 determine which value getProperty() returns.
A push test uses or tests a device’s implementation of the push technology defined in the MIDP 2.0 (JSR 118) javax/microedition/io/PushRegistry API. Push technology defines a way for a MIDlet to be awakened by an alarm from the device’s clock or an incoming network connection. See the JSR 118 specification for details and the World Wide Web for introductory articles.
This section describes how to write connection-based push tests (hereinafter simply called “push tests”). Push technology can also be useful in other kinds of tests. For an example, see registerAlarm.java and AlarmMidlet.java in devKitHome/tests/runtime/src/client/com/sun/samples/network/client/pus/push/.
You must be familiar with Writing Network Tests to use this section successfully.
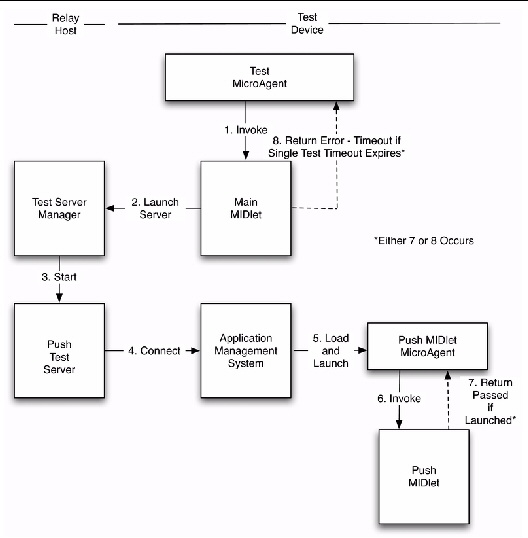
Similar to a network test, a push test has client and server parts. However, the client is composed of two MIDlets, called the main MIDlet and the push MIDlet. For downloading, the main and push MIDlets are bundled together but they are separate applications. These components and their interactions are shown in FIGURE 9-4.
FIGURE 9-4 Connection-based Push Test Components and Interactions

The components interact as follows:
1. The test MicroAgent (see Automated Tests) invokes the main MIDlet.
2. The main MIDlet is primarily an initializer. It directs the test server manager to start the push test server, registers the push MIDlet if dynamic registration is being tested, and returns WAIT_FOR_PUSH_RESULT. This return value causes the main MIDlet to periodically check the Record Management Service store for a value that indicates the push MIDlet has returned a result. If the Single Test Timeout specified in the test run configuration expires, the main MIDlet returns an Error - Timeout status. If the main MIDlet finds the value created by the push MIDlet, it exits.
3. The test server manager starts the push test server.
4. The test server opens a connection to the device.
5. The device’s application management system (which implements the push registry) loads and launches the push MIDlet (and its MicroAgent), which has been registered and associated with the server’s connection.
6. The push MIDlet’s MicroAgent invokes the push MIDlet.
7. If all steps have been successful, the push MIDlet notifies its MicroAgent that the test has passed.
8. If, due to a failure, the push MIDlet is not launched, the main MIDlet wakes from its sleep after the configuration’s Single Test Timeout value expires and notifies its MicroAgent that the test has failed.
A push client package is identical to a network client package, except that it also has at least one pushMIDlet.java file. See FIGURE 9-3 for details.
A push test main MIDlet implements AutomatedTest, an interface whose documentation is accessible from devKitRoot/docs/test-api/index.html. See Automated Runtime Test Directory Contents for a description of an automated test class.
There are two example main MIDlets in devKitRoot/tests/runtime/src/client/com/sun/samples/network/client/push/:
The examples are otherwise logically identical.
A main MIDlet’s comment block (see Chapter 4) must contain the equivalent of the following line to ensure that the push MIDlet (and all classes it requires) is included in the same test bundle as the main MIDlet (ignore the line break):
* @card.requires com/sun/samples/network/client/push/PushMIDlet.class *
A push test’s main MIDlet comment block must include a line that declares the push MIDlet in the test bundle JAD file in accordance with the MIDP 2.0 specification. For example:
* @card.specialproperty <jad>.1=MIDlet-2: \
*PushMIDlet,,com.sun.samples.network.client.push.PushMIDlet
For more information on @card.requires and @card.specialproperty, see @card.specialproperty.
If the test registers the push MIDlet statically, the comment block must also include a line that causes the registration information to be included in the JAD file in accordance with the MIDP 2.0 specification. For example:
* @card.specialproperty <jad>.2=MIDlet-Push-1: socket://:5775, \
*com.sun.samples.network.client.push.PushMIDlet,\
*$IPFILTER("0123456???*")
If a main MIDlet has more than one push MIDlet, provide @card.requires and @card.specialproperty comments for each push MIDlet.
A push MIDlet can be automated or interactive. For an example of an automated push MIDlet, see devKitRoot/tests/runtime/src/client/com/sun/samples/network/client/push/PushMIDlet.java.
For an interactive example, see devKitRoot/tests/runtime/src/client/com/sun/samples/network/client/push/AlarmMidlet.java.
A push server is identical to a network server described in Writing the Server Part. For an example, see devKitRoot/tests/runtime/src/server/com/sun/samples/network/server/push/SamplePushTestServer.java.
This server has a simple “one-shot” logic. It does not have a “conversation” with the main MIDlet. When the test server manager calls the server’s init() method, the method creates a socket connection to the device, writes a 0 to the socket, and closes the socket. If your server needs are as simple, you can re-use reuse this server. The network examples have more elaborate server samples.
The $IPFILTER is a macro that can be used in JAD file values specified with a special property attribute. It is useful when the user needs to register a push MIDlet statically. For example,
MIDlet-Push-1: socket://:5775, com.sun.samples.network.client. push.PushMIDlet, $IPFILTER("0123456???*")
In this example, the IP mask is specified using $IPFILTER. with expands depending on the IP address of the relay (as it seen from the device) according to the rule specified by the filter.
$IPFILTER("string")
where string is the filter. It is composed of the characters 0,1,2 ...,9,A, .. ,D,E,*,?
The Nth character of the result is the Kth character of he IP address, where K is found in the Nth position of the filter or “*” or “?” respectively if “*” or “?* is found in the Nth position of the filter. For example, if the second character of the filter is “E”, the second position of the result is the Eth (last) character of the IP address. If the second character of the filter is “?”, the second character of the result is “?”.
| Note - The IP address is considered to be in 15-digit form (nnn.nnn.nnn.nnn, not nn.n.nnn.nn). The digits of the IP address are numbered from 0 to E. |
Example: Suppose IP=AAA.BBB.CCC.DDD is the IP address of the relay as seen from the device. Each character of the IP address is used to calculate an arithmetic mean with the corresponding character of the filter.
The special characters * (asterisk) and ? (question mark) stand for themselves.
Example: If the IP address of the relay is 129.159.125.101 and the filter is $IPFILTER("0123456???*"), the resultant string is 129.159???*.
Example: Using the same IP address for the relay, the filter $IPFILTER("EDCBA9876543210") expands to the string 101.521.951.921.