| C H A P T E R 7 |
|
Readiness Tests |
If you have trouble running tests, use the readiness tests to verify that the device has the core capabilities required to run tests and that they are operational. Readiness tests take a “lowest common denominator” approach to downloading test bundles, concentrating on over-the-air (OTA) transfer, which all test devices must be able to perform. Some devices might also be able to download tests over a local link, such as a serial cable, or TCP/IP. These options, which can be faster or easier to use than OTA, are described in Chapter 4.
Before you can run the readiness tests, you must know how to download (OTA), install, and remove MIDlet suites, and how to launch MIDlets on the test device. A test bundle is a MIDlet suite. For OTA tests, the MIDlet suite contains only one test. The agent that manages the test is the MIDlet. In particular, you must know if the test device downloads MIDlet suites over the air in one of the following ways:
To learn more about the concepts and terms of the Java Device Test Suite, see the online help in addition to the rest of this guide.
| Note - Run the tests one at a time as described in the instructions. |
|
A test device that can download MIDlet suites (test bundles) that are up to 128 kilobytes in size can run most tests. The smallest tests fit in bundles of about 75KB. A few MMAPI tests require bundles as large as 1300KB. 128KB is a good base and enables multiple small tests to be packed into a single bundle, which reduces traffic between the test device and the Relay. The test128K test verifies that a test device can download and install a 128KB bundle.
1. Determine if the device supports CLDC version 1.0 or 1.1 and MIDP version 1.0 or 2.0.
3. Close the current test suite.
4. Choose File > Open > Open Test Suite and select a test suite from the browser dialog box.
5. Choose File > Create Work Directory.
Provide a name for the work directory and set the path of the directory.
6. For the purposes of this test, select the jdts_installDir/admin/shared/resources/templates/builtin/readiness.jtm template.
When creating a work directory, you are asked to specify a template. The builtin templates provided with the Java Device Test Suite are not intended for use other than for demonstration tests. Do not use these templates when performing actual work. Updates to builtin templates do not propagate, which means that your configuration is not updated when its template is updated.
Your administrator is responsible for creating the templates you normally use for test runs. Updates to templates created by your administrator are propagated to configurations. For production work, use the templates provided by your administrator.
7. Choose Configure > New Configuration.
Enter a name and a brief description of the configuration and click Next to proceed to the Tests Selection section.
8. Specify Yes to run only selected tests in the Specify Tests to Run question in the Configuration Editor.
9. Select Directly to specify the test from the test tree.
10. Expand the Readiness test suite in the test tree to see the test cases under the readiness test node.
Continue answering the questions in the Configuration Editor as needed. Skip the individual test pack questions until you get to the Readiness section (be sure you go to the Readiness panel, not the Automatic Readiness section).
12. In the General panel of the Readiness section, specify the number of clients that download the JAD file simultaneously.
The default value is two. Three clients is an average number. Do not specify any less than two. Click Next to proceed to the Headers panel.
13. In the Headers panel, specify which versions of CLDC and MIDP the device supports and click Done.
14. Click the Start button to begin testing.
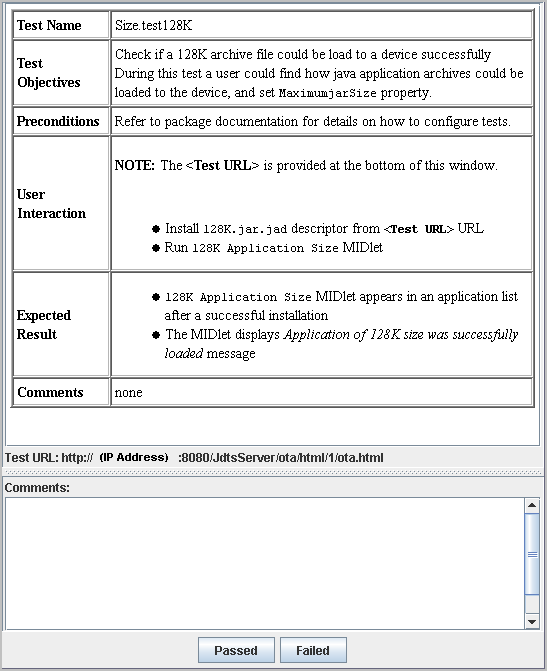
Instructions for downloading and running the test, similar to FIGURE 7-1, appear.
FIGURE 7-1 Size#test128K Instructions

16. If the test device supports bookmarks, create a bookmark for the URL shown in the Test URL field.
The Test URL you see is probably different from the one shown in FIGURE 7-1.
17. Download the URL shown in the Test URL field.
How you download URLs is device dependent. The readiness tests use the same URL so you can use one bookmark to download every test.
18. Install 128K.jar.jad file.
The test device asks for confirmation to install the MIDlet suite. Install it. How you install MIDlet suites is device dependent.
The device downloads 128K.jar.jad if it can. If the device indicates that it cannot download 128K.jar.jad, there is no point to continuing with the Readiness tests.
19. If the test device asks if you want to continue the installation even though the application is not signed, click Continue.
20. Launch 64K Application Size test.
How you launch MIDlets is device dependent.
The device displays: Application of a 128K size was successfully loaded.
21. Exit the MIDlet and remove 128K Application Size test.
How you exit and remove a MIDlet is device dependent.
22. Click either the Passed or Failed button at the bottom of the test instructions.
It does not matter if you click the Passed or Failed button. The test run terminates.
|
For tests to run, the following facilities must be operational on the test device:
The testUtil test verifies these facilities.
To run testUtil, follow these steps (which assume you have just finished successfully running Size#test64K test):
1. Select Configure > Edit Configuration.
2. Click next until you get to the Tests to Run panel.
3. In the test tree, navigate to the Size#test64K test under the Readiness node.
4. Select the Util#testUtil test.
The Size#test64K test becomes unselected.
5. Click Done in the Configuration Editor.
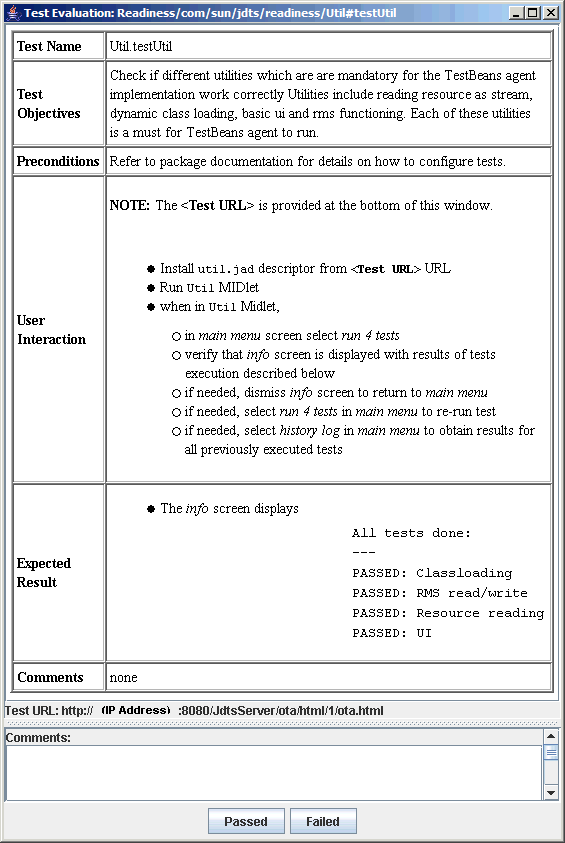
Instructions for downloading and running the test, similar to FIGURE 7-2, appear.
FIGURE 7-2 Util#testUtil Instructions

8. Download the URL named in the Test URL field.
The URL you see is probably different from that shown in FIGURE 7-2. How you download URLs is device dependent.
How you install MIDlet suites is device dependent.
10. If the test device asks if you want to continue the installation even though the application is not signed, click Continue.
How you launch MIDlets is device dependent.
The device displays a menu containing:
run 4 tests
info
history log
All tests done:
PASSED: Classloading
PASSED: RMS read/write
PASSED: Resource reading
PASSED: UI
If the device does not display the above lines, there is no point continuing with the Readiness tests.
13. Click the Done soft button or select the Done command in a device-dependent way.
14. Exit the MIDlet and remove Util.
How you exit and remove a MIDlet is device dependent.
15. Click either the Passed or Failed button at the bottom of the test instructions.
It does not matter if you click the Passed or Failed button. The test run terminates.
|
If you want the test device to return test results to the harness, and you want the harness to automatically display interactive test instructions, the test device must support HTTP communication with Java methods. Supporting HTTP at a lower level is sufficient for downloading tests, but it is not sufficient for returning test results. The testGet and testPost tests verify that the test device’s Java methods for HTTP are working.
Run these tests as follows. The instructions assume that you have successfully run testUtil.
1. Select Configure > Edit Configuration.
2. Click next until you get to the Tests to Run panel.
3. In the test tree, navigate to the Util#testUtil test under the Readiness node.
4. Select Http#testGet and Http#testPost.
The Size#test64K test becomes unselected.
5. Click Done in the Configuration Editor.
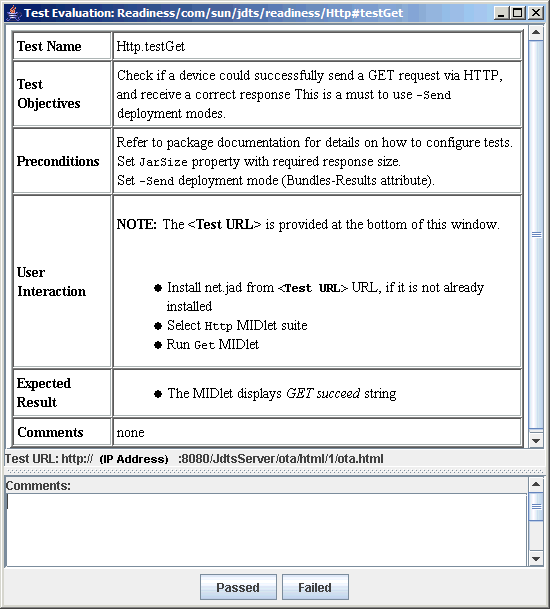
Instructions for downloading and running the test, similar to FIGURE 7-3, appear.
FIGURE 7-3 testGet Instructions

8. Download the URL displayed next to Test URL.
The URL you see is probably different from the one shown in FIGURE 7-3. How you download URLs is device dependent.
How you install MIDlet suites is device dependent.
10. If the test device asks if you want to continue the installation even though the application is not signed, click Continue.
The device downloads the net.jad file.
How you launch MIDlets is device dependent.
12. If the test device asks permission to use air time, grant it.
The device downloads the Http MIDlet.
How you launch applications is device dependent.
14. If the test device asks permission to use air time, grant it.
If the test passes, the device displays:
GET succeed
If it does not pass, the device displays an error message.
How you exit an application is device dependent.
16. Click either the Passed or Failed button at the bottom of the test instructions.
It does not matter if you click the Passed or Failed button.
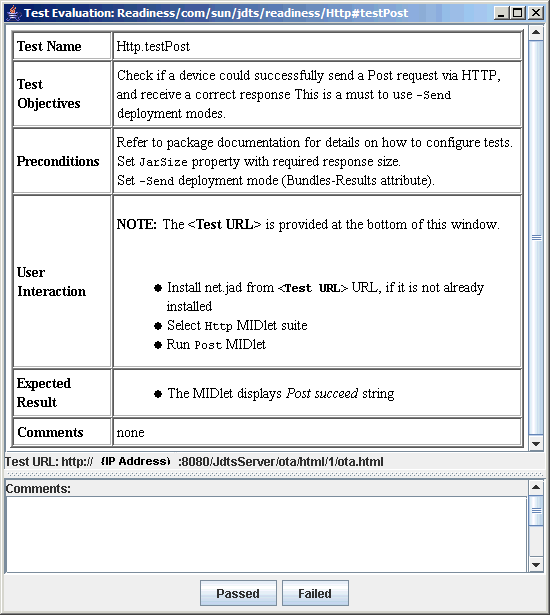
The harness displays the instructions for testPost, similar to FIGURE 7-4.
FIGURE 7-4 testPost Instructions

How you launch an application is device dependent.
How you launch an application is device dependent.
19. If the test device asks permission to use air time, grant it.
If the test succeeds, the device displays:
POST succeed.
If the test fails, the device displays an error message.
How you exit and remove an application is device dependent.
21. Click either the Passed or Failed button at the bottom of the test instructions.
It does not matter if you click the Passed or Failed button.