4 木のアニメーションの例
この章では、木のアニメーションの例について詳しく説明します。 シーン上のすべての要素がどのように作成されてアニメーション化されたかについて学習します。
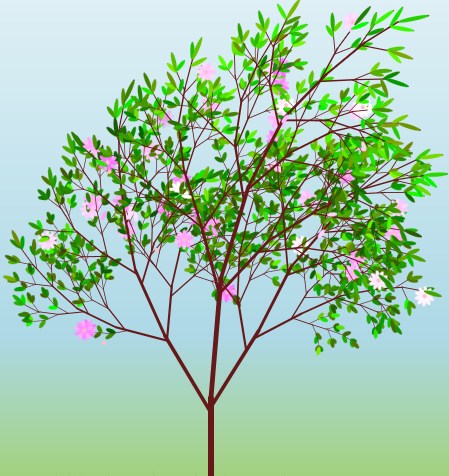
図4-1に、木が表示されたシーンを示します。
プロジェクトと要素
木のアニメーションのプロジェクトは、複数のファイルで構成されています。 葉、草の葉身およびその他などの各要素が個別クラス内に作成されます。 TreeGeneratorクラスは、すべての要素から木を作成します。 Animatorクラスには、GrassWindAnimationクラス内にある葉のアニメーションを除くすべてのアニメーションが含まれます。
この例のシーンには、次の要素が含まれます。
-
枝、葉および花がある木
-
草
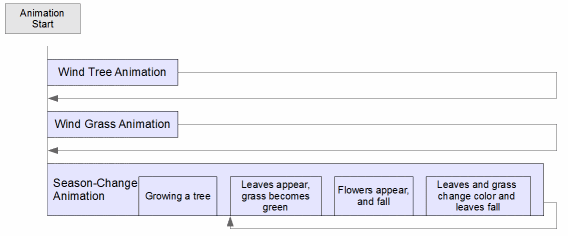
各要素は、独自の方法でアニメーション化されます。 一部のアニメーションはパラレルに実行され、他のアニメーションは順次実行されます。 木の成長のアニメーションは1回のみ実行されますが、季節の変化のアニメーションは無限に実行されるよう設定されています。
季節の変化アニメーションには、次の各部が含まれます。
-
葉と花が木に現れます
-
花びらが落ちて消えます
-
葉と草の色が変化します
-
葉が地面に落ちて消えます
草
この項では、草を作成してアニメーション化する方法について説明します。
草の作成
木のアニメーションの例では、図4-3に示す草は、個別の草の葉身で構成されており、これらはPathを使用して作成され、リストに追加されています。 それぞれの葉身は曲げられ、色が付けられます。 葉身の高さ、曲線および色をランダム化し、葉身を地面に分散するためにアルゴリズムが使用されます。 葉身の数や、草で覆われた地面のサイズを指定できます。
例4-1 草の葉身の作成
public class Blade extends Path {

    public final Color SPRING_COLOR = Color.color(random() * 0.5, random() * 0.5
 + 0.5, 0.).darker();
    public final Color AUTUMN_COLOR = Color.color(random() * 0.4 + 0.3, random()
 * 0.1 + 0.4, random() * 0.2);
    private final static double width = 3;
    private double x = RandomUtil.getRandom(170);
    private double y = RandomUtil.getRandom(20) + 20;
    private double h = (50 * 1.5 - y / 2) * RandomUtil.getRandom(0.3);
    public SimpleDoubleProperty phase = new SimpleDoubleProperty();

    public Blade() {

        getElements().add(new MoveTo(0, 0));
        final QuadCurveTo curve1;
        final QuadCurveTo curve2;
        getElements().add(curve1 = new QuadCurveTo(-10, h, h / 4, h));
        getElements().add(curve2 = new QuadCurveTo(-10, h, width, 0));

        setFill(AUTUMN_COLOR); //autumn color of blade
        setStroke(null);

        getTransforms().addAll(Transform.translate(x, y));

        curve1.yProperty().bind(new DoubleBinding() {

            {
                super.bind(curve1.xProperty());
            }

            @Override
            protected double computeValue() {

                final double xx0 = curve1.xProperty().get();
                return Math.sqrt(h * h - xx0 * xx0);
            }
        }); //path of top of blade is circle

        //code to bend blade
        curve1.controlYProperty().bind(curve1.yProperty().add(-h / 4));
        curve2.controlYProperty().bind(curve1.yProperty().add(-h / 4));

        curve1.xProperty().bind(new DoubleBinding() {

            final double rand = RandomUtil.getRandom(PI / 4);

            {
                super.bind(phase);
            }

            @Override
            protected double computeValue() {
                return (h / 4) + ((cos(phase.get() + (x + 400.) * PI / 1600 +
 rand) + 1) / 2.) * (-3. / 4) * h;
            }
        });
    }
}
草の動きのタイムライン・アニメーションの作成
葉身の上部のx座標を変更するタイムライン・アニメーションを使用して、草の動きを作成します。
動きを自然に見せるために複数のアルゴリズムが使用されます。 たとえば、各葉身の上部は直線的ではなく円を描いて移動し、葉身の側面の曲線により、葉身が風にそよいで曲がるように見えます。 それぞれの葉身の動きには区別するためにランダム数が追加されています。
例4-2 草のアニメーション
class GrassWindAnimation extends Transition {

    final private Duration animationTime = Duration.seconds(3);
    final private DoubleProperty phase = new SimpleDoubleProperty(0);
    final private Timeline tl = new Timeline(Animation.INDEFINITE);

    public GrassWindAnimation(List<Blade> blades) {

        setCycleCount(Animation.INDEFINITE);
        setInterpolator(Interpolator.LINEAR);
        setCycleDuration(animationTime);
        for (Blade blade : blades) {
            blade.phase.bind(phase);
        }
    }

    @Override
    protected void interpolate(double frac) {
        phase.set(frac * 2 * PI);
    }
}
木
この項では、図4-4に示す木を作成してアニメーション化する方法について説明します。
枝
木は、枝、葉および花で構成されます。 葉と花は、木の上部の枝に描画されます。 各枝の生成は、親枝から延伸された3本の枝(上部に1本の枝、側面に2本の枝)で構成されます。 MainクラスのTreeGeneratorのコンストラクタに渡されたNUMBER_OF_BRANCH_GENERATIONSを使用して、コード内での生成の数を指定できます。 例4-3に、木の幹(または根元の枝)を作成し、後続の生成用として3本の枝を追加するTreeGeneratorクラス内のコードを示します。
例4-3 根元の枝
private List<Branch> generateBranches(Branch parentBranch, int depth) {
        List<Branch> branches = new ArrayList<>();
        if (parentBranch == null) { // add root branch
            branches.add(new Branch());
        } else {
            if (parentBranch.length < 10) {
                return Collections.emptyList();
            }
            branches.add(new Branch(parentBranch, Type.LEFT, depth));
            branches.add(new Branch(parentBranch, Type.RIGHT, depth));
            branches.add(new Branch(parentBranch, Type.TOP, depth));
        }

        return branches;
    }
木がより自然に見えるようにするために、生成されたそれぞれの子枝は親枝に対して任意の角度で成長し、それぞれの子枝は親枝より小さくなります。 子の角度はランダム値を使用して計算されます。 例4-4に、子枝を作成するためのコードを示します。
例4-4 子枝
public Branch(Branch parentBranch, Type type, int depth) {
        this();
        SimpleDoubleProperty locAngle = new SimpleDoubleProperty(0);
        globalAngle.bind(locAngle.add(parentBranch.globalAngle.get()));
        double transY = 0;
        switch (type) {
            case TOP:
                transY = parentBranch.length;
                length = parentBranch.length * 0.8;
                locAngle.set(getRandom(10));
                break;
            case LEFT:
            case RIGHT:
                transY = parentBranch.length - getGaussianRandom(0,
 parentBranch.length, parentBranch.length / 10, parentBranch.length / 10);
                locAngle.set(getGaussianRandom(35, 10) * (Type.LEFT == type ? 1 :
 -1));
                if ((0 > globalAngle.get() || globalAngle.get() > 180) && depth <
 4) {
                    length = parentBranch.length * getGaussianRandom(0.3, 0.1);
                } else {
                    length = parentBranch.length * 0.6;
                }
                break;
        }
        setTranslateY(transY);
        getTransforms().add(new Rotate(locAngle.get(), 0, 0));
        globalH = getTranslateY() * cos(PI / 2 - parentBranch.globalAngle.get() *
 PI / 180) + parentBranch.globalH;
        setBranchStyle(depth);
        addChildToParent(parentBranch, this);
    }
葉と花
葉は上部の枝に作成されます。 葉は木の枝と同時に作成されるため、例4-5に示すように、木が成長するまでは表示されないようにleaf.setScaleX(0)およびleaf.setScaleY(0)によって0にスケーリングされます。 これと同じテクニックを使用して、葉が落ちたときに表示されないようにします。 より自然に見えるようにするために、それぞれの葉は若干濃淡が異なる色に設定されています。 また、葉の色は葉の位置に応じて変化します。樹冠の中央より下にある葉にはより濃い色が適用されます。
例4-5 葉の形状と配置
public class Leaf extends Ellipse {

    public final Color AUTUMN_COLOR;
    private final int N = 5;
    private List<Ellipse> petals = new ArrayList<>(2 * N + 1);

    public Leaf(Branch parentBranch) {
        super(0, parentBranch.length / 2., 2, parentBranch.length / 2.);
        setScaleX(0);
        setScaleY(0);

        double rand = random() * 0.5 + 0.3;
        AUTUMN_COLOR = Color.color(random() * 0.1 + 0.8, rand, rand / 2);

        Color color = new Color(random() * 0.5, random() * 0.5 + 0.5, 0, 1);
        if (parentBranch.globalH < 400 && random() < 0.8) { //bottom leaf is darker
            color = color.darker();
        }
        setFill(color);
    }
}
花はFlowerクラス内に作成された後、TreeGeneratorクラス内の木の上部の枝に追加されます。 花びらの数は指定できます。 花びらは、一部が重なって円状に配置された楕円です。 草や葉と同じように、花びらには異なる濃淡のピンク色が付けられます。
木要素のアニメーション化
この項では、木と季節の変化をアニメーション化する木のアニメーションの例で採用されているテクニックについて説明します。 例4-6に示すように、シーン内のすべてのアニメーションを開始するためにパラレル遷移が使用されます。
例4-6 メイン・アニメーション
final Transition all = new ParallelTransition(new GrassWindAnimation(grass),
treeWindAnimation, new SequentialTransition(branchGrowingAnimation,
seasonsAnimation(tree, grass)));
        all.play();
木の成長
木の成長のアニメーションは、木のアニメーション例の開始時に1回のみ実行されます。 このアプリケーションでは、例4-7に示すように、次々に生成される枝が成長する順次遷移アニメーションが開始されます。 最初に、長さが0に設定されます。 根元の枝のサイズと角度は、TreeGeneratorクラスに指定されています。 現在、生成されたそれぞれの枝は2秒以内に成長します。
例4-7 枝の成長のアニメーションを開始する順次遷移
SequentialTransition branchGrowingAnimation = new SequentialTransition();
例4-8のコードでは、木の成長のアニメーションが作成されています。
例4-8 枝の成長のアニメーション
private Animation animateBranchGrowing(List<Branch> branchGeneration) {

        ParallelTransition sameDepthBranchAnimation = new ParallelTransition();
        for (final Branch branch : branchGeneration) {
            Timeline branchGrowingAnimation = new Timeline(new KeyFrame(duration,
 new KeyValue(branch.base.endYProperty(), branch.length)));
            PauseTransition pauseTransition = new PauseTransition();
            pauseTransition.setOnFinished(t -> branch.base.setStrokeWidth(branch.length / 25));
            sameDepthBranchAnimation.getChildren().add(
                    new SequentialTransition(
                            pauseTransition,
                            branchGrowingAnimation));
        }
        return sameDepthBranchAnimation;

    }
すべての枝の線は同時に計算されて作成されるため、これらはシーン上にドットとして表示される可能性があります。 このコードには、線が成長するまで非表示にするテクニックがいくつか組み込まれています。 この例では、コードduration.one millisecondを使用すると、目立たない間だけ遷移が一時停止されます。 例4-9では、base.setStrokeWidth(0)コードにより、成長のアニメーションで各生成が開始されるまでは枝の幅を0に設定しています。
樹冠の動きの作成
木の成長と並行して、風のアニメーションが開始されます。 木の枝、葉および花は一緒に動きます。
木の風のアニメーションは草の動きのアニメーションと似ていますが、枝の角度のみが変化するため、こちらの方が単純です。 木の動きが自然に見えるようにするために、枝の生成ごとに曲がる角度が異なります。 木の生成場所が高くなるほど(つまり、枝が小さくなるほど)、曲がる角度が大きくなります。 例4-10に、風のアニメーションのコードを示します。
例4-10 風のアニメーション
private Animation animateTreeWind(List<Branch> branchGeneration, int depth) {
    ParallelTransition wind = new ParallelTransition();
    for (final Branch brunch : branchGeneration) {
        final Rotate rotation = new Rotate(0);
        brunch.getTransforms().add(rotation);

        Timeline windTimeline = new Timeline(new KeyFrame(WIND_CYCLE_DURATION,
new KeyValue(rotation.angleProperty(), depth * 2)));
        windTimeline.setAutoReverse(true);
        windTimeline.setCycleCount(Animation.INDEFINITE);
        wind.getChildren().add(windTimeline);
    }
        return wind;
}
季節の変化のアニメーション化
季節の変化のアニメーションは、実際には木が成長した後に開始され、無限に実行されます。 例4-11のコードでは、季節のアニメーションをすべて呼び出しています。
例4-11 季節のアニメーションの開始
private Transition seasonsAnimation(final Tree tree, final List<Blade> grass) {

        Transition spring = animateSpring(tree.leafage, grass);
        Transition flowers = animateFlowers(tree.flowers);
        Transition autumn = animateAutumn(tree.leafage, grass);

        SequentialTransition sequentialTransition = new SequentialTransition(spring, flowers, autumn);
        return sequentialTransition;
    }

    private Transition animateSpring(List<Leaf> leafage, List<Blade> grass) {
        ParallelTransition springAnimation = new ParallelTransition();
        for (final Blade blade : grass) {
springAnimation.getChildren().add(new FillTransition(GRASS_BECOME_GREEN_DURATION, blade,
        (Color) blade.getFill(), blade.SPRING_COLOR));
        }
        for (Leaf leaf : leafage) {
            ScaleTransition leafageAppear = new ScaleTransition(LEAF_APPEARING_DURATION, leaf);
            leafageAppear.setToX(1);
            leafageAppear.setToY(1);
            springAnimation.getChildren().add(leafageAppear);
        }
        return springAnimation;
    }
木の枝がすべて成長したら、例4-12で命令されているように葉が現れ始めます。
例4-12 春のアニメーションを開始して葉を表示するためのパラレル遷移
private Transition animateSpring(List<Leaf> leafage, List<Blade> grass) {
    ParallelTransition springAnimation = new ParallelTransition();
    for (final Blade blade : grass) {
        springAnimation.getChildren().add(new FillTransition(GRASS_BECOME_GREEN_DURATION, blade,
                (Color) blade.getFill(), blade.SPRING_COLOR));
    }
    for (Leaf leaf : leafage) {
        ScaleTransition leafageAppear = new ScaleTransition(LEAF_APPEARING_DURATION, leaf);
        leafageAppear.setToX(1);
        leafageAppear.setToY(1);
        springAnimation.getChildren().add(leafageAppear);
        }
    return springAnimation;
    }
枝がすべて表示されたら、例4-13に示すように、花が現れ始めます。 花を段階的に表示するために順次遷移が使用されます。 花の出現の遅延は、例4-13の順次遷移コードに設定されています。 花は樹冠にのみ表示されます。
例4-13 花の表示
private Transition animateFlowers(List<Flower> flowers) {

        ParallelTransition flowersAppearAndFallDown = new ParallelTransition();

        for (int i = 0; i < flowers.size(); i++) {
            final Flower flower = flowers.get(i);
            for (Ellipse pental : flower.getPetals()) {

                FadeTransition flowerAppear = new FadeTransition(FLOWER_APPEARING_DURATION, petal);
                flowerAppear.setToValue(1);
                flowerAppear.setDelay(FLOWER_APPEARING_DURATION.divide(3).multiply(i + 1));
                flowersAppearAndFallDown.getChildren().add(new SequentialTransition(new SequentialTransition(
                       flowerAppear,
                       fakeFallDownAnimation(petal))));
        }
    }
    return flowersAppearAndFallDown;
}
すべての花が画面に表示されたら、花びらが落ち始めます。 例4-14のコードでは、花は重複しており、最初の一連の花は後で表示するために非表示になっています。
例4-14 花びらの重複
private Ellipse copyEllipse(Ellipse petalOld, Color color) {
        Ellipse ellipse = new Ellipse();
        ellipse.setRadiusX(petalOld.getRadiusX());
        ellipse.setRadiusY(petalOld.getRadiusY());
        if (color == null) {
            ellipse.setFill(petalOld.getFill());
        } else {
            ellipse.setFill(color);
        }
        ellipse.setRotate(petalOld.getRotate());
        ellipse.setOpacity(0);
        return ellipse;
    }
例4-15に示すように、コピーされた花びらは1つずつ地面に落ち始めます。 地面の上の花びらは5秒後に消えます。 花びらの落ちる軌跡は直線ではなく、計算された正弦曲線であるため、花びらは落ちながら旋回しているように見えます。
例4-15 花の落下
Animation fakeLeafageDown = fakeFallDownEllipseAnimation(leaf, leaf.AUTUMN_COLOR,
node -> {
    node.setScaleX(0);
    node.setScaleY(0);
});
すべての花がシーンから消えると、次の季節の変化が開始されます。 葉と草は黄色くなり、葉は落ちて消えます。 花びらを落とすために例4-15で使用したものと同じアルゴリズムを使用して、落下する葉が表示されます。 例4-16のコードを使用すると、秋のアニメーションを実行できます。
例4-16 秋の変化のアニメーション化
private Transition animateAutumn(List<Leaf> leafage, List<Blade> grass) {
    ParallelTransition autumn = new ParallelTransition();

    ParallelTransition yellowLeafage = new ParallelTransition();
    ParallelTransition dissappearLeafage = new ParallelTransition();

    for (final Leaf leaf : leafage) {

    final FillTransition toYellow =
new FillTransition(LEAF_BECOME_YELLOW_DURATION, leaf, null, leaf.AUTUMN_COLOR);

    Animation fakeLeafageDown = fakeFallDownEllipseAnimation(leaf,
leaf.AUTUMN_COLOR,node -> {
        node.setScaleX(0);
        node.setScaleY(0);
    });
    dissappearLeafage.getChildren().add(fakeLeafageDown);
    }

    ParallelTransition grassBecomeYellowAnimation = new ParallelTransition();
    for (final Blade blade : grass) {
        final FillTransition toYellow =new
FillTransition(GRASS_BECOME_YELLOW_DURATION, blade, (Color) blade.getFill(),
blade.AUTUMN_COLOR);
        toYellow.setDelay(Duration.seconds(1 * random()));
        grassBecomeYellowAnimation.getChildren().add(toYellow);
        }

        autumn.getChildren().addAll(grassBecomeYellowAnimation, new
 SequentialTransition(yellowLeafage, dissappearLeafage));
        return autumn;
}
すべての葉が地面から消えた後、春のアニメーションが開始され、草が緑色になり、葉が表示されます。


