주:
- 이 자습서에서는 Oracle Cloud에 액세스해야 합니다. 무료 계정에 등록하려면 Oracle Cloud Infrastructure Free Tier 시작하기를 참조하십시오.
- Oracle Cloud Infrastructure 자격 증명, 테넌시 및 구획에 예제 값을 사용합니다. 실습을 완료했으면 이러한 값을 자신의 클라우드 환경과 관련된 값으로 대체하십시오.
Oracle Cloud Infrastructure에서 Terraform 시작하기
소개
Terraform은 Hashicorp가 개발한 Infrastructure as Code(IaC) 툴로, Terraform 언어 구문인 HCL을 사용하여 여러 클라우드 제공업체에 걸쳐 인프라를 정의, 프로비저닝 및 관리할 수 있습니다. Terraform을 사용하면 클라우드 인프라의 전체 수명 주기를 자동화하여 일관되고 재현 가능한 방식으로 리소스를 쉽게 구축, 업데이트 및 확장할 수 있습니다. Terraform은 DevOps 팀에서 클라우드 리소스를 관리하고, 인프라 효율성을 개선하고, 수동 오류를 줄이고, 클라우드 리소스를 버전 제어하기 위해 널리 사용됩니다.
이 사용지침서에서는 IaC를 활용하여 클라우드 인프라를 배포하고 관리하는 과정을 시작할 수 있습니다.
Terraform 구조 워크플로우

목표
- MacOS 및 Windows용 OCI(Oracle Cloud Infrastructure)에서 Terraform을 설치, 구성 및 사용합니다. OCI 네트워킹 및 컴퓨팅 리소스를 배포하는 예제를 살펴보겠습니다.
필요 조건
-
OCI 테넌시에 액세스합니다.
-
OCI 서비스 및 리소스에 액세스할 수 있는 권한이 있는 사용자 계정입니다.
-
다음 종속성을 설치합니다.
-
MacOS의 경우: HomeBrew 패키지 관리자 및 Terraform을 설치합니다.
-
HomeBrew site로 이동합니다.
-
터미널에서 다음 설치 명령을 복사합니다.
Command: /bin/bash -c "$(curl -fsSL https://raw.githubusercontent.com/Homebrew/install/HEAD/install.sh)" -
sudo 권한에 대한 비밀번호를 입력하면 설치가 수행됩니다.


-
다음 명령을 실행하여 brew 설치를 완료합니다.
Command 1: (echo; echo 'eval "$(/opt/homebrew/bin/brew shellenv)"') >> /Users/{username}/.zprofile Command 2: eval "$(/opt/homebrew/bin/brew shellenv)" -
brew help명령을 실행하여 성공적으로 설치되었는지 확인합니다. -
다음 명령을 실행하여 terraform을 설치합니다.
Command 1: brew tap hashicorp/tap
Command 2: brew install hashicorp/tap/terraform
-
terraform -help명령을 실행하여 성공적으로 설치되었는지 확인합니다.
-
-
Windows용:
-
여기서 terraform
.exe파일을 다운로드하세요. Install Terraform, use x86 or 64 based on the user Windows OS architecture. 다운로드한 Terraform 파일의 압축을 풀고 경로를 복사합니다. 경로 예:C:\Users\useradmin\Downloads\terraform_1.7.5_windows_amd64. -
Windows 10 또는 11에서 System Environment Variables를 검색하고 Environment Variables(환경 변수)를 눌러 편집합니다.
-
시스템 변수에서 경로를 선택하고 편집을 누릅니다.
-
환경 변수 편집에서 새로 만들기를 선택하고 Terraform 파일에 대해 복사된 경로를 입력합니다.
-
새 항목을 업데이트하려면 3개 창을 모두 보려면 확인을 누릅니다.

-
명령 프롬프트를 열고 다음 명령을 실행합니다.
terraform version주: Windows 랩톱 또는 VM(가상 머신)에서 인식할 수 없는 terraform 오류가 발생할 경우 시스템을 다시 시작하거나 재부트해야 하므로 새로운 시스템 환경 변수 세트가 Windows 시스템에 반영됩니다.
-
작업 1: 제공자 선언
Terraform 제공자는 특정 유형의 인프라 또는 서비스를 이해하고 상호 작용할 책임이 있는 플러그인을 가리킵니다. 제공자는 Terraform과 관리하려는 서비스 또는 플랫폼의 API 간의 브리지입니다. 제공업체를 통해 Terraform은 클라우드 플랫폼과 효과적으로 통신하고 상호 작용할 수 있습니다. 즉, Terraform 제공자는 Terraform이 다른 클라우드 서비스 또는 시스템과 통신할 수 있도록 도와주는 번역기와 같아서 가상 머신, 데이터베이스 및 네트워크와 같은 리소스를 생성, 관리 및 삭제할 수 있습니다.
일반적으로 각 제공업체는 특정 클라우드 플랫폼(예: OCI, AWS, Azure, GCP) 또는 인프라 서비스(예: Kubernetes, Docker)에 해당합니다.
-
terraform-beginners-demo이라는 폴더를 생성하고 VS Code에서 엽니다. -
VS 코드에 HashiCorp Terraform 확장을 설치합니다.
-
terraform-beginners-demo폴더 아래에provider.tf및variables.tf파일을 생성합니다. -
provider.tf파일에서 다음 코드를 복사합니다.terraform { required_providers { oci = { source = "oracle/oci" version = "5.30.0" } } } provider "oci" { tenancy_ocid = var.tenancy_id user_ocid = var.user_id fingerprint = var.api_fingerprint private_key_path = var.api_private_key_path region = var.region }참고: 공식 Terraform 레지스트리 페이지의 코드를 사용했습니다. 자세한 내용은 Oracle Cloud Infrastructure Provider 및 최신 버전(5.30.0)을 참조하십시오.
작업 2: OCI 구성 생성
제공자를 구성하려면 OCI 사용자 OCID(Oracle Cloud 식별자), 테넌시 OCID, 컴파트먼트 OCID가 필요합니다.
-
OCI 콘솔에 로그인합니다.
-
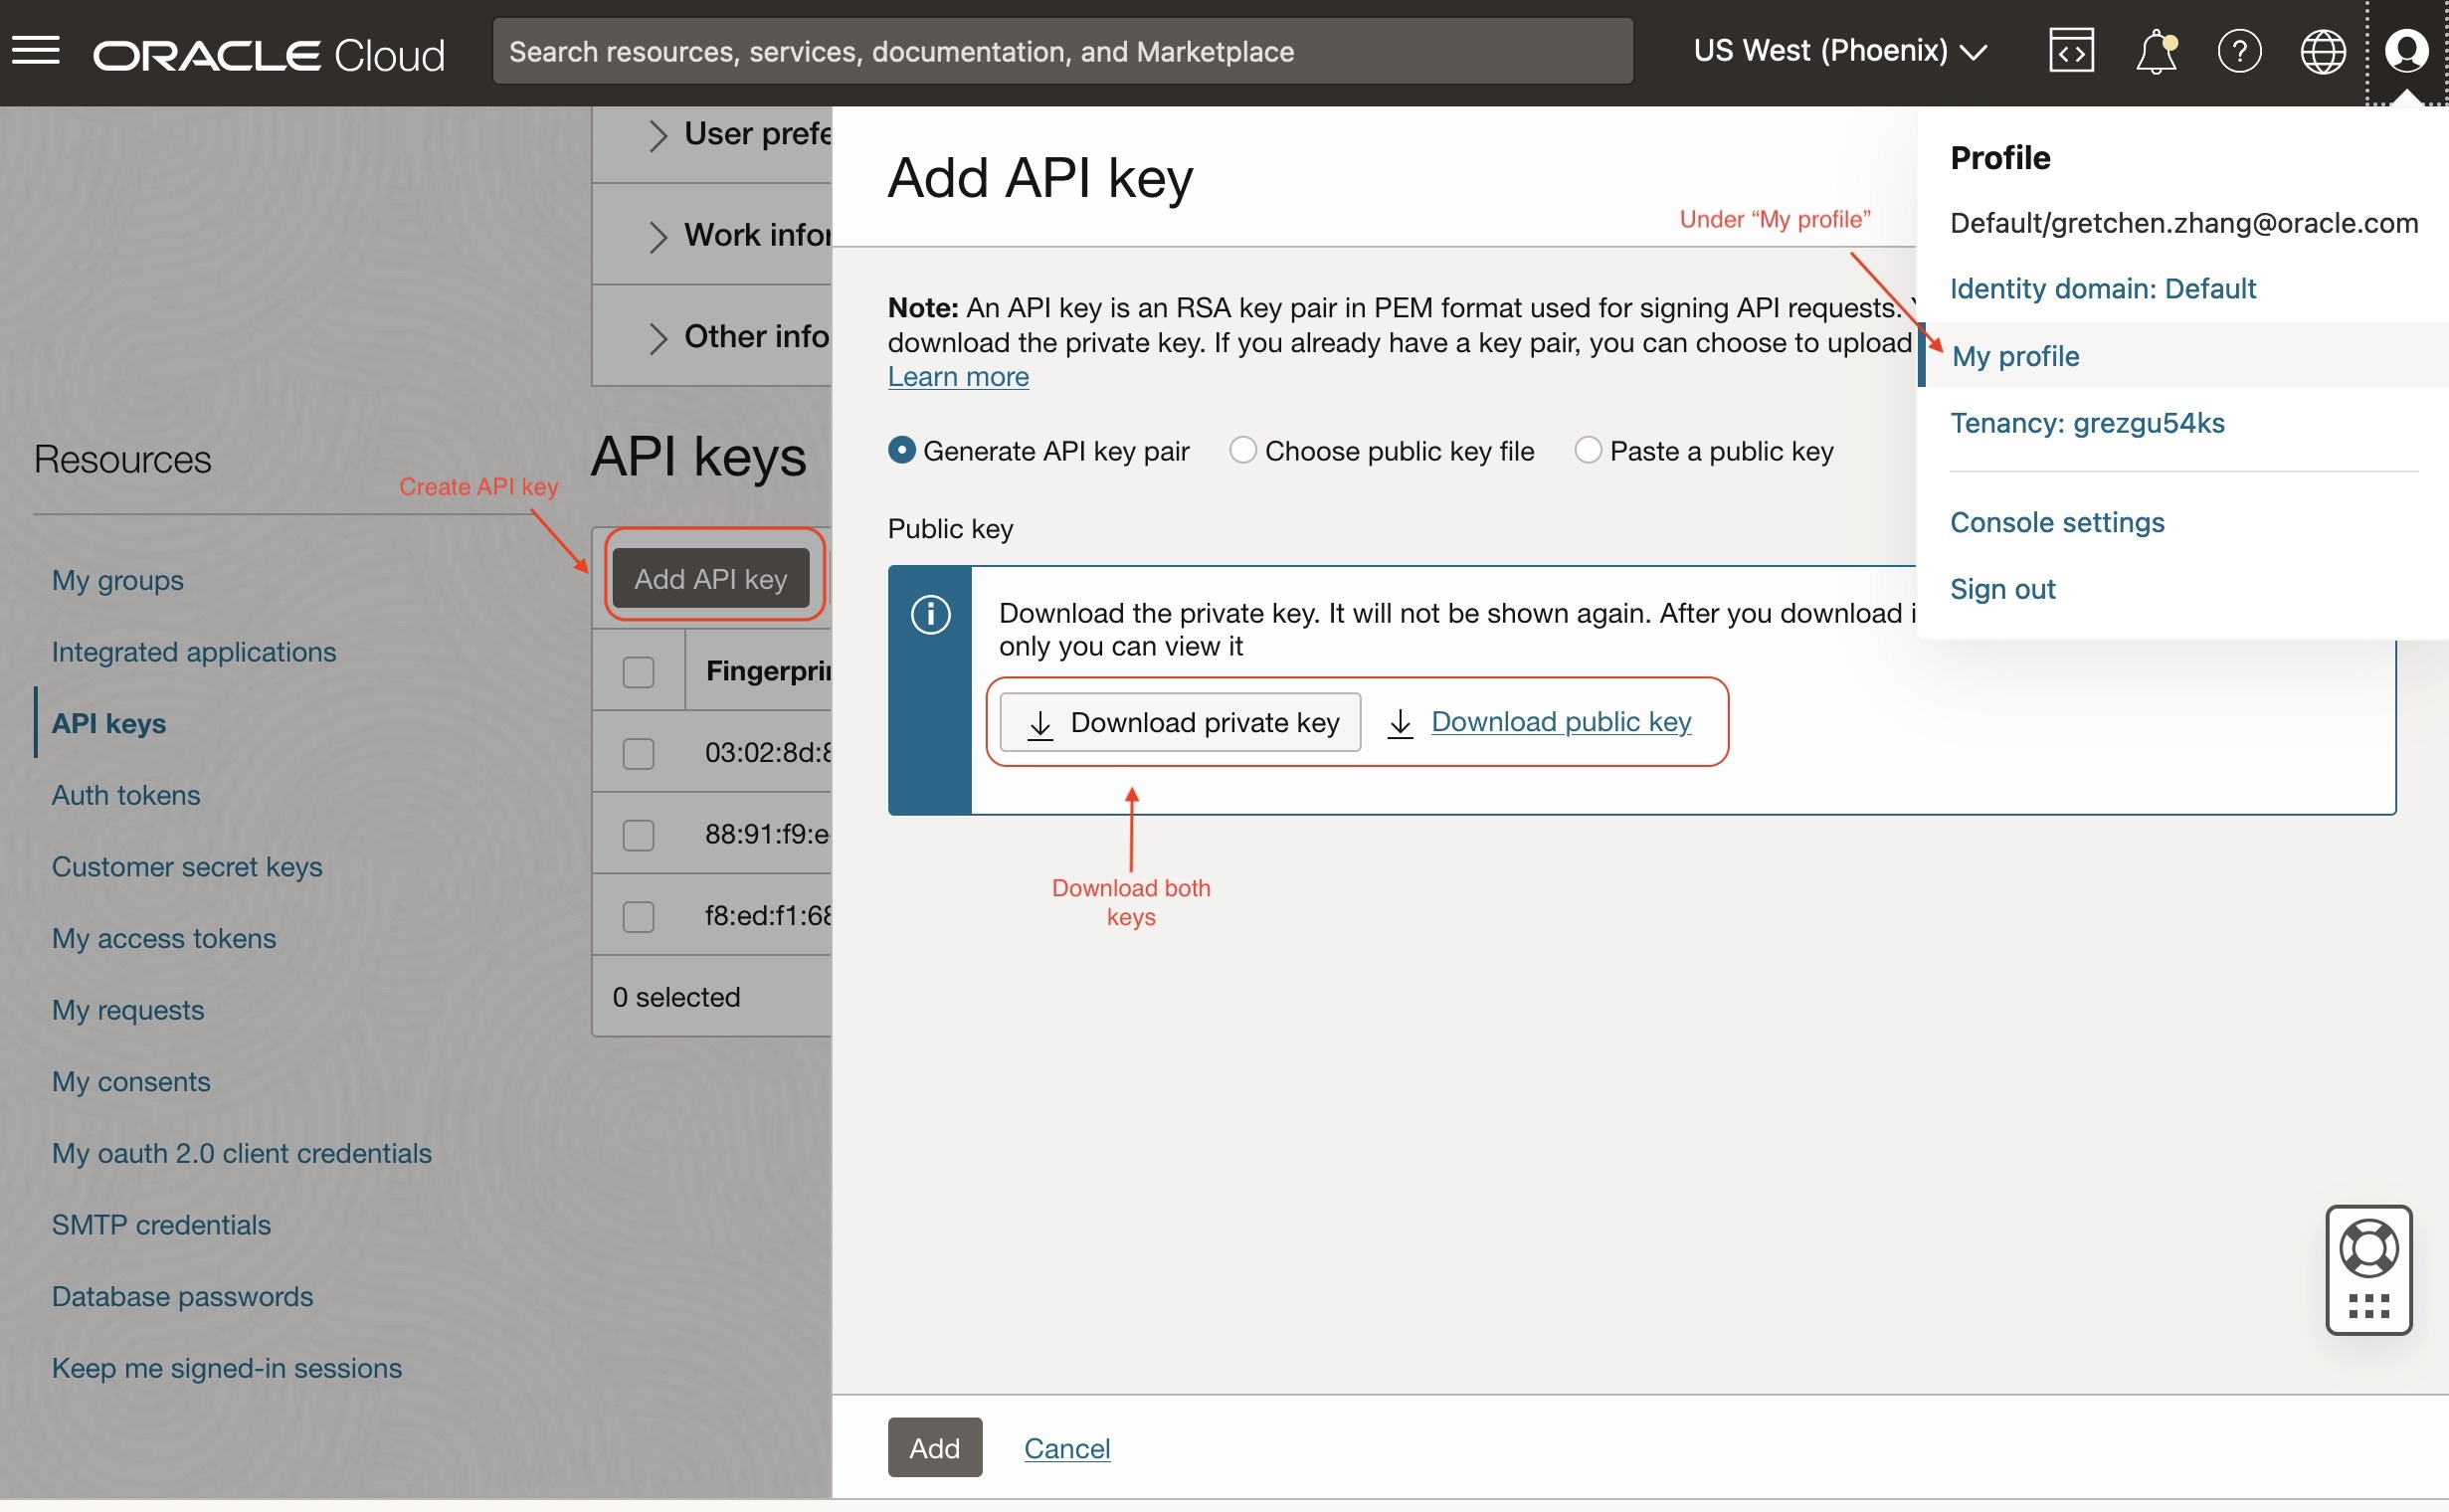
사용자 프로파일 아이콘을 누르고 내 프로파일을 선택합니다.
-
API 키 쌍을 가져오려면 다음 단계를 수행합니다.
-
리소스에서 API 키를 선택하고 API 키 추가를 누릅니다.
-
새 API 키 쌍을 생성하거나 기존 퍼블릭 키를 사용하여 API 키 쌍을 생성할 수 있습니다. API 키 쌍 생성을 선택합니다. 개인 키와 공개 키를 다운로드했는지 확인하세요.
-
추가를 누릅니다. 구성 파일 미리보기 상자가 표시됩니다.

-
구성 파일 미리보기에 제공된 세부정보를 복사하여 다른 곳에 저장합니다.
variables.tf파일에서 사용됩니다.다음과 같아야 합니다.
[DEFAULT] user=ocid1.user.oc1..xxxxxxxxxxx fingerprint=xx:xx:xx:xx:xx tenancy=ocid1.tenancy.oc1..xxxxxxxxx region=us-phoenix-1 # your region ID key_file=<path to your private keyfile> # TODO -
닫기를 누르면
OR
API 키 쌍을 가져오려면 OCI 콘솔에서 API 키 구성 생성을 참조하십시오.
-
작업 3: OCI 인증서로 Terraform 환경 구성
-
VS Code Editor로 이동하여
terraform-beginners-demo폴더 아래에variables.tf이라는 새 파일을 생성하고 다음 코드를 붙여넣습니다.variable "api_fingerprint" { description = "Fingerprint of OCI API private key for Tenancy" type = string } variable "api_private_key_path" { description = "Path to OCI API private key used for Tenancy" type = string } variable "tenancy_id" { description = "Tenancy ID where to create resources for Tenancy" type = string } variable "user_id" { description = "User ID that Terraform will use to create resources for Tenancy" type = string } variable "region" { description = "OCI region where resources will be created for Tenancy" type = string } -
terraform.tfvars라는 다른 새 파일을 생성하고 다음 코드를 붙여넣습니다. 작업 2.3의 구성 파일 값을 사용하여variables.tf에서 각 변수를 정의합니다.# Identity and access parameters api_fingerprint = "REPLACE_BY_YOUR_FINGERPRINT" # Fingerprint of OCI API private key for Tenancy api_private_key_path = "~/.oci/oci_api_key.pem" # Path to OCI API private key used for Tenancy region = "us-phoenix-1" # OCI region where resources will be created for Tenancy tenancy_id = "REPLACE_YOUR_TENACY_OCID" # Tenancy ID where to create resources user_id = "REPLACE_BY_YOUR_USER_OCID" # Path to OCI API private key used for Tenancy주: 운용 환경에서는
terraform.tfvars파일을 사용하여 보안 및 확장성을 향상시키기 위해 terraform 변수를 정의하는 것이 좋습니다. 자세한 내용은 Variable Definitions (.tfvars) Files을 참조하십시오.
작업 4: OCI 테넌시로 Terraform 접속 테스트
-
terraform-beginners-demo폴더 아래에data_source.tf라는 새 파일을 생성하고 다음 코드를 복사합니다.data "oci_identity_availability_domains" "ad" { #Required compartment_id = var.tenancy_id } -
terraform-beginners-demo폴더 아래에output.tf라는 새 파일을 생성하고 다음 코드를 복사합니다.output "list_ads" { value = data.oci_identity_availability_domains.ad.availability_domains } -
VS Code에서 새 터미널을 열고 다음 명령을 실행하여 terraform 스크립트를 실행합니다.
Command 1: terraform init

Command 2: terraform plan #to view your deployments what is going to be created

Command 3: terraform apply #then type "yes" once prompted alternatively run "apply -auto-approve
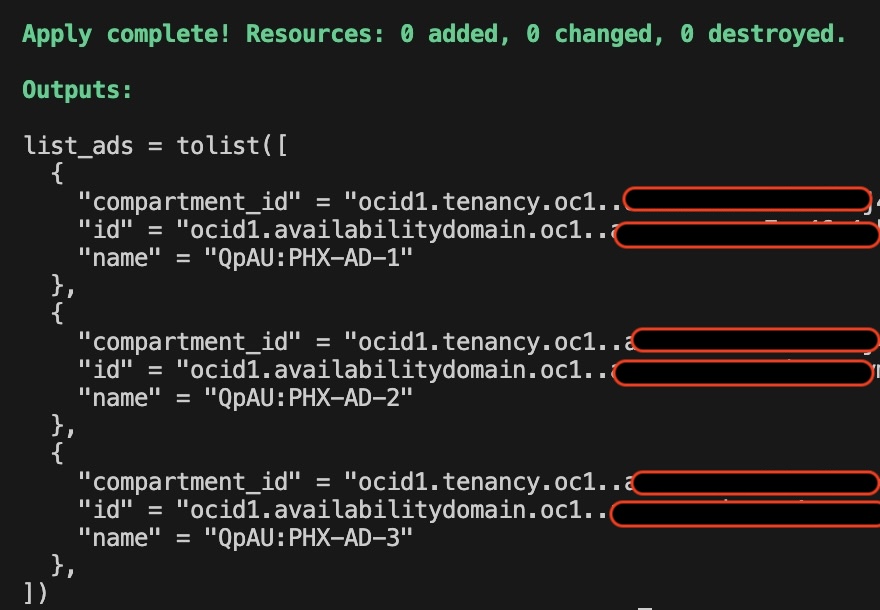
이제 출력에서 가용성 도메인 목록 및 이와 연관된 컴파트먼트를 볼 수 있어야 합니다.

이제 Terraform 내에서 OCI 테넌시에 리소스를 배치하도록 시스템을 성공적으로 구성했습니다. 변수를 전달했지만 테넌시를 변경하지 않았습니다. Terraform을 사용하여 리소스를 추가, 체인화 및 삭제하는 프로세스를 더 잘 이해할 수 있도록 몇 가지 샘플을 살펴보겠습니다.
작업 5: (예) Terraform을 사용하여 OCI 컴퓨트 인스턴스 배치
이제 네트워킹 및 컴퓨팅 리소스를 배포하기 위해 이전 작업에서 만든 것을 기반으로 구축할 것입니다.
-
networking.tf라는 파일을 생성하고 다음 코드를 복사합니다.resource "oci_core_vcn" "test_vcn" { count = (var.create_new_vcn) ? 1 : 0 #Required compartment_id = var.compartment_id cidr_block = var.vcn_cidr_block display_name = var.vcn_display_name dns_label = var.vcn_dns_label }주: 추가 구성이 포함된 core-vcn 변수에 대한 자세한 내용은 oci_core_vcn를 참조하십시오.
-
variables.tf파일을 편집하고 다음 변수를 추가합니다.#VCN specific variables variable "create_new_vcn" { description = "Boolean variable to specify whether to create a new VCN or to reuse an existing one." type = bool } variable "compartment_id" { description = "OCI compartment where resources will be created" type = string } variable "vcn_cidr_block" { description = "The list of IPv4 CIDR blocks the VCN will use" type = string } variable "vcn_display_name" { description = "provide a descriptive name for the VCN - this is what you will see displayed in the OCI console" type = string } variable "vcn_dns_label" { description = "provide a descriptive alphanumeric name for the DNS - this is what you will see displayed in the OCI console" type = string } variable "vcn_id" { description = "provide your existing VCN OCID if create_new_vcn = false" type = string } variable "private_subnet_id" { description = "provide existing private subnet OCID" type = string } variable "public_subnet_id" { description = "provide existing public subnet OCID" type = string } -
terraform.tfvars에 새 변수를 추가하고 테넌시 구성에 따라 각 변수를 정의합니다.# VCN specific variables create_new_vcn = true # Set this to true if you want terraform to crearte the network for you, otherwise set it to false. compartment_id = "REPLACE_BY_YOUR_COMPARTMENT_OCID" # add your own compartment id where the vcn will be created vcn_cidr_block = "10.0.0.0/16" # The list of IPv4 CIDR blocks the VCN will use vcn_display_name = "terraform_vcn_example" # provide a descriptive name for the VCN - this is what you will see displayed in the OCI console vcn_dns_label = "terraformvcn" # provide a descriptive alphanumeric name for the DNS - this is what you will see displayed in the OCI console # Configure CIDR Blocks, Subnet(Public, Private) OCIDS for an existing VCN. # vcn_id = "REPLACE_BY_YOUR_VCN_OCID" #ADD WITH YOUR VCN OCID private_subnet_id = "REPLACE_BY_YOUR__PRIVATE_SUBNET_OCID" #ADD WITH YOUR PRIVATE SUBNET public_subnet_id = "REPLACE_BY_YOUR_PUBLIC_SUBNET__OCID" #AA WITH YOUR PUBLIC SUBNET참고: 기존 VCN이 이미 있는 경우
create_new_vcn을 false로 설정하고vcn_id,private_subnet_id및public_subnet_id변수를 수정합니다. -
새 VCN에 대한 서브넷을 생성합니다.
-
networking.tf파일에서 다음 코드를 추가하여 공용 및 전용 서브넷을 생성합니다.resource "oci_core_subnet" "private_subnet" { count = (var.create_new_vcn) ? 1 : 0 #Required cidr_block = var.private_subnet_cidr_block compartment_id = var.compartment_id vcn_id = oci_core_vcn.test_vcn.*.id[0] display_name = var.private_subnet_display_name prohibit_public_ip_on_vnic = var.private_subnet_prohibit_public_ip_on_vnic } resource "oci_core_subnet" "public_subnet" { count = (var.create_new_vcn) ? 1 : 0 #Required cidr_block = var.public_subnet_cidr_block compartment_id = var.compartment_id vcn_id = oci_core_vcn.test_vcn.*.id[0] display_name = var.public_subnet_display_name prohibit_public_ip_on_vnic = var.public_subnet_prohibit_public_ip_on_vnic route_table_id = oci_core_route_table.test_route_table.*.id[0] }주: 추가 구성이 포함된 코어 서브넷 변수에 대한 자세한 내용은 oci_core_subnet을 참조하십시오.
-
다음 코드를 복사하여 새 서브넷 변수를
variables.tf파일에 추가합니다.#Private subnet variables variable "private_subnet_cidr_block" { description = "OCI private subnet CIDR block range" type = string } variable "private_subnet_display_name" { description = "provide a descriptive name for the private subnet - this is what you will see displayed in the OCI console" type = string } variable "private_subnet_prohibit_public_ip_on_vnic" { description = "Allow public IP address to the VNIC" type = bool } #Public subnet variables variable "public_subnet_cidr_block" { description = "OCI public subnet CIDR block range" type = string } variable "public_subnet_display_name" { description = "provide a descriptive name for the public subnet - this is what you will see displayed in the OCI console" type = string } variable "public_subnet_prohibit_public_ip_on_vnic" { description = "Allow public IP address to the VNIC" type = bool } -
terrform.tfvars파일에 새 서브넷 변수를 선언합니다.#Private subnet variables private_subnet_cidr_block = "10.0.1.0/24" # OCI private subnet CIDR block range private_subnet_display_name = "terraform_private_subnet_example" # provide a descriptive name for the private subnet - this is what you will see displayed in the OCI console private_subnet_prohibit_public_ip_on_vnic = false # Allow public IP address to the VNIC #Public subnet variables public_subnet_cidr_block = "10.0.2.0/24" # OCI public subnet CIDR block range public_subnet_display_name = "terraform_public_subnet_example" # provide a descriptive name for the public subnet - this is what you will see displayed in the OCI console public_subnet_prohibit_public_ip_on_vnic = false
-
-
networking.tf파일에 다음 코드를 추가하여 인터넷 게이트웨이를 생성합니다.resource "oci_core_internet_gateway" "test_internet_gateway" { count = (var.create_new_vcn) ? 1 : 0 #Required compartment_id = var.compartment_id display_name = "INTERNET_GTWFOR_${var.vcn_display_name}" vcn_id = oci_core_vcn.test_vcn.*.id[0] #route_table_id = oci_core_route_table.test_route_table.id } -
인터넷에 대한 트래픽을 관리하려면 경로 테이블에 대해
networking.tf에 다음 코드를 추가합니다.resource "oci_core_route_table" "test_route_table" { count = (var.create_new_vcn) ? 1 : 0 #Required compartment_id = var.compartment_id vcn_id = oci_core_vcn.test_vcn.*.id[0] route_rules { #Required network_entity_id = oci_core_internet_gateway.test_internet_gateway.*.id[0] description = "route rule internet access for ${var.vcn_display_name}" destination = "0.0.0.0/0" destination_type = "CIDR_BLOCK" } } -
VCN과 연관된 NSG(네트워크 보안 그룹)를 생성합니다. 다음 코드를
networking.tf파일에 복사합니다.resource "oci_core_network_security_group" "test_nsg" { count = (var.create_new_vcn) ? 1 : 0 #Required compartment_id = var.compartment_id vcn_id = oci_core_vcn.test_vcn.*.id[0] display_name = "NETWORK_SECURITY_GROUP_${var.vcn_display_name}" freeform_tags = { "Lab" = "Terraofm 101 Guide" } } -
이제 Linux VM 및 Windows VM을 배치하기 위한 2개의 새 파일
compute_linux.tf및compute_windows.tf를 만듭니다. -
compute_linux.tf에서 다음 코드를 복사하여 Linux OS를 사용하는 컴퓨트 인스턴스를 생성합니다.resource "oci_core_instance" "test_linux_instance" { #Required count = var.create_linux_instance ? 1 : 0 availability_domain = data.oci_identity_availability_domains.ad.availability_domains[0].name compartment_id = var.compartment_id create_vnic_details { assign_public_ip = "true" display_name = var.instance_display_name nsg_ids = [] skip_source_dest_check = "false" subnet_id = var.create_new_vcn ? oci_core_subnet.public_subnet.*.id[0] : var.public_subnet_id } display_name = "${var.instance_display_name}_linux" metadata = { ssh_authorized_keys = "${file(var.public_ssh_key)}" } shape = var.instance_shape shape_config { memory_in_gbs = var.instance_flex_memory_in_gbs ocpus = var.instance_flex_ocpus } launch_options { boot_volume_type = "PARAVIRTUALIZED" firmware = "UEFI_64" is_consistent_volume_naming_enabled = "true" is_pv_encryption_in_transit_enabled = "true" network_type = "PARAVIRTUALIZED" remote_data_volume_type = "PARAVIRTUALIZED" } source_details { #Required source_id = var.linux_image_ocid source_type = "image" } preserve_boot_volume = false } -
compute_windows.tf에서 다음 코드를 복사합니다.resource "oci_core_instance" "test_windows_instance" { #Required count = var.create_windows_instance ? 1 : 0 availability_domain = data.oci_identity_availability_domains.ad.availability_domains[0].name compartment_id = var.compartment_id create_vnic_details { assign_public_ip = "true" display_name = var.instance_display_name nsg_ids = [] skip_source_dest_check = "false" subnet_id = var.create_new_vcn ? oci_core_subnet.public_subnet.*.id[0] : var.public_subnet_id } display_name = "${var.instance_display_name}_windows" metadata = { } shape = var.instance_shape shape_config { memory_in_gbs = var.instance_flex_memory_in_gbs ocpus = var.instance_flex_ocpus } launch_options { boot_volume_type = "PARAVIRTUALIZED" firmware = "UEFI_64" is_pv_encryption_in_transit_enabled = "true" network_type = "PARAVIRTUALIZED" remote_data_volume_type = "PARAVIRTUALIZED" } source_details { #Required source_id = var.windows_image_ocid source_type = "image" } preserve_boot_volume = false } -
compute_linux및compute_windows에 대한 새 변수로variables.tf를 업데이트합니다.#Compute variables variable "instance_shape" { description = "value" type = string } variable "instance_flex_memory_in_gbs" { description = "(Updatable) The total amount of memory available to the instance, in gigabytes." type = number } variable "instance_flex_ocpus" { description = "(Updatable) The total number of OCPUs available to the instance." type = number } variable "instance_create_vnic_details_assign_public_ip" { description = "To allow compute connectivity from internet" type = bool } variable "instance_display_name" { description = "provide a descriptive name for the compute instance - this is what you will see displayed in the OCI console" type = string } variable "public_ssh_key" { description = "Add your public ssh key - for provisioning your compute instance" type = string } variable "private_ssh_key" { description = "Add your private ssh key - for accessing your compute instance after creation" type = string } variable "create_linux_instance" { description = "Boolean variable to specify whether to provision a Linux instances" type = bool } variable "create_windows_instance" { description = "Boolean variable to specify whether to provision a Windows instances" type = bool } variable "windows_image_ocid" { description = "OCID of the Windows image to use" type = string } variable "linux_image_ocid" { description = "OCID of the Linux image to use" type = string } -
terraform.tfvars에서 새 변수를 추가하고 정의합니다.#Compute variables - Make sure to select a compatible shape (e.g.: VM.Standard.E4.Flex) instance_shape = "VM.Standard.E5.Flex" # Shape of the compute instance instance_flex_memory_in_gbs = 16 # (Updatable) The total amount of memory available to the instance, in gigabytes. instance_flex_ocpus = 1 # (Updatable) The total number of OCPUs available to the instance. instance_create_vnic_details_assign_public_ip = true # To allow compute connectivity from internet instance_display_name = "terraform_compute_example" # provide a descriptive name for the compute instance - this is what you will see displayed in the OCI console #SSH keys https://docs.oracle.com/en/learn/generate_ssh_keys/index.html#introduction public_ssh_key = "~/cloudshellkey.pub" # Add your public ssh key private_ssh_key = "~/cloudshellkey" # Add your private ssh key create_linux_instance = true # if set to true a test linux instance will be created and false no linux instance will be deployed. create_windows_instance = true # # If set to true a test windows instance will be created and false no windows instance will be deployed. linux_image_ocid = "REPLACE_BY_YOUR_REGION_LINUX_IMAGE_OCID" # OCID for chosen image (Oracle Linux 9 example) specific to the test region (us-phoenix-1) windows_image_ocid = "REPLACE_BY_YOUR_REGION_WINDOWS_IMAGE_OCID" # OCID for chosen image (Windows example) specific to each region (us-phoenix-1) # Here are other image OCIDs for popular region (Ashburn, San Jose, Toronto) # Ashburn # Oracle linux image_id = ocid1.image.oc1.iad.aaaaaaaau7uaok7n5qd4nivgiyfatfdddhltmxddtfbyqg3bsg3fxk6z6aqq # Windows image_id = ocid1.image.oc1.iad.aaaaaaaamaaiupezxbrw6fji5ndk3jdujwhjuexcafheqjqf45g6nzyblz6a #San Jose # Oracle linux image_id = ocid1.image.oc1.us-sanjose-1.aaaaaaaabjixxpfouczgpcnpvgny5pcqtgjgi3nincszbfdkd2xr4jvzahua # Windows image_id = ocid1.image.oc1.us-sanjose-1.aaaaaaaatmjlzoqw5gzohjvygzcm5rpugomxyfho5xi6subjchoxnxo4wcfa #Toronto # Oracle linux image_id = ocid1.image.oc1.ca-toronto-1.aaaaaaaai6uhjrtajuuitl5hara5brnvwqvq4aebenmnbehv2cila75xbvzq # Windows image_id = ocid1.image.oc1.ca-toronto-1.aaaaaaaaeged3obrrmmwvyruvknszy23btvb2fqu7vn3c5azeecbj2prm64q # for other image OCIDs: https://docs.oracle.com/en-us/iaas/images/주: 이미지 OCID는 각 지역에 따라 다릅니다. 위 코드에는 인기 있는 지역에 대한 이미지 OCID가 있으며 다른 모든 지역에 대한 이미지 OCID는 모든 이미지 계열에서 찾을 수 있습니다.
-
output.tf에서 다음 코드를 복사합니다. 그러면 터미널에서 생성된 리소스가 출력됩니다.# Regions output "linux_instance_region" { value = oci_core_instance.test_linux_instance.*.region } output "windows_instance_region" { value = oci_core_instance.test_windows_instance.*.region } # Networking output "network_vcn_name" { value = oci_core_vcn.test_vcn.*.display_name } # Compute: Linux Test Instance output "output_linux_instance_display_name" { value = oci_core_instance.test_linux_instance.*.display_name } output "output_linux_instance_public_ip" { value = oci_core_instance.test_linux_instance.*.public_ip } output "output_linux_instance_state" { value = oci_core_instance.test_linux_instance.*.state } # Compute: Windows Test Instance output "output_windows_instance_display_name" { value = oci_core_instance.test_windows_instance.*.display_name } output "output_windows_instance_public_ip" { value = oci_core_instance.test_windows_instance.*.public_ip } output "output_windows_instance_state" { value = oci_core_instance.test_windows_instance.*.state } -
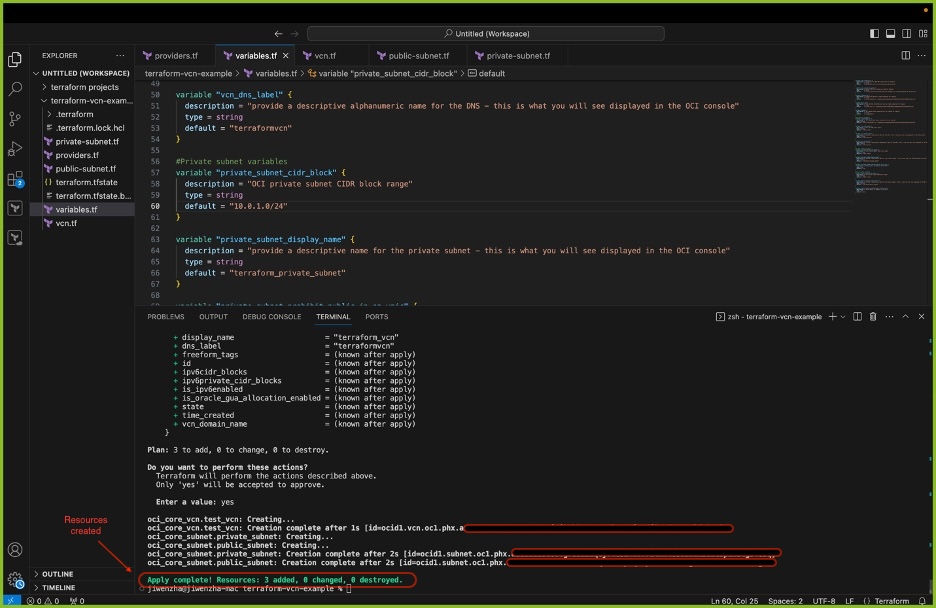
terraform-example에 대한 새 터미널을 열고 다음 명령을 실행합니다.Command 1: terraform init Command 2: terraform plan Commnad 3: terraform apply (and then respond "yes") OR terraform apply -auto-approve출력과 VCN, 전용(private) 서브넷 및 공용 서브넷, 라우트 테이블, 인터넷 게이트웨이, nsg, Linux VM 및 Windows VM이 생성되어야 합니다.

-
리소스가 이제 Terraform을 사용하여 배치되었습니다. OCI 테넌시에서 리소스 생성을 확인한 후 다음 명령을 사용하여 모든 리소스를 삭제합니다.
Command: terraform destroy
다음 단계
이제 Terraform에 대한 연결을 구축하고 간단한 예제로 리소스를 배포, 업데이트 및 삭제하는 방법을 배웠습니다. OCI에서 Terraform 여정을 계속하고 OCI Architect Professional 인증에 자신을 설정하려면 Terraform을 사용하여 Oracle Cloud Infrastructure Architect Professional 인증 가속화를 확인하십시오.
이 튜토리얼을 개선하고 확장하는 독자들의 기여를 환영합니다. 귀하의 기여는 향후 Terraform 학습자를 위해 이 리소스를 개선하는 데 매우 중요합니다.
관련 링크
확인
- Authors - Gretchen Zhang(클라우드 엔지니어), Akarsha I(스태프 클라우드 엔지니어), Mahamat Guiagoussou(마스터 수석 클라우드 아키텍트)
추가 학습 자원
docs.oracle.com/learn에서 다른 실습을 탐색하거나 Oracle Learning YouTube 채널에서 더 많은 무료 학습 콘텐츠에 액세스하세요. 또한 Oracle Learning Explorer가 되려면 education.oracle.com/learning-explorer을 방문하십시오.
제품 설명서는 Oracle Help Center를 참조하십시오.
Get Started with Terraform in Oracle Cloud Infrastructure
G18828-01
November 2024