Adding and Deleting Pages in Dashboards
Adding Pages to Dashboards
You can add new pages to organize content of a dashboard. For example, you can first add a new dashboard page that contains regional sales data in a table and in a bar graph. Then, you can add another that contains links to various competitors' web sites.
To add a new page to a dashboard:
-
Open the dashboard for editing.
-
On the toolbar of the Dashboard builder, click Add Dashboard Page.
-
In the Add Dashboard Page dialog, enter a name and description for the page, and click OK.

Description of the illustration dash28.gif
The page is displayed as a new tab in the Dashboard builder.
-
Click Save.
After you add a new page, you can add content to it. See Adding Content to Dashboard Pages.
Adding Content to Dashboard Pages
You can add dashboard objects (any of the objects from the Dashboard objects pane) to dashboard pages. You can also add objects that you have saved in the catalog.
For example, you can add content to the newly created Sales Performance dashboard to track your team's progress. To do so, you can add a Brand Revenue analysis from the catalog.
To add content to a dashboard page:
-
Open the dashboard for editing.
-
Navigate to the page to which you want to add content.
-
In the Dashboard Builder, add each object that you want to include. To do so, select it in the Dashboard Objects pane or the Catalog pane and drag and drop it to the Page Layout area.
The following table describes some of the objects that you can add.
Object Description Column Add a column to align content on a dashboard. You can create as many columns on a dashboard page as you need. You can place columns horizontally or vertically. Section Add sections within columns to hold the content for the page, such as action links and analyses. You can include as many sections as you need for a column. -
Set the properties of each object, as appropriate by clicking Properties.
-
To enable users to specify values to display in views on the dashboard page, include prompts as described in Adding Prompts to Dashboard Pages.
-
Click Save.
Changing the Properties of a Dashboard and Its Pages
You can change the style and description of the dashboard or specify links to include at the dashboard level by setting dashboard properties.
For example, you can specify the options that your team members have when they view the Brand Revenue analysis on a dashboard page. You might give them options to export, refresh, and print the analysis.
To change the properties of a dashboard and its pages:
-
Open the dashboard for editing.
-
Click Tools and select Dashboard Properties.
-
In the Dashboard Properties dialog, make the property changes that you want. The following table describes some of the properties.
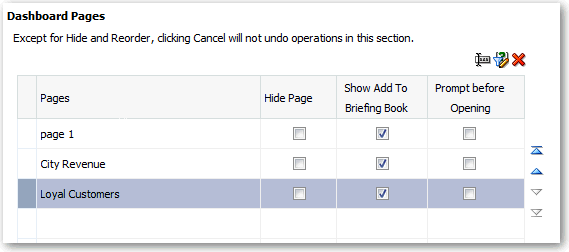
Option Description Page Size Specify whether you want the dashboard to fit content or fill the browser window. Filters and Variables Specify to embed dashboard prompts with default values. Dashboard Report Links Set the links to display with analyses on the dashboard: analyze, edit, refresh, print, export, or add to briefing book. Prompts Apply Buttons Specify whether to show or hide Reset buttons. Dashboard Pages Hide a dashboard page, show "Add to Briefing Book," or display a prompt before opening the dashboard page. -
Click OK.
-
Click Save.
Changing the Properties of Objects Added to Dashboard Pages
You can change the properties of objects that have been added to a dashboard page. For example, you can change the column properties of the Brand Revenue analysis to specify the heading display in 14-point bold Helvetica font.
To change the properties of an object on a dashboard page:
-
Open the dashboard for editing.
-
Navigate to the page that contains the object.
-
Hover the mouse pointer over the object in the Page Layout area to display the object's toolbar and click Properties.
What is displayed depends on the type of object. For some objects, a properties dialog is displayed. For other objects, a menu of options is displayed.
-
Make the property changes that you want. The following table describes some properties that you can set:
Dialog Action Break Add page and column breaks to the layout of a dashboard page. Prompt Links Specify whether to display the Edit link with a prompt. This link, which displays at runtime, enables users (with the proper privileges) to edit the prompt. -
Click Save.
Deleting Objects on Dashboard Pages
If you add an object that you later decide that you do not want, then you can delete it. For example, you can delete last year's Brand Revenue analysis from the Sales Performance dashboard, to replace it with the current year's analysis.
To delete an object on a dashboard page:
-
Open the dashboard for editing.
-
Navigate to the page that contains the object to delete.
-
Hover the mouse pointer over the object in the Page Layout area to display the object's toolbar and click Delete.
Deleting Dashboard Pages
You can delete the current dashboard page, or one or more dashboard pages. For example, you can delete pages 2 and 3 from the Sales Performance dashboard. Doing so, you retain only the page with the most recent Brand Revenue analysis.
To delete the current dashboard page:
-
Open the dashboard for editing.
-
Navigate to the page to delete.
-
Click Delete Current Page.
-
Confirm the deletion.
To delete one or more dashboard pages:
-
Open the dashboard for editing.
-
Click Tools and select Dashboard Properties.
-
For each page to delete:
-
In the Dashboard Pages area of the dialog, select the page.
-
On the Dashboard Pages toolbar, click Delete.

Description of the illustration dash08.gif
-
Confirm the deletion.
-
-
Click OK.