Manipulating Members Using Groups and Calculated Items
About Groups and Calculated Items
You can create a group or calculated item as a way to display data in a table, pivot table, trellis, or graph. Groups and calculated items enable you to add new "members" to a column, when those members do not exist in the data source. These members are also known as "custom members."
Use a group to define members of a column, as a list of members or a set of selection steps that generate a list of members. A group is represented as a member.
A calculated item is a computation between members, which is represented as a single member that cannot be drilled. When you create a calculated item, you add a new member in which you have selected how to aggregate the item. You can aggregate using Sum or Average or custom formula.
Creating Groups and Calculated Items
![]() Video on Creating Calculated Items
Video on Creating Calculated Items
Use a group or calculated item to add new "members" to a column. For example, you can review how much revenue was generated for mobile devices and compare that number to other product types. You can create a group called Mobile Devices for the Product column that includes Flip Phones and Smart Phones.
To create a group or calculated item for an analysis:
-
Open the analysis for editing.
-
On the toolbar of the Results tab, click New Group or New Calculated Item.
The New Group or New Calculated Item dialog is displayed.
-
Enter a value for Display Label for the group or calculated item when it is displayed in a view.
-
In the Values From list, select the column whose values you want to include in the group or calculated item.
-
If you are creating a calculated item, select the function for the calculated item.
-
Move the appropriate column values from the Available area to the Selected area.
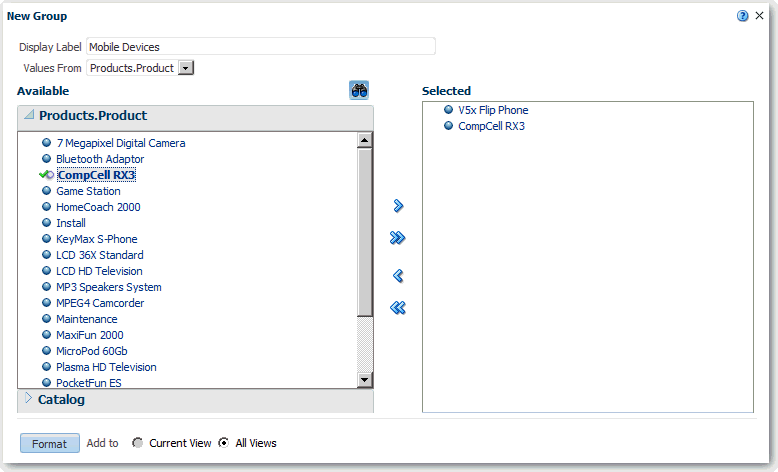
Description of the illustration filtering03.gif
-
For a calculated item with Custom Formula selected as the function, select mathematical operators to include in the function using the toolbar. You can also use these functions: Absolute, Ceiling, Floor, Round, and Sqrt.
A formula creates a dynamic custom grouping within the view. All measures referenced in a formula must be from the same column and must be present in the results. Formulas can be inserted into, or combined with, other calculated items.
Instead of specifying a named item for columns, you can specify $n or $-n. Here, n is an integer that indicates the item's row position. If you specify $n, then the measure is taken from the nth row. If you specify $-n, then the measure is taken from the nth to the last row.
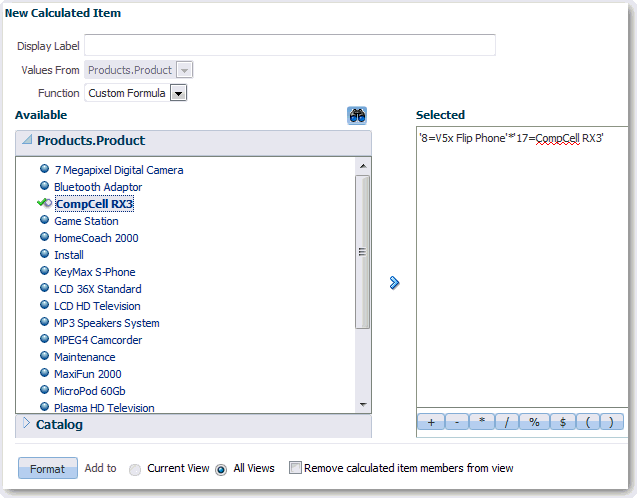
Description of the illustration filtering04.gif
-
(Optional) If you are creating a calculated item, select Remove calculated item members from view.
Use this box to suppress the display of members that you have included in the calculated item in the view.
-
Click OK.
By default, the new group or calculated item is created for all views in the analysis.
Editing Groups and Calculated Items
You can edit groups and calculated items through the Selection Steps pane or from the catalog pane. You can also edit groups and calculated items in a table, pivot table, or trellis. For example, you can edit a group to include the Game Station and Plasma Television members.
To edit a group or calculated item, use one of the following ways:
| Location | Step |
|---|---|
| In the Selection Steps pane | Click the link to the group or calculated item and click Edit. |
| In the Catalog pane (if you saved it in the Catalog) | Select the object and click Edit. |
| In a table, pivot table, or trellis (on an outside edge) | Right-click the group or calculated item and select Edit Group or Edit Calculated Item. |
Viewing Group Contents
You can view the contents of a group to verify that it contains the members that you want. For example, suppose you created a group of categories in a Product Category column. You can view the group contents to verify that it contains the appropriate categories.
To view the contents of a group:
-
Open the analysis for editing.
-
Click on the Analysis Editor: Results tab.
-
In the table view, right-click on the cell that contains the group.
-
Select View Group Definition. The View Group dialog is displayed.
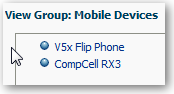
Description of the illustration filtering42.gif
-
Click Close.
Saving Groups and Calculated Items
You can save a group or calculated item as either an inline object (with an analysis) or as a named object (a standalone object). For example, you can save the Mobile Devices group as a named object in the catalog, for reuse in the Brand Revenue analysis.
To save a group or calculated item as an inline object:
-
Create the group or calculated item, as described in Creating Groups and Calculated Items.
-
To save the analysis and the group or calculated item that it contains, click Save Analysis.
The group or calculated item is saved as a part of the analysis.
To save a group or calculated item as a named object:
-
Create the group or calculated item, as described in Creating Groups and Calculated Items.
-
On the Analysis Editor: Results tab, display the Selection Steps pane.
-
Click the link for the group or calculated item.
-
Select Save Group As or Save Calculated Item As.
The Save As dialog is displayed.
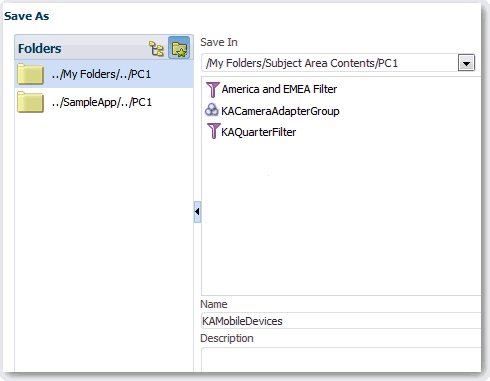
Description of the illustration analysis63.gif
-
Enter a folder in the Save In field. If you want to save a group or calculated item for your own use, then save it in a /My Folders/subfolder. If you want to share the group or calculated item with others, then save it in a / Shared Folders/subfolder.
-
Enter a group or calculated item name (required) and a description (optional).
-
Click OK.
The group or calculated item is saved in the catalog as an object.
Reusing a Group or Calculated Item in an Analysis
You can add a group or calculated item to the same column on which it was created in another analysis. The group or calculated item can be either a list of members or a set of selection steps.
For example, you can display the Brand Revenue analysis and add the group members from the Mobile Devices group. The members of the Mobile Devices group are included as an "Add" step in the Selection Steps pane.
To reuse a group or calculated item from the Catalog pane:
-
On the Results tab, display an analysis containing the same column to which you want to apply the selections from a group or calculated item.
-
In the Catalog pane, select the group or calculated item.

Description of the illustration views11.gif
-
On the toolbar of the Catalog pane, click Add More Options.
-
Select Add to add the group or calculated item itself. Select Add Members to add only the group or calculated item members.
To reuse a group or calculated item from the Edit Member Step dialog:
-
On the Results tab, display an analysis containing the same column to which you want to apply the selections from a group or calculated item.
-
Display the Selection Steps pane.
-
In the entry for the column you want, click the pencil icon.
The Edit Member Step dialog is displayed.
-
From the Action menu, select Start with Group or Calculated Item.
-
Move the saved group or calculated item from the Available area to the Selected area.
-
Click OK.
To reuse a group or calculated item from the Selection Steps pane:
-
On the Results tab, display an analysis containing the same column to which you want to apply the selections from a group or calculated item.
-
On the Selection Steps pane select Then, New Step for the appropriate column.
-
Select Add Groups or Calculated Items.
-
Select Select Existing Groups and Calculated Items.
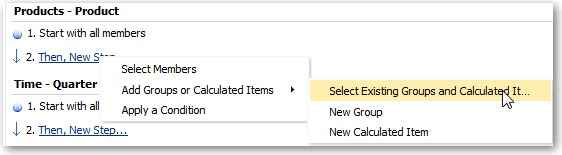
Description of the illustration filtering39.gif
-
On the resulting dialog, select the group or calculated item from the Available area and move it to the Selected area.
-
Click OK.
Deleting Groups and Calculated Items
You can delete inline and named groups and calculated items. For example, suppose you no longer need the combination of Flip Phones and Smart Phones in the analysis. You can delete the Mobile Devices group.
To delete an inline group or calculated item:
-
On the Analysis Editor: Results tab, right-click on the cell that contains the group or calculated item that you want to delete.
-
Click Remove.
To delete a named group or calculated item:
-
On the global toolbar, click Catalog.
-
Locate the group or calculated item in the Catalog page.
-
Click More on the group or calculated item.
-
Select Delete.