8 Working with the Project Life Cycle
This chapter describes some of the advanced features related to BPM projects and how to work with them within the development life-cycle.
This chapter includes the following sections:
8.1 Importing and Exporting Projects
Business Process Composer enables you to import and export BPM projects as .exp files. This enables you to share projects directly with other Business Process Composer and BPM Studio users directly through the files system without having to use the BPM repository.
8.1.1 How to Import a Project from Your Local File System
You can import a BPM project that was previously exported and saved as an .exp file. The imported project is stored in the BPM repository.
-
Access the application welcome page.
-
From the main menu, select Import, then select Import Project
The main menu is accessible from the upper left-hand corner of the Business Process Composer user interface as shown in Figure 8-1.
Figure 8-1 The Application Composer Main Menu
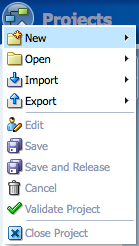
Description of "Figure 8-1 The Application Composer Main Menu"
-
Click Browse, then select the project file you want to import.
-
Click OK.
-
Enter a name for the project.
After you select a project file to import, the name field is automatically propagated.
-
Enter an optional description.
-
If you want to optionally select a folder within the BPM repository where the imported project will be created, click Browse, then select the folder.
-
Click OK to import the project into the BPM repository.
8.1.2 How to Export a Project to Your Local File System
Projects exported from Business Process Composer can be imported into Oracle BPM Studio. Exporting a project to your local file system enables you to share projects without using the Oracle BPM MDS repository.
For information on importing a project into Oracle BPM Studio see the Modeling and Implementation Guide for Oracle Business Process Management.
To export a project as an EXP file:
-
Open the project you want to export.
-
From the main menu, select Export, then select Export Project.
-
Choose a location on your local file system and click Save.
Your exported project is saved as a.EXP file on your local file system.
To export a project as an Oracle Tutor file:
-
Open the project you want to export.
-
From the main menu, select Export, then select Export Oracle Tutor.
-
Select one of the following:
-
Active process: Selects the currently active process. This option is only displayed if a process has already been opened and focus is currently on that process.
-
All open processes: Exports only the processes that are currently open.
-
All processes of project: Exports all of the processes of the current project.
-
-
Click OK.
The file is saved as a ZIP file on your file system.
8.2 Introduction to BPM Project Templates
Project templates enable business users to quickly create custom Oracle BPM applications and deploy them to runtime without assistance from developers. Using Oracle Business Process Composer business users can create new BPM projects based on project templates. These projects contain BPMN process flows and can be deployed directly to runtime.
Project templates enable you to incorporate reusable components and services including Human Tasks, Business Rules, and Adapters. These services are stored as part of the business catalog.
Business Process Composer users who have administrative privileges can also import project templates directly from their local file system. See Chapter 16, "Performing Administrative Tasks" for more information.
Using Oracle BPM Studio process developers can convert a normal project to a template and publish it to the Oracle BPM repository. After a template is available in the repository, you can create new projects based on the template using Business Process Composer.
See the Modeling and Implementation Guide for Oracle Business Process Management for more information on creating process templates.
Project templates are based on normal Oracle BPM projects and generally have all the required implementation and services defined in the business catalog. However, they often do not have all of the required services assigned to the necessary flow objects. After creating a new project based on a project template, a business analyst can assign business catalog components to the necessary flow objects.
The specific services required for each activity are defined by the editor policies of the project template. After the process analyst incorporates the required services, the project can be deployed to Oracle BPM runtime.
8.2.1 Introduction to Edit Policies
Project templates also allow you to define edit policies for processes and flow objects within a process. Edit policies determine what parts of a process can be changed or edited when creating a new project based on a project template. Edit policies are defined for the entire process. However, you can also define edit policies for individual flow objects.
See the Modeling and Implementation Guide for Oracle Business Process Management for information on defining edit policies in a process template.
Edit policies allow the creator of a project template to define what elements of a process can and cannot be changed when a project is created from a template.
Note:
You cannot change the edit policy settings of processes and elements using Business Process Composer.8.2.1.1 Process Level Edit Policies
Within a project template, each process contains an edit policy which determines the changes you can make to the process using Business Process Composer.
Table 8-1 describes the process level edit policies.
8.2.1.2 Component Level Edit Policies
Within a process, there are also edit policies that apply to the flow objects within a process. Component level edit policies can be configured for the flow objects within a process.
Table 8-2 describes the edit policies values that can be configured for component level edit policies.
Table 8-2 Component Level Edit Policies
| Edit Policy | Description |
|---|---|
|
Sealed |
The flow object cannot be modified |
|
Can modify implementation |
The user may redefine this flow object if necessary. |
|
Must implement |
The user is required to assign a component from the business catalog to this flow object for it to function correctly. |
|
Use process permission |
Uses the default edit policy defined by the process. |
8.2.2 About Using Data Objects and Variables in Project Templates
A project template can define the data objects used within a project. These can be the Oracle BPM default types or complex data objects created by process template developers within Oracle BPM Studio.
When editing a project based on a project template in Business Process Composer, you can add and create new data objects as necessary. However, you can only create new data objects based on types that are previously defined in the project template. You cannot create new types of complex data objects.
You can use any of the data objects defined in a project template in data associations and expressions. See Section 12, "Handling Data in Your Business Processes" for more information.
8.3 Working with Project Templates
Using Business Process Composer you can create new projects based on project templates.
To create a new project from a project template:
-
Launch Business Process Composer.
-
From the main menu select New, then select New Project.
-
Enter a name for you project
-
Select Use Template, then click Choose.
-
Select the template you want to use.
-
Optionally, choose the folder where you want to store the new project.
-
Click Next
-
From the drop-down list, choose the type of approval routing you want to configure for the project.
Note:
You can change the type of approval routing after you create the new project. -
Click Choose, then select Users or Groups from the drop-down menu in the browser.
-
Click Search to see a list of available users or groups.
-
Select an item from the Available list, then click Move selected items to other list.
-
Click OK.
-
Click Finish to create the new project.
8.4 Working with Project Snapshots
A project snapshot is a read-only copy of a project at a particular moment. Since snapshots are read-only, they cannot be modified or opened for editing. You can view the contents of a project snapshot as well as export and deploy a project based on a snapshot.
8.4.1 How to Create a New Project Snapshot
You can create a new project snapshot from the Project Welcome Page.
To create a new project snapshot:
Users with owner and editor permissions on a project can create new snapshots.
-
Go to the Project Welcome Page, then expand Snapshots.
-
Click New.
-
Enter a name for your snapshot, then click Create Snapshot.
The snapshot appears in the list of snapshots defined for this project, including the date the snapshot was created and the user ID of the snapshot creator.
8.4.2 How to View the Contents of a Project Snapshot
Viewing the contents of a project snapshot enables you to view and compare previous version of a project with the current one.
To view the contents of a project snapshot:
-
Go to the Project Welcome Page.
-
Expand Snapshots, then click the name of the snapshot you want to view.
Within the snapshot view, you can view the state of the processes, rules, and human tasks associated with the project.
8.4.3 How to Return to the Active Version of a Project
To return to the active version of a project from a project snapshot, click the Back to Active Version button at the top of the Project Welcome Page.
8.4.4 How to Delete a Project Snapshot
Using Business Process Composer a user who is granted the editor role of a project can delete the snapshots they created. A user who is granted the owner or administrator role of a project can delete any snapshot created by any user.
-
Open your project.
-
From the Project Welcome Page, expand Snapshots.
-
Select the snapshot you want to delete from the list, then click Delete.
-
Click Yes to confirm that you want to delete the project snapshot.
Once you delete a project snapshot, it cannot be recovered.
8.4.5 How to Export a Project Snapshot
You can use Business Process Composer to export a project snapshot. Project snapshots are exported as normal BPM projects which you can deploy, share with other users, etc.
-
Open your project.
-
View the project snapshot you want to export.
See Section 8.4.2, "How to View the Contents of a Project Snapshot" for more information.
-
From the main menu, select Export, then Export Project.
-
Choose a location on your local file system and click Save.
The exported project snapshot is saved as an .EXP file on your file system.
8.4.6 How to Deploy a Project Snapshot
You can use Business Process Composer to deploy a project snapshot directly to runtime. This enables you to test or revert back to an older version of a project.
-
Open your project.
-
View the project snapshot you want to deploy.
See Section 8.4.2, "How to View the Contents of a Project Snapshot" for more information.
-
From the main menu, select Deploy Project.
-
Provide the information as shown in Figure 15-1.
-
Click Deploy.