5 Managing Oracle WebCenter Portal on IBM WebSphere
This chapter contains information about installing, building, and managing WebCenter Portal, WebCenter Portal Framework applications, and related components on IBM WebSphere.
This chapter contains the following topics:
-
Differences Installing and Configuring Oracle WebCenter Portal on IBM WebSphere
-
Differences Developing and Deploying Portal Framework Applications on IBM WebSphere
-
Differences Managing Oracle WebCenter Portal Components on IBM WebSphere
-
Patching Oracle WebCenter Portal on IBM WebSphere from 11.1.1.7 to 11.1.1.8
-
Patching Oracle WebCenter Portal on IBM WebSphere from 11.1.1.6 to 11.1.1.8
-
Upgrading WebCenter Portal Framework Applications to 11.1.1.8
5.1 Overview - Roadmaps
The roadmaps in this section provide an overview of the steps required to install and configure Oracle WebCenter Portal on IBM WebSphere and point you to more detailed documentation. The steps required depend on whether you want to use the out-of-the-box WebCenter Portal application or build your own Portal Framework applications using JDeveloper. For details, see:
Click the flow charts for more information on how to complete each step.
Note:
If you have an existing Oracle WebCenter Portal installation (11.1.1.7.0) on IBM WebSphere, and you want to apply the latest patch (11.1.1.8.0), follow the patching steps in Section 5.5, "Patching Oracle WebCenter Portal on IBM WebSphere from 11.1.1.7 to 11.1.1.8."For general information about Oracle's support for IBM WebSphere Application Server, such as supported versions, see Section 1.3.1, "Supported IBM WebSphere Application Servers."
5.1.1 Getting WebCenter Portal Up and Running on IBM WebSphere
Figure 5-1 illustrates the installation and configuration process for WebCenter Portal in a simple, non-clustered environment.
Figure 5-1 Getting WebCenter Portal Up and Running on IBM WebSphere
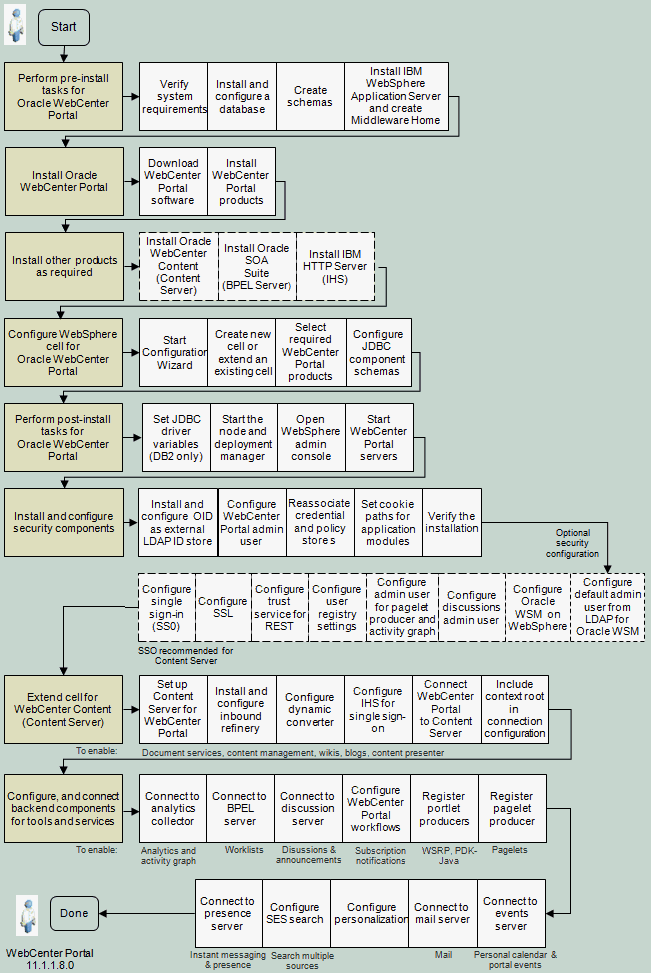
Description of "Figure 5-1 Getting WebCenter Portal Up and Running on IBM WebSphere"
Note:
For deployment in a clustered environment, see Section 3.4, "Configuring Oracle Fusion Middleware High Availability on IBM WebSphere" and Section 5.2.19, "Configuring WebCenter Portal or Portal Framework Applications for High Availability on IBM WebSphere."Click the flow chart or use Table 5-1 to navigate to the appropriate documentation.
Table 5-1 Getting WebCenter Portal Up and Running on IBM WebSphere - Simple Topology
| Task and link to more information | Mandatory or Optional? | Notes |
|---|---|---|
|
Mandatory |
See also, Section 2.1, "Task 1: Review the System Requirements and Certification Information." |
|
|
Mandatory |
For up-to-date information about which Oracle or IBM DB2 database versions are supported with IBM WebSphere Application Server, refer to the certification matrix on Oracle Technology Network (OTN). For details, see Section 2.1, "Task 1: Review the System Requirements and Certification Information." |
|
|
Mandatory |
||
|
Install IBM WebSphere Application Server and create Middleware Home |
Mandatory |
|
|
Mandatory |
||
|
Install other products as required: |
Optional |
Oracle WebCenter Content is mandatory for content presenter, wikis and blogs, and recommended for the documents tool and WebCenter Portal. SOA is mandatory for worklists portal workflows. IHS is recommended for Oracle WebCenter Content Server integration and for single sign-on (SSO) since SSO is needed to stop multiple login prompts), and is required for REST and SOA. |
|
Mandatory |
||
|
Perform general post-install tasks for WebCenter Portal: |
Mandatory |
|
|
Install and configure mandatory security components: |
Mandatory |
An external LDAP server is mandatory on IBM WebSphere. The WebCenter Portal application requires an Oracle Internet Directory LDAP server. |
|
Configure optional security components:
|
Optional |
Oracle Web Services Manager (WSM) |
|
Extend cell for Oracle WebCenter Content Server: |
Mandatory |
Mandatory for content presenter, wikis and blogs, and recommended for the documents tools. |
|
Install and configure back-end components for tools and services: |
Optional |
Mandatory for the tools and services you want to use |
5.1.2 Creating a WebSphere Cell for Portal Framework Application Deployments
Figure 5-2 illustrates the installation and configuration process if you want to build your own portal applications (referred to as Portal Framework application) and deploy them in a simple, non-clustered environment.
Note:
For deployment in a clustered environment, see Section 3.4, "Configuring Oracle Fusion Middleware High Availability on IBM WebSphere" and Section 5.2.19, "Configuring WebCenter Portal or Portal Framework Applications for High Availability on IBM WebSphere."Click the flow chart or use Table 5-2 to navigate to the appropriate documentation.
Figure 5-2 Creating a WebSphere Cell for Portal Framework Application Deployments
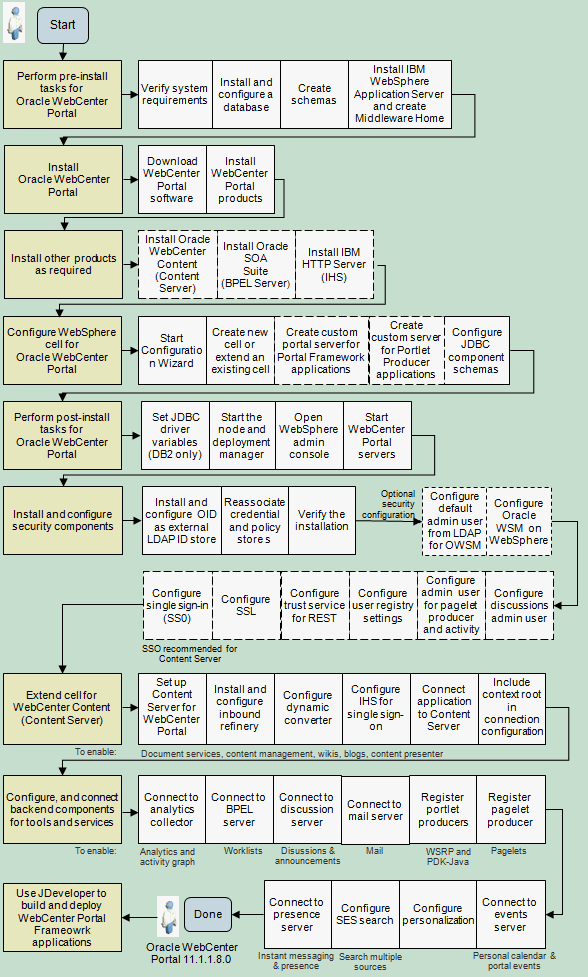
Description of "Figure 5-2 Creating a WebSphere Cell for Portal Framework Application Deployments"
Note:
For deployment in a clustered environment, see Section 3.4, "Configuring Oracle Fusion Middleware High Availability on IBM WebSphere" and Section 5.2.19, "Configuring WebCenter Portal or Portal Framework Applications for High Availability on IBM WebSphere."Click the flow chart or use Table 5-2 to navigate to the appropriate documentation.
Table 5-2 Creating a WebSphere Cell for Portal Framework Application Deployments - Simple Topology
| Task and link to more information | Mandatory or Optional? | Notes |
|---|---|---|
|
Mandatory |
See also, Section 2.1, "Task 1: Review the System Requirements and Certification Information." |
|
|
Mandatory |
For up-to-date information about which Oracle or IBM DB2 database versions are supported with IBM WebSphere Application Server, refer to the certification matrix on Oracle Technology Network (OTN). For details, see Section 2.1, "Task 1: Review the System Requirements and Certification Information." |
|
|
Mandatory |
||
|
Install IBM WebSphere Application Server and create Middleware Home |
Mandatory |
|
|
Mandatory |
||
|
Install other products as required: |
Optional |
Oracle WebCenter Content is mandatory for content presenter, wikis and blogs, and documents tools. SOA is mandatory for the worklists. IHS is recommended for Oracle WebCenter Content Server integration and for single sign-on (SSO) since SSO is needed to stop multiple login prompts), and is required for REST and SOA. |
|
Create new WebSphere cell for the Portal Framework application: |
Mandatory |
Oracle does not recommend deploying Portal Framework applications or Portlet Producer applications to the Administration Server or any of the default managed servers created during Oracle WebCenter Portal installation. |
|
Perform post-install tasks for WebCenter Portal Framework deployments: |
Mandatory |
|
|
Install and configure mandatory security components: |
Mandatory |
An external LDAP server is mandatory on IBM WebSphere. All Portal Framework applications require an Oracle Internet Directory LDAP server. |
|
Configure optional security components:
|
Optional |
Oracle Web Services Manager (WSM) |
|
Extend cell for Oracle WebCenter Content Server: |
Optional |
Mandatory for content presenter, wikis and blogs, and documents tool. |
|
Configure, and connect back-end components for the Portal Framework application: |
||
|
Use JDeveloper to build and deploy Portal Framework applications. |
5.2 Differences Installing and Configuring Oracle WebCenter Portal on IBM WebSphere
This section describes differences between installing and configuring Oracle WebCenter Portal install on WebLogic Server and IBM WebSphere:
-
Installing Oracle WebCenter Portal Products on IBM WebSphere
-
Configuring an IBM WebSphere Cell for Portal Framework Applications
-
Configuring an IBM WebSphere Cell for Portlet Producer Applications
-
Performing General Post-install Tasks for Oracle WebCenter Portal on WebSphere
-
Installing and configuring mandatory security components:
-
Optional security configuration:
-
Cloning Oracle WebCenter Portal Installations on IBM WebSphere
-
Configuring WebCenter Portal or Portal Framework Applications for High Availability on IBM WebSphere
5.2.1 Installing Oracle WebCenter Portal Products on IBM WebSphere
Use the Oracle WebCenter Portal installer to install the binaries for all Oracle WebCenter Portal products on IBM WebSphere. The instructions are similar to those provided for Oracle WebLogic Server in the "Installing Oracle WebCenter Portal" section in Oracle Fusion Middleware Installation Guide for Oracle WebCenter Portal.
There are a few differences when installing on IBM WebSphere. For details see Section 2.5.2, "Special Instructions When Installing Oracle Fusion Middleware with IBM WebSphere."
5.2.2 Configuring an IBM WebSphere Cell for WebCenter Portal
To configure an IBM WebSphere cell for the out-of-the-box WebCenter Portal application:
-
Start the IBM WebSphere version of Oracle Fusion Middleware Configuration Wizard:
WCP_ORACLE_HOME/common/bin/was_config.shFor details, see the "Using the Configuration Wizard" section in the Oracle Fusion Middleware Configuration Guide for IBM WebSphere Application Server.
-
Select the appropriate configuration option, such as Create and Configure Cell, click Next.
-
On the Add Products to Cell screen:
-
Select the Oracle WebCenter Portal product you want to install, such as the Discussions Server, Portlet Producers, Analytics Collector.
Note:
Do not select all the WebCenter Portal products you want to configure at once. Choose a single product (with all of its dependent products), complete the wizard, and then repeat step 3 to configure other product groups. -
Click Next, and complete the wizard.
For details, see the "Selecting Oracle WebCenter Portal Products for Configuration" section in Oracle Fusion Middleware Installation Guide for Oracle WebCenter Portal.
-
-
Repeat step 3 to configure another WebCenter Portal product, if required.
5.2.3 Configuring an IBM WebSphere Cell for Portal Framework Applications
If you want to deploy Portal Framework applications built using JDeveloper to an IBM WebSphere application server you must configure a suitable server using Oracle WebCenter Portal's Custom Portal Template.
For Custom Portal Template to display in the Oracle Fusion Middleware Configuration Wizard you need to set a system property before you run the Configuration Wizard:
Note:
This step is not required if you are configuring a cell for the out-of-the-box application WebCenter Portal.-
Set the JVM_ARG environment variable:
setenv CONFIG_JVM_ARGS -DTemplateCatalog.enable.selectable.all=true
-
Start the IBM WebSphere version of Oracle Fusion Middleware Configuration Wizard using:
WCP_ORACLE_HOME/common/bin/was_config.sh.For details, see the "Using the Configuration Wizard" section in Oracle Fusion Middleware Configuration Guide for IBM WebSphere Application Server.
-
On the Select Domain Source screen, select Base this domain on an existing template, and click Browse to locate the template:
-
On UNIX operating systems, the template is located at:
WCP_ORACLE_HOME/common/templates/was/oracle.wc_custom_portal_template_11.1.1.jar -
On Windows operating systems, the template is available here:
WCP_ORACLE_HOME\common\templates\was\oracle.wc_custom_portal_template_11.1.1.jar
For details, see the "Creating a Portal Managed Server for Portlet Producer Applications" section in Oracle Fusion Middleware Installation Guide for Oracle WebCenter Portal.
-
5.2.4 Configuring an IBM WebSphere Cell for Portlet Producer Applications
If you want to deploy Portlet Producer applications built using JDeveloper to an IBM WebSphere application server you must configure a suitable server using Oracle WebCenter Portal's Custom Services Producer Template.
For Custom Services Producer Template to display in the Oracle Fusion Middleware Configuration Wizard you need to set a system property before you run the Configuration Wizard:
Note:
This step is not required if you are configuring a cell for the out-of-the-box application WebCenter Portal.-
Set the JVM_ARG environment variable:
setenv CONFIG_JVM_ARGS -DTemplateCatalog.enable.selectable.all=true
-
Start the IBM WebSphere version of Oracle Fusion Middleware Configuration Wizard:
WCP_ORACLE_HOME/common/bin/was_config.shFor details, see the "Using the Configuration Wizard" section in Oracle Fusion Middleware Configuration Guide for IBM WebSphere Application Server.
-
On the Select Domain Source screen, select Base this domain on an existing template, and click Browse to locate the template:
-
On UNIX operating systems, the template is located at:
WCP_ORACLE_HOME/common/templates/was/oracle.wc_custom_services_producer_template_11.1.1.jar -
On Windows operating systems, the template is available here:
WCP_ORACLE_HOME\common\templates\was\oracle.wc_custom_services_producer_template_11.1.1.jar
For details, see the "Creating a Portal Managed Server for Portlet Producer Applications" section in Oracle Fusion Middleware Installation Guide for Oracle WebCenter Portal.
-
5.2.5 Performing General Post-install Tasks for Oracle WebCenter Portal on WebSphere
This section includes the following topics:
5.2.5.1 Setting JDBC Driver Variables (DB2 only)
If you are using a DB2 database, you must set the following environment variables to include the full path to db2jcc4.jar, db2jcc_license_cu.jar and db2jcc_license_cisuz.jar:
-
DB2_JCC_DRIVER_NATIVEPATH -
DB2_JCC_DRIVER_PATH
You must do this immediately after installing Oracle WebCenter Portal products using the Configuration Wizard. If you do not do this, all DB2 connection tests will fail.
If you are deploying your own Portal Framework applications to IBM WebSphere, you must also set these two environment variables at the Deployment Manager scope. If you do not, the JDeveloper MDS deployment wizard cannot query or allow configuration to DB2 back-end MDS repositories, and this causes issues at application runtime.
Note:
Some additional steps are required to enable theMDS schema to run on a DB2 database. If you have not done so already, read the "Notes for Using an IBM DB2 Database for the MDS Schema" section in Oracle Fusion Middleware System Requirements and Specifications.To set DB2 driver environment variables:
-
Log in to the IBM WebSphere Administrative Console:
https://host:port/ibm/console
-
Navigate to Environment > WebSphere variables
-
Set DB2 driver variables for the server node:
-
From the Scope drop down, select the node containing your Oracle WebCenter Portal installation.
-
Locate and set the following JBDC variables:
DB2_JCC_DRIVER_NATIVEPATHDB2_JCC_DRIVER_PATHSpecify the location of the required DB2 drivers (
db2jcc4.jar,db2jcc_license_cu.jaranddb2jcc_license_cisuz.jar).Refer to your IBM WebSphere documentation to find the location of these drivers. Look for the topic entitled "Data source minimum required settings for DB2 with the application server" or similar.
-
Save both settings.
-
-
If you are using a cluster, repeat step 3 for each node in the cluster.
-
To test the DB2 connection:
-
Navigate to Resources > JDBC >Data sources.
-
Select a data source in the table, and click Test Conection.
-
-
If you are deploying your own Portal Framework applications to IBM WebSphere, repeat step 3 at the Deployment Manager scope.
-
From the Scope drop down, select the Node=ManagerNode, Server=dmgr scope where ManagedNode maps to the Manage Node of your installation.
-
Create and set JBDC variables, as above:
DB2_JCC_DRIVER_NATIVEPATHDB2_JCC_DRIVER_PATH -
Save both settings.
-
5.2.5.2 Starting the Node Agent and Deployment Manager
After using the Configuration Wizard to install and configure Oracle WebCenter Portal products on IBM WebSphere, start up the deployment manager for the cell and the application node as described in Section 2.7, "Task 7: Start the IBM WebSphere Servers."
The IBM WebSphere Administration Console is accessible after starting the node and deployment manager.
5.2.5.3 Opening IBM WebSphere Administrative Console
IBM WebSphere Administrative Console provides a web-based interface for managing the IBM WebSphere environment. The IBM WebSphere Administrative Console is similar to Oracle WebLogic Server Administration Console, that is, while you cannot use the console to manage Oracle WebCenter Portal products, you can use the console to monitor and manage the cell and the servers on which Oracle WebCenter Portal and other Oracle Fusion Middleware products are deployed. For more information, see Section 3.1.1, "Using the WebSphere Administrative Console."
5.2.5.4 Starting WebCenter Portal Servers
After installing and configuring Oracle WebCenter Portal on IBM WebSphere and starting both the deployment manager and node, you can start the Oracle WebCenter Portal servers using the IBM WebSphere Administrative Console or Fusion Middleware Control. For details, see Section 2.7, "Task 7: Start the IBM WebSphere Servers."
The default names for Oracle WebCenter Portal servers in a WebCenter Portal installation are:
-
WC_Spaces
-
WC_Collaboration
-
WC_Portlet
-
WC_Utilities
The default names for Oracle WebCenter Portal servers for Portal Framework applications and portlet producer deployments are:
-
WC_CustomPortal (Portal Framework applications)
-
WC_CustomServicesProducer (Portlet producer applications)
5.2.6 Installing External LDAP ID Store for WebCenter Portal or Portal Framework Applications
An LDAP server is not automatically installed and configured when you install Oracle WebCenter Portal products on IBM WebSphere. Before you can configure Oracle WebCenter Portal, you must install and configure Oracle Internet Directory (OID) as the external LDAP ID store for WebCenter Portal or your Portal Framework applications. For instructions on how to set up external LDAP ID stores, such as Oracle Internet Directory, see Section 9.1, "IBM WebSphere Identity Stores."
Note:
WebCenter Portal and all Portal Framework applications must use Oracle Internet Directory (OID).Once the LDAP ID store is set up, you must set the CONNECTION_POOL_CLASS property in cell's jps-config.xml. For details, Section 5.2.6.1, "Setting the Connection Pool on IBM WebSphere When Connecting to an External LDAP Server."
5.2.6.1 Setting the Connection Pool on IBM WebSphere When Connecting to an External LDAP Server
To avoid excessive database connections, you must add the following <serviceInstance> entry to the cell's jps-config.xml:
<property name="CONNECTION_POOL_CLASS" value="oracle.security.idm.providers.stdldap.JNDIPool"/>
-
Modify
jps-config.xmlusing a text editor:-
Open the following file:
WAS_HOME/profiles/dmgr_profile_name/
     config/cells/myCell/fmwconfig/jps-config.xml
Where
Dmgr01maps to the Deployment Manager name, andmyCellmaps to the cell name. -
Specify the following:
<serviceInstance name="idstore.ldap.0" provider="idstore.ldap.provider">
            <property name="subscriber.name" value="dc=us,dc=oracle,dc=com"/>
            <property name="CONNECTION_POOL_CLASS" value="oracle.security.idm.providers.stdldap.JNDIPool"/>
            <property name="bootstrap.security.principal.key" value="bootstrap_idstore"/>
            <property name="idstore.type" value="OID"/>
            <property name="ldap.url" value="ldap://example.com:3060"/>
            <property name="bootstrap.security.principal.map" value="BOOTSTRAP_JPS"/>
            <property name="user.login.attr" value="mail"/>
            <property name="username.attr"  value="mail"/>
            <extendedProperty>
                <name>user.search.bases</name>
                <values>
                    <value>cn=Users,dc=us,dc=oracle,dc=com</value>
                </values>
            </extendedProperty>
            <extendedProperty>
                <name>group.search.bases</name>
                <values>
                    <value>cn=Groups,dc=us,dc=oracle,dc=com</value>
                </values>
            </extendedProperty>
        </serviceInstance>
-
-
Restart all the servers.
5.2.7 Configuring an Admin User for WebCenter Portal
After installing Oracle WebCenter Portal products on IBM WebSphere and setting up your LDAP ID store, you must manually grant the WebCenter Portal administrator role to a user in the ID store.
You can configure the administrative user through Fusion Middleware Control or use the Opss.grantAppRole wsadmin command as shown in this example:
Opss.grantAppRole(appStripe='webcenter', appRoleName='s8bba98ff_4cbb_40b8_beee_296c916a23ed#-#Administrator',principalClass='weblogic.security.principal.WLSUserImpl', principalName='myadmin')
For more information, see the "Granting the WebCenter Portal Administrator Role" section in Oracle Fusion Middleware Administering Oracle WebCenter Portal.
Note:
Oracle Fusion Middleware Administering Oracle WebCenter Portal describes how to run the equivalent WebLogic WLST command. The way you run IBM WebSphere wsadmin commands is slightly different to WLST, so if you are new to wsadmin, refer to Section 5.4.1, "Running Oracle WebCenter Portal wsadmin Commands."5.2.8 Configuring an Admin User for the Discussions Server
If you chose to install Oracle WebCenter Portal's Discussion Server while installing Oracle WebCenter Portal on WebSphere you must configure an administrative user for the discussions server using the wsadmin command WebCenter.addDiscussionsServerAdmin.
For example:
WebCenter.addDiscussionsServerAdmin(appName='owc_discussions_11.1.1.4.0',name='myadmin',type='USER')
Where:
-
myadminis a user in the identity store with administrative privileges in the portal application. -
owc_discussions_11.1.1.4.0is the name of the discussion server application installed on IBM WebSphere.
For information on how to run WebCenter Portal wsadmin commands, see Section 5.4.1, "Running Oracle WebCenter Portal wsadmin Commands".
See also, "addDiscussionsServerAdmin" in Oracle Fusion Middleware WebLogic Scripting Tool Command Reference.
Note:
After adding an admin user using wsadmin you must restart the WC_Collaboration server.5.2.9 Configuring an Admin User for Pagelet Producer and Activity Graph Applications
If you chose to install Oracle WebCenter Pagelet Producer or Oracle WebCenter Activity Graph Engines while installing Oracle WebCenter Portal on WebSphere you must assign administrative permissions to an appropriate user or a group through the following roles:
| Application Name | Admin Role |
|---|---|
| pageletproducer | EnsembleAdmin |
| activitygraph-engines | activity-graph-admins |
To configure administrators:
-
Log in to the IBM WebSphere Administrative Console.
-
Navigate to Applications > Application Types > WebSphere enterprise applications.
-
Configure an administrative user for the Pagelet Producer admin application:
-
Select pageletproducer.
-
Click Security role to user/group mapping.
-
Select the EnsembleAdmin role and the click either Map Users... or Map Groups... to assign one or more users/groups to this admin role.
-
Click OK.
-
-
Configure administrative user for the Activity Graph Engine application:
-
Select activitygraph-engines_11.1.1.6.0.
-
Click Security role to user/group mapping.
-
Select the activity-graph-admins role and the click either Map Users... or Map Groups... to assign one or more users/groups to this admin role.
-
Click OK.
-
-
Restart WC_Portlet (pageletproducer) and WC_Utilities (activitygraph-engines), as required.
5.2.10 Reassociating the Credential and Policy Store
When you install Oracle WebCenter Portal products on IBM WebSphere Application Server, you must reassociate your credential and policy store with an external LDAP (either Oracle Internet Directory 11gR1 or 10.1.4.3), or an Oracle database. For detailed steps see the "Configuring the Policy and Credential Store" section in Oracle Fusion Middleware Administering Oracle WebCenter Portal.
5.2.11 Setting Cookie Paths for WebCenter Portal and Portal Framework Application Modules Post Deployment
By default, applications deployed on IBM WebSphere have their cookie path set to "/". This default setting means that all applications on the same IBM WebSphere cell share the same session identifier and therefore, as you move between applications, the session identifier value for the previous application is overwritten. For example, if you access WebCenter Portal (/webcenter), access Enterprise Manager (/em), and then move back to WebCenter Portal (/webcenter) you are prompted to log in to WebCenter Portal again because the previous session identifier value is overwritten at the point when you log in to Enterprise Manager (/em).
To avoid session invalidation as you move between applications, specify a unique cookie path for each application:
-
Log in to the IBM WebSphere Administrative Console.
https://host:port/ibm/console
-
Navigate to Applications > WebSphere enterprise applications.
-
Select the name of your application from the list.
For example, the name of the WebCenter Portal application is
webcenter. -
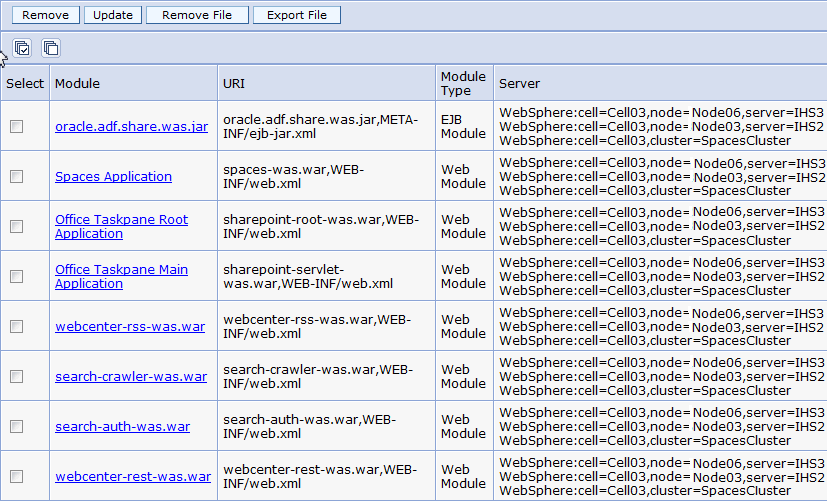
Click Manage Modules (Figure 5-3).
Figure 5-3 Enterprise Applications - Manage Modules
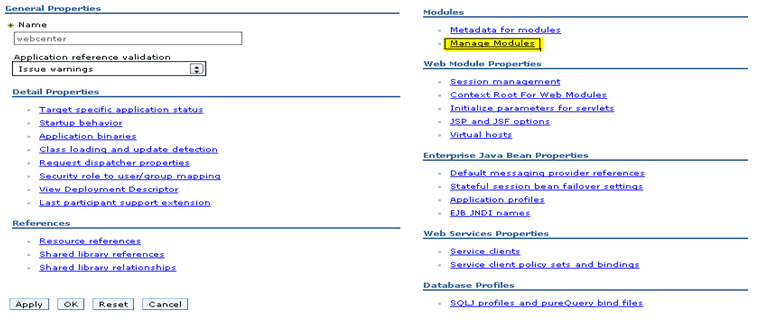
Description of "Figure 5-3 Enterprise Applications - Manage Modules"
A list of modules displays (Figure 5-4).
-
Set the cookie path for each module listed in Table 5-3:
Table 5-3 Cookie Paths for Oracle WebCenter Portal Modules
Module Name Cookie Path spaces-was.war
/webcenter
webcenter-rest-was.war
/rest
search-crawler-was.war
/rsscrawl
webcenter-rss-was.war
/rss
sharepoint-servlet-was.war
/wcsdocs
-
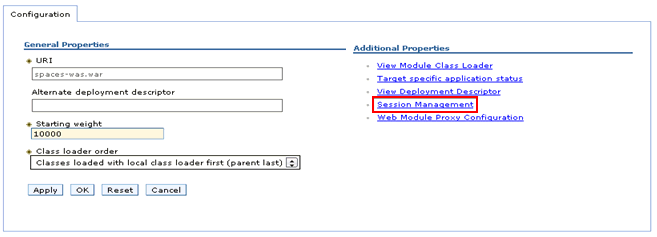
Click the module name, for example spaces-was.war (WebCenter Portal application).
-
Click Session Management (Figure 5-5).
-
Select the Enable cookies check box (Figure 5-6).
Figure 5-6 Configure Module - Enable Cookies
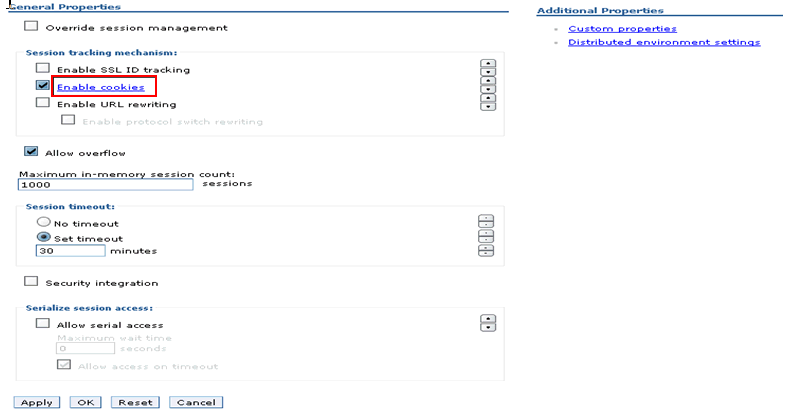
Description of "Figure 5-6 Configure Module - Enable Cookies"
-
Click Enable cookies link.
-
Enter the appropriate cookie path for the selected module (Figure 5-7). For details, see Table 5-3.
Figure 5-7 Configure Module - Set Cookie Path
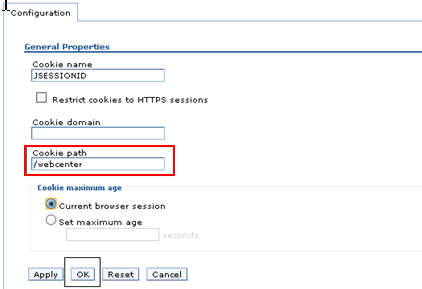
Description of "Figure 5-7 Configure Module - Set Cookie Path"
-
Click OK and then Save.
-
Select the Override session management check box.
-
(In a clustered environment only) Select the Distributed environment settings link, select Memory-to-memory replication, and then click OK.
-
Click OK.
-
Repeat steps a through j for each module listed in Table 5-3.
-
-
Restart the server on which the WebCenter Portal application is deployed.
-
Navigate to Servers > WebSphere Application servers.
-
Select the WC_Spaces check box, and click Restart (Figure 5-8).
-
5.2.12 Verifying a WebCenter Portal Installation on IBM WebSphere
To verify your WebCenter Portal installation, start your browser and enter the following URLs:
-
To access the IBM WebSphere Administration Server console:
https://dmgr_server_host:WC_Adminhost_port/ibm/console
You will be prompted for the username and password credentials that you specified on the Specify Deployment Manager Information screen of the Configuration Wizard.
To discover the port numbers required to access individual servers, such as WC_Spaces, OracleAdminServer, and so on, navigate to the server in the IBM WebSphere Administration Server console, select the Ports link and look for "WC_defaulthost". See also, Section 3.1.1.2, "Locating the Port Number and URL of the IBM WebSphere Administrative Console."
-
To access Enterprise Manager:
http://OracleAdminServer_host:OracleAdminServer_port/em -
To access the out-of-the-box WebCenter Portal application:
http://WC_Spaces_server_host:WC_Spaces_server_port/webcenter
The default port number for WebCenter Portal is 8888.
-
To access the pagelet producer:
http://WC_Portlet_server_host:WC_Portlet_server_port
The default port number for pagelet producer is 8889.
To access the pagelet producer console:
http://WC_Portlet_server_host:WC_Portlet_server_port/pageletadmin
-
To access the analytics collector, activity graph engines, and personalization:
http://WC_Utilities_server_host:WC_Utilities_server_port/activitygraph-engines
To access activity graph engines:
http://WC_Utilities_server_host:Wc_Utilities_server_port/activitygraph-engines/Login.jsp
To access personalization:
http://WC_Utilities_server_host:Wc_Utilities_server_port/wcps/api/property/resourceIndex
The default port number for analytics collector, activity graph engines, and personalization is 8891.
-
To access OmniPortlet and Web Clipping portlets:
http://WC_Portlet_server_host:WC_Portlet_server_port/portalTools/
The default port number for portlets is 8889.
-
To access the discussions server:
http://WC_Collaboration_server_host:WC_Collaboration_server_port/owc_discussions
The default port number for the discussions server is 8890.
5.2.13 Configuring User Registry Settings for External LDAP ID Store
Several additional user registry settings may be required after configuring the external LDAP ID store:
-
Enable nested user group searching - IBM WebSphere supports nested user groups however, they are not automatically included in LDAP searches as enabling them impacts performance. If your Oracle WebCenter Portal installation utilizes nested user groups you can enable this feature.
-
Configure the user login attribute - If required, you can set the user login attribute to an attribute other than
cn. For example, if set tomail, LDAP searches utilize the username that is used to log in to WebCenter Portal or Portal Framework application.
To configure these settings:
-
Log in to the IBM WebSphere Administrative Console.
-
Navigate to Global security > Standalone LDAP registry.
-
Under Additional properties, click Advanced Lightweight Directory Access Protocol (LDAP) user registry settings.
-
Specify the user login attribute in User filter and User ID map (Figure 5-9).
For example, to configure the
mailattribute, enter:-
User filter - (&(mail=%v)(objectclass=inetOrgPerson))
-
User ID map - inetOrgPerson:mail
Figure 5-9 Advanced LDAP User Registry Settings
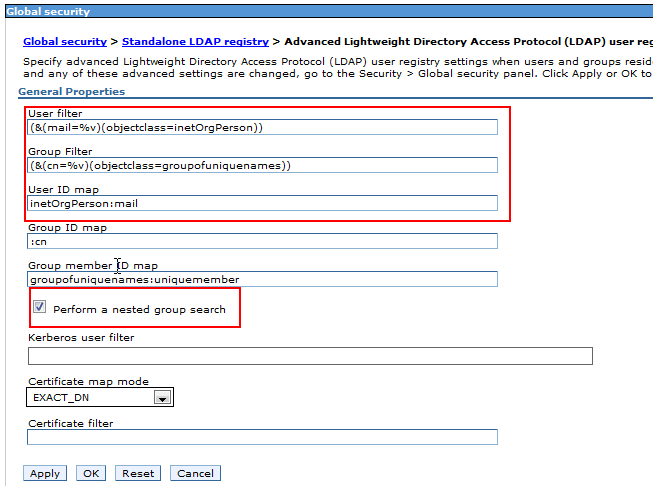
Description of "Figure 5-9 Advanced LDAP User Registry Settings"
-
-
Select the Perform a nested group search check box.
-
Click OK.
-
Modify
jps-config.xmlusing a text editor:-
Open the
MW_HOME/user_projects/domains/my_domain/config/fmwconfig/jps-config.xml -
Specify the user login attribute in the LDAP properties user.login.attr and username.attr to mail.
For example, to configure the
mailattribute, enter:<serviceInstance provider="idstore.ldap.provider" name="idstore.ldap.0"> <!-- existing props ... -> <property name="user.login.attr" value="mail"/> <property name="username.attr" value="mail"/> <extendedProperty> ... ... </extendedProperty> </serviceInstance> -
Restart all the servers.
-
5.2.14 Configuring Trust Service Information for the REST Service
This section describes how to configure an identity asserter for the REST service.
-
Login to the IBM WebSphere Administrative Console.
-
Navigate to Security > Global Security.
-
In the Authentication section, expand Web and SIP security, and then click Trust Association.
-
Select the Enable trust association check box and save the changes.
-
In the Additional Properties section, click Interceptors.
-
Click New.
-
For Interceptor class name, enter the fully qualified Trust Service TAI name:
oracle.security.jps.was.providers.trust.TrustServiceAsserterTAI
The Trust Association Interceptor (TAI) class is in the
jps-was.jarfile located in the standard Oracle Platform Security Services (OPSS) jar distribution directory. -
Save the changes (Figure 5-10).
Figure 5-10 Configuring Trust Information
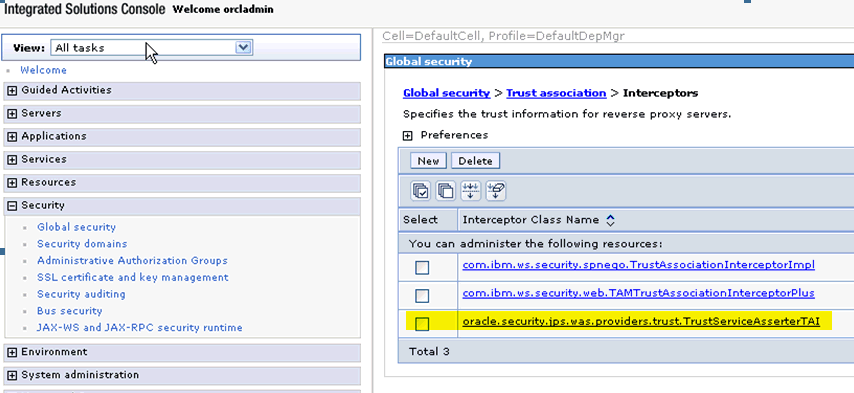
Description of "Figure 5-10 Configuring Trust Information"
5.2.15 Installing and Configuring IBM HTTP Server
This section describes how to install and configure an IBM HTTP Server to front end the WebSphere Application Server hosting Oracle WebCenter Portal. An IBM HTTP server is required to implement single sign-on for WebCenter Portal or Portal Framework applications and also for high availability environments. For more information about using the IBM HTTP Server, see:
To install and configure an IBM HTTP Server:
-
Install the IBM HTTP Server, and take note of the Server Name and the HTTP Port.
For detailed installation instruction, refer to IBM HTTP Server documentation. See also, Section 1.4, "Documentation Resources for Using Oracle Fusion Middleware on IBM WebSphere."
-
Configure the HTTP Server, specifying the server name and port you specified in step 1.
-
Log in to the IBM WebSphere Administrative Console.
-
Navigate to Servers >Web Servers > New.
-
Enter the Server name that you defined during IBM HTTP server installation. For example, webserver1 (Figure 5-11).
Ensure that the server type is IBM HTTP Server.
Figure 5-11 Configure HTTP Server - Server Name
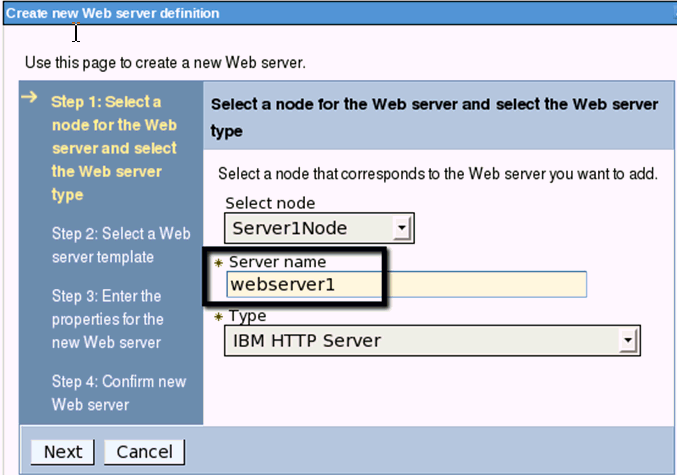
Description of "Figure 5-11 Configure HTTP Server - Server Name"
-
Click Next
-
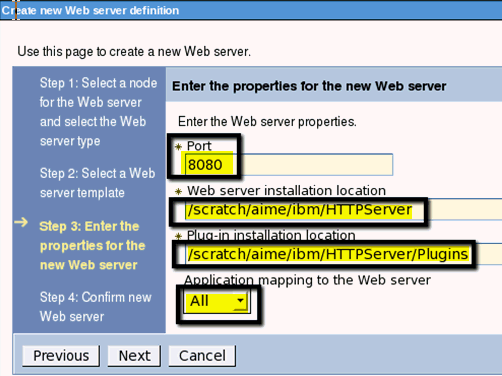
Enter the port that you defined during HTTP server installation. For example 8080 (Figure 5-12).
-
Click Next and Finish.
-
-
Create a virtual host entry to enable access to the port specified in step 1.
If the port is not accessible, error messages similar to that shown display:
SRVE0255E: A WebGroup/Virtual Host to handle /webcenter/ has not been defined.SRVE0255E: A WebGroup/Virtual Host to handle host:8080 has not been defined.-
In the WebSphere Administrative Console, navigate to Environment, Virtual Hosts> default_host> Host Aliases (Figure 5-13).
Figure 5-13 Configure Virtual Host -default_host
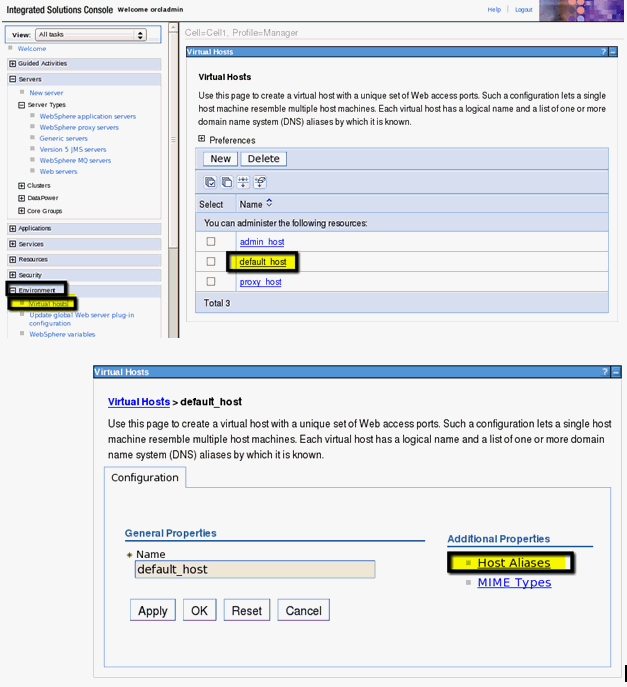
Description of "Figure 5-13 Configure Virtual Host -default_host"
-
On the Host Aliases page, select New.
-
For Port, enter the port number specified in step 1 (Figure 5-14).
Leave Host Name as *.
Figure 5-14 Configure default_host - Port
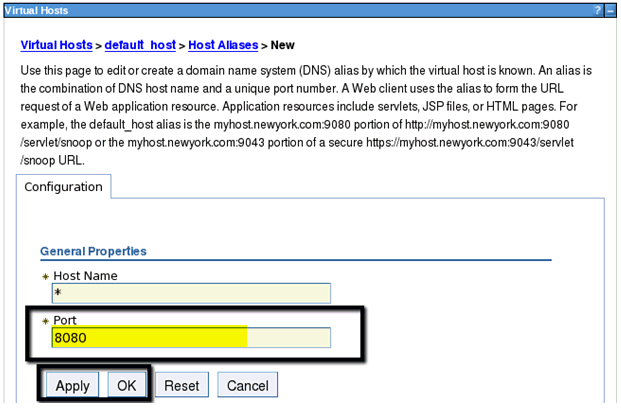
Description of "Figure 5-14 Configure default_host - Port"
-
-
Generate and propagate the Web Server plug-in that coordinates the wiring between the WebSphere Application Server and the HTTP Server front end.
Note: You must repeat this step each time there is a change to applications deployed on the servers.
-
In WebSphere Administrative Console, navigate to Servers >Web Servers and select the HTTP server that you created.
-
Click Generate Plug-in (Figure 5-15).
Figure 5-15 Configure HTTP Server - Generate Plug-in
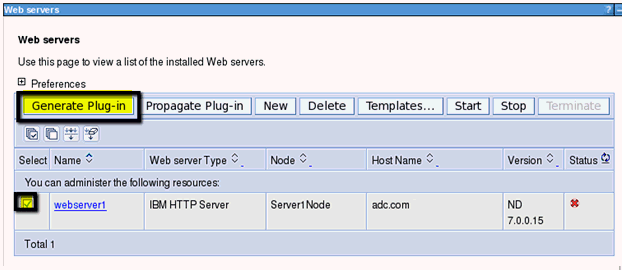
Description of "Figure 5-15 Configure HTTP Server - Generate Plug-in"
-
Click Propagate Plug-in (Figure 5-16).
Figure 5-16 Configure HTTP Server - Propagate Plug-in
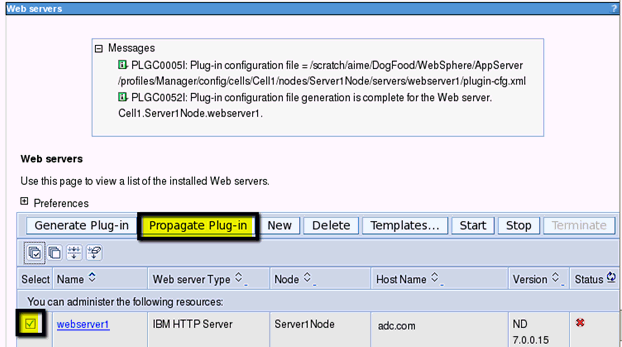
Description of "Figure 5-16 Configure HTTP Server - Propagate Plug-in"
-
-
Update the Web Server
httpd.conffile to refer to the correct plug-in file:-
Click the Web Server.
-
Next to Configuration file name, click Edit.
-
Scroll down to see the property WebSpherePluginConfig and confirm that it is pointing to the
plugin-cfg.xmlfile under this Web Server's directory name (for example,/IHS_HOME/Plugins/config/<WebServerName>/plugin-cfg.xml). -
Click Apply and then OK.
-
Click OK again to return to the Web Servers page.
-
-
Click Start.
Note: If the instance is already running, click Stop, then Start (Figure 5-17).
Figure 5-17 Configure HTTP Server - Start

Description of "Figure 5-17 Configure HTTP Server - Start"
-
Restart the WebSphere server on which the WebCenter Portal application is deployed.
-
Restart the HTTP server to enable the virtual host and Web Server plug-in.
The WebCenter Portal application should now be accessible on the HTTP Server port (Figure 5-18).
Figure 5-18 HTTP Server Port - Application Accessible
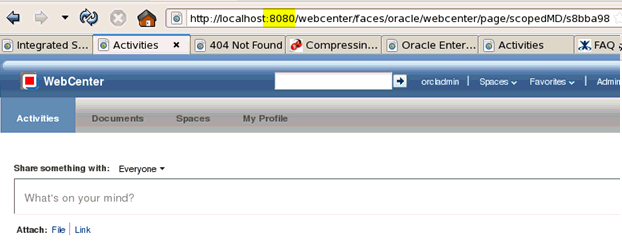
Description of "Figure 5-18 HTTP Server Port - Application Accessible"
5.2.16 Configuring Single Sign-On for WebCenter Portal or Portal Framework Applications
This section includes the following topics:
5.2.16.1 Configuring OAM 11g Single Sign-On
This section describes how to set up single sign-on for Oracle WebCenter Portal installations on IBM WebSphere, using Oracle Access Manager (OAM) 11g (Figure 5-19).
Note:
WebCenter Portal or Portal Framework applications deployed on IBM WebSphere support Oracle Access Manager (OAM) 11g. Earlier versions, such as Oracle Access Manager (OAM) 10g, are not supported on IBM WebSphere.Figure 5-19 Configuring OAM Single Sign-On for Oracle WebCenter Portal Installations on IBM WebSphere
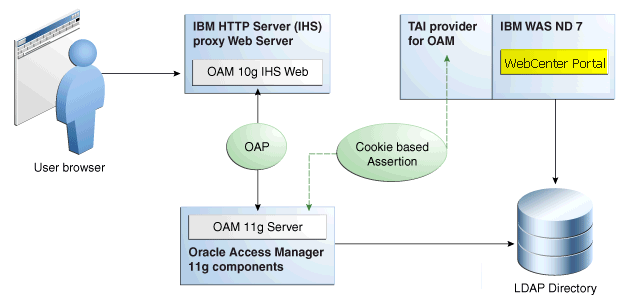
Description of "Figure 5-19 Configuring OAM Single Sign-On for Oracle WebCenter Portal Installations on IBM WebSphere"
Oracle Access Manager Identity Assertion Provider for IBM WebSphere can be used to provide authentication and single sign-on with Oracle Access Manager (OAM) 11g. Chapter 10, "Managing OAM Identity Assertion on IBM WebSphere" describes the Oracle Access Manager Identity Assertion Provider is detail. The purpose of this section is to guide you through single sign--on configuration requirements for WebCenter Portal and Portal Framework applications. The main steps are:
-
Install Oracle Access Manager 11g
-
Install and configure IBM HTTP Server
-
Register the WebGate agent
-
Restart IHS
-
Install WebGate 10g
-
Configure IBM WebSphere for OAM single sign-on
-
Configure logout details
-
Configure WebCenter Portal or Portal Framework applications to require certificate based authentication and SSO synchronization filter
-
Configure other Oracle WebCenter Portal components for single sign-on
To set up single sign-on for WebCenter Portal or Portal Framework, using OAM 11g:
-
Install Oracle Access Manager 11g.
See Chapter 10, "Managing OAM Identity Assertion on IBM WebSphere."
-
Install and configure IBM HTTP Server.
See Chapter 5, "Installing and Configuring IBM HTTP Server."
-
Register the WebGate agent on the machine where OAM 11g is installed before installing WebGate on IBM HTTP Server.
You can register the WebGate agent using the OAM Console or, if you have administrator rights, you can use the
oamregtool. Follow the steps below to register the WebGate agent using theoamregtool in inband mode.-
Navigate to the following directory on the Oracle Access Manager server:
IDM_HOME/oam/server/rreg/client/ -
On the command line, untar
RREG.tar.gzgunzip RREG.tar.gz tar -xvf RREG.tar
The tool used to register the agent is located in the following location:
(UNIX) RREG_HOME/bin/oamreg.sh
(Windows) RREG_HOME\bin\oamreg.bat
Note:
RREG_HOME is the directory where you extracted the contents ofRREG.tar.gz/rreg. -
Set the following environment variables in the
oamreg.shoroamreg.batscript:OAM_REG_HOME - Set this variable to the absolute path to the directory where you extracted the contents of RREG.tar/rreg.
JDK_HOME - Set this variable to the absolute path to the directory where Java/JDK is installed on your machine.
-
Change directories to
RREG_HOME/inputand copy the following files to this location:WCP_ORACLE_HOME/webcenter/scripts/webcenter.oam.conf SOA_ORACLE_HOME/soa/prov/soa.oam.conf WC_CONTENT_ORACLE_HOME/common/security/oam.conf
-
Create a new file named
WebCenterOAM11gRequest.xmlto serve as a parameter file to theoamregtool.Copy and paste the example below, and then replace the contents within
$$webtier..$$with your WebTier host and port IDs, and$$oam...$$with the OAM host and administration server port.<?xml version="1.0" encoding="UTF-8"?> <!-- Copyright (c) 2009, 2010, Oracle and/or its affiliates. All rights reserved. NAME: OAMRequest.xml - Template (with all options) for OAM Agent Registration Request file DESCRIPTION: Modify with specific values and pass file as input to the tool. --> <OAMRegRequest> <serverAddress>http://$$oamhost$$:$$oamadminserverport$$</serverAddress> <hostIdentifier>$$webtierhost$$_webcenter</hostIdentifier> <agentName>$$webtierhost$$_webcenter</agentName> <agentBaseUrl>http://$$webtierhost$$:$$webtierport$$</agentBaseUrl> <applicationDomain>$$webtierhost$$_webcenter</applicationDomain> <autoCreatePolicy>true</autoCreatePolicy> <primaryCookieDomain>example.com</primaryCookieDomain> <logOutUrls> <url>/oamsso/logout.html</url> </logOutUrls> </OAM11GRegRequest>
-
Change to the
RREG_Homedirectory. -
Run the following command:
RREG_HOME/bin/oamreg.sh inband input/WebCenterOAM11gRequest.xmlWhen prompted for agent credentials enter your OAM administrator credentials.
Enter your WebGate password.
Enter
yeswhen asked whether you want to import a URIs file. Specify the full path to theRREG_HOME/input/webcenter.oam.conffile you copied there earlier.You should see output like that below indicating that registration has been successful:
----------------------------------------
Request summary:
OAM11G Agent Name:example_webcenter
Base URL: http://example.com:8080
URL String:example_webgate
Registering in Mode:inband
Your registration request is being been sent to the Admin server at: http://example.com:7001
----------------------------------------
Inband registration process completed successfully! Output artifacts are created in the output folder
Note:
ObAcessClient.xmlis generated in the output folder. You will need this file later on after you install WebGate. -
Change to the
RREG_HOME/inputdirectory. -
From the OAM Console, you should now be able to see the following artifacts:
- 10g WebGate agent named
$$webtierhost$$_webcenter- host identifier by the same name
- an application domain with the same name containing authentication and authorization policies which in turn contain protected and public policies
-
Go to Application Domain> $$webtierhost$$_webcenter > Authentication Policies. You should be able to see the following policies:
Exclusion Scheme
Protected Resource Policy
Public Resource Policy
WebCenter REST Policy
-
Open the WebCenter Portal REST Policy and change the Authentication Scheme to
BasicScheme(from the defaultLDAPScheme). -
Open the Resources tab and search for resources with their Authentication Policy set to
Exclusion Scheme. You should see the following resources:/rsscrawl* /rsscrawl/.../* /sesUserAuth* /sesUserAuth/.../* /services-producer/portlets* /services-producer/portlets/.../* /wsrp-tools/portlets* /wsrp-tools/portlets/.../*
-
Select the
/rsscrawl*resource in the search results and click Edit. -
Change the Protection Level from
ProtectedtoExcludedand click Apply. Note that the resource's authentication policy and authorization policy is removed. -
Close the Resources tab and repeat the steps for the remaining
Exclusion Schemeresources.When you now search for resources with their Authentication Policy set to
Exclusion Schemeyou should see no results. -
If your installation includes SOA and Content Server deployments, you must update your application policy with SOA and Content Server resources.
Create a policy update file called
WebCenterOAM11gPolicyUpdate.xml(underRREG_HOME/input) as shown in the example below, replacing the content within$$webtier..$$with your Web Tier host and port IDs, and$$oam...$$with the OAM host and administration server port:<?xml version="1.0" encoding="UTF-8"?> <!-- Copyright (c) 2009, 2011, Oracle and/or its affiliates. All rights reserved. NAME: UpdatePolicyRequest.xml - Template for updating application domain and/or policies without changes to any agent profile DESCRIPTION: Modify with specific values and pass file as input to the tool --> <PolicyRegRequest> <serverAddress>http://$$oamhost$$:$$oamadminserverport$$</serverAddress> <hostIdentifier>$$webtierhost$$_webcenter</hostIdentifier> <applicationDomainName>$$webtierhost$$_webcenter</applicationDomainName> </PolicyRegRequest> -
Run the following command:
RREG_HOME/bin/oamreg.sh policyUpdate input/WebCenterOAM11gPolicyUpdate.xmlEnter your OAM credentials when prompted.
Enter
yeswhen asked whether you want to import a URIs file, and specifyRREG_HOME/input/soa.oam.conf.Your policy updates with SOA resources.
-
Run the
policyUpdatecommand again, this time specifyingRREG_HOME/input/oam.confto update the policy with Content Server resources. Your policy now contains WebCenter Portal, SOA and Content Server artifacts.
-
-
Restart IBM HTTP Server (IHS).
-
Install WebGate 10g.
OAM 11g can work with both WebGate 10g and 11g but IBM HTTP Server currently only supports WebGate 10g. Therefore, you must download and install WebGate 10g.
-
Download WebGate 10g from Oracle Technology Network. The installable is called Oracle Access Manager 10g - non OHS11g Webgates and 3rd Party Integrations.
For Windows, select Oracle_Access_Manager10_1_4_3_0_Win32_IHS22_WebGate installer
For Linux, select Oracle_Access_Manager10_1_4_3_0_linux_IHS22_WebGate installer
For Linux, ensure that the GCC libraries are available. If your IHS is 32 bit, choose 32 bit libraries and if your IHS is 64 bit, choose 64 bit libraries.
Also, ensure that User and Group options are correctly set in
IHS_Install_Dir/conf/httpd.conf. Change settingsUser nobodyandGroup nobodyto the names of the user and group performing the set up and restart the Web Tier. -
During installation, specify a location for installing WebGate.
Note: If you ran the installer before and it had failed for some reason, choose a different installation directory.
-
Specify the location of the GCC libraries.
-
Enter the following WebGate details:
WebGate Id: <
agentName> chosen in the previous step, that is,$$webtierhost$$_webcenterWebGate Password: <
password> entered to runoamreg.shAccess Server Name: oam_server1 (determine this value from OAMConsole)
Access Server HostName:
$$oamhost$$Access Server Port:
5575(determine this value from OAMConsole) -
Select to automatically update of
httpd.confand specify the location ofhttpd.conffrom your WebTier. Typically,<webtier>/conf/httpd.conf -
Finish the wizard.
WebGate successfully installed.
-
-
Configure IBM WebSphere for OAM single sign-on.
Detailed steps are provided in Section 10.9, "Configuring IBM WebSphere for OAM SSO and the IAP." To summarize, you must:
-
Configure a stand alone LDAP registry for OAM in IBM WebSphere.
-
Add and configure a virtual host in IBM WebSphere.
-
Configure IHS reverse proxy in the IBM WebSphere Console.
Note:
Ensure you remove all occurrences of<Uri AffinityCookie="JSESSIONID" AffinityURLIdentifier="jsessionid" Name="/"/>and also you make this change each time you generate and propagate the web server plugin. -
Create the Interceptor entry in the IBM WebSphere Console.
-
Configure the OAM TAI configuration file.
If you choose to copy
oamtai.xml, ensure that you make the change in the Deployment Manager profile directory as this is the source of truth for other application server profiles.The values you provide in
oamtai.xmlare similar to those you provided during WebGate installation. Here's a sample oamtai.xml for reference:<?xml version="1.0" encoding="UTF-8"?> <OAM-configuration> <AAAClientConnect> <Parameters> <param name = "hostPort" value ="example.com:8080"/> <param name = "resource" value ="/Authen/SSOToken"/> <param name = "operation" value ="GET"/> <param name = "AccessGateName" value ="myWG10g"/> <param name = "AccessGatePassword" value ="welcome1"/> <param name = "AccessServerHost" value ="oam.example.com"/> <param name = "AccessServerPort" value ="5575"/> <param name = "AccessServerName" value ="oam_server1"/> <param name = "TransportSecurity" value ="open"/> <param name = "debug" value ="false"/> <param name = "minConn" value ="1"/> <param name = "maxConn" value ="1"/> <param name = "timeOutForConnPool" value ="30000"/> <!-- Note:Following parameter is used for Anonymous User Authentication. Configure anonymous user value here --> <param name = "Anonymous" value =""/> <!-- Note:Following parameters are required for Header Based Assertion. Uncomment it if and only if in case Header based assertion. 1. If you configure the headername here, then the same name will be used to configure as return attribute in OAM policy. Don't change the assertion type parameter value. Only uncomment the parameter entry. 2. If you do not configure the header name here, the default header name is "OAM_REMOTE_USER" and the same should be configured in OAM policy. Don't change the assertion type parameter value. Only uncomment parameter entry. --> <param name = "assertionType" value ="HeaderBasedAssertion"/> <param name = "customHeaderName" value ="OAM_REMOTE_USER"/> </Parameters> </AAAClientConnect> </OAM-configuration>
-
-
Configure logout details.
-
Configure the single sign-on logout provider.
Follow steps in Section 10.10.2.2, "Configuring SSO Logout for OPSS with ADF-coded applications and OAM 10g Webgate" to update
jps-config.xml. Ensure that the jps-config.xml you update is from the Deployment Manager profile directory as this is the source of truth for other application server profiles. -
Add
oamAuthenProvider.jarto the classpath.Follow steps in Section 10.10.2.3, "Configuring oamAuthenProvider.jar in the IBM WebSphere classpath." Do this for all servers in the install.
-
Add
ssofilter.jarto the classpath.See Section 5.2.16.2, "Configuring WebCenter Portal and Portal Framework Applications for Single Sign-On" for details on how to update the SSO filter in
web.xml. -
Create
logout.htmlin WebGate.i Navigate to
<WebGate install directory>/access/oamssoii Create a file called
logout.htmlwith the following content and configureSERVER_LOGOUTURLfor your installation:<html> <head> <script language="javascript" type="text/javascript"> /////////////////////////////////////////////////////// //Before using, you need to change the values of: //a. "oamserverhost" to point to the host where the OAM 11g Server is running. //b. "port" to point to the port where the OAM 11g Server is running. ///////////////////////////////////////////////////////////////////// var SERVER_LOGOUTURL = "http://example.com:14100/oam/server/logout"; ////////////////////////////////////////////////////////////////// function delCookie(name,path,domain) { var today = new Date(); var deleteDate = new Date(today.getTime() - 48 * 60 * 60 * 1000); // minus 2 days var cookie = name + "=" + ((path == null) ? "" : "; path=" + path) + ((domain == null) ? "" : "; domain=" + domain) + "; expires=" + deleteDate; document.cookie = cookie; } function delOblixCookie() { // set focus to ok button var isNetscape = (document.layers); if (isNetscape == false || navigator.appVersion.charAt(0) >= 5) { for (var i=0; i<document.links.length; i++) { if (document.links[i].href == "javascript:top.close()") { document.links[i].focus(); break; } } } delCookie('ObTEMC', '/'); delCookie('ObSSOCookie', '/'); delCookie('LtpaToken', '/'); delCookie('LtpaToken2', '/'); // in case cookieDomain is configured // delete same cookie to all of subdomain var subdomain; var domain = new String(document.domain); var index = domain.indexOf("."); while (index > 0) { subdomain = domain.substring(index, domain.length); if (subdomain.indexOf(".", 1) > 0) { delCookie('ObTEMC', '/', subdomain); delCookie('ObSSOCookie', '/', subdomain); delCookie('LtpaToken', '/', subdomain); delCookie('LtpaToken2', '/', subdomain); } domain = subdomain; index = domain.indexOf(".", 1); } } function handleLogout() { //get protocol used at the server (http/https) var webServerProtocol = window.location.protocol; //get server host:port var webServerHostPort = window.location.host; //get query string present in this URL var origQueryString = window.location.search.substring(1); var newQueryString = ""; //vars to parse the querystring var params = new Array(); var par = new Array(); var val; if (origQueryString != null && origQueryString != "") { params = origQueryString.split("&"); for (var i=0; i<params.length; i++) { if (i == 0) newQueryString = "?"; if (i > 0) newQueryString = newQueryString + "&"; par = params[i].split("="); //prepare a new query string, if the end_url value needs to be changed newQueryString = newQueryString + (par[0]); newQueryString = newQueryString + "="; val = par[1]; if ("end_url" == par[0]) { //check if val (value of end_url) begins with "/" or "%2F" (is it an URI?) if (val.substring(0,1) == "/" || val.substring(0,1) == "%") { //modify the query string now val = webServerProtocol + "//" + webServerHostPort + val; } } newQueryString = newQueryString + val; } } //delete oblix cookies delOblixCookie(); //redirect the user to this URL window.location.href = SERVER_LOGOUTURL + newQueryString; } </script> </head> <body onLoad="handleLogout();"> </body> </html> -
Update
httpd.confin WebTier.-
Navigate to
<webtier install directory>/conf/httpd.conf -
Add the following entries in the
webgatesectionAlias /oamsso "<webage-install-dir>/access/oamsso"
-
-
Restart WebTier and all the servers, including the Node Manager in WebSphere.
-
-
Configure WebCenter Portal or Portal Framework applications to require certificate based authentication and SSO synchronization filter.
For detailed steps, see Section 5.2.16.2, "Configuring WebCenter Portal and Portal Framework Applications for Single Sign-On."
-
Configure other Oracle WebCenter Portal components for single sign-on:
-
WebCenter Portal
-
Discussions server
-
Worklists
-
RSS news feeds
-
Secure Enterprise Search
-
Content Server
-
Enterprise Manager
For details steps, see the "Additional Single Sign-on Configurations" section in Oracle Fusion Middleware Administering Oracle WebCenter Portal.
-
Note: Since IBM WebSphere only supports one auth-method, once SSO is configured, access through via IBM WebSphere ports results in an error as the required OAM headers are not available. Access to all the applications must be through the Web tier.
5.2.16.2 Configuring WebCenter Portal and Portal Framework Applications for Single Sign-On
If you want WebCenter Portal or any other Portal Framework application, to participate in single sign-on, you must specify CLIENT-CERT as the authentication method for Trust Access Interceptors. By default, WebCenter Portal and all Portal Framework applications specify FORM or BASIC as their authentication mechanism.
Unlike Oracle WebLogic Server, IBM WebSphere does not support multiple comma separated authentication-method and therefore, you must change the authentication method to CLIENT-CERT for WebCenter Portal or Portal Framework applications to participate in single sign-on.
Follow these steps to change authentication method for portal applications:
-
Locate
web.xmlfor WebCenter Portal or the Portal Framework application.-
For WebCenter Portal, go to the machine where IBM WebSphere Application Server is installed and navigate to:
PROFILE_DIR/config/cells/
   cellname/applications/webcenter.ear/
   deployments/webcenter/spaces-was.war/WEB-INF/web.xml
-
For other Portal Framework applications, go to the machine where IBM WebSphere Application Server is installed and navigate to the application WAR file. For example:
PROFILE_DIR/config/cells/
   cellname/applications/MyPortalApp.ear/
   deployments/MyPortalApp/portal-app.war/WEB-INF/web.xml
-
-
Copy
web.xmlto a temporary location. -
Open
web.xmlin a text editor.-
Remove (or comment out) the
<login-config>section as follows:<login-config> <auth-method>FORM</auth-method> <form-login-config> <form-login-page>/oracle/webcenter/webcenterapp/view/templates/ publichtml/LoginGateway.jsp</form-login-page> <form-error-page>/oracle/webcenter/webcenterapp/view/templates/ publichtml/LoginGateway.jsp?login_fail=true</form-error-page> </form-login-config> </login-config> -
Replace with the following
<login-config>section:<login-config> <auth-method>CLIENT-CERT</auth-method> </login-config> -
Add the SSO synchronization filter:
<filter>
   <display-name>SSOSessionSynchronizationFilter</display-name>
   <filter-name>SSOSessionSynchronizationFilter</filter-name>
<filter-class>oracle.security.was.filter.SSOSessionSynchronizationFilter</filter-class> </filter>
 <filter-mapping>
   <filter-name>SSOSessionSynchronizationFilter</filter-name>
   <url-pattern>/*</url-pattern>
 </filter-mapping>
-
Save the changes.
-
-
Redeploy the updated
web.xmlfile:-
Log in to the IBM WebSphere Administrative Console:
https://host:port/ibm/console -
Navigate to Applications > Application Types > WebSphere enterprise applications.
-
Locate and select WebCenter Portal or your Portal Framework application, and then click Update.
To update
web.xmlfor WebCenter Portal, for example, locate the application namedwebcenter. -
Choose the option Replace or add a single file.
-
Specify the path to the
web.xmlfile you want to replace. Start the path from the name of the application's archive file (.war):war_file_name/WEB-INF/web.xmlFor example:
For the WebCenter Portal, enter:
spaces-was.war/WEB-INF/web.xmlFor a Portal Framework application, enter:
MyPortalApp.war/WEB-INF/web.xml -
Click Next.
-
In the section Specify the path to the file, enter the full path to the
web.xmlfile you updated in step 3. -
Click Next.
-
Click OK and Save Changes.
Wait for a couple of minutes for the changes to be propagated.
-
To confirm the change, navigate to the application's deployment descriptor:
For example, for WebCenter Portal, navigate to: WebSphere enterprise Applications > webcenter > Manage Modules > spaces-was.war > View Deployment Descriptor
-
-
Restart the WebCenter Portal or your Portal Framework application.
-
Access the portal application and, if single sign-on is configured, the
web.xmlchanges take effect. -
Repeat similar steps to update any other Web application that participates in single sign-on, for example:
WebCenter Portal install:
-
WebCenter Portal Application:
webcenter/spaces-was.war -
REST API Web Application:
webcenter/webcenter-rest-was.war -
RSS Web Application:
webcenter/webcenter-rss-was.war -
Activity Graph Engines Application:
activitygraph-engines_11.1.1.6.0/activityGraph-engines.war -
Pagelet Producer Admin:
pagelet-producer_11.1.1.6.0/pageletadmin.war -
Pagelet Producer Proxy:
pagelet-producer_11.1.1.6.0/ensembleproxy.war -
Services Producer:
services-producer_11.1.1.6.0/services-producer-was.war -
Worklist Application:
WebCenterWorklistDetailApp/WebCenterWorklistDetail_was.war
SOA Suite install:
-
SOA Infra Application:
soa-infra/fabric.war -
UMS Application:
usermessagingserver/sdpmessaginguserprefs-ui-web.war -
UMS SCA:
usermessagingsca-ui-worklist/sdpmessagingsca-ui-worklist-was.war -
Composer Application:
composer/soa-composer-was.war -
To Do Task Flow:
DefaultToDoTaskFlow/DefaultToDoTaskFlow.war
WebCenter Content install:
-
Content Server:
Oracle WebCenter Content-Content Server/cs.war -
Inbound Refinery:
Oracle WebCenter Content-Inbound Refinery/ibr.war
-
5.2.17 Configuring SSL for WebCenter Portal or Portal Framework Applications
Typically, SSL is enabled between the browser and HTTP server. If you need a SSL connection between your IBM HTTP Server and WebSphere nodes (because of your topology/hardened security requirements) or between the browser and WebSphere node directly, you may need to do addition configuration.
This section contains the following topics:
5.2.17.1 Obtaining the SSL Port for WebCenter Portal or Portal Framework Applications
For SSL between the browser and the WebSphere node, obtain the SSL port as follows:
-
Log in to the IBM WebSphere Administrative Console.
-
Navigate to the WebSphere cell on which WebCenter Portal or your Portal Framework application is deployed. Select Application servers> <cell name>
For WebCenter Portal, for example, navigate to Application servers> WC_Spaces.
-
Select Ports.
A list of ports displays. Use the SSL port WC_defaulthost_Secure to access your application securely (Figure 5-20).For WebCenter Portal, for example,
https://myhost.com:8788/webcenterFigure 5-20 Port Information for WC_Spaces
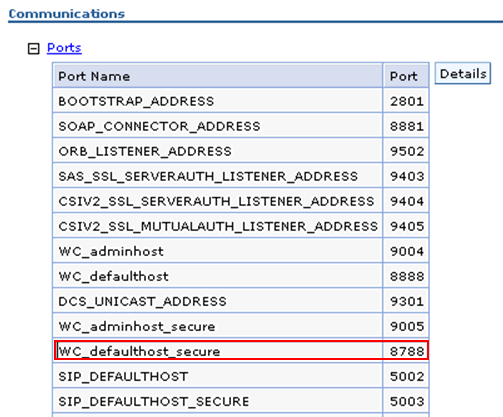
Description of "Figure 5-20 Port Information for WC_Spaces"
5.2.17.2 Importing SSL Certificates on IBM WebSphere
To import SSL certificates on IBM WebSphere:
-
Log in to the IBM WebSphere Administrative Console.
-
In the navigation panel, expand Security, then click SSL certificate and key management.
-
Click Key stores and certificates.
The Keystore usages dropdown should show SSL keystores (Figure 5-21).
Figure 5-21 Keystores and Certificates Configuration
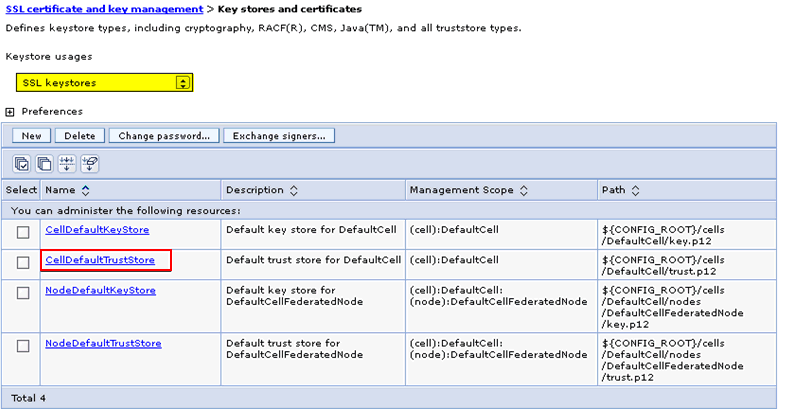
Description of "Figure 5-21 Keystores and Certificates Configuration"
-
Select a trust store (for example, CellDefaultTrustStore).
-
Click Personal Certificate.
-
Select Import (Figure 5-22).
Figure 5-22 CellDefaultTrustStore - Import Personal Certificates

Description of "Figure 5-22 CellDefaultTrustStore - Import Personal Certificates"
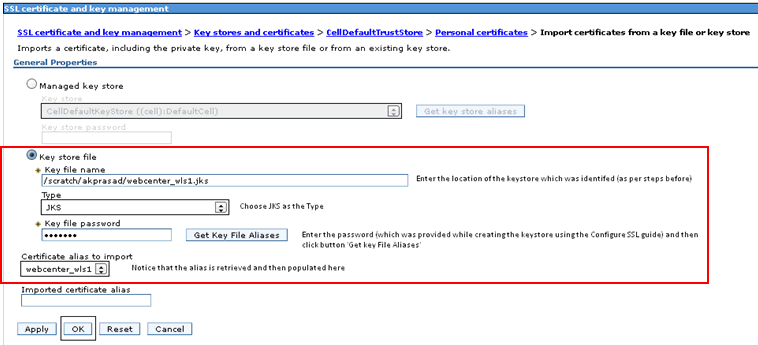
-
Select Key store file and specify the location of your keystore (.jks) file (Figure 5-23).
-
For Type, select JKS, and then enter a Password.
-
Click OK to import the certificates from the keystore.
-
Restart the application server.
5.2.18 Cloning Oracle WebCenter Portal Installations on IBM WebSphere
Use the IBM WebSphere Administrative Console to clone Oracle WebCenter Portal installations on WebSphere as follows:
-
Log in to the IBM WebSphere Administrative Console.
-
Navigate to Servers > Server Types > WebSphere application servers.
-
Create a server template based on the server you want to clone:
-
Click the Templates... button.
-
On the Server Templates screen, click New and select the server for the template.
-
Click OK.
-
Enter a Name for your server template, then click OK.
-
-
Navigate to Servers > Server Types > WebSphere application servers.
-
Create an application server based on the template you created in the previous step:
-
Click New.
-
Complete Step 1: Select a node.
-
For Step 2: Select a server template, select the template.
-
Complete Step 3 and Step 4 as required.
-
The new application server has the same resources as the specified template.
5.2.19 Configuring WebCenter Portal or Portal Framework Applications for High Availability on IBM WebSphere
This section describes a typical WebCenter Portal cluster topology and explains some additional set up steps that are required for clustered deployments on IBM WebSphere.
This section is not meant to provide comprehensive information for configuring high availability for Oracle WebCenter Portal on IBM WebSphere. For more information about the resources available when configuring high availability on WebSphere, see Section 3.4, "Configuring Oracle Fusion Middleware High Availability on IBM WebSphere."
For an overview of the steps required for setting up high availability for Oracle WebCenter Portal on IBM WebSphere, refer to the following:
-
Install Required Oracle WebCenter Portal Components on Both Hosts
-
Configure Oracle Internet Directory as the LDAP Identity Store
5.2.19.1 Typical Oracle WebCenter Portal Cluster Topology
Figure 5-24 shows a typical cluster set up for a WebCenter Portal deployment.
Figure 5-24 Cluster Topology - WebCenter Portal Application
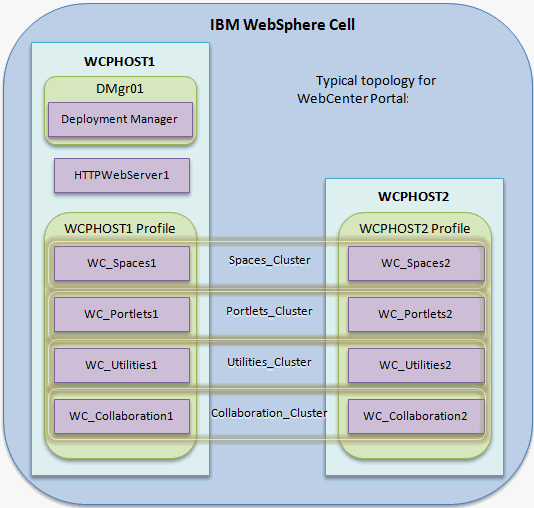
Description of "Figure 5-24 Cluster Topology - WebCenter Portal Application"
Figure 5-25 shows a typical cluster set up for Portal Framework and Portlet Producer applications built using JDeveloper.
Figure 5-25 Cluster Topology - Portal Framework and Portlet Producer Applications
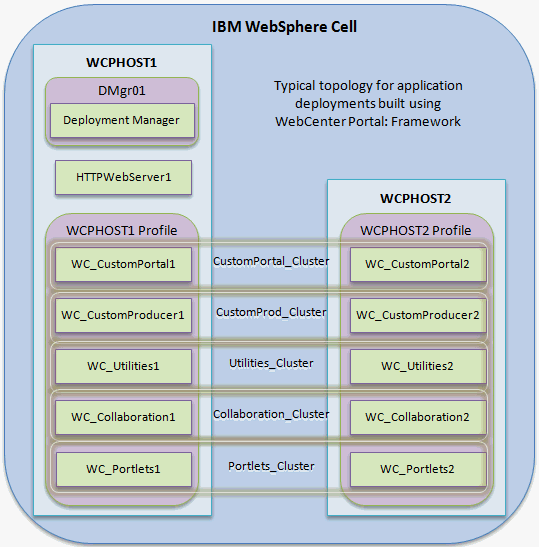
Description of "Figure 5-25 Cluster Topology - Portal Framework and Portlet Producer Applications"
5.2.19.2 Install Required Oracle WebCenter Portal Components on Both Hosts
In a clustered environment, you must install and configure a suitable database, IBM WebSphere Application Server, Oracle Fusion Middleware (WebCenter Portal, WebCenter Content, SOA Suite), and IBM HTTP Server on both hosts. In this section, the hosts are referred to as WCPHOST1 and WCPHOST2.
See also, Section 5.2.1, "Installing Oracle WebCenter Portal Products on IBM WebSphere."
5.2.19.3 Configure a New WebSphere Cell on WCPHOST1
On the first Oracle WebCenter Portal host (WCPHOST1), create a new WebSphere cell:
-
Launch the Configuration Wizard using:
WCP_ORACLE_HOME/common/bin/was_config.sh -
On the Select Configuration Option page, click Create and Configure Cell.
-
On the following screens, select Oracle WebCenter Portal products and configure JDBC schemas, as required.
For details, see the "Using the Configuration Wizard" section in Oracle Fusion Middleware Configuration Guide for IBM WebSphere Application Server.
-
On the Select Optional Configuration page, click Application Servers, Clusters and End Points.
-
On the Configure Cluster page, add the new cluster and the first member, and select Enabled memory to memory replication.
-
Finish creating the cell by completing the Configuration Wizard.
-
Start the Deployment Manger:
WAS_HOME/profiles/dmg_profile_name/bin/startManager.sh
-
Start the node agent on the WCPHOST1 using:
WAS_HOME/profiles/profile_name/bin/startNode.sh.
5.2.19.4 Federate WCPHOST2 and Configure Cell
If the second Oracle WebCenter Portal machine (WCPHOST2), is not yet federated to the cell on WCPHOST1, perform the following steps:
-
Launch the Configuration Wizard using:
WCP_ORACLE_HOME/common/bin/was_config.sh -
On the Select Configuration Option page, click Federate Machine and Configure Cell.
-
Enter Deployment Manager details for WCPHOST1 or the machine where the Deployment Manager is located.
You can find the machine details at the following location:
WAS_HOME/profiles/dmgr_profile_name/logs/AboutThisProfile.txt
-
On the Add Products to Cell page, click Next.
You do not need to select any products on this page.
-
On the Select Optional Configuration page, click Application Servers, Clusters and End Points.
-
On the Configure Additional Cluster Members page, add the second server for the cluster associated with this node.
-
Finish federating the machine by completing the Configuration Wizard.
-
Start the node agent on Machine2 by opening:
WAS_HOME/profiles/profile_name/bin/startNode.sh
5.2.19.5 Configure a Load Balancer
Configure an IBM HTTP server for load balancing in a clustered IBM WebSphere environment. For detailed steps, see Section 5.2.15, "Installing and Configuring IBM HTTP Server."
5.2.19.6 Configure Oracle Internet Directory as the LDAP Identity Store
Set up Oracle Internet Directory (OID) as the external LDAP ID store for WebCenter Portal applications:
-
Install and configure Oracle Internet Directory (OID).
-
Configure the LDAP registry.
Create a properties file for your Oracle Internet Directory LDAP ID store and then run the wsadmin configuration command
Opss.configureIdentityStore. For detailed steps, see Section 9.1.1, "Configuring a Registry." -
Perform a full resynchronization for all nodes:
-
Login to the IBM WebSphere Administrative Console and navigate to the Nodes page (System administration > Nodes).
-
Select all nodes in the cluster and click Full Resynchronize.
-
-
Restart all servers in the cluster.
5.2.19.7 Reassociate the Identity Store
Perform the following steps to reassociate the identity store:
-
Connect to the Dmgr server using wsadmin:
WCP_ORACLE_HOME/common/bin/wsadmin.sh -conntype SOAP -user <admin username> -password <password> -port <admin SOAP port> -host <Dmgr host> -
Run the security store reassociate wsadmin command:
Opss.reassociateSecurityStore(domain="Cell_WebSphere",servertype="OID", ldapurl="ldap://<host>:<port>", jpsroot="<jpsroot>",
admin="<admin username>", password="<admin password>")
-
Perform a full resynchronization for all nodes:
-
Login to the IBM WebSphere Administrative Console and navigate to the Nodes page (System administration > Nodes).
-
Select all nodes in the cluster and click Full Resynchronize.
-
-
Restart all servers in the cluster.
5.2.19.8 Configure Distributed Java Object Cache
For details how to configure the distributed Java Object Cache (JOC), see Section 3.4.2, "Configuring Java Object Cache for Oracle Fusion Middleware on IBM WebSphere."
5.2.19.9 Configure Clustering for Discussions
Configure clustering options for discussions, deployed on the WC_Collaboration servers:
-
Create an Admin user for the discussions server:
For details, see Section 5.2.8, "Configuring an Admin User for the Discussions Server."
-
Restart all WC_Collaboration servers in the cluster.
-
For each server in the WC_Collaboration cluster, configure unicast cluster communication:
-
Log into the IBM WebSphere Administrative Console.
-
Expand Servers, expand Server Types, then click WebSphere application servers.
-
Click WC_Collaboration, the server on which the discussions application is deployed.
-
Under Server Infrastructure, expand Java and Process Management, then click Process definition.
-
On the process definition page, under Additional Properties, click Java Virtual Machine.
-
On the Java virtual machine page, under Additional Properties, click Custom properties.
-
Create the following variables. Click New, enter the name, enter the value, then click OK.
Name: tangosol.coherence.wka1, Value=WCPHOST1
Name: tangosol.coherence.wka2, Value=WCPHOST2
Name: tangosol.coherence.localhost, Value=WCPHOST1
Name: tangosol.coherence.wka1.port, Value=8089
Name: tangosol.coherence.wka2.port, Value=8089
Name: tangosol.coherence.localport, Value=8089
-
-
Repeat step 3 for WC_Collaboration2, swapping WCPHOST1 for WCPHOST2, and WCHost2 for WCHost1:
Name: tangosol.coherence.wka1, Value=WCPHOST1
Name: tangosol.coherence.wka2, Value=WCPHOST2
Name: tangosol.coherence.localhost, Value=WCPHOST1
Name: tangosol.coherence.wka1.port, Value=8089
Name: tangosol.coherence.wka2.port, Value=8089
Name: tangosol.coherence.localport, Value=8089
-
Restart all WC_Collaboration servers in the cluster.
5.2.19.10 Configure Activity Graph
The activity graph application (activitygraph-engines) cannot be targeted to a cluster. As IBM WebSphere does not allow you to target an application to a server that is part of a cluster, you must create a new server for the activity graph application:
-
Create a server template based on the WC_Utilities server
-
Log into the IBM Admin Console.
-
Expand Servers, expand Server Types, then click WebSphere application servers.
-
Click Templates.
-
Click New.
-
Select WC_Utilities as the server for the template, then click OK.
-
Enter the name for the server template, then click OK.
-
-
Create the new server based on the newly created server template:
-
Expand Servers, expand Server Types, then click WebSphere application servers.
-
Click New.
-
Select the node where this server is located, enter the server name, then click Next.
-
Select the template you just created, then click Next.
-
Select Generate Unique Ports, then click Next.
-
Click Finish.
-
-
Re-target the application to the new server:
-
Expand Applications, expand Application Types, then click WebSphere enterprise applications.
-
Click activitygraph-engines_11.1.1.4.0.
-
Under Modules, click Manage Modules.
-
Select all modules, select the target server you created in step 2, and click Apply.
-
Click OK.
-
5.3 Differences Developing and Deploying Portal Framework Applications on IBM WebSphere
The following topics describe differences and restrictions when developing and deploying WebCenter Portal Framework applications on IBM WebSphere:
-
Configuring a WebSphere Application Server Connection in JDeveloper
-
Deploying Portal Framework Applications on IBM WebSphere Directly from JDeveloper
-
Targeting Application EAR and WAR Files for IBM WebSphere Deployment
-
Deploying Portal Framework Application EARs using WebSphere Console and wsadmin
-
Securing a Portal Framework Application Connection to IMAP and SMTP with SSL
-
Using the Deploy and Configure Script for Portal Framework Applications Deployed on WebSphere
-
Creating SQL Data Controls for Applications Deployed on WebSphere Administration Server
5.3.1 Configuring a WebSphere Application Server Connection in JDeveloper
If you want to deploy a Portal Framework application to an IBM WebSphere Server that resides outside JDeveloper, you must ensure that the target server is up and running with the required libraries, and then you must.set up a connection to the target WebSphere server.
During application server connection creation, you are prompted for configuration information on several wizard pages. Table 5-4 describes where to find this information in the IBM WebSphere Administrative Console for which you are prompted.
Table 5-4 Location of Application Server Connection Configuration Details
| Connection Wizard Fields | For IBM WebSphere Application Server - 7.0, Select... |
For IBM WebSphere Application Server - Network Deployment (ND), Select... |
|---|---|---|
|
Configuration Page |
||
|
System administration > Deployment manager > Configuration > Ports > SOAP_CONNECTOR_ADDRESS |
System administration > Deployment manager > Configuration > Ports > SOAP_CONNECTOR_ADDRESS |
|
System administration > Deployment manager > Configuration > Name |
Servers > Server Types > WebSphere Application Servers > Your_Server_Name > Configuration > Name |
|
System administration > Deployment manager > Runtime > Node name |
Servers > Server Types > WebSphere Application Servers > Your_Server_Name > Runtime > Node name |
|
System administration > Deployment manager > Runtime > Cell name |
Servers > Server Types > WebSphere Application Servers > Your_Server_Name > Runtime > Cell name |
For more information about creating an application server connection, see the Oracle JDeveloper online help or Section 4.2.4, "Creating an Application Server Connection."
5.3.2 Deploying Portal Framework Applications on IBM WebSphere Directly from JDeveloper
Deploying Portal Framework applications directly from Oracle JDeveloper to IBM WebSphere Server is largely the same as described in Oracle Fusion Middleware Developing Portals with Oracle WebCenter Portal and Oracle JDeveloper.
The differences are as follows:
-
Database connection configuration for seeded data sources is different on IBM WebSphere. For details, see:
-
Database connection configuration for custom data sources is different on IBM WebSphere. For details, see:
Note:
Custom data sources are not automatically created when you deploy WebCenter Portal applications to a WebSphere Application Server through JDeveloper or Fusion Middleware Control. -
The Deploy using SSL check box does not appear on the Create Application Server Connection wizard page. See Section 5.3.2.4, "Deploying Portal Framework Applications Using SSL."
-
Deployed applications do not start automatically after deployment. You have to start the WebCenter Portal application manually using the console. See Section 5.3.2.5, "Deploying and Redeploying Portal Framework Applications From JDeveloper."
5.3.2.1 Creating Database Connections for Seeded Data Sources on Out-of-the-Box Server
Servers created using WC_CustomPortal and WC_CustomServicesProducer templates automatically come pre-seeded with two data sources (WebCenter and Activities):
| Data Source | Data Source Name | JNDI Name |
|---|---|---|
| WC_CustomPortal Template | ||
| WebCenter | webcenter/CustomPortalDS | jdbc/webcenter/CustomPortalDS |
| Activities | activities/CustomPortalDS | jdbc/activities/CustomPortalDS |
| WC_CustomServicesProducer Template | ||
| WebCenter | webcenter/CustomServicesProducerDS | jdbc/webcenter/CustomServicesProducerDS |
| Activities | activities/CustomServicesProducerDS | jdbc/activities/CustomServicesProducerDS |
No additional configuration is required if you want to deploy a working Portal Framework application directly to a WC_CustomPortal or WC_CustomServicesProducer server, through JDeveloper.
Optionally, if you plan to test the application in JDeveloper's embedded WebLogic Server, you must manually create the relevant database connections, ensuring that the database connection names map to the data sources in the target server as follows:
| Data Source | Database Connection Name |
|---|---|
| WebCenter | webcenter/CustomPortal or webcenter/CustomServicesProducer |
| Activities | activities/CustomPortal or activities/CustomServicesProducer |
When the bindings are generated in the deployment descriptor, the above connection names are prefixed with the sting "jdbc/" and appended with the string "DS".
To enable application testing in the embedded WebLogic Server, create database connections for seeded data sources as follows (this example illustrates deployment to a WC_CustomPortal server):
-
In JDeveloper, create a database connection.
For general steps, see the "Setting Up a Database Connection" section in Oracle Fusion Middleware Developing Portals with Oracle WebCenter Portal and Oracle JDeveloper.
-
To connect to the WebCenter Portal database, ensure that:
-
Connection Name = webcenter/Custom Portal (Figure 5-26)
-
Associate to Data Source = WebCenterDS (Figure 5-27)
Figure 5-26 Database Connection Name - WebCenter/CustomPortal
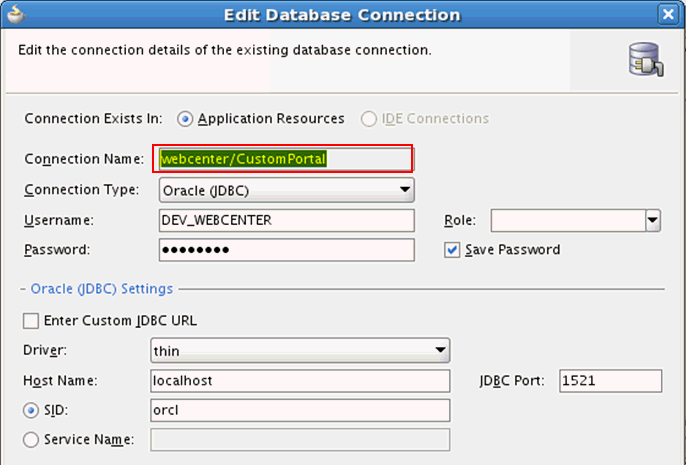
Description of "Figure 5-26 Database Connection Name - WebCenter/CustomPortal"
Figure 5-27 Associate webcenter/CustomPortal Connection to WebCenterDS
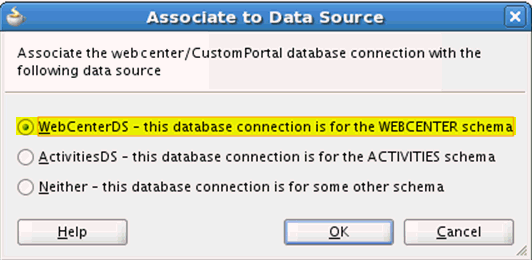
Description of "Figure 5-27 Associate webcenter/CustomPortal Connection to WebCenterDS"
-
-
To connect to the Activities database, ensure that:
-
Connection Name = activities/Custom Portal (Figure 5-28)
-
Associate to Data Source = ActivitiesDS (Figure 5-29)
Figure 5-28 Database Connection Name - activities/CustomPortal
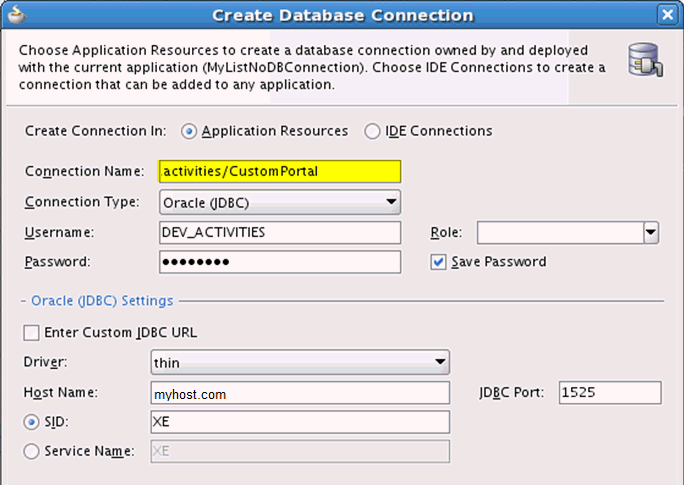
Description of "Figure 5-28 Database Connection Name - activities/CustomPortal"
Figure 5-29 Associate activities/CustomPortal Connection to ActivitiesDS
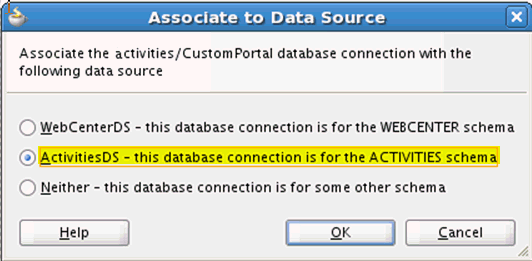
Description of "Figure 5-29 Associate activities/CustomPortal Connection to ActivitiesDS"
-
The database connections appear in the navigator as follows:
Figure 5-30 Application Navigator - Database Connections to Seeded Data Sources
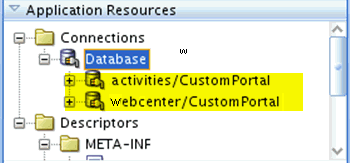
Description of "Figure 5-30 Application Navigator - Database Connections to Seeded Data Sources"
5.3.2.2 Creating Database Connections for Seeded Data Sources on Other Target Servers
Oracle recommends that Portal Framework applications built using JDeveloper are deployed on servers created using the WC_CustomPortal template (and come pre-seeded with WebCenter and Activities data sources). However, if you must deploy your Portal Framework application to a different target server (such as WC_CustomServicesProducer) and want to use the WebCenter or Activities data sources that have been created or pre-exist on the target server, you must manually create database connections to the WebCenter and Activities data sources.
To ensure that the correct bindings are generated for the data sources in the target server, the names of the database connections must match up with the existing JNDI name (if any). When the bindings are generated in the deployment descriptor, connection names are prefixed with the sting "jdbc/" and appended with the string "DS". For example:
| Data Source | JNDI Name | Database Connection Name |
|---|---|---|
| WebCenter | jdbc/MyWebCenterDS | MyWebCenter |
| Activities | jdbc/ActivitiesDS | MyActivities |
Failure to create a database connection results in run time failures with log entries such as:
Caused by: javax.naming.NameNotFoundException:
Context: Cell1/nodes/Server1Node/servers/WC_Spaces,
name: jdbc/webcenter/CustomPortalDS:
First component in name webcenter/CustomPortalDS not found.
Root exception is org.omg.CosNaming.NamingContextPackage.NotFound:
IDL:omg.org/CosNaming/NamingContext/NotFound:1.0]
Failure to create binding entries that do not match an existing data source JNDI name result in run time failures with log entries such as:
Caused by: javax.naming.NameNotFoundException:
Context: Cell1/nodes/Server1Node/servers/WC_Spaces,
name: jdbc/MyWebCenterDS:
First component in name MyWebCenterDS not found.
[Root exception is org.omg.CosNaming.NamingContextPackage.NotFound:
IDL:omg.org/CosNaming/NamingContext/NotFound:1.0]
To create database connections for seeded data sources on a server other than WC_CustomPortal:
-
In JDeveloper, create a database connection.
For general steps, see the "Setting Up a Database Connection" section in Oracle Fusion Middleware Developing Portals with Oracle WebCenter Portal and Oracle JDeveloper.
-
To connect to the WebCenter Portal database, ensure that:
-
Connection Name = <matches the JNDI name>
For example, if the JNDI name is
jdbc/MyWebCenterDS, the connection name must beMyWebCenter(Figure 5-31) -
Associate to Data Source = WebCenterDS (Figure 5-32)
Figure 5-31 Database Connection Name - MyWebCenter
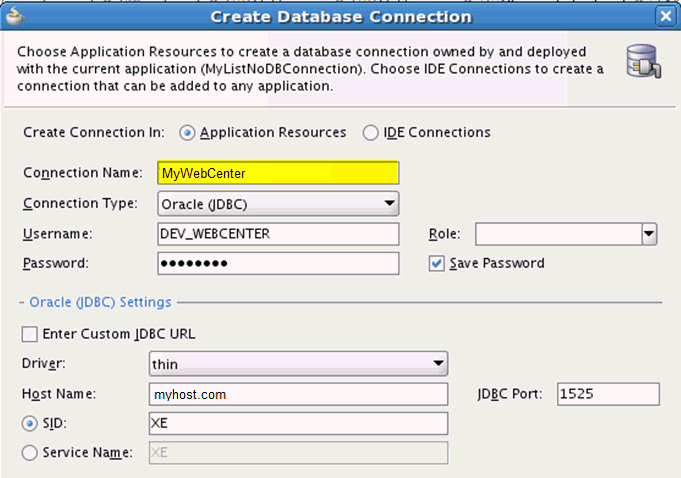
Description of "Figure 5-31 Database Connection Name - MyWebCenter"
Figure 5-32 Associate MyWebCenter Connection to WebCenterDS
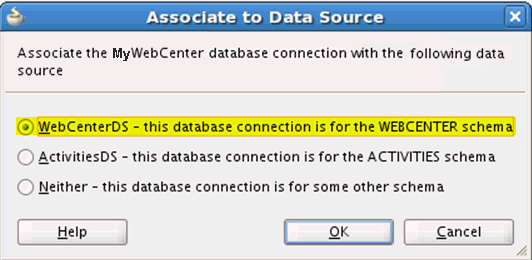
Description of "Figure 5-32 Associate MyWebCenter Connection to WebCenterDS"
-
-
To connect to the ACTIVITIES database, ensure that:
-
Connection Name = <matches the JNDI name>
For example, if the JNDI name is
jdbc/MyActivitiesDS, the connection name must beMyActivities(Figure 5-33) -
Associate to Data Source = ActivitiesDS (Figure 5-34)
Figure 5-33 Database Connection Name - MyActivities
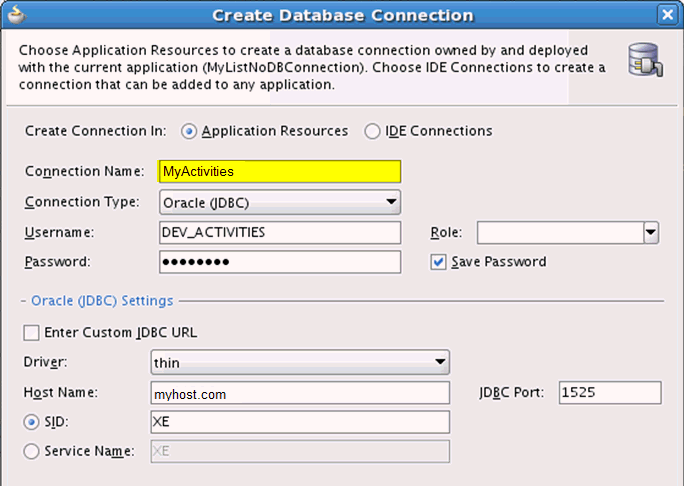
Description of "Figure 5-33 Database Connection Name - MyActivities"
Figure 5-34 Associate MyActivities Connection to ActivitiesDS
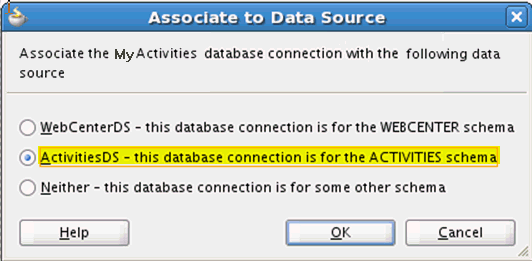
Description of "Figure 5-34 Associate MyActivities Connection to ActivitiesDS"
-
The database connections appear in the navigator as follows:
Figure 5-35 Application Navigator - Database Connections to Data Sources
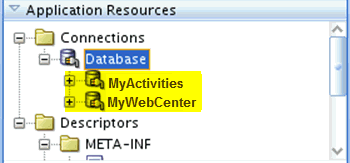
Description of "Figure 5-35 Application Navigator - Database Connections to Data Sources"
5.3.2.3 Creating Database Connections to Custom Data Sources
Custom data sources are not automatically created when you deploy Portal Framework applications to an IBM WebSphere Application Server through JDeveloper and Fusion Middleware Control. If you want to use data sources other than those provided by the template (WebCenter and Activities), you must create the custom data sources manually using the IBM WebSphere Administrative Console.
Firstly, at design-time, you must create a database connection and map it to the WebCenter or Activities schema. Once complete, you can note down the associated JNDI name that the application will use post deployment and create a data source that maps to that JNDI name.
| Mapped Data Source | Database Connection Name | JNDI Name |
|---|---|---|
| WebCenter or Activities | <DatabaseConnectionName> | jdbc/<DatabaseConnectionName>DS |
| For example: | ||
| WebCenterDS | MyLists | jdbc/MyListsDS |
To create the database connection and verify the JNDI name:
-
In JDeveloper, create a database connection.
For general steps, see the "Setting Up a Database Connection" section in Oracle Fusion Middleware Developing Portals with Oracle WebCenter Portal and Oracle JDeveloper.
-
To connect to a custom data source instead of the default WebCenter Portal database, ensure that:
-
Connection Name = <any name> For example, MyLists (Figure 5-36)
-
Associate to Data Source = WebCenterDS or ActivitiesDS (Figure 5-37)
Figure 5-36 Custom Database Connection Name - MyLists
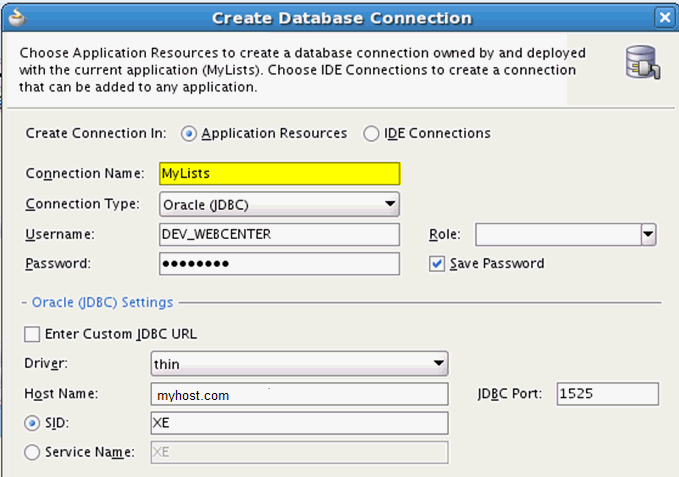
Description of "Figure 5-36 Custom Database Connection Name - MyLists"
Figure 5-37 Associate Custom Database Connection to WebCenterDS
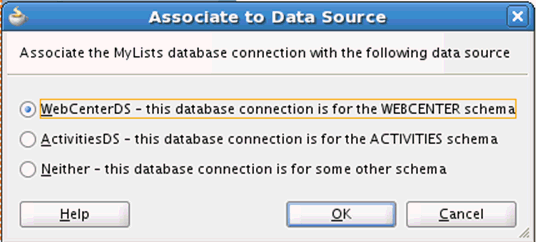
Description of "Figure 5-37 Associate Custom Database Connection to WebCenterDS"
This step ensures that when you deploy the application, deployment descriptor updates map the MyLists data source name to all usages of the WebCenter schema for this application. For instance, in this example, the MyLists data source specifies an alternative back-end repository for the Lists tool.
Similarly, you can specify an alternative data source for all usages of the Activities schema.
-
-
To examine the content of the EAR file and validate the mapping, deploy the application to the file system (ensuring the target platform is specified as IBM WebSphere), and then click the EAR file in the JDeveloper log file (Figure 5-38)
Figure 5-38 EAR File Deployed to IBM WebSphere
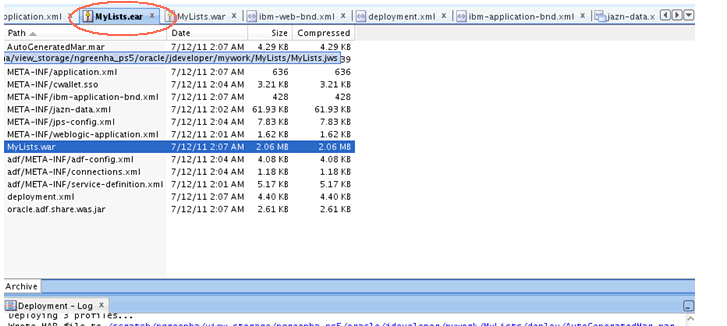
Description of "Figure 5-38 EAR File Deployed to IBM WebSphere"
-
Select the WAR file, and navigate to
WEB-INF/ibm-web-bnd.xml(Figure 5-39).Figure 5-39 WAR File Deployed to IBM WebSphere
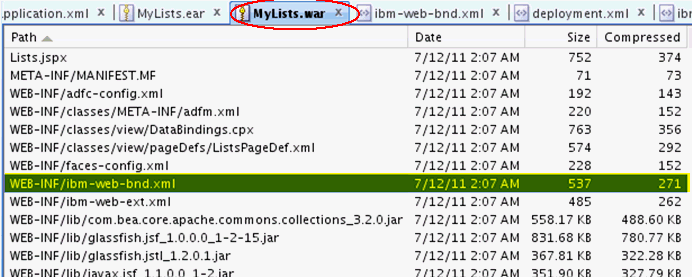
Description of "Figure 5-39 WAR File Deployed to IBM WebSphere"
-
Open
WEB-INF/ibm-web-bnd.xmlto verify that the binding entry maps the MyLists entry to WebCenterDS usages in the application (Figure 5-40).Note: The binding-name is
jdbc/MyListsDS—the database connection name prefixed with "jdbc" and appended with "DS". This information must be used when you create the data source for the target server, using the IBM WebSphere Administrative Console.Figure 5-40 ibm-web-bnd.xml Deployed to IBM WebSphere
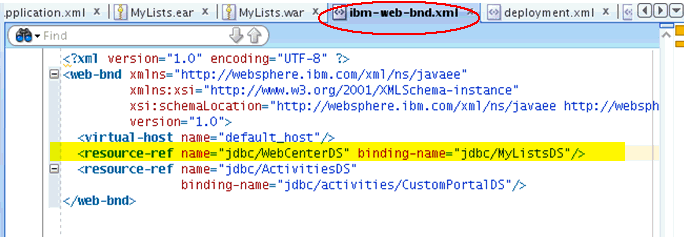
Description of "Figure 5-40 ibm-web-bnd.xml Deployed to IBM WebSphere"
To create a data source using the IBM WebSphere Administrative Console:
-
Log in to the IBM WebSphere Administrative Console.
https://host:port/ibm/console
-
Navigate to Guided Activities > Connecting to a database.
See also, Section 3.2.7, "Creating a Data Source in an IBM WebSphere Cell."
-
Configure credentials for secure database access (Figure 5-41).
Figure 5-41 Configure Credentials for Secure Database Access
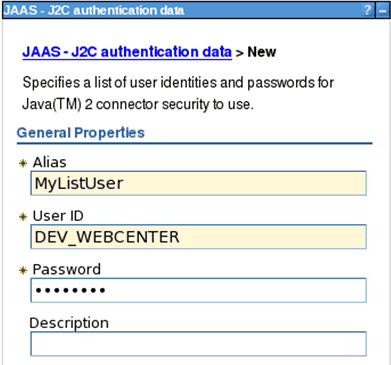
Description of "Figure 5-41 Configure Credentials for Secure Database Access"
-
Configure a JBDC provider (Figure 5-42).
Figure 5-43 Create and Save the JBDC Provider
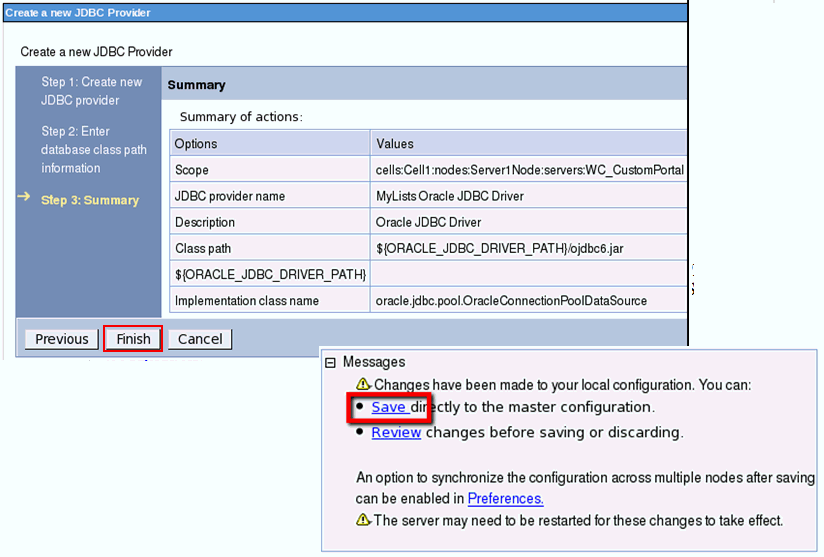
Description of "Figure 5-43 Create and Save the JBDC Provider"
-
Modify the JDBC provider to use the latest Oracle database classes (Figure 5-44):
${COMMON_COMPONENTS_HOME}/modules/oracle.jdbc_11.1.1/ojdbc6dms.jar
${COMMON_COMPONENTS_HOME}/modules/oracle.dms_11.1.1/dms.jar
${COMMON_COMPONENTS_HOME}/modules/oracle.odl_11.1.1/ojdl.jar
and save your changes to the master configuration.
Figure 5-44 Add the Latest Oracle Database Classes
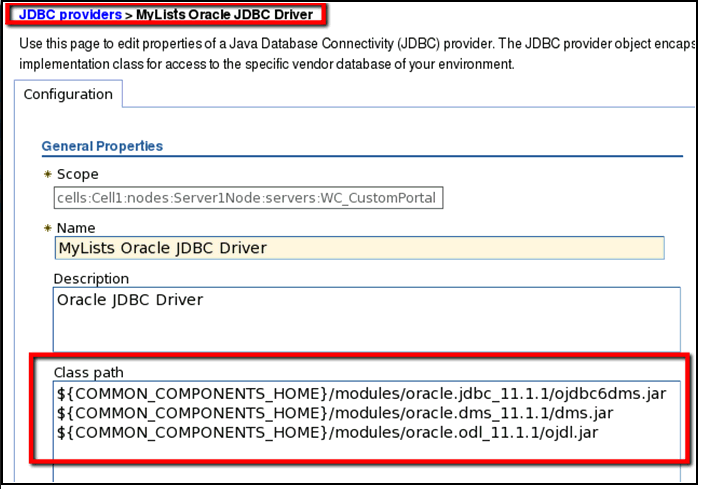
Description of "Figure 5-44 Add the Latest Oracle Database Classes"
-
Skip the step "Configure WebSphere variables."
-
Configure a data source:
-
Enter the JNDI Name exactly as it appears in the application bindings (Figure 5-45). For example:
jdbc/MyListsDS -
Click Next. Select the JBDC Provider you created earlier and enter the JBDC URL to the database connection you created in JDeveloper (Figure 5-46).
-
Click Next. For Container-managed authentication alias, select the alias created earlier, for example MyListUser, and leave all the other fields blank (Figure 5-47).
Note:
Component managed authentication is required if you plan to build SQL data controls. For details, see Section 5.3.7, "Creating SQL Data Controls for Applications Deployed on WebSphere Administration Server."Figure 5-47 Select the Data Source Security Alias
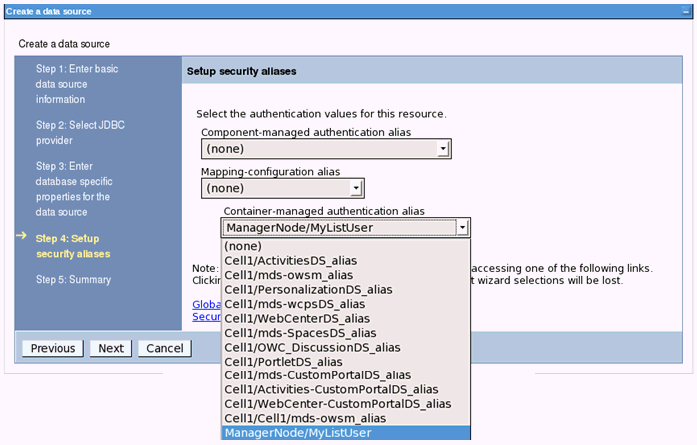
Description of "Figure 5-47 Select the Data Source Security Alias"
-
-
Click Next. Confirm the changes and click Finish (Figure 5-48).
Figure 5-48 Save Data Source Configuration
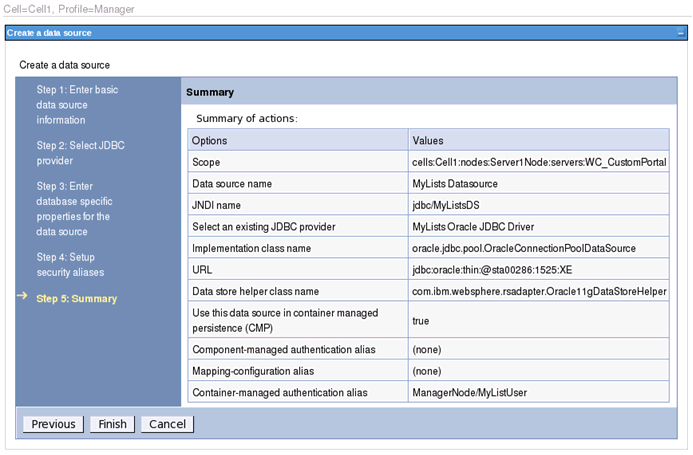
Description of "Figure 5-48 Save Data Source Configuration"
-
Restart the servers to effect the new authentication alias MyListUser.
-
Test the data source connection.
-
Deploy the application and it verify that it uses the new custom data source.
5.3.2.4 Deploying Portal Framework Applications Using SSL
When you deploy Portal Framework applications to IBM WebSphere from JDeveloper, a Deploy using SSL check box displays on the deployment wizard. This differs from Oracle WebLogic Server deployment, where the Deploy using SSL check box instead appears on the Create Application Server Connection wizard (Configuration page).
Table 5-5 describes what occurs when you select this check box during IBM WebSphere Server deployment.
Table 5-5 Deployment to HTTPS and HTTP Servers
| If This Checkbox Is... | Then... |
|---|---|
|
Selected |
An HTTPS server URL must exist to deploy the application with SSL. If the server only has an HTTP URL, deployment fails. |
|
Not selected |
An HTTP server URL must exist to deploy to a non-SSL environment. Otherwise, deployment fails. If the server has both HTTPS and HTTP URLs, deployment occurs through a non-SSL connection. This enables you to force a non-SSL deployment from Oracle JDeveloper, even though the server is SSL-enabled. |
5.3.2.5 Deploying and Redeploying Portal Framework Applications From JDeveloper
Applications do not start automatically after deployment or redeployment from JDeveloper. You have to start the Portal Framework application manually using IBM WebSphere Administrative Console or wsadmin commands. For details, see Section 5.3.4.2, "Deploying Portal Framework Application EARs using WebSphere Admin Console" and Section 5.3.4.3, "Deploying Portal Framework Application EARs using wsadmin Commands."
5.3.3 Targeting Application EAR and WAR Files for IBM WebSphere Deployment
If you want to deploy Portal Framework applications to IBM WebSphere you must ensure that the application's WAR deployment profile and EAR deployment profile are configured with Platform set to WebSphere (Figure 5-49). For details, see the "Creating a WAR Deployment Profile" and "Creating an Application-level EAR Deployment Profile" sections in Oracle Fusion Middleware Fusion Developer's Guide for Oracle Application Development Framework.
Figure 5-49 Configure WebSphere Targeted EAR and WAR Deployment Profiles
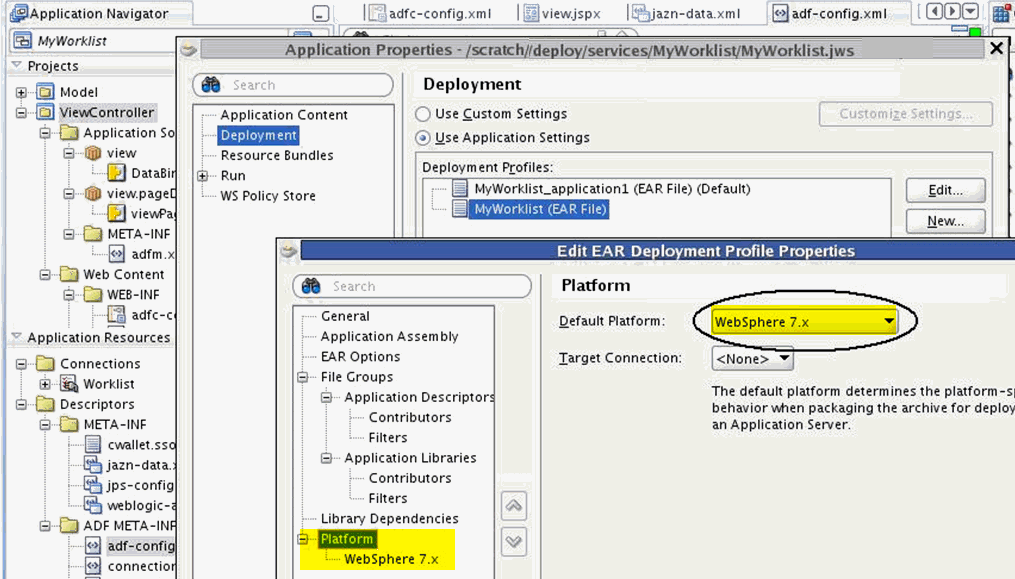
Description of "Figure 5-49 Configure WebSphere Targeted EAR and WAR Deployment Profiles"
5.3.4 Deploying Portal Framework Application EARs using WebSphere Console and wsadmin
If your Portal Framework application is packaged in an EAR file, you can use the IBM WebSphere Console or wsadmin command (AdminApp.install) to deploy the application to WebSphere:
-
Deploying Portal Framework Application EARs using WebSphere Admin Console
-
Deploying Portal Framework Application EARs using wsadmin Commands
Note:
Applications do not start automatically after deployment or redeployment from JDeveloper. You have to start the WebCenter Portal application manually using the IBM WebSphere Administrative Console or using wsadmin commands.5.3.4.1 Deployment Prerequisites
Before you deploy the EAR file:
-
Ensure that the WAR and EAR deployment descriptors used to generate the EAR file specify "WebSphere" as the target platform. See Section 5.3.3, "Targeting Application EAR and WAR Files for IBM WebSphere Deployment."
-
Update the archive's MDS configuration using the wsadmin command
MDSAdmin.getMDSArchiveConfigandarchive.setAppMetadataRepository.For example:
wsadmin>archive = MDSAdmin.getMDSArchiveConfig(fromLocation='/scratch/oracle/jdeveloper/mywork/myPortalFwkApp/deploy/myPortalFwkApp_application1.ear')
wsadmin>archive.setAppMetadataRepository(repository='mds-CustomPortalDS',partition='myPortalFwkApp_application1',type='DB',jndi='jdbc/mds/CustomPortalDS')
Operation "setAppMetadataRepository" successful.
wsadmin>archive.save()
See also the "Deploying Portal Framework Applications" section in Oracle Fusion Middleware Administering Oracle WebCenter Portal.
5.3.4.2 Deploying Portal Framework Application EARs using WebSphere Admin Console
To deploy a Portal Framework application EAR file using IBM WebSphere Console:
Note:
For more information, see the IBM WebSphere documentation.-
Log in to the IBM WebSphere Administrative Console.
-
Navigate to Applications > New Application >New Enterprise Application.
-
Enter the location of your application EAR file and click Next (Figure 5-50).
Figure 5-50 Specifying the Portal Framework Application EAR Location
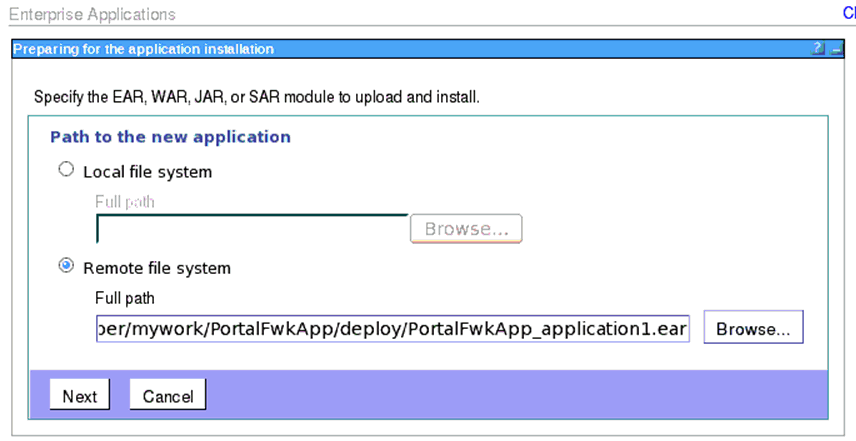
Description of "Figure 5-50 Specifying the Portal Framework Application EAR Location"
-
On the Preparing for the application installation page, accept the default Fast Path install option, and click Next.
-
On the Specify options for installing enterprise applications and modules page, accept all the default settings, and click Next.
-
On the Map modules to servers page, choose the target server for your application
For example:
-
For Portal Framework applications, choose WC_CustomPortal
-
For Portlet Producer applications, choose WC_CustomServicesProducer
-
-
On the summary page select to Finish to install.
-
Select Save (Figure 5-51).
Figure 5-51 Saving Portal Framework Application EAR Installation
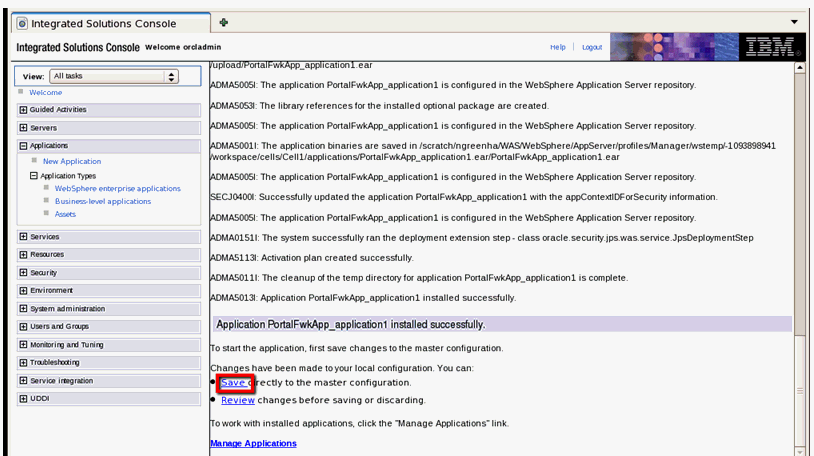
Description of "Figure 5-51 Saving Portal Framework Application EAR Installation"
-
Select the name of your newly installed application, and click Start (Figure 5-52).
Figure 5-52 Starting the Portal Framework Application
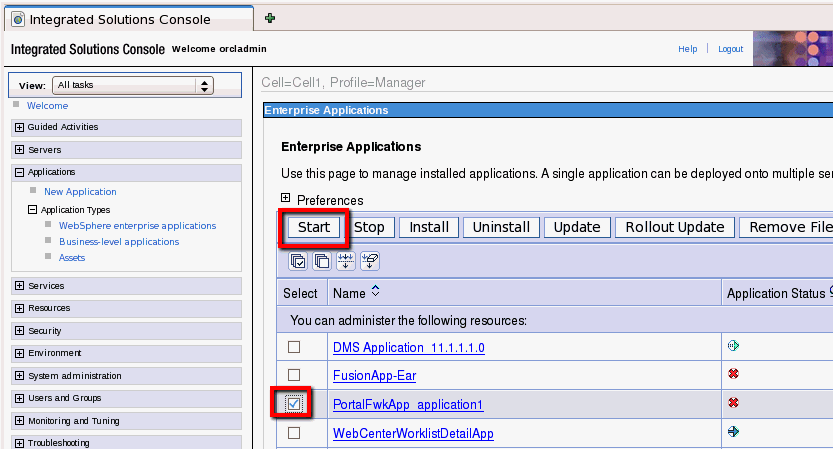
Description of "Figure 5-52 Starting the Portal Framework Application"
Your application is now available.
5.3.4.3 Deploying Portal Framework Application EARs using wsadmin Commands
The steps in this section recommend using Command Assistance to ascertain the correct command syntax and parameter values for application EAR file deployment. While not mandatory, Command Assistance is highly recommended when compiling scripts for lifecycle operations such as deployment.
Note:
For more information, see IBM WebSphere documentation.-
Complete steps 1 through 5 in Section 5.3.4.2, "Deploying Portal Framework Application EARs using WebSphere Admin Console."
-
On the summary page, select View administrative scripting command for last action (Figure 5-53).
Figure 5-53 Viewing Deployment Scripting Commands
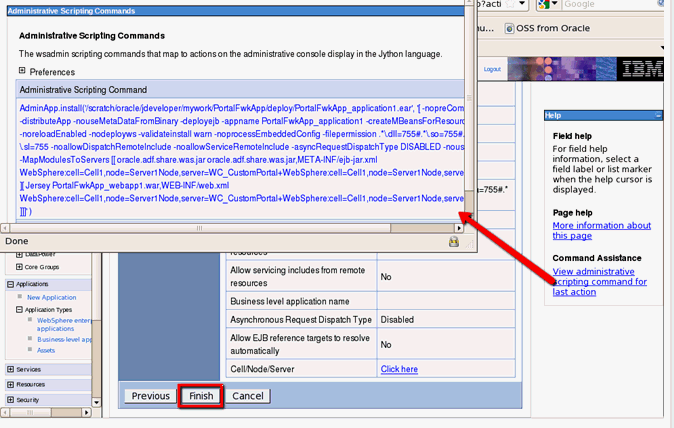
Description of "Figure 5-53 Viewing Deployment Scripting Commands"
-
Copy the AdminApp.install command displayed and paste into a suitable text editor.
-
Edit the EAR file path in the copied command to match the location of your ear file.
-
Deploy your application using the wsadmin command:
-
Open the wsadmin command prompt connected to the deployment manager.
-
Paste the updated command.
-
Execute the wsadmin command.
-
Save the command.
For example:
wsadmin>AdminApp.install('/scratch/oracle/jdeveloper/mywork/PortalFwkApp/deploy/PortalFwkApp_application1.ear',
'[ -nopreCompileJSPs -distributeApp -nouseMetaDataFromBinary -deployejb -appname PortalFwkApp_application1
-createMBeansForResources -noreloadEnabled -nodeployws -validateinstall warn -noprocessEmbeddedConfig -filepermission
.\.dll=755#.\.so=755#.\.a=755#.\.sl=755 -noallowDispatchRemoteInclude  -noallowServiceRemoteInclude
-asyncRequestDispatchType DISABLED -nouseAutoLink -MapModulesToServers [[ oracle.adf.share.was.jar oracle.adf.share.was.jar,
META-INF/ejb-jar.xml WebSphere:cell=Cell1,node=Server1Node,server=WC_CustomPortal+WebSphere:cell=Cell1,
node=Server1Node,server=webserver1 ][ Jersey PortalFwkApp_webapp1.war,WEB-INF/web.xml
WebSphere:cell=Cell1,node=Server1Node,server=WC_CustomPortal+WebSphere:cell=Cell1,node=Server1Node,server=webserver1 ]]]' )
wsadmin>AdminConfig.save()
-
-
Start the newly deployed Portal Framework application using the IBM WebSphere Administrative Console or using wsadmin commands.
For example:
wsadmin>AdminControl.invoke('WebSphere:name=ApplicationManager,process=WC_CustomPortal,
platform=proxy,node=Server1Node,version=7.0.0.19,type=ApplicationManager,mbeanIdentifier=ApplicationManager,cell=Cell1,spec=1.0',
'startApplication', '[PortalFwkApp_application1]', '[java.lang.String]')
5.3.5 Securing a Portal Framework Application Connection to IMAP and SMTP with SSL
The steps to secure an IMAP/ SMTP connection with SSL for a Portal Framework application deployed on IBM WebSphere are slightly different to that on Oracle WebLogic Server. On WebSphere, you need to specify an additional property in the trust store—trustStoreType:
-
Follow steps in the "Securing a Portal Framework Application's Connection to IMAP and SMTP with SSL" section in Oracle Fusion Middleware Administering Oracle WebCenter Portal.
-
Add the following property to the truststore:
-Djavax.net.ssl.trustStore=C:\mail\jssecacerts
-Djavax.net.ssl.trustStorePassword=changeit
-Djavax.net.ssl.trustStoreType=JKS
For example:
set JAVA_PROPERTIES=-Dplatform.home=%WAS_HOME% -Dwls.home=%WAS_HOME%
-Dweblogic.home=%WAS_HOME%
-Djavax.net.ssl.trustStore=C:\mail\jssecacerts
-Djavax.net.ssl.trustStorePassword=changeit
-Djavax.net.ssl.trustStoreType=JKS
-
Restart the Portal Framework application.
-
Log into the application and provide your mail credentials.
5.3.6 Using the Deploy and Configure Script for Portal Framework Applications Deployed on WebSphere
During its life cycle, a typical portal is deployed to testing, staging, and production servers. Oracle WebCenter Portal provides configurable scripts (create_profile_was.csh and deploy_and_config_was.csh) that allow you to easily deploy and configure Portal Framework applications to these server instances and Oracle recommends that you use these deployment scripts rather than ojdeploy.
Note:
The deploy and configure scripts instage2prod are samples only. You are free to develop your scripts in a different location (after copying the sample and making changes to it for your deployed environment).The portal lifecycle and the tasks, tools, and techniques for managing a Portal Framework application deployed on WebLogic Server throughout its life cycle is described in detail in the "Understanding the WebCenter Portal Framework Application Life Cycle" section in Oracle Fusion Middleware Developing Portals with Oracle WebCenter Portal and Oracle JDeveloper. The process is largely the same for WebSphere deployments, however, the script names are different and there is WebSphere-specific content in both setup.properties and profile.properties.
To deploy and configure an application to a WebSphere using Oracle WebCenter Portal scripts:
-
In a terminal window, go to the directory that contains the deploy and configure scripts. These scripts are called:
create_profile_was.cshanddeploy_and_config_was.csh. These files reside inWCP_ORACLE_HOME/webcenter/scripts/stage2prod, whereWCP_ORACLE_HOMEis the directory where Oracle WebCenter Portal is installed.Note:
These scripts need access towsadmin.propertiesandsoap.client.propsfiles to authenticate and connect to the WebSphere deployment manager's SOAP port. Ensure that bothwsadmin.propertiesandsoap.client.propsare present in the directories referenced by the scripts. For more information on howwsadmin.shuseswsadmin.propertiesandsoap.client.props, refer to IBM WebSphere documentation. -
Provide target environment-specific information in the
setup.propertiesfile, such as the target server URL, user name, and password. Open the filesetup.propertiesand add the appropriate values for the target environment. A sample file is shown in Example 5-1. -
Update
create_profile_was.cshanddeploy_and_config_was.cshto reflect the deployed environment.setenv WCP_ORACLE_HOME <webcenter_home> setenv SCRIPTS_DIR <scripts_home>
WCP_ORACLE_HOMEis the Oracle WebCenter Portal Home andSCRIPTS_DIRis where the scripts are located. By default, the scripts are here:$WCP_ORACLE_HOME/webcenter/scripts/stage2prod. If you copied the scripts to another location, then setSCRIPTS_DIRto that location. -
Run the
create_profile_wasscript. The input to this script is thesetup.properitesfile. For example, in a Linux environment, enter:./create_profile_was.csh
This script examines your application environment and produces an output properties file called
profile.properties. -
If you wish, rename the output file,
profile.propertiesto a name that reflects the target environment. For example, if the target environment is your stage environment, you might call the file output filewcstage.properties.The
profile.propertiesfile specifies all the configuration information needed to run the portal on the target environment. For example, it includes settings for the content repository, OmniPortlet, WSRP producers, personalization for Oracle WebCenter Portal and more. Example 5-2 shows a sampleprofile.propertiesfile.Example 5-2 Sample profile.properties File
webcenter.wcps.app.name=wcps-services
webcenter.wcps.app.server=WC_Utilities
doclib.Content.cis.socket.host=hostname
app.mds.jndi=jdbc/mds/SpacesDS
webcenter.app.archive=/net/hostname/scratch/webapp.ear
doclib.Content.cis.socket.port=9444
webcenter.wcps.archive=/net/hostname/scratch/wcps.mar
webcenter.app.name=webapp
app.mds.repository=mds-SpacesDS
app.mds.partition=wcps-services
webcenter.app.version=V2.0
web.OmniPortlet.url=http\://hostname\:7101/portalTools/omniPortlet/providers/omniPortlet
app.restart=false
webcenter.app.server=WC_CustomPortal
# Websphere Server SPECIFIC properties
webcenter.app.node=DefaultCellFederatedNode
webcenter.app.deployoptions=[ -nopreCompileJSPs -distributeApp
-nouseMetaDataFromBinary -nodeployejb -appname PortalApp1_application1
-createMBeansForResources -noreloadEnabled -nodeployws -validateinstall warn
-noprocessEmbeddedConfig -filepermission
.*\\.dll\=755\#.*\\.so\=755\#.*\\.a\=755\#.*\\.sl\=755
-noallowDispatchRemoteInclude -noallowServiceRemoteInclude
-asyncRequestDispatchType DISABLED -nouseAutoLink -MapResRefToEJB [[ PortalApp1_
webapp1.war "" PortalApp1_webapp1.war,WEB-INF/web.xml jdbc/WebCenterDS
javax.sql.DataSource jdbc/WebCenterDS "" "" "" ][ PortalApp1_webapp1.war ""
PortalApp1_webapp1.war,WEB-INF/web.xml jdbc/ActivitiesDS javax.sql.DataSource
jdbc/ActivitiesDS "" "" "" ]]
-MapModulesToServers [[ PortalApp1_webapp1.war PortalApp1_webapp1.war,WEB-INF/web.xml
WebSphere\:cell\=DefaultCell,node\=DefaultCellFederatedNode,server\=WC_CustomPortal]]
-MapWebModToVH [[ PortalApp1_webapp1.war PortalApp1_webapp1.war,WEB-INF/web.xml default_host
Note:
Your environment -specific values will replace the sample values shown in Example 5-2. If a property is not needed, delete it or comment it out rather than leave the value empty. -
Run
create_profile_wasto create a properties file for each of your target environments. For example, you might create one each for your test, stage, and production environments. -
Run the
deploy_and_config_wasscript. The input to this script is theprofile.propertiesfile (or whatever you renamed the file). For example, in a Linux environment, might enter:./deploy_and_config_was.csh wcstage.properties
The deploy_and_config_was script takes one of two "modes" as input. These modes are deploy_config and p13n_metadata. For example:
./deploy_and_config_was.csh p13n_metadata
The deploy_config mode is the default mode if no input is passed to deploy_and_config_was.csh. The deploy_config mode does the deployment and configuration tasks. If you only need to update the personalization metadata, you can override the default behavior by passing in p13n_metadata as the input to the script.
This script deploys and configures the Portal Framework applications to run on the target environment.
5.3.7 Creating SQL Data Controls for Applications Deployed on WebSphere Administration Server
If you want to build SQL data controls for WebCenter Portal or Portal Framework applications deployed on IBM WebSphere that use data sources other than the out-of-the-box data sources (WebCenter and Activities), follow the instructions here:
Note:
If the SQL data control is consumed in a task flow, the task flow displays only the first 25 rows of data. This is a known limitation.-
Create the custom data sources manually using the IBM WebSphere Administrative Console. See Section 5.3.2.3, "Creating Database Connections to Custom Data Sources."
However, to be able to create a SQL data control from custom data source, you must configure security alias information as follows:
Setup security aliases screen:
-
Component-managed authentication alias - Select the user connection alias from the Component-managed authentication alias dropdown menu.
-
Container-managed authentication alias - Select
nonefrom the Container-managed authentication alias dropdown menu.
-
-
Assign administrator roles to users who will create data controls.
Mbeans are used to access data sources available on the IBM WebSphere Application Server. By default, global security is enabled on the server and only users assigned an administrator role can access Mbeans. Users who are not assigned an administrator role will not be able to see any data sources when they try to create a SQL data control so you must assign an administrator role to each user who may need to create SQL data controls.
To assign an administrator role to a user:
-
Log in to the IBM WebSphere Administrative Console and navigate to Security > Global Security.
-
Click the Administrative user roles link.
-
Click Add.
-
Select the role (any of
deployer,operator,configurator,monitor,administrator,adminsecuritymanager,auditor) and search for the user. -
Select the user from the
Availablelist and move to theMapped to rolelist. -
Click OK.
-
5.4 Differences Managing Oracle WebCenter Portal Components on IBM WebSphere
This section includes the following topics:
-
Section 5.4.1, "Running Oracle WebCenter Portal wsadmin Commands"
-
Section 5.4.3, "(WebCenter Portal Only) Migrating Portal Changes"
5.4.1 Running Oracle WebCenter Portal wsadmin Commands
All Oracle WebCenter Portal wsadmin commands have equivalent WLST (WebLogic Scripting Tool) commands which are documented in detail in Oracle Fusion Middleware WebLogic Scripting Tool Command Reference.
Table 5-6 describes some general differences when running wsadmin commands on IBM WebSphere.
Table 5-6 Differences Between WebCenter wsadmin and WLST
| Issue | WLST | wsadmin |
|---|---|---|
|
Command Names |
WLST commands are documented in Oracle Fusion Middleware WebLogic Scripting Tool Command Reference. For example: createMailConnection setWebCenterIdStoreSearchConfig exportWebCenterApplication |
All WebCenter.createMailConnection WebCenter.setWebCenterIdStoreSearchConfig WebCenter.exportWebCenterApplication Note: The |
|
Boolean Type |
You can use true/false or 1/0. For example: setMailConnection(appName='webcenter', name='MyMailServer', default=1) setMailConnection(appName='webcenter', name='MyMailServer', default=true) |
You must use 1/0 For example: WebCenter.setMailConnection (appName='webcenter', name='MyMailServer', default=1) |
|
applicationVersion |
Valid argument. |
Not used. |
|
cloneWebCenterManagedServer command |
Used to clone WebLogic managed servers when setting up a cluster |
Not applicable. |
|
exportWebCenterPortalChanges |
Not applicable |
Exports portal metadata changes for a named portal to a portal archive ( |
|
importWebCenterPortalChanges |
Not applicable |
Imports portal metadata changes for a named portal from a portal archive ( |
Run Oracle WebCenter Portal wsadmin commands from the /common/bin directory of the Oracle WebCenter Portal home:
(UNIX) WCP_ORACLE_HOME/common/bin/wsadmin.sh
(Windows) WCP_ORACLE_HOME\common\bin\wsadmin.bat
To invoke online help for Oracle WebCenter Portal commands, enter the following:
wsadmin> print OracleHelp.help('WebCenter')
To invoke online help for a specific command, enter the command name:
wsadmin> print OracleHelp.help('WebCenter.createMailConnection')
For more information about wsadmin commands, see Section 3.1.3, "Using the Oracle Fusion Middleware wsadmin Commands."
For information about the equivalent Oracle WebCenter Portal WLST commands, see Oracle Fusion Middleware WebLogic Scripting Tool Command Reference.
5.4.2 Managing WebCenter Portal and Portal Framework Applications With Fusion Middleware Control
You can start, stop, or restart an Oracle WebCenter Portal cell and manage WebCenter Portal or Portal Framework applications deployed on IBM WebSphere with Fusion Middleware Control. The functionality is the same as that described for WebLogic deployments. The only differences are as follows:
-
Navigation Tree - a WebSphere Cell folder displays in the navigation tree instead of WebLogic Domain folder.
-
Home Page for WebCenter Portal (Figure 5-54)
-
Related Components section - you cannot navigate directly to the WebCenter Portal application.
-
Related Components section - a link to the WebSphere Cell on which the WebCenter Portal application is deployed displays instead of a WebLogic Server link.
-
-
Home Page for Portal Framework Applications - You cannot navigate to the IBM WebSphere Administrative Console.
Figure 5-54 Fusion Middleware Control Home Page for a WebCenter Portal Deployment on IBM WebSphere
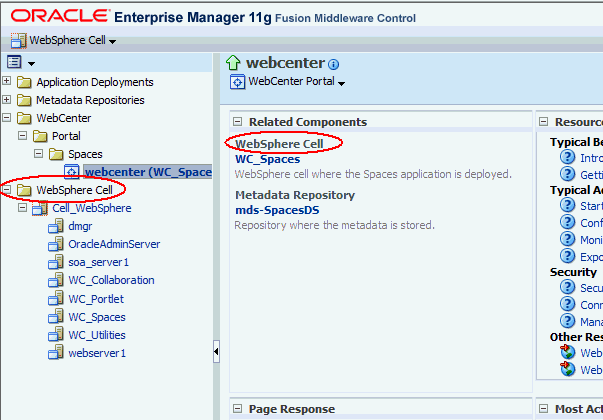
Description of "Figure 5-54 Fusion Middleware Control Home Page for a WebCenter Portal Deployment on IBM WebSphere"
5.4.3 (WebCenter Portal Only) Migrating Portal Changes
You can export metadata changes for a named portal to a portal archive (.par file) and import them to another target.
Portal metadata changes:
-
Include: new pages, page edits, page and task flow customizations (global customizations and user customizations)
-
Exclude: subportals, security, any changes to content and data, user customizations to portlets
Notes:
-
You can only export changes for a portal that was previously exported using the
exportWebCenterPortalscommand.Similarly, you can only import changes for a portal that was previously imported using the
importWebCenterPortalscommand. -
You must have at least the
Monitorrole and the WebCenter Portal permissionPortals - Manage Allto run this command.
In the source environment, run the wsadmin command WebCenter.exportWebCenterPortalChanges to export metadata changes for a named portal to an archive:
WebCenter.exportWebCenterPortalChanges(appName, fileName, portalName, [server, applicationVersion])
In the target environment, run the command WebCenter.importWebCenterPortalChanges to import portal metadata changes from the archive:
WebCenter.importWebCenterPortalChanges(appName, fileName, [server, applicationVersion])
For command syntax, see the "exportWebCenterPortalChanges" and "importWebCenterPortalChanges" sections in the Oracle Fusion Middleware WebLogic Scripting Tool Command Reference.
Here is an example:
Example 1 - Exporting portal metadata changes to an archive
The following example exports metadata changes for a portal named myPortal to an archive named myPortalChangesExport.par:
exportWebCenterPortalChanges(appName='webcenter', fileName='myPortalChangesExport.par', portalName='myPortal')
Example 2 - Importing portal metadata changes from an archive
The following example imports portal metadata changes from an archive named myPortalChangesExport.par:
exportWebCenterPortalChanges(appName='webcenter', fileName='myPortalChangesExport.par')
See also, Section 5.9.14, "Error Messages Exporting and Importing Portal Changes".
5.5 Patching Oracle WebCenter Portal on IBM WebSphere from 11.1.1.7 to 11.1.1.8
To migrate an existing Oracle WebCenter Portal 11.1.1.7 installation on IBM WebSphere to WebCenter Portal version 11.1.1.8, follow these steps. Follow the same steps in a clustered WebCenter Portal environment:
-
Determine your existing Oracle Web Services Manager (OWSM) security policy URIs for WebCenter Portal, Discussions, and Portlet Producer web service end points, so you can restore the policies in your patched instance:
-
Ensure the following managed servers are up and running:
WC_Spaces- WebCenter Portal applicationWC_Collaboration- Discussions applicationWC_Portlet- Portlet producers, including the WebCenter Services Portlets producerAny other custom managed servers on which custom portlet producers are deployed.
-
Connect to the Dmgr server using wsadmin:
WCP_ORACLE_HOME/common/bin/wsadmin.sh -conntype SOAP -user <admin username> -password <password> -port <admin SOAP port> -host <Dmgr host> -
To determine the policy used by the WebCenter Portal application, run the following command:
WebServices.listWebServicePolicies(application='/Node_name/WC_Spaces/webcenter', moduleOrCompName='webcenter', moduleType='web',
serviceName='SpacesWebService', subjectName='SpacesWebServiceSoapHttpPort')
Where, Node_name refers to the name of the node in which the server is running, and WC_Spaces is the name of the managed server on which the WebCenter Portal application is deployed. The other parameters are all fixed.
If you are using the out-of-the-box OWSM security policy, the command displays information in the following format:
SpacesWebServiceSoapHttpPort :security : oracle/wss11_saml_or_username_token_with_message_protection_service_policy, enabled=true
Attached policy or policies are valid; endpoint is secure.
Note down the security policy name highlighted in bold so you can restore the setting after patching your instance.
-
To determine the policy used by the discussions application, run the following command:
WebServices.listWebServicePolicies(application='/Node_name/WC_Collaboration/owc_discussions_11.1.1.4.0', moduleOrCompName='owc_discussions', moduleType='web',
serviceName='OWCDiscussionsServiceAuthenticated', subjectName='OWCDiscussionsServiceAuthenticated')
Where, Node_name refers to the name of the node in which the server is running, and WC_Collaboration is the name of the managed server on which discussions server is deployed. The other parameters are all fixed.
If you are using the out-of-the-box OWSM security policy, the command's result is of the following format:
OWCDiscussionsServiceAuthenticated :security : oracle/wss10_saml_token_service_policy, enabled=true
Attached policy or policies are valid; endpoint is secure.
Note down the security policy URI highlighted in bold so you can restore the setting after patching your instance.
-
To determine the policy used by the WebCenter Services Portlets producer, run the following command:
WebServices.listWebServicePolicies(application='/Node_name/WC_Portlet/services-producer', moduleOrCompName='services-producer',
moduleType='web', serviceName='WSRP_v2_Service', subjectName='WSRP_v2_Markup_Service')
Where, Node_name refers to the name of the node in which the server is running, and WC_Portlet is the name of the managed server on which this producer is deployed. The other parameters are all fixed.
The WebCenter Services Portlets producer is available out-of-the-box from WebCenter Portal release 11.1.1.6.0 onward. If this producer is deployed in your instance, run the command above and note down the security policy URI displayed so you can restore the setting after patching your instance.
-
For any custom portlet producers deployed in your instance, run the following command:
WebServices.listWebServicePolicies(application='/Node_name/WC_Portlet/TestJSR286#1.0', moduleOrCompName='TestJSR286',
moduleType='web',serviceName='WSRP_v2_Service', subjectName='WSRP_v2_Markup_Service')
Where, Node_name refers to the name of the node in which the server is running and WC_Portlet is the name of the managed server on which the producer is deployed, and the custom portlet producer is named
TestJSR286(version 1.0). The other parameters are all fixed.You may have various custom portlet producers deployed in your WebCenter Portal instance that have Oracle WSM security policies attached to web service end points (
WSRP_v2_Markup_Service). If you intend to redeploy the custom portlet producers after patching your instance, note down the security policy URI (highlighted in bold) for each custom portlet producer so you can restore the security setting after patching.The following is a sample output for the command:
WSRP_v2_Markup_Service :
security : oracle/wss10_saml_token_service_policy, enabled=true
Attached policy or policies are valid; endpoint is secure.
-
-
Stop the IBM WebSphere deployment manager, node managers, and all the server processes.
For more information, see Section 3.2.2, "Starting and Stopping Servers on IBM WebSphere."
-
Back up your existing Oracle WebCenter Portal instance (or clustered Oracle WebCenter Portal instance).
Follow your usual back up process. For example, if you are running Linux and the
/scratch/WASdirectory contains your IBM WebSphere and Oracle WebCenter Portal installation, you can use the tar utility as follows:sudo sutar -cvhf backup-#DATE#.tar /scratch/WAS -
Back up your existing database and database schemas.
See also, the "Backing Up Your Database and Database Schemas" section in Oracle Fusion Middleware Patching Guide.
-
Install Oracle WebCenter Portal 11.1.1.8 into your existing Oracle Middleware home (11.1.1.7):
-
Download and install WebCenter Portal, as described in Chapter 2, "Installing and Configuring Oracle Fusion Middleware on IBM WebSphere."
-
Ensure that Oracle Middleware Home, specifies your existing install location.
-
Click Yes when asked to confirm that you want to upgrade your existing Oracle Middleware Home (Figure 5-55).
Figure 5-55 Upgrade Existing Oracle WebCenter Portal Installation
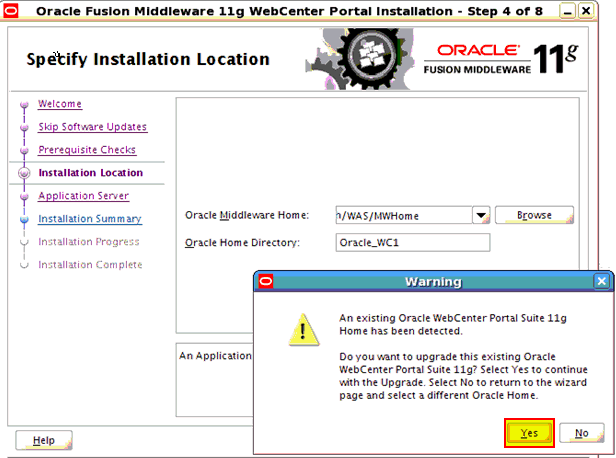
Description of "Figure 5-55 Upgrade Existing Oracle WebCenter Portal Installation"
-
Complete the installation (screens 5 to 8).
Note:
If the Oracle WebCenter Portal instance is part of a cluster, perform the install step on each node where Oracle WebCenter Portal is installed. The deployment manager will push out application changes to the other nodes using the node agent, and application redeployment will take place when the other nodes and server are restarted. -
-
Use the Patch Set Assistant to update all the required schemas, including WEBCENTER, MDS, ACTIVITIES, DISCUSSIONS, and DISCUSSIONS_CRAWLER schemas.
To determine which schemas you need to patch, refer to the "Which Schemas Need to be Updated with Patch Set Assistant?" section in Oracle Fusion Middleware Patching Guide.
Before running Patch Set Assistant, you should check to make sure that your database is up and running and that the schema you want to upgrade is at the version supported for upgrade. See also the "Which Schemas Need to be Updated with Patch Set Assistant?" section in Oracle Fusion Middleware Patching Guide.
-
Start the upgraded IBM WebSphere deployment manager and node agent.
On a Linux installation for example, where the IBM WebSphere profile's manager is named "Manager" and the node agent is named "Server1", enter:
/scratch/WAS/WebSphere/AppServer/profiles/Manager/bin/startManager.sh/scratch/WAS/WebSphere/AppServer/profiles/Server1/bin/startNode.shFor detail, see Section 2.7, "Task 7: Start the IBM WebSphere Servers."
Note:
In a clustered environment, start the node agent on each node in the cluster. -
Upgrade all the shared libraries and the policy store:
-
Delete all
.classfiles inWCP_Oracle_Home/common/wsadminandWCP_Oracle_Home/common/script_handlers.For example:
cd <WCP_Oracle_Home>/common/wsadmin
rm -rf *.class
cd <WCP_Oracle_Home>/common/script_handlers
rm -rf *.class
-
Connect to the Dmgr server using wsadmin:
WCP_ORACLE_HOME/common/bin/wsadmin.sh -conntype SOAP -user <admin username> -password <password> -port <admin SOAP port> -host <Dmgr host> -
Run the
WebCenter.upgradeSharedLibrarieswsadmin command to upgrade the required shared libraries:WebCenter.upgradeSharedLibraries()
-
Run the
WebCenter.upgradeWebCenterPermissionswsadmin command to update the policy store:WebCenter.upgradeWebCenterPermissions()
-
-
Redeploy the enterprise applications listed in Table 5-7 to the specified locations.
Note:
You can ignore applications that are not deployed in your existing Oracle WebCenter Portal 11.1.1.7.0 installation.Table 5-7 Enterprise Applications Requiring Redeployment
Application Name Application EAR Location DMS Application 11.1.1.1.0
MW_HOME/oracle_common/modules/oracle.dms_11.1.1/dms-was.ear
FMW Welcome Page Application_11.1.0.0.0
MW_HOME/oracle_common/modules/oracle.jrf_11.1.1/fmw-welcome.ear
Dmgr DMS Application 11.1.1.1.0
MW_HOME/oracle_common/modules/oracle.dms_11.1.1/dms-was.ear
activitygraph-engines 11.1.1.4.0
MW_HOME/WCP_ORACLE_HOME/activitygraph/archives/applications/activityGraph-engines-was.ear
analytics-collector 11.1.1.4.0
MW_HOME/WCP_ORACLE_HOME/analytics-collector/archives/applications/analytics-collector-jee-was.ear
em
MW_HOME/oracle_common/sysman/archives/fmwctrl/app/em.ear
owc_discussions 11.1.1.4.0
MW_HOME/WCP_ORACLE_HOME/discussionserver/owc_discussions-was.ear
pagelet-producer 11.1.1.6.0
MW_HOME/WCP_ORACLE_HOME/ensemble/archives/applications/pagelet-producer-was.ear
portalTools
MW_HOME/WCP_ORACLE_HOME/webcenter/modules/oracle.portlet.server_11.1.1/portalTools.ear
services-producer
MW_HOME/WCP_ORACLE_HOME/webcenter/archives/services-producer-was.ear
wcps-services 11.1.1.4.0
MW_HOME/WCP_ORACLE_HOME/wcps-services-app/archives/applications/wcps-services-was.ear
webcenter
MW_HOME/WCP_ORACLE_HOME/archives/applications/webcenter-was.ear
webcenter-help
MW_HOME/WCP_ORACLE_HOME/archives/applications/webcenter-help-was.ear
wsil-nonwls
MW_HOME/oracle_common/modules/oracle.webservices_11.1.1/wsil-nonwls.ear
wsm-pm
MW_HOME/oracle_common/modules/oracle.wsm.pm_11.1.1/wsm-pm-was.ear
wsrp-tools
MW_HOME/WCP_ORACLE_HOME/webcenter/modules/oracle.portlet.server_11.1.1/wsrp-tools-was.ear
To redeploy applications, follow these steps:
-
Log in to the IBM Administrative Console.
-
Navigate to Applications> Application Types> WebSphere Enterprise Applications.
-
Select the name of the application you want to redeploy, for example DMS Application 11.1.1.1.0 and click Update (Figure 5-56).
Figure 5-56 Update Enterprise Application Deployment
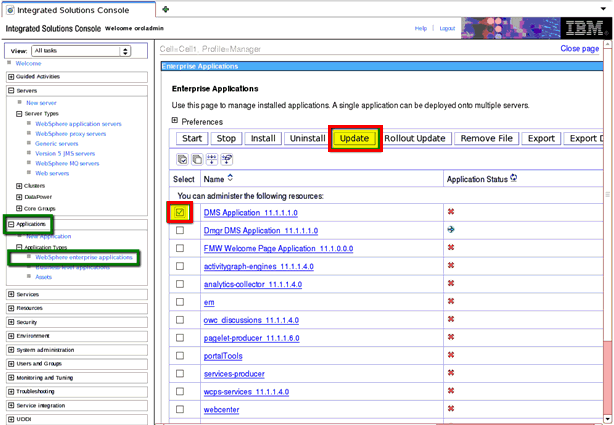
Description of "Figure 5-56 Update Enterprise Application Deployment"
-
In the Application Update Options screen, select Replace the entire application, and then enter the full path to the EAR file in the Remote file system (Figure 5-57).
For example, if your MW_HOME is
/scratch/WAS/Middleware, enter/scratch/WAS/Middleware/oracle_common/modules/oracle.dms_11.1.1/dms-was.ear.Figure 5-57 Application Upgrade - Specify Full Path to Application EAR File
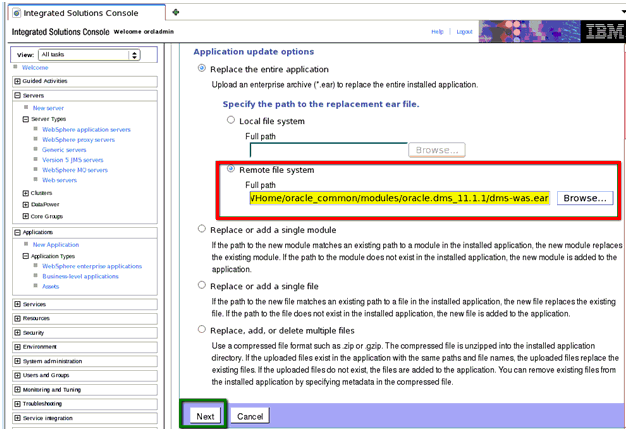
Description of "Figure 5-57 Application Upgrade - Specify Full Path to Application EAR File"
-
Click Next.
-
In the Preparing for the Application Updates screen, keep the defaults and click Next (Figure 5-58).
Figure 5-58 Application Upgrade - Preparing for the Application Update Screen
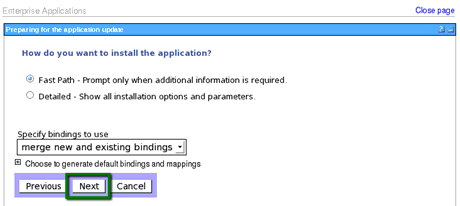
Description of "Figure 5-58 Application Upgrade - Preparing for the Application Update Screen"
-
In the Select Installation Options screen, keep the defaults, and click Next (Figure 5-59).
Figure 5-59 Application Upgrade - Select Installation Options Screen
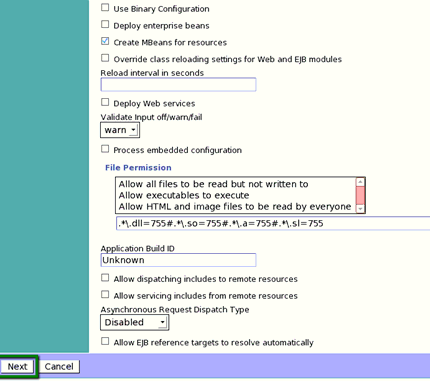
Description of "Figure 5-59 Application Upgrade - Select Installation Options Screen"
-
In the Map Modules to Servers screen, keep the defaults, and click Next (Figure 5-60).
Figure 5-60 Application Upgrade - Map to Modules Screen
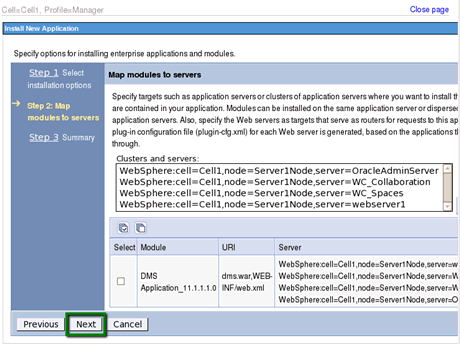
Description of "Figure 5-60 Application Upgrade - Map to Modules Screen"
-
In the Summary screen, keep the defaults, and click Finish.
Installation progress messages are displayed (Figure 5-61).
Figure 5-61 Application Upgrade - Application Installed Successfully
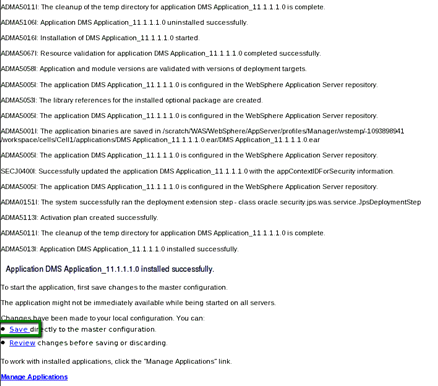
Description of "Figure 5-61 Application Upgrade - Application Installed Successfully"
-
Click Save.
-
Repeat step 6 for each application in Table 5-7 that you need to redeploy.
-
-
Update the security role mapping of the
wsm-pmapplication.When you redeploy the
wsm-pmapplication some required security role mapping configuration is lost which you need to re-apply as follows:-
Log in to the IBM Administrative Console.
-
Navigate to Applications> Application Types> WebSphere Enterprise Applications.
-
Select the wsm-pm application link.
-
Select Security role to user/group mapping.
Figure 5-62 Update Security Role Mapping for wsm-pm
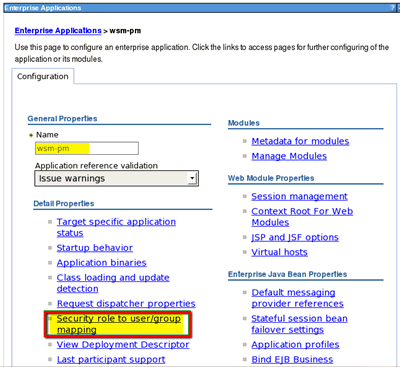
Description of "Figure 5-62 Update Security Role Mapping for wsm-pm"
-
Select policy.Accessor, policy.Updater, policy.User roles as shown in Figure 5-63.
These three roles must be mapped to the same users as policyViewer.
You do not need to map users to policyQuerier.
Figure 5-63 Map Security Roles for wsm-pm
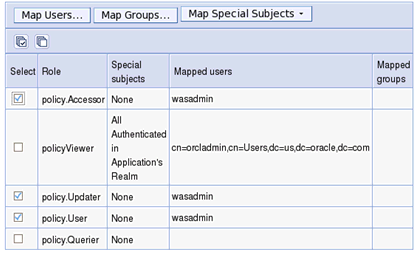
Description of "Figure 5-63 Map Security Roles for wsm-pm"
-
Select Map Users, and map the same users as policyViewer.
In the example shown (Figure 5-63), the administrative user for policyViewer is
orcladmin. -
Click OK.
-
-
Restore the Oracle Web Services Manager (OWSM) security policies settings that you recorded earlier in Step 1:
-
Ensure the WC_Spaces, WC_Collaboration, and WC_Portlet managed servers are running.
If custom portlet producers are deployed to any custom managed servers, ensure those servers are also up and running.
-
Connect to the Dmgr server using wsadmin:
WCP_ORACLE_HOME/common/bin/wsadmin.sh -conntype SOAP -user <admin username> -password <password> -port <admin SOAP port> -host <Dmgr host> -
Run the following command to attach the Oracle WSM security policy to the web service endpoint (
SpacesWebService):WebServices.attachWebServicePolicy(applicaton='webcenter', moduleOrCompName='webcenter', moduleType='web', serviceName'SpacesWebService', 'SpacesWebServiceSoapHttpPort', policyURI='oracle/wss11_saml_or_username_token_with_message_protection_service_policy')
Where
oracle/wss11_saml_or_username_token_with_message_protection_service_policyis the policy setting you recorded in Step 1c. -
Run the following command to attach the Oracle WSM security policy to the web service endpoint (
OWCDiscussionsServiceAuthenticated) for discussions:WebServices.attachWebServicePolicy(applicaton='owc_discussions_11.1.1.4.0', moduleOrCompName='owc_discussions', moduleType='web', serviceName='OWCDiscussionsServiceAuthenticated', subjectName='OWCDiscussionsServiceAuthenticated', policyURI='oracle/wss10_saml_token_service_policy')
Where
oracle/wss10_saml_token_service_policyis the policy setting you recorded in Step 1d. -
Run the following command to attach the Oracle WSM security policy to the web service endpoint (
services-producer) for the WebCenter Services Portlets producer:WebServices.attachWebServicePolicy(applicaton='services-producer', moduleOrCompName='services-producer', moduleType='web', serviceName='WSRP_v2_Service', subjectName='WSRP_v2_Markup_Service', policyURI='oracle/wss10_saml_token_service_policy')
Where
oracle/wss10_saml_token_service_policyis the policy setting you recorded in Step 1e.Note:
This step is required only if you are patching from release 11.1.1.6.0, and the WebCenter Services Portlets producer is deployed. -
Run the following command to attach the Oracle WSM security policy to the web service endpoint (
WSRP_v2_Markup_Service) for a custom portlet producer, for example, if your portlet producer's name isTestJSR286, and it is deployed to theWC_Portletmanaged server with version 1.0, run the following command:WebServices.attachWebServicePolicy(applicaton='TestJSR286#1.0', moduleOrCompName='TestJSR286', moduleType='web', serviceName='WSRP_v2_Service', subjectName='WSRP_v2_Markup_Service', policyURI='oracle/wss10_saml_token_service_policy')
Where
oracle/wss10_saml_token_service_policyis the policy setting you recorded in Step 1f.Note:
This step is required only if any custom portlet producers are deployed in your WebCenter Portal environment. You must run theWebServices.attachWebServicePolicycommand for each custom portlet producer separately.
-
-
Set unique cookie paths for WebCenter Portal and Portal Framework applications.
For details, see Section 5.2.11, "Setting Cookie Paths for WebCenter Portal and Portal Framework Application Modules Post Deployment."
-
Restart all the servers, including the node manager in IBM WebSphere to effect the security mapping updates.
5.6 Patching Oracle WebCenter Portal on IBM WebSphere from 11.1.1.6 to 11.1.1.8
To migrate an existing Oracle WebCenter Portal 11.1.1.6 installation on IBM WebSphere to WebCenter Portal version 11.1.1.8, follow these steps. Follow the same steps in a clustered WebCenter Portal environment:
-
Determine your existing Oracle Web Services Manager (OWSM) security policy URIs for WebCenter Portal, Discussions, and Portlet Producer web service end points, so you can restore the policies in your patched instance:
-
Ensure the following managed servers are up and running:
WC_Spaces- WebCenter Portal applicationWC_Collaboration- Discussions applicationWC_Portlet- Portlet producers, including the WebCenter Services Portlets producerAny other custom managed servers on which custom portlet producers are deployed.
-
Connect to the Dmgr server using wsadmin:
WCP_ORACLE_HOME/common/bin/wsadmin.sh -conntype SOAP -user <admin username> -password <password> -port <admin SOAP port> -host <Dmgr host> -
To determine the policy used by the WebCenter Portal application, run the following command:
WebServices.listWebServicePolicies(application='/Node_name/WC_Spaces/webcenter', moduleOrCompName='webcenter',
moduleType='web', serviceName='SpacesWebService', subjectName='SpacesWebServiceSoapHttpPort')
Where, Node_name refers to the name of the node in which the server is running, and WC_Spaces is the name of the managed server on which the WebCenter Portal application is deployed. The other parameters are all fixed.
If you are using the out-of-the-box OWSM security policy, the command displays information in the following format:
SpacesWebServiceSoapHttpPort :security : oracle/wss11_saml_or_username_token_with_message_protection_service_policy, enabled=true
Attached policy or policies are valid; endpoint is secure.
Note down the security policy name highlighted in bold so you can restore the setting after patching your instance.
-
To determine the policy used by the discussions application, run the following command:
WebServices.listWebServicePolicies(application='/Node_name/WC_Collaboration/owc_discussions_11.1.1.4.0', moduleOrCompName='owc_discussions', moduleType='web',
serviceName='OWCDiscussionsServiceAuthenticated', subjectName='OWCDiscussionsServiceAuthenticated')
Where, Node_name refers to the name of the node in which the server is running, and WC_Collaboration is the name of the managed server on which discussions server is deployed. The other parameters are all fixed.
If you are using the out-of-the-box OWSM security policy, the command's result is of the following format:
OWCDiscussionsServiceAuthenticated :security : oracle/wss10_saml_token_service_policy, enabled=true
Attached policy or policies are valid; endpoint is secure.
Note down the security policy URI highlighted in bold so you can restore the setting after patching your instance.
-
To determine the policy used by the WebCenter Services Portlets producer, run the following command:
WebServices.listWebServicePolicies(application='/Node_name/WC_Portlet/services-producer', moduleOrCompName='services-producer',
moduleType='web', serviceName='WSRP_v2_Service', subjectName='WSRP_v2_Markup_Service')
Where, Node_name refers to the name of the node in which the server is running, and WC_Portlet is the name of the managed server on which this producer is deployed. The other parameters are all fixed.
The WebCenter Services Portlets producer is available out-of-the-box from WebCenter Portal release 11.1.1.6.0 onward. If this producer is deployed in your instance, run the command above and note down the security policy URI displayed so you can restore the setting after patching your instance.
-
For any custom portlet producers deployed in your instance, run the following command:
WebServices.listWebServicePolicies(application='/Node_name/WC_Portlet/TestJSR286#1.0', moduleOrCompName='TestJSR286',
moduleType='web',serviceName='WSRP_v2_Service', subjectName='WSRP_v2_Markup_Service')
Where, Node_name refers to the name of the node in which the server is running and WC_Portlet is the name of the managed server on which the producer is deployed, and the custom portlet producer is named
TestJSR286(version 1.0). The other parameters are all fixed.You may have various custom portlet producers deployed in your WebCenter Portal instance that have Oracle WSM security policies attached to web service end points (
WSRP_v2_Markup_Service). If you intend to redeploy the custom portlet producers after patching your instance, note down the security policy URI (highlighted in bold) for each custom portlet producer so you can restore the security setting after patching.The following is a sample output for the command:
WSRP_v2_Markup_Service :
security : oracle/wss10_saml_token_service_policy, enabled=true
Attached policy or policies are valid; endpoint is secure.
-
-
Stop the IBM WebSphere deployment manager, node managers, and all the server processes.
For more information, see Section 3.2.2, "Starting and Stopping Servers on IBM WebSphere."
-
Back up your existing Oracle WebCenter Portal instance (or clustered Oracle WebCenter Portal instance).
Follow your usual back up process. For example, if you are running Linux and the
/scratch/WASdirectory contains your IBM WebSphere and Oracle WebCenter Portal installation, you can use the tar utility as follows:sudo sutar -cvhf backup-#DATE#.tar /scratch/WAS -
Back up your existing database and database schemas.
See also, the "Backing Up Your Database and Database Schemas" section in Oracle Fusion Middleware Patching Guide.
-
Install Oracle WebCenter Portal 11.1.1.8 into your existing Oracle Middleware home (11.1.1.6):
-
Download and install WebCenter Portal, as described in Chapter 2, "Installing and Configuring Oracle Fusion Middleware on IBM WebSphere."
-
Ensure that Oracle Middleware Home, specifies your existing install location.
-
Click Yes when asked to confirm that you want to upgrade your existing Oracle Middleware Home (Figure 5-55).
Figure 5-64 Upgrade Existing Oracle WebCenter Portal Installation

Description of "Figure 5-64 Upgrade Existing Oracle WebCenter Portal Installation"
-
Complete the installation (screens 5 to 8).
Note:
If the Oracle WebCenter Portal instance is part of a cluster, perform the install step on each node where Oracle WebCenter Portal is installed. The deployment manager will push out application changes to the other nodes using the node agent, and application redeployment will take place when the other nodes and server are restarted. -
-
Use the Patch Set Assistant to update all the required schemas, including
WEBCENTER,ACTIVITIES,DISCUSSIONS, andDISCUSSIONS_CRAWLERschemas.To determine which schemas you need to patch, refer to the "Which Schemas Need to be Updated with Patch Set Assistant?" section in Oracle Fusion Middleware Patching Guide.
Before running Patch Set Assistant, you should check to make sure that your database is up and running and that the schema you want to upgrade is at the version supported for upgrade. See also, the "Which Schemas Need to be Updated with Patch Set Assistant?" section in Oracle Fusion Middleware Patching Guide.
-
Start the upgraded IBM WebSphere deployment manager and node agent.
On a Linux installation for example, where the IBM WebSphere profile's manager is named "Manager" and the node agent is named "Server1", enter:
/scratch/WAS/WebSphere/AppServer/profiles/Manager/bin/startManager.sh/scratch/WAS/WebSphere/AppServer/profiles/Server1/bin/startNode.shFor detail, see Section 2.7, "Task 7: Start the IBM WebSphere Servers."
Note:
In a clustered environment, start the node agent on each node in the cluster. -
Upgrade all the shared libraries and the policy store:
-
Delete all
.classfiles inWCP_Oracle_Home/common/wsadminandWCP_Oracle_Home/common/script_handlers.For example:
cd <WCP_Oracle_Home>/common/wsadmin
rm -rf *.class
cd <WCP_Oracle_Home>/common/script_handlers
rm -rf *.class
-
Connect to the Dmgr server using wsadmin:
WCP_ORACLE_HOME/common/bin/wsadmin.sh -conntype SOAP -user <admin username> -password <password> -port <admin SOAP port> -host <Dmgr host> -
Run the
WebCenter.upgradeSharedLibrarieswsadmin command:WebCenter.upgradeSharedLibraries()
-
Update the policy store
WebCenter.upgradeWebCenterPermissions()
-
-
Redeploy the enterprise applications listed in Table 5-7 to the specified locations.
Note:
You can ignore applications that are not deployed in your existing Oracle WebCenter Portal 11.1.1.6.0 installation.Table 5-8 Enterprise Applications Requiring Redeployment
Application Name Application EAR Location DMS Application 11.1.1.1.0
MW_HOME/oracle_common/modules/oracle.dms_11.1.1/dms-was.ear
FMW Welcome Page Application_11.1.0.0.0
MW_HOME/oracle_common/modules/oracle.jrf_11.1.1/fmw-welcome.ear
Dmgr DMS Application 11.1.1.1.0
MW_HOME/oracle_common/modules/oracle.dms_11.1.1/dms-was.ear
activitygraph-engines 11.1.1.4.0
MW_HOME/WCP_ORACLE_HOME/activitygraph/archives/applications/activityGraph-engines-was.ear
analytics-collector 11.1.1.4.0
MW_HOME/WCP_ORACLE_HOME/analytics-collector/archives/applications/analytics-collector-jee-was.ear
em
MW_HOME/oracle_common/sysman/archives/fmwctrl/app/em.ear
owc_discussions 11.1.1.4.0
MW_HOME/WCP_ORACLE_HOME/discussionserver/owc_discussions-was.ear
pagelet-producer 11.1.1.6.0
MW_HOME/WCP_ORACLE_HOME/ensemble/archives/applications/pagelet-producer-was.ear
portalTools
MW_HOME/WCP_ORACLE_HOME/webcenter/modules/oracle.portlet.server_11.1.1/portalTools.ear
services-producer
MW_HOME/WCP_ORACLE_HOME/webcenter/archives/services-producer-was.ear
wcps-services 11.1.1.4.0
MW_HOME/WCP_ORACLE_HOME/wcps-services-app/archives/applications/wcps-services-was.ear
webcenter
MW_HOME/WCP_ORACLE_HOME/archives/applications/webcenter-was.ear
webcenter-help
MW_HOME/WCP_ORACLE_HOME/archives/applications/webcenter-help-was.ear
wsil-nonwls
MW_HOME/oracle_common/modules/oracle.webservices_11.1.1/wsil-nonwls.ear
wsm-pm
MW_HOME/oracle_common/modules/oracle.wsm.pm_11.1.1/wsm-pm-was.ear
wsrp-tools
MW_HOME/WCP_ORACLE_HOME/webcenter/modules/oracle.portlet.server_11.1.1/wsrp-tools-was.ear
To redeploy applications, follow these steps:
-
Log in to the IBM Administrative Console.
-
Navigate to Applications> Application Types> WebSphere Enterprise Applications.
-
Select the name of the application you want to redeploy, for example DMS Application 11.1.1.1.0 and click Update (Figure 5-56).
Figure 5-65 Update Enterprise Application Deployment

Description of "Figure 5-65 Update Enterprise Application Deployment"
-
In the Application Update Options screen, select Replace the entire application, and then enter the full path to the EAR file in the Remote file system (Figure 5-57).
For example, if your MW_HOME is
/scratch/WAS/Middleware, enter/scratch/WAS/Middleware/oracle_common/modules/oracle.dms_11.1.1/dms-was.ear.Figure 5-66 Application Upgrade - Specify Full Path to Application EAR File

Description of "Figure 5-66 Application Upgrade - Specify Full Path to Application EAR File"
-
Click Next.
-
In the Preparing for the Application Updates screen, keep the defaults and click Next (Figure 5-58).
Figure 5-67 Application Upgrade - Preparing for the Application Update Screen

Description of "Figure 5-67 Application Upgrade - Preparing for the Application Update Screen"
-
In the Select Installation Options screen, keep the defaults, and click Next (Figure 5-59).
Figure 5-68 Application Upgrade - Select Installation Options Screen

Description of "Figure 5-68 Application Upgrade - Select Installation Options Screen"
-
In the Map Modules to Servers screen, keep the defaults, and click Next (Figure 5-60).
Figure 5-69 Application Upgrade - Map to Modules Screen

Description of "Figure 5-69 Application Upgrade - Map to Modules Screen"
-
In the Summary screen, keep the defaults, and click Finish.
Installation progress messages are displayed (Figure 5-61).
Figure 5-70 Application Upgrade - Application Installed Successfully

Description of "Figure 5-70 Application Upgrade - Application Installed Successfully"
-
Click Save.
-
Repeat step 6 for each application in Table 5-7 that you need to redeploy.
-
-
Update the security role mapping of the
wsm-pmapplication.When you redeploy the
wsm-pmapplication some required security role mapping configuration is lost which you need to re-apply as follows:-
Log in to the IBM Administrative Console.
-
Navigate to Applications> Application Types> WebSphere Enterprise Applications.
-
Select the wsm-pm application link.
-
Select Security role to user/group mapping.
Figure 5-71 Update Security Role Mapping for wsm-pm

Description of "Figure 5-71 Update Security Role Mapping for wsm-pm"
-
Select policy.Accessor, policy.Updater, policy.User roles as shown in Figure 5-63.
These three roles must be mapped to the same users as policyViewer.
You do not need to map users to policyQuerier.
Figure 5-72 Map Security Roles for wsm-pm

Description of "Figure 5-72 Map Security Roles for wsm-pm"
-
Select Map Users, and map the same users as policyViewer.
In the example shown (Figure 5-63), the administrative user for policyViewer is
orcladmin. -
Click OK.
-
-
Restore the Oracle Web Services Manager (OWSM) security policies settings that you recorded earlier in Step 1:
-
Ensure the WC_Spaces, WC_Collaboration, and WC_Portlet managed servers are running.
If custom portlet producers are deployed to any custom managed servers, ensure those servers are also up and running.
-
Connect to the Dmgr server using wsadmin:
WCP_ORACLE_HOME/common/bin/wsadmin.sh -conntype SOAP -user <admin username> -password <password> -port <admin SOAP port> -host <Dmgr host> -
Run the following command to attach the Oracle WSM security policy to the web service endpoint (
SpacesWebService) for WebCenter Portal:WebServices.attachWebServicePolicy(applicaton='webcenter', moduleOrCompName='webcenter', moduleType='web', serviceName'SpacesWebService', 'SpacesWebServiceSoapHttpPort', policyURI='oracle/wss11_saml_or_username_token_with_message_protection_service_policy')
Where
oracle/wss11_saml_or_username_token_with_message_protection_service_policyis the policy setting you recorded in Step 1c. -
Run the following command to attach the Oracle WSM security policy to the web service endpoint (
OWCDiscussionsServiceAuthenticated) for discussions:WebServices.attachWebServicePolicy(applicaton='owc_discussions_11.1.1.4.0', moduleOrCompName='owc_discussions', moduleType='web', serviceName='OWCDiscussionsServiceAuthenticated', subjectName='OWCDiscussionsServiceAuthenticated', policyURI='oracle/wss10_saml_token_service_policy')
Where
oracle/wss10_saml_token_service_policyis the policy setting you recorded in Step 1d. -
Run the following command to attach the Oracle WSM security policy to the web service endpoint (
services-producer) for the WebCenter Services Portlets producer:WebServices.attachWebServicePolicy(applicaton='services-producer', moduleOrCompName='services-producer', moduleType='web', serviceName='WSRP_v2_Service', subjectName='WSRP_v2_Markup_Service', policyURI='oracle/wss10_saml_token_service_policy')
Where
oracle/wss10_saml_token_service_policyis the policy setting you recorded in Step 1e.Note:
This step is required only if you are patching from release 11.1.1.6.0, and the WebCenter Services Portlets producer is deployed. -
Run the following command to attach the Oracle WSM security policy to the web service endpoint (
WSRP_v2_Markup_Service) for a custom portlet producer, for example, if your portlet producer's name isTestJSR286, and it is deployed to theWC_Portletmanaged server with version 1.0, run the following command:WebServices.attachWebServicePolicy(applicaton='TestJSR286#1.0', moduleOrCompName='TestJSR286', moduleType='web', serviceName='WSRP_v2_Service', subjectName='WSRP_v2_Markup_Service', policyURI='oracle/wss10_saml_token_service_policy')
Where
oracle/wss10_saml_token_service_policyis the policy setting you recorded in Step 1f.Note:
This step is required only if any custom portlet producers are deployed in your WebCenter Portal environment. You must run theWebServices.attachWebServicePolicycommand for each custom portlet producer separately.
-
-
Run the
ADFAdmin.updateADFLibrarywsadmin command to add the Batik SVG libraries to the ADF View JRF classpath and the Apache JARs to the application classpath. The Apache JARs are required for remote ADF task flows:ADFAdmin.updateADFLibrary('DefaultCell', 'DefaultCellFederatedNode', OracleAdminServer') -
Set unique cookie paths for WebCenter Portal and Portal Framework applications.
For details, see Section 5.2.11, "Setting Cookie Paths for WebCenter Portal and Portal Framework Application Modules Post Deployment."
-
Restart all the servers, including the node manager in IBM WebSphere to effect the security mapping updates.
5.7 Upgrading WebCenter Portal Framework Applications to 11.1.1.8
After migrating to WebCenter Portal 11.1.1.8, follow the steps in this section to upgrade your existing Portal Framework application deployments:
-
Upgrade JDeveloper and WebCenter Portal's Extension for Oracle JDeveloper to 11.1.1.8.
-
Open the Portal Framework application that you wish to upgrade in JDeveloper.
-
In JDeveloper, repackage the Portal Framework application in an EAR file.
-
Redeploy the EAR to IBM WebSphere, overwriting your existing deployment.
-
To ensure that the Portal Framework application always redirects to the home page after log in, set up a custom filter for the Web Container that processes log in requests:
-
Log on to the IBM WebSphere console.
-
Select Servers > Application Servers > server_name > Web Container settings > Web Container.
-
Under Additional Properties select Custom Properties.
-
On the Custom Properties page, click New.
-
On the settings page, enter Name and Value as follows:
Name:
com.ibm.ws.webcontainer.invokeFiltersCompatibilityValue:
true -
Click OK.
-
Click Save on the console task bar.
-
Restart the server.
-
For detailed information on any of these steps, see Oracle Fusion Middleware Developing Portals with Oracle WebCenter Portal and Oracle JDeveloper.
5.8 Restrictions Using Oracle WebCenter Portal on WebSphere
This section describes Oracle WebCenter Portal features that are not supported on WebSphere. It contains the following topics:
-
Oracle WebCenter Adapter for SharePoint Not Supported on WebSphere
-
Activity Rank for Oracle Secure Enterprise Search Not Supported on WebSphere
5.8.1 Oracle WebCenter Adapter for SharePoint Not Supported on WebSphere
You cannot connect WebCenter Portal or Portal Framework application deployments on IBM WebSphere to Microsoft Sharepoint repositories.
5.8.2 Process Spaces Not Supported on WebSphere
The Oracle BPM Process Spaces workspace is not supported on IBM WebSphere for this release (11.1.1.7.0).
5.8.3 Activity Rank for Oracle Secure Enterprise Search Not Supported on WebSphere
The use of activity graph ranking to improve the relevancy of Oracle Secure Enterprise Search results is unavailable on IBM WebSphere deployments.
5.8.4 Web Clipping Portlet Not Supported on WebSphere
The Web Clipping portlet is not supported on IBM WebSphere. The Web Clipping portlet must be deployed and run on an Oracle WebLogic Server.
5.9 Troubleshooting Oracle WebCenter Portal on WebSphere
Use the information in this section to help troubleshoot issues with Oracle WebCenter Portal on WebSphere. It contains the following topics:
-
Diagnosing java.lang.RuntimeException or java.lang.NullPointerException
-
Unable to Deploy WebCenter Portal Workflows When the SOA MDS Schema is Running on DB2
-
HTTP 500 Error Accessing Portal Workflow Notifications in the Worklist Task Flow
5.9.1 Diagnosing java.lang.RuntimeException or java.lang.NullPointerException
If you attempt to access WebCenter Portal or a Portal Framework application that is not yet connected to an identity store, one of the following error messages display:
Caused by: java.lang.RuntimeException: User Principal could not be found forauthenticated user.
        at oracle.webcenter.framework.service.Utility.getUserName
Caused by: java.lang.NullPointerException
        at
oracle.webcenter.framework.service.Utility$1.run(Utility.java:1023)
        at
oracle.webcenter.framework.service.Utility$1.run(Utility.java:1020)
at java.security.AccessController.doPrivileged(AccessController.java:251
You must install and configure an LDAP ID store for your application. For more information, see Section 5.2.6, "Installing External LDAP ID Store for WebCenter Portal or Portal Framework Applications."
5.9.2 Connection Timeout Errors
If your application is processing large data sets you might experience timeout errors. To prevent frequent timeouts, consider increasing the requestTimeout property for wsadmin commands and for Enterprise Manager.
The default timeout values are as follows:
-
For the call from the wsadmin environment to the deployment manager. The default for is 180 seconds.
-
For the connection between the deployment manager and the node agent, the default is 600 seconds.
-
For the connection between the node agent and the runtime deployment target, the default is 600 seconds.
To modify the com.ibm.SOAP.requestTimeout property for wsadmin commands:
-
Edit the Deployment Manager
soap.client.propsfile. -
Modify the
com.ibm.SOAP.requestTimeoutvalue. Enter a value in seconds.For example, enter 18000 for a 5 hour timeout.
-
Restart Deployment Manager.
-
Restart the OracleAdminServer.
To modify the Request Timeout for Enterprise Manager:
-
Log in to the IBM Administrative Console.
-
Navigate to: Servers> Server Types> WebSphere application servers> OracleAdminServer> Container Settings> Container Services> ORB service
-
Update the value for "Request timeout"
-
Restart the OracleAdminServer.
5.9.3 Session Timeouts in WebCenter Portal
Two different settings drive the session timeout in a WebCenter Portal:
-
Global timeout (LTPA timeout property)
-
Application timeout (Session Timeout property. Out-of-the-box, the session timeout is 45 minutes.)
The lowest of these two values determine the session timeout that is used.
Oracle recommends that you set the global LTPA timeout to be a minute longer than the WebCenter Portal session timeout so that users automatically navigate to the WebCenter Portal session timeout page.
To set the LTPA timeout:
-
Determine the current session timeout value by navigating to the WebCenter Portal Administration> Configuration> General page.
See also, the "Setting Session Timeout Settings" section in Oracle Fusion Middleware Using Oracle WebCenter Portal.
-
Log in to the IBM Administrative Console.
-
Navigate to: Security> Global Security> LTPA
-
Set LTPA timeout (Figure 5-73).
-
Restart the servers.
5.9.4 Session Timeouts Due to Inactivity
By default, application modules deployed on IBM WebSphere have their cookie path set to "/". If one or more WAR modules running on the same server as WebCenter Portal or your Portal Framework application's WAR have the same cookie path, you may encounter the following message:
Because of inactivity, your session has timed out and is no longer active. Click OK to reload page
If you encounter such messages, specify a unique cookie path for each application WAR.
For example, if WebCenter Portal is using portal membership workflows and these workflows are deployed on a SOA server that is in the same cell as WebCenter Portal, you must update the cookie path for the JSessionID cookie to match the module name. In this case the module name is WebCenterWorklistDetail, so set the "Cookie Path" property to /WebCenterWorklistDetail.
For detailed steps, see Section 5.2.11, "Setting Cookie Paths for WebCenter Portal and Portal Framework Application Modules Post Deployment."
5.9.5 Access Denied Error When Importing WebCenter Portal
On IBM WebSphere, the getConfiguredApplications permission is required to import WebCenter Portal using the wsadmin command WebCenter.importWebCenterApplication. Before running the import command, grant the getConfiguredApplications permission as follows:
Opss.grantPermission(codeBaseURL="file:${wc.oracle.home}/webcenter/modules/oracle.webcenter.framework_11.1.1/-", ermClass="oracle.security.jps.service.policystore.PolicyStoreAccessPermission, permTarget="context=SYSTEM", permActions="getConfiguredApplications")
5.9.6 Users Can Log In With Old Passwords
User credentials are cached by default on IBM WebSphere. If you change your password, the old password may still work until you enter your new password. Credential caching is controlled through the security cache property: com.ibm.websphere.security.util.authCacheEnabled
If you want to turn off user credential caching, update the JVM setting as follows:
com.ibm.websphere.security.util.authCacheEnabled=false
Note:
Setting this property tofalse impacts performance so Oracle recommends the default setting (true).See also, IBM WebSphere documentation at: http://publib.boulder.ibm.com/infocenter/wasinfo/v6r1/index.jsp?topic=/com.ibm.websphere.nd.doc/info/ae/ae/tsec_authusers.html
5.9.7 WASX7015E: NameError Exception Running WSADMIN Commands
If you run WSADMIN commands without the required prefix (WebCenter.) or enter an incorrect prefix you see a NameError similar to that below:
wsadmin>webcenter.listWorklistConnections('webcenter')
WASX7015E: Exception running command:
"webcenter.listWorklistConnections('webcenter')"; exception information:
com.ibm.bsf.BSFException: exception from Jython:
Traceback (innermost last):
File "<input>", line 1, in ?
NameError: webcenter
In this example, the incorrect prefix webcenter. must be replaced with WebCenter., that is:
wsadmin>WebcCenter.listWorklistConnections('webcenter')
See also Section 5.4.1, "Running Oracle WebCenter Portal wsadmin Commands."
5.9.8 Unable to Deploy WebCenter Portal Workflows When the SOA MDS Schema is Running on DB2
The composite that manages WebCenter Portal's workflows (sca_CommunityWorkflows) sometimes fails to deploy on a SOA server whose MDS schema is running on a DB2 database.
In such cases, the following message displays in Enterprise Manager (Figure 5-74):
Deploying on partition "default" of "/Cell_WebSphere/soa_server1/soa-infra" ...
Deploying on "/Cell_WebSphere/soa_server1/soa-infra" failed!
There was an error deploying the composite on soa_server1: Deployment Failed:
Unable to transfer file: [jcc][10120][11936][4.8.86] Invalid operation: Lob
is closed. ERRORCODE=-4470 SQLSTATE=null.
Figure 5-74 scs_CommunityWorkflows Fails to Deploy
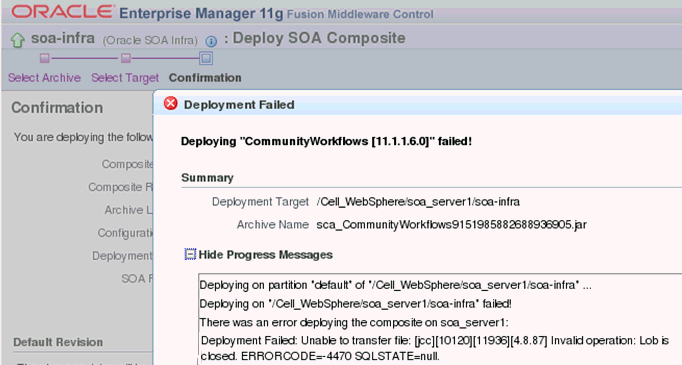
Description of "Figure 5-74 scs_CommunityWorkflows Fails to Deploy"
If you want to use the WebCenter Portal workflows to manage space membership or want to deploy any other BPEL composite on a DB2 back end, modify JBDC data source properties as follows:
-
Log in to the IBM Administrative Console.
-
Navigate to: Resources> JDBC> Data Sources> mds-soa
-
Select Custom properties.
-
Click New and create a custom property with the following values
Name: progressiveStreaming
Value: 2
Description: Disable Progressive Streaming to read lob after result set is closed.
-
Click OK.
-
Restart the SOA server.
-
In Enterprise Manager, confirm that the required BPEL composite is now deployed and available as expected.
5.9.9 HTTP 500 Error Accessing Portal Workflow Notifications in the Worklist Task Flow
If WebCenter Portal workflows fail to register several shared libraries at deployment time, you may see the following HTTP 500 error when you access portal workflow notifications, such as a portal membership invitation, from a Worklist task flow in the WebCenter Portal:
Error 500: javax.servlet.ServletException: SRVE0207E: Uncaught initialization exception created by servlet
The associated BPEL server log entry for this error in /IBM/WebSphere/AppServer/profiles/Server1/logs/soa_server1/soa_server1/SystemOut.log is:
java.lang.IllegalStateException: Application was not properly initialized at startup, could not find Factory: javax.faces.context.FacesContextFactory
To resolve the error, navigate to the application (WebCenterWorklistDetailApp) in the Admin Console and include the missing shared library references (oracle.jsp.next_11.1.1_11.1.1 and adf.oracle.domain_1.0_11.1.1.2.0):
-
Go to IBM WebSphere Administration Console.
-
Select Applications > Application Types > WebSphere Enterprise Applications > WebCenterWorklistDetailApp > Shared library references.
-
Manually add
adf.oracle.domain_1.0_11.1.1.2.0andoracle.jsp.next_11.1.1_11.1.1. -
Restart the application.
Note:
The same issue can occur for other applications, such asusermessagingsca-ui-worklist. If this is the case, follow similar steps to resolve the issue.5.9.10 OAM Single Sign-On Logout Not Working
Global logout is not available in an Oracle Access Manager (OAM) Single Sign-On setup on WebSphere if the following property is set to true in your WebSphere instance:
com.ibm.ws.security.addHttpOnlyAttributeToCookies=true
5.9.11 Workflow Related Error Messages in Log Files
After successfully installing and configuring WebCenter Portal 11.1.1.8.0 and starting the WC_Spaces managed server you may see the following errors in the logs:
-
WAS_HOME/profiles/Custom01/logs/WC_Spaces/SystemOut.log[3/28/13 19:49:21:636 PDT] 0000002a error W oracle.webcenter.webcenterapp.internal.view.backing.PreferenceBackingBean getMessagingURL SDP Messaging URL cannot be obtained due to Cannot retrieve portal workflow configuration. Please contact your administrator.
-
WAS_HOME/profiles/Custom01/logs/WC_Spaces/WC_Spaces-diagnostic.log[WC_Spaces] [WARNING] [WCS-19363][oracle.webcenter.webcenterapp.error] [tid: WebContainer : 2] [userId:wasadmin] [ecid: disabled,0] [APP: webcenter] SDP Messaging URL cannot be obtained due to Cannot retrieve portal workflow configuration. Please contact your administrator.
Both errors display if Oracle SOA is not configured for your WebCenter Portal instance. You can ignore both errors.
5.9.12 jiveURL Error Messages in Log Files
After successfully installing and configuring WebCenter Portal 11.1.1.8.0 and starting the WC_Spaces managed server you may see the following errors in the log:
WAS_HOME/profiles/Custom01/logs/WC_Collaboration/SystemOut.log
[3/28/13 15:24:21:181 PDT] 0000002f Jive-WARN     W
No URL set for property  'jiveURL', this will cause RSS links to fail.
This message warns that RSS feeds will not work as the jiveURL property is not set. If you do not wish to see this error message, run the following wsadmin command:
WebCenter.setDiscussionsServerProperty(appName='owc_discussions', key='jiveURL', value='http://host:port/owc_discussions')
5.9.13 DCS Stack Messages in Log Files
Sometimes upon starting Admin Server and WebCenter Portal instances on WebSphere, the following entries are seen in the log files:
WAS_HOME/profiles/Dmgr01/logs/dmgr/SystemOut.log
WAS_HOME/profiles/Custom01/logs/nodeagent/SystemOut.log
WAS_HOMEprofiles/Custom01/logs/OracleAdminServer/SystemOut.log
WAS_HOME/profiles/Custom01/logs/WC_Spaces/SystemOut.log
WAS_HOME/profiles/Custom01/logs/WC_Collaboration/SystemOut.log
[3/28/13 19:29:10:160 PDT] 0000000e RoleViewLeade I   DCSV8030I: DCS Stack DefaultCoreGroup at Member Cell01\Node01\WC_Collaboration:
Failed  to join or establish a view with member
[Cell01\CellManager01\dmgr]. The reason is Not all candidates are connected ConnectedSetMissing= [ ]ConnectedSetAdditional [Cell01\slc02poqNode01\nodeagent].
These warnings can be ignored if you can access the Admin Server, WebCenter Portal instances, and corresponding web pages. If you cannot access or log in, refer to IBM support documentation at: http://www-01.ibm.com/support/docview.wss?uid=swg21245012
5.9.14 Error Messages Exporting and Importing Portal Changes
Section 5.4.3, "(WebCenter Portal Only) Migrating Portal Changes" describes how to propagate portal changes to another portal instance. Internal labels keep the source and target portal instances, such as stage and production portals, in-sync and you can only propagate portal changes to another portal instance when these labels match. For details, see the "Labeling During WebCenter Portal Lifecycle" appendix in Oracle Fusion Middleware Administering Oracle WebCenter Portal.
These labels are for internal use only so there is no need for you to view or manage these labels. If there is a mismatch between the source and target labels an error message displays. For example:
Scenario 1: You attempt to export portal changes but the portal's initial base label, which is the starting point for exporting changes, is missing from the source portal so the following message displays:
Cannot export portal changes. Internal label for the portal <portal name> does not exist on the source. Export the portal from the source before attempting to export portal changes
Scenario 2: You attempt to import portal changes but the target portal's initial base label, which is the starting point for importing changes, is missing from the target portal so the following message displays:
Cannot import portal changes. Internal label for the portal <portal name> does not exist on the target. Export the portal from the source and then import the portal on the target to synchronize the portals before attempting to import portal changes
Scenario 3: You attempt to export portal changes but the internal label to be used on export already exists on the source so the following message displays:
Cannot export portal changes. Internal label already exists on the source.
Scenario 4: You attempt to import portal changes but the internal label in the portal archive already exists on the target so the following message displays:
Cannot import portal changes. Internal label obtained from the portal archive already exists on the target. Export the portal from the source and then import the portal on the target to synchronize the portals before attempting to import portal changes. Alternatively, specify a portal archive that contains more recent changes and try again
Scenario 5: You attempt to import portal changes but the internal label in the archive is lower than the label on the target so the following message displays:
Cannot import portal changes. The target portal {0} already contains the changes from the specified archive. If necessary, export the portal from the source and then import the portal on the target to synchronize the portals before attempting to import further portal changes. Alternatively, specify a portal archive that contains more recent changes and try again.
