14.2 Creating and Managing Failover Groups
You can ensure high availability of Oracle Traffic Director instances by combining two Oracle Traffic Director instances in a failover group represented by one or two virtual IP (VIP) addresses. Both the hosts in a failover group must run the same operating system version, use identical patches and service packs, and run Oracle Traffic Director instances of the same configuration.
Note:
-
You can create multiple failover groups for the same node, but with a distinct VIP address for each failover group.
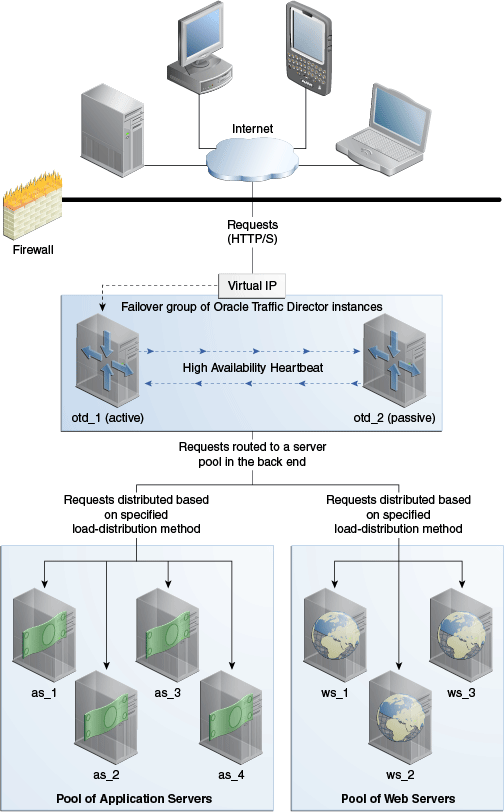
Figure 14-1 shows Oracle Traffic Director deployed for a high-availability use case in an active-passive failover mode.
Figure 14-1 Oracle Traffic Director Network Topology: Active-Passive Failover Mode

Description of ''Figure 14-1 Oracle Traffic Director Network Topology: Active-Passive Failover Mode''
The topology shown in Figure 14-1 consists of two Oracle Traffic Director instances—otd_1 and otd_2—forming an active-passive failover pair and providing a single virtual IP address for client requests. When the active instance (otd_1 in this example) receives a request, it determines the server pool to which the request should be sent and forwards the request to one of the servers in the pool based on the load distribution method defined for that pool.
Note that Figure 14-1 shows only two server pools in the back end, but you can configure Oracle Traffic Director to route requests to servers in multiple server pools.
In the active-passive setup described here, one node in the failover group is redundant at any point in time. To improve resource utilization, you can configure the two Oracle Traffic Director instances in active-active mode with two virtual IP addresses. Each instance caters to requests received on one virtual IP address and backs up the other instance.
This section contains the following topics:
14.2.1 How Failover Works
Oracle Traffic Director provides support for failover between the instances in a failover group by using an implementation of the Virtual Routing Redundancy Protocol (VRRP), such as keepalived for Linux and vrrpd (native) for Solaris.
Keepalived v1.2.2 is included in Oracle Linux in Exalogic environment. You need not install or configure it. Keepalived is licensed under the GNU General Public License. Keepalived provides other features such as load balancing and health check for origin servers, but Oracle Traffic Director uses only the VRRP subsystem. For more information about Keepalived, go to http://www.keepalived.org.
VRRP specifies how routers can failover a VIP address from one node to another if the first node becomes unavailable for any reason. The IP failover is implemented by a router process running on each of the nodes. In a two-node failover group, the router process on the node to which the VIP is currently addressed is called the master. The master continuously advertises its presence to the router process on the second node.
Caution:
On a host that has an Oracle Traffic Director instance configured as a member of a failover group, Oracle Traffic Director should be the only consumer of Keepalived. Otherwise, when Oracle Traffic Director starts and stops thekeepalived daemon for effecting failovers during instance downtime, other services using keepalived on the same host can be disrupted.If the node on which the master router process is running fails, the router process on the second node waits for about three seconds before deciding that the master is down, and then assumes the role of the master by assigning the VIP to its node. When the first node is online again, the router process on that node takes over the master role. For more information about VRRP, see RFC 5798 at http://datatracker.ietf.org/doc/rfc5798.
14.2.2 Failover Modes
You can configure the Oracle Traffic Director instances in a failover group to work in the following modes:
-
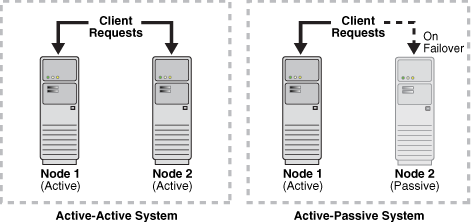
Active-passive: A single VIP address is used. One instance in the failover group is designated as the primary node. If the primary node fails, the requests are routed through the same VIP to the other instance.
-
Active-active: This mode requires two VIP addresses. Each instance in the failover group is designated as the primary instance for one VIP address and the backup for the other VIP address. Both instances receive requests concurrently.
The following figure illustrates the active-active and active-passive failover modes.
14.2.3 Creating Failover Groups
This section describes how to implement a highly available pair of Oracle Traffic Director instances by creating failover groups. For information about how failover works, see Section 14.2.1, "How Failover Works."
You can create a failover group by using either the administration console or the CLI.
Note:
The CLI examples in this section are shown in shell mode (tadm>). For information about invoking the CLI shell, see Section 2.3.1, "Accessing the Command-Line Interface."-
Decide the unique VIP address that you want to assign to the failover group.
-
The VIP addresses must be accessible to clients.
Note:
To configure an active-active pair of Oracle Traffic Director instances, you would need to create two failover groups with the same instances, but with a distinct VIP address for each failover group, and with the primary and backup node roles reversed. -
-
Identify the network prefix of the interface on which the VIP should be managed. The network prefix is the subnet mask represented in the Classless Inter-Domain Routing (CIDR) format, as described in the following examples.
-
For an IPv4 VIP address in a subnet that contains 256 addresses (8 bits), the CIDR notation of the subnet mask
255.255.255.0would be24, which is derived by deducting the number of addresses in the given subnet (8 bits) from the maximum number of IPv4 addresses possible (32 bits). -
Similarly, for an IPv4 VIP address in a subnet that has 4096 addresses (12 bits), the CIDR notation of the subnet mask
255.255.240.0would be20(=32minus12). -
To calculate the CIDR notation of the subnet mask for an IPv6 subnet, you should deduct the bit-size of the subnet's address space from 128 bits, which is the maximum number of IPv6 addresses possible.
The default network-prefix-length is
24or64for an IPv4 VIP or IPv6 VIP, respectively. The default network-prefix-length is used, if not specified, for automatically choosing the NIC.While actually plumbing the VIP it is preferred to use the hostmask, 32 for IPv4 and 128 for IPv6, so that any outgoing traffic originating from that node does not use the VIP as the source address.
-
-
Identify the Oracle Traffic Director administration nodes that you want to configure as primary and backup nodes in the failover group.
Note that the administration nodes that you select should have Oracle Traffic Director instances present on them for the specified configuration.
-
Identify the network interface for each node.
If you do not specify the network interface, the administration server attempts to automatically discover a usable network interface for the specified VIP. For each network interface that is currently up on the host, the administration server compares the network part of the interface's IP address with the network part of the specified VIP. The first network interface that results in a match is used as the network interface for the VIP.
For this comparison, depending on whether the VIP specified for the failover group is an IPv4 or IPv6 address, the administration server considers only those network interfaces on the host that are configured with an IPv4 or IPv6 address, respectively.
-
You can bind to a VIP IP address within the HTTP listener by performing a system configuration that allows you to bind to a non-existing address, as a sort of forward binding. Perform one of the following system configurations:
echo 1 > /proc/sys/net/ipv4/ip_nonlocal_bindor,
sysctl net.ipv4.ip_nonlocal_bind=1(change in/etc/sysctl.confto keep after a reboot)Make sure that the IP addresses of the listeners in the configuration for which you want to create a failover group are either an asterisk (
*) or the same address as the VIP. Otherwise, requests sent to the VIP will not be routed to the virtual servers. -
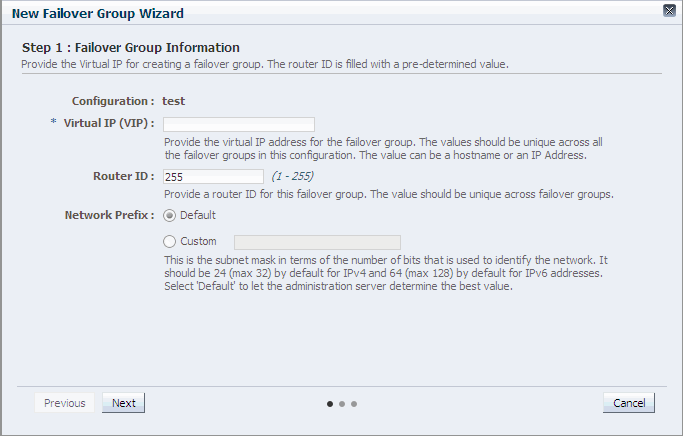
Make sure that the router ID for each failover group is unique. If you do not specify the router ID, it is set to 255 for the first failover group. For every subsequent failover group that you create, the default router ID is decremented by one: 254, 253, and so on.
Creating Failover Groups Using the Administration Console
To create a failover group by using the administration console, do the following:
-
Log in to the administration console, as described in Section 2.3.2, "Accessing the Administration Console."
-
Click the Configurations button that is situated at the upper left corner of the page.
A list of the available configurations is displayed.
-
Select the configuration for which you want to create a failover group.
-
In the navigation pane, select Failover Groups.
The Failover Groups page is displayed.
-
Click New Failover Group.
The New Failover Group wizard is displayed.
-
Follow the on-screen prompts to complete creation of the failover group by using the details—virtual IP address, network interface, host names of administration nodes, and so on—that you decided earlier.
After the failover group is created, the Results screen of the New Failover Group wizard displays a message confirming successful creation of the failover group.
-
Click Close on the Results screen.
The details of the failover group that you just created are displayed on the Failover Groups page.
Note:
At this point, the two nodes form an active-passive pair. To convert them into an active-active pair, create another failover group with the same two nodes, but with a different VIP and with the primary and backup roles reversed.
Creating Failover Groups Using the CLI
To create a failover group, run the create-failover-group command.
For example, the following command creates a failover group with the following details:
-
Configuration:
soa -
Primary node:
node1.example.com -
Backup node:
node2.example.com -
Virtual IP address:
10.229.227.80 -
Network prefix for the VIP: Not specified; so the command assumes the network prefix to be
24(equivalent to subnet mask255.255.255.0)
> tadm create-failover-group --config=soa --virtual-ip=10.229.227.80 --primary-node=node1.example.com --backup-node=node2.example.com
OTD-70201 Command 'create-failover-group' ran successfully.
Note:
When creating a failover group, if the administration node process is running as non-root on the node where the instances are located, then you must run start-failover on those nodes as a root user. This is to manually start the failover. If this command is not executed, failover will not start and there will be no high availability. For more information about start-failover, see the Oracle Traffic Director Command-Line Reference.To enable active-active failover, create another failover group with the same two nodes, but with the primary and backup roles reversed.
For more information about create-failover-group, see the Oracle Traffic Director Command-Line Reference or run the command with the --help option.
14.2.4 Managing Failover Groups
Oracle Traffic Director starts the keepalived daemon automatically when you start instances that are part of a failover group, and stops the daemon when you stop the instances. The configuration parameters for the keepalived daemon are stored in a file named keepalived.conf in the config directory of each instance that is part of the failover group. If the administration node process is running as non-root on the node where the instances are located, then you must run the start-failover command on those nodes as a root user. This is to manually start the failover. If this command is not executed, failover will not start and there will be no high availability. For more information about start-failover, see the Oracle Traffic Director Command-Line Reference.
Note:
For thekeepalived daemon to be started and stopped automatically, you must run the commands to start and stop the Oracle Traffic Director instances as the root user.After creating failover groups, you can list them, view their settings, change the primary node for a failover group, switch the primary and backup nodes, and delete them. Note that to change the VIP or any property of a failover group, you should delete the failover group and create it afresh.
You can view, modify, and delete failover groups by using either the administration console or the CLI.
Note:
The CLI examples in this section are shown in shell mode (tadm>). For information about invoking the CLI shell, see Section 2.3.1, "Accessing the Command-Line Interface."Managing Failover Groups Using the Administration Console
To view, modify, and delete failover groups by using the administration console, do the following:
-
Log in to the administration console, as described in Section 2.3.2, "Accessing the Administration Console."
-
Click the Configurations button that is situated at the upper left corner of the page.
A list of the available configurations is displayed.
-
Select the configuration for which you want to manage failover groups.
-
In the navigation pane, select Failover Groups.
The Failover Groups page is displayed. It shows the list of available failover groups, and indicates the primary and backup nodes for each failover group.
-
To view the properties of a failover group, click its virtual IP.
-
To switch the hosts for the primary and backup nodes, click the Toggle Primary button. In the resulting dialog box, click OK.
-
To delete a failover group, click the Delete button. In the resulting dialog box, click OK.
-
Managing Failover Groups Using the CLI
-
To view a list of the failover groups for a configuration, run the
list-failover-groupscommand, as shown in the following example:tadm> list-failover-groups --config=soa --verbose --all virtual-ip primary-node backup-node ------------------------------------------- 10.229.231.254 node1.example.com node2.example.com 10.229.231.253 node2.example.com node1.example.com -
To view the current settings of a failover group, run the
get-failover-group-propcommand, as shown in the following example:tadm> get-failover-group-prop --config=soa --virtual-ip=10.229.231.254 virtual-ip=10.229.231.254 backup-node=node2.example.com network-prefix-length=21 router-id=255 primary-node=node1.example.com primary-nic=eth0 backup-nic=eth0 -
To switch the primary and backup nodes in a failover group, run the
set-failover-group-primarycommand.For example, the following command changes the primary node in the failover group represented by the VIP address
10.228.12.250in the configurationsoatoapp2.example.com.tadm> set-failover-group-primary --config=soa --virtual-ip=10.228.12.250 --primary-node=app2.example.com OTD-70201 Command 'set-failover-group-primary' ran successfully.Note:
If the administration node process is running as non-rooton the node where the instances are located, then you must runstart-failoveron those nodes as arootuser. This is to manually toggle the nodes. If this command is not executed, the nodes will not be toggled. And, when you executeget-failover-group-prop, the result will include the configured primary and the backup nodes, which will not be the same as the runtime primary and backup nodes. -
To delete a failover group, run the
delete-failover-groupcommand, as shown in the following example:tadm> delete-failover-group --config=soa --virtual-ip=10.228.12.250 OTD-70201 Command 'delete-failover-group' ran successfully.Note:
When deleting a failover group, if the administration node process is running as non-rooton the node where the instances are located and if at least one failover group is still available, then you must runstart-failoveron those nodes as arootuser. On the other hand, after deleting a failover group, if no other failover groups are available for the corresponding instances, thenstop-failovermust be executed to stop the failover. If you do not execute eitherstart-failoverorstop-failover, then the VIP associated with the deleted failover group will continue to be available. For more information about these commands, see the Oracle Traffic Director Command-Line Reference.
For more information about the commands mentioned in this section, see the Oracle Traffic Director Command-Line Reference or run the commands with the --help option.
Note:
-
If you want to assign a different node as the primary or backup node in a failover group, you should create the failover group afresh.
-
There can be a maximum of 255 failover groups across configurations.

