18 Managing Oracle Mediator Service Components and Engines
This chapter describes how to manage Oracle Mediator service components and engines using Oracle Enterprise Manager Fusion Middleware Control. It provides instructions for viewing recovering faults, and attaching and detaching Mediator policies.
This chapter includes the following sections:
-
Section 18.1, "Recovering From Oracle Mediator Service Component Faults"
-
Section 18.3, "Recovering From Oracle Mediator Service Engine Faults"
18.1 Recovering From Oracle Mediator Service Component Faults
You can monitor Mediator service component faults and perform individual and bulk recoveries for faults that are identified as recoverable.
To manage Mediator service component faults:
-
Access the SOA Component home page through one of the following options:
From the SOA Infrastructure Menu... From the SOA Folder in the Navigator... - Select Home.
-
Select the Deployed Composites tab.
-
In the Composite section, select a specific SOA composite application.
- Expand soa-infra, and then select a specific SOA composite application.
-
Select the Mediator service component in the Component Metrics section.
-
Click Faults.
The Faults page displays the following information:
-
A utility that you can use to search for a specific fault by specifying criteria and clicking Search. Click the Help icon for more information. By default, faults are not displayed the first time you access this page. You must click Search to display any faults.
-
Faults that occurred in the service component, including the error message, whether you can recover from the fault, the time at which the fault occurred, service component instance ID, activity in which the fault occurred, and a link to a log file describing the fault.
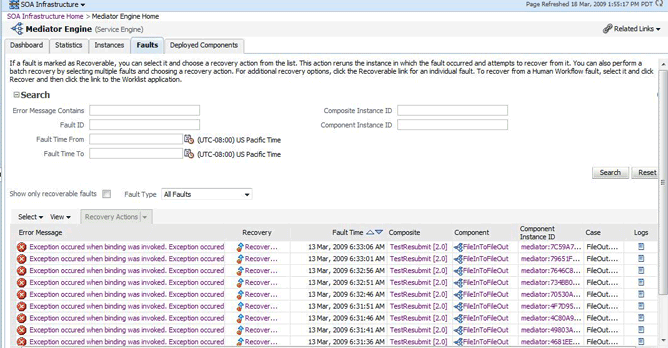
Description of the illustration med_srveng_fault.gif
Mediator service component faults that are marked as recoverable can be recovered.
-
-
Select faults for recovery using one of the following methods.
For... Then... Single fault recovery There are three options from which to choose for single fault recovery. Perform any of the following actions to recover a single fault. -
Click the row of the fault that has been identified as recoverable. With the row highlighted, select a specific action from the Recovery Action list, as described in Step 5.
-
In the Recovery column, click the Recover link to access the Faults page of the instance audit trail to perform fault recovery. Figure 18-1 illustrates the fault page.
-
In the Error Message column, click the message of a fault that has been identified as recoverable. This displays complete fault details, including the fault ID, fault time, fault location, fault type, and error message text. Click Recover Now to access the Faults page of the instance audit trail to perform fault recovery. If there is no Recover Now option, the fault is not recoverable.
Bulk fault recovery There are two options from which to choose for bulk fault recovery. Perform the following steps to recover multiple faults. -
Do one of the following:
-
Use Shift+Click or Control+Click to select specific faults in the rows.
-
From the Select menu, choose Select All Recoverable. Then use Shift+Click or Control+Click to deselect the faults to not include in the recovery operation.
-
-
Select an action from the Recovery Action list, as described in Step 5.
Note: Only the actions applicable to all selected faults are available.
Recovery of all faults Perform the following steps to recover all faults. -
From the Select menu, choose Select All Recoverable.
-
Select an action from the Recovery Action list, as described in Step 5.
Note: Only the actions applicable to all selected faults are available.
Figure 18-1 Fault Tab on the Mediator Instance Detail Dialog
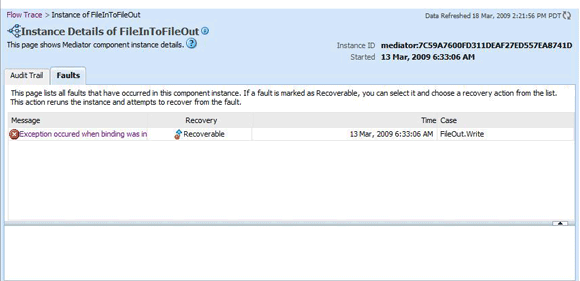
Description of "Figure 18-1 Fault Tab on the Mediator Instance Detail Dialog"
-
-
If you did not already select a recovery method in the above step, select one of the following actions from the Recovery Action list.
For more information, see the following documentation:
-
Oracle Fusion Middleware Developer's Guide for Oracle SOA Suite
-
Oracle Fusion Middleware Administrator's Guide for details about viewing and searching log files
18.2 Managing Oracle Mediator Policies
Oracle Fusion Middleware uses a policy-based model to manage web services. Policies apply behavioral requirements and security to the delivery of messages. You can view, attach, and detach policies for Mediator service components in currently deployed SOA composite applications.
The Policies page of the Mediator Component Home page provides the following information about a Mediator component instance:
-
Policy Name: The name of the policy.
-
Policy Reference Status: A toggle button that allows you to enable or disable a policy. Disabling a policy temporarily turns it off without detaching it. If the button says Disable, the policy is enabled; if it says Enable, the policy is disabled.
-
Category: The category of the policy. It has the following values: Management, Reliable Messaging, MTOM Attachments, Security, and WS-Addressing.
-
Total Violations: The total number of violations since the SOA Infrastructure was restarted.
-
Security Violation: The number of violations in each category. Category can have the following values: Authentication, Authorization, Confidentiality, and Integrity.
Note:
Before attaching policies, see Oracle Fusion Middleware Security and Administrator's Guide for Web Services for definitions of available policies and details about which ones to use in your environment.To manage Mediator policies:
-
Access the SOA Composite home page through one of the following options:
From the SOA Infrastructure Menu... From the SOA Folder in the Navigator... - Select Home.
-
Select the Deployed Composites tab.
-
In the Composite section, select a specific SOA composite application.
- Under soa-infra, select a specific SOA composite application.
-
Select the Mediator service component in the Component Metrics section.
-
Click the Policies tab.
-
View the policies attached to a Mediator component.
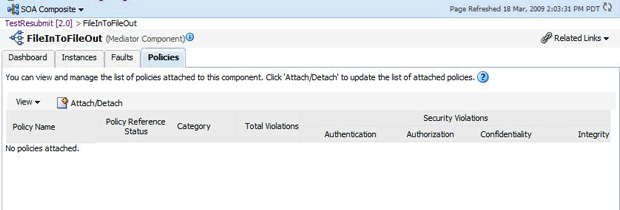
Description of the illustration med_comphome_pol1.gif
-
Click Attach/Detach to attach or detach a policy.
-
If multiple components are available, select the service or component to which you want to attach the policy.
The Attach/Detach Policies page appears with all attached policies displayed in the upper pane and all available policies displayed in the lower pane.
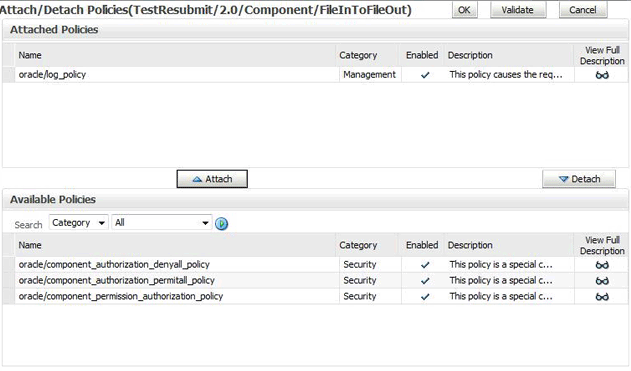
Description of the illustration med_comphome_pol2.gif
-
To attach a policy, select the policy in the lower pane and then click Attach.
-
To detach a policy, select the policy in the upper pane and then click Detach.
-
When you finish attaching or detaching policies, click Validate.
-
If any validation errors occur, make the necessary corrections and run the validation until no more errors occur.
-
Click OK.
The dialog closes and the attached policies appear in the policies table.
For more information, see the following documentation:
-
Section 7.7, "Managing SOA Composite Application Policies" for the dialogs that are displayed during policy attachment
-
Oracle Fusion Middleware Security and Administrator's Guide for Web Services for definitions of available policies and details about which ones to use for your environment
18.3 Recovering From Oracle Mediator Service Engine Faults
You can monitor and perform individual and bulk fault recoveries for Mediator service engines that are identified as recoverable. All Mediator service component faults, regardless of the SOA composite application instance of which they are a part, can be viewed in the Mediator service engine.
To manage Mediator service engine faults:
-
Access the SOA Composite home page through one of the following options:
From the SOA Infrastructure Menu... From the SOA Folder in the Navigator... - Select Service Engines > Mediator.
- Right-click soa-infra.
-
Select Service Engines > Mediator.
The Mediator Engine home page appears.
-
Click Faults.
The Faults page displays the following:
-
A utility so you can search for a specific fault by specifying criteria and clicking Search. Click the Help icon for more information. By default, faults are not displayed the first time you access this page. You must click Search to display any faults.
-
Faults that occurred in the service component, including the error message, whether you can recover from the fault, the time at which the fault occurred, service component instance ID, activity in which the fault occurred, and a link to a log file describing the fault.
Description of the illustration med_srveng_fault.gif
Mediator service engine faults that are marked as recoverable can be recovered.
-
-
Select a fault or faults.
As with fault recovery at the SOA Infrastructure level, SOA composite application level, and Mediator service component level, you can perform single fault recovery, bulk fault recovery, and recovery of all faults. See Step 4 of Section 18.1, "Recovering From Oracle Mediator Service Component Faults" for instructions on selecting faults to perform these types of recovery.
-
If you did not select a recovery action in the previous step, select an action from the Recovery Action list.
-
Perform the following additional monitoring tasks from within the faults table:
-
Click the Show only recoverable faults check box to only display faults from which you can recover.
-
From the Fault Type list, select to display all faults, system faults, business faults, or OWSM faults in the faults table. Click Help for a description of these fault types.
-
From the View list, select Columns > Fault ID to display the fault IDs for each error message. The fault ID is automatically generated and uniquely identifies a fault. The fault ID is also displayed when you click an error message.
-
In the Composite column, click a specific SOA composite application to access its home page.
-
In the Component column, click a specific service component to access its home page.
-
In the Component Instance ID column, click a specific service component ID to access task details about the instance (for example, the current state of a task). Note that rejected messages do not have a component instance ID.
-
For more information, see the following documentation:
-
Section 1.4.3.1, "Introduction to Fault Recovery" for conceptual details about faults
-
Oracle Fusion Middleware Developer's Guide for Oracle SOA Suite
18.4 Skipping Resequenced Messages
When a resequencing group is in the timed out state, you can skip the message that is blocking the group to begin processing again. In some cases, such as when there is no timeout duration set, a standard resequencing group might wait indefinitely without timing out and remain in the running state. In this case, you can skip the sequence ID it is waiting for even though the group has not yet timed out.
18.4.1 Skipping to the Next Sequence ID in a Running Group
When a standard resequencing group is running and you know the next message is not going to arrive within the specified timeout duration (or there is no timeout duration), perform the following steps to skip the next expected sequence ID and begin processing the next available message.
To skip to the next sequence ID in a running group:
-
Access the SOA Component home page through one of the following options:
From the SOA Infrastructure Menu... From the SOA Folder in the Navigator... - Select Home.
-
Select the Deployed Composites tab.
-
In the Composite section, select a specific SOA composite application.
- Expand soa-infra, and then select a specific SOA composite application.
-
Select the Mediator service component in the Component Metrics section.
-
Do one of the following:
-
In the Recent Instances list, click the group ID of the group for which you want to skip sequence IDs.
-
Click the Instances tab, perform a search for the instance, and in the results list, click the group ID of the group for which you want to skip sequence IDs.
The Mediator Resequencing Group Dialog appears.
Figure 18-2 Mediator Resequencing Group Dialog with Skip Option (Running)
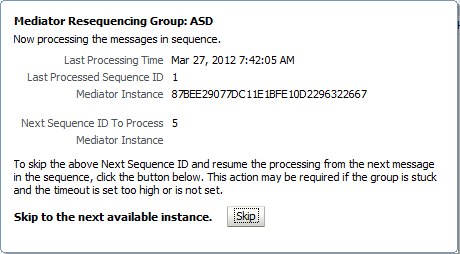
Description of "Figure 18-2 Mediator Resequencing Group Dialog with Skip Option (Running)"
-
-
To skip to the next sequence ID, click Skip.
Note:
The Skip button only appears on the dialog for groups configured for the standard resequencer, and not best effort or FIFO resequencers. When you skip a message, it is always in the skipped state and is not purged by the purge scripts.
18.4.2 Skipping to the Next Sequence ID in a Timed Out Group
When processing of a resequencing group stops while waiting for an expected message, the group is in a timed out state and no messages are processed. To remedy this, you need to skip the message that caused the timeout and move on to the next available sequence ID.
To skip to the next sequence ID in a timed out group:
-
Access the SOA Component home page through one of the following options:
From the SOA Infrastructure Menu... From the SOA Folder in the Navigator... - Select Home.
-
Select the Deployed Composites tab.
-
In the Composite section, select a specific SOA composite application.
- Expand soa-infra, and then select a specific SOA composite application.
-
Select the Mediator service component in the Component Metrics section.
-
Do one of the following:
-
In the Recent Instances list, click the group ID of the group that is timed out.
-
Click the Instances tab, perform a search for the instance, and in the results list, click the group ID of the group that is timed out.
The Mediator Resequencing Group Dialog appears.
Figure 18-3 Mediator Resequencing Group Dialog with Skip Option (Timed Out)
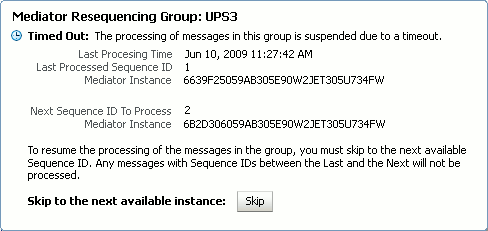
Description of "Figure 18-3 Mediator Resequencing Group Dialog with Skip Option (Timed Out)"
-
-
To unlock the group and start processing the next instance in the group, click Skip.
Note:
Mediator will not process any messages with sequence IDs between the sequence ID of the last message processed and the next message processed.