3 Configuring Capture
This chapter describes the configuration options available to an Oracle WebCenter Enterprise Capture administrator and how they are accessed.
This chapter includes the following sections:
3.1 Overview of Configuring Oracle WebCenter Enterprise Capture
System administrators use Oracle Enterprise Manager functions for:
-
Making changes to the Capture system configuration. See Section 3.2.1.
-
Monitoring the overall Capture system on the Performance Summary page. See Section 4.2.2.
-
Starting and stopping the Capture server. See Section 2.3.
-
Changing logging levels. See Section 5.3.
-
Searching and viewing logs. See Section 5.2.
-
Receiving and viewing notification of critical issues. See Section 3.2 for more information on how to configure an email account to send error messages when an error occurs during batch processing.
-
Managing client bundles. See Section 3.2.2.
-
Managing Capture users and security. See Section 3.3.
-
Browsing Capture MBeans. See Section 3.4.
By default, errors, warnings, and major application lifecycle events are logged. You can progressively increase the log level to cause configuration messages, debug messages, and trace messages to be logged. See Chapter 5 for more information on how to configure log files.
3.2 Managing Capture Settings in Enterprise Manager
The system administrator can make changes to the Capture system configuration from the System Configuration page in Oracle Enterprise Manager Fusion Middleware Control. The system administrator can change the following settings from the System Configuration page:
-
System Properties
-
Import Processor Settings
-
SMTP Settings for E-mail broadcasts
3.2.1 Modifying System Configuration Settings
To modify the system configuration:
-
Log in to Oracle Enterprise Manager using the steps listed in Section 2.2.
-
Click the Capture server in the right pane to display the Capture menu options.
-
To modify the system configuration, select Configuration, and then System Configuration from the Capture menu. The System Configuration page displays.
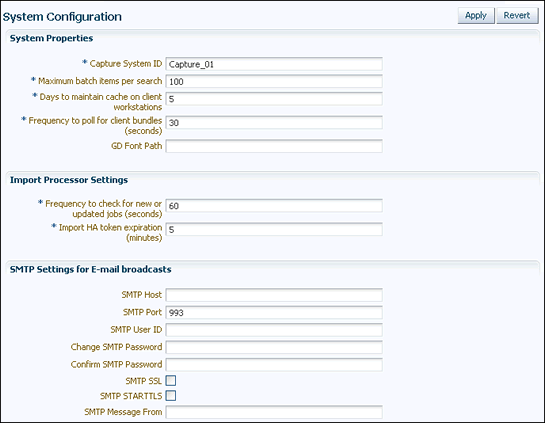
Description of the illustration system-config.gif
The following table lists all the configuration parameters that you can set in this page.
Table 3-1 System Configuration Parameters
| Group | Parameter | Description |
|---|---|---|
|
System Properties |
This group contains configuration settings for batches and client bundles. |
|
|
Capture System ID |
A value that uniquely identifies the Capture system. Enter a value that uniquely identifies the Capture system on the network. Value: Any string, for example, Capture_01. Default value: Capture_01 |
|
|
Maximum batch items per search |
Specify the maximum number of batches to return per search. Value: Any integer, for example, 100. Default value: 100 |
|
|
Days to maintain cache on clients workstations |
Specify the number of days cache will be maintained on client workstations. If a batch is locked, it will not be deleted from the client workstation's cache. No warning is given when a batch is deleted from the cache. Value: Any integer, for example, 3. Default value: 5 |
|
|
Frequency to poll for client bundles (seconds) |
Specify the frequency to check for updated client bundles. This is measured in seconds. Default value: 30 |
|
|
GD Font Path |
For Unix systems, specify the location of the Unix font directory. This path is used by the PDF Image Only document output format driver to render the fonts for PDF documents. Value: A valid directory path, for example, /usr/share/X11/fonts. |
|
|
Import Processor Settings |
This group contains configuration settings for the Import Processor. |
|
|
Frequency to check for new or updated jobs (seconds) |
Specify how often an internal timer will fire to check for Import Processor jobs that need to be processed. This is measured in seconds. Value: Any integer, for example, 60. Default value: 60 |
|
|
Import HA token expiration (minutes) |
Specify the duration for which an Import HA Token is valid. This is measured in minutes. An Import HA Token uniquely identifies and maintains processing state of an object being imported such as an email, file, or list file. Value: Any integer, for example, 60. Default value: 5 |
|
|
SMTP Settings for E-mail broadcasts |
This group contains settings for configuring an email account to use when sending error messages if an error occurs during batch processing. |
|
|
SMTP Host |
Specify an SMTP Server Host. Value: Any string, for example, test.example.com. |
|
|
SMTP Port |
Specify the SMTP Server Port. Value: Any valid port number, for example, 80. |
|
|
SMTP User ID |
Specify a user ID for the SMTP server. Value: Any string, for example, TEST01. |
|
|
Change SMTP Password |
Specify a value for the SMTP password. Value: Any string |
|
|
Confirm SMTP Password |
Re-enter the new SMTP password. Value: Any string |
|
|
SMTP SSL |
Specify if the SMTP server should use SSL security. |
|
|
SMTP Start TLS |
Specify if the SMTP server should use start TLS. |
|
|
SMTP Message From |
Specify a value for the From field for SMTP messages. Value: Any string |
3.2.2 Managing Client Bundles
Bundles are program modules that are downloaded and executed by the Capture client. As a system administrator, you may need to delete selected bundles, search for new or updated bundles, and apply them.
To manage client bundles from Oracle Enterprise Manager:
-
Log in to Oracle Enterprise Manager using the steps listed in Section 2.2.
-
Click the Capture server in the right pane to display the Capture menu options.
-
To manage client bundles, select Configuration, and then Bundle Manager from the Capture menu. The Bundle Manager page displays.
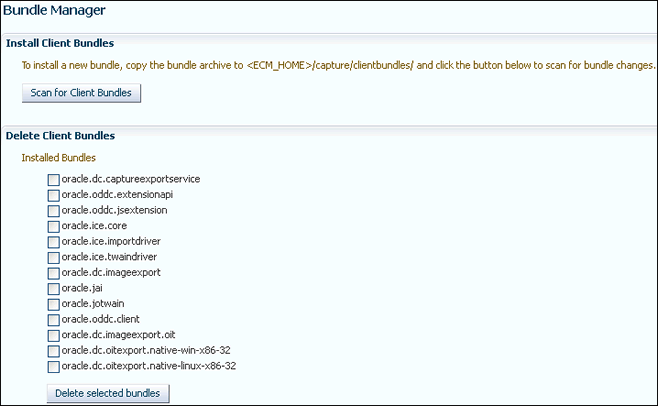
Description of the illustration client_bundle_manage.gif
-
To delete orphaned client bundles, from the list of installed client bundles, select the ones you want to delete, then click Delete selected bundles.
-
To scan for and install updated client bundles, click Scan for Client Bundles. Any updated client bundled are installed.
Note:
To install a new bundle, copy the bundle archive to the <ECM_HOME>/capture/clientbundles directory, and then click Scan for Client Bundles. -
Click Apply to save your changes. You may need to restart the Capture server for the changes to take effect.
3.3 Managing Users and Security
This section covers the following topics:
3.3.1 About Security and Capture Roles
Capture includes the following roles:
3.3.1.1 System Administrator
The system administrator is a super user that has complete control over the Capture system's configuration and administration. This user can give permissions to access the system to others. The system administrator can perform the following tasks:
-
Access the Enterprise Manager application to configure system parameters, assign roles to Capture users and groups, view performance data, and manage system logs.
-
Apply system updates.
-
Grant the workspace manager role to individuals or groups of individual users.
3.3.1.2 Capture Workspace Manager
A workspace manager is allowed to create Capture workspaces, and create client profiles and batch processing jobs for processes that act upon batches within the workspace. In addition, the workspace manager also grants other users permission to access the workspace in the workspace manager, workspace viewer, or user roles.
3.3.1.3 Capture Workspace Viewer
A workspace viewer is granted read-only permission to the workspace for the purpose of reviewing the workspace configuration to include client profiles and batch processor job configurations.
3.3.1.4 Capture Client User
A Capture client user may create, update, and delete batch-related content within a workspace, including batches, batch items, documents, and pages.
3.3.2 Assigning Capture Roles in Oracle Enterprise Manager
You can create Capture users in Oracle WebLogic Server administration control, and then assign roles to them in Oracle Enterprise Manager.
To create an Oracle WebCenter Enterprise Capture user:
-
Log into the WebLogic Server administration console using the steps listed in Section 2.5.
-
Navigate to the capture_domain within WebLogic Server, and then click Security Realms.
-
In the table under the Summary of Security Realms section, click myrealm, the built-in realm that works with the integrated LDAP.
-
Select the Users and Groups tab and then the Users subtab.
-
Under the Users section, click New to display the Create a New User section.
-
In the Name field, specify a name, for example Workspace Manager.
-
In the Password field, specify a password.
-
In the Confirm Password field, enter the password again, and then click OK.
You can assign LDAP users and groups to Capture roles in Oracle Enterprise Manager.
To assign a Capture role to users and groups:
-
Log in to Oracle Enterprise Manager using the steps listed in Section 2.2.
-
Navigate to the capture_domain within the WebLogic Domain.
-
Right-click the capture_domain, select Security, and then Application Roles. The Application Roles page displays.
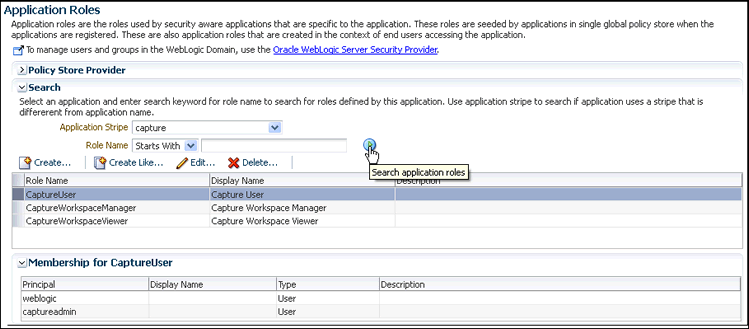
Description of the illustration capture-roles.gif
-
In the Application Stripe field, select capture, and then click the Search application roles icon to display the Capture application roles.
-
Select a role from the list, for example, CaptureWorkspaceManager, then click Edit. The Edit Application Role page for the selected role displays.
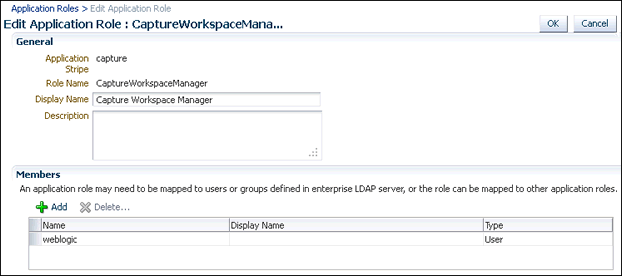
Description of the illustration edit-role.gif
-
In the Edit Application Role page, under Members, click Add.
-
In the Add Principal dialog box, search for users or groups that you want to add to the selected Capture role.
-
Click OK to add the selected user or group.
-
Repeat steps 6 to 8 to add more users or groups to the selected role.
Note:
After a user has been granted the CaptureWorkspaceManager role, that user can sign in to the Workspace Console, create a workspace, and grant Capture access to other LDAP users who have been assigned Capture roles.Note:
You must assign the CaptureWorkspaceManager and CaptureUser roles to the first workspace manager to provide access to the Capture Workspace Console and the Capture client. Only members of the CaptureUser role can use the Capture client. -
Click OK.
-
Add users and groups to the other Capture roles by performing steps 5 to 10.
3.3.3 About Authentication
Authentication is handled by the application server. Capture's user login, access, and authentication are integrated with Oracle WebLogic Server and Oracle Platform Security Services (OPSS). Once authenticated, users' permissions are dictated by application role membership and the workspaces and Capture resources to which they have been granted permission. Within Capture, workspace managers grant access to users or groups. For example, a workspace manager assigns a user group granted the Capture user role to a client profile within the workspace.
3.3.4 About SSL
Capture supports communication between the client and server using HTTP or HTTPS application protocols. If the Capture client is accessed outside the protection of an organization's firewall, the application server's web container should be configured to require HTTPS connections to ensure that all sensitive information is properly secured. SSL applies to the managed server and encompasses both the client and workspace console. Therefore, configuring the server to use SSL affects both the client and workspace console web applications. For more information on how to configure SSL in Oracle Fusion Middleware, see the Oracle Fusion Middleware Administrator's Guide.
3.4 Browsing Capture MBeans
Java Management Beans, called MBeans, are part of the greater Java Management eXtensions (JMX) standard which defines ways for administration applications to configure and control Java applications externally. At installation, Capture registers its MBeans with the hosting application server's MBean server. This allows other applications to interact with Capture's configuration data. This includes WebLogic Scripting Tool (WLST) and Oracle Enterprise Manager MBean browser.
3.4.1 Viewing Capture MBeans
If you use Oracle Enterprise Manager to monitor server performance, you may want to also use the Enterprise Manager System MBean Browser to view Oracle WebCenter Enterprise Capture MBean values.
To view Capture MBeans using the System MBean Browser:
-
Log in to Oracle Enterprise Manager using the steps listed in Section 2.2.
-
Click the Capture server in the right pane to display the Capture menu options.
-
To view Capture MBeans, select System MBean Browser from the Capture menu. The System MBean Browser page displays.
-
In the left navigation pane, under Application Defined MBeans, expand oracle.capture. Select the appropriate server.
-
Expand the appropriate server.
-
Expand the Capture application within the selected server.
-
Expand config.
-
Click Config. The list of Capture MBeans displays in the right pane.
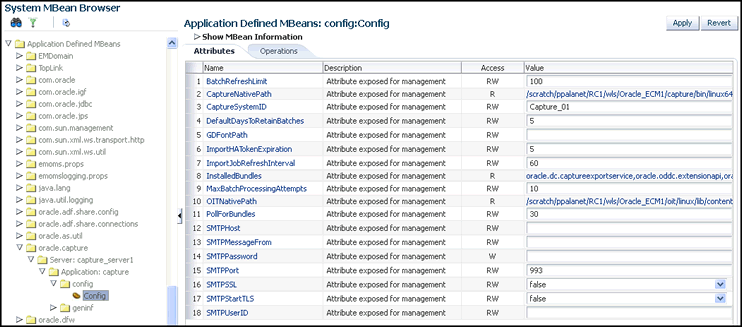
Description of the illustration mbean-browser.gif
The Capture MBeans can be configured from the System Configuration page in Oracle Enterprise Manager. See Section 3.2 for more information.
You can also use WLST to view Capture MBeans. For more information on how to use WLST to view Capture MBeans, see the Oracle Fusion Middleware WebLogic Scripting Tool Command Reference.