8 Completing the Records Configuration
This chapter explains how to complete the initial configuration of Oracle WebCenter Content: Records in an Oracle WebLogic Server domain.
This chapter includes the following sections:
-
Section 8.2, "Configuring Additional Parameters for Records Cluster Nodes"
-
Section 8.4, "Setting Connection Pool Property Values for an IBM DB2 Data Source"
8.1 Completing the Initial Records Configuration
After installation and startup, when you go to the web interface for Records, you will get the WebCenter Content: Records Configuration page, which Figure 8-1 shows.
Figure 8-1 Configuration Page for Records
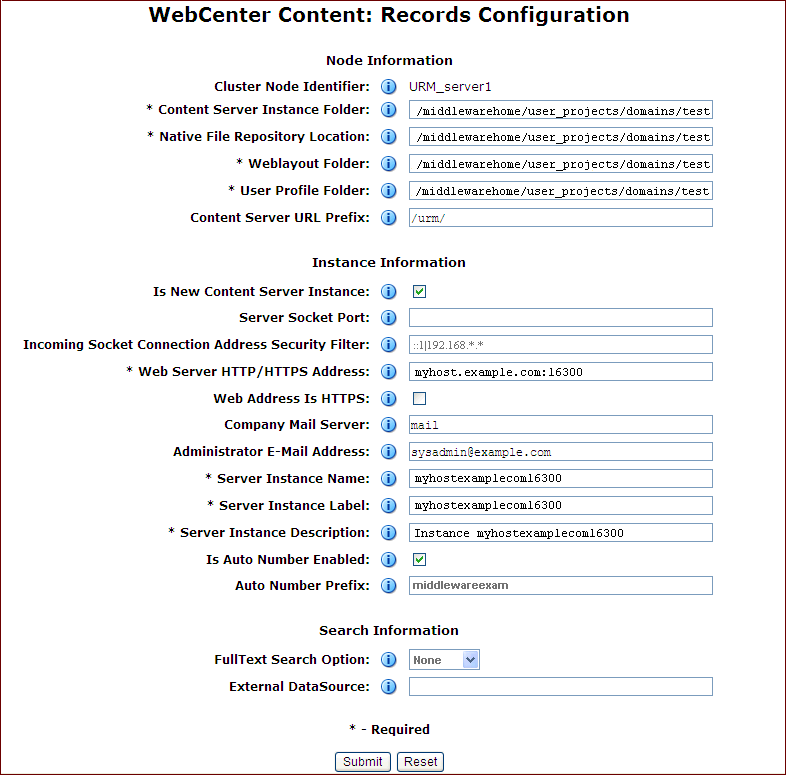
Description of "Figure 8-1 Configuration Page for Records"
For information about the fields on this page and the values you can enter to configure your Records instance, see Section 4.3.2, "Configuring the Content Server Instance." After you complete the WebCenter Content: Records Configuration page and click the Submit button, you need to restart Records, as described in Section 10.3, "Restarting a Managed Server."
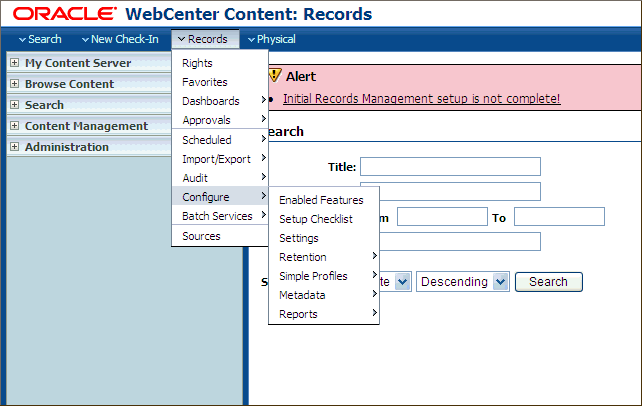
When Records restarts, the web interface shows an alert:
Initial Records Management Setup is Not Complete!
Then you can select the Records install settings and installation level you want on the Configure: Enabled Features page and configure the features. For information about configuring these settings, see Section 8.1.1, "Configuring the Level of Records Features."
After you configure the installation level and features, you can complete the Records configuration through the Setup Checklist page. For more information, see Section 8.1.2, "Completing the Setup Checklist for Records."
Note:
TheContentFolios component is required for access to the Records web interface. This component is enabled by default in a Records Managed Server. Do not disable the ContentFolios component.8.1.1 Configuring the Level of Records Features
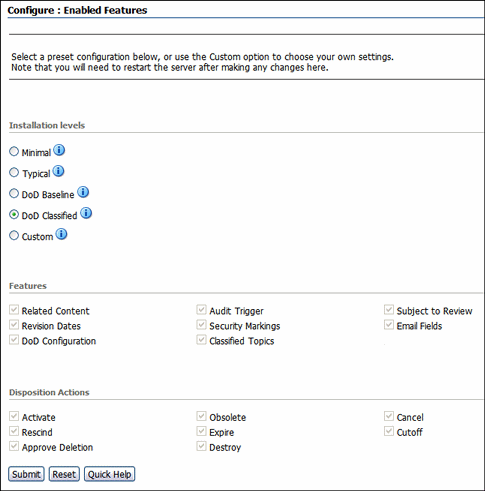
On the Enabled Features page, you can configure and installation level and features for Records. The default installation level is Minimal.
To configure the level of Records features:
-
From the Records menu, choose Configure, then choose Enabled Features, as Figure 8-2 shows.
-
On the Enabled Features page, which Figure 8-3 shows, select an installation level, which selects all the features and disposition actions for that level.
The following table describes the installation levels and features that can be enabled. For information about the components to be enabled for each level, and the features and disposition actions to be installed, click the Info icon next to the level.
Element Description Installation Level Specifies the type of configuration to be enabled: -
Minimal
-
Typical
-
DoD Baseline
-
DoD Classified
-
Custom
Features When you select an installation level, the default features for that level are selected to be enabled. If you select the Custom installation level, you can select the features you want enabled: -
Related Content
-
Audit Trigger
-
Subject to Review
-
Revision Dates
-
Security Markings
-
Email Fields
-
DoD Configuration
-
Classified Topics
Disposition Actions This section contains the disposition actions that can be used for content: -
Activate
-
Rescind
-
Approve Deletion
-
Obsolete
-
Expire
-
Destroy
-
Cancel
-
Cutoff
Note:
If you are using Oracle WebCenter with Records and want to use the DOD feature, you can set the DoD Baseline or Classified Installation level after WebCenterConfigure has been enabled and has had a chance to check in its conversion templates.If you select a DOD installation level first, you can create a rule that matches the documents created by WebCenterConfigure to assign them to a default category. The category could be based on the content IDs. For more information, see "Setting Up Workflows" in Managing Oracle WebCenter Content.
-
-
If you selected the Custom installation level, select the features and disposition actions that you want enabled, and deselect any that you do not want enabled.
-
Click the Submit button.
After making selections or if configuration options are changed (for example, switching from Baseline to Classified), you need to restart the Records Managed Server and rebuild the Content Server index. For more information, see Section 8.1.2, "Completing the Setup Checklist for Records." For information about rebuilding the index, see "Working with the Search Index" in Administering Oracle WebCenter Content.
8.1.2 Completing the Setup Checklist for Records
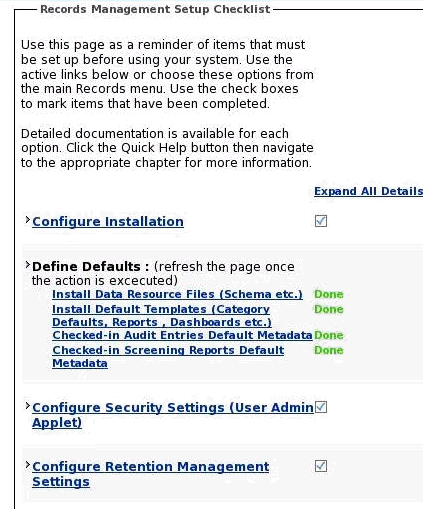
After the installation and configuration of Records on a Managed Server, you need to complete the Setup Checklist page before you can set up retention policies and procedures. This page is used to set global options for aspects of the retention management system.
For information about setting up retention policies and procedures, see "Retention Management Options" in Managing Oracle WebCenter Content.
To complete the Setup Checklist for Records:
-
From the Records menu, choose Configure then choose Setup Checklist.
-
On the Setup Checklist page, which Figure 8-4 shows, for each action that is marked Not Done, click the action, complete the configuration for it, refresh the Setup Checklist page, and then mark the checkbox to the right of the action to indicate that it is complete.
If any required configuration tasks on this page are not completed, a warning message with a link to this page appears on the home page of the Records system. You can click the link to display this page, or you can display the page from the Records menu again.
Note:
The Configure Report Library task is only for the Records Management feature in Content Server. This library is not needed for Oracle WebCenter Content: Records. For information about how to configure the report library, see Section 4.1, "Configuring the Report Library for Records Management in Content Server." -
For any of the other actions that you want to configure, click the action, complete the configuration for it, refresh the Setup Checklist page, and then mark the checkbox to the right of the action to indicate that it is complete.
Expanding any action in this list displays a detailed explanation of the action's purpose. The options available on the page depend on your installation level:
-
Minimal
-
Typical
-
DoD Baseline
-
DoD Classified
-
Custom
The following table lists the actions that can be on the Setup Checklist and describes the purpose of each action.
Action Description Configure Installation Used to configure optional components and metadata fields. Select from preset configurations to choose the features that are needed. Configure Report Library Used to configure the report library for the Records Management feature of Content Server, after adding the oracle.xdo.runtimelibrary from the Oracle WebLogic Server Administration Console and a library reference toweblogic-application.xmlThis library is not needed for Oracle WebCenter Content: Records.Define Defaults Used to define the default for audit trails, template locations, and metadata for content that is automatically checked in on a periodic basis. You can configure metadata for Audit Entries and for Screening reports. Clicking an option brings up a check in page where you can edit the fields to be used as defaults.
Configure Security Settings Used to define the security settings including roles, rights, and access control list use. This link opens the Admin Applets. Click the User Applet to configure security. Configure Retention Management Settings Used to configure many of the retention management options such as supplemental markings, triggers, and reports. Clicking this option displays the Configure Retention Settings page. For more information, see "Retention Management Options" in Managing Oracle WebCenter Content.
Configure Fiscal, Calendar, and Custom Periods Used to set periods used for disposition processing. Selecting this option displays the Configure Periods page. For information, see "Managing Time Periods" in Managing Oracle WebCenter Content.
Configure Global, Direct, and Indirect Triggers Used to set up the triggers used for disposition processing. Selecting this option displays the Configure Triggers page. For information, see "Working with Triggers" in Managing Oracle WebCenter Content.
Create Retention Schedule or Import Retention Schedule Used to set up retention schedules. Selecting Create Retention Schedule displays the Exploring Retention Schedule page. Selecting Import Retention Schedule displays the Import/Export Screen. For information about importing and exporting files, see "Managing Imports and Exports" in Managing Oracle WebCenter Content.
Configure Freeze Reasons Used to set up freezes. Selecting this option displays the Freeze Configuration page. For more information, see "Managing Freezes" in Managing Oracle WebCenter Content.
Configure Workflows Used to set up workflows to use with off-site storage, reservations, and category disposition processing. These workflows must be set up for that functionality to work properly. For more information, see "Setting Up Workflows" in Managing Oracle WebCenter Content.
Configure Default Reviewers Used to add users who will be default reviewers. Click User Admin Applet to proceed. Configure Related Content Types Used to set up links. Selecting this option displays the Configure Links Type Page. For more information, see "Configuring Related Content (Links)" in Managing Oracle WebCenter Content.
Configure Federated Search Default Category Used to indicate a default category and default folder to use for Federated searches. Selecting this option displays the Component Manager page, where you can enter configuration variables: -
FederatedSearchDefaultCategory=categoryId -
FederatedSearchDefaultFolder=folderId
Configure 'Profile Trigger' as Trigger Field Used to determine the trigger for profiles used in searching and checking in content and physical items. -
There is no longer an installation requirement that the NumConnections configuration variable be set to 10. This configuration is now controlled by Oracle WebLogic Server and does not need to be set independently.
8.2 Configuring Additional Parameters for Records Cluster Nodes
For Records cluster nodes, you need to add some additional parameters to avoid performance problems such as stuck threads or other file system issues.
Using a text editor, add the following options to each cluster node's DOMAIN_HOME/ucm/urm/bin/intradoc.cfg file, where the directories specified are on a direct-bus-attached-controlled local disk and not a remote file system, such as a Windows mapped drive to NTFS/CIFS, or a UNIX/Linux mounted NFS or clustered file system (like OCFS2, GFS2, or GPFS):
TraceDirectory=local_domain_home/servers/URM_serverN/logs/
EventDirectory=local_domain_home/servers/URM_serverN/logs/event/
ArchiverDoLocks=true
DisableSharedCacheChecking=true
For each cluster node created with the Oracle WebLogic Scripting Tool (WLST) unpack command, you will need to create the preceding directories, ensuring that the permissions are the same as for the first installed node (RWXD for the user executing the Records Managed Server, usually oracle). The trailing N should match the node's server name, like URM_server1 is node 1, URM_server2 is node 2, and so on.
Note:
The directories can reside in any local disk path that you have determined to have enough space to hold the Records logs and any trace that you might configure. The preceding paths are suggestions.Finally, add one more parameter, which must be on a shared file system (unlike the other entries, which should point to the local disk installation):
UserProfilesDir=ORACLE_BASE/admin/domain_name/urm_cluster_name/urm/data/users/profiles/
Note:
A Records Managed Server cannot be configured for server migration.8.3 Using OracleTextSearch with Records
When you use OracleTextSearch with Content Server, 32 optimized fields are allowed. When Records is installed, the number of optimized fields can exceed the 32-field limit.
To accommodate this limitation, if OracleTextSearch is configured as the search engine, Records sets its date fields to be nonsearchable. Because of this, Records date fields will not appear on search pages.
If you install Records while using OracleTextSearch and later change search engines, you can configure the date fields to be searchable by using the Content Server Configuration Manager.
If you install Records without OracleTextSearch and later change your current search engine to OracleTextSearch, you must manually configure the date fields to be nonsearchable in the Content Server Configuration Manager.
To search auxiliary metadata in Records with Oracle Text 11g, you must configure Content Server to use OracleTextSearch as the search engine. You can set OracleTextSearch on the WebCenter Content postinstallation configuration page or in the configuration file. For more information, see Section 4.5, "Configuring OracleTextSearch for Content Server."
8.4 Setting Connection Pool Property Values for an IBM DB2 Data Source
If the Records Managed Server has an IBM DB2 data source, you need to set the DynamicSections property value to at least 500 in the connection pool configuration for the data source. This setting can prevent a DYNAMICSECTIONS error.
To set connection pool property values for an IBM DB2 data source:
-
Log in to the Oracle WebLogic Server Administration Console, at the following URL:
http://adminServerHost:adminServerPort/console
For
adminServerHost, specify the name of the computer that hosts the Administration Server for your domain. ForadminServerPort, specify the listen port number for the Administration Server. The default number is7001. For example:http://myHost.example.com:7001/console
To log in, supply the user name and password that were specified on the Configure Administrator User Name and Password screen in the configuration wizard.
-
Click Services in the navigation tree on the left.
-
Click JDBC in the Section column under Summary of Services.
-
Click Data Source in the Section column under Summary of Services: JDBC.
-
Click URDMS, or the JNDI name of the data source for the Records Managed Server, in the Data Sources table.
-
On the Settings page for the data source, click the Connection Pool tab.
-
In the Properties field, add the following lines to the list of properties to be passed to the JDBC driver:
createDefaultPackage=true
replacePackage=true
dynamicSections=500
-
Click the Save button.