7 Connector Deactivation and Uninstallation
This chapter provides information on how you can deactivate and uninstall the WebCenter Content Storage Connector for Microsoft SharePoint 2010.
This chapter covers the following topics:
-
Section 7.1, "Deactivating and Cleaning Up the Connector for a SharePoint Content Database"
-
Section 7.2, "Deleting the Connection between SharePoint and WebCenter Content"
7.1 Deactivating and Cleaning Up the Connector for a SharePoint Content Database
This section provides information on how you can deactivate the connector on a SharePoint content database, perform reverse migration, run the RBS Maintainer utility, and clean up the connector for a SharePoint content database.
7.1.1 Deactivating the Connector on a SharePoint Content Database
Deactivating the connector on a SharePoint content database removes the security, metadata, and scope configuration settings that you configured for the SharePoint content database. After you deactivate the connector for a SharePoint content database, the connector does not externalize the documents created or updated in the site collections that belong to this SharePoint content database. These documents are stored in the SharePoint content database. However, the documents that were already externalized before you deactivated the connector remain in the connector custom database or in WebCenter Content.
To deactivate the connector on a SharePoint content database:
-
Log on to WebCenter Content as an administrator.
-
In the Content Server portal, open the SharePoint Connector tray, and then click Activation Configuration. The Activation Configuration page appears. See Figure 3-4.
-
From the Web Application drop-down list, select the SharePoint web application that contains the content database that you want to deactivate. The list of content databases for the Web Application that you selected appears.
-
In the Action column, click Deactivate for the appropriate SharePoint content database.
7.1.2 Performing Reverse Migration
With reverse migration, you can copy the documents that are stored in WebCenter Content and the connector custom database to the SharePoint content database.
To initiate reverse migration:
-
Log on to WebCenter Content as an administrator.
-
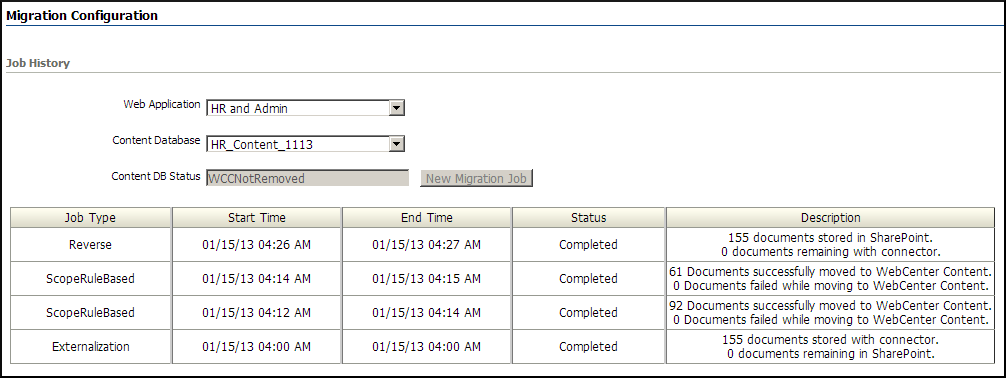
In the Content Server portal, open the SharePoint Connector tray, and then click Migration Configuration. The Migration Configuration page appears.
Figure 7-1 Migration Configuration Home Page

Description of "Figure 7-1 Migration Configuration Home Page"
-
From the Web Application drop-down list, select a SharePoint web application.
-
From the Content Database drop-down list, select a content database whose contents you want to copy to the SharePoint content database from WebCenter Content and the connector custom database. The status of the content database that you selected appears in the Content DB Status field.
Note:
The content database that you selected must be in the WCCDeactivated status.
-
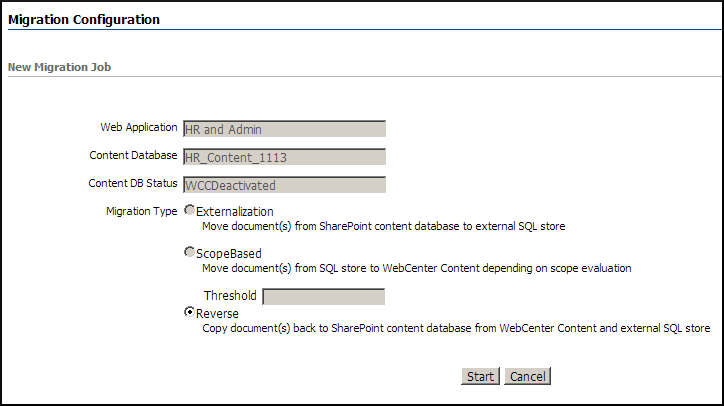
Click New Migration Job. The New Migration Job page appears.
Note:
The New Migration Job button is enabled only if the status of the content database is WCCActivated or WCCDeactivated.
-
In the Migration Type options group, select Reverse.
-
Click Start. The connector initiates reverse migration process for the content database that you selected. You can view the status of the migration task in the Job History table on the Migration Configuration home page.
7.1.3 Running the RBS Maintainer Utility
To delete documents from WebCenter Content and perform other RBS Maintainer operations, you must run the RBS Maintainer utility. For more information, see Section 5.3.
7.1.4 Cleaning Up the Connector for a SharePoint Content Database
Before cleaning up the connector for a SharePoint content database, you must run the the RBS Maintainer. For more information, see Section 7.1.3.
To clean up the connector for a SharePoint content database:
-
Log on to WebCenter Content as an administrator.
-
In the Content Server portal, open the SharePoint Connector tray, and then click Activation Configuration. The Activation Configuration page appears.
-
From the Web Application drop-down list, select the SharePoint web application that contains the content database that you want to clean up. The list of content databases for the Web Application that you selected appears.
-
Click CleanUp.
7.2 Deleting the Connection between SharePoint and WebCenter Content
Before you delete the connection between SharePoint and WebCenter Content, you must perform the deactivation and cleanup process for all the SharePoint content databases that you connected with WebCenter Content. For more information, see Section 7.1.1.
After you deactivate all the content databases, click Delete on the Connection Configuration page.
7.3 Uninstallation
This section provides information on how you can uninstall the WebCenter Content Storage Connector for Microsoft SharePoint 2010 from the SharePoint environment and the WebCenter Content environment.
7.3.1 Uninstalling the Connector from the SharePoint Environment
This section provides information on how you can uninstall and retract the connector, and unregister the WebCenter Content RBS provider.
7.3.1.1 Uninstalling and Retracting the Connector
Before uninstalling the connector, you must delete the connection that is configured between SharePoint and WebCenter Content. For more information, see Section 7.2.
To uninstall the connector from the SharePoint farm:
-
On the SharePoint server from where you want to uninstall the connector, open SharePoint 2010 Management Shell as an administrator.
-
Change the directory to the location where you extracted the WCCConnector.zip package. For more information, see Section 2.3.1.
-
To uninstall the connector from the SharePoint farm, use the following command:
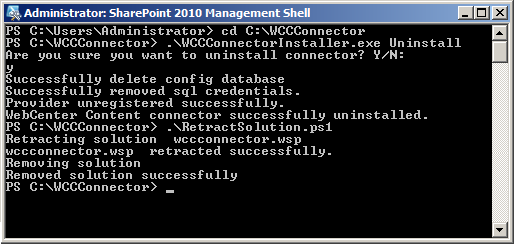
.\WCCConnectorInstaller.exe Uninstall
-
When the system prompts you whether you want to uninstall the connector, press Y, and then press Enter.
-
To retract the WCCConnector WSP from the SharePoint farm, use the following command:
.\RetractSolution.ps1
Figure 7-5 Retract Solution Command and Output

Description of "Figure 7-5 Retract Solution Command and Output"
7.3.1.2 Unregistering the WebCenter Content RBS Provider
Apart from the server where you uninstalled the connector, you must unregister the WebCenter Content RBS provider from each server in the SharePoint farm. If you have a single-server SharePoint farm environment, you do not need to perform this step. To unregister the WebCenter Content RBS provider from the SharePoint farm:
-
On the SharePoint server where you want unregister the WebCenter Content RBS provider, open SharePoint 2010 Management Shell as an administrator.
-
Change the directory to the location where you extracted the WCCConnector.zip package. For more information, see Section 2.3.1.
-
Use the following command:
.\WCCConnectorInstaller.exe UnregisterProvider
Figure 7-6 Unregister Provider Command and Output

Description of "Figure 7-6 Unregister Provider Command and Output"
7.3.2 Disabling the Connector from WebCenter Content
To disable the connector from WebCenter Content:
-
Log on to WebCenter Content as an administrator.
-
In the Content Server portal, choose Administration, then Admin Server, then Component Manager. The Component Manager page opens. See Figure 2-10.
-
Click the Advanced Component Manager link. The Advanced Component Manager page appears. See Figure 2-11.
-
In the Enabled Components list, select SharepointConnector, and then click Disable.
-
From the Uninstall Component drop-down list, select SharepointConnector, and then click Uninstall.


