2 Configuring WebCenter Forms Recognition Integration with WebCenter Enterprise Capture 11g
This chapter describes how to configure WebCenter Forms Recognition Integration with WebCenter Enterprise Capture 11g.
This chapter includes the following sections:
-
Task 7: Configure Recognition Processing for Document Separation
-
Task 8: Configure WebCenter Forms Recognition to Process Committed Documents
2.1 WebCenter Enterprise Capture 11g Integration Overview
Figure 2-1 illustrates a Capture workspace configuration for manual and automated capture, conversion, and commit of invoices for subsequent Accounts Payable processing.
Figure 2-1 Example Forms Recognition Integration With WebCenter Enterprise Capture 11g
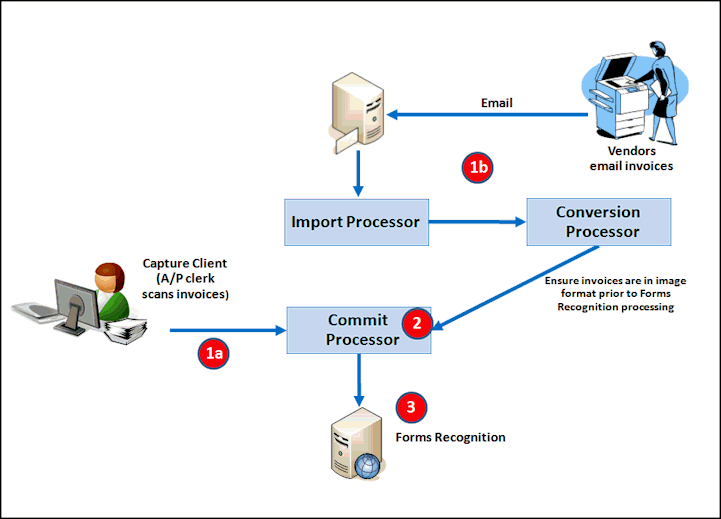
Description of ''Figure 2-1 Example Forms Recognition Integration With WebCenter Enterprise Capture 11g''
-
Invoices enter a Capture workspace through one of several manual or automated paths:
-
Capture Client: An Accounts Payable clerk scans paper invoices using a client profile. Because scanning always creates image documents, no document conversion is needed.
-
Email: Vendors email invoices as attachments to email messages. In Capture, an email Import Processor job imports the attachments and creates batches from them, then sends the batches to the Document Conversion Processor to ensure image format for Forms Recognition processing. (Invoice documents already in image format pass through document conversion unchanged.)
-
-
A commit profile commits the emailed or scanned invoice documents to a folder. The Capture commit outputs each invoice document as a multiple page TIFF file with a unique name.
-
WebCenter Forms Recognition imports the image files from the Capture commit folder and processes them.
WebCenter Forms Recognition monitors the Capture commit folder, importing image files it finds, parsing their filename metadata, and processing them through OCR, classification, and extraction. Once exception documents are validated, Forms Recognition exports batch documents to an export folder. The export includes:
-
A TIFF image file for each processed document.
-
An XML file for each processed document, containing values extracted by WebCenter Forms Recognition. For example, XML files for invoices might contain detailed information such as line item values.
-
A CSV file that identifies, on a batch level, the location of image and XML files and key metadata values.
-
-
Oracle WebCenter Content: Imaging's Input Agent imports the CSV, image, and XML files into Imaging.
Typically, image files become viewable in the Imaging Viewer, and each XML data file is stored in Imaging as a supporting document. In Imaging, workflow processing is initiated that processes the XML data.
2.1.1 System Requirements for WebCenter Enterprise Capture 11g Integration
Integrating Oracle WebCenter Enterprise Capture 11g with WebCenter Forms Recognition requires the following components:
-
Oracle WebCenter Enterprise Capture 11g Release 1 (11.1.1.8.0 or later)
-
Oracle WebCenter Forms Recognition 11g Release 1 (11.1.1.8.0 or later), including a project
-
Oracle WebCenter Content: Imaging (referred to as Imaging) 11g Release 1 (11.1.1)
Prerequisites for Invoices Use Case
To work with this use case, you need the following:
-
Invoice documents, such as TIFF or PDF files, to import in the client and to attach to email messages.
-
An email server account from which to import email messages.
-
A location to which to commit files. For testing purposes, this might be a shared folder on your network, such as \\Server\WFR_Projects\AP\Import.
Note:
The instructions in this section assume one invoice per document, which is standard. If you plan to capture multiple invoices contained in one document, see information in Section 2.8 about configuring the Recognition Processor to separate the invoice documents. Each invoice within the multiple invoice document must contain a separator coversheet as its first page, and the coversheet must contain a separator patch code or bar code.2.2 Task 1: Configure an Invoices Workspace and Elements
Begin by creating the structure and building blocks for the invoices use case. For more information about these tasks, see Oracle Fusion Middleware Managing Oracle WebCenter Enterprise Capture. Perform the steps in this task in the WebCenter Enterprise Capture Workspace Console.
-
Create a workspace.
Click the Add button in the Capture Workspaces pane, and enter a name (for example,
Invoices). Select the new workspace. -
On the Metadata tab, add a metadata field to pass an organization ID value.
-
Click the Add button in the Metadata Fields table.
-
Enter
Org IDas the field name. -
In the Auto Populate Type field, select Default Value.
-
In the Default Value field that becomes available, enter a value that represents the organization ID for the documents being captured (for example, 204).
-
Click Submit to complete creating the metadata field.
-
-
On the Classification tab, add a document profile to pass the organization ID metadata value.
-
Click the Add button in the Document Profiles table.
-
Enter
Invoice Documentsin the Name field. -
Move the Org ID field you created in the previous step to the Selected Metadata Fields box.
-
Click Submit to complete creating the document profile.
-
2.3 Task 2: Configure Client Scanning of Invoices
Configure a client profile that client users can use to scan and import invoices.
-
On the Capture tab, create a client profile by clicking the Add button in the Client Profiles table.
-
Select settings on the General Settings train stop.
-
In the Profile Type field, select 2 - Capture and Index.
-
Enter a Profile Name (for example,
Invoices). -
In the Batch Prefix field, enter a prefix (for example,
INV-).
-
-
Select settings on the Image Settings train stop.
-
In the Default DPI field, select 300.
-
Select Convert to Image Format in the Non-Image File Import Action field. This will allow you to import non-image files such as PDF files, and Capture will automatically convert them to image format.
-
In the DPI field under Non-Image Conversion options, select 300.
-
-
Select settings on the Document Indexing Settings train stop.
-
In the Document Creation Option field, select 4 - Prompt User.
-
In the Document Profiles field, select the Invoice Documents profile you created in Section 2.2.
Figure 2-2 Client Profile for A/P Clerks to Manually Scan Invoices
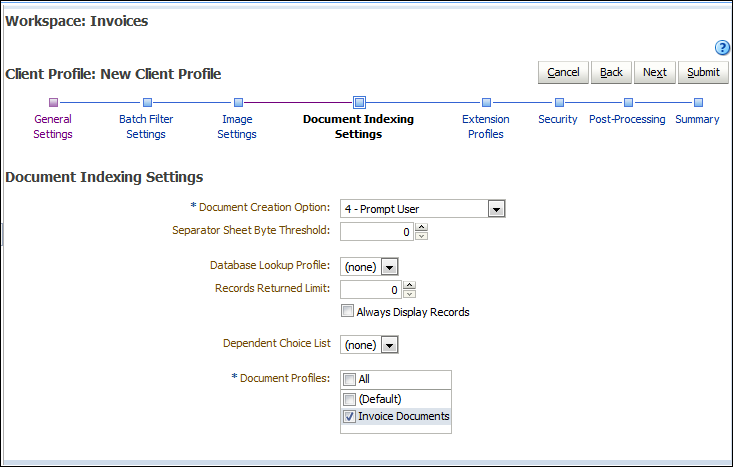
Description of ''Figure 2-2 Client Profile for A/P Clerks to Manually Scan Invoices''
-
-
On the Security train stop, add yourself to the client profile.
-
On the Post-Processing train stop, select Commit Processor in the Batch Processor field.
-
Click Submit to complete the client profile.
2.4 Task 3: Configure Commit Processing
Follow these steps to configure a text file commit that commits the images to a folder. Because an actual text commit file with metadata values is not needed, you configure the commit profile so it does not create a text file.
-
On the Commit tab, create a commit profile by clicking the Add button in the Commit Profiles table.
-
Specify settings on the General Settings train stop.
-
In the Commit Profile Name field, enter a name (for example,
Commit Invoices). -
In the Commit Driver field, select Text File.
-
In the Document Output Format field, select TIFF Multi-Page.
-
In the Default Date Format field, enter
yyyyMMdd. This is the format that WebCenter Forms Recognition expects.
-
-
Select the Commit Driver Settings train stop to configure settings specific to text file commits.
-
On the Text File Folder tab, select the Do not create Commit Text File field.
-
On the Document Folder tab, specify a location such as a shared network folder in the Document Folder field. (This is the folder from which WebCenter Forms Recognition will import the committed invoice documents.)
Select the Create a folder per committed batch field.
-
On the Document File Naming tab, configure how invoice documents are named upon commit.
-
Select the Name document file based on metadata field values field.
-
Move the following fields to the Selected Fields box and order them as follows:
<Batch ID>
<Document ID>
Org ID
<Batch Creation Date>
-
In the Field Delimiter field, enter an
_(underscore) character.
Figure 2-3 Commit Profile for Writing Invoice Documents to a Folder
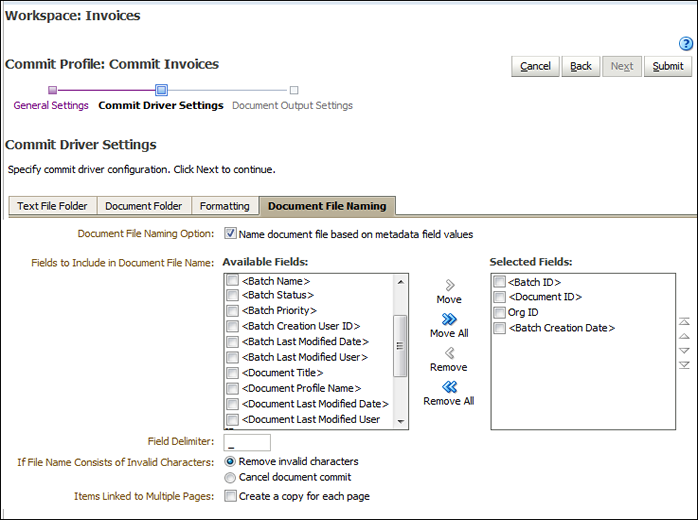
Description of ''Figure 2-3 Commit Profile for Writing Invoice Documents to a Folder''
-
-
Click Submit to save the commit profile.
2.5 Task 4: Test the Client Profile and Commit Profile
Now test the profiles you configured. For more information about client use, see Oracle Fusion Middleware Using Oracle WebCenter Enterprise Capture.
-
Sign in to the Capture client.
-
Select the client profile you created (for example, Invoices).
-
Capture one or more invoices.
-
If scanning invoices, the Document Creation Option window displays each time you scan.
-
If scanning one or two page invoices, choose the One Page or Two Pages option, respectively.
-
If scanning multiple page invoices, include a blank separator page between invoices, and choose the Variable Number of Pages option.
-
-
If importing invoices, select the Create one document per import file option when prompted for an import option. Note that you can import PDF files in addition to TIFF files, because you selected Convert to Image Format in the Non-Image File Import Action field in step 3 in Section 2.3.
-
-
Review, then release a batch.
Figure 2-4 Use the Capture Client to Test Invoices Client Profile Settings
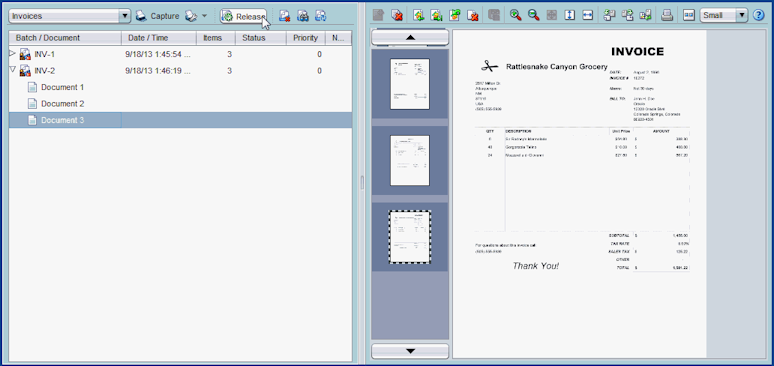
Description of ''Figure 2-4 Use the Capture Client to Test Invoices Client Profile Settings''
-
Verify the commit. Click the Refresh Batch List button.
-
The batch was successfully committed if it was removed from the batch pane list. Open the document folder you specified in the commit profile in Section 2.4 and verify that the documents (but no text file) were committed to the folder.
-
If the batch remains and displays an error (red x) icon, right-click the document and select Display Batch Errors. For example, an error may have occurred in committing to the shared network folder.
-
2.6 Task 5: Configure Import Processing of Emailed Invoices
Now that you have configured manual invoice scanning/importing, configure the automated portion of the use case. In this task, configure how invoices attached to email messages are imported and sent for processing.
-
On the Capture tab of your workspace, click the Add button in the Import Processor Jobs table.
-
Complete settings on the General Settings train stop.
-
In the Import Job Name field, enter a name (for example,
Import Invoices). -
In the Batch Prefix field, enter a prefix (for example,
INV). -
In the Import Source field, select Email Source.
-
In the Import Frequency field, select Every 30 seconds. Then deselect the Online field above. When online, the import processor job monitors the specified inbox folder at the specified import frequency for files to import. When you are ready, you will change the job to Online.
Figure 2-5 Import Processor Job for Importing Invoices Attached to Email Messages

Description of ''Figure 2-5 Import Processor Job for Importing Invoices Attached to Email Messages''
-
-
Select the Import Source Settings train stop and complete settings on the Email Accounts tab.
-
In the Email Server Name field, enter a DNS name or IP address (for example,
emailserver.example.com). -
Click the Add button in the Email Accounts to Process table.
-
In the Email Address and Password fields of the Add/Edit Email Account window, enter an address and password.
-
Click Verify to verify the address/password entry. A message displays that the email account connection was successful. Click OK.
-
-
On the Message Filters tab, specify the folder to process in the Folders to Process field.
For example, you might specify
inbox/invoicesto import email messages stored in an invoices folder in the email inbox.Caution:
Be sure to specify a limited folder from which to import. Otherwise, Capture may attempt to process an entire inbox, which could result in unintended consequences. -
On the Processing tab, optionally restrict the type of attachments to be imported.
By default, the Include attachments matching these mask(s) field is set to
*.*(all attachments are processed). To restrict import to certain file types, enter their extensions. For example, enter*.TIF;*.PDFto import all email attachments with a TIF or PDF extension. -
On the Post-Processing tab, leave the default settings selected, which will delete email messages after they are successfully imported but retain email messages that fail import.
-
Click Submit to complete creating the import processor job.
-
When ready to begin importing, ensure there are email messages with attached documents in the specified inbox folder. Select the job in the Import Processor Jobs table and click the Toggle Online/Offline button until the job's status changes to Online.
-
Start the Capture client and select the previously created client profile. Wait about a minute for imported batches to display in the batch pane. If they do not appear, check your email inbox folder settings.
-
To stop importing, select the job in the Import Processor Jobs table and click the Toggle Online/Offline button until its status displays as Offline.
2.7 Task 6: Configure Document Conversion Processing
Invoices in non-image formats (such as PDF) that arrive in Capture attached to email messages need to be converted to image format to be processed by WebCenter Forms Recognition. In this task, configure a document conversion processor job to automatically convert documents from PDF to TIFF format.
-
On the Processing tab, click the Add button in the Document Conversion Jobs table.
-
Complete settings on the Document Selection train stop.
-
In the Name field, enter a job name (for example,
Convert Non-Images). -
In the Documents to Convert field, choose Selected non-image documents. Enter
*.pdfin the File Name Filter field.
-
-
On the Output Format train stop, select TIFF: black and white in the Output Image Format field.
-
On the Post-Processing train stop, select Commit Processor in the Batch Processor field under the When there is no system error options. This setting will direct successfully converted batches to the commit profile.
-
Click Submit to complete creating the document conversion processor job.
-
Set the import processor job to direct imported batches to the document conversion job.
Click the Capture tab and edit the import processor job. On the Post-Processing train stop, select Document Conversion Processor in the Batch Processor field, then select the conversion processor job you created in the Batch Processor Job field. Click Submit.
-
Verify the document conversion processor job.
Ensure there are email messages with attached documents in the specified inbox folder and change the import processor job's status to Online. Note that it will take a little longer for batches to be imported, converted, and committed. Check your commit folder and confirm that the document files are in TIFF image format.
2.8 Task 7: Configure Recognition Processing for Document Separation
If the invoice documents imported as attachments may contain multiple invoices within a single file, you can configure a Recognition Processor job to separate the invoice documents, as described in this section. You can skip this section if your invoice processing configuration will always include one invoice per document.
Below is a summary of this task's configuration, which includes additional document conversion and recognition processing steps for separating and organizing multiple invoice documents. For more information, see Oracle Fusion Middleware Managing Oracle WebCenter Enterprise Capture.
-
Ensure that each invoice within a multiple invoice document that arrives in Capture contains a separator coversheet as its first page, and the coversheet contains a separator patch code or bar code.
-
On the workspace's Processing tab, create a recognition processor job that includes the following settings.
-
On the Document Organization train stop, set an organization type of Separator pages.
-
On the Document Processing train stop, configure an invoice coversheet separator page that detects either a patch code or a bar code for separation.
-
Set post-processing to go to the Commit Processor when there is no system error.
-
-
On the workspace's Processing tab, edit the document conversion job for this use case.
Because the Recognition Processor expects a single image document, you must configure the Document Conversion Processor job to merge all documents into a single document so that the Recognition Processor can organize the documents in the batch.
-
On the Document Merge Options train stop, select the Merge all documents in the Batch Merge Option field.
-
Set the Document Conversion Processor job's post-processing to go to the Recognition Processor job when there is no system error.
-
2.9 Task 8: Configure WebCenter Forms Recognition to Process Committed Documents
After completing these tasks, configure WebCenter Forms Recognition to import the committed invoice documents, extract and validate their data, and store the documents in WebCenter Content Imaging. See the WebCenter Forms Recognition documentation listed in Related Documents. For an A/P invoice solution, see the Oracle Fusion Middleware Oracle WebCenter Forms Recognition AP Project Guide.