58 Creating Portlets from JSF Applications Using the Oracle JSF Portlet Bridge
This chapter describes how to use the Oracle JSF Portlet Bridge to expose a JSF application as a portlet.
This chapter includes the following topics:
-
Section 58.1, "Introduction to the Oracle JSF Portlet Bridge"
-
Section 58.3, "Updating the Portlet Entry for a Portletized Page or Task Flow"
-
Section 58.4, "Testing a Portletized Page or Task Flow in JDeveloper"
-
Section 58.5, "Testing a JSF Portlet Using the Integrated WebLogic Server"
-
Section 58.6, "Deploying JSF Portlets to a WebLogic Managed Server"
-
Section 58.7, "Using Events to Link JSF Portlets with Other Portlets"
-
Section 58.8, "What You May Need to Know When Creating a JSF Portlet"
-
Section 58.9, "Copying a Runtime-Created Skin to a JSF Portlet Producer Application"
Note:
The Oracle JSF Portlet Bridge extends the Apache Reference implementation of JSR 329. JSR 329 is the standards effort to define the functionality for the Portlet 2.0 Bridge for JavaServer Faces. Oracle is the specification lead for this standard. More information is available at:http://www.jcp.org/en/jsr/detail?id=329
58.1 Introduction to the Oracle JSF Portlet Bridge
The Oracle JSF Portlet Bridge enables application developers to quickly and easily expose their existing JSF applications and Oracle ADF applications and task flows as JSR 286 portlets.
Note:
Unless otherwise noted, the term JSF applications encompasses Oracle ADF applications.The Oracle JSF Portlet Bridge:
-
Simplifies portlet development by enabling you to provide portlet functionality using JSF rather than relying on the JSR 286 portlet APIs.
-
Simplifies exposing your JSF application to JSR 286 portlet consumers, such as Oracle WebCenter Portal.
-
Eliminates the requirement to store, maintain, and deploy your portlets separately from your application by enabling the application to run simultaneously as a regular web application and as a portlet from the same installation.
-
Enables you to create portlets at a more granular level by exposing task flows as portlets. Because portletized task flows are JSR 286 portlets, this also enables you to use your task flows in a distributed environment.
Note:
The Oracle JSF Portlet Bridge uses WSRP extensions that may prevent JSF portlets working as intended with third party WSRP consumers.58.2 Creating a Portlet from a JSF Application
The Oracle JSF Portlet Bridge enables you to expose a JSF application or task flow as a portlet. You do this declaratively, using the Create Portlet Entry dialog; no coding is required. Using the Create Portlet Entry dialog, you can configure Oracle JSF Portlet Bridge on a JSF application to expose the application as a JSR 286 portlet. As part of this configuration, you indicate the initial JSF view (or task flow) to invoke when the portlet is rendered. From that point on the Oracle JSF Portlet Bridge works with the JSF application to navigate through the additional views that are reachable from this initial view. So in the typical situation when you are exposing the entire JSF application as the portlet, you configure the Oracle JSF Portlet Bridge to render the application's initial view in the portlet and the rest of the navigation works naturally within that same portlet.
This section includes the following topics:
-
Section 58.2.1, "How to Create a JSF Portlet Based on a Page"
-
Section 58.2.2, "What Happens When You Create a JSF Portlet Based on a Page"
-
Section 58.2.3, "How to Create a JSF Portlet Based on a Task Flow"
-
Section 58.2.4, "What Happens When You Create a Portlet Based on a Task Flow"
58.2.1 How to Create a JSF Portlet Based on a Page
The simplest way to create a portlet from a JSF application is to generate a portlet based upon a page.
To create a JSF portlet from an existing application page:
-
In JDeveloper, open the application that contains the JSPX page that you want to portletize.
-
In the Application Navigator, right-click the JSPX page and choose Create Portlet Entry.
Note:
You cannot generated a portlet based on a page that contains a portlet. -
In the Create Portlet Entry dialog, in the Portlet Name field, enter a name for the portlet.
-
In the Display Name field, enter a descriptive name for your portlet.
-
In the Portlet Title field, enter a descriptive title for your portlet.
The portlet title is displayed in the Resource Palette or Application Resources panel, so make the title something to help users decide whether the portlet is useful to them. The portlet title is also displayed on the portlet header when the portlet appears on a page.
-
In the Short Title field, enter a shorter title for your portlet. This short title is displayed on the portlet header when the portlet appears on a page on a mobile device.
-
In the Description field, enter a description for your portlet.
-
Select Create portlet events for contextual events to create portlet events in the
portlet.xmlfile for any contextual events exposed by the page. This option is selected by default.Portlet events enable a portlet to communicate with the page on which it resides and with other portlets on that page.
-
Click OK.
58.2.2 What Happens When You Create a JSF Portlet Based on a Page
When you create a JSF portlet based on a page, a portlet.xml file is created (or updated if it already exists) to contain the portlet entry (Example 58-1) for the page. The file is opened ready for viewing or editing. By default, the file is opened in Design view. To view or edit the source code, click the Source tab.
Example 58-1 Generated Portlet Entry for a Page
<portlet id="adf_jsf__testPage_jspx">
  <description>PortletBridgeApplication_testPage_jspx</description>
  <portlet-name>PortletBridgeApplication_testPage_jspx</portlet-name>
  <display-name>PortletBridgeApplication_testPage_jspx</display-name>
  <portlet-class>
    oracle.portlet.bridge.adf.application.ADFBridgePortlet
  </portlet-class>
  <init-param>
    <name>javax.portlet.faces.defaultViewId.view</name>
    <value>/myPage.jspx</value>
  </init-param>
  <supports>
    <mime-type>text/html</mime-type>
    <portlet-mode>VIEW</portlet-mode>
  </supports>
  <supported-locale>en</supported-locale>
  <portlet-info>
    <title>PortletBridgeApplication_testPage_jspx</title>
    <short-title>PortletBridgeApplication_testPage_jspx</short-title>
  </portlet-info>
  <supported-processing-event id="DepartmentSelectedEvent">
    <qname xmlns:x="http://xmlns.oracle.com/adfm/contextualEvent">
      x:DepartmentSelectedEvent
    </qname>
  <supported-publishing-event id="DepartmentSelectedEvent">
    <qname xmlns:x="http://xmlns.oracle.com/adfm/contextualEvent">
      x:DepartmentSelectedEvent
    </qname>
  </supported-publishing-event>
  <supported-public-render-parameter>
    _adf_event_DepartmentSelectedEvent
  </supported-public-render-parameter>
  <container-runtime-option>
    <name>com.oracle.portlet.requireIFrame</name>
    <value>true</value>
  </container-runtime-option>
  <container-runtime-option>
    <name>com.oracle.portlet.minimumWsrpVersion</name>
    <value>2</value>
  </container-runtime-option>
</portlet>
The page you selected is used as the entry point for the portlet View mode. This is indicated in the portlet.xml file by the javax.portlet.faces.defaultViewId.view initialization parameter. You can manually edit the portlet.xml file to define the pages for other default and extended portlet modes supported by WebCenter Portal:
-
Edit mode:
javax.portlet.faces.defaultViewId.edit -
Help mode:
javax.portlet.faces.defaultViewId.help -
About mode:
javax.portlet.faces.defaultViewId.about -
Config mode:
javax.portlet.faces.defaultViewId.config -
Edit Defaults mode:
javax.portlet.faces.defaultViewId.edit_defaults -
Preview mode:
javax.portlet.faces.defaultViewId.preview -
Print mode:
javax.portlet.faces.defaultViewId.print
Note:
The value for thedefaultViewId is relative to the application context root and must always start with a /. In Example 58-1, the value for defaultViewId.view is /myPage.jspx.
If you add defaultViewId for other portlet modes, then ensure that you also add the mode to the <supports> tag. For example, <portlet-mode>HELP</portlet-mode>.
For information about portlet modes, see Section 57.4.2, "Portlet Modes."
58.2.3 How to Create a JSF Portlet Based on a Task Flow
An advantage of using Oracle ADF is the existence of task flows, which provide a modular approach for defining control flow in an application. Instead of representing an application as a single large JSF page flow, you can break it up into a collection of reusable task flows. In each task flow, you identify application activities, the work units that must be performed in order for the application to complete. An activity represents a piece of work that can be performed when running the task flow.
Task flows can be unbounded or bounded:
-
An unbounded task flow is a set of activities, control flow rules, and managed beans interacting to allow a user to complete a task. An unbounded task flow consists of all activities and control flows in an application that are not included within any bounded task flow.
-
A bounded task flow is a specialized form of task flow, having a single entry point and one or more exit points. It contains its own set of private control flow rules, activities, and managed beans. An Oracle ADF bounded task flow allows reuse, parameters, transaction management, and reentry. It can have zero to many exit points. Bounded task flows can use pages or page fragments, however only those that use page fragments can be portletized.
A typical application is a combination of an unbounded and one or more bounded task flows. The application can then call bounded task flows from activities within the unbounded task flow. For more detailed information about bounded and unbounded task flows, see the Fusion Developer's Guide for Oracle Application Development Framework.
This section includes the following topics:
58.2.3.1 Creating a Portlet From a Task Flow Using the Create Portlet Entry Dialog
Use the Create Portlet Entry dialog to create a portlet from a single task flow.
To make a portlet from a task flow using the Create Portlet Entry dialog:
-
In JDeveloper, open the JSF application that contains the task flow from which you want to make a portlet.
-
In the Application Navigator, right-click the task flow that you want to portletize, and choose Create Portlet Entry.
-
In the Create Portlet Entry dialog, in the Portlet Name field, enter a name for the portlet.
-
If the task flow is unbounded, the Entry Point View drop-down list displays all the view activities of the task flow. From this drop-down list, choose the view activity to use as the entry point for the portlet. By default, the first view activity in the task flow is chosen.
If the task flow is bounded, there is only a single possible entry point, so you do not see the Entry Point View drop-down list.
-
In the Display Name field, enter a descriptive name for your portlet.
-
In the Portlet Title field, enter a descriptive title for your portlet.
The portlet title is displayed in the Resource Palette or Application Resources panel, so make the title something to help users decide whether the portlet is useful to them. The portlet title is also displayed on the portlet header when the portlet appears on a page.
-
In the Short Title field, enter a shorter title for your portlet. This short title is displayed on the portlet header when the portlet appears on a page on a mobile device.
-
In the Description field, enter a description for your portlet.
-
Select Create portlet events for contextual events to create portlet events in the
portlet.xmlfile for any contextual events exposed by the task flow. This option is selected by default.Portlet events enable a portlet to communicate with the page on which it resides and with other portlets on that page.
-
Click OK.
58.2.3.2 Creating a Portlet From a Task Flow Using the Manage Portlet Entries of Task Flows Dialog
If your project includes a lot of task flows, you may find it easier to select the task flows to create as portlets from a list. You can do this using the Manage Portlet Entries of Task Flows dialog. This dialog also lets you create portlets from multiple task flows at the same time, rather than having to create them individually.
To create a portlet from a task flow using the Manage Portlet Entries of Task Flows dialog:
-
From the main menu, choose File and then New.
-
In the New Gallery, expand Web Tier, select Portlets and then Manage Portlet Entries of Task Flows, and click OK.
-
In the Manage Portlet Entries of Task Flows dialog, use the shuttle buttons to select which task flows you want to create as portlets.
-
Select Create portlet events for contextual events to create portlet events in the
portlet.xmlfile for any contextual events exposed by the task flows. This option is selected by default.Portlet events enable a portlet to communicate with the page on which it resides and with other portlets on that page.
-
Click OK to create portlets for the selected task flows.
58.2.4 What Happens When You Create a Portlet Based on a Task Flow
When your portlet, or portlets, have been created, you should receive a message that says:
New portlet has been successfully created
In addition, the portlet.xml file is created. The portlet.xml file contains the portlet entry (Example 58-2) and is opened ready for viewing or editing.
Example 58-2 Generated Portlet Entry for a Task Flow
<portlet id="adf_taskflow_WEB_INF_department_xml">
<description>PortletBridgeApplication department</description>
<portlet-name>PortletBridgeApplication_department</portlet-name>
<display-name>PortletBridgeApplication department</display-name>
<portlet-class>oracle.portlet.bridge.adf.application.ADFBridgePortlet</portlet-class>
<init-param>
<name>javax.portlet.faces.defaultViewId.view</name>
<value>
/adf.task-flow?adf.tfDoc=/WEB-INF/adfp-portlet-bridge-container.xml
&adf.tfId=adfp-portlet-bridge-container&_fragmentTaskFlowDoc=/WEB-INF/
department.xml&_fragmentTaskFlowId=department
</value>
</init-param>
<supports>
<mime-type>text/html</mime-type>
<portlet-mode>VIEW</portlet-mode>
</supports>
<supported-locale>en</supported-locale>
<portlet-info>
<title>PortletBridgeApplication department</title>
<short-title>PortletBridgeApplication department</short-title>
</portlet-info>
<supported-publishing-event id="DepartmentSelectedEvent">
<qname xmlns:x="http://xmlns.oracle.com/adfm/contextualEvent">
x:DepartmentSelectedEvent
</qname>
</supported-publishing-event>
<supported-public-render-parameter>
_adf_event_DepartmentSelectedEvent
</supported-public-render-parameter>
<container-runtime-option>
<name>com.oracle.portlet.requireIFrame</name>
<value>true</value>
</container-runtime-option>
<container-runtime-option>
<name>com.oracle.portlet.minimumWsrpVersion</name>
<value>2</value>
</container-runtime-option>
</portlet>
Note:
Theportlet.xml file can include multiple portlets and can have a combination of pages and task flows exposed as portlets. The file can also include standard JSR 286 (non bridge) portlets.58.3 Updating the Portlet Entry for a Portletized Page or Task Flow
If you edit a page or task flow that has been previously portletized, if those edits include updates to the task flow or page's parameters or events, then you must update the portlet entry for the page or task flow to keep the portlet in sync with the underlying page or task flow.
Note:
If you delete a page that has been portletized, you must manually remove the portlet entry for that page from theportlet.xml file.To update the portlet entry for a portletized page or task flow:
-
In the Application Navigator, open the JSF application that contains the portletized page or task flow that you want to update.
-
Right-click the page or task flow, and choose Update Portlet Entry.
-
If the portlet entry is for an unbounded task flow, then a dialog prompts you to select the view activity that was used to create the portlet.
-
The portlet entry is updated as follows:
-
The Create portlet events for contextual events option is set to true.
-
No updates are made to the portlet name, display name, title, short title, or description.
-
Any
event-definitionelements (at the portlet application level) are created as necessary. -
None of the existing
event-definitionelements are deleted or updated. -
Any
public-render-parameterelements (at the portlet application level) are created as necessary. -
None of the existing
public-render-parameterelements are deleted or updated. -
The list of
supported-processing-event,supported-publishing-event, andsupported-public-render-parameterelements in the portlet entry are re-created to reflect the current events and input parameters of the page or task flow. This means that some existing portlet events and public parameters may be deleted and new ones added.
-
58.4 Testing a Portletized Page or Task Flow in JDeveloper
After you have portletized a page or task flow, you must test it to ensure that it is working correctly. Testing a portletized page or task flow requires the following steps:
-
Portletize the page or task flow to create a portlet entry in the
portlet.xmlfile. -
Deploy the portletized application to a portlet server.
-
Create an application to consume the portletized page or task flow.
-
Register the portletized application with the consumer application.
-
Create a page in the consumer application and add the portletized page or task flow to it.
-
Deploy the consumer application and display the page that contains the portletized page or task flow.
WebCenter Portal provides a menu option, Run as Portlet, within JDeveloper to simplify this process by automatically performing these steps.
Tip:
You can also use the Run as Portlet menu option to test how a page or task flow behaves as a portlet before explicitly creating the portlet entry.For the Run as Portlet option to work correctly, the following conditions must be met:
-
You must deploy the Portlet Bridge Tester Consumer application to the Integrated WebLogic Server.
If the application is not yet deployed, from the Run menu, choose WebCenter Portal Deployments, then select Portlet Bridge Tester Consumer and click OK.
-
Integrated WLS must be using the default port,
7101. -
When you start Integrated WLS, it must listen to the local IP address,
127.0.0.1(you specify this in the Configure WebLogic Domain dialog by explicitly entering the IP address in the Listen Address field, or leaving the field blank). -
There must be no other application deployed to Integrated WLS using the context root
portletBridgeTester-Portlets-context-root. -
The application containing the page or task flow must be able to be successfully deployed to Integrated WLS.
If any of these conditions cannot be met, you must manually test the portletized page or task flow using the steps provided in Section 58.5, "Testing a JSF Portlet Using the Integrated WebLogic Server."
To test a portletized page or task flow:
-
In the Application Navigator, open the JSF application that contains the portletized page or task flow that you want to test.
-
Right-click the page or task flow, and choose Run as Portlet.
-
If you selected to run an unbounded task flow as a portlet, then a dialog prompts you to select the view activity to use as the entry point for the portlet.
-
The following happens:
-
If a portlet entry already exists for the page or task flow, then the portlet entry is updated to ensure that it reflects the current functionality of the page or task flow. For more information, see Section 58.3, "Updating the Portlet Entry for a Portletized Page or Task Flow."
If a portlet entry does not already exist for the page or task flow, then a portlet entry is created using the default values.
-
If the selected task flow is an unbounded task flow, a dialog prompts you to select the view activity to use as the entry point for the portlet.
-
If the selected task flow is a bounded task flow with input parameters, a dialog enables you to enter default values for those parameters.
-
The application is deployed to the Integrated WebLogic Server, using the context root
portletBridgeTester-Portlets-context-root.Note:
If this is the first time that the Integrated WLS has been started for this application, a dialog prompts you to configure the default domain. Set the Listen Address to127.0.0.1(or leave the field blank) and the Listen Port to7101. -
When deployment is complete, the portletized page or task flow is displayed in a browser window.
-
-
Test the functionality of the portletized page or task flow within the test consumer application.
58.5 Testing a JSF Portlet Using the Integrated WebLogic Server
When you have created your JSF portlet you can test it using the Integrated WebLogic Server that comes packaged with JDeveloper.
Before you test your portletized page or task flow, it is a good idea to first test that the page or task flow works correctly in the running ADF application. You can do this, using the Integrated WebLogic Server, by running the page or, for task flows, adding the task flow to a page and running that page.
For more information, see the "Running an ADF Application in Integrated WebLogic Server" section in the Fusion Developer's Guide for Oracle Application Development Framework.
To test a JSF portlet:
-
From the main menu, choose Run and then Start Server Instance.
It may take a few moments for the Integrated WLS to start. When the instance has started, you should see a message similar to the following in your Log panel:
IntegratedWebLogicServer started.
For more information, see Section 2.2.4, "Managing the Integrated WebLogic Server."
-
You are now ready to run your Portlet Producer application on the Integrated WLS. Because your web application and Portlet Producer application are one and the same (the Portlet Producer application is your existing web application with additional portlet artifacts), you can run your web application as you normally would (see the "Running an ADF Application in Integrated WebLogic Server" section in the Fusion Developer's Guide for Oracle Application Development Framework) or you can run your portlet following the instructions in Section 59.4.1, "How to Run a WSRP Portlet Producer on Integrated WebLogic Server."
-
When the application is deployed, you can view the WSRP Producer Test Page by going to:
http://host:port/context-root/info
where:
-
hostis the server to which the application has been deployed. -
portis the HTTP Listener port. Typically it is 7101. When the server is started, the port is displayed in the console. -
context-rootis the web application's context root.
-
-
Once you have successfully deployed the application containing the portlet, you can register it as a portlet producer with any other application. For more information see Section 63.2.1.1, "How to Register a WSRP Portlet Producer."
Note:
Because the Oracle JSF Portlet Bridge uses WSRP 2.0 features, you should register the producer using the WSRP v2 WSDL URL listed in the WSRP Producer Test Page.You can continue to access the application as a regular web application or consume it as a portlet producer.
-
Now that your portlet producer is deployed and registered, you can consume your JSF portlet as you would any other portlet. For more information, see Section 63.5, "Adding Portlets to a Page."
58.6 Deploying JSF Portlets to a WebLogic Managed Server
When you are satisfied that the application works correctly both as a web application and a portlet application, you can deploy it to your production Oracle WebLogic Managed Server.
Because your web application and portlet application are one and the same (the portlet application is your existing web application with additional portlet artifacts), deploying the web application also deploys the portlet producer application.
For information about how to deploy an application to a WebLogic Managed Server, see the "Deploying Fusion Web Applications" chapter in the Fusion Developer's Guide for Oracle Application Development Framework.
Note:
Ensure that you deploy your application to a Java EE container with the Oracle Portlet Container installed. The Integrated WLS has the container installed, which is why it is recommended for testing.After successful deployment, you can access both the application and the portlet producer test page. For example, the application URL would be similar to:
http://host:port/appcontextroot/faces/pagename.jspx
And the portlet producer test URL would be similar to:
http://host:port/appcontextroot/info
58.7 Using Events to Link JSF Portlets with Other Portlets
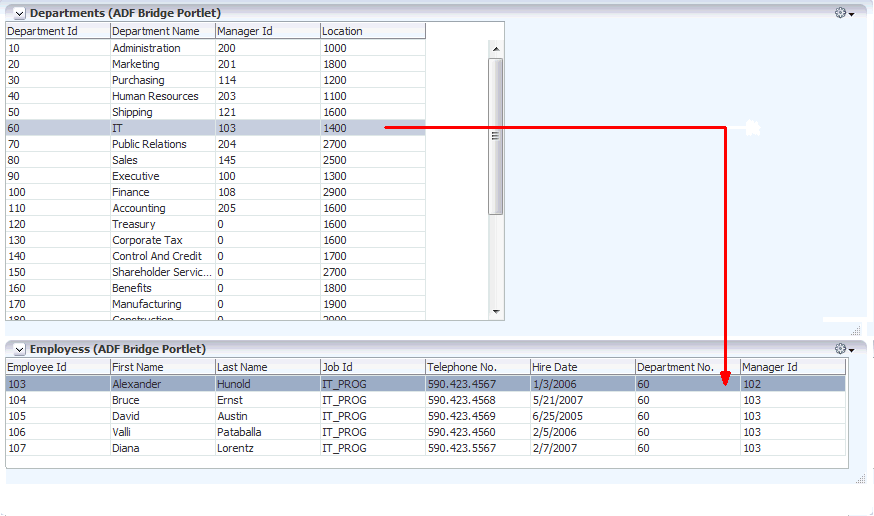
If you portletize an Oracle ADF task flow that triggers a contextual event, the Oracle JSF Portlet Bridge creates a JSR 286 portlet event to wrap the contextual event. This means that when the portletized task flow is consumed on a page, it can be linked to other JSF portlets or to JSR 286 portlets.
The examples in this section use the following portlets:
-
Departments portlet, a portletized ADF task flow that displays a list of departments. The list of departments can be restricted by location ID. This portlet raises a contextual event,
departmentSelected, when a department row is selected in the portlet. The payload of the departmentSelected event is an object of type hr.Department (a Java object representing one row of the Departments table). -
Employees portlet, a portletized ADF task flow that displays a list of employees. The list of employes can be restricted by department ID.
-
Department Address portlet, a JSR 286 portlet that displays the address of a specified department.
-
Department Locations portlet, a JSR 286 portlet that displays a list of locations. This portlet raises a portlet event, named
locationIdwith the namespacehttp://xmlns.oracle.com/adfm/contextualevent, when one of the listed locations is selected.
This section includes the following topics:
-
Section 58.7.1, "How to Link a JSF Portlet to Another JSF Portlet"
-
Section 58.7.2, "How to Link a JSF Portlet to a JSR 286 Portlet"
-
Section 58.7.3, "How to Link a JSR 286 Portlet to a JSF Portlet"
-
Section 58.7.4, "What You May Need to Know About Portlet Events in the Oracle JSF Portlet Bridge"
58.7.1 How to Link a JSF Portlet to Another JSF Portlet
The Departments task flow raises a contextual event, departmentSelected, when a department row is selected within the task flow. The event is ultimately raised by an eventBinding which is triggered from a row selection listener (Example 58-3).
The payload of the event (an object of type hr.Department, a Java object representing one row of the departments table) is generated by using the customPayload attribute which points to the current row from the departments table iterator.
For more information about standard ADF contextual event techniques, like the ones used in this example, see the "Creating Contextual Events" section in the Fusion Developer's Guide for Oracle Application Development Framework.
Example 58-3 Contextual Event for the Departments Task Flow
<eventBinding Listener="org.apache.myfaces.trinidad.event.SelectionListener"
              id="DepartmentSelectedEvent">
  <events xmlns="http://xmlns.oracle.com/adfm/contextualEvent">
    <event name="departmentSelected"
           customPayLoad="#{bindings.departments.currentRow.dataProvider}"/>
  </events>
</eventBinding>
When the Departments task flow is portletized, using the steps described in Section 58.2.3, "How to Create a JSF Portlet Based on a Task Flow," a portlet.xml file is created containing a definition for a portlet event that is used to transfer the corresponding contextual event during portlet communication with the portlet over WSRP (Example 58-4).
Example 58-4 Portlet Entry for the Portletized Departments Task Flow
<portlet id="adf_taskflow_WEB_INF_departments_xml">
  ...
  <supported-publishing-event id="departmentSelected">
    <qname xmlns:x="http://xmlns.oracle.com/adfm/contextualEvent">
      x:departmentSelected
    </qname>
  </supported-publishing-event>
  ...
</portlet>
There is also a corresponding event definition in portlet.xml for the Departments portlet's departmentSelected event (Example 58-5).
Example 58-5 Event Definition for the departmentSelected Event
<event-definition id="departmentSelected">
  <qname xmlns:x="http://xmlns.oracle.com/adfm/contextualEvent">
    x:departmentSelected
  </qname>
  <value-type>
    oracle.portlet.bridge.adf.lifecycle.ADFmPayloadWrapper
  </value-type>
</event-definition>
Note:
The namespace for contextual events that are converted into portlet events is always:http://xmlns.oracle.com/adfm/contextualEvent
The payload type is always:
oracle.portlet.bridge.adf.lifecycle.ADFmPayloadWrapper
The ADFmPayloadWrapper is used to ensure that any serializable contextual event payload is wrapped in a JAXB marshallable wrapper. It also ensures that a fixed type can be declared for the portlet event, even though it is not possible to know the payload type until the event is raised. The payload is unwrapped when extracting the contextual event from the portlet event.
The Employees task flow uses standard ADF techniques to handle a departmentSelected event. This is in the form of a methodAction binding that invokes a method on a data control, delivering the event payload from the departmentSelected event as a parameter to that method. Example 58-6 shows the definition of the methodAction binding.
Example 58-6 Definition of methodAction for the Employees Task Flow
<methodAction id="updateTableForDepartmentId" RequiresUpdateModel="true"
              Action="invokeMethod" MethodName="updateTableForDepartmentId"
              IsViewObjectMethod="false" DataControl="EmployeesDataControl"
              InstanceName="EmployeesDataControl.dataProvider">
  <NamedData NDName="departmentIdPayLoad" NDType="hr.Department"/>
</methodAction>
The updateTableForDepartmentId method takes the hr.Department object, passed as the payload of the departmentSelected event, and filters the data queried from the EmployeesDataControl so that it shows only employees who are in the selected department. It also takes steps to ensure that the iterator is re-executed and that the table view component is marked as needing to be re-rendered in this request.
The Employees task flow includes an event map to specifically map the incoming event onto the appropriate methodAction when the task flow is portletized (Example 58-7).
Example 58-7 Event Map for Portletized Employees Task Flow
<eventMap xmlns="http://xmlns.oracle.com/adfm/contextualEvent">
  <event name="departmentSelected">
    <producer region="*">
      <consumer region="" handler="updateTableForDepartmentId"
                handleCondition="${ADFPortletBridge.bridgeRequest}">
        <parameters>
          <parameter name="p1" value="#{payLoad}"/>
        </parameters>
      </consumer>
    </producer>
  </event>
</eventMap>
Note:
The<producer region="*"> attribute accepts events from any region. This is because when the task flow is running as a portlet, with the event coming into the portlet from a remote application, the remote application does not have any knowledge of the producer region.
The EL expression within handleCondition="${ADFPortletBridge.bridgeRequest}" evaluates to true if the current request is running under the Oracle JSF Portlet Bridge. This ensures that this event map is used only when the task flow is running as a portlet. It is not essential to have this handleCondition. However it can be useful to be able to define a separate eventMap which is used only when the task flow is running as a portlet.
When the two portletized task flows are added to a page, as long as the name of the event triggered by the Departments portlet is the same as that expected by the Employees portlet, no further coding is required; the portlets are automatically linked and when a department is selected in the Departments portlet, the Employees portlet is updated to display employees belong to the selected department.
You may choose to not use automatic event listening, for example, if you have multiple portlets on the same page that use the same events and you wish to control the flow of events between them. Or perhaps the names of the contextual events used by the JSF portlets that you want to link do not match. In this case you must explicitly create an event map in the page definition of the page containing the portletized task flows. This event map links the portlet events of the portlets that you want to wire together. Example 58-8 shows how this would work in our example if the Employees task flow was expecting an event named departmentId instead of departmentSelected.
Example 58-8 Event Map to Manually Link JSF Portlets
<eventMap xmlns="http://xmlns.oracle.com/adfm/contextualEvent">
  <event name="departmentSelected">
    <producer region="EventSampleProducerdepartments1_1">
      <consumer handler="EventSampleProduceremployees1_1.
          {http://xmlns.oracle.com/adfm/contextualEvent}departmentId"/>
    </producer>
  </event>
</eventMap>
Note:
In the case of portletized task flows, thehandler attribute must specify not only the specific binding object that is to handle the event, it must also specify the full QName of the portlet event, using the format <portletBindingId>.<eventQName>. The namespace does not have to be the ADFm namespace; it can be any portlet event, provided the payload is compatible.58.7.2 How to Link a JSF Portlet to a JSR 286 Portlet
As well as linking JSF portlets to other JSF portlets, you can also link a JSF portlet to a regular JSR 286 portlet. To do this, you must ensure that the JSR 286 portlet explicitly declares that it can to receive contextual events.
For example, we can link the Departments task flow from our previous example to a Department Address portlet, a JSR 286 portlet, to display the address of a selected department.
For automatic event wiring to work, the Department Address portlet must declare that it can receive the contextual event from the Department portlet. It can do this in two ways:
-
The Department Address portlet directly supports the
departmentSelectedcontextual event:<supported-processing-event id="departmentSelected"> <qname xmlns:x="http://xmlns.oracle.com/adfm/contextualEvent"> x:departmentSelected </qname> </supported-processing-event> -
The event definition for the Department Address portlet's event,
department, provides an alias to associate it with thedepartmentSelectedcontextual event:<event-definition id="department"> <qname xmlns:x="http://xmlns.oracle.com/portlet/EventSample"> x:department </qname> <alias xmlns:x="http://xmlns.oracle.com/adfm/contextualEvent"> x:departmentSelected </alias> <value-type>hr.Department</value-type> </event-definition>
Note:
The namespace for portlet events used to carry contextual event is always:http://xmlns.oracle.com/adfm/contextualEvent
The namespace is used in the event declarations or alias given above. This namespace indicates to the consumer that the portlet wishes to receive a contextual event with the given name as a portlet event. This is essential for automatic event wiring to work.
The Department Address portlet includes code in its processEvent implementation to handle the event (Example 58-9). This method looks for either the departmentSelected or the department event with the alias as defined above. The payload type for both of these events is hr.Department. However, the method shown in Example 58-9 illustrates how to use the ADFmPayloadWrapper to unwrap the payload. ADFmPayloadWrapper is the event type that the Oracle JSF Portlet Bridge uses by default when raising events.
Example 58-9 Code to Handle the departmentSelected Event
public void processEvent(EventRequest request, EventResponse response)
    throws PortletException, IOException
  {
    response.setRenderParameters(request);

    Event event = request.getEvent();
    String eventName = event.getName();
    if ("departmentSelected".equals(eventName) ||
        "department".equals(eventName))
    {
      Object payload = event.getValue();
      if (payload instanceof ADFmPayloadWrapper)
      {
        payload = ((ADFmPayloadWrapper)payload).getPayload();
      }
      if (payload instanceof Department)
      {
        Department department = (Department)payload;
        int locationId = department.getLocation();
        response.setRenderParameter("locationId", Integer.toString(locationId));
      }
    }
  }
When these two portlets are displayed together on a page, selecting a department in the Departments portlet automatically updates the Department Address portlet to display the address of the selected department.
Figure 58-2 Linking a JSF Portlet to a JSR 286 Portlet
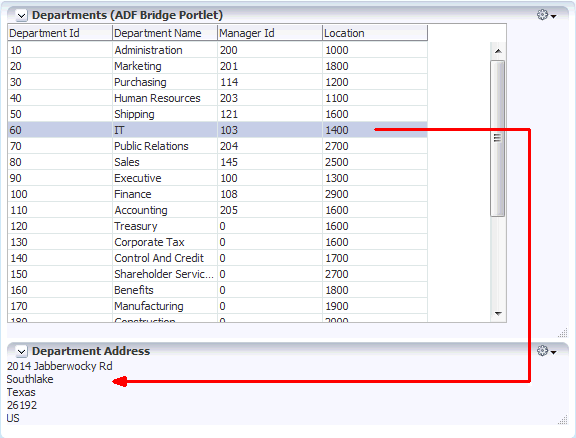
Description of ''Figure 58-2 Linking a JSF Portlet to a JSR 286 Portlet''
If the Department Address portlet does not explicitly support the departmentSelected event or define an appropriate alias, you can still link the two portlets by creating an event map in the page definition (Example 58-10).
Example 58-10 Event Map to Explicitly Link the Departments and Department Address Portlets
<eventMap xmlns="http://xmlns.oracle.com/adfm/contextualEvent">
  <event name="departmentSelected">
    <producer region="EventSampleProducerdepartments1_1">
      <consumer handler="DepartmentAddress1_1.
          {http://xmlns.oracle.com/portlet/EventSample}department"/>
    </producer>
  </event>
</eventMap>
The result of this event mapping is that when the departmentSelected contextual event is raised by the EventSampleProducerdepartments1_1 portlet binding, the event is delivered to the DepartmentAddress1_1 portlet binding, which in turn sends the event on to the portlet using the portlet event, department.
Note:
The payload of thedepartmentSelected contextual event is a hr.Departments object. This is the same payload type that the portlet's department portal event is expecting, so that matches and everything works correctly. It is also possible for the portlet to declare that it expects a payload of type ADFmPayloadWrapper. In this case, the portlet consumer detects this and automatically wraps the contextual event payload in an ADFmPayloadWrapper object.58.7.3 How to Link a JSR 286 Portlet to a JSF Portlet
You can also send portlet events from a JSR 286 portlet to a JSF portlet. The portlet event is converted into a contextual event by the Oracle JSF Portlet Bridge and is then delivered into the producer ADF application to be consumed using standard contextual event techniques.
The Departments task flow contains a methodAction binding that binds to a method on the DepartmentsDataControl (Example 58-11).
Example 58-11 Definition of methodAction for the Departments Task Flow
<methodAction id="updateTableForLocationId" RequiresUpdateModel="true"
              Action="invokeMethod" MethodName="updateTableForLocationId"
              IsViewObjectMethod="false"
              DataControl="DepartmentsDataControl"
              InstanceName="DepartmentsDataControl.dataProvider">
  <NamedData NDName="locationId" NDType="int"/>
</methodAction>
The updateTableForLocationId method receives, as a parameter, a location ID that causes the list of departments returned by the data control to be filtered by that location ID.
The task flow contains an event map to map the contextual event onto the appropriate methodAction (Example 58-12).
Example 58-12 Event Map for Portletized Departments Task Flow
<eventMap xmlns="http://xmlns.oracle.com/adfm/contextualEvent">
  <event name="locationId">
    <producer region="*">
      <consumer region="" handler="updateTableForLocationId"
                handleCondition="${ADFPortletBridge.bridgeRequest}">
        <parameters>
          <parameter name="p1" value="#{payLoad}"/>
        </parameters>
      </consumer>
    </producer>
  </event>
</eventMap>
Note:
The event map cannot reference the region where the event originates because it is not present when the task flow is running as a portlet, so we use a wildcard as the event source in the event mapIn the Department Locations portlet, when a location is selected, the processAction method raises a portlet event, locationId, giving the location ID of the selected location (Example 58-13).
public void processAction(ActionRequest request, ActionResponse response)
    throws PortletException
  {
    String locationId = request.getParameter("locationId");
    Location location = getLocation(Integer.parseInt(locationId));

    if (location != null)
    {
      // QName matches the event declared as a supported-publishing-event in
      // portlet.xml for this portlet.

      // LocationId event. Raised in the ContextualEvent namespace makes it readily
      // consumable by ADF Bridge portlets. Likewise we wrap with the
      // ADFmPayloadWrapper payload object that the ADF Bridge expects.
      response.setEvent(new QName("http://xmlns.oracle.com/adfm/contextualEvent",
                                  "locationId"),
                        new ADFmPayloadWrapper(Integer.valueOf(location.getLocationId())));
    }
 }
Note:
ThelocationId event raised in the processAction method has a payload of type of Integer. However, because JSF portlets always expect portlet events with the contextual event payloads wrapped with ADFmPayloadWrapper, we must wrap the payload to suit the receiving portlet's requirements if we want automatic delivery of events to work.
Likewise, the QName for the event we raise must be:
{http://xmlns.oracle.com/adfm/contextualEvent}locationId
When you drop the portlets on a page, selecting a location in the Department Location portlet automatically updates the Departments portlet to display the departments at the selected location.
Figure 58-3 Linking a JSR 286 Portlet to a JSF Portlet
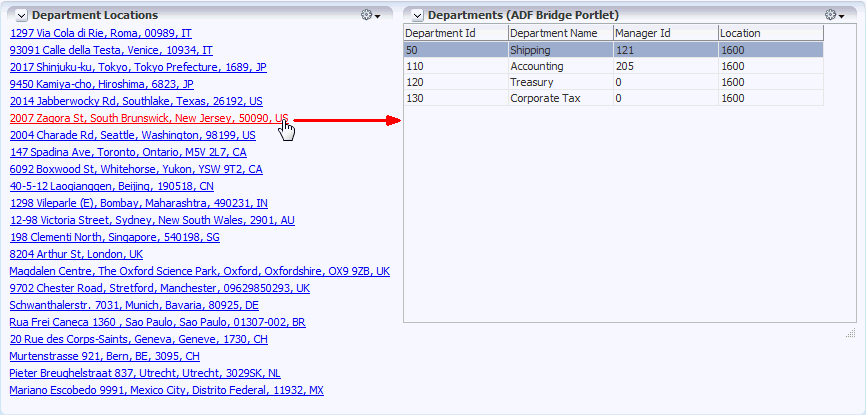
Description of ''Figure 58-3 Linking a JSR 286 Portlet to a JSF Portlet''
If the two portlets do not declare events with matching names (for example the contextual event from the Departments portlet is called locId), or if automatic event listening is disabled, you can still link the two portlets by creating an event map in the page definition to map the contextual event from the Departments portlet to the portlet event from the Department Location portlet (Example 58-14).
58.7.4 What You May Need to Know About Portlet Events in the Oracle JSF Portlet Bridge
Using a Serialized Type for the Contextual Event Payload
Part of the JSR 286 event's payload is the wrapped contextual event payload, which is serialized. Therefore, while contextual event payloads can be any object type, when you are sending contextual events via WSRP, only serialized types are supported.
When this wrapped contextual event is delivered, the contextual event payload must be deserialized on the consumer before the contextual event can be forwarded into the consumer application. To deserialize the event, the payload class must be available on the consumer as well as on the producer. This condition is automatically met when the original payload is a Java Runtime Environment class, such as java.lang.String.
If your Oracle ADF task flow includes ADFm events that do not have corresponding portlet events declared in the portlet.xml file, you can enable the Oracle JSF Portlet Bridge to raise these undeclared events.
To raise undeclared events, set the following container runtime option for the portletized task flow:
<portlet id="Application5untitled1jspx1_1">
   ...
   <container-runtime-option>
      <name>oracle.portlet.bridge.adf.raiseUndeclaredContextualEvents</name>
      <value>true</value>
   </container-runtime-option>
   ...
</portlet>
Setting this option to true means that any ADFm event raised is forwarded on as a portlet event. If this option is not provided or is set to false, then only events with corresponding portlet event declarations are forwarded. For information about setting container runtime options, see Section 59.3.4.3, "Setting Container Runtime Options for Individual Portlets."
You can also enable undeclared portlet events to automatically be forwarded on from the portlet binding in the consumer application as ADFm events.
In the portlet binding, set the raiseUndeclaredContextualEvent attribute to true, for example:
<portlet id="Application5untitled1jspx1_1"
         portletInstance="/oracle/adf/portlet/WsrpPortletProducer4/ap/
               Application5untitled1jspx_2943bd23_012e_1000_8004_0aa7c0849010"
         class="oracle.adf.model.portlet.binding.PortletBinding"
         retainPortletHeader="false"
         listenForAutoDeliveredPortletEvents="true"
         listenForAutoDeliveredParameterChanges="true"
         raiseUndeclaredContextualEvents="true"
         xmlns="http://xmlns.oracle.com/portlet/bindings"/>
Setting this option to true means that if a portlet event is received, a corresponding ADFm event is raised, even if there is no event declaration in the portlet binding. The name of the ADFm event is directly taken from the QName of the portlet event. This is so that ADFm events raised from the Oracle JSF Portlet Bridge have the same name as that used when the event was raised on the remote application.
The Oracle JSF Portlet Bridge uses portlet events to transport contextual events to and from the consumer application. However, partial page rendering (PPR) requests are implemented using Portlet 2.0 resource requests. It is not possible to send or receive portlet events in resource requests. Therefore proprietary mechanisms are used to transport the contextual events from the JSF Portlet to the consumer application in the case of PPR requests.
58.8 What You May Need to Know When Creating a JSF Portlet
You must code your JSF pages such that they produce markup that conforms with JSR 286 portlet markup fragment rules. If you have chosen to use Oracle ADF, the markup in your page comes mainly from the Oracle ADF Faces components, which naturally render markup in a style that is either compatible with JSF portlets or can be automatically interpreted by the Oracle JSF Portlet Bridge into a compatible style (for example, by rendering the portlet in an inline frame).
The sections that follow provide some guidance on how to avoid common issues that you may encounter as you code Oracle ADF pages that you later choose to publish as portlets.
This section includes the following topics:
58.8.1 General Guidelines
This section includes the following topics:
-
Section 58.8.1.1, "Application Must Run as a Web Application"
-
Section 58.8.1.2, "The Portlet Is Contained by a Different Page"
58.8.1.1 Application Must Run as a Web Application
Prior to creating a portlet from your JSF application, the application, including all of its pages and task flows, must run properly after you deploy it to Integrated WLS. If it cannot run as a regular web application, it cannot run as a portlet producer either.
58.8.1.2 The Portlet Is Contained by a Different Page
One area that you should consider when creating task flows that will be exposed as portlets is that the page on which you render the task flow as a portlet is different to the one in the original producer application.
Some common errors that occur include:
-
Expecting to access JavaScript in the consuming page.
-
Expecting to find managed beans or objects added to scopes as part of the consuming page.
-
Expecting components in the JSF component tree from the consumer to be present.
58.8.1.3 Servlet Dependencies
When writing an application that is supposed to run in both servlet and portlet environments, avoid casting to HttpServlet objects (or you get a ClassCastException when running as a portlet). Instead, use the abstraction provided by the Faces ExternalContext object. For example, instead of:
HttpServletRequest request = getRequestFromFacesContext();
String localContextPath = request.getContextPath();
Use the following:
String localContextPath=
FacesContext().getCurrentInstance().getExternalContext().getRequestContextPath();
To the extent that ExternalContext does not provide that abstraction for you, you can write servlet or portlet specific code. You can use the following method to check if the application runs as portlet:
public static boolean isPortletRequest()
  {
    Map<String, Object> m =
        FacesContext.getCurrentInstance().getExternalContext().getRequestMap();
    Object phase = m.get("javax.portlet.faces.phase");
    if (phase != null)
    {
      return true;
    }
    else
    {
      return false;
    }
  }
58.8.1.4 Secured Applications
If your application is secured, ensure that you have secured identity propagation as described in Section 74.17, "Securing Identity Propagation Through WSRP Producers with WS-Security."
58.8.1.5 Deep Links
For normal interactions with a portlet, there is a session maintained between the consumer and the producer. This is done by storing a session cookie in the consumer and sending it to the producer on each request. On the original request, the session is established and on subsequent requests, the portlet sends the session cookie to the producer and the session is reused.
For deep links, that is, links from the portlet to the producer application, the request is from the browser direct to the producer application. In this case, the session cookie cannot be sent so a new session is established. If a shared session is required for deep links, then this must be implemented by the developer. A common implementation is to write this state to a common location, accessible from the producer and the application, and pass a reference to this state in the deep link.
58.8.1.6 Java EE Authentication
Java EE login is not supported. Java EE applications can be configured with different authentication techniques, such as Basic and Digest. As portlets are fragments incorporated into a consumer's page, it is generally expected that direct authentication occurs between the client and the consumer, not the client and the portlet producer. As a result, these authentication techniques are not supported in JSR 286. In the JSR 286 case, Java EE authentication occurs through WS-Security mechanisms that allow the Web service consumer to be authenticated and verified by the producer, and propagate the user identity for user authentication and authorization. Published Oracle ADF artifacts must not contain login links that trigger Java EE authentication.
58.8.1.7 Timeout Period
For applications that take a long time to render, consider increasing the time out period when you register a producer that was created by the Oracle JSF Portlet Bridge. Note however that the time out period specified during producer registration is limited by the maximum time out period (maximumTimeout element) specified in adf-config-xml.
58.8.2 Portlet Guidelines
This section includes the following topics:
58.8.2.1 Portlet Sizing
When consuming a JSF portlet, the consumer application automatically renders the portlet content within an inline frame. This means that any inline popup is then confined within the inline frame. You should take this into consideration when specifying the size of the portlet.
If the JSF portlet is a portletized page, then you have full control of the content and can decide how that content fills the inline frame window, utilizing exactly the same techniques as you would to determine how the content would fill the browser window.
If the portlet is being stretched by its ancestor in the consumer application, then the maximized attribute is set to true on the af:document component in the document produced by the Oracle JSF Portlet Bridge. This means that components that support it, such as panelStretchLayout, will fill the entire inline frame.
For more information about portlet sizing, see Section 63.5.5, "What You May Need to Know About Portlet Sizing."
58.8.2.2 Resources and Links
For resources and links, you must specify the location relative to the web-app-context-root. Otherwise, your images and other resources cannot be found by the portlet. Do not use relative (../) path notation. Portlets in Oracle WebCenter Portal Framework run remotely and are accessed using a SOAP protocol (WSRP). The latter means that the regular web application concept of request path does not apply in a JSR 286 container. The JSR 286 specification reflects this by mandating that all resource URLs either be absolute or context path relative.
58.8.2.3 Redirecting Requests
Do not redirect or forward a request within your JSP. JSR 286 only supports requestDispatcher.include(). The use of httpServletResponse.sendRedirect() or requestDispatcher.forward() results in exceptions and errors. To work properly in a portlet environment, you must implement JSF navigation rules in faces-config.xml or Oracle ADF task flow control flow rules.
58.8.2.4 Memory Consumption
The Oracle JSF Portlet Bridge stores the content of the request scope between requests so that the request scope is preserved between a portlet Action and a portlet Render (which are two separate requests). Because of this, to minimize overall memory consumption, you must especially avoid storing too much data in the request scope when the application contains JSF portlets.
58.8.2.5 WSRP Version
The Oracle JSF Portlet Bridge makes use of Portlet 2.0 features. Consequently, it should be used only with WSRP V2. The portlet's minimumWsrpVersion container runtime option should be set to 2. For more information, see Section 59.3.4, "How to Customize the Runtime Environment for JSR 286 Portlets."
58.8.3 Security Guidelines
This section includes the following topics:
58.8.3.1 Oracle ADF Secured Applications
When you use the Create Portlet Entry or Manage Portlet Entries of Task Flows dialog to portletize a task flow in an Oracle ADF secured application (the security scheme being Authentication and Authorization), you must manually grant permission to the following wrapper task flow in the jazn-data.xml file of the producer application:
/WEB-INF/adfp-portlet-bridge-container.xml#adfp-portlet-bridge-container
If you do not grant the permissions, the portlet does not render.
For example, if you have an application with two roles: authenticated-role, with view permission; and testrole, with customize, edit, grant, personalize, and view permissions, you must add the following entries inside the <permissions> tag of each role:
-
For authenticated-role:
<permission>
  <class>oracle.adf.controller.security.TaskFlowPermission</class>
  <name>
  /WEB-INF/adfp-portlet-bridge-container.xml#adfp-portlet-bridge-container
  </name>
  <actions>view</actions>
</permission>
-
For testrole:
<permission>
  <class>oracle.adf.controller.security.TaskFlowPermission</class>
  <name>
    /WEB-INF/adfp-portlet-bridge-container.xml#adfp-portlet-bridge-container
  </name>
  <actions>customize,edit,grant,personalize,view</actions>
</permission>
58.8.3.2 Role Based Authorization
If you are portletizing a task flow or page that has role based authorization (that is, the task flow or page has been granted certain roles), WS-Security is required to propagate the user correctly. If you set up WS-Security, the JSF portlet does not render the content if the propagated user does not have permission to view the task flow.
For information about setting up WS-Security on the producer, see Section 74.17, "Securing Identity Propagation Through WSRP Producers with WS-Security."
When registering the producer with the consuming application, you must ensure that you set the appropriate security properties. For more information, see Section 63.2.1.1, "How to Register a WSRP Portlet Producer."
58.8.4 JSF Guidelines
This section includes the following topics:
58.8.4.1 Using h:commandLink
When using the h:commandLink JSF standard HTML component ensure that you set the following context-param in web.xml so that the JSF Reference Implementation does not generate any external JavaScript resource. This is to work around an issue in the JSF Reference Implementation where the reference to the JavaScript resource is not properly encoded.
<context-param>
    <param-name>com.sun.faces.externalizeJavaScript</param-name>
    <param-value>false</param-value>
</context-param>
58.8.5 Oracle ADF Guidelines
This section includes the following topics:
-
Section 58.8.5.5, "The fileDownloadActionListener Component"
-
Section 58.8.5.10, "Using ADF Faces Client-Side APIs to Find Components"
58.8.5.1 Task Flow Returns
When an ADF bounded task flow completes it may use a task flow return to send control back to the calling task flow. In a portletized task flow, there is no calling task flow, so the task flow return does not make any sense in this context. This may cause what appears to be an empty portlet to display as the task flow navigates to a state where there is no view selected. The task flow will stay in this state until it is refreshed either when the input parameters change or the session on the producer is reset.
If you plan to portletize your task flow, you should avoid using task flow returns. If you must use a task flow return, you can provide a dummy task flow with a default activity of the task flow that you want to portletize. When the task flow return is executed, it returns to the dummy task flow. The dummy task flow then executes its default activity, which is to call back to the original task flow and thus restart the task flow when the portlet is next called.
58.8.5.2 Mismatched Style Sheets
In general, when you consume a task flow using the Oracle JSF Portlet Bridge, the portlet producer tries to use the skin of the consumer page. When the producer cannot match the consumer skin, the portlet generates and references its own style sheet. This is known as a mismatched skin. A mismatched skin can occur when:
-
The consumer and producer use different versions of ADF Faces. In this case, the producer still uses the consumer skin.
-
The consumer has additional
skin-additionsthat the producer does not have, or vice versa. In this case, the producer still uses the consumer skin. -
The producer does not have the consumer skin. In this case, the producer uses the portlet skin.
Mismatched skins can cause performance problems because the browser has to fetch an extra style sheet and the generated portlet markup uses uncompressed styles resulting in larger markup.
If a mismatched skin occurs, the producer log includes the following:
The skin skinName specified on the requestMap will not be used because the
styleSheetDocument id on the requestMap does not match the local skin's
styleSheetDocument's id. It could mean the jars are not identical. For example,
one might have trinidad-skins.xml skin-additions in a jar file on the class path
that the other does not have.
The portlet markup inside the inline frame also includes a link tag to the portlet style sheet resource, for example:
<link rel=\"stylesheet\" charset=\"UTF-8\" type=\"text/css\" href=\"http:.../resourceproxy/portletId...252525252Fadf%252525252Fstyles%252525252Fcache%252525252Fblafplus-rich-portlet-d1062g-en-ltr-gecko.css...
You can use an HTTP monitoring tool to see that a request is made to the portlet style sheet resource.
There are a number of reasons for mismatched skins. For a skin to match, the producer and consumer must be the same for all the following conditions:
-
The ADF Faces version; a different version of ADF Faces may have different style selectors.
-
The style compression, defined in
web.xml, for example:<context-param> <param-name> org.apache.myfaces.trinidad.DISABLE_CONTENT_COMPRESSION </param-name> <param-value>false</param-name> </context=param> -
Tonal style or themes, defined in
web.xml, for example:<context-param> <param-name>xyz</param-name> <param-value>xyz</param-value> </context-param>
-
Availability of skin additions. Skin additions are defined in
META-INF/trinidad-skins.xmlin a JAR file. These are then aggregated from all the JAR files in the class path. If there are any JAR files that exist on the producer but not on the consumer, or vice versa, you get a mismatch.<skin-addition> <skin-id>blafplus-rich.desktop</skin-id> <style-sheet-name> adf/styles/flexComponents-blafplus-rich-desktop.css </style-sheet-name> </skin-addition>To determine if the JAR files match, turn on Trinidad logging to show which
skin-additionit is processing. To do this, update thelogging.xmllog level of both the producer and consumer WebLogic Servers toFINESTthen restart the servers:<logger name="org.apache.myfaces.trinidad.skin.SkinUtils" level=FINEST"/>
When you run the consumer page, any skin entries that do not match in the consumer and producer log files are the cause of the skin mismatch.
58.8.5.3 ADF Faces Dialog Framework
ADF Faces Dialog Framework is not supported. If your application includes any buttons or icons that launch secondary browser windows, then the contents of the new windows are not displayed properly when the application is run as a portlet. As such, you should avoid using these components if you plan to portletize your application. Examples of components that launch secondary windows are:
-
<tr:inputDate> -
<tr:inputColor> -
<tr:popup> -
the
useWindowattribute of<af:commandButton>
58.8.5.4 Composer Components
Portletization of pages that contain Composer components is not supported.
58.8.5.5 The fileDownloadActionListener Component
The <af.fileDownloadActionListener> component is not supported.
58.8.5.6 The prepareModel Phase
Oracle ADF components/code that handle prepareModel must be idempotent. Any code running during the prepareModel phase must be rerunnable without effect to the underlying data/business logic. When running in the portlet environment, prepareModel is called twice during the complete JSF life cycle as opposed to being called once when running within a regular web application.
The reason for this difference is that the Oracle JSF Portlet Bridge runs JSF in two requests not one. It is implemented as if every JSF request redirected before the render phase. The consequence of this approach is that the JSF restoreView phase is called both when the request is first submitted and then again when request to render is received.
58.8.5.7 Accessing Request Parameters
Do not access or reference request parameters from model code except in page parameters. Besides being a cleaner MVC2 implementation, following this guideline avoids problems when such artifacts are published as portlets. Where regular JSF artifacts run their entire lifecyle in a single request, the Oracle JSF Portlet Bridge runs these artifacts in two requests, as if every JSF request redirected before the render phase.
This two phase model enables the clearing of submitted parameters before rendering in a manner that allows such clearing to be communicated all the way back to the client, which makes this request something you could bookmark. As a result, request parameters do not exist during the render phase. As described previously, prepareModel is invoked again in this rendering phase. Therefore, any references to request parameters in this phase handler fail. You should avoid code like either of the following fragments:
<invokeAction id="doExecuteWithParams"
              Binds="ExecuteWithParams"
              Refresh="prepareModel"
              RefreshCondition="${param.id != null}"
/>

<invokeAction id="doExecuteWithParams"
              Binds="ExecuteWithParams"
              Refresh="renderModel"
              RefreshCondition="${param.id != null}"
/>
58.8.5.8 Referencing Page Parameters
Do not reference page parameters in the prepareModel phase. This issue relates to the same problem described for request parameters in Section 58.8.5.7, "Accessing Request Parameters." Generally, page parameters depend on request parameters and are evaluated during the restoreView phase. As this phase is called a second time during portlet rendering and request parameters are not available, such use fails. Instead, move any dependency on a page parameter value into the model before JSF transitions from its execute phases to its render phase.
58.8.5.9 Trinidad Components
If you are portletizing an application that contains only Trinidad components (<tr:> tags only), then you must manually include the following libraries in your project:
-
jdeveloper\modules\oracle.adf.view_11.1.1\adf-richclient-api-11.jar -
jdeveloper\modules\oracle.adf.view_11.1.1\adf-richclient-impl-11.jar
This is so that the URLs to icons in the style sheet generated for the producer are encoded correctly.
58.8.5.10 Using ADF Faces Client-Side APIs to Find Components
Because a portlet is a naming container, special consideration should be taken when using ADF Faces client-side APIs to find components. An example component ID:
-
When run as a regular web application:
id="demoTemplate:popup" -
When run as a Portlet Producer application:
id="__ns12345678:demoTemplate:popup"
Things to watch out for specifically are:
-
Avoid using the
AdfPage.PAGE.findComponentByAbsoluteId()API. UsegetSource()andfindComponent()methods instead. For example:<trh:script text=" function showPopup(event) { event.cancel(); // var popup = // AdfPage.PAGE.findComponentByAbsoluteId("demoTemplate:popup"); var source = event.getSource(); var popup = source.findComponent("popup"); popup.show({align:"after_end", alignId:"button"}); } "/> -
Use a relative path for
clientIdinstead of an absolute path (starting with a ':'). For example, use:<af:showPopupBehavior popupId="demoTemplate:iteratorpop" triggerType="mouseHover"/>Instead of:
<af:showPopupBehavior popupId=":demoTemplate:iteratorpop" triggerType="mouseHover"/> -
For more information, see the "What You May Need to Know About Using Naming Containers" section in the Web User Interface Developer's Guide for Oracle Application Development Framework.
58.8.5.11 Encoded URLs
By default, URLs in the portletized page or task flow are encoded such that they are proxied by the consumer application. In some circumstances, you may not want to encode these URLs, for example, when requesting JavaScript libraries from content delivery networks or accessing resources directly from the user's browser to make use of a locally configured HTTP proxy.
Another example is if your task flow includes an inline frame (for example, using an af:inlineFrame tag). In this case you need to ensure that the inline frame URL does not get encoded to go via the portlet resource proxy in the consumer. If you do not do this, any relative URLs in the content inside the inline frame will not work because they will be relative to the URL to the resource proxy rather than their correct location relative to the original URL for the inline frame.
To bypass the URL encoding, set the _xEncodeUrl parameter to false on URLs that are passed to the Oracle JSF Portlet Bridge for encoding. This parameter is picked up by the Oracle JSF Portlet Bridge, which ensures that the URL does not get encoded via the resource proxy. The parameter is ignored if the task flow is not running as a portlet.
For example, replace:
<af:inlineFrame source="http://myiframe.example.com">
with:
<af:inlineFrame source="http://myiframe.example.com?_xEncodeUrl=false">
Note:
Do not use this parameter to access resources that reside on the producer server. These resources must be accessed using the portlet client's proxy.58.8.5.12 Issues with goLink
The adf:goLink component encodes the link URL as an action for the current JSF application. In other words, it encodes the link using ExternalContext.encodeActionURL(...). This is different to the JSF h:outputLink component, which encodes the URL as a resource URL using ExternalContext.encodeResourceURL(...). If you are using goLink to link to a resource that is not a Faces View, then the URL must be encoded as a Resource URL. To do this, you must tell the Oracle JSF Portlet Bridge the link is not a Faces View by adding the following parameter to the URL:
javax.portlet.faces.ViewLink=false
For example:
<af:goLink text="goLink 1" id="gl1" destination="/mynonfaceslink?javax.portlet.faces.ViewLink=false"/>
58.8.5.13 In-Protocol Resource Requests
Within a JSF application running under the Oracle JSF Portlet Bridge, when a resource URL is created using ExternalContext.encodeResourceURL(...), that resource URL is encoded in such a way that it is executed as an out-of-protocol resource request. This means that when the portlet consumer accesses that resource it does so by making a direct call to the target URL. It is also possible for resource URLs to be in-protocol. This means that the portlet consumer accesses the resource by making a WSRP web service call to the producer application, which in turn ultimately leads to the serverResource method being called on the portlet. It is then the portlet's responsibility to provide the resource which is sent back in the WSRP response. When that portlet is the Oracle JSF Portlet Bridge, it serves the resource by using a request dispatcher to forward to the target URL.
Generally out-of-protocol resource requests are to be preferred as they do not incur the additional overhead of the web service call. In-protocol requests can also cause large amounts of memory to be allocated as the WSRP SOAP response is constructed, if the resource being served is large. In the case of the Oracle JSF Portlet Bridge, the only time that you would want to use in-protocol resources is when you need to share the portlet scoped HTTP session between the resource requests and the other portlet requests, such as portlet action or render requests.
To cause the Oracle JSF Portlet Bridge to encode resource URLs as in-protocol resource requests, add the following parameter to the URL, before ExternalContext.encodeResourceURL(...) is called:
javax.portlet.faces.InProtocolResourceLink=true
For example:
<af:goLink text="goLink 1" id="gl1" destination="/mynonfaceslink?javax.portlet.faces.ViewLink=false&javax.portlet.faces.InProtocolResourceLink=true"/>
58.9 Copying a Runtime-Created Skin to a JSF Portlet Producer Application
In a WebCenter Portal application, you can create skins at runtime, using the Resource Manager. When you do this, you may encounter rendering issues on pages that include JSF portlets. This is because the skin used by the WebCenter Portal application is not available to the remote application rendering the task flow.
To rectify this issue, you must copy the runtime-created skin to the Portlet Producer application created when the task flow was portletized.
To copy a runtime-created skin to a Portlet Producer application:
-
Export the skin from the Portal Framework application to an EAR file.
For information about how to do this, see Section 9.6.1, "How to Download a Portal Resource Using the Assets Page."
-
Repackage the exported skin as a shared library (a JAR file):
-
Extract the
transport.marfile:$ jar xvf myskin.ear inflated: transport.mar
-
Extract the metadata files:
$ jar xvf transport.mar
inflated: oracle/webcenter/siteresources/.../Skin.css
inflated: oracle/webcenter/siteresources/.../generic-site-resources.xml
...
-
Locate and view the file
generic-site-resources.xmlamong the metadata files. Normally, this file is in a directory like:oracle/webcenter/siteresources/scopedMD/scopeGUID/generic-site-resources.xmlThe file should have a section that describes the exported skin, similar to the following example:
<resourceType name="skin" ...> <resource displayName="MySkin" metadataFile="/oracle/webcenter/siteresources/.../Skin.css" ...> <customAttributes> <customAttribute name="skinId" value="gsr616d879d_99e0_4bd9_8c10_98e7ea272a6a.desktop" .../> <customAttribute name="skinFamily" value="gsr616d879d_99e0_4bd9_8c10_98e7ea272a6a" ...> <customAttribute name="skinExtends" Value="webcenter-fusion-internal.desktop" .../> </customAttributes> </resource> </resourceType> -
Note the following information from
generic-site-resources.xml:-
skinId(for example,gsr616d879d_99e0_4bd9_8c10_98e7ea272a6a.desktop) -
skinFamily(for example,gsr616d879d_99e0_4bd9_8c10_98e7ea272a6a) -
skinExtends(for example,webcenter-fusion-internal.desktop)
-
-
Build the directory structure for the JAR file:
$ mkdir META-INF
-
Copy the
Skin.cssfile into theMETA-INFdirectory:$ cp oracle/webcenter/siteresources/.../Skin.css META-INF
-
Create a new file called
trinidad-skins.xmlunder theMETA-INFdirectory:$ edit META-INF/trinidad-skins.xml
-
Add the following XML to the new
trinidad-skins.xmlfile:<?xml version="1.0" encoding="ISO-8859-1"?> <skins xmlns="http://myfaces.apache.org/trinidad/skin"> <skin> <style-sheet-name>Skin.css</style-sheet-name> <id>skinId</id> <family>skinFamily</family> <extends>skinExtends</extends> <render-kit-id>org.apache.myfaces.trinidad.desktop</render-kit-id> </skin> </skins>where
skinId,skinFamily, andskinExtendsare the values noted earlier. -
Package the JAR file:
$ jar cvf myskin.jar META-INF
adding: META-INF/trinidad-skins.xml(in = 359) (out= 171)(deflated 52%)
adding: META-INF/Skin.css(in = 5560) (out= 1413)(deflated 74%)
The JAR file should contain two files:
Skin.cssandtrinidad-skins.xml.
-
-
Copy the new
myskin.jarfile to the Portlet Producer application.The easiest way to do this is to copy the file to the
WEB-INF/libdirectory of the Portlet Producer web application.