9 Introduction to Portal Resource Management
This chapter describes the different portal resources available for you to use in your WebCenter Portal Framework applications, and some of the common operations you can perform on them. Portal resources include navigation models, page templates, page styles, resource catalogs, and so on.
This chapter includes the following topics:
Tip:
Portal resources are also sometimes referred to as assets.9.1 Introduction to Portal Resources
Portal Framework applications provide the following portal resources to help you define the structure, look and feel, and content of your portal:
-
Page Templates define the interface that surrounds page content and help to apply a consistent look and feel across groups of pages. For more information, see Chapter 11, "Developing Page Templates."
-
Navigation Models define how to link together information from multiple sources, such as pages, content repositories, and external web pages. For more information, see Chapter 10, "Developing a Navigation Model."
-
Resource Catalogs define the components that users can add to their pages, page templates, and task flows. For more information, see Chapter 14, "Developing Resource Catalogs."
-
Skins define the appearance and look and feel, including colors and fonts, of a specific portal or the entire application. For more information, see Chapter 13, "Developing Skins."
-
Page Styles define the layout of a newly created page, and may also dictate the type of content the page supports. For more information, see Section 12.2, "Developing Page Styles."
-
Content Presenter Display Templates define templates for displaying content. For more information, see Chapter 27, "Creating Content Presenter Display Templates."
-
Task Flow Styles are used at runtime to define the layout of task flows created using Data Presenter to display data controls. For more information, see Section 12.3, "Developing Task Flow Styles."
9.2 Creating Portal Resources
The process for creating a portal resource depends on the type of portal resource.
Table 9-1 shows where to find further information about creating the different portal resources.
Table 9-1 Creating Portal Resources
| Portal Resource | More Information |
|---|---|
|
Page Template |
|
|
Navigation Model |
|
|
Resource Catalog |
|
|
Skin |
|
|
Page Style |
|
|
Content Presenter Display Template |
Section 27.3, "Creating Content Presenter Display Templates" |
|
Task Flow Style |
9.3 Editing Portal Resources
The process for editing a portal resource depends on the type of portal resource.
Table 9-2 shows where to find further information about editing the different portal resources.
Table 9-2 Editing Portal Resources
| Portal Resource | More Information |
|---|---|
|
Page Template |
|
|
Navigation Model |
|
|
Resource Catalog |
|
|
Skin |
|
|
Page Style |
|
|
Content Presenter Display Template |
Section 27.3, "Creating Content Presenter Display Templates" |
|
Task Flow Style |
9.4 Deleting Portal Resources
When a portal resource is no longer required, you may want to remove it.
Note:
Before you delete a portal resource, you must ensure that the resource is not in use. If you mark a portal resource for deletion, it is deleted even if it is in use.To delete a portal resource:
-
In the Application Navigator, right-click the portal resource that you want to delete and choose Delete.
-
The Confirm Delete dialog identifies if the portal resource is used within the application. Click Show Usages for more details.
You can use this information to determine whether you really want to delete the portal resource.
-
Click Yes to continue and delete the navigation model. Click No to cancel the operation.
9.5 Working with Portal Resources at Runtime
Tip:
At runtime, portal resources are referred to as assets.A portal is a constantly evolving application. While the initial framework for the portal is designed prior to deployment, this really acts as a starting point. The design of the portal is likely to be enhanced by the actual users of the portal.
This runtime resource management provides:
-
Runtime development—Continue developing your portal after deployment by creating portal resources, such as pages, skins, and data controls at runtime. For more information, see Section 9.5.1.5, "How to Use the Assets Page at Runtime."
-
Round-trip development—Pull portal resources from the deployed portal into JDeveloper for further development and then upload the enhanced resources back into the running application. For more information, see Section 9.6, "Working with Round-Trip Development."
-
Iterative development—Supply a running portal with new or improved visualizations of metadata-only resources from JDeveloper without the need to redeploy or restart the application. For more information, see Section 2.3.1, "Preparing for Iterative Development in a Portal Framework Application."
-
Extension of WebCenter Portal—Build and manage new WebCenter Portal resources in JDeveloper and package them on a periodic basis for distribution to the runtime portal. For more information, see Section 55.1, "Developing Assets for WebCenter Portal."
Portal Framework applications enable runtime portal resource management through the Assets page of the runtime administration console. Using the administration console, users with the appropriate privileges can continue developing the portal after the application has been deployed (Figure 9-1).
Figure 9-1 The Assets Page of the Runtime Administration Console
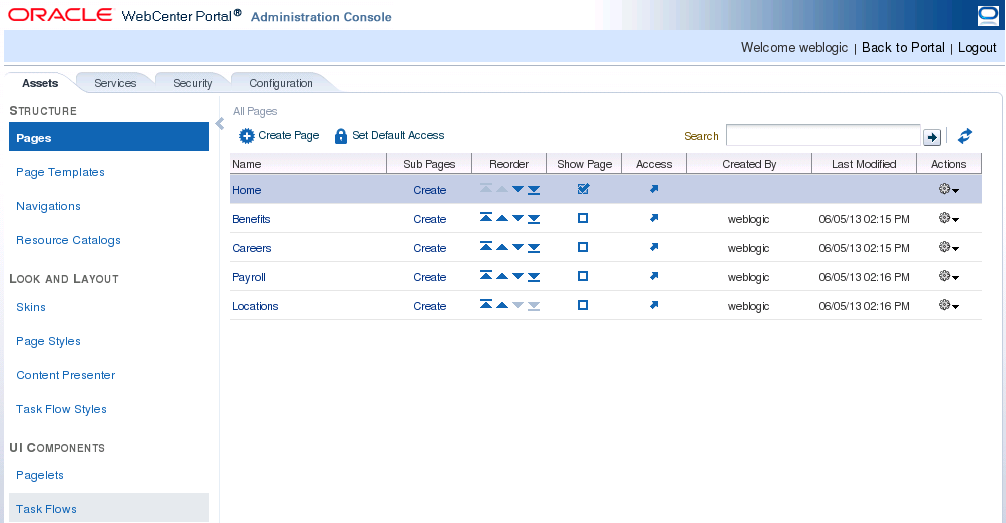
Description of ''Figure 9-1 The Assets Page of the Runtime Administration Console''
At runtime, users with the appropriate privileges can create and manage the following resources:
-
Pages
-
Page templates
-
Navigation models
-
Resource catalogs
-
Skins
-
Page styles (can be created at runtime only by copying an existing page style)
-
Content Presenter display templates (cannot be created at runtime)
-
Task flow styles (can be created at runtime only by copying an existing task flow style)
-
Task flows
-
Data controls
Using the Assets page of the runtime administration console, users can also download portal resources, or an entire application, from the runtime environment, edit them in JDeveloper, and then upload them back into the deployed application.
Users can also create portal resources from scratch in JDeveloper, export them to an archive file, and then upload them into the deployed portal. This is a very useful way of creating more fully functional portal resources for use in WebCenter Portal.
This process is known as round-trip development. For more information, see Section 9.6, "Working with Round-Trip Development."
9.5.1 Enabling Runtime Administration of Portal Resources
You can enable portal administrators to manage portal resources at runtime by exposing them on the Assets page of your application.
If you use the WebCenter Portal Framework Application template to create your application, the Assets page is automatically provided as part of the runtime administration console.
If you prefer, you can add the Assets page to any other page in your application by adding the List of Resource Types task flow to that page.
For a portal resource to be exposed on the Assets page, and therefore available for runtime administration, it must be located under the oracle/webcenter/portalapp directory of the application project and explicitly identified as a portal resource.
This section includes the following topics:
-
Section 9.5.1.2, "How to Include a Portal Resource on the Assets Page"
-
Section 9.5.1.4, "How to Remove a Portal Resource from the Assets Page"
9.5.1.1 How to Add the Assets Page to a Page
For applications created using the WebCenter Portal Framework Application template, the Assets page is available out of the box as part of the runtime administration console (Figure 9-1).
In addition, you can add the Assets page to any page in your application. This is especially useful if you do not want to use the WebCenter Portal Framework Application template, and the runtime administration console is therefore not part of your project.
When you add the Assets page to a page, anyone with view access to the page can view the Assets page and perform view related operations on portal resources, such as viewing resource properties, previewing resources, and so on. For users to be able to perform other operations on portal resources, such as creating new resources, editing resources, or deleting resources, they must have the appropriate permissions on the type of portal resource with which they want to work. These permissions can be provisioned using the Role Manager task flow. For more information, see Section 74.4, "Using the Role Manager Task Flow."
Tip:
By default, theAdministrator role has manage access on all portal resource types available on the Assets page.To add the Assets page:
-
Open the page to which you want to add the Assets page.
-
In the Resource Palette, expand the WebCenter Portal - Services Catalog and then Task Flows.
-
Select the List of Asset Types task flow and drag it to the desired location on the page.
-
From the menu that displays, select Region.
You may be prompted to add the Assets page library to the project. Confirm by clicking Add Library.
-
The Assets page is added to the page.
-
To enable users to upload and download portal resources at runtime, the
usesUploadproperty for the form that contains the Assets page task flow must be set to true:<af:form id="f1" usesUpload="true">
9.5.1.2 How to Include a Portal Resource on the Assets Page
To include a portal resource on the Assets page, and therefore enable runtime administration of it, you must explicitly identify the resource as a portal resource.
For navigation models and resource catalogs, you have the option of identifying the resource as a portal resource when you first create it by selecting the Create as Portal Resource check box. For other resources, for example, page templates and skins, you must identify the resource as a portal resource after you create it.
To include a portal resource on the Assets page:
-
In the Application Navigator, right-click the portal resource that you want to include on the Assets page and choose Create Portal Resource.
Note:
If you do not see the Create Portal Resource option in the context menu, the resource is not under theoracle/webcenter/portalappdirectory. To move the resource to the correct directory, right-click it, choose Refactor, and then Move. -
In the Create Portal Resource dialog (Figure 9-2), in the Display Name field, edit the name if required.
This is the name that is listed on the Assets page at runtime, so make sure that users are able to easily identify the resource from the display name.
Figure 9-2 The Create Portal Resource Dialog
Description of ''Figure 9-2 The Create Portal Resource Dialog''
-
The Resource Type field identifies the kind of resource you are including on the Assets page. You cannot edit this field.
-
In the Icon URL field, enter the path and file name of an image to use as a graphical representation of the portal resource.
This image is used for page styles only to specify the icon to display in the Create Page dialog.
-
In the Description field, enter a description for the portal resource. This description should help users determine if they want to use the resource in their application.
The description is displayed below the portal resource's name on the Assets page.
-
Provide values for any additional attributes supported by the portal resource.
-
If you want to specify resource-level security for the portal resource, click the Security tab. Otherwise, skip to step 11.
Resource-level security enables you to override the application-level security for individual portal resources to specify who can edit and delete the resource at runtime.
-
Select Override default access policy (Figure 9-3).
Figure 9-3 Create Portal Resource - Security Tab
Description of ''Figure 9-3 Create Portal Resource - Security Tab''
-
Click the Add permissions to new role icon (represented by a plus sign) and select the role for which you want to grant permissions.
-
Select the Manage check box to grant full access to the portal resource at runtime. Users with this role can edit and delete the portal resource.
Select the Update check box to grant the permission to edit the portal resource at runtime. Users with this role can edit the portal resource, but they cannot delete it.
Note:
The user must also have the appropriate permissions to access the Assets page. For more information, see Section 9.5.1.1, "How to Add the Assets Page to a Page." -
Click OK.
The portal resource is exposed on the Assets page and users with the appropriate privileges can manage the resource at runtime.
9.5.1.3 How to Update Portal Resource Properties
You can update the details of portal resources that are exposed on the Assets page.
To update portal resource properties:
-
In the Application Navigator, right-click the portal resource that you want to edit and choose Update Portal Resource.
-
In the Update Portal Resource dialog, edit the fields as necessary.
For information about the fields in this dialog, see Section 9.5.1.2, "How to Include a Portal Resource on the Assets Page."
-
When you are done, click OK.
9.5.1.4 How to Remove a Portal Resource from the Assets Page
If you no longer want users to be able to administer a particular portal resource at runtime, you can remove it from the Assets page.
To remove a portal resource from the Assets page:
-
In the Application Navigator, right-click the portal resource that you want to remove and choose Remove Portal Resource.
-
In the Remove Portal Resource dialog, click Yes to confirm that you want to remove the portal resource from the Assets page.
The portal resource is removed from the Assets page and can no longer be managed at runtime. The portal resource itself is not deleted, so it is still available for use within the Portal Framework application.
9.5.1.5 How to Use the Assets Page at Runtime
At runtime, the Assets page provides access to administration tools for the resources available to the portal. For example, the administrator can create new portal resources (navigation models, page templates, skins, and so on), edit existing resources, upload resources exported from other applications, and so on.
For information about how to manage portal resources at runtime using the Assets page of the runtime administration console, see the "Managing Assets for a Portal Framework Application" section in Administering Oracle WebCenter Portal.
9.6 Working with Round-Trip Development
If you enable runtime administration of your portal resources, you may want to be able to pull those resources back into JDeveloper. For example, if a user adds a new navigation model to a portal at runtime, you may want to further refine it in JDeveloper. To do this, you must download the portal resource from the deployed application, using the Assets page. You can then import the portal resource into JDeveloper, carry out your development work, export the resource, and finally upload it back into the deployed application. This is known as round-trip development.
You can do this with portal resources in any deployed Portal Framework application that includes the Assets page, including WebCenter Portal.
Note:
Oracle WebCenter Portal provides a JDeveloper project (WebCenterSpacesResources) to help you develop portal resources for WebCenter Portal. Section 55, "Developing Components for WebCenter Portal Using JDeveloper" explains how to use the WebCenterSpacesResources project to build resources for use in WebCenter Portal.The process for round-trip development works as follows:
-
Build Portal Framework application in JDeveloper
-
Deploy application
-
Add or edit portal resources and add content to the application at runtime
-
Download portal resource to EAR file using the Assets page
See Section 9.6.1, "How to Download a Portal Resource Using the Assets Page"
-
Import EAR file into JDeveloper
See Section 9.6.2, "How to Import a Portal Resource into JDeveloper"
-
Edit portal resource in JDeveloper
-
Export portal resource to EAR file
See Section 9.6.3, "How to Export a Portal Resource from JDeveloper"
-
Upload portal resource to deployed application using the Assets page
See Section 9.6.4, "How to Upload a Resource Using the Assets Page"
-
Repeat from step 3.
In addition, after the deployment of the application, developers can continue to create and edit portal resources in JDeveloper and upload those resources to the deployed application periodically.
Figure 9-4 illustrates the round-trip development process described above.
This section includes the following topics:
-
Section 9.6.1, "How to Download a Portal Resource Using the Assets Page"
-
Section 9.6.2, "How to Import a Portal Resource into JDeveloper"
-
Section 9.6.3, "How to Export a Portal Resource from JDeveloper"
-
Section 9.6.4, "How to Upload a Resource Using the Assets Page"
Note:
You cannot upload a task flow created in and exported from JDeveloper into a deployed application (or into WebCenter Portal), but you can import a task flow created at runtime into JDeveloper, modify it, and export it back to the runtime application. The steps to import, modify, and export task flows are the same as those for task flow styles. Therefore, the export, import, and edit tasks in this section are applicable for task flows and task flow styles.For information about adding and exporting custom task flows, see Section 15.4, "Adding Custom Task Flows to a Page."
9.6.1 How to Download a Portal Resource Using the Assets Page
To edit a portal resource in JDeveloper, you first need to use the Assets page in the deployed application to download the portal resource to an EAR file that contains all the metadata for the resource.
For information about how to do this, see the "Downloading an Asset" section in Administering Oracle WebCenter Portal.
9.6.2 How to Import a Portal Resource into JDeveloper
When you have the EAR file, you can import it into JDeveloper, where you can then edit the portal resource.
Note:
You must import the portal resource into a Portal Framework application or an application that includes the appropriate technology scopes.Note:
When you import a portal resource into JDeveloper, if the resource already exists, the resource in JDeveloper is overwritten with the one from the archive. The original resource is saved to a temporary location, which is identified in the log.To import a portal resource into JDeveloper:
-
In the Application Navigator, right-click the Portal project of the application into which you want to import the resource, and choose Import Portal Resource.
-
In the Import Portal Resource dialog (Figure 9-5), in the Import Archive File Name field, enter or browse for the archive file that contains the portal resource that you want to import.
Figure 9-5 The Import Portal Resource Dialog
Description of ''Figure 9-5 The Import Portal Resource Dialog''
-
Click OK.
Note:
Artifacts used or referenced by portal resources, such as icons and images, are not included in the archive when a portal resource is downloaded. When you import the portal resource, you must manage and move dependent artifacts manually. We recommend that you use a folder structure on your content server specifically for portal resource artifacts so that content is easy to identify and move, if required.If you are managing legacy portal resources that store artifacts in MDS, we recommend that you relocate dependent artifacts to your content server. However, if you do need to move artifacts stored in MDS, you can use the MDS WLST commands exportMetadata and importMetadata.
9.6.3 How to Export a Portal Resource from JDeveloper
After editing the portal resource, you must export it to create an EAR file that can be uploaded to the deployed application.
To export a a portal resource from JDeveloper:
-
In the Application Navigator, right-click the resource that you want to export and choose Export Portal Resource.
Note:
If you do not see the Export Portal Resource option in the context menu, the resource is not a portal resource. For information about how to create the resource as a portal resource, see Section 9.5.1.2, "How to Include a Portal Resource on the Assets Page." -
In the Export Portal Resource dialog (Figure 9-6), in the Export Archive File Name field, enter or browse for the path and file name for the export file.
If you select an existing file, the contents of the file will be overwritten.
Figure 9-6 The Export Portal Resource Dialog
Description of ''Figure 9-6 The Export Portal Resource Dialog''
-
Click OK.
The export archive contains the files that make up the resource, for example, the JSPX file and the page definition. The archive also contains the
generic-site-resources.xmlfile and the registry file with just the information about the exported resource.
Note:
Artifacts used or referenced by portal resources, such as icons and images, are not included in the archive. When you upload the portal resource, you must manage and move dependent artifacts manually. We recommend that you use a folder structure on your content server specifically for portal resource artifacts so that content is easy to identify and move, if required.If you are managing legacy portal resources that store artifacts in MDS, we recommend that you relocate dependent artifacts to your content server. However, if you do need to move artifacts stored in MDS, you can use the MDS WLST commands exportMetadata and importMetadata.
9.6.4 How to Upload a Resource Using the Assets Page
The final step is to take the EAR file of the updated resource and use the Assets page to upload the resource back into the deployed application.
For information about how to do this, see the "Uploading an Asset" section in Administering Oracle WebCenter Portal.
9.7 Working with WebCenter Portal Resources
WebCenter Portal is a web-based application that offers the very latest technology for building portals, social networking, communication, collaboration, and personal productivity. Out of the box, WebCenter Portal provides various built-in portal resources that users can leverage in their portals. If these built-in portal resources do not meet users' requirements, application administrators can build more within WebCenter Portal. For more information, see the "Creating Assets" section in Building Portals with Oracle WebCenter Portal.
Tip:
In WebCenter Portal, portal resources are referred to as assets.In some cases, WebCenter Portal may not provide the necessary controls to create a portal resource that provides all the required functionality. In such cases, you can bring portal resources originally created in WebCenter Portal into JDeveloper for editing, and then upload them back into WebCenter Portal.
In addition, some portal resources used by WebCenter Portal, such as page styles and task flow styles, cannot be created in WebCenter Portal. Instead, these resources must be created in JDeveloper and then exported and uploaded to WebCenter Portal.
Oracle WebCenter Portal provides a special JDeveloper project (WebCenterSpacesResources) to help you develop portal resources for use in WebCenter Portal. For more information, see Section 55.1, "Developing Assets for WebCenter Portal."
When working with WebCenter Portal resources in JDeveloper, you should consider the following:
-
All the resources required for a WebCenter Portal navigation model exist within WebCenter Portal. Therefore, you should really only use JDeveloper to restructure WebCenter Portal navigation models and perform minor edits. First, you should create as much of the navigation model in WebCenter Portal as possible and add the required resources. You can then use JDeveloper to refine the order of the resources and set all required attributes and parameters.
-
If you do want to use JDeveloper to add resources to a WebCenter Portal navigation model, you should obtain the path for the resource from WebCenter Portal by accessing the Show Properties dialog for the resource. For more information, see the "Viewing Information About an Asset" section in Building Portals with Oracle WebCenter Portal.
-
When adding resources to a WebCenter Portal navigation model, you must manually enter the path to the resource. You cannot use the Browse icon. For example, to enter a link to a page, you must identify the ID of the page in WebCenter Portal and then enter that value manually as
page://pathToXmlFile.
-
The page template must include a facet definition called
content. -
The page template must include at least one UI component with
class="WCPGTEMPLATE". The runtime editing of skins enables the targeting of the template background in a basic tab; it depends on this style being there.