11 Developing Page Templates
This chapter describes how to use Oracle JDeveloper to design and develop page templates for portal pages displayed in WebCenter Portal Framework applications and portals built with WebCenter Portal (Portal Builder).
This chapter includes the following topics:
11.1 Introduction to Developing Page Templates
Page templates define how individual pages and groups of pages display on a user's screen, and help to ensure that the pages in a portal are consistent in structure and layout. If you change a page template, then all pages that reference that template automatically inherit the changes.
See Also:
For general information about page templates, see the "Using Page Templates" section in Web User Interface Developer's Guide for Oracle Application Development Framework.Oracle recommends that you use JDeveloper to develop page templates for both Portal Framework applications and portals built with WebCenter Portal (Portal Builder). In JDeveloper, you can build fully functional page templates from scratch or you can refine and further develop existing page templates to suit your particular requirements. You can also develop page templates in Portal Builder, but the editing capabilities are limited.
When fully developed, you can upload page templates directly to WebCenter Portal (the portal server) for immediate use or for testing. Alternatively, you can export the page template to a file and upload the page template to WebCenter Portal later on through Portal Builder.
You can develop page templates in the following ways:
-
Build page templates from scratch, as described in Section 11.3, "Creating a Page Template."
-
Download out-of-the-box page templates provided with WebCenter Portal (Portal Builder), and modify them, as described in Section 11.4, "Editing a Page Template."
-
Leverage the out-of-the-box page templates provided with JDeveloper, as described in Section 11.1.4, "Understanding the Built-In Page Templates in a WebCenter Portal Framework Application" and Section 11.4, "Editing a Page Template."
This section includes the following topics:
11.1.1 Understanding Page Template Structure
Typical elements of a page template include:
-
Header, content area (different in each page), and footer. The header and footer commonly include brand-specific elements. For example, a header usually includes a logo and possibly a slogan, and a footer usually includes contact and copyright information.
-
Navigation. A page template can expose the navigation for a portal in many ways. For example, on a mobile device, portal navigation may be shown as a popup or slide in/out. On a desktop browser, portal navigation is typically shown along the top of the page, or down the side of the page.
-
Branding elements. For example, a page template my include a company logo, slogan, or copyright message.
-
Links and actions. For example, a log in/log out link, drop-down menus, or global links (such as links to send a mail message to the web administrator or to display a privacy statement).
-
Conditional elements. For example, some elements on the page might differ depending on whether the user is public or authenticated or depending on the user's role and privileges.
Figure 11-1 shows a sample application based on a page template that illustrates these elements.
Figure 11-1 Sample Portal that Uses a Page Template
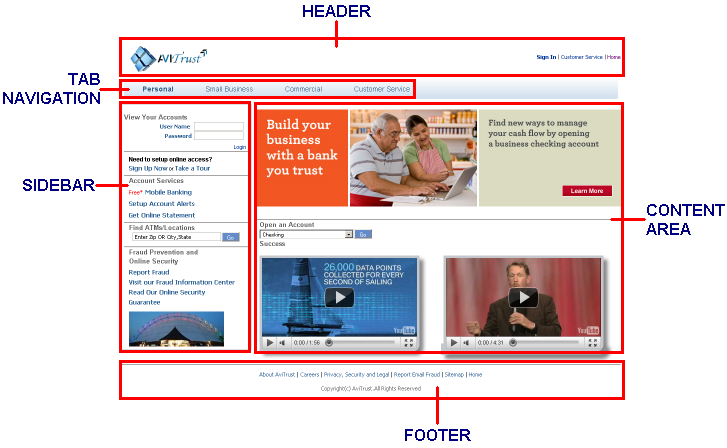
Description of ''Figure 11-1 Sample Portal that Uses a Page Template''
11.1.2 Understanding Page Template Layout
One of the most important aspects of page template design is the layout of components, both elements of the template and page content. There are two basic strategies:
-
A flowing layout is the most typical layout. Components are arranged side by side or one below the other, displayed using their natural size. When the content of the page extends beyond the size of the browser window, the browser displays scroll bars on the page.
-
A stretching layout may be a suitable choice when your page content fills a large area, or you want the page content to grow and shrink depending on the size of the browser window. Components are stretched to occupy the available space on the page. For example, a stretching layout may be suitable when a page contains a table or graph that you want to fill up the whole content area, no matter what size it is. Another example is a page that contains an editing area, where you want the editor to be exactly as tall and wide as the space given to the content area. This layout has a region for the page content, and adds scroll bars to the region on the page when the content cannot be contained within the size of the browser window. In other words, individual components display scroll bars (which might mean that you have multiple scroll bars on one page).
Stretching enables you to maximize the usage of the viewable area. You can use tabs, accordions, menus, and popups to expand your viewable area. When scroll bars are added to the page, the navigation area, page header, and page footer remain in view while the content area scrolls.
Because most web sites use a flowing layout, you will probably also want to use a flowing layout as it will likely feel more familiar to your users. However, stretching layouts are good for dashboards and applications that are rich in nature or when you want to mimic a desktop experience. You can also combine flowing and stretching layout on the same page.
Depending on whether your layout is flowing or stretching, the vertical behavior of the page differs as follows:
-
Flowing layout:
-
The header and/or footer might not always be visible
-
The height of the page is calculated based on the page contents
-
The content is never stretched vertically
-
The browser might display a scroll bar
-
-
Stretching layout:
-
The header and footer are always visible
-
The height of the page is determined by the browser window
-
The content is stretched vertically
-
The content area might display a scroll bar
-
Depending on whether your layout is flowing or stretching, the horizontal behavior of the page differs as follows:
-
Flowing layout:
-
If your page includes a side bar (for example, left-side navigation), the side bar might not always be visible
-
The width of the page is calculated based on the components
-
Some components might be stretched to fill up existing space
-
The browser might display a scroll bar
-
-
Stretching layout:
-
If your page includes a side bar (for example, left-side navigation), the side bar is always visible
-
The width of the page is determined by the browser window
-
The content is stretched horizontally
-
The content might display a scroll bar
-
11.1.3 Understanding Page Template Layout Components
The underlying structure of a page template is provided by Oracle Application Development Framework (ADF) layout components. After you decide on the appropriate layout to use for your page template (see Section 11.1.2, "Understanding Page Template Layout"), you will use ADF layout components to create your page template. This is a complex task, and requires knowledge of the ADF components that will achieve the structure and layout you require, and best practices to employ (see Section 11.2, "Best Practices for Developing Page Templates").
See Also:
-
For details on what different layout components look like, see the ADF Faces Rich Client demo online tool:
http://jdevadf.oracle.com/adf-richclient-demo/faces/visualDesigns/index.jspxIn the demo tool, you can select Page or Page Template from the View Source menu to see what layout components and attributes are used to achieve the page structure.
Figure 11-2 and Figure 11-3 illustrate common ADF components used in a page template layout, showing the page template code followed by the generated layout:
-
af:panelGridLayout—a versatile layout component that uses rows (gridRow) and cells (gridCell) to define a structured layout. This component is the preferred general layout component as it offers a small client side footprint while being very flexible in layout capabilities. It allows you to more naturally define areas of the page to match your desired layout in the form of rows and columns. WithpanelGridLayout, you can easily specify fixed or variable column widths (% or pixels), which cannot be done as easily with other layout components. See Figure 11-2. -
af:panelGroupLayout—a flowing series of components arranged horizontally, vertically, or in scrollable structures. Typically,panelGroupLayoutis used with flowing layouts, and with flowing content inside a stretching layout. It provides vertical and horizontal scroll bars if the content does not fit into the available space. See Figure 11-2 and Figure 11-3. -
af:panelSplitter—a stretched box divided into two user-modifiable sections. See Figure 11-3.
Figure 11-2 Page Template Code and Generated Stretching Layout: Example 1
Description of ''Figure 11-2 Page Template Code and Generated Stretching Layout: Example 1''
Figure 11-3 Page Template Code and Generated Stretching Layout: Example 2
Description of ''Figure 11-3 Page Template Code and Generated Stretching Layout: Example 2''
11.1.4 Understanding the Built-In Page Templates in a WebCenter Portal Framework Application
Note:
For information about the built-in page templates, see the "About Built-in Page Templates" section in Building Portals with Oracle WebCenter Portal. You can download these page templates and modify them in JDeveloper, as described in Section 11.4, "Editing a Page Template."When you create a Portal Framework application, and select the Configure the application with standard Portal features check box (see Section 6.1, "Creating a New WebCenter Portal Framework Application"), as shown in Figure 11-4, two built-in templates are added to your application: pageTemplate_globe.jspx and pageTemplate_swooshy.jspx.
Figure 11-4 Create WebCenter Portal Framework Wizard Step 4 of 5
Description of ''Figure 11-4 Create WebCenter Portal Framework Wizard Step 4 of 5''
These built-in page templates both offer essentially the same functionality but with different graphics. Figure 11-5 shows the pageTemplate_globe.jspx page template.
Figure 11-5 Built-In Page Template - pageTemplate_globe.jspx
Description of ''Figure 11-5 Built-In Page Template - pageTemplate_globe.jspx''
-
Link to the portal home page
-
Tag line
-
Welcome message
-
Link to the runtime administration console
-
Login area that converts to a logout link when users are logged in
-
Navigation bar
-
Area for adding content to pages based on the template
-
Copyright notice
These page templates use the following attributes:
Table 11-1 Built-In Page Template Attributes
| Name | Type | Default Value |
|---|---|---|
|
|
String |
|
|
|
Boolean |
|
|
|
Boolean |
|
|
|
Boolean |
|
|
|
Boolean |
|
|
|
Boolean |
|
|
|
Boolean |
|
You can edit these built-in page templates to meet your particular requirements, or you can create your own from scratch. If you choose to create your own page templates, Oracle recommends that you refer to the latest built-in page templates, which provide examples of recommended layout components that include fewer task flows and faster performance. See the "About Built-in Page Templates" section in Building Portals with Oracle WebCenter Portal.
11.2 Best Practices for Developing Page Templates
Because page templates are present in every page of a portal, the design of your page templates should be carefully planned to optimize their performance and conform to best practices. This section provides tips for developing page templates for a portal.
Note about Page Templates in WebCenter Portal (Portal Builder):
The development of a page template is a complex task. Oracle recommends that you use JDeveloper to develop page templates for both Portal Framework applications and portals built with WebCenter Portal (Portal Builder). You can also develop page templates in Portal Builder, but the editing capabilities are limited.When fully developed, you can upload page templates directly to WebCenter Portal (the portal server) for immediate use or for testing. Alternatively, you can export the page template to a file and upload the page template to WebCenter Portal later on through Portal Builder.
For more information, see Section 11.3, "Creating a Page Template," Section 11.4, "Editing a Page Template," and Section 55.1, "Developing Assets for WebCenter Portal."
Table 11-2 provides a quick reference summary of considerations and guidance for achieving the best results out of your page templates.
Table 11-2 Best Practices Summary for Page Templates
| Considerations | Best Practices |
|---|---|
|
Performance |
While all of this section, "Best Practices for Developing Page Templates", is aimed at improving the performance of your page templates, there are a few general tips to keep in mind as overall best practices:
|
|
Layout |
One of the most important aspects of page template design is how to lay out components, both elements of the template and page content. Page templates can have a flowing layout or a stretching layout. For more details about these two strategies, see Section 11.1.2, "Understanding Page Template Layout." As a page template developer, you can control whether the content facet is in a stretching or flowing region of the page. Page content must be created taking the layout strategy into consideration. Once you decide on the best strategy for your page templates, see the following sections for tips on creating the layout you choose: |
|
Navigation |
A page template can expose the navigation for a portal in many ways. For example, in a desktop browser, portal navigation is typically shown along the top of the page, or down the side of the page:
On different devices, other navigation models can be used. For example, in page templates optimized for mobile devices, navigation can be provided as either a popup or slide in/out. The navigation model provided out-of-the-box with WebCenter Portal ( |
|
Skin |
:
Each page template works together with a skin to determine the overall look and feel of the pages in your portal. While the page template controls the structure of components on the page, the skin controls the visual appearance of those components, such as the colors, fonts, and other aspects such as the position, height, and width of components on the page. Each page template can define a preferred skin to identify the skin that works best with that page template. When the page template is selected as the default page template for a portal or as the system default, the default skin automatically updates to the page template's preferred skin. For more information, see Chapter 13, "Developing Skins." |
|
Storage location |
In a Portal Framework application, to expose the new page template in the Assets page of the runtime administration console, you must create the page template under the
After importing a page template, you need to edit For more information, see Section 9.5.1, "Enabling Runtime Administration of Portal Resources." |
|
Runtime behavior |
If you develop a page template in JDeveloper that you plan to allow authorized users to edit in Composer at runtime, follow the tips provided in Section 11.2.3, "Best Practices for Developing Page Templates That Can Be Edited at Runtime." Select the Create Associated ADFm Page Definition option when developing a page template so that the template can include portlets and task flows and to enable runtime switching. For more information, see Section 11.3, "Creating a Page Template." and Section 11.5.3, "How to Enable Dynamic Switching of Page Templates at Runtime in a WebCenter Portal Framework Application." |
|
Components |
For details on what different ADF layout components look like, see the ADF Faces Rich Client demo online tool ( Because a page template layout can be changed, create pages and design custom components that display properly in flowing and stretching context. For tips on customizing the appearance of components, see Section 11.2.4, "Best Practices for Customizing the Appearance of Components." |
|
Scrolling |
Add scroll bars only around flowing island content. For tips on implementing scroll bars, see Section 11.2.5, "Best Practices for Defining Scrolling in a Page Template." |
|
Margins, borders, and padding |
Due to browser CSS Box Model Rules, defining margins, borders and padding on components might be complex. For tips on resolving the complexities of defining margins, borders and padding on components, see Section 11.2.6, "Best Practices for Defining Margins, Borders, and Padding." |
|
Attributes |
Consider attributes that can be set in your page templates or pages that use the page templates. For example, A page template without attributes is syntactically correct. However, page template attributes are useful when you want to use one page template for several pages where the template should render slightly differently. Information about using attributes in your page templates is provided throughout this chapter, including Section 11.2.7, "Best Practices for Hiding Content in Page Templates in a Portal Framework Application" and Section 11.3, "Creating a Page Template." |
|
Links |
To add links to page templates, copy components provided in the out-of-the-box page templates to include links navigation, menus, breadcrumbs, buttons, and images.
|
|
Internationalization |
To create page templates with internationalization techniques in mind, see Chapter 75, "Building Multilanguage Portals" for information about recommended practices such as storing static text in resource bundle files. |
|
Naming page templates (display name) |
The display name is exposed to users when creating a new page. For this reason, you should make the page template name something that helps users quickly identify which type of pages the template should be used for. |
This section includes the following topics:
-
Section 11.2.1, "Best Practices for Creating Stretching Layouts"
-
Section 11.2.2, "Best Practices for Creating Flowing Layouts"
-
Section 11.2.3, "Best Practices for Developing Page Templates That Can Be Edited at Runtime"
-
Section 11.2.4, "Best Practices for Customizing the Appearance of Components"
-
Section 11.2.5, "Best Practices for Defining Scrolling in a Page Template"
-
Section 11.2.6, "Best Practices for Defining Margins, Borders, and Padding"
11.2.1 Best Practices for Creating Stretching Layouts
If your page template is best suited to a stretching layout (see Section 11.1.2, "Understanding Page Template Layout"), follow these tips as you develop the layout:
-
Build the outer structure with containers that can be stretched and can stretch their children. Inside your
documentcomponent, use containers such aspanelGridLayout(Figure 11-2) with rows (gridRow) and cells (gridCell), andpanelSplitter(Figure 11-3).Note:
Each layout or panel component's tag documentation identifies whether it is stretchable and how to achieve it in its "Geometry Management" documentation. Some components have attributes to determine whether children will be stretched or not. For example:documenthas amaximizedattribute,showDetailItemhas astretchChildrenattribute. -
Create flowing islands. Inside of the stretchable outer structure, create islands of flowing (non-stretched) components. To make this transition from stretching to flowing, use
panelGroupLayoutwithlayout="scroll"orlayout="vertical"since it supports being stretched but will not stretch its children. -
On stretching components, set
dimensionsFrom="auto"so that the stretching component (for example,panelStretchLayout) will only try to stretch its child if it itself is being stretched. If it is not being stretched, then it will flow (not stretch) its children. -
Do not stretch something vertically (by using a height with a percent value) when inside a flowing container.
-
Do not use the
positionCSS property in aninlineStyle. Doing so will impede the ability to override this property with a style specified in the skin.
Note:
The following components are just some of the components that cannot be reliably stretched:-
Most input components
-
panelBorderLayout -
panelFormLayout -
panelGroupLayout(withlayout="default") -
panelGroupLayout(withlayout="horizontal") -
panelHeader(withtype="flow") -
panelLabelAndMessage -
panelList -
panelGrid -
tableLayout(Apache MyFaces Trinidad HTML Component)
11.2.2 Best Practices for Creating Flowing Layouts
If your page template is best suited to a flowing layout (see Section 11.1.2, "Understanding Page Template Layout"), follow these tips as you develop the layout:
-
Use
panelGridLayoutwith rows (gridRow) and cells (gridCell) to define a structured layout that will flow. -
To avoid multiple scroll bars, do not nest scrolling
panelGroupLayoutcomponents, instead uselayout="vertical". -
Most stretchable ADF components also work in flowing context with
dimensionsFrom="auto". -
To stretch a component horizontally, use
styleClass="AFStretchWidth"(instead ofinlineStyle="width:100.0%").
Working with customizable components:
-
In
panelCustomizable, uselayout="auto"to detect whether to stretch its children. -
To support flowing and stretching layouts, use
showDetailFramewithstretchChildren="auto".
11.2.3 Best Practices for Developing Page Templates That Can Be Edited at Runtime
To create a page template at design time (in JDeveloper) that is suited to being editable at runtime (in Composer), follow these tips:
-
Add components from the Composer group in the Component Palette.
-
Do not add
pageCustomizableto a page template. -
Add at least one
panelCustomizablecomponent, which provides a container with horizontal or vertical layout that holds other components. -
Inside a
panelCustomizablecomponent, add ADF components (such asoutputText,richTextEditor, orgoLink) surrounded by ashowDetailFrame, which provides a chrome for a component that enables you to add actions like show, hide, and move. You can edit the frame or the embedded component properties.Caution:
Use this technique sparingly, asshowDetailFramecomponents impact processing time. If the end user is not expected to move components around, do not wrap them in ashowDetailFrame.
Many of the components available to add to a page at design time are also available at runtime in the resource catalog. Table 11-3 maps design time components to runtime components.
11.2.4 Best Practices for Customizing the Appearance of Components
To customize the appearance of components, follow these tips:
-
For custom styling, use Cascading Style Sheets (CSS), which is easy to maintain and can be changed without changing the page template source. For example, make the background color of a page blue using the CSS code
background-color: blue. -
Use a custom skin for consistently modified appearances if the existing skin doesn't provide all that you need.
-
For instance-specific alternative styling, use the
styleClassattribute. Keep the corresponding style definitions in an easy-to-maintain location such as in a custom skin (recommended) or in a style provided by theaf:resourcetag. -
As a last resort, use component attributes such as
inlineStyle,contentStyle, andlabelStyle. These are harder to maintain as they are scattered throughout components rather than collected in a single style sheet, contribute more to the page's raw HTML size, and may not even be needed if one or more of the above mechanisms are used. Styles are directly processed by the web browser, which gives you a great deal of power but at the cost of being error-prone. -
Browsers do not support all styles on all elements and certain combinations of styles produce non-obvious results. Here is some guidance on style configurations to avoid:
-
An
inlineStylewith aheightvalue with%units -
An
inlineStylewith awidthvalue between90%and100%(usestyleClass="AFStretchWidth"orstyleClass="AFAuxiliaryStretchWidth"instead) -
An
inlineStylewithheight,top, andbottomvalues -
An
inlineStylewithwidth,left, andrightvalues -
An
inlineStylewith apositionvalue -
In a child being stretched by a parent component, an
inlineStylewithwidthorheightvalues
-
11.2.5 Best Practices for Defining Scrolling in a Page Template
To define scrolling in a page template, follow these tips:
-
Try to avoid the need for end users to scroll horizontally by designing the page content to occupy the available screen size.
-
Add scroll bars only around flowing island content. The recommended transition component for switching from a stretching outer frame into a flowing island is the
panelGroupLayoutwithlayout="scroll". If the contents of thispanelGroupLayoutcannot fit in the space allocated, the browser will determine whether scroll bars are needed and will add them automatically. -
Do not nest scrolling
panelGroupLayoutcomponents because this will make the user see multiple scroll bars. Also, this should only be used at transitions from stretching to flowing areas and since you should not have stretching areas inside of flowing areas, you would generally never end up with nested scroll bars. It is best to minimize the number of areas that users must scroll in order to see what they are looking to find. Take time to consider what scrolling users will need. In cases where undesired scroll bars exist, you may want to change thelayoutattribute of thepanelGroupLayouttovertical.
11.2.6 Best Practices for Defining Margins, Borders, and Padding
Due to browser CSS Box Model Rules, defining margins, borders and padding on components can be complex. In many cases, to apply these kinds of styles, you need to use multiple components together:
-
In a scrolling area, you can add an extra
panelGroupLayoutwithlayout="vertical"with the padding defined on it, inside of the outerpanelGroupLayoutwithlayout="scroll". -
In a stretching area, you may need to wrap a
panelGroupLayoutcomponent inside apanelGridLayoutwith spacers insidegridCellcomponents. See Figure 11-2.
See Also:
Refer to the Navigation-Master-Detail, Tiled Flowing, and Tiled Stretching layout pattern examples for various mechanisms to apply padding:http://jdevadf.oracle.com/adf-richclient-demo/faces/feature/layoutBasicTest.jspx
11.2.7 Best Practices for Hiding Content in Page Templates in a Portal Framework Application
In a Portal Framework application, there are several special pages based on a page template that hide parts of the page template. These pages use the attributes specified in the page template to accomplish this:
-
In out-of-the-box
login.jspxanderror.jspx:showNavigation=falseandshowLogin=false. -
In built-in administration pages:
isAdminPage=true. -
When editing a template, Assets Manager sets
isEditingTemplate=true.
Use these attributes in your custom page template if the template will be used as the default template or if you use the out-of-the-box login page.
You may allow page templates with editable components to be edited using Composer. Oracle recommends you hide the template content, except the content facet reference, when editing the page so that only the page content, not the page template, can be edited. For example, use the rendered attribute:
rendered = "#{!composerContext.inEditMode or attrs.isEditingTemplate}"
11.3 Creating a Page Template
Before you create a page template, read through Section 11.2, "Best Practices for Developing Page Templates."
This section describes how to start from scratch with a new page template of your own design. Alternatively, you can start with the two built-in page templates provided in Portal Framework applications, or the latest page templates provided with WebCenter Portal (recommended), and modify them according to your requirements. To use an existing page template as a starting place, see Section 11.4, "Editing a Page Template."
Note:
Creating a page template is a complex task. Oracle recommends that you use JDeveloper to develop page templates for both Portal Framework applications and portals built with WebCenter Portal (Portal Builder). You can also develop page templates in Portal Builder, but the editing capabilities are limited.When fully developed, you can upload page templates directly to WebCenter Portal (the portal server) for immediate use or for testing. Alternatively, you can export the page template to a file and upload the page template to WebCenter Portal later on through Portal Builder.
To create a page template:
-
In the Application Navigator, right-click the node where you want to create and store page templates (Figure 11-6) and choose New:
Figure 11-6 Contents of the pagetemplates Folder
Description of ''Figure 11-6 Contents of the pagetemplates Folder''
-
For Portal Framework applications, the recommended directory is
/oracle/webcenter/portalapp/pagetemplatesNote:
In a Portal Framework application, to expose the new page template in the Assets page of the runtime administration console, you must create the page template under theApplication_Root/Portal/public_html/oracle/webcenter/portalappdirectory. By default, Portal Framework applications include a separatepagetemplatesdirectory, which contains the built-in page templates. -
For page templates to be used in WebCenter Portal (Portal Builder), use the
WebCenterSpacesResourceproject to select a directory for shared assets or portal assets, as described in Section 55.1, "Developing Assets for WebCenter Portal."
-
-
In the New Gallery, expand Web Tier, select JSF and then JSF Page Template, and click OK.
-
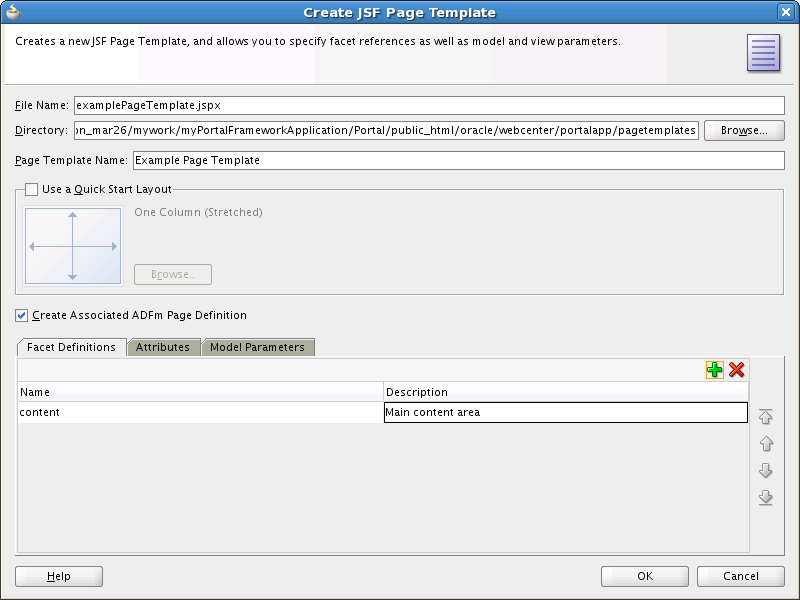
In the Create JSF Page Template dialog (Figure 11-7), in the File Name field, enter a name for the JSPX file that represents the page template (for example
myCompanyPageTemplate.jspx).The file name identifies the page template in the Application Navigator.
Figure 11-7 The Create JSF Page Template Dialog
Description of ''Figure 11-7 The Create JSF Page Template Dialog''
-
In the Directory field, verify or enter the full directory path of the location under which to create the page template.
-
In the Page Template Name field, enter a display name for the page template that will help users quickly identify which type of pages this template should be used for.
-
If you want to use one of the predefined layouts for your page template, select Use a Quick Start Layout.
-
Select Create Associated ADFm Page Definition to use ADFm Model data bindings in the page template.
Associating a page definition with the page template enables you to include objects that have model elements to them (for example, task flows and portlets) in the page template. It also enables users to switch to a different page template at runtime. For runtime page template switching to work, one of the following conditions must be met:
-
All page templates in the application have associated page definitions.
-
None of the page templates in the application have associated page definitions.
Therefore, because the built-in page templates provided with Portal Framework applications have associated page definitions, for page template switching to work in Portal Framework applications, any other page templates created within the application must also have associated page definitions.
-
-
Click the Facet Definitions tab to define the areas, or facets, in the page template where content can be inserted.
Facets are placeholders in the template that will be filled in by the pages using the template. An ADF page template can have any number of facets, but a Portal Framework application requires that each template have one facet called
content. Typically Portal Framework applications do not use any other facets, since WebCenter Portal's runtime tools recognize only this facet. Other facets could be used only at design time, in JDeveloper.A page template that is intended for use in a WebCenter Portal application must contain at least one facet definition that must be called
content. To create this facet definition:-
Click the New icon to add a new row to the Facet Definitions tab.
-
In the Name field for the new facet definition, enter
content. -
In the Description field, enter a brief description for the facet definition, for example
Main content area. -
Create additional facet definitions as required.
-
For information about how to add the facets to the required location in the page template, see Section 11.4, "Editing a Page Template."
Example 11-1 shows the
contentfacet definition in the<af:xmlContent>section of thepageTemplate_globe.jspxbuilt-in page template.Example 11-1 Content Facet in the Globe Built-In Page Template
<af:xmlContent> <component xmlns="http://xmlns.oracle.com/adf/faces/rich/component"> <display-name>Globe Page Template</display-name> <facet> <description>Facet for content</description> <facet-name>content</facet-name> <facet> ... </component> </af:xmlContent> -
-
Click the Attributes tab and click the New icon to define attributes for passing values from pages that use the template to the template itself. These values can be used by the page template to drive what is actually displayed on individual pages that use the template.
A page template without attributes is syntactically correct. However, page template attributes are useful when you want to use one page template for several pages where the template should render slightly differently.
For example, the
pageTemplate_globe.jspxbuilt-in page template includes a link to the seeded Administration page. If the current page is the Administration page, then this link does not need to be displayed. The template uses an attribute, calledisAdminPage, to identify whether the current page is the seeded Administration page. The value of this attribute, set by pages that use the template, determines whether or not to display the link to the Administration page.Example 11-2 shows the
isAdminPageattribute definition in the page template.Example 11-2 Attribute Definition in the Globe Built-In Page Template
<af:xmlContent>
  ...
    <attribute>
      <attribute-name>isAdminPage</attribute-name>
      <attribute-class>java.lang.Boolean</attribute-class>
      <default-value>#{false}</default-value>    </attribute>
  ...
</af:xmlContent>
Example 11-3 shows how the page template uses the value of the
isAdminPageattribute to determine whether or not to render the link to the seeded Administration page.Example 11-3 Conditional Value for Rendering the Administration Page Link
<af:pageTemplateDef var="attrs">
  ...
  <af:goLink id="pt_glnk1" text="Administration"
             destination="/admin"
             rendered="#{attrs.showAdmin !attrs.isAdminPage}"
             inlineStyle="font-size:small; color:White;"/>
Example 11-4 shows how the seeded Administration page sets the
isAdminPageattribute totrue, ensuring that the page template does not render the link when users are viewing the Administration page.Example 11-4 Setting the Value of a Page Template Attribute
<af:pageTemplate value="#{bindings.pageTemplateBinding.templateModel}" id="pt1">
  <f:attribute name="isAdminPage" value="#{true}"/>
Example 11-5 shows how the page template uses the value of the
contentWidthattribute to set the page width. The default value is 960 pixels.Example 11-5 contentWidth Attribute
<attribute>
  <attribute-name>contentWidth</attribute-name>
  <attribute-class>java.lang.String</attribute-class>
  <default-value>960px</default-value>
</attribute>
Example 11-6 shows how the page template uses the value of the
showNavigationandshowLoginattributes to show or hide the login link and the navigation bar. -
Click OK.
The page template is created and opened in the visual editor. The next step is to edit the page template to define its layout and content.
11.4 Editing a Page Template
You can edit your page template after its initial creation. You can also edit one of the built-in page templates to alter it to meet your specific requirements. Any changes you make are automatically rolled out to any pages that use the page template.
Note:
Editing a page template is a complex task. Oracle recommends that you use JDeveloper to develop page templates for both Portal Framework applications and portals built with WebCenter Portal (Portal Builder). You can also develop page templates in Portal Builder, but the editing capabilities are limited.When fully developed, you can upload page templates directly to WebCenter Portal (the portal server) for immediate use or for testing. Alternatively, you can export the page template to a file and upload the page template to WebCenter Portal later on through Portal Builder.
Before you edit a page template, read through Section 11.2, "Best Practices for Developing Page Templates."
For examples of features that you can include in your own page templates, refer to:
-
The two built-in page templates in Portal Framework applications. See Section 11.1.4, "Understanding the Built-In Page Templates in a WebCenter Portal Framework Application."
-
The built-in page templates provided with WebCenter Portal, specifically the latest templates that include fewer task flows and the performance-optimizing
panelGridLayoutcomponent, which uses rows (gridRow) and cells (gridCell) to define a structured layout. See the "About Built-in Page Templates" section in Building Portals with Oracle WebCenter Portal.
Even if you do not intend to base your page templates on the built-in ones at all, it is still worth studying them for ideas. For example, the built-in page templates include a login form, and a good example of navigation visualization, which you can modify according to your requirements.
If iterative development is enabled, any changes that you make to page templates can be seen immediately in a running Portal Framework application. For more information about iterative development, see Section 2.3.1, "Preparing for Iterative Development in a Portal Framework Application."
To edit a page template:
-
To add WebCenter Portal-specific components to your page template, you must first add the JSP library to your project in JDeveloper. For example:
JDev_HOME/jdeveloper/webcenter/modules/oracle.webcenter.framework_11.1.1/spaces-components.jarAfter adding the library to your project, you see a new component palette named
SpacesDeclarativeComponents. You can drop components from the palette into your page template. These same built-in components are available at run time through the resource catalog, under Template Development. -
In the Application Navigator, right-click the page template that you want to edit, and choose Open.
-
For Portal Framework applications, the recommended directory for page templates is
/oracle/webcenter/portalapp/pagetemplatesNote:
In a Portal Framework application, to expose the new page template in the Assets page of the runtime administration console, the page template must be stored under theApplication_Root/Portal/public_html/oracle/webcenter/portalappdirectory. By default, Portal Framework applications include a separatepagetemplatesdirectory. -
For page templates to be used in WebCenter Portal (Portal Builder), use the
WebCenterSpacesResourceproject to locate page templates for shared assets or portal assets, as described in Section 55.1, "Developing Assets for WebCenter Portal."
-
-
In the visual editor, make required changes to the layout and content of the page template.
-
Drag components from the Component Palette and drop them onto the page template in the visual editor.
Navigation visualization is a very important aspect of a page template. For information about adding navigation visualization to your page template, see Section 10.11, "Visualizing Portal Navigation."
For information about adding other resources to your page template, such as portlets, task flows, or content, see Chapter 15, "Creating Pages and Adding Resources."
Other features you might want to provide in your page template include a log in/log out area or a search field. The built-in page templates include an example of a login form.
Throughout your page templates, you can use expression language (EL) expressions to specify a variable value instead of a constant value. For descriptions of common EL expressions, see Appendix G, "Expression Language Expressions."
-
For areas on the page template where users can place their own content in pages based on the template:
-
Drag the FacetRef component from the Component Palette and drop it onto the appropriate location on the page template.
-
In the Insert Facet Ref dialog, from the Facet Name drop-down list, select the facet that you want to use for this area of the page template. If you enter a new facet name, JDeveloper creates a new facet definition in the page template definition file.
Example 11-6 shows how the
contentfacet is included in thepageTemplate_globe.jspxbuilt-in page template.Example 11-6 The content Facet in the Globe Built-In Page Template
<af:pageTemplateDef var="attrs"> <af:panelGroupLayout id="pt_root" layout="scroll"> <af:panelGroupLayout id="pt_pg12" layout="vertical"> ... <af:facetRef facetName="content"/> ... </af:panelGroupLayout> </af:panelGroupLayout> ... <af:pageTemplateDef> -
-
To add new facet definitions or attributes, select the
af:pageTemplateDeftag in the Structure window and use the Property Inspector. For examples, see the steps in Section 11.3, "Creating a Page Template." -
For general information about JSF page templates, see the "Using Page Templates" section in the Web User Interface Developer's Guide for Oracle Application Development Framework.
-
-
Save the page template definition file.
11.5 Applying a Page Template to a Page
This section describes how to apply a page template to a page in a Portal Framework application.
Note:
If you developed a page template in JDeveloper for use in WebCenter Portal (Portal Builder), this task is performed using Portal Builder, where the page template is selected at either the application level or the portal level to define the structure and layout (header, body, navigation, and footer) of all pages in the portal. For Portal Builder, see the "Choosing a Default Page Template" section in Administering Oracle WebCenter Portal to configure global defaults across portals, and the "Changing the Page Template for a Portal" section in Building Portals with Oracle WebCenter Portal to select the default page template for the portal.This section includes the following topics:
11.5.1 How to Apply a Page Template During Page Creation in a WebCenter Portal Framework Application
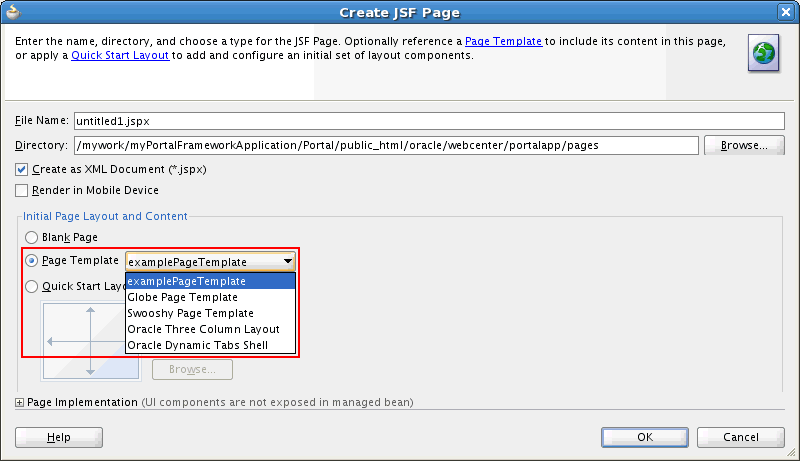
When you create a JSF page in a Portal Framework application, you can choose the page template to apply to the page in the Create JSF Page dialog, as shown in Figure 11-8.
Figure 11-8 Page Template Option in the Create JSF Page Dialog
Description of ''Figure 11-8 Page Template Option in the Create JSF Page Dialog''
For more information about creating pages in Portal Framework applications, see Section 15.2, "Creating Pages in a WebCenter Portal Framework Application."
11.5.2 How to Change the Page Template Applied to a Page in a WebCenter Portal Framework Application
When you create a page, you select a specific page template to use for that page (see Section 11.5.1, "How to Apply a Page Template During Page Creation in a WebCenter Portal Framework Application"). This adds a static reference to the page template to the JSPX file for the page. Example 11-7 shows such a reference.
Example 11-7 Referencing A Page Template in a Page
<af:pageTemplate
    viewId="/oracle/webcenter/portalapp/pagetemplates/pageTemplate_globe.jspx"
    value="#{bindings.pageTemplateBinding  }"
    id="pt1">
  <f:facet name="content"/>
</af:pageTemplate>
A binding of the page template is created in the page's page definition file. Example 11-8 shows such a binding.
Example 11-8 Binding a Page Template to a Page
<executables>
  <variableIterator id="variables"/>
  <page path="oracle.webcenter.portalapp.pagetemplates.pageTemplate_globePageDef"
        id="pageTemplateBinding" Refresh="ifNeeded"/>
</executables>
To apply a different page template to a page, you must change both these references.
11.5.3 How to Enable Dynamic Switching of Page Templates at Runtime in a WebCenter Portal Framework Application
You can change the references in a page's JSPX file and page definition file to use an EL expression that identifies the page template to use from the default page template setting. Users with the appropriate permissions can use the runtime administration console to switch to a different default page template.
Note:
You can switch between page templates at runtime only if the page template was created with an associated page definition.To enable dynamic switching of page templates at runtime:
-
In the Application Navigator, right-click the JSPX file for the page, and choose Open.
-
Click the Source tab.
-
Replace the following code:
<af:pageTemplate viewId="pathToPageTemplate"
                 value="#{bindings.pageTemplateBinding}"
                 id="ptId">
  <f:facet name="content"/>
</af:pageTemplate>
with:
<af:pageTemplate value="#{bindings.pageTemplateBinding.templateModel}"
                 id="ptId">
  <f:facet name="content"/>
</af:pageTemplate>
This indicates that the page template to be used by the page is defined in the page template's page definition.
-
Right-click the JSPX file and choose Go to Page Definition.
-
Click the Source tab.
-
Replace the following code:
<page path="pathToPageTemplatePageDef"
      id="pageTemplateBinding" Refresh="ifNeeded"/>
with:
<page viewId="${preferenceBean.defaultPageTemplate}"
      id="pageTemplateBinding" Refresh="ifNeeded"/>
The
${preferenceBean.defaultPageTemplate}EL expression retrieves the name of the page template from the default page template setting. -
You can set the default page template, as described in Section 11.6, "Selecting the Default Page Template."
11.5.3.1 What Happens at Runtime
When users with appropriate permission select a page template in the runtime administration console, it will be used by all the pages because the expression #{bindings.pageTemplateBinding.templateModel} always returns the page template set in the administration console.
See Also:
For information about configuring defaults for Portal Framework applications, see the "Choosing a Default Page Template" section in Administering Oracle WebCenter Portal.11.6 Selecting the Default Page Template
This section describes how to set the default page template that should be used by default for all pages in a Portal Framework application.
Note:
If you developed a page template for use in WebCenter Portal (Portal Builder), this task is performed using Portal Builder, where the default page template is selected at either the application level or the portal level for all pages in the portal. For Portal Builder, see the "Choosing a Default Page Template" section in Administering Oracle WebCenter Portal to configure global defaults across portals, and the "Changing the Page Template for a Portal" section in Building Portals with Oracle WebCenter Portal to select the default page template for the portal.When you first create a Portal Framework application, the pageTemplate_globe.jspx built-in page template is set as the application's default page template. If you subsequently create your own page template to use for the structure and layout of your application pages, you can set it as the default page template.
You can set the default page template for a Portal Framework application by editing the oracle.webcenter.portalapp.pagetemplate.pageTemplate preference in the adf-config.xml file. The preference bean #{preferenceBean} allows runtime access to this section in adf-config.xml and the configuration specified there.
To select the default page template:
-
In the Application Resources pane of the Application Navigator, right-click the adf-config.xml file, and choose Open.
Tip:
To locate theadf-config.xmlfile, expand the Descriptors node, and then the ADF META-INF node. -
Click the Source tab.
-
Locate the ADF preference with the following ID:
oracle.webcenter.portalapp.pagetemplate.pageTemplate
-
Set the value attribute to the path of the page template that you want to use as the default for the application, for example:
value="/oracle/webcenter/portalapp/pagetemplates/myPageTemplate.jspx
Example 11-9 shows an example of the complete preference element.
-
Save the
adf-config.xmlfile.
You can now reference the default page template without having to specify its actual name. Example 11-10 shows the EL expression to include in a page's page definition file to indicate that a page should use the application's default page template, rather than an explicitly selected page template.
11.7 Deleting a Page Template
This section describes how to delete a page template in a Portal Framework application.
Note:
If you developed a page template for use in WebCenter Portal (Portal Builder), this task is performed using Portal Builder, where the default page template is deleted at either the application level or the portal level. For Portal Builder, see the "Deleting an Asset" section in Building Portals with Oracle WebCenter Portal.Caution:
Before you delete a page template, ensure that there are no pages that use the page template. When you delete a page template, attempting to run any page that has a direct reference to the page template will result in a runtime error.To delete a page template in JDeveloper:
-
Right-click the page template in the Application Navigator and choose Delete from the context menu.
For more information, see Section 9.4, "Deleting Portal Resources."
11.8 Page Templates Tutorials and Examples
The following supplementary tutorials and examples provide additional information about page templates:
-
Dissecting a Page Template. Analyzes the details of a simple page template for an Oracle WebCenter Portal Framework application, including recommended practices.
-
Oracle WebCenter Portal Online Training: Creating and Using Page Templates in Oracle WebCenter Portal Applications. Provides a recorded presentation and slides to create and use page templates for a portal in an earlier release.
http://www.oracle.com/technetwork/middleware/webcenter/portal/learnmore/pagetemplates-1438595.pdf -
Optimizing WebCenter Portal Mobile Delivery. Identifies and analyzes some common WebCenter Portal performance bottlenecks related to page weight and describes a generic approach that can streamline a portal while improving the performance and response times. Of particular interest in the context of developing page templates is the section "Page Design and Component Choices." A sample application is available for download.
-
Working with Links in WebCenter Application. Describes considerations for using links. Pertinent to page templates are links in menus, breadcrumbs, buttons, and images.
http://www.ateam-oracle.com/working-with-links-in-webcenter-application/