7 Administering a Portal
This chapter describes how to administer an individual portal, including how to take a portal offline, close it, or delete it.
Note:
Exporting and importing a portal is a system administrator task. See the "Exporting and Importing a Portal" section in Administering Oracle WebCenter Portal.This chapter includes the following topics:
-
Section 7.2, "Administering Overview Settings and Actions for a Portal"
-
Section 7.3, "Administering Look and Feel Settings for a Portal"
Permissions:
To perform the tasks in this chapter, you need the portal-level permissionManage Security and Configuration or Manage Configuration. A portal moderator has this permission by default.
Any user who accesses administration settings for a portal and does not have Manage permission (for example, a user with Participant role, granted permission to edit a page in the portal) will see only the settings available to their role and permissions.
For more information about permissions, see Section 29.1, "About Roles and Permissions for a Portal."
7.1 Accessing Portal Administration
You can access administration settings for a portal in any of the following ways:
-
From the Portals menu, select Browse Portals to display the Portals page in the Home portal. Locate the portal you want to administer, then right-click the portal icon and select Administer (Figure 7-1). This menu item is shown only if you are the portal moderator or member with
Manage Security and ConfigurationorManage Configurationpermission in the portal.Figure 7-1 Accessing Portal Administration from Portals Page in Home Portal
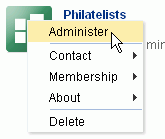
Description of ''Figure 7-1 Accessing Portal Administration from Portals Page in Home Portal''
-
From the Portals menu, select Portal Builder to display the Portals page in Portal Builder. Locate the portal you want to administer, then click the Administer link for the portal (Figure 7-2). This link is shown only if you are the portal moderator or member with
Manage Security and ConfigurationorManage Configurationpermission in the portal.Figure 7-2 Accessing Portal Administration from Portals Page in Portal Builder
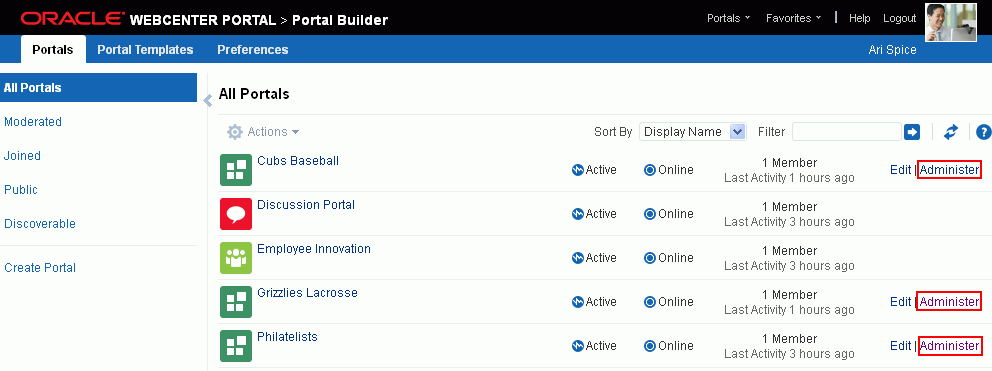
Description of ''Figure 7-2 Accessing Portal Administration from Portals Page in Portal Builder''
-
When viewing a portal, select Manage, then All Settings (Figure 7-3). This menu item is shown only if you are the portal moderator or member with
Manage Security and ConfigurationorManage Configurationpermission in the portal.Tip:
The location of the Manage action depends on the page template in use. For example, you may access it through an Actions menu as shown in Figure 7-3.
Figure 7-3 Accessing Portal Administration When Viewing Portal
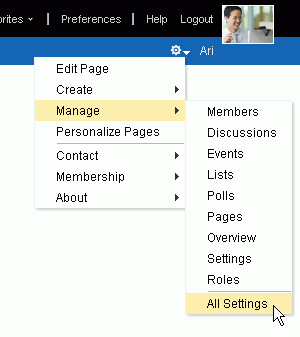
Description of ''Figure 7-3 Accessing Portal Administration When Viewing Portal''
-
In the portal editor (see Section 6.1, "Opening the Portal Editor"), click Administer Portal in the toolbar (Figure 7-4). This link is available to all users in the portal editor, but a user who does not have
Managepermission (for example, a user withParticipantrole, granted permission to edit a page in the portal) will see only the portal administration settings available to their role and permissions.Figure 7-4 Accessing Portal Administration from Portal Editor
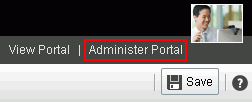
Description of ''Figure 7-4 Accessing Portal Administration from Portal Editor''
The administration settings for a portal are accessible through the links in the left navigation pane to the portal administration pages:
| Portal Administration Page | Description |
|---|---|
| Overview | Modify general settings for the portal, such as the title (name) and description, and to perform general actions on the portal, such as closing the portal, adding RSS feeds, or deleting the portal. For more information, see Section 7.2, "Administering Overview Settings and Actions for a Portal." |
| Settings | Specify settings that define the look and feel of the portal. For more information, see Section 7.3, "Administering Look and Feel Settings for a Portal." |
| Pages | Create a new portal page or subpage, edit a page, or add a page to the navigation. For more information, see Section 7.4, "Administering All Pages in a Portal." |
| Assets | Manage the assets for the portal, such as page templates, resource catalogs, skins, and more. For more information, see Section 7.5, "Administering All Assets in a Portal." |
| Attributes | Define custom attributes for the portal. For more information, see Section 7.6, "Administering Attributes in a Portal." |
| Security | Set security on the portal, such as access level, defining roles and permissions, and managing membership. For more information, see Section 7.7, "Administering Security in a Portal." |
| Tools and Services | Enable and disable tools and services operating in the portal, such as Announcements, Discussions, Documents, Events, and Lists. For more information, see Section 7.8, "Administering Tools and Services in a Portal." |
| Subportals | Use this page to manage child portals of the portal. For more information, see Section 7.9, "Administering Subportals in a Portal." |
| System Pages | Use this page to manage system pages in the portal. For more information, see Section 7.10, "Administering System Pages in a Portal." |
| Device Settings | Use this page to manage devices and device groups in a device-enabled portal. For more information, see Section 7.11, "Administering Device Settings in a Portal." |
7.2 Administering Overview Settings and Actions for a Portal
The Overview page in portal administration allows you to modify general settings for a portal, such as the title (display name) and description, the internal name, and to perform general actions on a portal, such as closing an inactive portal, taking a portal offline to perform maintenance tasks, adding RSS feeds, or deleting the portal. The following sections describe the Overview page tasks:
-
Section 7.2.1, "Accessing the Overview Settings and Actions for a Portal"
-
Section 7.2.3, "Modifying the Description or Keywords for a Portal"
-
Section 7.2.7, "Enabling or Disabling RSS News Feeds for a Portal"
7.2.1 Accessing the Overview Settings and Actions for a Portal
To access the overview administration settings and actions for a portal:
-
In the portal administration (see Section 7.1, "Accessing Portal Administration"), click Overview in the left navigation pane (Figure 7-5).
You can also enter the following URL in your browser to navigate directly to the Overview page:
http://host:port/webcenter/portal/portalName/admin/overviewFigure 7-5 Portal Administration: Overview
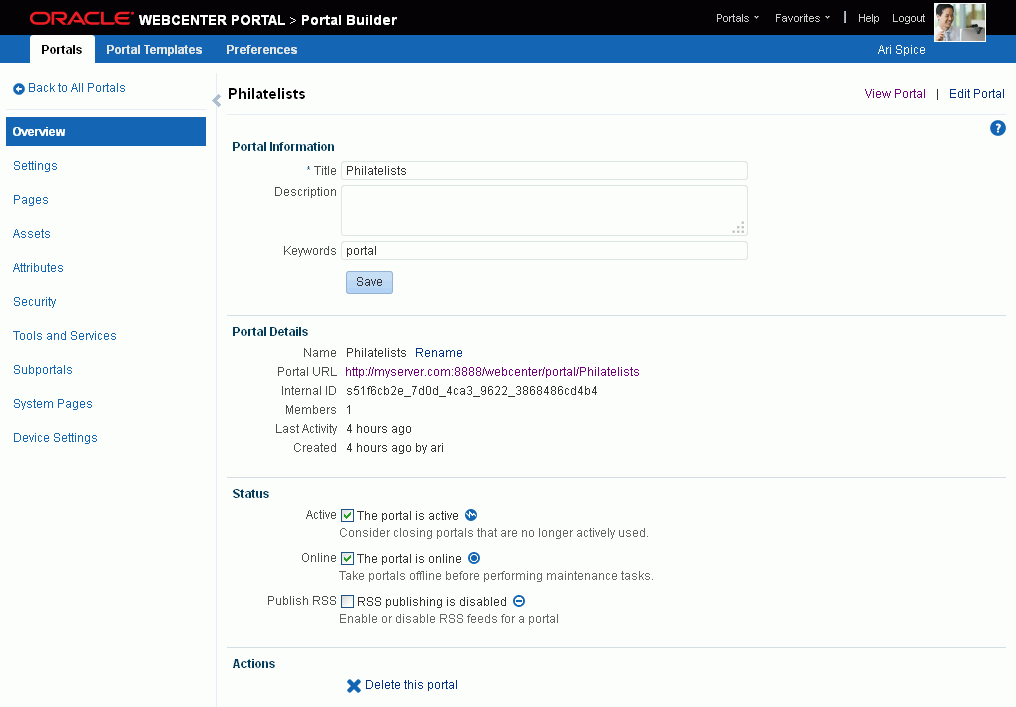
Description of ''Figure 7-5 Portal Administration: Overview''
7.2.2 Changing the Title of a Portal
A portal title displays at the top of the portal and other places where portals are available for selection, such as the Portals page. In prior releases, the title was referred to as the display name.
Note:
Changing the title does not affect the internal name and URL for the portal. To change the internal name of a portal (and consequently the URL that directly accesses the portal), see Section 7.2.4, "Changing the Internal Name of a Portal.""To change the title (display name) of a portal:
-
On the Overview page in portal administration (see Section 7.2.1, "Accessing the Overview Settings and Actions for a Portal"), under Portal Information, modify the Title as desired (Figure 7-6).
The title that you enter here is the display name that displays at the top of the portal and other places where portals are available for selection, such as the Portals menu and the Portals page. Portal titles can contain alphanumeric characters, underscores, spaces, multibyte characters, and special characters such as
&and#. The maximum allowable length is 200 characters. The following reserved keywords are not allowed as the full portal name either in upper or lowercase, or a combination of both—admin,builder,group,groups,home,last,page,pages,my portals,my spaces,portal,portals,space,spaces,system,webcenter,webcenter administration,webcenter portal,webcenter portals,webcenter space,webcenter spaces. These reserved words are allowable as part of a longer name (for example,Sales Group).Note:
WebCenter Portal removes any unsupported special characters (such as-) and character spaces in the display name specified here to derive the initial internal name for the portal. For example, the TitleMy Mega-Portalgenerates the internal nameMyMegaPortal. The URL to this portal ishttp://host:port/webcenter/portal/MyMegaPortal. -
Click Save.
7.2.3 Modifying the Description or Keywords for a Portal
A portal description appears in the listing of the portal on the Portals page. Keywords are useful to make a portal more easily discoverable in search results.
To change the title (display name), description, or keywords for a portal:
-
On the Overview page in portal administration (see Section 7.2.1, "Accessing the Overview Settings and Actions for a Portal"), under Portal Information, modify the Description and/or Keywords as desired (Figure 7-7). Separate keywords with a space or comma.
Figure 7-7 Modifying the Description or Keywords for a Portal

Description of ''Figure 7-7 Modifying the Description or Keywords for a Portal''
-
Click Save.
7.2.4 Changing the Internal Name of a Portal
If necessary for some purpose, you can change the internal name of a portal. It is important to note that when you change the internal name, you are also changing the pretty URL that other people use to navigate to the portal. The format of a portal pretty URL is as follows:
http://host:port/webcenter/portal/portalName
For example: http://mycompany:8888/webcenter/portal/philatelists.
This means that when you change the internal name of a portal, existing bookmarks to the portal URL will no longer work. If you wish to simply change the portal title; that is, the display name for the portal, see Section 7.2.2, "Changing the Title of a Portal."
To change the internal name of a portal:
-
On the Overview page in portal administration (see Section 7.2.1, "Accessing the Overview Settings and Actions for a Portal"), under Portal Details, click Rename next to the portal name (Figure 7-8).
Figure 7-8 Changing the Internal Name of a Portal

Description of ''Figure 7-8 Changing the Internal Name of a Portal''
-
In the Rename Portal dialog, enter a new internal name for the portal, then click Rename.
Note:
Use only alphanumeric characters for the internal name for a portal.The pretty URL that can be entered in a browser to directly access the portal changes to use the new internal name:
http://host:port/webcenter/portal/newInternalPortalName
7.2.5 Closing or Activating a Portal
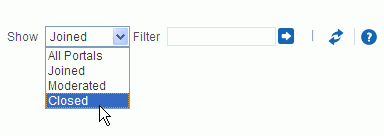
By default, a portal is active. You can close a portal that is no longer being actively used. Closing a portal archives its content. When you close a portal, it is removed from everyone's Portals menu and displays in the portal browser only when a user selects Closed from the Show list (Figure 7-9).
The content of a closed portal remains accessible and searchable to those who still want to reference it and portal members can continue working in the portal either by displaying closed portals on the Portals page, or by pretty URL (http://host:port/webcenter/portal/closedPortalName).
When a portal is closed, any activities performed in the portal are no longer reflected in the Activity Stream in the Home portal. Only the Home page of the closed portal shows activity in the portal.
To close down a portal temporarily, take the portal offline instead. See Section 7.2.6, "Taking a Portal Offline or Online."
To close a portal:
-
On the Overview page in portal administration (see Section 7.2.1, "Accessing the Overview Settings and Actions for a Portal"), under Status, deselect the Active check box (Figure 7-10).
Figure 7-10 Closing or Activating a Portal
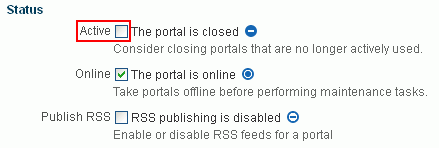
Description of ''Figure 7-10 Closing or Activating a Portal''
To reactivate the portal, select the Active check box.
Note:
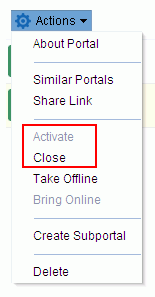
An alternate way to close and reactivate a portal is:-
From the Portals menu, select Portal Builder to display the Portals page in Portal Builder. Select the portal that you want to close or reactivate, then click the Actions icon in the toolbar and select Close or Activate:
7.2.6 Taking a Portal Offline or Online
By default, a portal is online. You can take a portal temporarily offline for maintenance. For example, if you notice inappropriate content, you can take a portal offline to modify its content, then bring it back online. Only the system administrator or portal members with Manage Configuration permission can access a portal that is offline, or bring it back online. Other members see the Portal Unavailable page (see Chapter 8, "Customizing System Pages for a Portal").
To permanently close down a portal that is not being used any more, see Section 7.2.5, "Closing or Activating a Portal."
To take a portal offline:
-
On the Overview page in portal administration (see Section 7.2.1, "Accessing the Overview Settings and Actions for a Portal"), under Status, deselect the Online check box (Figure 7-11).
Figure 7-11 Taking a Portal Offline or Online
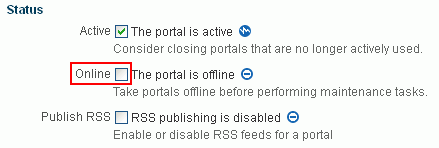
Description of ''Figure 7-11 Taking a Portal Offline or Online''
To bring the portal back online, select the Online check box.
Note:
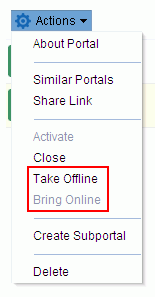
An alternate way to take a portal offline or bring it back online is:-
From the Portals menu, select Portal Builder to display the Portals page in Portal Builder. Select the portal that you want to close or reactivate, then click the Actions icon in the toolbar and select Take Offline or Bring Online.
7.2.7 Enabling or Disabling RSS News Feeds for a Portal
Portal members can find out what is happening in a portal through RSS news feeds. By default, RSS news feeds are disabled. When you enable RSS news feeds within the context of a portal, members can:
-
Monitor recent activities.
-
Track contributions to discussion forums.
-
View announcements.
-
Watch for revisions to lists.
For more information about publishing RSS new feeds, see Chapter 54, "Adding RSS Feeds to a Portal."
To allow members access to portal information through RSS feeds:
-
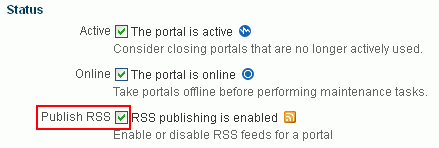
On the Overview page in portal administration (see Section 7.2.1, "Accessing the Overview Settings and Actions for a Portal"), under Status, select the Publish RSS check box (Figure 7-12).
Figure 7-12 Enabling or Disabling RSS News Feeds
Description of ''Figure 7-12 Enabling or Disabling RSS News Feeds''
To disable RSS feeds for this portal, deselect the Publish RSS check box.
7.2.8 Deleting a Portal
When a portal has been closed or inactive for some time, or it is no longer needed. you can remove it permanently from WebCenter Portal. A portal moderator or member Manage Security and Configuration permission can delete the portal. Deleting a portal is permanent; it cannot be restored after it is deleted.
When you delete a portal:
-
All pages associated within the portal are deleted.
-
Links, lists, notes, tags, and events) associated with the portal are deleted.
-
Portal roles and membership details are deleted.
-
Content managed by discussions and announcements is deleted, when it is stored in the default forum or category created by the portal. Content managed by nondefault forums or categories is not deleted (for details, see Section 46.3, "Modifying Discussion Forum Settings for a Portal").
-
The portal mail distribution list that is automatically created byWebCenter Portal is deleted. However, distribution lists that are customized by the portal moderator are not deleted (see Section 48.2, "Configuring the Mail Distribution List for a Portal").
-
Content managed by external services, such as content repositories, mail, and so on, is removed.
-
If the portal is a parent in a portal hierarchy, child subportals are deleted too.
To delete a portal:
-
On the Overview page in portal administration (see Section 7.2.1, "Accessing the Overview Settings and Actions for a Portal"), under Actions, select the Delete this Portal (Figure 7-13).
Note:
Alternate ways to delete a portal are:-
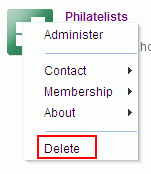
From the Portals menu, select Browse Portals to display the Portals page in the Home portal. Locate the portal that you want to delete, then right-click the portal icon or name, and select Delete.
-
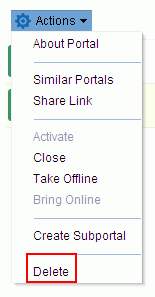
From the Portals menu, select Portal Builder to display the Portals page in Portal Builder. Select the portal that you want to delete, then click the Actions icon in the toolbar and select Delete.
-
-
In the confirmation prompt, click Delete to confirm or Cancel to preserve the portal.
If the delete process fails for any reason, the portal is not removed from your Portals tab. This sometimes happens when a back-end server cannot be contacted. If you click Delete again, the portal is removed.
7.2.9 Upgrading a Pre-11.1.1.8.0 Portal
Permissions:
To perform this task, you need the following portal-level permissions:-
Manage Security and ConfigurationorManage Configuration -
Assets: Create, Edit, and Delete Assets(simple permissions) orNavigations: Create, Edit, and Delete Navigations(advanced permissions)
A portal moderator has these permissions by default.
For more information about permissions, see Section 29.1, "About Roles and Permissions for a Portal."
You may have portals from a pre-11.1.1.8.0 release when you upgrade WebCenter Portal from a pre-11.1.1.8.0 release, which carries over any portals built in the pre-11.1.1.8.0 release.
You can work with pre-11.1.1.8.0 portals in the current release and they will continue to operate as they did in releases prior to 11.1.1.8.0. However, the following features are not available in pre-11.1.1.8.0 portals:
-
Page hierarchies (subpages)
-
Page variants (for display on other devices such as tablets and mobile phones)
-
Device preview
-
Device Settings page in portal administration
-
Centralized page editing and management
See Section 7.4.1, "Accessing Pages Administration for a Portal" and Section 6.2, "Accessing Pages in the Portal Editor" for examples that show the differences between managing and editing pages in a current release portal versus a pre-11.1.1.8.0 portal.
To take advantage of the full functionality of 11.1.1.8.0 and later releases, you can upgrade a pre-11.1.1.8.0 portal. Table 7-1 describes the changes made to a pre-11.1.1.8.0 portal during upgrade. See also Table 7-2, "Before and After Upgrade: Editing and Viewing a Portal" in the steps below to see how these changes are reflected in the user interface.
Table 7-1 Upgrading a Pre-11.1.1.8.0 Portal
| Before Upgrade | After Upgrade |
|---|---|
|
A portal navigation model can be a shared (application-level) asset, or a portal-level asset. |
Portal navigation is a portal-level asset only, and cannot be a shared asset. Beginning with Release 11.1.1.8.0, portal pages, page hierarchy, and page security are tightly integrated with portal navigation, and therefore a portal's navigation cannot be deleted or changed to a different navigation model. However, you can edit the default portal navigation model, Portal Default Navigation Model, to add other resources to it, including references to other navigation models, as described in Section 22.3.3, "Adding Items to a Navigation Model."
|
|
No support for hierarchical page structure (subpages) |
Subpages can be created and managed for any parent page (see Section 12.2, "Creating Pages or Subpages in a Portal" and Section 13.3, "Adjusting Page Order and Hierarchy in the Portal Navigation"). |
|
No support for page variants that render on different devices, device preview, or device settings. |
Page variants can be previewed, created, and managed for any page (see Section 12.1.2, "Previewing a Page Variant for a Device" and Section 12.3, "Creating a Page Variant for a Device Group"). A Device Settings page is added to the portal administration (see Section 7.11, "Administering Device Settings in a Portal"). |
|
Pages and page visibility are managed on a Pages page that reflects the Page Manager in prior releases (see Figure 6-7, "Pages Page (for pre-11.1.1.8.0 portals)"), and navigation is managed on the Assets page. |
Pages, page visibility, and navigation are managed on the Pages page (see Chapter 13, "Managing a Portal Page"). The page visibility setting is retained in the upgraded portal. |
|
Page security is managed through the Page Manager. |
Page security is maintained from the prior portal and managed on the Pages page (see Section 13.15, "Setting Page Security"). The upgraded portal includes hierarchical page security (subpages can either inherit parent page security, or override these settings to set their own security). |
|
Page parameters are set in the Page Properties dialog. |
Page parameters are maintained from the prior portal and managed on the PageDef tab in the page source code (see Section 13.14, "Viewing and Modifying Page Source Code"). New page parameters added after upgrade are managed on the Pages page (see Section 13.11, "Adding or Modifying Page Parameters"). |
To upgrade a pre-11.1.1.8.0 portal to the current release:
-
On the Overview page in portal administration (see Section 7.2.1, "Accessing the Overview Settings and Actions for a Portal"), confirm that the portal is a candidate for upgrade by noting the presence of an Upgrade section (Figure 7-14). If there is no Upgrade section, the portal has already been upgraded, or it was created in release 11.1.1.8.0 or later.
Figure 7-14 Upgrade Section on Overview Page

Description of ''Figure 7-14 Upgrade Section on Overview Page''
-
Under Status, deselect the Online check box to take the portal offline.
-
If you do not have a backup of the portal, ask your system administrator to export it to a backup file, as described in "Creating Portal Archives" in Administering Oracle WebCenter Portal.
-
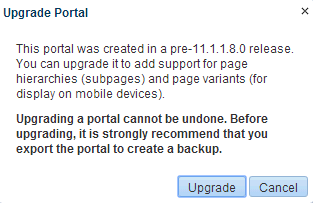
Click Upgrade this portal, click Upgrade again in the confirmation dialog (Figure 7-15), then click Upgrade in the second confirmation dialog.
Figure 7-15 Upgrade Portal Confirmation Dialog
Description of ''Figure 7-15 Upgrade Portal Confirmation Dialog''
-
When the notification of successful upgrade displays, click OK.
Notice that the Upgrade section on the Overview page no longer displays for this portal.
-
Log out and in again to refresh your upgraded portal to show the Device Settings page in portal administration. To manage device settings, see Section 7.11, "Administering Device Settings in a Portal."
-
View the upgraded portal, which will reflect the following changes:
-
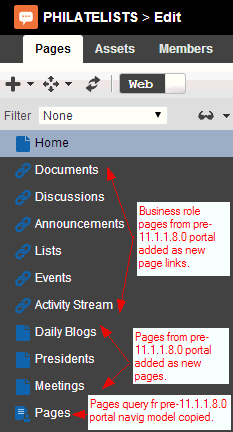
Business role pages (such as Documents, Discussions, and so on) from the prior portal are added to the upgraded portal as new page links. In the portal navigation, the page visibility setting from the prior portal is maintained to determine which business role pages are shown in the navigation. If you delete a page link in the navigation (see Section 22.3, "Editing a Navigation Model"), you delete only the navigation entry, not the page itself.
-
Pages from the prior portal are added to the upgraded portal as new pages. In the portal navigation, the page visibility setting from the prior portal is maintained to determine which pages are shown in the navigation. If you delete a page item in the navigation (see Section 13.5, "Deleting a Page"), you delete the page itself.
-
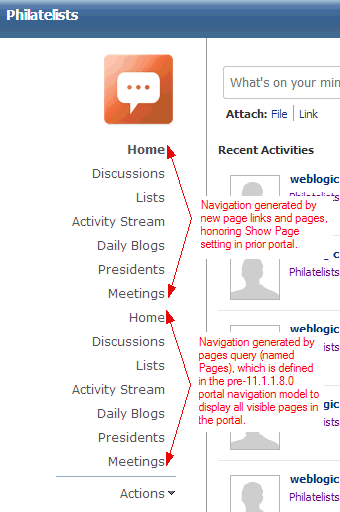
Pages queries from the prior portal navigation are carried over to the upgraded portal. The prior portal navigation may have used pages queries to show portal pages and business role pages, and build the navigation hierarchy. As a result, your initial upgraded portal navigation will contain duplicate entries for any business role or portal pages that are also exposed by a pages query. Oracle strongly recommends that you use the newly added page links and pages to manage your portal navigation, then once you have refined the navigation as desired, delete the unneeded navigation entries.
Note:
The visibility setting of a pages query filters the results of the query to expose in the navigation one of the following:-
Only those pages whose Visibility property is selected
-
Every page regardless of their Visibility property setting
-
Only those pages whose Visibility property is deselected
For more information, see Section 13.9, "Showing or Hiding a Page in the Portal Navigation" and Table 22-1, "Fields for Specific Navigation Model Items".
-
-
Other navigation items (such as content queries, portlets, or task flows) are carried over to the upgraded portal navigation.
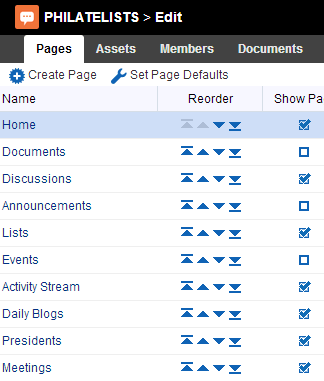
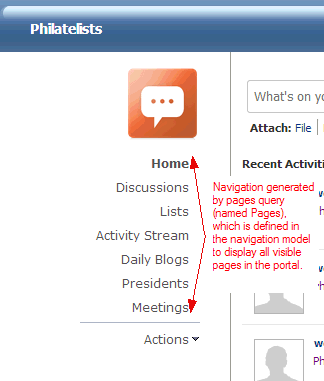
The images in Table 7-2 illustrate what you will see when editing and viewing a pre-11.1.1.8.0 portal before and after upgrade.
Table 7-2 Before and After Upgrade: Editing and Viewing a Portal
Editing a Portal Viewing a Portal Before
Pre-11.1.1.8.0 portal in portal editor (Pages page).
The view is the same on the Pages page in portal administration.
Pre-11.1.1.8.0 portal navigation.
After
Upgraded portal in portal editor (Pages page).
The view is the same on the Pages page in portal administration.
Upgraded portal initial navigation.
-
-
Refine and develop the portal navigation as required, and implement newer functionality:
-
Adjust the page hierarchy, using the newly added page links and pages. See Section 13.3, "Adjusting Page Order and Hierarchy in the Portal Navigation."
-
Hide or delete pages queries and other navigation items that are no longer needed or you do not want exposed. See Section 22.3, "Editing a Navigation Model."
-
Manage page links and pages, including deleting unneeded pages, and setting page properties and visibility. See Chapter 13, "Managing a Portal Page."
-
Create additional pages and subpages, as needed. See Chapter 12, "Creating and Editing a Portal Page."
-
Add page variants, as needed. See Section 12.1.2, "Previewing a Page Variant for a Device" and Section 12.3, "Creating a Page Variant for a Device Group."
-
-
On the Overview page in portal administration, under Status, select the Online check box to move the portal online.
Note:
If you wish to revert to the original portal, delete the upgraded portal (see Section 7.2.8, "Deleting a Portal"), and ask your system administrator to import the pre-11.1.1.8.0 backup of the portal, as described in "Importing One or More Portals from an Archive" in Administering Oracle WebCenter Portal.7.3 Administering Look and Feel Settings for a Portal
The Settings page in portal administration allows you to change the appearance of your portal and its pages through setting the page template, skin, navigation, header and footer, copyright and privacy statements, language, icon, and logo. This page also allows you to define the resource catalogs that contain the components you can add to pages and page templates, and specify the behavior when the page is displayed on another device. The following sections describe the Settings page tasks:
-
Section 7.3.1, "Accessing Look and Feel Settings for a Portal"
-
Section 7.3.5, "Changing the Resource Catalogs for Pages and the Page Template for a Portal"
-
Section 7.3.6, "Setting Page Behavior for a Portal When No Page Variant Exists"
-
Section 7.3.7, "Displaying or Hiding a Page Footer in a Portal"
-
Section 7.3.8, "Customizing the Copyright Statement and Privacy URL in a Portal"
7.3.1 Accessing Look and Feel Settings for a Portal
To access the asset, options, icon, and logo settings for a portal:
-
In the portal administration (see Section 7.1, "Accessing Portal Administration"), click Settings in the left navigation pane (Figure 7-16).
You can also enter the following URL in your browser to navigate directly to the Settings page:
http://host:port/webcenter/portal/portalName/admin/settingsFigure 7-16 Portal Administration: Settings
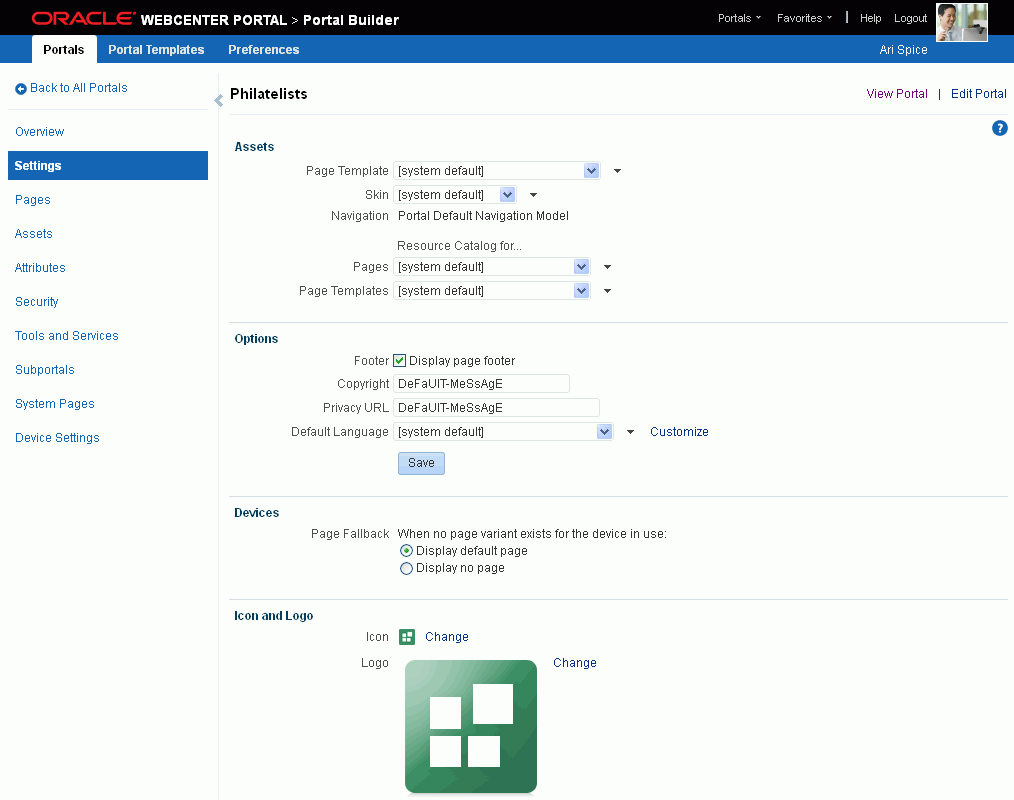
Description of ''Figure 7-16 Portal Administration: Settings''
7.3.2 Changing the Page Template for a Portal
A page template defines how all pages in a portal display on a user's screen. For more information about page templates, see Chapter 21, "Working with Page Templates."
WebCenter Portal provides several out-of-the-box page templates (see Section 21.1.1, "About Built-in Page Templates"). Alternatively, portal designers can create custom page templates to offer more ways to display pages on the screen, as described in Section 21.3, "Creating a Page Template." Within a portal, you can copy or customize an existing page template, as described below and in Section 7.5, "Administering All Assets in a Portal."
Each page template works together with a skin to determine the overall look and feel of the pages in your portal. While the page template controls the location and behavior of components on the page, the skin controls the visual appearance of those components, such as the colors, fonts, and various other aspects.
See Also:
Chapter 24, "Working with Skins"Each page template can define a preferred skin to identify the skin that works best with that page template. When the page template is selected as the default page template for a portal or as the system default, the default skin automatically updates to the page template's preferred skin.
By default, a portal inherits the page template defined for the portal template that you select when you create the portal.
Note:
If the portal template does not specify a page template, the portal uses the default page template specified by the system administrator, as described in the "Choosing a Default Page Template" section in Administering Oracle WebCenter Portal.You can optionally select a different page template for an individual portal, overriding the default page template settings. To change the page template for a portal:
-
On the Settings page in portal administration (see Section 7.3.1, "Accessing Look and Feel Settings for a Portal"), under Assets, select a new Page Template (Figure 7-17).
Figure 7-17 Changing the Page Template for a Portal
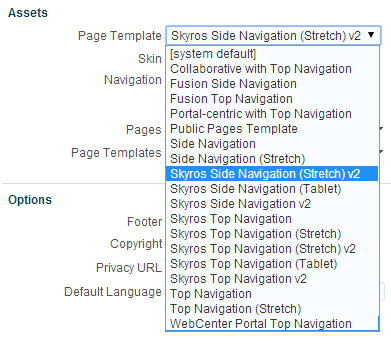
Description of ''Figure 7-17 Changing the Page Template for a Portal''
The page templates that are listed are those that are made available to the portal on the Shared Assets or Assets page (see Section 20.5.3, "Showing and Hiding Assets"). The [system default] selection applies the page template specified as the default for all portals by the system administrator, as described in the "Choosing a Default Page Template" section in Administering Oracle WebCenter Portal.
You can add custom page templates for the portal to this list in two ways:
-
Copy an existing page template into a new page template, completely separate from the original, as described in Section 7.5, "Administering All Assets in a Portal."
-
Customize an application-level page template to create a new page template for the portal. Any changes that are subsequently made to the page template at the application level are automatically cascaded down to the page template at the portal level. See Section 21.6, "Customizing a Shared Page Template for a Portal."
Note:
If you create a new page template for a portal, the custom page template is not shown in the Page Template list for subportals of the portal. To set the page template for a subportal to the same page template used by its parent portal, you must use an EL expression. If you need EL assistance, an application developer can provide an EL expression; see the "Expression Language Expressions" appendix in Developing Portals with Oracle WebCenter Portal and Oracle JDeveloper.To make a custom page template available in the Page Templates list for all portals and subportals, it must be created as a shared asset for all portals (see Section 59.3, "Creating Shared Assets").
An Expression Editor is available for entering custom values using Expression Language (EL) expression, allowing page template to be determined dynamically based on certain criteria. Click the
 icon next to the Page Template drop-down list, then select Expression Builder to open the editor. If you need EL assistance, an application developer can provide an EL expression; see the "Expression Language Expressions" appendix in Developing Portals with Oracle WebCenter Portal and Oracle JDeveloper
For example: in a subportal, the following EL expression sets the Page Template to the same setting as the parent portal:
{srmContext.resourceType['siteTemplate'].displayName['parent_page_template'].singleResult} -
7.3.3 Changing the Skin for a Portal
A skin defines the appearance and look and feel of a portal. For more information about skins, see Chapter 24, "Working with Skins."
WebCenter Portal provides several out-of-the-box skins (see Section 24.1, "About Skins"). Alternatively, portal designers can develop custom skins to reflect a personality, or to incorporate specific branding, as described in Section 24.3, "Creating a Skin." Within a portal, you can copy an existing skin, as described below and in Section 7.5, "Administering All Assets in a Portal."
By default, a portal inherits its skin from the default specified for all portals by the system administrator, as described the "Choosing a Default Skin" section in Administering Oracle WebCenter Portal.
Each page template can define a preferred skin to identify the skin that works best with that page template. When a page template is selected as the new default page template for a portal or as the system default, the default skin automatically updates to the page template's preferred skin.
You can optionally select a different skin for an individual portal, overriding the default skin setting. When you change the skin for a portal, the skin is applied to all the pages of the portal. However, the portal administration pages are not affected. They always appear with the default skin, Fusion FX.
WARNING:
changing the default skin to something other than the preferred skin for the selected default page template may produce unexpected results.
To change the skin for a portal:
-
On the Settings page in portal administration (see Section 7.3.1, "Accessing Look and Feel Settings for a Portal"), under Assets, select a new Skin (Figure 7-18).
Figure 7-18 Choosing a Skin for a Portal
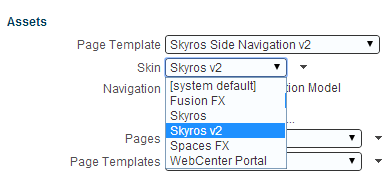
Description of ''Figure 7-18 Choosing a Skin for a Portal''
The skins that are listed are those that are made available to the portal on the Shared Assets or Assets page (see Section 20.5.3, "Showing and Hiding Assets"). The [system default] selection applies the skin specified as the default for all portals by the system administrator, as described in the "Choosing a Default Skin" section in Administering Oracle WebCenter Portal.
You can add custom skins for the portal to this list by copying an existing skin into a new skin. For more information, see Section 7.5, "Administering All Assets in a Portal."
Note:
If you create a new skin for a portal, the custom skin is not shown in the Skin list for subportals of the portal. To set the skin for a subportal to the same skin used by its parent portal, you must use an EL expression. If you need EL assistance, an application developer can provide an EL expression; see the "Expression Language Expressions" appendix in Developing Portals with Oracle WebCenter Portal and Oracle JDeveloper.To make a custom skin available in the Skin list for all portals and subportals, it must be created as a shared asset for all portals (see Section 59.3, "Creating Shared Assets").
An Expression Editor is available for entering custom values using Expression Language (EL) expression, allowing a skin to be determined dynamically based on certain criteria. Click the
 icon next to the Skin drop-down list, then select Expression Builder to open the editor. If you need EL assistance, an application developer can provide an EL expression; see the "Expression Language Expressions" appendix in Developing Portals with Oracle WebCenter Portal and Oracle JDeveloper
7.3.4 Changing the Navigation for a Portal
Navigation enables portal members to see what information the portal provides and to get to that information quickly and easily. For more information about portal navigation, see Chapter 22, "Working with Navigation Models."
The navigation model for a portal is part of the portal definition, including the portal page and security information. Therefore, as shown in Figure 7-19, it is not possible to change to a different navigation model for a portal. However, can change a portal's navigation in the following ways:
-
To edit the default navigation model for a portal, see Section 22.3.1, "Editing the Portal Default Navigation Model in the Portal Editor."
-
To alter the way in which the navigation displays (for example, in a side pane, or in tabs along the top of the portal), see Section 7.3.2, "Changing the Page Template for a Portal."
-
To add and remove items from the portal navigation, see Section 22.3.3, "Adding Items to a Navigation Model."
Figure 7-19 Default Navigation for a Portal
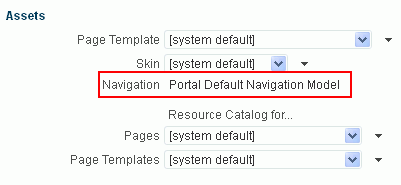
Description of ''Figure 7-19 Default Navigation for a Portal''
7.3.5 Changing the Resource Catalogs for Pages and the Page Template for a Portal
When you edit a page or page template in a portal, the resource catalog exposes the resources that you can select to add to the page or page template. For more information about resource catalogs, see Chapter 23, "Working with Resource Catalogs."
WebCenter Portal provides two out-of-the-box resource catalogs for pages and the page templates in a portal:
-
Default Portal Catalog for editing individual pages and task flows in a portal.
-
Default Page Template Catalog for editing page templates. Note that all pages in a portal use the same page template, though there may be several page templates available as portal assets.
Alternatively, portal designers can develop custom resource catalogs, as described in Section 23.4, "Creating a Resource Catalog." Within a portal, you can create a new resource catalog from scratch or copy an existing resource catalog into a new resource catalog, as described below and in Section 7.5, "Administering All Assets in a Portal."
You can optionally select different resource catalogs for the portal, overriding the Added inline graphic icon, which can be seen in figure above settings.
To change the resource catalogs used to edit pages or the page template in a portal:
-
On the Settings page in portal administration (see Section 7.3.1, "Accessing Look and Feel Settings for a Portal"), under Assets, select a new resource catalog from the Resource Catalog for Pages or Resource Catalog for Page Templates lists (Figure 7-20).
Figure 7-20 Choosing a Resource Catalog for a Portal
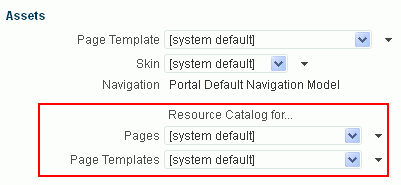
Description of ''Figure 7-20 Choosing a Resource Catalog for a Portal''
The [system default] selection applies the resource catalogs specified as the default for all portals by the system administrator, as described in the "Choosing Default Resource Catalogs" section in Administering Oracle WebCenter Portal.
You can add custom resource catalogs for the portal to this list by creating a new resource catalog from scratch or by copying an existing resource catalog into a new resource catalog. For more information, see Section 7.5, "Administering All Assets in a Portal."
Note:
If you create a new resource catalog for a portal, the custom resource catalog is not shown in the Resource Catalog lists for subportals of the portal. To set the resource catalogs for a subportal to the same resource catalogs used by its parent portal, you must use an EL expression. If you need EL assistance, an application developer can provide an EL expression; see the "Expression Language Expressions" appendix in Developing Portals with Oracle WebCenter Portal and Oracle JDeveloper.To make a custom resource catalog available in the Resource Catalog lists for all portals and subportals, it must be created as a shared asset for all portals (see Section 59.3, "Creating Shared Assets").
An Expression Editor is available for entering custom values using Expression Language (EL) expression, allowing the resource catalog to be determined dynamically based on certain criteria. Click the
 icon next to the Resource Catalog drop-down list, then select Expression Builder to open the editor. If you need EL assistance, an application developer can provide an EL expression; see the "Expression Language Expressions" appendix in Developing Portals with Oracle WebCenter Portal and Oracle JDeveloper
7.3.6 Setting Page Behavior for a Portal When No Page Variant Exists
portalportalPage variants are alternative views of an existing page for specific device groups to target specific device size and characteristics. The base page and the page variant have the same URL, security, parameters, and so on.
When using a device (such as a tablet or an iPhone) in a device group that does not have a page variant defined, and the device group is not the default device group for the portal, the page fallback setting determines how to render the page when it is viewed on that device. As the portal moderator, you can set the page fallback behavior for all pages in the portal. To override the portal-level setting for an individual page, see Section 13.10, "Setting Page Behavior for a Specific Page When No Page Variant Exists."
This setting is honored based on the following rules:
-
If the request is from a device in the default device group for the portal, then the default (base) page will be displayed no matter what is set for Page Fallback. The default setting always overrides the Page Fallback setting. See Section 9.3.3, "Setting a Default Device Group."
Note:
This means that even if there is a page variant for the device group, the default (base) page will be displayed. -
If the request is from a device that is not in the default device group for the portal, then:
-
If there is a page variant for that device group, the page variant is displayed on the device.
-
If no page variant exists for the device group, then the Page Fallback setting is used by the device
-
See Also:
-
Section 12.1.3, "Filtering a Portal Page Listing by Device Group"
-
Section 13.10, "Setting Page Behavior for a Specific Page When No Page Variant Exists"
At the application-level, your system administrator performs the following tasks described in Administering Oracle WebCenter Portal:
-
Configures device group settings, as described in the "Administering Device Settings" chapter
-
Creates page variants for system pages, as described in the "Creating a Page Variant of a System Page for Device Groups" section
To set the fallback behavior for all pages in the portal when displayed on a device in a device group that does not have a page variant defined, and the device group is not the default device group for the portal:
-
On the Settings page in portal administration (see Section 7.3.1, "Accessing Look and Feel Settings for a Portal"), under Devices, select the required Page Fallback setting (Figure 7-21):
-
Display default page to display the original base page on the device.
-
Display no page to display the Page Not Available page on the device.
Figure 7-21 Setting Page Fallback Behavior When No Page Variant Exists for Current Device

Description of ''Figure 7-21 Setting Page Fallback Behavior When No Page Variant Exists for Current Device''
-
-
Click Save.
Note:
A portal member with theBasic Services: Edit Page Access, Structure, and Content permission can override the default setting by changing the fallback behavior for the individual page, as described in Section 13.10, "Setting Page Behavior for a Specific Page When No Page Variant Exists."7.3.7 Displaying or Hiding a Page Footer in a Portal
A page footer can display copyright details for the portal and a link to its Privacy Statement.
To display or hide a page footer for a portal:
-
On the Settings page in portal administration (see Section 7.3.1, "Accessing Look and Feel Settings for a Portal"), under Options, select the Footer check box to display a page footer (Figure 7-22), or deselect the check box to hide the page footer.
Figure 7-22 Displaying or Hiding the Page Footer in a Portal

Description of ''Figure 7-22 Displaying or Hiding the Page Footer in a Portal''
-
Click Save.
7.3.8 Customizing the Copyright Statement and Privacy URL in a Portal
When enabled, the copyright statements and URL to the privacy statement specific to the portal display in the page footer of the portal (Figure 7-23 and Figure 7-24):
Figure 7-23 WebCenter Portal Copyright Statement
Description of ''Figure 7-23 WebCenter Portal Copyright Statement''
Figure 7-24 WebCenter Portal Privacy URL in Page Footer
Description of ''Figure 7-24 WebCenter Portal Privacy URL in Page Footer''
To customize the copyright statement and privacy URL for a portal:
-
On the Settings page in portal administration (see Section 7.3.1, "Accessing Look and Feel Settings for a Portal"), under Options, select Footer to display the area at the bottom of the portal for the copyright statement and privacy URL (Figure 7-25). Deselect the check box to hide the page footer, including the copyright statement and privacy URL.
Figure 7-25 Customizing the Copyright Statement and Privacy URL

Description of ''Figure 7-25 Customizing the Copyright Statement and Privacy URL''
-
In the Copyright and Privacy URL fields, enter appropriate values.
-
Click Save.
7.3.9 Setting a Portal Display Language
You can optionally set a portal display language to control the language in which the user interface (UI) elements of a particular portal render in WebCenter Portal. UI elements include button and field labels, application links, screen text, and so on.
For more information about working with languages in WebCenter Portal, and the different levels at which a display language can be set, see Chapter 61, "Translating Portals into Other Languages."
Within the scope of viewing a portal, the portal display language setting is given precedence over all other language settings. For example, if a portal named Sales Team has its display language set to English, and Monica (a member of Sales Team) has set her personal user preference language (on her Preferences page) to Dutch, assuming no other language settings are in effect:
-
Monica views the Sales Team portal in English, and cannot change this language setting.
-
Monica views other parts of WebCenter Portal, outside the Sales Team portal, in Dutch.
Note:
If you create a portal based on a portal template that is defined to use a specific language, that language setting is not inherited by the portal. Instead, the initial language setting for a new portal is based on the order of precedence described in Section 61.1.2, "Display Language Precedence.".To set a portal display language:
-
On the Settings page in portal administration (see Section 7.3.1, "Accessing Look and Feel Settings for a Portal"), under Options, select a language for the portal from the Default Language list (Figure 7-26).
Figure 7-26 Setting the Portal Display Language

Description of ''Figure 7-26 Setting the Portal Display Language ''
-
An Expression Editor is available for entering custom values using Expression Language (EL) expression, allowing the language to be determined dynamically based on certain criteria. Click the
 icon next to the Language drop-down list, then select Expression Builder to open the editor. If you need EL assistance, an application developer can provide an EL expression; see the "Expression Language Expressions" appendix in Developing Portals with Oracle WebCenter Portal and Oracle JDeveloper
 -
To customize the languages displayed in the Default Language list, click Customize. For example, your WebCenter Portal application might be available in 27 different languages, but you may only need to display the content in your portal in three or four different languages, so you could filter the list to display a subset of languages.
7.3.10 Changing the Portal Icon
The portal icon displays alongside the portal display name in menus and smaller areas. For example, it may display on the Portals menu (Figure 7-27) at the top of the portal (Figure 7-28), or on the Portals page in Portal Builder (Figure 7-29).
Figure 7-28 Portal Icon at Top of Portal
Description of ''Figure 7-28 Portal Icon at Top of Portal''
Figure 7-29 Portal Icon on Portals Page in Portal Builder
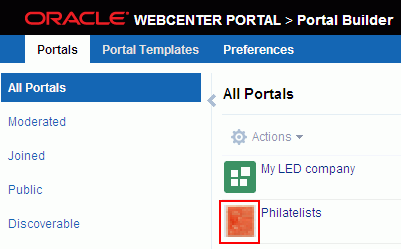
Description of ''Figure 7-29 Portal Icon on Portals Page in Portal Builder''
A default icon is provided by the template used when you create the portal, but you can assign a different icon if desired.
To change the portal icon:
-
On the Settings page in portal administration (see Section 7.3.1, "Accessing Look and Feel Settings for a Portal"), under Icon and Logo, click Change next to the current portal icon t(Figure 7-30) o open the Select an Icon dialog (Figure 7-31).
-
In the Select Icon dialog, either:
-
Select Upload image, then Browse to navigate to the icon you want to use.
The icon image file can be up to 150 KB, and should be no larger than 16 x 16 pixels for best results. Supported file formats are
.gifor.GIF,.pngor.PNG, and.jpgor.JPG. If the file is not uploading, check the size of the file you are trying to upload. The file name must contain alphanumeric characters only. -
Select Enter URL to image, then enter the URL to an icon image (beginning with
http://).
-
-
Click OK.
7.3.11 Changing the Portal Logo
The portal logo displays alongside the portal name in larger areas. For example, it may display on the Portals page in the Home portal (portal browser) (Figure 7-32).
Figure 7-32 Portal Logo on Portals Page in the Home Portal (Portal Browser)
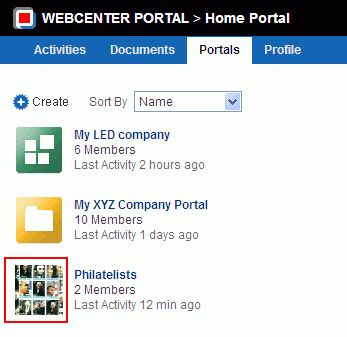
Description of ''Figure 7-32 Portal Logo on Portals Page in the Home Portal (Portal Browser)''
A default logo is provided by the template used when you create the portal, but you can assign a different logo if desired.
To change a portal logo:
-
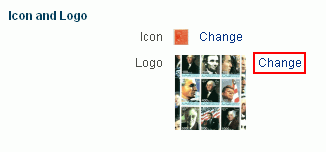
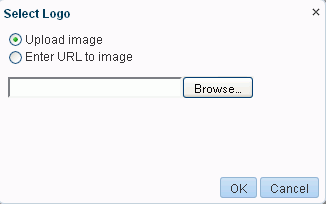
On the Settings page in portal administration (see Section 7.3.1, "Accessing Look and Feel Settings for a Portal"), under Icon and Logo, click Change next to the current portal logo (Figure 7-33) to open the Select a Logo dialog (Figure 7-34).
-
In the Select Logo dialog, either:
-
Select Upload image, then Browse to navigate to the logo you want to use.
The logo image file can be up to 150 KB, and should be no larger than 64 x 64 pixels for best results. Supported file formats are
.gifor.GIF,.pngor.PNG, and.jpgor.JPG. If the file is not uploading, check the size of the file you are trying to upload. The file name must contain alphanumeric characters only. -
Select Enter URL to image, then enter the URL to a logo image (beginning with
http://).
-
-
Click OK.
7.4 Administering All Pages in a Portal
portalPermissions:
To administer pages in a portal, you need at least the following portal-level permissions:-
Manage Security and Configuration -
Basic Services: Edit Page Access and Structure
A portal moderator has these permissions by default.
For more information about permissions, see Section 29.1, "About Roles and Permissions for a Portal."
The Pages page in portal administration allows you to create pages and subpages in the current portal, as well as add and manage pages and other navigation items to the portal navigation. The following sections describe the Pages page tasks:
-
Section 7.4.1, "Accessing Pages Administration for a Portal"
-
Section 7.4.2, "Working with Portal Pages (from Portal Administration)"
7.4.1 Accessing Pages Administration for a Portal
To access the pages administration for a portal:
-
In the portal administration (see Section 7.1, "Accessing Portal Administration"), click Pages in the left navigation pane.
You can also enter the following URL in your browser to navigate directly to the Pages page:
http://host:port/webcenter/portal/portalName/admin/pagesThe Pages page in the portal administration displays one of the following views:
-
Release 11.1.1.8.0 and later portals. If your portal is based on a portal template from WebCenter Portal 11.1.1.8.0 or later, either an out-of-the-box template (see Table 3-1, "Out-of-the-Box Portal Templates and Categories") or a custom template, you will see a view similar to Figure 7-35.
See Also:
Section 3.1, "About Portal Templates"To manage pages, see Section 7.4.2, "Working with Portal Pages (from Portal Administration)."
Figure 7-35 Portal Administration: Pages Page (11.1.1.8.0 or later portal template)
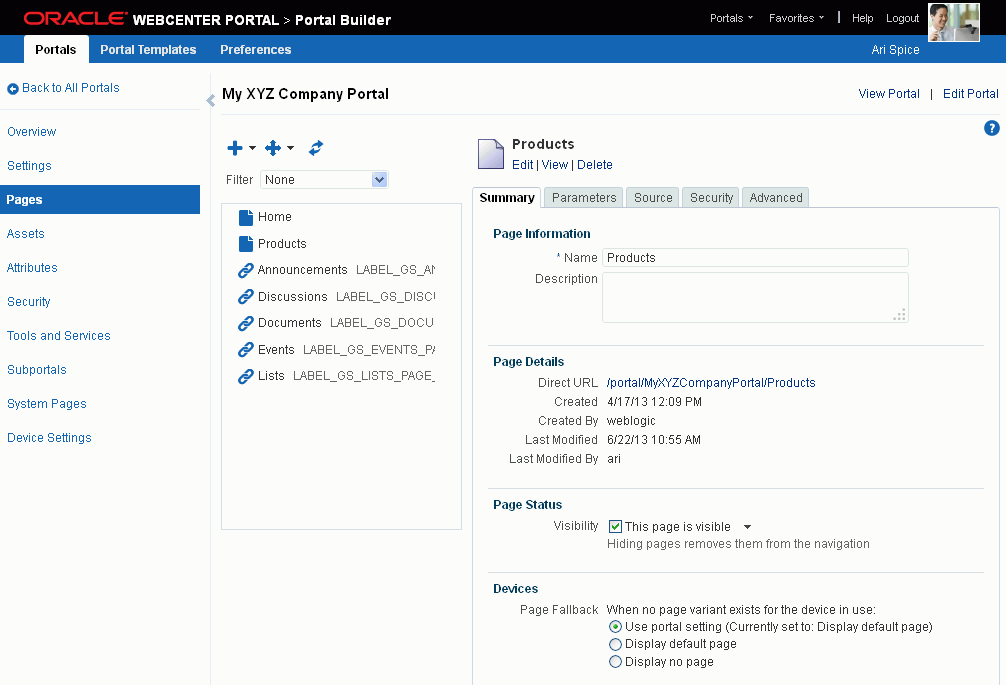
Description of ''Figure 7-35 Portal Administration: Pages Page (11.1.1.8.0 or later portal template)''
-
Pre-11.1.1.8.0 portals. If your portal is based on a portal (space) template from a release prior to WebCenter Portal release 11.1.1.8.0 and you have not upgraded it to release 11.1.1.8.0 or later (for example, if you simply upgrade WebCenter Portal from a pre-11.1.1.8.0 release, which carries over any portals built in that release), you will see a view similar to Figure 7-36. Note that this view does not include a Device Settings page, and there is no support for hierarchical pages (subpages), page variants, or device preview.
Figure 7-36 Portal Administration: Pages Page (for pre-11.1.1.8.0 portals)
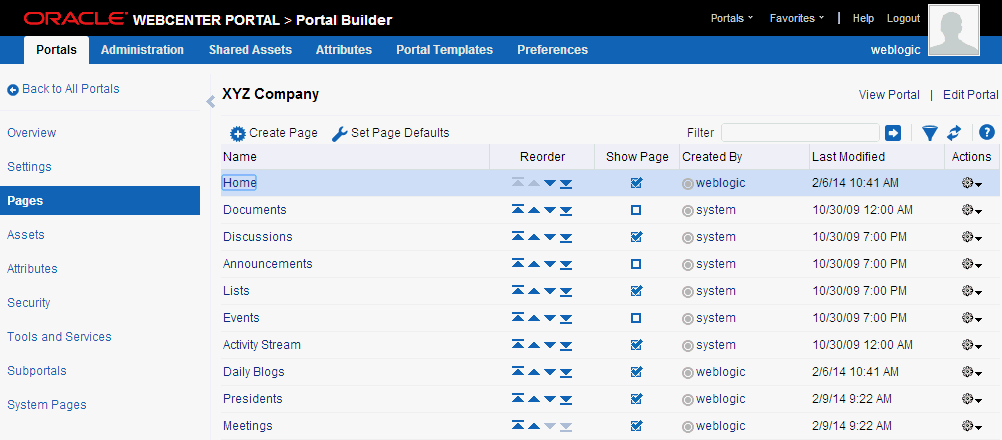
Description of ''Figure 7-36 Portal Administration: Pages Page (for pre-11.1.1.8.0 portals) ''
To upgrade a pre-11.1.1.8.0 portal (space) to support the full functionality of WebCenter Portal 11.1.1.8.0 and later releases, see Section 7.2.9, "Upgrading a Pre-11.1.1.8.0 Portal." Note that you can also continue to work with pre-11.1.1.8.0 portals in the current release without upgrading them.
-
7.4.2 Working with Portal Pages (from Portal Administration)
As an application specialist, portal moderator, or member with Manage Configuration permission in the portal, you can manage all the pages of a portal. The tasks are the same as those that can be performed in the portal editor by portal members with the portal-level Basic Services: Edit Page Access, Structure, and Content permission.
From the Pages page in portal administration (see Section 7.4.1, "Accessing Pages Administration for a Portal"), you can perform the following tasks:
-
Create a new page, subpage, or page variant. See Section 12.2.2, "Creating a Page or Subpage in an Existing Portal" and Section 12.3, "Creating a Page Variant for a Device Group."
-
Edit the selected page, including page background and layout. See Section 12.4, "Editing a Page."
-
Add existing resources to the navigation. See Section 13.2, "Adding an Existing Page to the Portal Navigation" and Section 22.3.3, "Adding Items to a Navigation Model."
-
Rearrange pages in the portal navigation. See Section 13.3, "Adjusting Page Order and Hierarchy in the Portal Navigation."
-
Copy a page to create a new page. Make a personal copy of a page. See Section 13.4, "Copying a Page."
-
Delete a page. See Section 13.5, "Deleting a Page."
-
View details about a page. See Section 13.6, "Viewing Information About a Page."
-
Rename a page. See Section 13.7, "Renaming a Page."
-
Edit a page description. See Section 13.8, "Entering or Changing a Page Description."
-
Show or hide a page in the portal navigation. See Section 13.9, "Showing or Hiding a Page in the Portal Navigation."
-
Set the fallback behavior when a page is displayed on a device. See Section 13.10, "Setting Page Behavior for a Specific Page When No Page Variant Exists."
-
Add a page parameter. See Section 13.11, "Adding or Modifying Page Parameters."
-
Modify the selected page layout. See Section 13.12, "Adjusting the Widths of Page Columns."
-
Add a header or footer to the selected page. See Section 13.13, "Adding a Page Header and Footer."
-
View and edit page source code. See Section 13.14, "Viewing and Modifying Page Source Code."
-
Set security for a page. See Section 13.15, "Setting Page Security."
-
Set navigation options for a page. See Section 13.16, "Setting Navigation Properties and Display Options for a Page."
7.5 Administering All Assets in a Portal
The Assets page in portal administration allows you to manage the assets for the portal, such as page templates, resource catalogs, and skins. The following sections describe the Assets page tasks:
-
Section 7.5.1, "Accessing Assets Administration for a Portal"
-
Section 7.5.2, "Working with Assets in Portal Administration"
7.5.1 Accessing Assets Administration for a Portal
To access the assets administration for a portal:
-
In the portal administration (see Section 7.1, "Accessing Portal Administration"), click Assets in the left navigation pane (Figure 7-37).
You can also enter the following URL in your browser to navigate directly to the Assets page:
http://host:port/webcenter/portal/portalName/admin/assetsFigure 7-37 Portal Administration: Assets
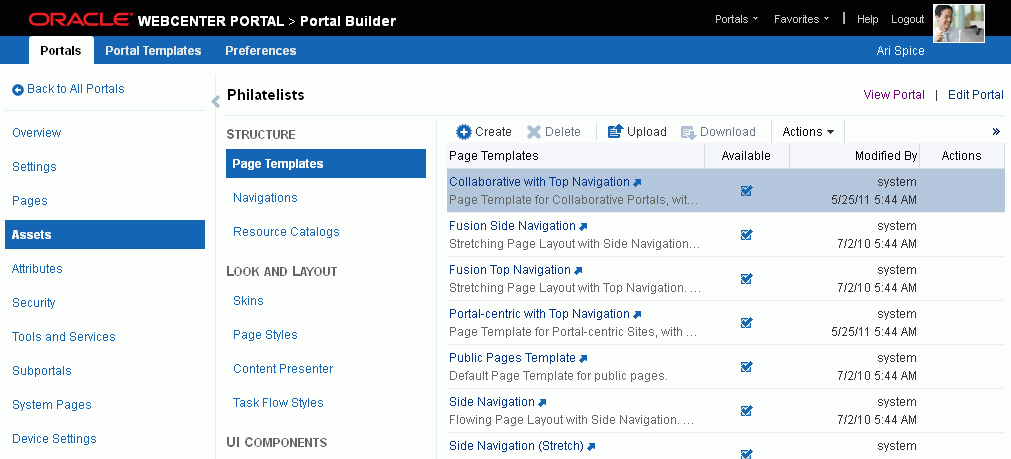
Description of ''Figure 7-37 Portal Administration: Assets''
7.5.2 Working with Assets in Portal Administration
7.6 Administering Attributes in a Portal
The Attributes page in portal administration allows you to define custom attributes for the portal. The following sections describe the Attributes page tasks:
-
Section 7.6.1, "Accessing Attributes Administration for a Portal"
-
Section 7.6.2, "Working with Attributes in Portal Administration"
7.6.1 Accessing Attributes Administration for a Portal
To access the attributes administration for a portal:
-
In the portal administration (see Section 7.1, "Accessing Portal Administration"), click Attributes in the left navigation pane (Figure 7-38).
You can also enter the following URL in your browser to navigate directly to the Attributes page:
http://host:port/webcenter/portal/portalName/admin/attributesFigure 7-38 Portal Administration: Attributes
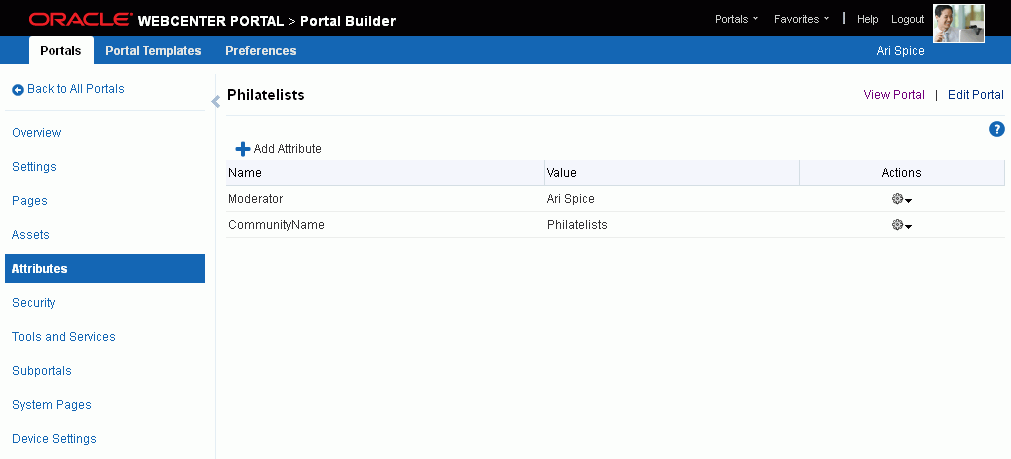
Description of ''Figure 7-38 Portal Administration: Attributes''
7.6.2 Working with Attributes in Portal Administration
This section contains the following topics:
7.6.2.1 About Portal Attributes
Every portal includes built-in attributes such as name, description, date created, icon, and so on. In addition to these built-in attributes, you can add custom attributes that are unique to the portal and its characteristics to specify additional portal information (metadata). Custom attributes are propagated throughout the portal.
In addition to portal-specific attributes, system administrators can define global custom attributes, which are available for use by any portal, as described in the "Working with Global Attributes Across Portals" chapter in Administering Oracle WebCenter Portal.
A custom attribute is simply a name value pair (such as customerId=400, orderId=11, or userName=Smith). The custom attribute name is unique within a portal. For example, if you build a portal for customer analysis purposes, it might contain several custom task flows that take the parameter customerId as an input: task flows such as Customer Sales History, Customer Satisfaction Rating, Future Sales Prospects, or Customer Contact Information. With a custom attribute defined named customerId with an appropriate value, all the task flows that can accept a customerId can display information specific to that customer.
A custom attribute can also be retrieved using Expression Language (EL) expressions. For example, an EL expression may read a value that is passed in through the URL that displays a portal (for example, customerid=10). Any portal pages, task flows, or portlets that deliver customized content based on parameter values can accept global custom attribute values and display content accordingly using the following Expression Language (EL) syntax to access the global custom attribute value:
-
For portal-specific attributes:
#{spaceContext.currentSpace.metadata.customAttributes[attributeName]} -
For global attributes:
#{WCAppContext.application.applicationConfig.customAttributes[attributeName]
For more information, see Section 19.4, "Passing Parameter Values Through the Page URL." If you need EL assistance, an application developer can provide an EL expression; see the "Expression Language Expressions" appendix in Developing Portals with Oracle WebCenter Portal and Oracle JDeveloper.
When you create a new portal that is based on a portal template that includes custom attributes, the new portal inherits the template's custom attributes and their values. You can enter new values for the attributes when you create the new portal.
7.6.2.2 Adding a Portal Attribute
To add a custom attribute for a portal:
-
On the Attributes page (see Section 7.6.1, "Accessing Attributes Administration for a Portal"), click Add Attribute (Figure 7-39).
Figure 7-39 Portal Administration: Add Attribute
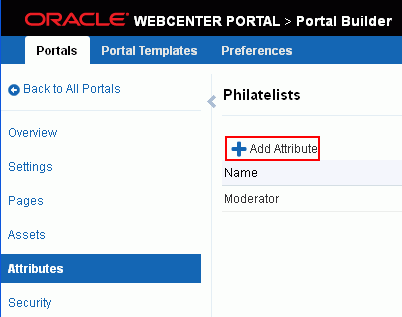
Description of ''Figure 7-39 Portal Administration: Add Attribute''
The Add Attribute dialog opens (Figure 7-40).
Figure 7-40 Entering Custom Attribute Name and Value
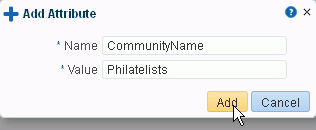
Description of ''Figure 7-40 Entering Custom Attribute Name and Value''
-
Enter a unique Name for the attribute. Valid names start with an alphabetic character and contain only alphanumeric characters.
-
Enter a Value for the custom attribute. The value you type is treated as a string value.
-
Click Add to save the custom attribute and display it in the list on the Attributes page.
7.6.2.3 Editing a Portal Attribute
To edit a custom attribute for a portal:
-
On the Attributes page (see Section 7.6.1, "Accessing Attributes Administration for a Portal"), click the Actions icon for the attribute and select Edit Attribute.
-
In the Edit Attribute dialog, modify the attribute Value. The value you type is treated as a string value.
-
Click OK to save your changes.
7.6.2.4 Deleting a Portal Attribute
To delete a global attribute:
-
On the Attributes page (see Section 7.6.1, "Accessing Attributes Administration for a Portal"), click the Actions icon for the attribute and select Delete Attribute.
-
In the confirmation dialog, click Delete.
7.7 Administering Security in a Portal
portalPermissions:
To administer security in a portal, you need at least the following portal-level permissions:-
Manage Security and Configuration -
Manage Membership
A portal moderator has these permissions by default.
For more information about permissions, see Section 29.1, "About Roles and Permissions for a Portal."
The Security page in portal administration allows you to set security on the portal, such as access level, defining roles and permissions, and managing membership. The following sections describe the Security page tasks:
7.7.1 Accessing Security Administration for a Portal
To access the security administration for a portal:
-
In the portal administration (see Section 7.1, "Accessing Portal Administration"), click Security in the left navigation pane (Figure 7-41).
You can also enter the following URLs in your browser to navigate directly to the Security subpages:
http://host:port/webcenter/portal/portalName/admin/roleshttp://host:port/webcenter/portal/portalName/admin/membersFigure 7-41 Portal Administration: Security
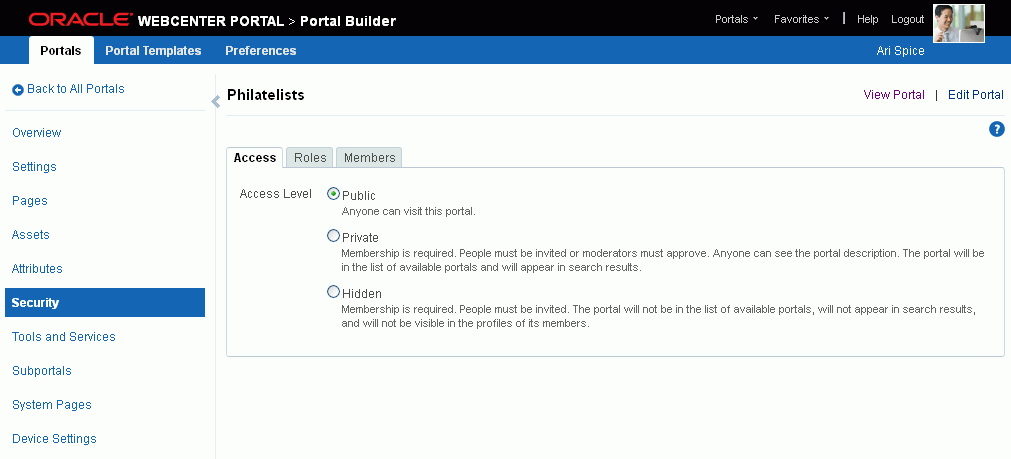
Description of ''Figure 7-41 Portal Administration: Security''
7.7.2 Changing the Access to a Portal
Access to a portal is defined when the portal is created (see Section 2.1, "About Creating a New Portal"). This access can be changed to make the portal more visible or less visible.
To change the access to a portal:
-
On the Security page (see Section 7.7.1, "Accessing Security Administration for a Portal"), click the Access subtab and select how you want the portal to be exposed:
Figure 7-42 Security Page for a Portal: Access Subpage

Description of ''Figure 7-42 Security Page for a Portal: Access Subpage''
-
Public: Anyone can visit the portal, whether they are a registered WebCenter Portal user or not. When this setting is selected, the
Public-Userrole in the portal is automatically grantedView Pages and Contentpermission in the portal, which allows public users to view pages, lists, events, links, and notes. To grant public users permissions to view announcements, discussions, and documents, you need to grant these permissions, as described in Section 4.5, "Granting Public Access to a Portal." -
Private: To access the portal, membership is required (either through invitation or self-registration if enabled). The portal will be shown in the list of available portals on the Portals page and will appear in search results.
-
Hidden: To access the portal, membership is required (through invitation). The portal will not be shown in the list of available portals on the Portals page and will not appear in search results.
-
-
Click Save.
7.7.3 Managing Roles and Permissions in a Portal
To manage the roles for assigning permissions in a portal:
-
On the Security page (see Section 7.7.1, "Accessing Security Administration for a Portal"), click the Roles subtab.
-
To work with portal roles, refer to Chapter 29, "Managing Roles and Permissions for a Portal."
7.7.4 Managing Members in a Portal
To manage the membership in a portal:
-
On the Security page (see Section 7.7.1, "Accessing Security Administration for a Portal"), click the Members subtab.
-
To work with portal membership, refer to Chapter 30, "Managing Members and Assigning Roles in a Portal."
7.8 Administering Tools and Services in a Portal
The Tools and Services page in portal administration allows you to enable and disable tools and services operating in the portal, such as Announcements, Discussions, Documents, Events, and Lists. The following sections describe the Tools and Services page tasks:
-
Section 7.8.1, "Accessing Tools and Services Administration for a Portal"
-
Section 7.8.2, "Working with Tools and Services in Portal Administration"
7.8.1 Accessing Tools and Services Administration for a Portal
To access the tools and services administration for a portal:
-
In the portal administration (see Section 7.1, "Accessing Portal Administration"), click Tools and Services in the left navigation pane (Figure 7-43).
You can also enter the following URL in your browser to navigate directly to the Tools and Services page:
http://host:port/webcenter/portal/portalName/admin/servicesFigure 7-43 Portal Administration: Tools and Services
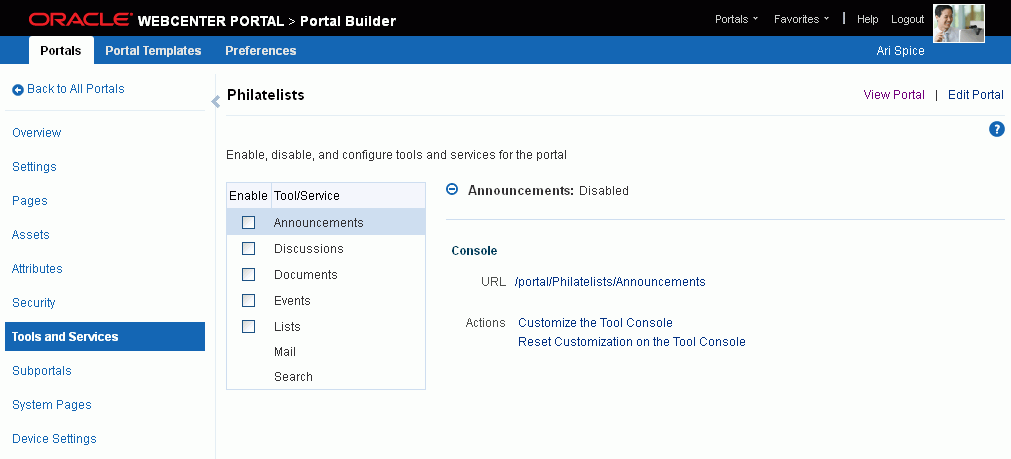
Description of ''Figure 7-43 Portal Administration: Tools and Services''
7.8.2 Working with Tools and Services in Portal Administration
Most tools and services configuration is the responsibility of the system administrator, who configures and maintains connections to make the tools and services available in WebCenter Portal, as described in the "Managing Tools and Services" chapter in Administering Oracle WebCenter Portal. Also see
You can check the Tools and Services page for a portal to see which tools and services are available, and enable or disable as required. If not shown on the Tools and Services page, then the system administrator has not configured that tool or service connection. When you enable a tool or service in a portal, you are automatically granted Manage permissions on that tool or service.
To work with the tools and service for a portal, see Part II, "Working with Portal Tools and Services."
7.9 Administering Subportals in a Portal
The Subportals page in portal administration allows you to manage the subportals of the current parent portal. The following sections describe the Subportals page tasks:
-
Section 7.9.1, "Accessing Subportals Administration for a Portal"
-
Section 7.9.2, "Working with Subportals in Portal Administration"
7.9.1 Accessing Subportals Administration for a Portal
To access the subportals administration for a portal:
-
In the portal administration (see Section 7.1, "Accessing Portal Administration"), click Subportals in the left navigation pane (Figure 7-44).
You can also enter the following URL in your browser to navigate directly to the Subportals page:
http://host:port/webcenter/portal/portalName/admin/subportalsFigure 7-44 Portal Administration: Subportals
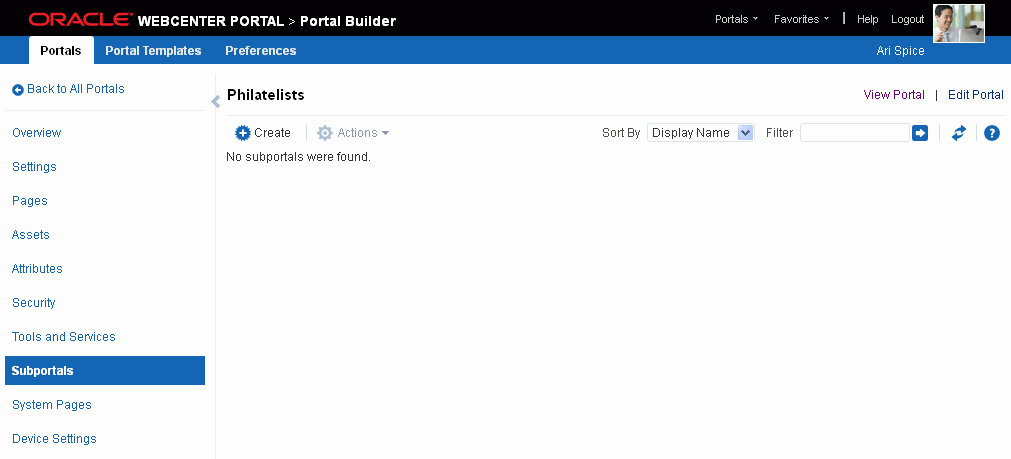
Description of ''Figure 7-44 Portal Administration: Subportals''
7.9.2 Working with Subportals in Portal Administration
To work with the subportals of the current parent portal, see Chapter 5, "Working with Subportals."
7.10 Administering System Pages in a Portal
The System Pages page in portal administration allows you to customize the system pages for a portal. The following sections describe the System Pages page tasks:
-
Section 7.10.1, "Accessing System Pages Administration for a Portal"
-
Section 7.10.2, "Working with System Pages in Portal Administration"
7.10.1 Accessing System Pages Administration for a Portal
To access the system pages administration for a portal:
-
In the portal administration (see Section 7.1, "Accessing Portal Administration"), click System Pages in the left navigation pane (Figure 7-45).
You can also enter the following URL in your browser to navigate directly to the System Pages page:
http://host:port/webcenter/portal/portalName/admin/systempagesFigure 7-45 Portal Administration: System Pages
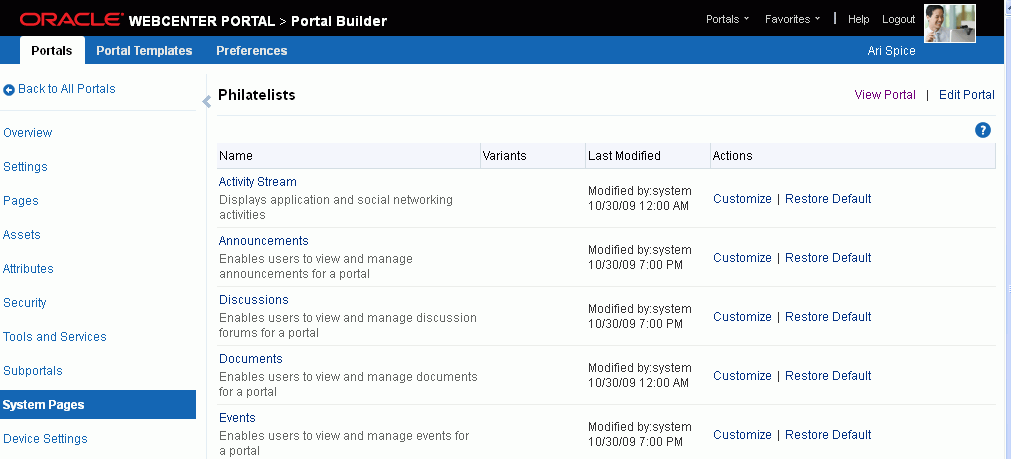
Description of ''Figure 7-45 Portal Administration: System Pages''
7.10.2 Working with System Pages in Portal Administration
To work with the system pages for a portal, see Chapter 8, "Customizing System Pages for a Portal."
7.11 Administering Device Settings in a Portal
The Device Settings page in portal administration allows you to control how portals render on different kinds of devices including desktop browsers, smart phones, and tablets.The following sections describe the Device Settings page tasks:
-
Section 7.11.1, "Accessing Device Settings Administration for a Portal"
-
Section 7.11.2, "Working with Device Settings in Portal Administration"
7.11.1 Accessing Device Settings Administration for a Portal
To access the device settings administration for a portal:
-
In the portal administration (see Section 7.1, "Accessing Portal Administration"), click Device Settings in the left navigation pane (Figure 7-46).
You can also enter the following URL in your browser to navigate directly to the Device Settings page:
http://host:port/webcenter/portal/builder/portals/admin/portalName/deviceFigure 7-46 Portal Administration: Device Settings
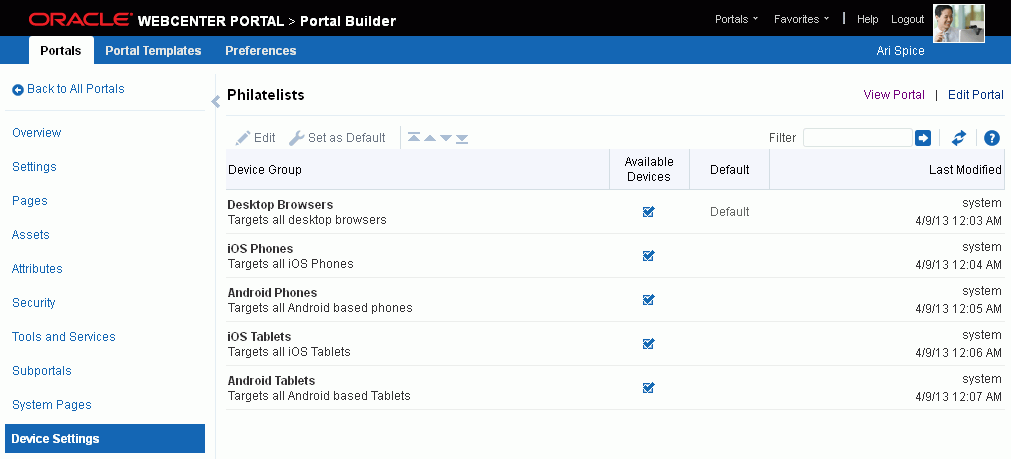
Description of ''Figure 7-46 Portal Administration: Device Settings''
7.11.2 Working with Device Settings in Portal Administration
To work with device settings for a portal, see Chapter 9, "Managing Device Groups for a Portal."

