8 Understanding the WebCenter Portal Framework Application Life Cycle
This chapter discusses tasks, tools, and techniques for managing a WebCenter Portal Framework application throughout its life cycle.
This chapter includes the following topics:
-
Section 8.1, "What Is the WebCenter Portal Framework Application Life Cycle?"
-
Section 8.4, "Understanding the Build and Test Environments"
-
Section 8.5, "Understanding the Staging and Production Environments"
-
Section 8.9, "Setting Up a Staging or Production Environment for the First Time"
-
Section 8.10, "Moving a WebCenter Portal Framework Application to an Existing Environment"
-
Section 8.12, "Deploying and Configuring the Application on Targeted Servers"
-
Section 8.13, "Using the Propagation Tool to Propagate From Staging to Production"
-
Section 8.14, "Propagating Content From Oracle WebCenter Content"
8.1 What Is the WebCenter Portal Framework Application Life Cycle?
The WebCenter Portal Framework application life cycle refers to the path a Framework Portal application takes from development through production. The phases of the life cycle typically include development, testing, staging, and production. Each phase requires certain tasks to be performed. Some tasks are performed only once, like setting up a content repository. Others are performed more frequently, like nightly builds. The phases of the portal life cycle are described in Table 8-1.
Table 8-1 WebCenter Portal Framework Application Life Cycle Phases
| Life Cycle Phase | Primary Actors/Roles | Description |
|---|---|---|
|
Development |
|
The development portal is primarily source control and file-based. Developers work locally in JDeveloper and deploy to the Integrated WebLogic server. The development portal typically employs test data and content. Some of the features that are developed in this phase of the life cycle include:
The code from the development environment is built (usually nightly) and deployed to a clean, independent, targeted environment. WebCenter provides a build script that can be adapted for this purpose. See Section 8.8, "Configuring a Nightly Build Script." |
|
Testing |
|
The development portal is built (usually nightly) and deployed to an independent testing environment. The test environment typically includes a Metadata Service (MDS) and policy store that are database-based, and a dedicated Oracle WebCenter Content instance. The testing environment may contain test data and test content that will not become part of the production portal. Portlet producers may be shared between the test and development environments. However, if the usage load is high, Oracle recommends that separate instances be created. |
|
Staging |
|
The staging environment provides a stable environment where final configuration and testing takes place before the portal is moved to production. Content contributors add content and refine the portal structure. Typically, the staging environment includes a dedicated Oracle WebCenter Content server, as well as dedicated portlet producer server(s). The staging server is often maintained as a mirror of the production site. |
|
Production |
|
A production portal is live and available to end users. A portal in production can be modified with tools like the Resource Manager and Oracle WebCenter Portal's Composer. For instance, an administrator might add additional portlets to a portal or reconfigure the contents of a portal. Individual users with proper authorization can also customize their view. See Administering Oracle WebCenter Portal. WebCenter provides a propagation tool for migrating metadata to the production environment. See Section 8.13, "Using the Propagation Tool to Propagate From Staging to Production." Content is provisioned using Oracle WebCenter Content replication tools. See Section 8.14, "Propagating Content From Oracle WebCenter Content." WebCenter provides WLST commands for importing and exporting portlet preferences. For more information, see Section 8.16, "Migrating Portlet Preferences." |
8.2 What Are the Major Life Cycle Tasks?
Each phase of the life cycle requires actors (developers, administrators, content contributors, and others) to perform certain tasks. This section provides an overview of the kinds of tasks that are performed during each phase of the portal life cycle.
8.2.1 One-Time Setup Tasks
You must perform certain preparatory steps to set up the development, build/test, stage, and production environments. Table 8-2 provides a general list of these preliminary setup tasks and the environments to which they apply. See also Section 8.8, "Configuring a Nightly Build Script" and Section 8.9, "Setting Up a Staging or Production Environment for the First Time."
Table 8-2 Typical One-Time Setup Tasks
| Setup Task | Development | Build/Test | Stage | Production |
|---|---|---|---|---|
|
Install JDeveloper |
Yes |
No |
No |
No |
|
Install Oracle WebCenter Portal |
Yes |
Yes |
Yes |
Yes |
|
Install Oracle WebLogic Server; create a domain and managed servers |
No |
Yes |
Yes |
Yes |
|
Create required database schemas using RCU |
No |
Yes |
Yes |
Yes |
|
Install and configure Oracle WebCenter Content |
Yes |
Yes |
Yes |
Yes |
|
Install identity management components, such as Oracle Access Manager |
No |
Yes |
Yes |
Yes |
|
Create the required Oracle Platform Security Services policies in the policy store |
No |
Yes |
Yes |
Yes |
|
Create required user credentials in the credential store |
No |
Yes |
Yes |
Yes |
|
Create connections to back end servers |
Yes |
Yes |
Yes |
Yes |
|
Create build scripts |
Yes |
No |
No |
No |
|
Create deploy and configure scripts |
No |
No |
Yes |
Yes |
|
Integrate/configure Oracle WebCenter Portal Personalization * |
Yes |
Yes |
Yes |
Yes |
* For more information on Oracle WebCenter Portal Personalization, see the chapter "Managing Personalization" in the Administering Oracle WebCenter Portal and Chapter 66, "Personalizing Oracle WebCenter Portal Applications."
Another technique for setting up an environment for the first time is to clone an existing instance. Typically, this strategy is used to clone a production instance from a stage instance. For detailed information on this "test to production" technique, see the section "Moving from a Test to a Production Environment" in the Administrator's Guide.
8.2.2 Development Environment Tasks
In a development environment, each developer has a local JDeveloper instance that is connected to a source control system and a shared Oracle WebCenter Content repository. Developers store metadata and code in source control. Portlets are deployed independently to a producer server and consumed by the portal.
In a development environment, developers typically build and run the application locally using the Integrated WebLogic Server. Both MDS and the Policy Store are file-based in the local development environment.
For more information, see Chapter 2, "Setting Up Your Development Environment" and Chapter 3, "Working Productively in Teams."
8.2.3 Nightly Build Environment Tasks
On a daily basis, developers work in JDeveloper and run code changes locally on the Integrated WebLogic Server, and code changes are checked into a source control system.
If you wish to set up a build environment that produces a clean environment that is built each night, there are certain tasks that must be performed with each build, including:
-
Creating schema (typically with Oracle Repository Creation Utility – RCU)
-
Creating and setting up the domain
-
Creating and configuring managed servers
-
Deploying the application
WebCenter provides sample build scripts that you can modify and use for your environment. See Section 8.8, "Configuring a Nightly Build Script." Nightly builds are usually made available to people within the organization, like QA engineers, technical writers, managers, and others. See also Section 8.4, "Understanding the Build and Test Environments."
For information on integrating Oracle WebCenter Portal Personalization into your development environment, see Section 66.2, "Integrating Personalization in Your Application."
8.2.4 Testing Environment Tasks
Usually, the testing environment is a mirror of the nightly build environment that is accessed by QA engineers. The tasks involved in providing a clean test environment are usually the same as creating a clean build environment. See also Section 8.4, "Understanding the Build and Test Environments."
8.2.5 Stage Environment Tasks
Runtime tools play a bigger role in the staging environment than in the development environment. Nonetheless, occasional updates from development will need to be deployed to the stage environment. To facilitate these more intermittent updates, WebCenter provides a set of deploy and configure scripts that you can copy and modify to suit your environment. The deploy and configure scripts isolate the information that is variable between environments, like the server names, ports, content management connections, and so on. For more information, see Section 8.5.1, "Provisioning the Staging Environment" and Section 8.12, "Deploying and Configuring the Application on Targeted Servers."
For information on integrating and configuring Oracle WebCenter Portal Personalization, see the section "Personalization Prerequisites and Limitations" in the Administering Oracle WebCenter Portal.
8.2.6 Production Environment Tasks
When changes are tested and approved in the stage environment, they need to be pushed to the production environment. WebCenter provides a Propagation tool in the WebCenter Portal Administration Console that moves all portal metadata from the staging to the production server. For more information, see Section 8.13, "Using the Propagation Tool to Propagate From Staging to Production."
WebCenter provides WLST commands for importing and exporting portlet preferences. For more information, see Section 8.16, "Migrating Portlet Preferences."
8.3 Who Participates in the Portal Life Cycle?
Many different people participate in the portal life cycle. In general, these people (the primary actors in Table 8-1) fall into one or more of these general roles:
-
Developer – Uses JDeveloper and the build scripts described in Section 8.8, "Configuring a Nightly Build Script."
-
IT Administrator – Uses the deploy and configuration scripts described in Section 8.12, "Deploying and Configuring the Application on Targeted Servers."
-
Site managers – Have administrative privileges for the Portal Framework application. Site managers use the WebCenter Portal Administration Console to modify the layout, content, and security settings of the portal. See also Administering Oracle WebCenter Portal and Section 8.15, "Managing Security Through the Life Cycle."
-
Content modelers – Uses Oracle WebCenter Content's Site Studio designer to model content. Refer to Site Studio and Oracle WebCenter Content documentation for more information.
-
Content contributors – Develops whatever content appears in or is available from the portal, including images, document files, video and audio content, and so on.
8.4 Understanding the Build and Test Environments
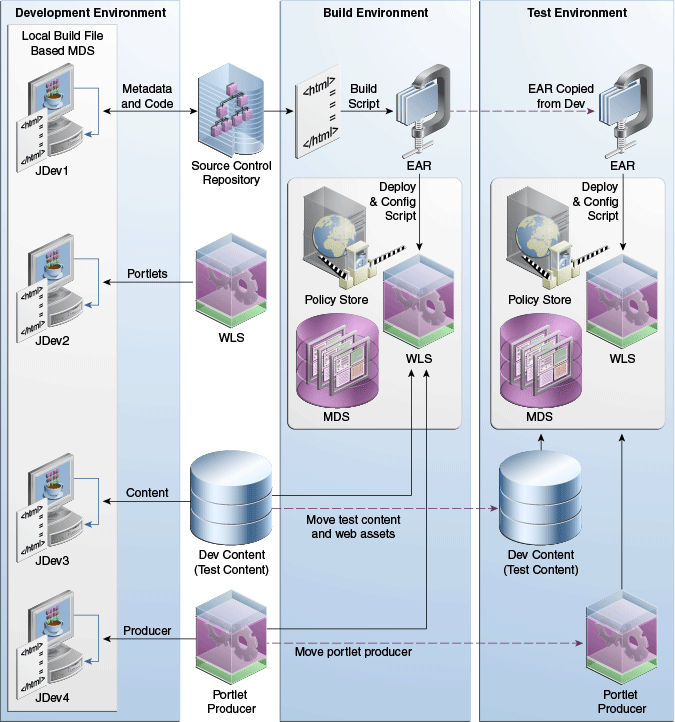
Although developers typically build and run locally, an automated nightly build environment is recommended. The build environment represents a clean deployment of the Portal Framework application.
To set up the build environment, back end servers and connections must be installed and created once. For example, the build environment requires WebLogic Server instance, and typically includes access to an installed Oracle WebCenter Content instance. In addition, the build environment includes a database-based MDS and policy store.
Figure 8-1 illustrates the general flow from development to build to test environments.
Note:
Figure 8-1 does not depict all possible portal features. For example, Oracle WebCenter Portal Personalization is not depicted in the diagram. For more information, see Section 66.3, "Deploying Personalization Files."Figure 8-1 Flow from Development to Build to Test Environments
Description of ''Figure 8-1 Flow from Development to Build to Test Environments''
A common practice is to use Ant-based build scripts to construct the EAR from source control and deploy it. The EAR includes metadata, code, and seeded policies. The build script also packages into the EAR metadata customizations made to portlets. See Section 8.8, "Configuring a Nightly Build Script." Some tasks performed by the build scripts include:
-
creating schema (with RCU)
-
setting up the managed server and domain
-
building and deploying the EAR
-
performing other setup tasks
The best practice is to use Oracle WebCenter Content archive tools to move Oracle WebCenter Content test content and web assets between the environments. See Section 8.14, "Propagating Content From Oracle WebCenter Content." For information on deploying portlets, see Chapter 61, "Deploying Portlet Producers."
For information on integrating Oracle WebCenter Portal Personalization into your development environment, see Section 66.2, "Integrating Personalization in Your Application."
8.5 Understanding the Staging and Production Environments
This section discusses the staging and production phases of the portal life cycle. Figure 8-2 illustrates the general flow from staging to production environments.
Note:
Figure 8-2 does not depict all possible portal features. For example, Oracle WebCenter Portal Personalization is not depicted in the diagram. For more information, see Section 66.3, "Deploying Personalization Files."Figure 8-2 Flow from Staging to Production Environments
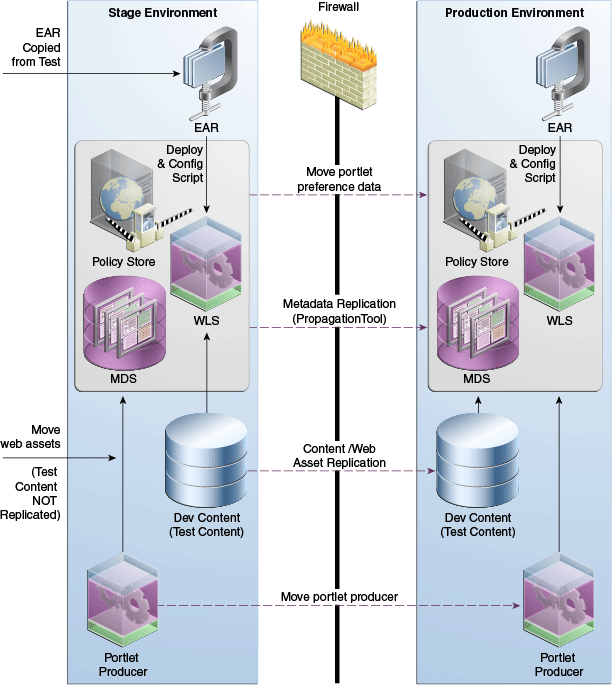
Description of ''Figure 8-2 Flow from Staging to Production Environments''
8.5.1 Provisioning the Staging Environment
The staging environment provides a stable environment where final configuration and testing takes place before the portal is moved to production. Typically, the staging environment includes a dedicated Oracle WebCenter Content server, as well as dedicated portlet producer server(s). For a list of typical setup tasks, see Table 8-2.
If you are setting up the staging environment for the first time, see Section 8.9, "Setting Up a Staging or Production Environment for the First Time." For information on making incremental changes to the staging environment, see Section 8.12, "Deploying and Configuring the Application on Targeted Servers."
If you wish, you can move Oracle WebCenter Content content and web assets between the testing and staging environment using Oracle WebCenter Content archive tools. See Section 8.14, "Propagating Content From Oracle WebCenter Content." For information on migrating portlets, see Section 8.16, "Migrating Portlet Preferences."
For a complete list of requirements, dependencies, and options for Personalization, see the section "Personalization Prerequisites and Limitations" in the Administering Oracle WebCenter Portal.
8.5.2 Adding Content to the Staging Environment
Content developers can add content directly to the staging server using Oracle WebCenter Content content contribution tools. Content workflow features of Oracle WebCenter Content can be used to manage content approvals. WebCenter also provides browser-based tools for creating and editing content. For example, you can:
-
Edit existing Oracle WebCenter Content region data files
-
Create new Oracle WebCenter Content region data files
-
Edit existing HTML content
-
Upload new images
8.5.3 Moving the Portal from Staging to Production
Once the staging environment is fully provisioned and tested, it can be moved to the production environment and made accessible to users. In a live production environment, you can make incremental updates to metadata, content, and web assets using automated scripts and/or replication techniques.
Typically, these updates are performed by a site manager rather than by individual content contributors. For more information, see Section 8.13, "Using the Propagation Tool to Propagate From Staging to Production."
Any content model or region definition changes can be pushed to the production server by the site manager. Oracle WebCenter Content Replication can be used to replicate content between the stage and production server. See Section 8.14, "Propagating Content From Oracle WebCenter Content."
WebCenter provides WLST commands for importing and exporting portlet preferences. For more information, see Section 8.16, "Migrating Portlet Preferences."
8.6 Tools for Managing the Life Cycle
WebCenter Portal is built on top of JDeveloper and Oracle ADF, which provide several benefits in the life cycle management of your application:
-
Development framework – JDeveloper and Oracle ADF provide the tools and framework you can use to build and update your application. Adding portlets, content, and customization capabilities to your Portal Framework application is simply a matter of dragging and dropping the appropriate objects in either a source or WYSIWYG environment.
-
Iterative Development – WebCenter provides an iterative development feature that greatly increases team productivity. See Section 2.3.1, "Preparing for Iterative Development in a Portal Framework Application."
-
Round-Trip Development: Round-trip development refers to features and techniques that allow you to retrieve resources from a deployed, runtime portal back to JDeveloper for maintenance or enhancement. For more information on round-trip development, see Section 9.6, "Working with Round-Trip Development."
-
Enterprise deployment: When you are ready to deploy your application to a production environment, you can use the deployment scripts provided by WebCenter. For more information, see Section 8.12, "Deploying and Configuring the Application on Targeted Servers" and Section 8.13, "Using the Propagation Tool to Propagate From Staging to Production." For more information about deployment, see Chapter 7, "Deploying and Testing Your Portal Framework Application."
Note:
Services for WebCenter Portal typically require some back end, such as Oracle WebCenter Portal's Discussions Server, to be available in the deployment environment. -
Standards-based administration: Browser-based tools enable administrators to deploy, configure, and manage Portal Framework applications and WebCenter Portal tools and services. In addition, tools built on industry standards-based JMX methods offer administrators granular control and monitoring mechanisms for health status, performance, and popularity. Tools for obtaining historical performance and status reporting over time (within a single Oracle Application Server context) are also provided. Portal Framework application metrics are delivered using the familiar Application Server Control monitoring and management interface. For more information, see Administering Oracle WebCenter Portal.
8.7 Understanding Iterative Development
8.7.1 What Is Iterative Development?
Iterative development lets you make changes to your Portal Framework application while it is running on the Integrated WebLogic Server and immediately see the effect of those changes simply by refreshing the current page in your browser. The iterative development feature works by disabling certain optimization features. Iterative development allows developers to work more quickly and efficiently when building a portal.
For example, iterative development lets you see changes to these components almost instantly upon a browser refresh:
-
page definitions
-
navigation model
-
page hierarchy
-
existing JSPX files
-
page templates
-
resource catalog
-
addition of task flows to pages
-
addition of portlets to pages
The following kinds of operations are not supported by iterative development. These operations require you to re-run the application:
-
Creating any new file explicitly (JSPX, page definition, and so on)
-
Editing any configuration file, like
web.xmloradfc-config.xml. -
Creating a new file implicitly. For instance, when you add a sub-page to a node in the page hierarchy, a new
*pages.xmlfile is created.
8.7.2 How Does Iterative Development Work?
Iterative development works by turning off certain MDS and runtime layer caches. Because these performance optimization features are disabled, you might notice some slower performance when running your application in a development environment.
Note:
When an application is deployed to the Integrated WebLogic Server, theorg.apache.myfaces.trinidad.CHECK_FILE_MODIFICATION flag is automatically set to true in the web.xml file on the server. This setting causes the server to automatically check the modification time of your JSP and skinning CSS files, and discard saved state when they change. This configuration occurs whether or not the iterative development feature is enabled.When iterative development is enabled, the following changes to application configuration occur:
-
The MDS Cache size is set to
0. This setting causes all metadata files to be re-loaded on each request. -
The Navigation Model cache is invalidated on each request.
For skin development, you can set the application to use uncompressed skins. This setting is not the default and should only be used in a development environment. You can update web.xml to enable this functionality with the following context parameter:
<context-param>
    <param-name>org.apache.myfaces.trinidad.DISABLE_CONTENT_COMPRESSION</param-name>
    <param-value>true</param-value>
</context-param>
Note:
When consuming Oracle JSF Portlet Bridge Portlets in your portal, ADF attempts to share the skin between the consumer and producer. Therefore, if you are disabling compression on the consumer, you should also do that on the producer. Otherwise, the producer will not generate the correct code to match the uncompressed IDs generated by the consumer. See also Chapter 58, "Creating Portlets from JSF Applications Using the Oracle JSF Portlet Bridge."Note that if you edit the base definition (source) of a resource at runtime while the portal is running in the Integrated WebLogic Server, iterative development will not work as expected: if you edit the resource file in JDeveloper and save, you will not see the change when the running page is refreshed. The reason is because when a resource is edited at runtime at the base document level in the Integrated WebLogic Server, a copy of the resource's base document is created in the MDS write directory. From that point forward, this copied version will be used, and the version of the base document in JDeveloper will be ignored. If you run into this issue and want to pick up changes made to the file in JDeveloper, you will need to re-run the application after taking the following steps:
-
In the Application Navigator, click the Application Menu icon next to your application's name and choose Application Properties.
-
In the Application Properties dialog, expand the Run node in the left pane, then select MDS.
-
In the right pane, select Delete customizations before each run. Doing so clears the MDS of any runtime customizations every time the application is run.
-
Click OK.
8.7.3 Enabling Iterative Development
For details, see Section 2.3.1.1, "Enabling Iterative Development."
8.8 Configuring a Nightly Build Script
When you create a Portal Framework application, an Ant build script and properties file are created automatically for you in the main application directory on the filesystem. These files are:
-
build.xml– Includes a standard set of targets for cleaning, compiling, building, and deploying the application. You can check this file into source control so that it is available to the developers. -
build.properties– Specifies the location of the JDeveloper workspace file (.jwsfile) for your application and the output folder for the application WAR file. Note that thebuild.xmlfile includes thebuild.propertiesfile, which enablesbuild.xmlto pick up these environment-specific variables. You can customize the properties file to match the setup and environment variables used in your build environment.
Before running the build script, be sure JAVA_HOME and ANT_HOME environment variables are set properly. For example:
JAVA_HOME = /path_to_your_java_installation/jdk
ANT_HOME = /path_to_your_ant_installation
To build and deploy your application, use the ant target all. For example:
ant all
If you are using Oracle WebCenter Portal Personalization to provide personalization features for your portal, you must perform a manual update to the build.xml file. For details, see Section 66.3, "Deploying Personalization Files."
8.9 Setting Up a Staging or Production Environment for the First Time
For detailed information on setting up and provisioning a staging or production environment for the first time, see the section "Moving Oracle WebCenter Portal to a New Target Environment," in the Administrator's Guide. See also Section 8.15, "Managing Security Through the Life Cycle" for information on moving security policies and credentials to an environment for the first time.
8.10 Moving a WebCenter Portal Framework Application to an Existing Environment
In this scenario, you have a working production environment with Oracle WebCenter Portal installed and configured and you want to test changes in your applications or configuration before rolling those changes into the production environment. For example, you have modified existing security policies or configurations.
Oracle recommends that you use the deploy and configure scripts to update existing environment. Sample scripts are provided with WebCenter, and you are free to modify them to suit your environment. For detailed information, see Section 8.12, "Deploying and Configuring the Application on Targeted Servers" and Section 66.3, "Deploying Personalization Files."
WebCenter provides a Propagation tool that is built in to the WebCenter Portal Administration Console. The Propagation tool is for moving your application from the staging environment to the production environment. See Section 8.13, "Using the Propagation Tool to Propagate From Staging to Production."
For information on moving Oracle WebCenter Content content, see Section 8.14, "Propagating Content From Oracle WebCenter Content."
For information on moving security policies and credentials, see Section 8.15, "Managing Security Through the Life Cycle."
For more information, see the section "Moving Oracle WebCenter Portal to an Existing Target Environment," in the Administrator's Guide.
8.11 Deploying to Managed Servers
Portal Framework application developers working in JDeveloper typically deploy their application locally to the Integrated WebLogic Server. For other phases of the life cycle – testing, staging, and production – deployment to a suitable managed server is recommended. Or, for portlet development, you need to deploy to the Services Producer Managed Server. For more information on deploying to managed servers, see Section 7.3, "Deploying a Portal Framework Application to a WebLogic Managed Server" and Section 66.3, "Deploying Personalization Files." See also the section "Creating a Managed Server" in Administering Oracle WebCenter Portal.
8.12 Deploying and Configuring the Application on Targeted Servers
During its life cycle, a typical portal is deployed to testing, staging, and production servers. This section describes a technique for deploying and configuring a Portal Framework application on a targeted server.
8.12.1 Introduction
WebCenter provides a configurable script that allows you to easily deploy and configure your application to these server instances. The build and deploy script takes a simple properties file parameter that specifies the server and connection information for the targeted server. You only need to create this properties file one time for each targeted server. Then, you execute the deploy and configure script with the appropriate properties file as a parameter.
Oracle recommends that you use the scripts described in this section to deploy your application rather than using ojdeploy. The best practice is to use the Ant task provided by JDeveloper to build your application, and then to use the scripts described in this section to deploy and configure the application. The ojdeploy command-line utility allows you to deploy your application from JDeveloper without starting the JDeveloper IDE.
Note:
The propagation tool, described in Section 8.13, "Using the Propagation Tool to Propagate From Staging to Production," is primarily used by site administrators to push approved site structure changes to production without incurring any downtime.Tip:
The build and deploy script isolates the information that is variable between environments, like the server names, ports, content management connections, database connections, and so on. Most aspects of the Portal Framework application do not need to change when you redeploy it to another server. For example, the name of the application doesn't change.8.12.2 Using the Deploy and Configure Script
The deploy and configure script described in this section is primarily used when the production application is mostly read only and live. In this scenario, content contributors make active changes to the staged application and receive content approval before that content is moved to production. Oracle recommends that you use automatic content replication so that content is moved from stage to production after appropriate workflow approvals. See Section 8.14, "Propagating Content From Oracle WebCenter Content."
Security changes are not affected by the deploy and configure scripts. To push site structure changes to production, administrators can use the propagation tool, as described in Section 8.13, "Using the Propagation Tool to Propagate From Staging to Production." See also Section 8.15, "Managing Security Through the Life Cycle."
To deploy and configure your application to a target environment:
-
In a terminal window, go to the directory that contains the deploy and configure scripts. These scripts are called:
create_profile.cshanddeploy_and_config.csh. These files reside inWEBCENTER_HOME/webcenter/scripts/stage2prod, whereWEBCENTER_HOMEis the directory where WebCenter is installed.Note:
The deploy and configure scripts instage2prodare samples only. You are free to develop your scripts in a different location (after copying the sample and making changes to it for your deployed environment). -
First, you need to provide some target environment-specific information in the
setup.propertiesfile, like the target server URL, user name, and password. Thesetup.propertiesfile is located inWEBCENTER_HOME/webcenter/scripts/stage2prod/setup. Simply open the filesetup.propertiesand add the appropriate values for the target environment. A sample file is shown in Example 8-1.Note:
For WebLogic Sever deployments, you can ignore properties listed under WebSphere Server properties. See also the section "Using the Deploy and Configure Script for Applications Deployed on WebSphere" in the Third-Party Application Server Guide. -
Update the
create_profile.cshanddeploy_and_config.cshto reflect the deployed environment.setenv WC_HOME <webcenter_home> setenv SCRIPTS_DIR <scripts_home>
WC_HOMEis the WebCenter Home andSCRIPTS_DIRis where the scripts are located. By default, the scripts are here:$WC_HOME/webcenter/scripts/stage2prod. If you copied the scripts to another location, then setSCRIPTS_DIRto that location. -
Run the
create_profilescript. The input to this script is thesetup.properitesfile. For example, in a Linux environment, enter:./create_profile.csh
This script examines your application environment and produces an output properties file called
wcconfig.propertiesinWEBCENTER_HOME/webcenter/scripts/stage2prod/setup. -
If you wish, rename the output file,
wcconfig.properties, to a name that reflects the target environment. For example, if the target environment is your stage environment, you might call the file output filewstage.properties.The
wcconfig.propertiesfile specifies all the configuration information needed to run the portal on the target environment. For example, it includes settings for content management repository, omni portlet, WSRP producers, Oracle WebCenter Portal Personalization and others. Example 8-2 shows a sampleprofile.propertiesfile.Example 8-2 Sample profile.properties File
webcenter.wcps.app.name=wcps-services
webcenter.wcps.app.server=WC_Utilities
admin.jmx.url=t3\://hostname\:7001
doclib.Content.cis.socket.host=hostname
app.mds.jndi=jdbc/mds/SpacesDS
webcenter.app.archive=/net/hostname/scratch/webapp.ear
doclib.Content.cis.socket.port=9444
webcenter.wcps.archive=/net/hostname/scratch/wcps.mar
webcenter.app.name=webapp
admin.user=weblogic
app.mds.repository=mds-SpacesDS
app.mds.partition=wcps-services
webcenter.app.version=V2.0
web.OmniPortlet.url=http\://hostname\:7101/portalTools/omniPortlet/providers/omniPortlet
app.restart=false
webcenter.app.server=WC_CustomPortal
Note:
All properties in theprofile.propertiesmust have a value. If a property is not needed, delete it or comment it out rather than leave the value empty. -
Run
create_profileto create a properties file for each of your target environments. For example, you might create one each for your test, stage, and production environments. -
Edit the
deploy_and_configscript to accept as input thewcconfig.propertiesfile (or whatever you renamed it). -
Run the
deploy_and_confgscript. The input to this script is theprofile.propertiesfile (or whatever you renamed the file). For example, in a Linux environment, might enter:./deploy_and_config.csh
The deploy_and_config script takes one of two "modes" as input. These modes are deploy_config and p13n_metadata. For example:
./deploy_and_config.csh p13n_metadata
The deploy_config mode is the default mode if no input is passed to deploy_and_config.csh. The deploy_config mode does the deployment and configuration tasks. If you only need to update the personalization metadata, you can override the default behavior by passing in p13n_metadata as the input to the script.
This script deploys and configures the Portal Framework application to run on the target environment.
8.12.3 Managing Post-Deployment Changes
All WebCenter Portal configuration changes performed after the application is deployed are stored as customizations in MDS. For example, if your application had some connections defined in connections.xml, and you then deployed the application on another managed server, and performed configurations using Oracle Enterprise Manager Fusion Middleware Control Console or WLST, then these changes are stored in MDS as customizations. Subsequently, if you deploy a newer EAR file, the connection changes you performed earlier would still be in effect, and will override the connection definition within the EAR file. The configuration changes performed with the Fusion Middleware Control Console or WLST persist after a redeployment. See also the section "Oracle WebCenter Portal Administration Tools" in the Administering Oracle WebCenter Portal.
Note:
When you deploy a portlet producer, the customizations are uploaded to the currently configured producer connection. Oracle recommends that you use the deploy and configure scripts to manage the producer connections (rather than reconfiguring them after deployment and then redeploying the application). The deploy and configure scripts ensure that the producer customizations are redeployed correctly whenever the connection information changes.8.13 Using the Propagation Tool to Propagate From Staging to Production
The WebCenter Portal Administration Console includes a propagation tool for moving portal metadata from a staging to a production server. Site administrators use this tool occasionally to push approved site structure changes to the production server without incurring any downtime.
Note:
The Propagation tool supports propagating portal metadata and Oracle WebCenter Portal Personalization files. For more information about propagating Personalization files, see Section 66.3.4, "Propagating Personalization Files."Note:
WebCenter provides WLST commands for importing and exporting portlet preferences. Use these commands to replicate portlet preference data between the stage and production servers. For more information, see Section 8.16, "Migrating Portlet Preferences."8.13.1 Introduction to the Propagation Tool
WebCenter provides a propagation tool to move a portal metadata from staging to production. In practice, the staging environment and the production remain identical until changes are made to the staged portal. When the changes are tested and approved, an administrator uses the propagation tool to "push" the changes to the production server. This transfer does not require the production server to be restarted.
When properly configured, the Propagation tool shows up as a tab in the WebCenter Portal Administration Console, as shown in Figure 8-3.
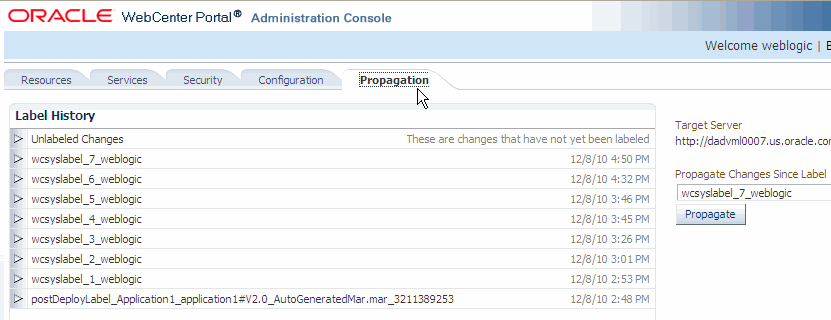
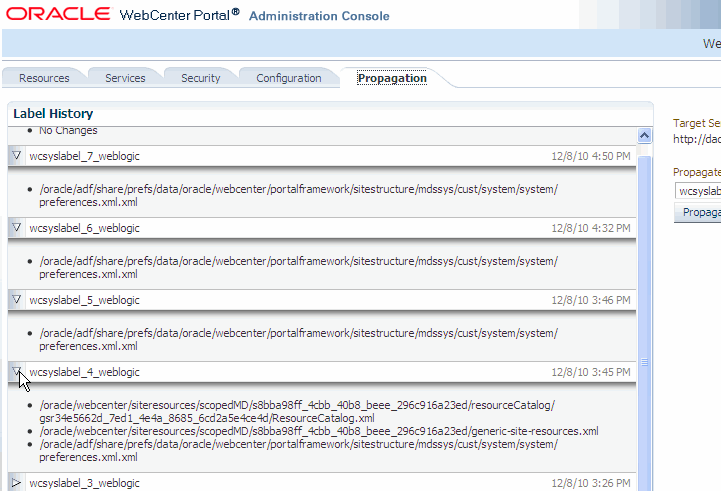
The Label History part of the Propagation tab lists the labels that were created for each propagation, labels created outside of the Propagation tab, such as labels created during deployment and labels created using WLST. Each label includes a list of files that change since the last propagation was performed. To view the contents of a label, click the arrow button to the left of the label name, as shown in Figure 8-4.
Figure 8-4 The Propagation Tab with Labels Opened
Description of ''Figure 8-4 The Propagation Tab with Labels Opened''
8.13.2 Configuring the Propagation Tool
Note:
If you are using the Propagation tool and if any of the MDS document file names contain multi-byte NLS characters, the stage machine should be configured for that NLS.The Propagation tab only shows up in the WebCenter Portal Administration Console if the portal deployed to the staging server has a URL Connection configured. This URL connection must point to the production server and it must be named ProductionURLConnection.
You have two choices for configuring the URL Connection: you can use the Fusion Middleware Control Console or Oracle WebLogic Scripting Tool (WLST). This section explains both techniques.
8.13.2.1 Configuring the URL Connection With Oracle Enterprise Manager Fusion Middleware Control Console
To configure the URL Connection with the Fusion Middleware Control Console:
-
In a browser, open the Fusion Middleware Control Console for your staging server domain. For details on starting the Fusion Middleware Control Console see Oracle Enterprise Manager Administrator's Guide.
-
In the navigation tree, open the Application Deployments folder and click on the application. See Figure 8-5.
-
In the application pane on the right, open the Application Deployment menu, then select Configure ADF Connections from the ADF submenu. The ADF Connections Configuration panel opens, as shown in Figure 8-5.
Figure 8-5 Selecting the Application in the Fusion Middleware Control Console
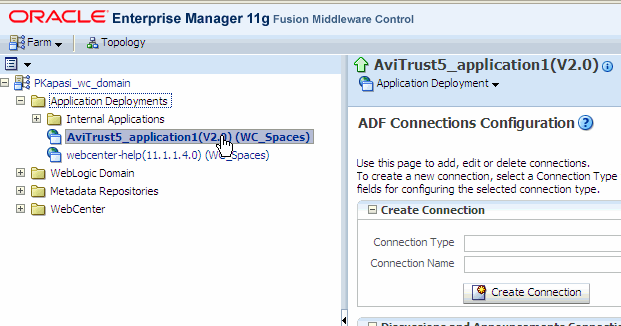
Description of ''Figure 8-5 Selecting the Application in the Fusion Middleware Control Console''
-
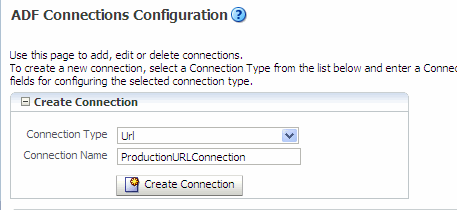
In the Create Connection box, select the URL connection type and enter
ProductionURLConnectionas the Connection Name. See Figure 8-6.Note:
You must name the connectionProductionURLConnection. The name is case sensitive. -
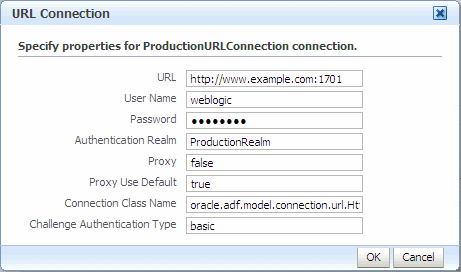
In the URL Connections box, click Edit.
-
Complete the URL Connection dialog box as follows.
-
URL – Enter the URL (including hostname and port number) of the production server.
-
Username – Enter a username for the connection.
-
Password – Enter a password for the connection.
-
Authentication Realm – You must enter a value for the Authentication Realm. Do not leave this field blank. You can enter any arbitrary string, such as
ProductionRealm.You can accept the default values for the remaining fields. See Figure 8-7.
-
-
Click OK after you complete the URL Connection dialog.
-
Click Apply in the upper-right corner of the Fusion Middleware Control Console window.
8.13.2.2 Configuring the URL Connection with WLST
You can use a Oracle WebLogic Scripting Tool (WLST) command to create the URL Connection. Note that the parameters to the command are equivalent to the values entered in the URL Connection dialog in the Fusion Middleware Control Console, described in the previous section, Section 8.13.2.1, "Configuring the URL Connection With Oracle Enterprise Manager Fusion Middleware Control Console."
The following is an example of the WLST command with sample values specified for each parameter. Replace these values with values that pertain to your production server:
adf_createHttpURLConnection(appName='portalApp', name='ProductionURLConnection',
url='http://production_adminserver_host:7001', user='weblogic',
password='password_for_weblogic', realm='ProductionRealm'
For information on WLST, see the WebLogic Scripting Tool Command Reference on the Oracle Technology Network.
8.13.3 Propagating Portal Metadata
Use the propagation tool when you want to move changes made on the staging portal to the production portal.
-
Be sure the propagation tool is configured, as described in Section 8.13.2, "Configuring the Propagation Tool." To use the propagation tool, you must have Administrator's privileges.
-
Open the WebCenter Portal Administration Console. By default, the administration console is located at this URL:
http://<server>:<port>/<context_root>/admin
For more information on using the WebCenter Portal Administration Console, see the section "Administering Portal Framework Applications Using the Administration Console" in the Administering Oracle WebCenter Portal.
-
Select the Propagation tab.
Note:
If you don't see the Propagation tab it could be because you don't have administrator's privileges or the propagation tool was not configured properly as explained in Section 8.13.2, "Configuring the Propagation Tool." -
Click Propagate to transfer the files to the production server.
8.14 Propagating Content From Oracle WebCenter Content
Oracle recommends that you use either manual or automated replication to move content from one environment to another. Another option is to manually propagate content; however, this option is only recommended if the source and target servers are unable to communicate with each other.
For detailed information on the tools and options for propagating Oracle WebCenter Content content, see the chapter "Understanding System Migration and Archiving" in the Oracle WebCenter Content System Administrator's Guide for Content Server. That chapter explains how to propagate Oracle WebCenter Content content by exporting and importing archive files. In addition, the chapter explains how to set up and use replication. Replication can automate the export, import, and transfer functions. For example, you can use replication to automatically export from one content server instance, transfer the archive to another computer, and import to another content server instance.
8.15 Managing Security Through the Life Cycle
This section discusses techniques for migrating security policies and credentials from one environment to another. Migration can be either automatic or manual. Automatic migration is typically used when the application is first deployed. Manual migration is used on redeployment.
8.15.1 Migrating Security Policies for First-Time Deployment
When jazn-data.xml with application policies is packaged in the EAR file, Oracle Platform Security Services (OPSS) performs policy migration based on the application configuration settings in weblogic-application.xml. Example 8-3 shows the recommended settings in weblogic-application.xml to achieve automatic policy migration for first-time deployment.
Example 8-3 Settings for Automatic Policy Migration (weblogic-application.xml)
<wls:application-param>
    <wls:param-name>jps.policystore.migration</wls:param-name>
    <wls:param-value>MERGE</wls:param-value>
</wls:application-param>

<wls:application-param>
    <wls:param-name>jps.policystore.removal</wls:param-name>
    <wls:param-value>OFF</wls:param-value>
</wls:application-param>

<wls:listener>
    <wls:listener-class>oracle.security.jps.wls.listeners.JpsApplicationLifecycleListener</wls:listener-class>
</wls:listener>
JpsApplicationLifecycleListener must be specified in weblogic-application.xml to enable policy and credential migration. Oracle recommends that jps.policystore.migration should be set to MERGE. With this configuration, polices packaged in jazn-data.xml will be always migrated during first time deployment. Oracle also recommends that jps.policystore.removal should be set to OFF so that application policies are not deleted from the policy store when the application is undeployed.
8.15.2 Migrating Security Policies On Redeployment
On redeployment, it is important to avoid overwriting policy changes made on the production system. When jps.policystore.migration parameter is set to MERGE, all new policies from the stage environment will be merged with production policies. With this setting, any changes made to existing policies, such as changing permissions for a role, deleting a role, or removing membership of a role, will not be migrated during redeployment, because such migration would cause a conflict.
If you want to overwrite the production policies with the staging environment security policies packaged in jazn-data.xml, use the migrateSecurityStore WLST command. See Oracle Fusion Middleware Application Security Guide for details on migrateSecurityStore command.
8.15.3 Migrating Credentials for First-Time Deployment
Application credential migration support is similar to application policy migration. JpsApplicationLifecycleListener supports credential migration in application deployment and redeployment with extra security enforcements.
With application credentials in cwallet.sso and packaged in an EAR file in the META-INF/ directory, OPSS will perform credential migration to system credential store based on the configuration settings in weblogic-application.xml.
Example 8-3 shows the recommended settings in weblogic-application.xml to achieve automatic credential migration for first-time deployment.
Example 8-4 Settings for Automatic Credential Migration (weblogic-application.xml)
<wls:application-param>
    <wls:param-name>jps.credstore.migration</wls:param-name>
    <wls:param-value> MERGE </wls:param-value>
</wls:application-param>
Oracle recommends that jps.credstore.migration should be set to MERGE so that at deployment and redeployment time all new credentials will be migrated. This setting will only migrate new credential key/value from cwallet.sso. Modification done to existing credential keys will not be migrated.
8.15.4 Migrating Credentials On Redeployment
If credentials are modified on stage and need to be moved to production, use the command migrateSecurityStore to migrate modified credentials. See Oracle Fusion Middleware Application Security Guide for details on migrateSecurityStore command.
8.16 Migrating Portlet Preferences
WebCenter provides WLST commands for importing and exporting portlet preferences. Exported preferences (customizations and personalizations) can be imported into a target application – for example, exported from the staging application and imported into the production application. For more information, see exportPortletClientMetadata and importPortletClientMetadata in "WebCenter Portal Custom WLST Commands" in the WebLogic Scripting Tool Command Reference. Also ensure that export and import are enabled. See Section 59.3.15, "How to Export and Import Portlet Producers at Design Time."
See also Section 61.5, "Deploying a Portlet Producer to a WebLogic Managed Server."
8.17 Rolling Back Production Site Changes
In rare instances, it might be necessary to roll back changes that are pushed to the production server from staging. The propagation model described in this chapter assumes that you are making a small number of changes to the staging instance and then pushing them to production using the propagation tool. If you ever need to roll back those changes, Oracle recommends that you manually undo the changes on the staging instance and push the modified staging instance back to production, after adequate validation and testing. By this process, you will have "rolled back" the original changes and the production system will be reverted to its original state.