61 Deploying Portlet Producers
This chapter describes how to use Oracle JDeveloper to deploy portlet producers to an Oracle WebLogic Managed Server configured to test application deployment or host applications for production.
This chapter includes the following topics:
-
Section 61.2, "Creating and Provisioning a WebLogic Managed Server for Deploying Portlet Producers"
-
Section 61.3, "Creating a Connection to a Portlet Producer WebLogic Managed Server"
-
Section 61.5, "Deploying a Portlet Producer to a WebLogic Managed Server"
For information about how to deploy producers using Fusion Middleware Control, Oracle WebLogic Server Administration Console, or WLST, see the "Deploying Portlet Producer Applications" section in Administering Oracle WebCenter Portal.
For more general information about deployment of applications, see Chapter 7, "Deploying and Testing Your Portal Framework Application."
61.1 Introduction to Deploying Portlet Producers
You can deploy your portlet producers directly from JDeveloper to any Oracle WebLogic Managed Server that is configured to support WebCenter Portal portlet producers.
A WebLogic Managed Server resides outside of JDeveloper as part of a domain, and is managed by an Administration server within that domain. A WebLogic Managed Server hosts applications, along with the libraries and other resources needed by those applications. A domain, which is a logically related group of Oracle WebLogic Server resources, can have any number of managed servers. Managed servers can be configured to run applications in a test environment, a production environment, or both.
The steps for deploying a portlet producer to a WebLogic Managed Server are:
-
Create and provision a WebLogic Managed Server instance that contains all the required shared libraries. For more information, see Section 61.2, "Creating and Provisioning a WebLogic Managed Server for Deploying Portlet Producers."
-
As the WebLogic Managed Server resides outside JDeveloper, you must create a connection to it. For more information, see Section 61.3, "Creating a Connection to a Portlet Producer WebLogic Managed Server."
-
Create an application WAR deployment profile. For more information, see Section 61.4, "Creating a WAR Deployment Profile."
-
Deploy the portlet producer to the WebLogic Managed Server. For more information, see Section 61.5, "Deploying a Portlet Producer to a WebLogic Managed Server."
Note:
Before you deploy the portlet producer, you must remove thetest-all application role if you enabled the automatic grants feature in the Configure ADF Security wizards (see Section 74.3.1, "Configuring ADF Security Settings"). Because the test-all role makes all ADF resources public, its presence increases the risk that your application may leave some resources unprotected. You must therefore remove the role before you migrate the application-level policy store.
For more information, see the "How to Remove the test-all Role from the Application Policy Store" section in the Fusion Developer's Guide for Oracle Application Development Framework.
61.2 Creating and Provisioning a WebLogic Managed Server for Deploying Portlet Producers
Before you can deploy your portlet producer to a WebLogic Managed Server, you must create a WebLogic Managed Server based on the Custom Services Producer template, oracle.wc_custom_services_producer_template_11.1.1.jar, which contains all the required shared libraries.
Using this template creates a Custom Services Producer managed server named WC_CustomServicesProducer and targets all the necessary resources to it. It also adds the following JDBC data sources:
-
mds-CustomServicesProducerDS(for accessing theMDSschema) -
WebCenter-CustomServicesProducerDS(for accessing theWebCenterschema) -
Activities-CustomServicesProducerDS(for accessing theActivitiesschema) -
Portlet-CustomServicesProducerDS(for accessing thePortletschema)
To create a Custom Services Producer managed server:
-
Start the Configuration Wizard in graphical mode.
For more information see the "Starting the Configuration Wizard in Graphical Mode" section in Creating Domains Using the Configuration Wizard.
-
On the Welcome page, select Extend an existing WebLogic domain, and then click Next.
Note:
If you prefer, you can create a new domain for your managed server. For more information, see the "Creating a New Domain" section in Installation Guide for Oracle WebCenter Portal. -
On the Select a WebLogic Domain Directory page, select a valid domain directory, and then click Next.
A domain directory contains a
configdirectory, which contains aconfig.xmlfile. In the navigation tree, these directories are indicated by a blue folder icon. -
On the Select Extension Source page, select Extend my domain using an existing extension template, then specify the path of the template as follows:
-
On UNIX operating systems:
WebCenter_ORACLE_HOME/common/templates/applications/oracle.wc_custom_services_producer_template_11.1.1.jar -
On Windows operating systems:
WebCenter_ORACLE_HOME\common\templates\applications\oracle.wc_custom_services_producer_template_11.1.1.jar
-
-
Click Next.
-
For information about the remaining steps in this wizard, see the "Extending a WebLogic Domain in Graphical Mode" section in Creating Domains Using the Configuration Wizard.
Note:
Although portlet producers only require access to theMDSschema, it is advisable to configure all of the JDBC data sources created for the managed server to avoid warnings later.
61.3 Creating a Connection to a Portlet Producer WebLogic Managed Server
Before you can use JDeveloper to deploy your portlet producer to a WebLogic Managed Server instance that resides outside JDeveloper, you must create a connection to the domain that contains the managed server instance where you will deploy the portlet producer. Before you create a connection to a WebLogic Managed Server instance, ensure that the target managed server is up and running and has the required libraries.
To create a WebLogic Managed Server connection for portlet producers:
-
In JDeveloper, from the File menu, choose New.
-
In the New Gallery, expand General, select Connections, and then Application Server Connection.
-
Click OK.
-
In the Create Application Server Connection wizard, for Step 1, enter a name for the new connection (for example,
WC_MyPortletProd), and then click Next. -
At Step 2, specify the user name and password for authentication, and then click Next.
-
At Step 3, enter the host name of the WebLogic Managed Server (for example
webcenter.myserver.example.com) and the port number (for example7888). -
In the WLS Domain field, specify the name of the domain in which the WebLogic Managed Server is created (for example,
wc_server), and then click Next. -
At Step 4, click Test Connection.
If the test is successful, you now have a connection to the target WebLogic Managed Server.
-
Click Finish.
61.4 Creating a WAR Deployment Profile
To deploy portlet producers to a managed server that resides outside JDeveloper, you must create a deployment profile to indicate how the producer and its associated files should be packaged. To do this, you must create a Web Application Archive (WAR) file.
To create a WAR deployment profile:
-
In the Application Navigator, right-click the project folder that contains your portlet producer, for example, Portlets, and choose New.
-
In the New Gallery, expand General, select Deployment Profiles, then WAR File, and click OK.
-
In the Create Deployment Profile -- WAR File dialog, enter a name for your deployment profile and click OK.
-
In the Edit WAR Deployment Profile Properties dialog, select Specify Java EE Web Context Root, enter a context root, then click OK.
-
In the Project Properties dialog, under Deployment Profiles, select the WAR file you just created and click OK.
61.5 Deploying a Portlet Producer to a WebLogic Managed Server
After you have created the deployment profile, you can deploy your portlet producer to the managed server.
To deploy a portlet producer to a WebLogic Managed Server:
-
In the Application Navigator, right-click the project folder, for example, Portlets, and choose Deploy, then the deployment profile (WAR file) that you created in Section 61.4, "Creating a WAR Deployment Profile."
-
In the Deploy dialog, on the Deployment Action page, select Deploy to Application Server, then click Next.
-
On the Select Server page, select the connection to the Managed Server, then click Next.
-
On the WebLogic Options page, select Deploy to selected instances in the domain, and select the managed server to which you want to deploy the portlet producer, and then click Finish.
-
If your application contains JSR 286 portlets, the Select deployment type dialog displays (Figure 61-1). Select Yes and then click OK to add the configuration required to expose this application as a WSRP service.
Figure 61-1 The Select Deployment Type Dialog
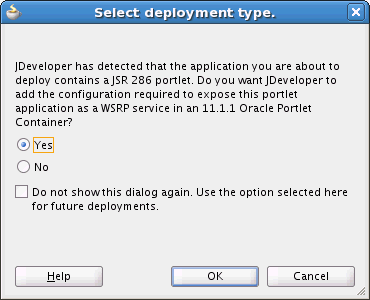
Description of ''Figure 61-1 The Select Deployment Type Dialog''
Tip:
This dialog does not display if, during a previous deployment, you selected Do not show this dialog again. -
The message
Deployment starteddisplays in the Deployment - Log window. If the application is successfully deployed to the targeted server instance, the messageDeployment finisheddisplays in the log.Note:
If you are deploying your portlet producer in a cluster environment, you will receive the following warning:WARNING: oracle.webcenter.lifecycle.exception.LifecycleLockedException: A lock exists that prevents export set import.
This is expected behavior. When you deploy your application, the producer metadata exported into the EAR file (as a MAR file) needs to be imported into an MDS schema for use in the production environment. Importing the metadata occurs automatically during deployment. This import only needs to happen with one node in the cluster, so a lock is created to prevent other nodes in the cluster trying to perform the same operation.
-
After the deployment has finished, check the log for any errors that may have occurred during deployment.
-
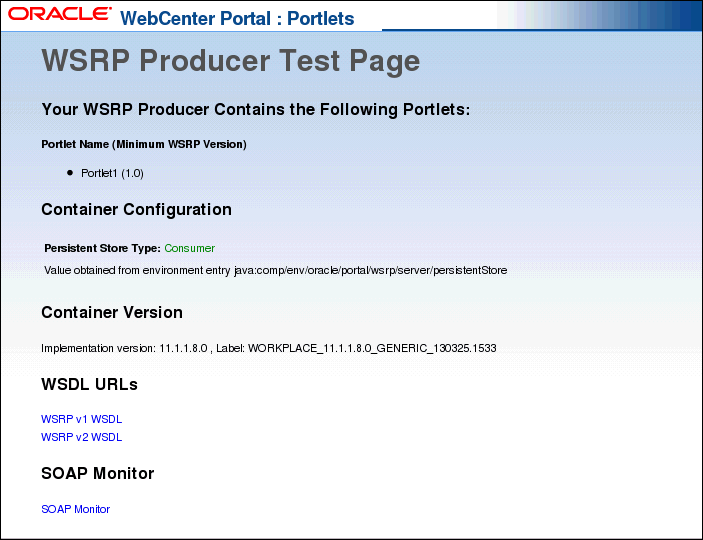
To confirm that your application has been successfully deployed, display the producer test page in your browser. The URL for the test page is:
http://host:port/context-root/info
where:
-
hostis the server to which you deployed the application. -
portis the HTTP Listener port. Typically this is7101. -
context-rootis the application's context root as defined in the Edit WAR Deployment Profile Properties (see Section 61.4, "Creating a WAR Deployment Profile").
-