16 Viewing and Participating in Discussions
This chapter describes how to work with discussions. Discussions provide a means of creating and participating in text-based discussions with other members of a portal. Use discussions to post questions and search for answers. Discussion forums additionally provide the means to preserve and revisit discussions.
This chapter includes the following topics:
Permissions:
This chapter is intended for WebCenter Portal users who want to view, create, and manage portal discussion forums and topics. To perform the tasks in this chapter, you need one or more of the following portal-level permissions:-
Create,Edit,andDelete Discussions -
Create and Edit Discussions -
View Discussions
These permissions are not granted by default to the portal Participant role.
Note:
Tasks discussed in this chapter are not available if discussions are not enabled and exposed. The portal moderator adds and configures discussions, as described in the "Adding Discussion Forums to a Portal" chapter in Building Portals with Oracle WebCenter Portal.16.1 About Discussions
You can use the discussions feature to post, respond to, and preserve topical information in discussion forums scoped to portals or to the entire WebCenter Portal application. Users post topics to a discussion forum, and other users post information relevant to those topics. All of this information is preserved within the forum.
A new portal is assigned a single discussion forum by default; however, portal moderators can specify to include multiple discussion forums in a portal. Discussions are scoped to portals. That is, you can create forums and topics only within the context of a portal. You can view and participate in discussions in both portals and the Home portal, depending on your permissions.
Access to discussions is influenced by portal security. Users can access discussions according to the permissions they are granted by their specific user roles within a given portal.
Scoping additionally limits the users who can view and participate in discussions. For example, only members of the Finance portal can view discussions that transpire in Finance portal forums.
Discussion forums provide configuration settings for specifying which forum content to show. This is of particular use in the Home portal, which exists outside a specific portal scope.
Discussions provides a wide variety of ways for viewing and participating in discussions. These include the following:
-
Discussion Forums provides controls for creating discussion forums (available to the portal moderator or participants having
Create, Edit, and Delete Discussionspermissions) as shown in Figure 16-1 (notice that the Create Forum option is not available in the participant's view in Figure 16-1); creating, replying to, and managing discussion forum topics; and selecting watched forums and watched topics (Figure 16-2).Figure 16-1 Discussion Forums View Showing Multiple Discussion Forums

Description of ''Figure 16-1 Discussion Forums View Showing Multiple Discussion Forums''
Only portal moderators can create, edit, and delete discussion forums, as described in the "Creating a Discussion Forum" section in Building Portals with Oracle WebCenter Portal. To view and post to different discussion forums, the enabling multiple forums option must be selected for the portal.
For more information about creating and managing forum topics and replies, watching forums and topics, showing and hiding forum information, and sending mail from discussion topics, see Section 16.2, "Working with Discussions."
Figure 16-2 Discussion Forums - Topics in a Single Discussion Forum
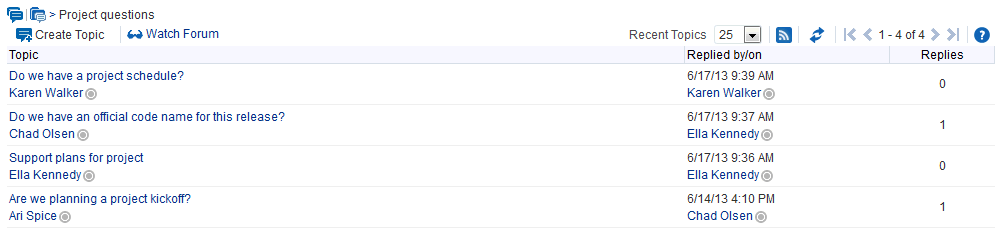
Description of ''Figure 16-2 Discussion Forums - Topics in a Single Discussion Forum''
-
Forums view provides a means of accessing all possible views of a particular portal's discussions: Recent Topics, Popular Topics, Watched Topics, and Watched Forums (Figure 16-3).
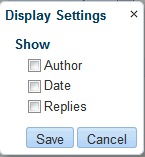
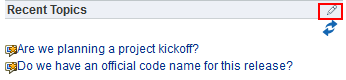
Forums view also provides controls for determining the data to show in addition to the forum or topic title. Click the Personalize icon (pencil) in the toolbar to open the Display Settings dialog (Figure 16-4). For example, when Recent Topics is selected on the menu, the Display Settings dialog offers the options Author, Date, and Replies (Figure 16-4). When Watched Forums is selected, the Display Settings dialog offers the options Date and Topics.
The available display options vary according to the option currently selected on the Forums - Quick View Display Options menu (Figure 16-5).
Figure 16-5 Display Options Menu (Forums - Quick View)
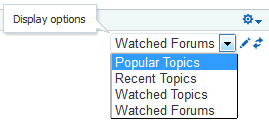
Description of ''Figure 16-5 Display Options Menu (Forums - Quick View)''
See Section 16.2.3.1, "Showing or Hiding Information in Forums View" for more information.
-
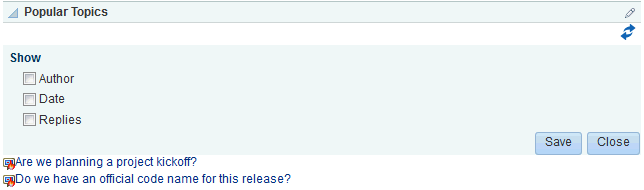
Popular Topics (Figure 16-6) provides a look at the most frequently viewed discussion topics in all the discussion forums in a given portal.
Popular Topics also provides controls for determining the data to show in addition to the topic title. Click the Personalize icon to open a panel with controls for selecting the type of additional data to show (Figure 16-7).
Figure 16-7 Show Panel in Popular Topics
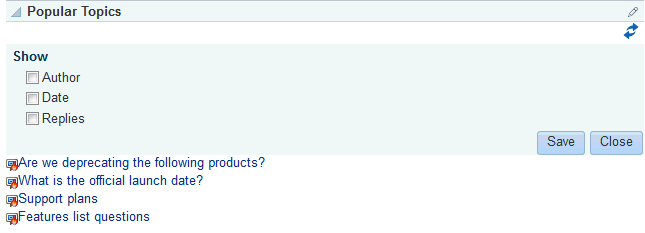
Description of ''Figure 16-7 Show Panel in Popular Topics''
See Section 16.2.3.2, "Showing or Hiding Information in Popular Topics" for more information.
-
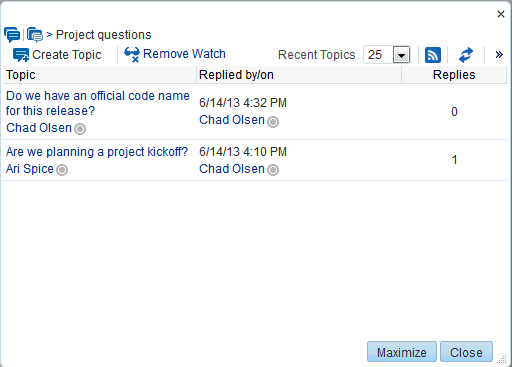
Recent Topics (Figure 16-8) provides a look at the most recently accessed discussion topics in all the discussion forums in a given portal.
Access to portal discussion topics is restricted to those portals of which you are a member.
Recent Topics also provides controls for determining the data to show in addition to the topic title. Click the Personalize (pencil) icon to open a panel with controls for selecting the type of additional data to show (Figure 16-9).
Figure 16-9 Show Panel in a Recent Topics
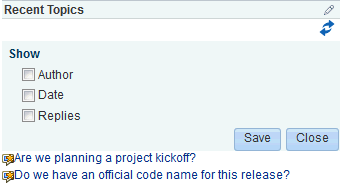
Description of ''Figure 16-9 Show Panel in a Recent Topics''
See Section 16.2.3.3, "Showing or Hiding Information in Recent Topics" for more information.
-
Watched Forums (Figure 16-10) provides a means of viewing all discussion forums you have selected to watch from a particular portal or from all portals.
Watched Forums also provides controls for determining the data to show with the topic title. Click the Personalize icon to open a panel with controls for specifying the type of additional data to show (Figure 16-11).
Figure 16-11 Show Panel in Watched Forums
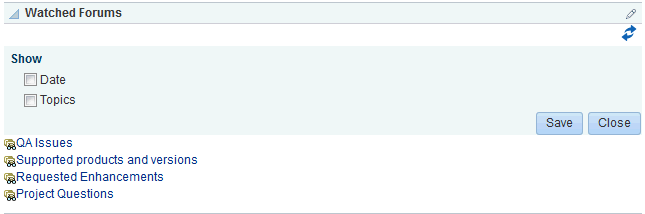
Description of ''Figure 16-11 Show Panel in Watched Forums''
See Section 16.2.3.4, "Showing or Hiding Information in Watched Forums" for more information.
-
Watched Topics (Figure 16-12) provides a cohesive view of all the topics you have selected to watch from a particular portal or from all portals.
Watched Topics also provides controls for determining the data to show with the topic title. Click the Personalize icon (pencil) to open a panel with controls for specifying the type of additional data to show (Figure 16-13).
Figure 16-13 Show Panel in Watched Topics

Description of ''Figure 16-13 Show Panel in Watched Topics''


See Section 16.2.3.5, "Showing or Hiding Information in Watched Topics" for more information.
Discussions is tightly integrated with other assets, such as links and mail. For example, mail sent to a portal distribution list can additionally be posted to that portal's default discussion forum. The portal moderator must choose Monitor Incoming Mail in the portal Tools and Services for Discussions. For more information, see the "Publishing Portal Mail in a Discussion Forum" section in Building Portals with Oracle WebCenter Portal.
Every discussion topic provides the opportunity to link from the topic to another portal asset, such as a document or an announcement. See Section 32.2.1.3, "Linking to an Existing Discussion Forum Topic" and Section 32.2.2.2, "Adding and Linking to a Discussion Forum Topic" for more information.
16.2 Working with Discussions
The Discussion Forums feature is rich, providing controls for creating and managing discussion forums (available to the portal moderator only) and posting and managing discussion topics and replies. The other views, such as Watched Topics or Watched Forums are useful windows into discussion forum content. They provide different views of the discussion forums and topics available to a particular portal or all portals.
Most of the subsections in this section describe tasks you can accomplish through the Discussion Forums page (or console). It is noted when you can use other views to perform the described actions.
This section contains the following topics:
Note:
Only portal moderators can create discussion forums and edit discussion forums (unless participants haveCreate, Edit, and Delete Discussions permissions). See the "Creating a Discussion Forum" and "Editing the Forum Name and Description" sections in Building Portals with Oracle WebCenter Portal.-
Section 16.2.1, "Creating and Managing Forum Topics and Replies"
-
Section 16.2.3, "Showing and Hiding Additional Discussion Forum Information"
16.2.1 Creating and Managing Forum Topics and Replies
The life of a discussion forum takes place in its topics and replies. Users can ask questions, post information, exchange ideas, and otherwise communicate in interesting and useful ways.
Note:
Only portal moderators can create, edit, and delete discussion forums. See the "Creating a Discussion Forum," "Editing the Forum Name and Description," and "Deleting a Discussion Forum" sections in Building Portals with Oracle WebCenter Portal.This section describes how to work with discussion forum topics and replies. It contains the following topics:
16.2.1.1 Posting a New Forum Topic
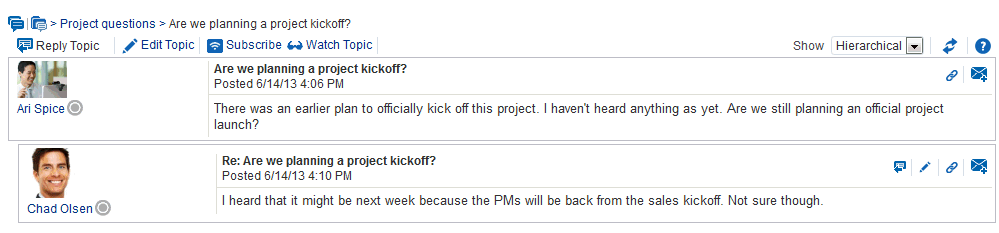
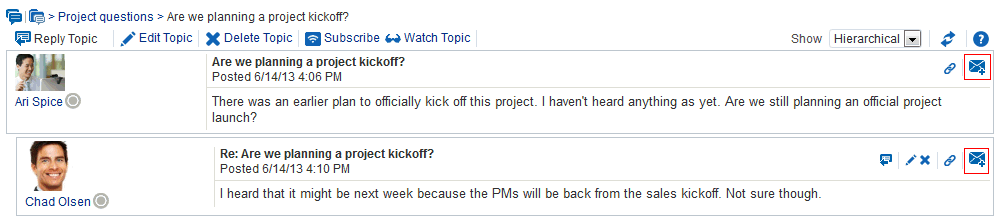
When you consider discussion forums hierarchically, the forum is the top container and topics are the next level down. Each posted topic can have subordinate replies, and the replies themselves can also have replies (Figure 16-14).
Figure 16-14 A Posted Topic and a Reply to the Topic
Description of ''Figure 16-14 A Posted Topic and a Reply to the Topic''
To post a topic under a discussion forum:
-
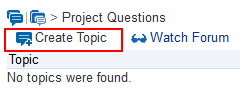
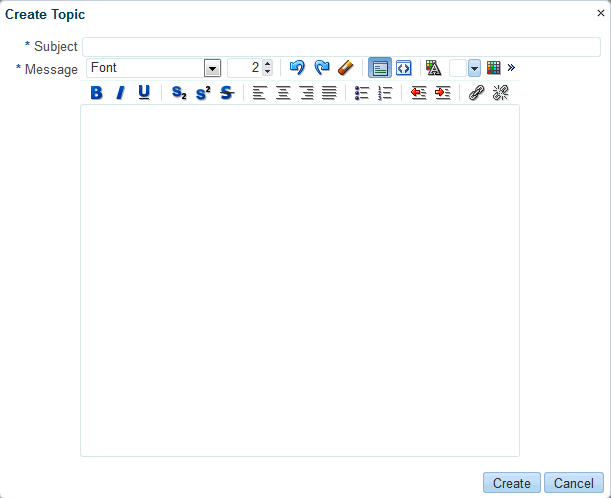
Go to the Discussion Forums console and then navigate to the forum topics page, and click Create Topic (Figure 16-15).
The Create Topic dialog opens (Figure 16-16).
-
In the Subject field, enter the subject of the topic.
You can enter up to 200 characters.
-
In the Message field, enter more details about the topic.
You can enter up to 4000 characters.
-
Click Create.
The newly-posted topic appears under the selected forum in Discussion Forums. Click the topic subject to view the message (Figure 16-17).
Figure 16-17 A New Discussion Forum Topic

Description of ''Figure 16-17 A New Discussion Forum Topic''
16.2.1.2 Replying to Topic Posts
To reply to topic posts:
-
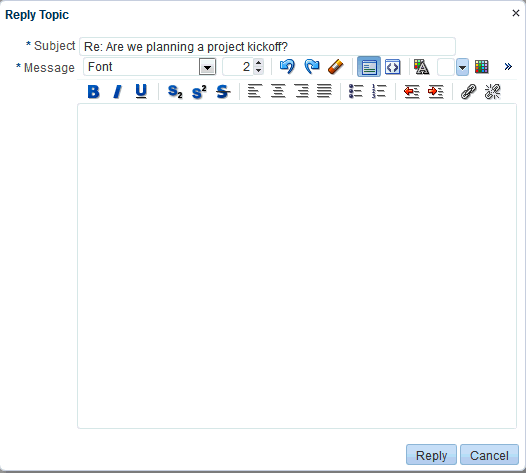
Go to the Discussion Forums console and then navigate to the forum topics page, and click the relevant topic link (Figure 16-18).
The selected topic opens.
-
Click Reply Topic (Figure 16-19).
The Reply Topic dialog opens (Figure 16-20).
-
In the Subject field, either leave the text as is or revise it.
You can enter up to 200 characters.
-
In the Message text box, enter your reply to the topic.
You can enter up to 4000 characters.
-
Click Reply.
Your reply appears below the main topic post (Figure 16-21).


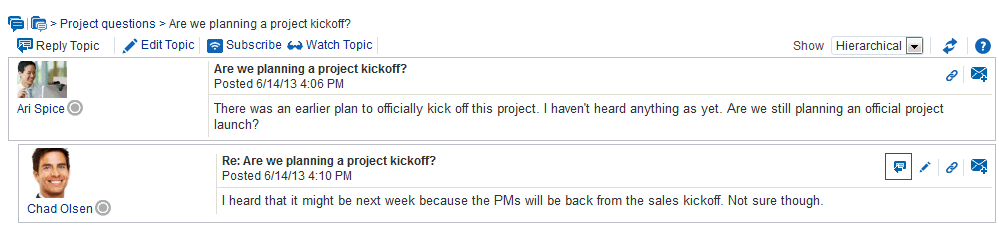
To post a reply to a reply, click the Reply to message icon (Figure 16-22) and follow the steps described in this section.
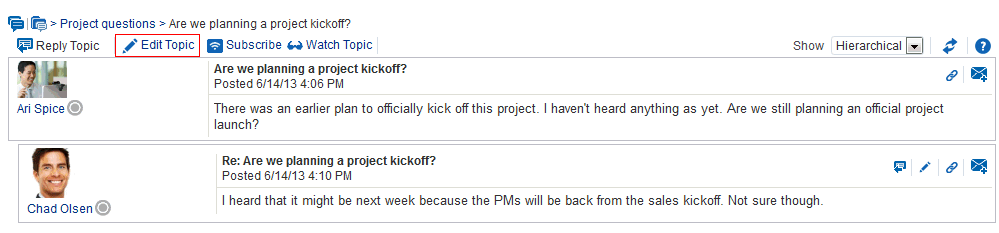
16.2.1.3 Viewing Topic Posts and Replies
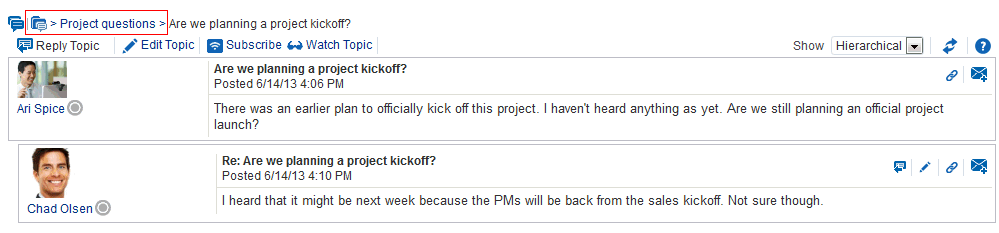
With Discussion Forums, topics and replies to the topic open directly in Discussions Forums. To navigate back up the forum hierarchy, click the locator links that display above the topic reply area (Figure 16-23).
With all the other Discussions views, topics open in a separate window. For example, in Figure 16-24, the topic and its reply displays in a window after clicking the topic from the Watched Topics view.
Figure 16-24 Viewing a Topic in Discussions - Watched Topics
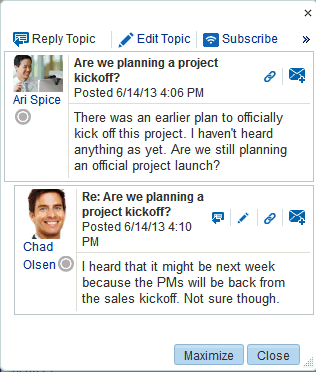
Description of ''Figure 16-24 Viewing a Topic in Discussions - Watched Topics''
To return to the main view, click the Close button in the window.
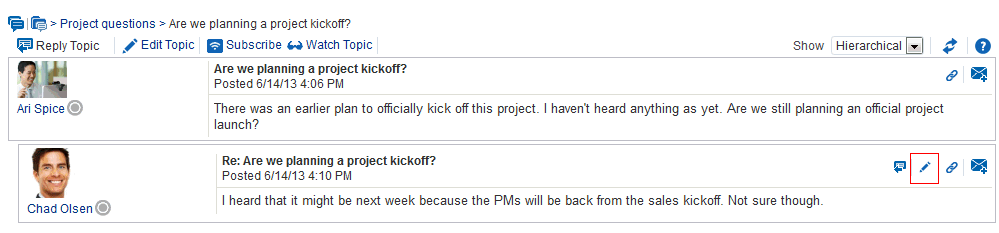
16.2.1.4 Editing Topics and Replies
After you post a topic or a reply, you retain the option of returning to it and revising its content. Only you, as the topic author, and portal moderators can edit your replies. This section describes how to edit topics and replies.
To edit a topic or a reply:
-
Go the Discussion Forum that displays the topic or reply you want to edit, and click the relevant topic.
The selected topic opens.
-
To edit a topic or a reply, do the following:
-
To edit the topic, click Edit Topic (Figure 16-25).
-
To edit a reply, click the Edit message icon (pencil) associated with the reply (Figure 16-26). Only the user who authored the reply or the portal moderator can view the icon.
The Edit Topic or Edit Message dialog opens (Figure 16-27).
-
-
Revise the topic (up to 200 characters) or reply (up to 4000 characters).
-
Click Save.
Your changes are posted to the forum.

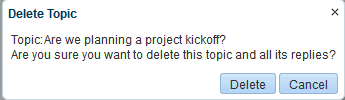
16.2.1.5 Deleting Topic Posts and Replies
When you delete a topic, the original topic post and all of its subordinate replies are deleted. When you delete a reply, you can select to delete the original reply as well as all of its subordinate replies or to delete only this message and keep its replies.
The steps to delete topics and replies are similar.
Note:
To delete a topic post or reply, you must be the user who created it or you must have access equivalent to the portal moderator (Create, Edit, and Delete Discussions permissions). If you do not have the permission to delete, you will not see the option to delete.To delete a topic or a reply:
-
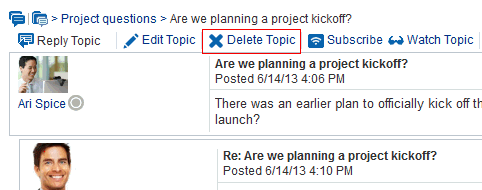
Go to the Discussion Forum that displays the topic or reply you want to delete, and click the relevant topic (Figure 16-28).
The selected topic opens.
-
Your next step depends on whether you want to delete a topic or a reply:
-
To delete a topic, click the Delete Topic link (Figure 16-29).
A Delete Topic confirmation dialog opens (Figure 16-30).
Figure 16-30 Delete Confirmation Dialog for Topics
Description of ''Figure 16-30 Delete Confirmation Dialog for Topics''
-
To delete a reply, click the Delete message icon associated with the reply (Figure 16-31).
A Delete Message confirmation dialog opens, with the option to select if you want to delete this message and all its replies or delete only this message (Figure 16-32).
Figure 16-32 Delete Confirmation Dialog for Topic Replies

Description of ''Figure 16-32 Delete Confirmation Dialog for Topic Replies''
-
-
Select an option, and then click Delete to confirm the deletion.
16.2.1.6 Selecting the Number of Topics or Forums to Display
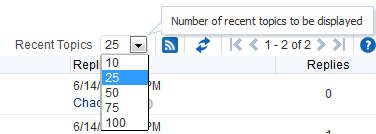
You can decide how many topics or forums to display; for example, 10, 25, 50, 75, or 100 (Figure 16-33).
Figure 16-33 Number of Topics to Display
Description of ''Figure 16-33 Number of Topics to Display''
For example, if you choose to display 10 topics, and if there are more than 10 topics available, then you click the More link to see the next 10 topics, and so on. (Note that your portal moderator may have configured the portal to not show the More link or to show a specific number of topics.)
16.2.1.7 Toggling Between Topic View Modes
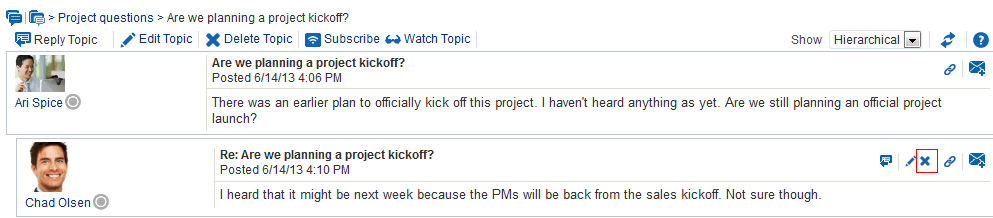
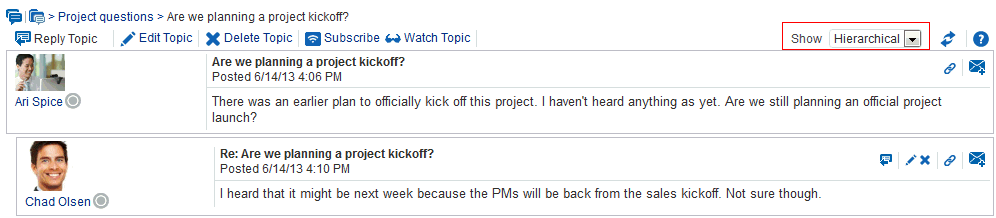
You have the option of viewing a topic and all of its replies in a hierarchical (indented) mode or a flat (unindented) mode. The hierarchical mode (Figure 16-34) uses indenting to indicate whether a reply is to the topic or to another reply.
For example, in Figure 16-34 the first entry is the main topic, the second is a reply to the topic, and so on.
The flat mode (Figure 16-35) makes no such distinctions.
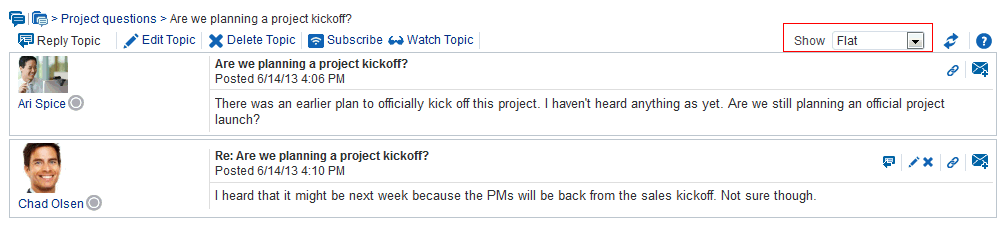
All Discussion views that show topics and replies on the same screen provide Show view mode options.
To toggle between topic view modes:
-
Go to the Discussions view that contains the topic you want to view, and click the topic.
-
From the Show drop-down list, select Flat or Hierarchical.
The topic view renders according to your selection. (You might have to click Refresh or click another page and then return to the page where the Discussions view is to see the changes.)
16.2.2 Watching Forums and Topics
Watching discussion forums and topics provides a convenient means of keeping a close eye on the information most current and relevant to you. The forums and topics you choose to watch are appear in your view only. No other user is affected by the forums and topics you choose to watch.
When you select to watch a forum or a topic, whenever users add to that forum or topic, in addition to it appearing in the user's watched forums or topics list, you receive a mail notification.
This section includes information about how to add, view, and manage watched topics and forums. It contains the following subsections:
-
Section 16.2.2.1, "Adding a Discussion Forum or Topic to Your Watch List"
-
Section 16.2.2.2, "Removing a Discussion Forum or Topic from a Watch List"
-
Section 16.2.2.3, "Viewing Watched Forums and Topics from the Forums View"
16.2.2.1 Adding a Discussion Forum or Topic to Your Watch List
To add a discussion forum or topic to your watch list:
-
Go to the discussion forum or topic you want to add to your watch list.
-
The next step depends on whether you want to watch a forum or a topic:
-
To watch a forum, click Watch Forum at the top of the forum (Figure 16-36).
Figure 16-36 Watch Forum Link on the Forum
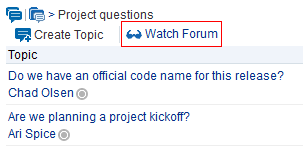
Description of ''Figure 16-36 Watch Forum Link on the Forum''
-
To watch a topic, click the topic link, then click Watch Topic at the top of the topic (Figure 16-37).
Figure 16-37 Watch Topic Link on the Topic
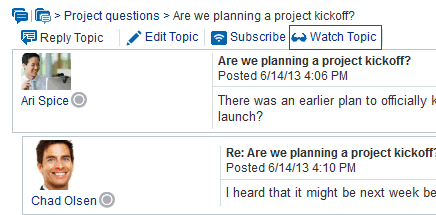
Description of ''Figure 16-37 Watch Topic Link on the Topic''
-
The watched forum or topic is listed on all Watched Forums or Watched Topics views, for example, in Watched Forums and Watched Topics (Figure 16-38) views.

16.2.2.2 Removing a Discussion Forum or Topic from a Watch List
To remove a discussion forum or a discussion topic from your watch list:
-
Go to the discussion forum or topic you want to remove from your watch list.
-
Click Remove Watch on the forum or topic (Figure 16-39).
Figure 16-39 Remove Watch Icon in a Topic
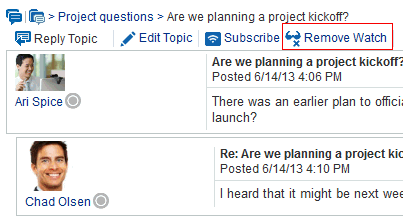
Description of ''Figure 16-39 Remove Watch Icon in a Topic''
The selected item is removed from your forum or topic watch list upon refresh.
16.2.2.3 Viewing Watched Forums and Topics from the Forums View
To view a watched forum or topic from the Forums view:
-
From the Forums view, set the panel display option to Watched Forums or Watched Topics (Figure 16-40).
Figure 16-40 Watched Forums on the Forums - Quick View

Description of ''Figure 16-40 Watched Forums on the Forums - Quick View''
-
Click the link to the discussion forum or forum topic you want to view.
The forum or topic opens (Figure 16-41).
Figure 16-41 A Watched Forum Opened from the Quick View
Description of ''Figure 16-41 A Watched Forum Opened from the Quick View''
16.2.3 Showing and Hiding Additional Discussion Forum Information
Most discussions views provide personalization settings for determining the amount of information to show in addition to the forum or topic title (the Discussion Forums view does not provide such settings). Additional information can include forum or topic author, creation date, and replies or topics.
How you set these display settings is personal, affecting only your view. How you access these display settings varies slightly from each discussion view.
This section describes how to configure display settings. It contains the following topics:
-
Section 16.2.3.1, "Showing or Hiding Information in Forums View"
-
Section 16.2.3.2, "Showing or Hiding Information in Popular Topics"
-
Section 16.2.3.3, "Showing or Hiding Information in Recent Topics"
-
Section 16.2.3.4, "Showing or Hiding Information in Watched Forums"
-
Section 16.2.3.5, "Showing or Hiding Information in Watched Topics"
16.2.3.1 Showing or Hiding Information in Forums View
To show or hide additional information in Discussions Forums View:
-
Go to the Forums view where you want to select display settings.
-
Click the Select the data to display icon (Figure 16-42).
Figure 16-42 Select the data to display Icon in Forums

Description of ''Figure 16-42 Select the data to display Icon in Forums ''
The Display Settings dialog opens (Figure 16-43).
-
Select the data you want to show, or deselect the data check box you want to hide. Select or deselect one or more from:
-
Author—The user name of the person who created the forum or topic (for Watched Forums, this option does not appear).
-
Date—The date the forum or topic was last updated.
-
Replies—The replies associated with the topic (for Watched Forums, this displays Topics).
-
-
Click Save to save your changes and close the dialog.
16.2.3.2 Showing or Hiding Information in Popular Topics
To show or hide additional information in Popular Topics:
-
Go to the Popular Topics view where you want to show or hide additional information.
-
Click the Personalize icon (pencil) in the header (Figure 16-44).
Figure 16-44 Personalize Icon in Popular Topics

Description of ''Figure 16-44 Personalize Icon in Popular Topics''
The Show panel displays, where you can select or deselect additional data (Figure 16-45).
Figure 16-45 Show Panel in Popular Topics
Description of ''Figure 16-45 Show Panel in Popular Topics''
-
Select the data you want to show, or deselect the data check box you want to hide. Select or deselect one or more from:
-
Author—The user name of the person who posted the topic
-
Date—The date the topic was last updated
-
Replies—The replies associated with the topic
-
-
Click Save to save your changes and close the panel.
16.2.3.3 Showing or Hiding Information in Recent Topics
To show or hide additional information in Recent Topics:
-
Go to the Recent Topics view where you want to show or hide additional information.
-
Click the Personalize icon (pencil) in the header (Figure 16-47).
Figure 16-46 Personalize Icon in Recent Topics
Description of ''Figure 16-46 Personalize Icon in Recent Topics''
The Show panel displays, where you can select or deselect additional data (Figure 16-47).
Figure 16-47 Show Panel in Recent Topics
Description of ''Figure 16-47 Show Panel in Recent Topics''
-
Select the data you want to show, or deselect the data check box you want to hide. Select or deselect one or more from:
-
Author—The user name of the person who posted the topic
-
Date—The date the topic was last updated
-
Replies—The replies associated with the topic
-
-
Click Save to save your changes and close the panel.
16.2.3.4 Showing or Hiding Information in Watched Forums
To show or hide additional information in Watched Forums:
-
Go to the Watched Forums view where you want to show or hide additional information.
-
Click the Personalize (pencil) icon in the header (Figure 16-48).
Figure 16-48 Personalize Icon in Watched Forums

Description of ''Figure 16-48 Personalize Icon in Watched Forums''
The Show panel displays, where you can select or deselect additional data (Figure 16-49).
Figure 16-49 Show Panel in Watched Forums
Description of ''Figure 16-49 Show Panel in Watched Forums''
-
Select the data you want to show, or deselect the check box of the data you want to hide. Select or deselect one or more from:
-
Date—The date the forum was last updated
-
Topics—The topics associated with the forum
-
-
Click Save to save your changes and close the panel.
16.2.3.5 Showing or Hiding Information in Watched Topics
To show or hide additional information in Watched Topics:
-
Go to the Watched Topics view where you want to show or hide additional information.
-
Click the Personalize icon (pencil) in the header (Figure 16-50).
Figure 16-50 Personalize Icon in Watched Topics

Description of ''Figure 16-50 Personalize Icon in Watched Topics''
The Show panel displays, where you can select or deselect additional data (Figure 16-51).
Figure 16-51 Show Panel in Watched Topics
Description of ''Figure 16-51 Show Panel in Watched Topics''
-
Select the data you want to show, or deselect the data check box you want to hide. Select or deselect one or more from:
-
Author—The user name of the person who posted the topic
-
Date—The date the topic was last updated
-
Replies—The replies associated with the topic
-
-
Click Save to save your changes and close the panel.
16.2.4 Sending Mail from Discussion Topics
Each discussion topic has an associated Send Mail icon in its toolbar (Figure 16-52). Click the Send Mail icon to initiate a mail message containing the discussion text, location, author, and date it was created. This feature makes it easy for you to communicate interesting discussions to others.
Figure 16-52 Send Mail Icons on Discussion Topics
Description of ''Figure 16-52 Send Mail Icons on Discussion Topics''
The portal moderator determines the mail client to use with the Send Mail icon. If a local mail client was specified, then a plain text message opens (if you have not logged into your mail application, you will be prompted to do so). If WebCenter Portal's Mail service was set as the mail client, then the HTML Mail Compose dialog opens. With either mail client, you can add or edit the standard, perpetuated message before sending.