25 Managing Security in Oracle Data Integrator
This chapter describes how to set up security in Oracle Data Integrator. It includes an overview of Oracle Data Integrator security concepts and components.
This chapter includes the following sections:
Introduction to Oracle Data Integrator Security
Oracle Data Integrator security is used to secure any action performed by authenticated users against the design-time and run-time artifacts and components of Oracle Data Integrator.
The Oracle Data Integrator security model is based on granting privileges on methods, objects types, or specific object instances to users.
All the security information for Oracle Data Integrator is stored in the master repository.
This section contains the following topics:
Objects, Instances and Methods
An object is a representation of a design-time or run-time artifact handled through Oracle Data Integrator. Examples of objects include agents, projects, models, data stores, scenarios, mappings, and even repositories. Specific objects have a double name, such as Agent/Context and Profile/Method. These objects represent links between objects. These links are also objects. For instance, Agent/Context corresponds to a physical/logical agent association made through the contexts. Privileges on this object enable the ability to change this association in the topology.
An instance is a particular occurrence of an object. For example, the Datawarehouse project is an instance of the Project object.
A method is an action that can be performed on an object, such as edit, delete, and so on. Each object has a predefined set of methods.
Note:
The notions of object instance and method in Oracle Data Integrator are similar to the same concepts used in object-oriented programming.
CAUTION:
Although they appear in the Security Navigator, objects and methods are predefined in Oracle Data Integrator and should not be altered.
Profiles
A profile contains a set of privileges for working with Oracle Data Integrator. You can assign one or more profiles to a user, or to a role, to grant the sum of the privileges in those profiles to that user or role.
A profile method is an authorization granted to a profile on a method of an object type. Each granted method allows a user with this profile to perform an action on an instance of an object type.
In Oracle Data Integrator Studio, methods granted to a profile appear under this profile in the Profiles accordion of the Security Navigator. When a method does not appear for a given profile, this profile does not have access to this method.
A method can be granted as a generic or nongeneric privilege:
-
A method granted as a generic privilege is granted by default on all the instances of this object.
-
A method granted as a nongeneric privilege is not granted by default on all object instances, but may be granted on a per instance basis.
Generic vs. Nongeneric Profiles
Generic profiles have the generic privilege option selected for all object methods. This implies that a user, or role, with such a profile is by default authorized for all methods of all instances of an object to which the profile is authorized.
Nongeneric profiles are not by default authorized for all methods on the instances because the generic privilege option is not selected for all object methods. You must grant the user, or role, the rights on the methods for each instance.
If you want a user, or role, to have the rights on no instance by default, but want to grant the rights on a per instance basis, the user or role must be given a nongeneric profile.
If you want a user or role to have the rights on all instances of an object type by default, you must give the user or role a generic profile.
Oracle Data Integrator contains built-in profiles that you can assign to the users or roles you create.
Table 25-1 shows the built-in profiles provided by Oracle Data Integrator.
| Profile Name | Description |
|---|---|
|
CONNECT |
Profile granted with the basic privileges to connect to Oracle Data Integrator. It should be granted with another profile. |
|
CONSOLE |
Profile granted with privileges to use the Oracle Data Integrator Console. |
|
DESIGNER |
Profile granted with privileges to perform development operations. Use this profile for users who will work mainly on projects. |
|
METADATA_ADMIN |
Profile granted with privileges to manage metadata. Use this profile for users that will work mainly on models. |
|
NG_CONSOLE |
Nongeneric version of the CONSOLE profile. |
|
NG_DESIGNER |
Nongeneric version of the DESIGNER profile. |
|
NG_METADATA_ADMIN |
Nongeneric version of the METATADA_ADMIN profile. |
|
NG_VERSION_ADMIN |
Nongeneric version of the VERSION_ADMIN profile. |
|
OPERATOR |
Profile granted with privileges to manage run-time objects. Use this profile for production users. |
|
SECURITY_ADMIN |
Profile granted with privileges to edit security. Use this profile for security administrators. |
|
TOPOLOGY_ADMIN |
Profile granted with privileges to edit the Topology. Use this profile for system or Oracle Data Integrator administrators. |
|
VERSION_ADMIN |
Profile granted with privileges to create, restore and edit versions and solutions. Use this profile for project managers, or developers who are entitled to perform version management operations. |
Note:
Oracle recommends not modifying built-in profiles because they evolve to secure new features of Oracle Data Integrator. If you want to customize your own profiles or existing profiles, Oracle recommends that you create copies of the built-in profiles and then customize those copies.
Users
A user is an Oracle Data Integrator user. A user inherits the following privileges:
-
All the privileges granted to its various profiles
-
Privileges on objects or instances, or both, given to this user
A user method is a privilege granted to a user on a method of an object type. Each granted method allows the user to perform an action (edit, delete, and so forth) on instances of an object type (project, model, data store, and so forth). These methods are similar to profiles methods, but applied to users.
You can grant users with privileges on instances on specific work repositories where these instances exist. For example, you may grant a developer user with the edit privilege on the LOAD_DATAWAREHOUSE scenario on the a DEVELOPMENT repository and not on a PRODUCTION repository.
You grant an authorization by object instance to a user on an object instance. It allows you to grant to this user certain methods of this object instance.
An authorization by object instance for a given instance that appears in a user's tree indicates that the user is granted specific privileges on the object methods for the given instance. You specify these privileges in the object instance editor. If an instance is not visible in the tree of the user instances, then the User Method or Profile Method privileges for the object type apply.
Because an instance may be replicated over the different work repositories that are attached to the master repository, you can define authorizations by object instances for one, several, or all your work repositories that are attached to this master repository. For example, you can replicate a LOAD_DATAWAREHOUSE scenario instance (using, for example, versioning) in the DEVELOPMENT, TEST, and PRODUCTION repositories. Privileges on the instance can change depending on the repository. For example, it is common to replicate projects from a development repository to a test repository. You can grant edit privileges to a developer for that developer's project in the development repository, but not in the test repository. In the test repository, the developer is granted with only view privileges on the project.
Roles
If Oracle Data Integrator is configured to use external authentication (see "Configuring External Authentication"), you can leverage the enterprise role integration feature in Oracle Data Integrator. Enterprise role integration in Oracle Data Integrator is based on the authorization model in Oracle Platform Security Services (OPSS). This feature allows you to map enterprise roles to Oracle Data Integrator roles, enabling enterprise users of a particular enterprise role to access Oracle Data Integrator through the permissions granted to the Oracle Data Integrator roles in the mapping.
Enterprise role integration in Oracle Data Integrator enables you to:
-
Create a set of Oracle Data Integrator roles.
-
Grant Oracle Data Integrator privileges (instance level and type level) and profiles to Oracle Data Integrator roles.
-
Map enterprise principals — that is, users or roles — defined in an external identity store to Oracle Data Integrator roles.
-
Determine the privileges granted to a user who is authenticated into Oracle Data Integrator by evaluating the Oracle Data Integrator role to which the user is mapped. (Privileges are automatically calculated during authentication.)
For an introduction to enterprise roles, see "Understanding Users and Roles" in Securing Applications with Oracle Platform Security Services. For details about how enterprise role integration works in Oracle Data Integrator and how you can manage roles in Oracle Data Integrator Studio, see "Mapping Principals Defined in an Identity Store to Oracle Data Integrator Roles".
Setting up a Security Policy
This section explains how to use the different security capabilities to enforce security in Oracle Data Integrator.
This section contains the following topics:
Security Policy Approaches
Two main approaches are available for defining the security in Oracle Data Integrator:
-
The strongly secured approach, where users have no default authorizations on objects. This approach uses only nongeneric profiles. The security administrator must grant users authorizations on object instances. This policy is complex to configure because it requires managing privileges by instance.
-
The generic approach, where users inherit the privileges of the profiles they have. This policy is suitable in most cases and is simple to configure.
To implement a strongly secured approach:
-
Create the users.
-
Give the users nongeneric profiles (built-in or customized).
-
Grant the users privileges on object instances after those instances are created. This operation must be repeated for every new instance.
To implement a generic approach:
-
Create the users.
-
Give the users the generic profiles (built-in or customized).
Note:
It is possible to combine the two approaches by simultaneously using generic and non generic profiles. For example, by using DESIGNER and NG_METADATA_ADMIN for the users, you manage projects in a generic approach, and manage models in a strongly secured approach.
Managing Profiles
You can create, delete, or duplicate profiles. Creating and duplicating profiles enables you to customize the profiles assigned to users. The following topics provide the steps for performing these procedures in Oracle Data Integrator Studio.
Creating a New Profile
To create a profile:
-
In Security Navigator, expand the Profiles accordion.
-
Click New Profile in the toolbar of the Profiles accordion.
-
In the Name field, enter a name for your profile.
-
From the File main menu, select Save.
The new profile appears.
Duplicating a Profile
To duplicate a profile:
-
In Security Navigator expand the Profiles accordion.
-
Select the profile that you want to duplicate from the list of profiles.
-
Right-click and select Duplicate.
A new profile appears, which is a copy of the original profile.
Deleting a Profile
To delete a profile:
-
In Security Navigator expand the Profiles accordion.
-
Select the profile that you want to delete from the list of profiles.
-
Right-click and select Delete.
-
Click OK in the Confirmation dialog.
The profile disappears from the list. All users granted with this profile lose the privileges attached to this profile.
Managing Users
The way in which you manage users depends, in part, on where the user is defined. By default, a user corresponds to the login name used to connect to a repository and is persisted in the internal repository of Oracle Data Integrator. However, if external authentication is enabled for Oracle Data Integrator components:
-
Users authenticated into Oracle Data Integrator are created and managed in an external identity store, such as Oracle Internet Directory. You use the tools and utilities provided with that store to create, update, and delete users.
-
To let external users access Oracle Data Integrator, you can do any of the following:
-
Map the external user to an Oracle Data Integrator role.
-
Map any of the enterprise roles to which this external user belongs to an Oracle Data Integrator role.
-
Register the external user in Oracle Data Integrator using the Security Navigator as in prior releases.
-
-
You can assign profiles or other security privileges directly to external users who are registered in Oracle Data Integrator. Or you can assign profiles or other security privileges to an Oracle Data Integrator role, and then map external users (or any of the external users' enterprise roles) to that Oracle Data Integrator role. By doing the latter, an external user can inherit all the profiles or privileges granted to the Oracle Data Integrator role.
You can also map an enterprise user (or the user's enterprise roles) to multiple Oracle Data Integrator roles. When a user is authenticated, Oracle Data Integrator calculates the user's privileges as a union of all the privileges granted to all the Oracle Data Integrator roles in the mapping.
For more information about external authentication, see "Configuring External Authentication"). For more information about enterprise role integration, see "Mapping Principals Defined in an Identity Store to Oracle Data Integrator Roles".
Creating a New User in the Internal Repository
To create a user in the internal repository of Oracle Data Integrator:
-
In Security Navigator expand the Users accordion.
-
Click New User in the toolbar of the Users accordion.
-
In the Name field, enter a name for your user.
-
Provide the Initials for this user.
-
Do one of the following:
-
If using internal authentication, click Enter the Password and provide a password for this user.
-
If using external authentication, click Retrieve GUID to associate the new user with a user from the external identity store. The user name in Oracle Data Integrator must match the user name in the identity store. If a match is found, a Global Unique ID appears in the External GUID field.
-
-
From the File main menu, select Save.
The new user appears in the Users accordion.
Assigning a Profile to a User
To assign a profile to a user:
-
In Security Navigator expand the Users and the Profiles accordions.
-
Select the profile that you want to assign, then drag it on the user you want to assign it to.
-
Click OK in the Confirmation dialog.
The profile appears under the profiles of this user. The user is immediately granted the privileges attached to this profile.
Note:
If external authentication is enabled, you can assign profiles to roles. Users who are defined in a given Oracle Data Integrator role are granted all the profiles assigned to that role. Enterprise role integration gives you a more convenient and coarse-grained approach to managing the privileges granted to users. For more information, see "Assign Privileges or Profiles to Oracle Data Integrator Roles".
Removing a Profile from a User
To remove a profile from a user:
-
In Security Navigator expand the Users accordions.
-
Expand the Profiles node under the user.
-
Right-click the profile to be removed.
-
Select Delete.
-
Click OK in the Confirmation dialog.
The profile disappears from the list of profiles assigned to this user. All privileges granted to this user by this profile are removed.
Note:
If external authentication is enabled, you can remove profiles from roles. Users who are defined in a given Oracle Data Integrator role are granted only the profiles assigned to that role. For more information, see "Assign Privileges or Profiles to Oracle Data Integrator Roles".
Deleting a User from the Internal Repository
To delete a user that is defined in the internal repository of Oracle Data Integrator:
-
In Security Navigator expand the Users accordion.
-
From the list of users, select the user that you want to delete.
-
Right-click and select Delete.
-
Click OK in the Confirmation window.
The user disappears from the list.
Managing Privileges
After creating users and profiles, you can grant privileges to these users and profiles. You can grant profile methods and user methods that apply to object types, and you can also grant authorizations by object instances (for users only) that apply to specific object instances.
Note:
If external authentication is enabled for Oracle Data Integrator components, you can manage privileges for users more conveniently by using the enterprise role integration feature. For more information, see "Using the Roles Editor".
Granting a Profile Method or User Method
To grant a profile method or user method:
-
In Security Navigator expand the Users or Profiles accordion.
-
Expand the Objects accordion, and expand the node of the object for which you want to grant a privilege.
-
Select the method that you want to grant, then drag it on the user or profile you want to grant the method to.
-
Click OK in the Confirmation window.
The method is granted to the user or the profile. The method appears either under the objects node of this user or under the profile.
Note:
You can grant privileges on all the methods of an object by dragging the object itself onto the user or profile instead of dragging one of its methods.
Revoking a Profile Method or User Method
To revoke a profile method or user method:
-
In Security Navigator expand the Users or Profiles accordions.
-
Expand the Profiles or the Objects node under the user for which you want you revoke privileges, then expand the object whose method needs to be revoked.
-
Right-click the method and then select Delete.
-
Click OK in the Confirmation dialog.
The method is revoked from the user or the profile. It disappears from the methods list under the objects node of this user or profile.
Granting an Authorization by Object Instance
To grant an authorization by object instance to a user:
-
In Security Navigator expand the Users accordion.
-
In the Designer, Operator, or Topology Navigator, expand the accordion containing the object to which you want to grant privileges.
-
Select this object, then drag it onto the user in the Users accordion. The authorization by object instance editor appears. This editor shows the list of methods available for this instance and the instances it contains. For example, if you grant privileges on a project instance, the folders and mappings contained in this project appear in the editor.
-
Fine tune the privileges granted per object and method. You may want to implement the following simple privilege policies on methods that you select from the list:
-
To grant all these methods in all repositories, click Allow selected methods in all repositories.
-
To deny all these methods in all repositories, click Deny selected methods in all repositories.
-
To grant all these methods in certain work repositories, click Allow selected methods in selected repositories, then select the repositories from the list.
-
-
From the File main menu, select Save.
Note:
Only certain objects support authorization by object instance. These object types are listed under the Instances node for each user.
Methods for which the user has generic privileges are not listed in the Object Instance Editor.
Revoking an Authorization by Object Instance
To revoke an authorization by object instance from a user:
-
In Security Navigator expand the Users accordion.
-
Expand the Instances node under the user for which you want you revoke privileges.
-
Right-click the instance from which you want to revoke an authorization, and then select Delete.
-
Click OK in the Confirmation dialog.
The authorizations on this object instance are revoked from the user.
Note:
You can also revoke privileges per method by editing the Authorization by Object instance and denying certain methods to this user. After this operation, if the user no longer has any privilege on an instance, the instance automatically disappears from the tree in Security Manager.
Cleaning up Unused Authorizations
Authorizations by object instance are stored in the master repository. However, if objects are deleted from all work repositories, the authorization are not necessarily deleted. You may wish to retain certain unused authorizations; for example, if they refer to objects currently stored in an exported file or in a stored solution.
You should use the Security Clean-up Tool periodically to remove these unused authorizations from the master repository. Unused authorizations are removed if they refer to objects that do not exist in the master repository or in any work repository.
Note:
All work repositories attached to the master repository must be accessible so that you can verify the existence of the objects in those repositories
To clean up unused authorizations:
-
From the Security Navigator toolbar menu, select Clean Up Security Settings.... The Security Clean-up Tool dialog appears.
-
On the Cleanable tab, select Clean for the cleanable security settings you want to remove. The security settings that cannot be removed are shown on the Non-cleanable tab.
-
Click OK to clean up the selected security settings.
Using a Password-Protected Wallet for Storing Login Credentials
Prior to logging in to the Oracle Data Integrator Studio internal repository for the first time, you must create a login name for which you specify your Oracle Data Integrator login credentials. These credentials include your Oracle Data Integrator user name and password, and also the Oracle Data Integrator master repository database user name and password. Oracle Data Integrator can save these credentials in either an encrypted login XML file or a password-protected wallet. By default, they are saved in a password-protected wallet.
The use of password-protected wallets for storing database login credentials is strongly recommended by Oracle. To generate password-protected wallets, Oracle Data Integrator leverages the Oracle Wallet features in Oracle Platform Security Services (OPSS). Password-protected wallets use a strong encryption algorithm to secure the wallet's contents.
Note the following about using the password-protected wallet in Oracle Data Integrator Studio:
-
When you create the wallet, you specify the wallet password and the days until the password expires. Oracle Data Integrator then stores the internal repository login credentials in the wallet.
-
When you connect to an Oracle Data Integrator repository, you need only to enter the wallet password. All repository login credentials are then automatically retrieved from the wallet.
-
The wallet file is named
ewallet.p12and is placed in the following directory:Windows:
%APPDATA%\odi\oracledi\ewalletUNIX:
$HOME/.odi/oracledi/ewalletNote:
Depending on your environment, you might first need to create the root directory for the wallet. For more information, see "Creating the Password-Protected Wallet".
-
When the wallet password expires, Oracle Data Integrator Studio automatically prompts you to enter a new one when you attempt to log in to Studio.
-
You can change the wallet password and expiration at any time from Studio.
The following sections explain how to create and use the password-protected wallet for storing Oracle Data Integrator login credentials:
Creating the Password-Protected Wallet
When logging in to Studio for the first time, you can create the password-protected wallet using the following steps:
-
Create the root directory on your machine for storing the wallet, if it does not already exist.
Windows:
On Windows machines, you must create the root directory path
odi\oraclediin the location represented by the environment variable%APPDATA%. For example:c:\> mkdir %APPDATA%\odi\oracledi
UNIX:
On UNIX machines, you must create the root directory path
.odi/oraclediin the location represented by the environment variable$HOME. For example:prompt> mkdir -p $HOME/.odi/oracledi/
-
Change to the
ORACLE_HOME/odi/studiodirectory. -
Launch Oracle Data Integrator Studio by running the following command:
Windows:
odi.exe
UNIX:
./odi.sh
The Studio main window is displayed.
-
Click Connect to Repository...
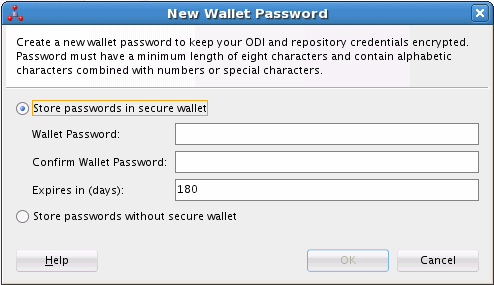
The New Wallet Password dialog box is displayed, shown in Figure 25-1.
Figure 25-1 New Wallet Password Dialog Box
Description of "Figure 25-1 New Wallet Password Dialog Box"
-
Choose the default option, Store passwords in a secure wallet, then enter the password in the Wallet Password and Confirm Wallet Password fields.
Optionally, you can change the password expiration.
-
Click OK.
You are then prompted to enter login credentials for the master repository. For more information about the required credentials, see "Creating the Master Repository".
Subsequently, each time you log in to Studio and connect to a repository, you are prompted for the wallet password.
Permitting Repository Access to Other Users
To give Oracle Data Integrator users access to the repository, you can distribute the password-protected wallet to them in either of the following ways:
-
Provide each user with a copy of the
ewallet.p12file you created, along with the password you specified. -
Create an individual password-protected wallet for each Oracle Data Integrator user. This allows you to set a different password for each wallet.
When creating a wallet for other users, be sure to do the following:
-
Prior to creating a new wallet, move the existing
ewallet.p12file to a different directory. -
When creating a wallet for other users, set the expiration to
0days. This way, when users connect to the repository for the first time, they are prompted to set a new password for their wallets (see "Changing the Wallet Password").
All password-protected wallet files for Oracle Data Integrator Studio must be named ewallet.p12 and must be placed in the ~oracledi/ewallet directory on each machine from which it is used, as explained in "Creating the Password-Protected Wallet".
Changing the Wallet Password
When the password-protected wallet expires, you are automatically prompted to enter a new one when you try to connect to a repository. However, you can also change the wallet password from Studio at any time, as follows:
-
Launch Oracle Data Integrator Studio.
-
From the ODI menu, choose Change Wallet Password...
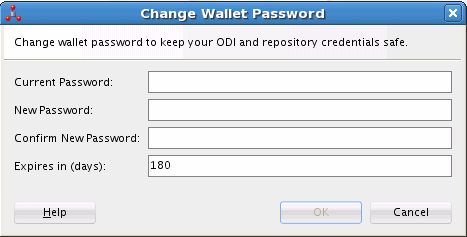
The Change Wallet Password dialog box is displayed, shown in Figure 25-2.
Figure 25-2 Change Wallet Password Dialog Box
Description of "Figure 25-2 Change Wallet Password Dialog Box"
-
Enter the current password and the new password, then confirm your new password.
Optionally, you can also change the expiration.
-
Click OK.
Customizing How Login Credentials Are Saved
Oracle Data Integrator Studio provides the following options for storing login credentials:
-
You can enable or disable the saving of login credentials.
-
If login credentials are being saved, you can choose between saving them in a password-protected wallet or a login XML file.
To change whether or how login credentials are saved, complete the following steps:
-
Launch Oracle Data Integrator Studio.
-
From the Tools menu, choose Preferences...
The Preferences dialog box is displayed.
-
In the Preferences dialog box, expand the ODI node, then select User Interface.
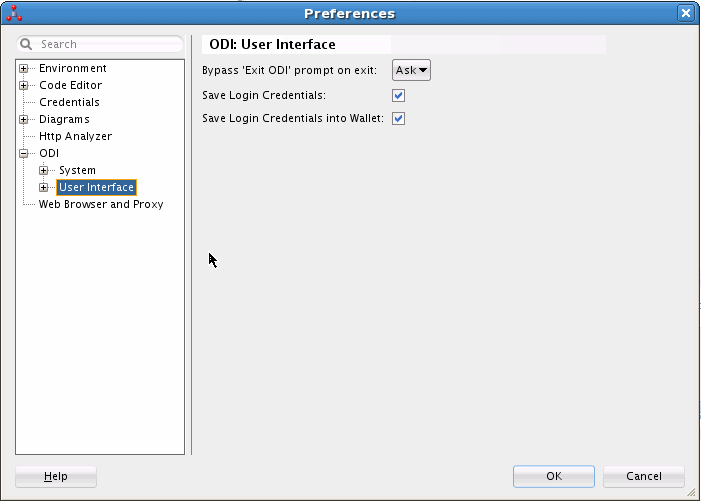
The Preferences dialog box, shown in Figure 25-3, displays the following options for saving login credentials:
-
Save Login Credentials — Select this option to save credentials.
-
Save Login Credentials into Wallet — Select this option to store the Oracle Data Integrator login credentials in a password-protected wallet.
If Save Login Credentials is selected, but Save Login Credentials into Wallet is deselected, login credentials are saved in a login XML file.
By default, both options are selected, which is the setting recommended by Oracle.
-
-
If you change any preferences, click OK.
Figure 25-3 Preferences Dialog Box for Saving Login Credentials
Description of "Figure 25-3 Preferences Dialog Box for Saving Login Credentials"
Setting Up External Password Storage
Oracle Platform Security Services (OPSS) offers the standard Java Security Model services for authentication and authorization.
Oracle Data Integrator stores by default all security information in the master repository. This password storage option is called internal password storage.
Oracle Data Integrator can optionally use OPSS for storing critical security information. When using OPSS with Oracle Data Integrator, the data server passwords and context passwords are stored in the OPSS Credential Store Framework (CSF). This password storage option is called external password storage.
Note:
When using external password storage, other security details such as user names, password, and privileges remain in the master repository. It is possible to externalize the authentication and have users and password stored in an identity store using external authentication. Note also: The external password storage option is unrelated to the external authentication feature. For more information about external authentication, see "Configuring External Authentication".
To use the external password storage option:
-
You need to install a WebLogic Server instance configured with OPSS.
-
All Oracle Data Integrator components, including the run-time agent, need to have access to the remote credential store.
See "Configuring Java EE Applications to Use OPSS" in Securing Applications with Oracle Platform Security Services for more information.
Setting the Password Storage
There are four ways to set or modify the password storage:
-
Importing the master repository (see "Importing the Master Repository") allows you to change the password storage.
-
Creating the master repository (see "Creating the Master Repository") allows you to define the password storage.
-
Switching the Password Storage modifies the password storage for an existing master repository.
-
Recovering the Password Storage allows you to recover from a credential store crash.
Switching the Password Storage
Switching the password storage of the Oracle Data Integrator repository changes how data servers and contexts passwords are stored. This operation must be performed by a SUPERVISOR user.
Use the Switch Password Storage wizard to change the password storage options of the data server passwords.
Before launching the Switch Password Storage wizard perform the following tasks:
-
Disconnect Oracle Data Integrator Studio from the repository.
-
Shut down every component using the Oracle Data Integrator repository.
To launch the Switch Password Storage wizard:
-
From the ODI main menu, select Password Storage > Switch...
-
Specify the login details of your Oracle Data Integrator master repository as defined when connecting to the master repository (see: "Connecting to the Master Repository").
-
Click Next.
-
Select the password storage:
-
Select Internal Password Storage if you want to store passwords in the Oracle Data Integrator repository.
-
Select External Password Storage if you want use OPSS Credential Store Framework (CSF) to store the data server and context passwords.
If you select external password storage, you must provide the MBean Server Parameters to access the credential store described in Table 25-2, and then click Test Connection check the connection to the MBean Server.
-
-
Click Finish.
The password storage options have been changed. You can now reconnect to the Oracle Data Integrator repository.
Recovering the Password Storage
Oracle Data Integrator offers a password recovery service that should be used only in case of an external password storage crash. Using this procedure, password storage is forced to internal password storage because external storage is no longer available. This operation should be performed by a supervisor user.
CAUTION:
When performing a password storage recovery, passwords for context, data servers, JDBC password of the work repository and Enterprise Scheduler related passwords are lost and need to be re-entered manually in Topology Navigator.
Use the Recover Password Storage wizard to start the password recovery.
To launch the Recover Password Storage wizard:
-
From the ODI main menu, select Password Storage > Recover...
-
Specify the login details of your Oracle Data Integrator master repository defined when connecting to the master repository (see: "Connecting to the Master Repository").
-
Click Finish.
-
Re-enter manually data server and context passwords. Refer to Chapter 4, "Setting Up a Topology," for more information.
Managing the Authentication Mode
By default, Oracle Data Integrator users are authenticated using the identity information contained in the master repository. However, Oracle Data Integrator users can be authenticated using an external authentication service instead: Using Oracle Platform Security Services (OPSS), Oracle Data Integrator users are authenticated against an external enterprise identity store (for example, an LDAP server such as Oracle Internet Directory or Microsoft Active Directory), which contains enterprise users and enterprise roles in a central place.
When external authentication is enabled, the master repository retains the Oracle Data Integrator specific privileges. External users do not need to be created in Oracle Data Integrator's internal repository. Instead, external user credentials rely on a centralized identity store, and authentication always takes place against this external store.
The authentication mode (internal or external) can be defined when you create the repository, and can also be switched for existing repositories, as explained in "Setting the Authentication Mode in the Master Repository".
For details about configuring external authentication, see "Configuring External Authentication".
Setting the Authentication Mode in the Master Repository
There are two ways to set the authentication mode:
-
When you create the master repository. The Master Repository Creation Wizard contains options for setting the authentication mode. For information about how to set external authentication when creating the master repository, see "Set External Authentication when Creating the Master Repository". For general information, see also "Creating the Master Repository".
-
When you switch the authentication mode from Studio. The Switch Authentication Mode Wizard allows you to change the authentication mode used by an existing master repository. For detailed steps to switch to external authentication mode in Studio, using this wizard, see "Switching an Existing Master Repository to External Authentication Mode".
Note:
Before you can select external authentication mode in the master repository, you must configure external authentication, as explained in "Configuring External Authentication".
Configuring External Authentication
By default, Oracle Data Integrator stores all user information as well as users' privileges in the master repository. When a user logs to Oracle Data Integrator, it logs against the master repository. This authentication method is called internal authentication.
However, you can customize Oracle Data Integrator to use Oracle Platform Security Services (OPSS) to authenticate users that are defined in an enterprise identity store, which is typically an LDAP server such as Oracle Internet Directory or Microsoft Active Directory. The identity store contains enterprise user information and enterprise roles. Such an identity store is used at the enterprise level by applications to have centralized user definitions and to support single sign-on (SSO). In Oracle Data Integrator, this authentication method is called external authentication. Configuring external authentication enables you to leverage the standard Java Security Model authentication and authorization services that are provided by OPSS.
To use external authentication, you need to configure an enterprise identity store and also configure each Oracle Data Integrator component to refer to that identity store.
Note:
When using external authentication, only users and passwords are externalized. Oracle Data Integrator privileges remain within the repository.
The following sections explain how to set up external authentication for the Studio, and the Standalone Agent:
-
Configuring Oracle Data Integrator Studio for External Authentication
-
Switching an Existing Master Repository to External Authentication Mode
-
Reactivating Users After Switching to External Authentication
-
Configuring the Standalone Agent for External Authentication
-
Mapping Principals Defined in an Identity Store to Oracle Data Integrator Roles
Configuring Oracle Data Integrator Studio for External Authentication
To configure Oracle Data Integrator Studio with external authentication, you must do the following:
Set Up the OPSS Configuration File
The configuration to connect and use the identity store is contained in the OPSS configuration file, called jps-config-jse.xml. To configure Oracle Data Integrator components with external authentication, you must set up this configuration file to correspond to the external identity store that you plan to use.
To set up the OPSS configuration file, complete the following steps:
-
Create the
odi/oracledidirectory on your machine, if it does not already exist. For example:Windows:
c:\> mkdir %APPDATA%\odi\oracledi
UNIX:
prompt> mkdir -p $HOME/.odi/oracledi/
-
Copy the following files into the
odi/oracledidirectory:-
ORACLE_HOME/oracle_common/modules/oracle.jps_12.1.2/domain_config/jse/jps-config.xml -
ORACLE_HOME/oracle_common/modules/oracle.jps_12.1.2/domain_config/jse/system-jazn-data.xml
-
-
Change to the
odi/oracledidirectory. -
Rename
jps-config.xmltojps-config-jse.xml. -
Open
jps-config-jse.xmlin an editor. -
Add a service instance for the identity store provider and include the following properties:
-
The service instance name. For example, for Oracle Internet Directory,
name="idstore.oid". -
The
idstore.typeproperty. -
The
bootstrap.security.principal.mapproperty. -
The
bootstrap.security.principal.keyproperty.
For an example service instance configuration, see Example 25-1.
For details about specifying these properties for your identity store, see "LDAP Identity Store Properties" in Securing Applications with Oracle Platform Security Services.
-
-
In the default jps context, change the
serviceInstanceRefname="idstore.xml"value to"idstore.<your-idstore-type>", as in the following example that sets the identity store type for Oracle Internet Directory:<serviceInstanceRef ref="idstore.oid"/>
-
Comment out the
keystoreandauditservice instance references in the default jps context. For example:<jpsContext name="default"> <serviceInstanceRef ref="credstore"/> <!-- <serviceInstanceRef ref="keystore"/> --> <serviceInstanceRef ref="policystore.xml"/> <!-- <serviceInstanceRef ref="audit"/> -->
-
Set any additional property attribute values as appropriate for your identity store. For complete details about the OPSS configuration file, see "Configuring Java SE Applications to Use OPSS" in Securing Applications with Oracle Platform Security Services for more information.
Example 25-1 shows the configuration of Oracle Internet Directory in the service instance section of the configuration file.
Example 25-1 Example Service Instance Configuration
<!-- OID LDAP Identity Store Service Instance -->
  <serviceInstance name="idstore.oid" provider="idstore.ldap.provider">
  <property name="subscriber.name" value="dc=us,dc=oracle,dc=com" />
  <property name="idstore.type" value="OID" />
   <property name="bootstrap.security.principal.map" value="BOOTSTRAP_JPS"/>
   <property name="bootstrap.security.principal.key" value="bootstrap_idstore"/>
  <property name="username.attr" value="uid"/>
  <property name="groupname.attr" value="cn"/>
  <property name="ldap.url" value="ldap://hostname:port" />
  <extendedProperty>
   <name>user.search.bases</name>
   <values>
    <value>cn=users,dc=us,dc=oracle,dc=com</value>
   </values>
  </extendedProperty>
  <extendedProperty>
   <name>group.search.bases</name>
   <values>
    <value>cn=groups,dc=us,dc=oracle,dc=com</value>
   </values>
  </extendedProperty>
 </serviceInstance>
  .
  .
  .
 <serviceInstanceRef ref="idstore.oid"/>
Create a Wallet File for an LDAP Bootstrap User
You must create a wallet file to store the identity store bootstrap user's credentials. This wallet file is referenced from the OPSS configuration file and is used by Oracle Data Integrator to establish the connection to the identity store that is configured in the OPSS configuration file.
To create this wallet file, complete the following steps:
-
Change to the
ORACLE_HOME/odi/sdk/bindirectory. -
Run the
odi_credtoolscript.You are prompted to enter the following parameters:
For the following parameter . . . . . . enter the following value User name
The Distinguished Name (DN) of the bootstrap user account used to connect to the identity store with necessary privileges.
For example, for Microsoft Active Directory, specify this user as follows:
CN=Administrator,CN=Users,DC=ad,DC=vm,DC=mycompany,DC=comPassword
The password for the bootstrap user account that is used to connect to the identity store.
After you enter the correct credentials for the bootstrap user account, the following message is displayed:
The credentials have been successfully added to the boostrap credential store.
Set External Authentication when Creating the Master Repository
To create the master repository and set it to use external authentication:
-
Change to the
ORACLE_HOME/odi/studiodirectory. -
Launch Oracle Data Integrator Studio by running the following command:
Windows:
odi.exe
UNIX:
./odi.sh
-
In Oracle Data Integrator Studio, select File > New, select Master Repository Creation Wizard, and click OK.
-
In the repository selection screen of the Master Repository Creation Wizard, enter the connection parameters for the database that is to contain the Master Repository, and click Test Connection to ensure the parameters are correct. For details about configuring this database, see "Configuring Oracle Data Integrator in a WebLogic Server Domain" in Installing and Configuring Oracle Data Integrator.
When the connection test is successful, click OK.
-
In the authentication screen of the Master Repository Creation Wizard, select Use External Authentication.
For information about how to select principals who have supervisor privileges in the master repository, see "Mapping Principals Defined in an Identity Store to Oracle Data Integrator Roles".
For information about how to update an existing master repository to use external authentication, see "Switching an Existing Master Repository to External Authentication Mode".
Switching an Existing Master Repository to External Authentication Mode
To switch the authentication mode from internal to external in an existing master repository, complete the following steps:
-
Change to the
ORACLE_HOME/odi/studiodirectory. -
Launch Oracle Data Integrator Studio by running the following command:
Windows:
odi.exe
UNIX:
./odi.sh
-
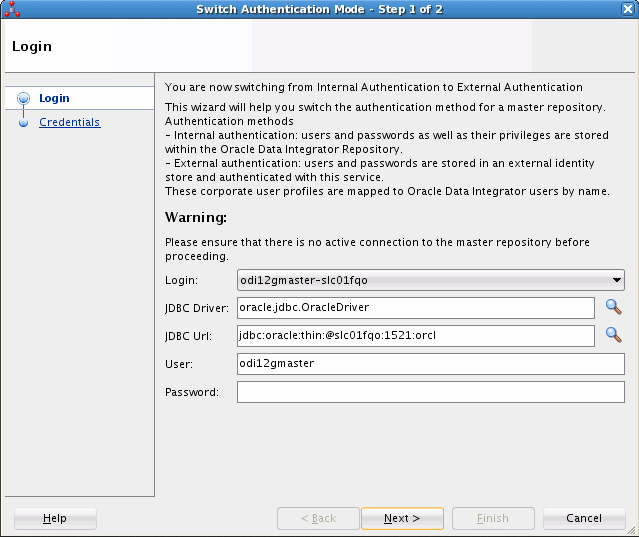
In Oracle Data Integrator Studio, select ODI > Switch Authentication Mode....
The Login screen of the Switch Authentication Mode wizard is displayed, as shown in Figure 25-4.
Figure 25-4 Login Screen of Switch Authentication Mode Dialog Box
Description of "Figure 25-4 Login Screen of Switch Authentication Mode Dialog Box"
-
Enter the login name of the master repository, the JDBC connection parameters, and the user name and password for the master repository database user, then click Next.
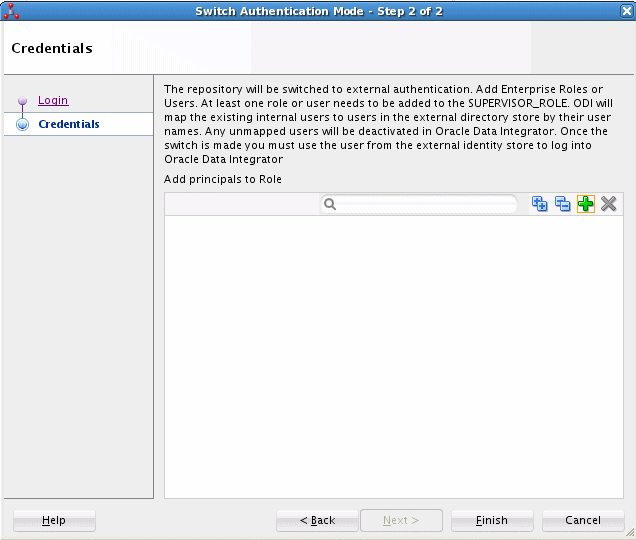
The Credentials screen of the Switch Authentication Mode wizard is displayed, as shown in Figure 25-5.
Figure 25-5 Credentials Screen of Switch Authentication Mode Wizard
Description of "Figure 25-5 Credentials Screen of Switch Authentication Mode Wizard"
-
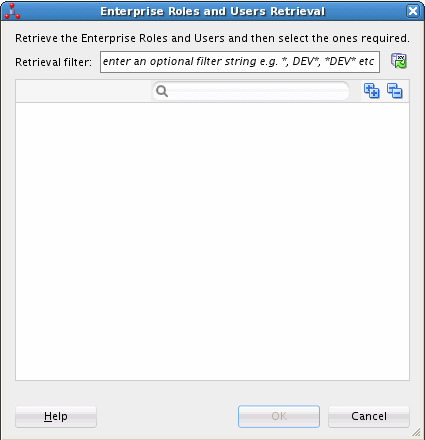
Click the Add button, which is shown as the green plus symbol adjacent to the search field, to display the Enterprise Roles and Users Retrieval dialog box, shown in Figure 25-6.
Figure 25-6 Enterprise Roles and Users Retrieval Dialog Box
Description of "Figure 25-6 Enterprise Roles and Users Retrieval Dialog Box"
You can use the Enterprise Roles and Users Retrieval dialog box to either:
-
Enter a filter expression to display the roles and users in the identity store that match the filter.
-
Search the identity store for a specific role or user name.
You can expand the Enterprise Roles and Enterprise Users nodes to browse the available enterprise roles and users in the identity store.
-
-
Select the user or role you wish to assign to the
SUPERVISOR_ROLErole, then click Finish.
If the external authentication mode switch is successful, a dialog box similar to the one in Figure 25-7 is displayed:
Figure 25-7 Successful Switch to External Authentication Mode Message Box

Description of "Figure 25-7 Successful Switch to External Authentication Mode Message Box"
Reactivating Users After Switching to External Authentication
If you have an existing set of Oracle Data Integrator users defined, you can re-enable them after switching to external authentication as explained in this section. To re-enable users, first reconnect to Studio as a user with supervisor privileges—for example, SUPERVISOR—using the password specified in the external identity store, and not the one stored in the internal Oracle Data Integrator repository. Then complete the following steps:
-
In the Security Navigator, expand the Users accordion.
-
From the list of users displayed, select the user that you want to re-enable.
-
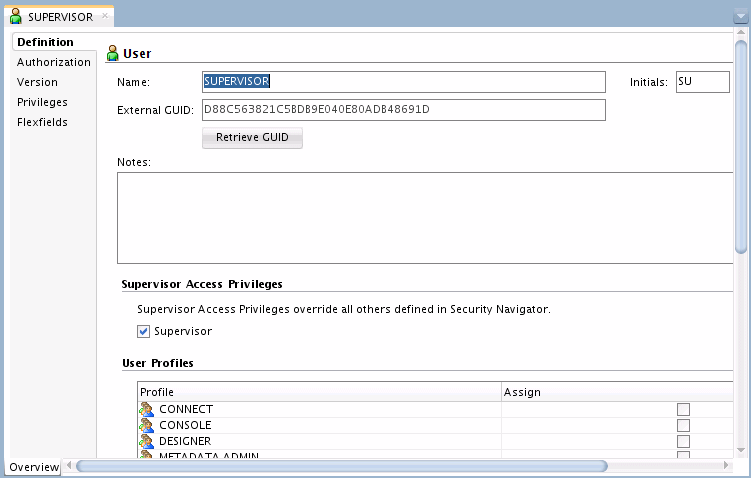
Right-click and select Open. The User editor appears, shown in Figure 25-8.
Figure 25-8 Open USER Administrator Dialog Box
Description of "Figure 25-8 Open USER Administrator Dialog Box"
The Name field displays the user you selected in Step 2.
-
Click Retrieve GUID. If the user name has a match in the identity store, this external user's GUID appear in the External GUID field.
-
From the File main menu, select Save and disconnect.
-
Reconnect as this user (for example, the user
SUPERVISORshown in Figure 25-8) using the password in the external identity store.
You should now be able to connect to Oracle Data Integrator Studio using the external authentication.
Note the following:
-
For troubleshooting LDAP server issues, it is very useful to use any LDAP client to browse the LDAP tree. You can download an LDAP client from the following URL:
-
For any LDAP directory other than Microsoft Active Directory, make sure that the property
user.filter.object.classesis set correctly to the user's object class, which by default is set toUSERif not specified. -
If Oracle Data Integrator Console and Java EE agent are installed in your environment, and you have switched Oracle Data Integrator Studio to external authentication, you might be unable to log in to Oracle Data Integrator Console and the Java EE agent also might fail. If this occurs, you must also configure Oracle Data Integrator Console and Java EE agent for external authentication using the same external identity store. The procedure for doing this is documented in Note 1510434.1 at My Oracle Support, available at the following URL:
https://support.oracle.com/epmos/faces/DocumentDisplay?id=1510434.1
Configuring the Standalone Agent for External Authentication
To configure the Standalone Agent for external authentication, complete the following steps:
-
Copy the following files into the
DOMAIN_HOME/config/fmwconfigdirectory, if they do not already exist there, whereDOMAIN_HOMErepresents the root directory of your Oracle Data Integrator domain.-
ORACLE_HOME/oracle_common/modules/oracle.jps_12.1.2/domain_config/jse/jps-config.xml -
ORACLE_HOME/oracle_common/modules/oracle.jps_12.1.2/domain_config/jse/system-jazn-data.xml
Note:
For information about creating an Oracle Data Integrator domain, see "Configuring Oracle Data Integrator in a WebLogic Server Domain" in Installing and Configuring Oracle Data Integrator.
-
-
Change to the
DOMAIN_HOME/config/fmwconfigdirectory. -
Rename
jps-config.xmltojps-config-jse.xml. -
Open
jps-config-jse.xmlin an editor. -
Add a service instance for the identity store provider and include the following properties:
-
The service instance name. For example, for Oracle Internet Directory,
name="idstore.oid". -
The
idstore.typeproperty. -
The
bootstrap.security.principal.mapproperty. -
The
bootstrap.security.principal.keyproperty.
For an example service instance configuration, see Example 25-1.
For details about specifying these properties for your identity store, see "LDAP Identity Store Properties" in Securing Applications with Oracle Platform Security Services.
-
-
In the default jps context, change the
serviceInstanceRefname="idstore.xml"value to"idstore.<your-idstore-type>", as in the following example that sets the identity store type for Oracle Internet Directory:<serviceInstanceRef ref="idstore.oid"/>
-
Comment out the
keystoreandauditservice instance references in the default jps context element. For example:<jpsContext name="default"> <serviceInstanceRef ref="credstore"/> <!-- <serviceInstanceRef ref="keystore"/> --> <serviceInstanceRef ref="policystore.xml"/> <!-- <serviceInstanceRef ref="audit"/> -->
-
Save your changes to
jps-config-jse.xmland exit from your editor. -
Change to the
DOMAIN_HOME/bindirectory. -
Run the
odi_credtoolscript.You are prompted to enter the following parameters:
For the following parameter . . . . . . enter the following value User name
This is the Distinguished Name (DN) of the bootstrap user account used to connect to the identity store with Administrator privileges.
For example, for Microsoft Active Directory, specify this user as follows:
CN=Administrator,CN=Users,DC=ad,DC=vm,DC=mycompany,DC=comPassword
The password for the bootstrap user account that is used to connect to the identity store.
After you enter the correct credentials for the bootstrap user account, the following message is displayed:
The credentials have been successfully added to the boostrap credential store.
Mapping Principals Defined in an Identity Store to Oracle Data Integrator Roles
Oracle Data Integrator's enterprise role integration feature leverages the authorization model in Oracle Platform Security Services (OPSS) to allow you to map enterprise roles to Oracle Data Integrator roles. Enterprise users who belong to the mapped enterprise role can access Oracle Data Integrator by inheriting the privileges that are granted to the mapped Oracle Data Integrator role. Enterprise role integration simplifies both the management of users and also of privileges because you do not need to register users individually in Oracle Data Integrator to grant them access, and you do not need to manage privileges on a per user basis.
The following sections explain how enterprise role integration works and how you can use it to manage the privileges that are assigned to objects, instances, and profiles.
How Enterprise Role Integration Works
When external authentication is enabled, users are managed in an external identity store, such as Oracle Internet Directory or Microsoft Active Directory.
When using enterprise role integration:
-
Any enterprise principal in the identity store that can be mapped to an Oracle Data Integrator role is entitled to the privileges granted to that role. For example, if the enterprise role
DESIGNERSis mapped to the Oracle Data Integrator roleDESIGNERS_ROLE, any enterprise user who is a member ofDESIGNERSin the identity store is given all the privileges granted toDESIGNERS_ROLEwhen authenticated into Oracle Data Integrator. -
You can map multiple enterprise users and roles to an Oracle Data Integrator role, and you can also map an enterprise user or role to multiple Oracle Data Integrator roles. (Note that you cannot map an Oracle Data Integrator role to another Oracle Data Integrator role.
-
When a user is authenticated into Oracle Data Integrator, privileges granted to that user are determined by a union of all the Oracle Data Integrator roles to which the user is mapped.
If the external user is also registered directly in Oracle Data Integrator, as in previous releases, the overall set of privileges given to the user consists of a union of:
-
The Oracle Data Integrator roles to which the user is mapped
-
Any privileges granted directly to the user
-
-
Users do not need to be created and registered in Oracle Data Integrator in order to enable them to be granted access to Oracle Data Integrator.
-
Any existing privileges and profiles assigned to individual users, as described in "Users", remain in effect. This enables backward compatibility with previous releases of Oracle Data Integrator.
Defining and Managing Oracle Data Integrator Roles
At the time you create the master repository and configure it to use external authentication, the following occurs:
-
The Oracle Data Integrator role
SUPERVISOR_ROLEis automatically created. This is the main administrative role in Oracle Data Integrator. -
You are prompted to select one or more enterprise roles, or enterprise users, from the identity store to be mapped to this
SUPERVISOR_ROLE. Note that Oracle Data Integrator can retrieve all available enterprise roles or enterprise users existing in the identity store that is configured in thejps-config-jse.xmlfile, as explained in "Set Up the OPSS Configuration File".
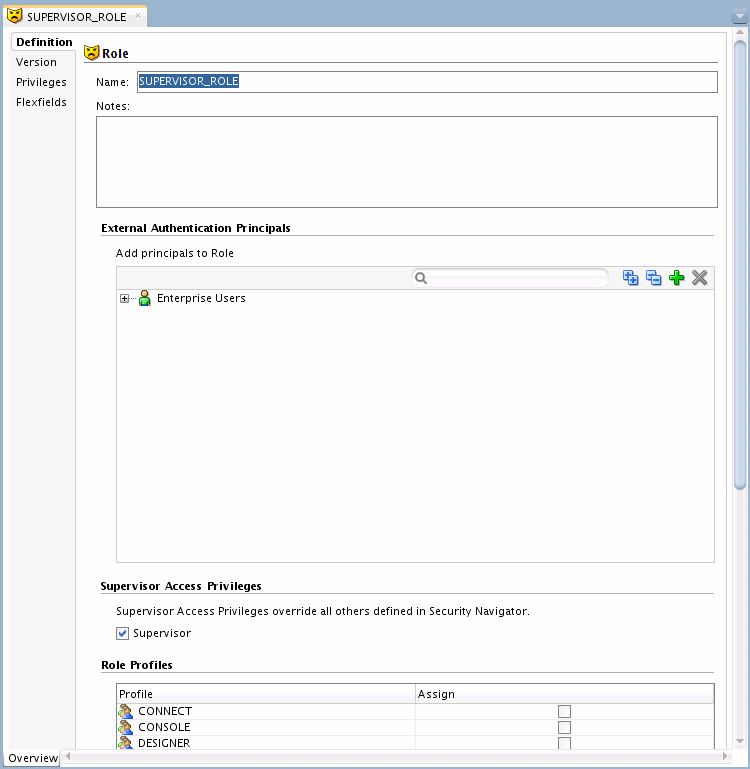
Once you can be authenticated into Oracle Data Integrator and mapped to the SUPERVISOR_ROLE role, you can use the Roles Editor, available from Studio, to map additional enterprise principals to this role. Consequently, any user mapped to this role can then use the Roles Editor to create additional Oracle Data Integrator roles, assign privileges and profiles to those roles, and create other principal mappings from the identity store.
The following sections explain how to map enterprise principals to the SUPERVISOR_ROLE role and how to use the Roles Editor to create, update, and remove Oracle Data Integrator roles:
Configuring Enterprise Roles for the Supervisor Role
When you select Use External Authentication when creating the master repository, as explained in "Set External Authentication when Creating the Master Repository", you need to configure enterprise roles. The initial enterprise role you configure is the principal (one or more) in the identity store to be mapped to the Oracle Data Integrator SUPERVISOR_ROLE.
To configure enterprise roles for the SUPERVISOR_ROLE in the master repository:
-
Start the Master Repository Creation Wizard, as explained in "Set External Authentication when Creating the Master Repository".
-
In the Master Repository Creation Wizard — Step 2 of 3 page, click the Add button retrieve the available enterprise roles and users from the external identity store, as shown in Figure 25-9:
Figure 25-9 Authentication Screen of the Master Repository Creation Wizard
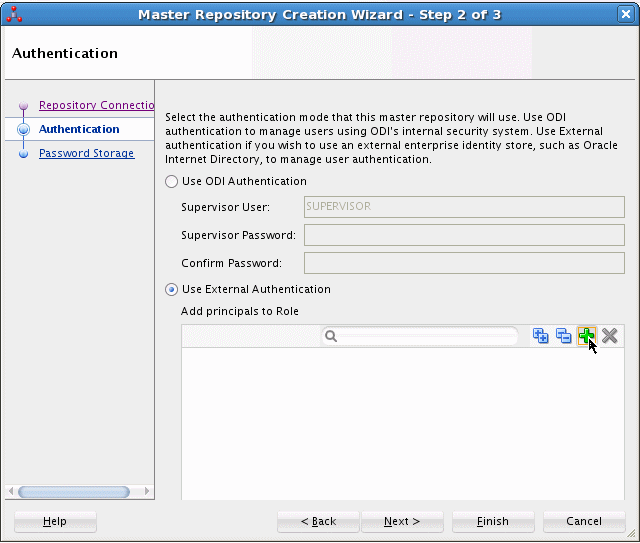
Description of "Figure 25-9 Authentication Screen of the Master Repository Creation Wizard"
When you click the Add button, the Enterprise Roles and Users Retrieval dialog box is displayed, shown in Figure 25-10, in which you can either:
-
Enter a filter expression to display the roles and users in the identity store that match the filter.
-
Search the identity store for a specific role or user name.
You can expand the Enterprise Roles and Enterprise Users nodes to display the individual roles and users, respectively, that are defined in the identity store.
Figure 25-10 Enterprise Roles and Users Retrieval Dialog Box
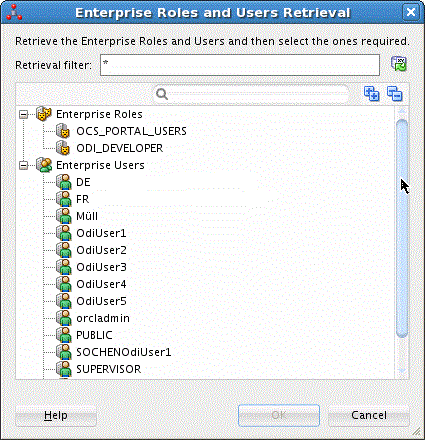
Description of "Figure 25-10 Enterprise Roles and Users Retrieval Dialog Box"
-
-
Select the enterprise user or role from the Enterprise Roles and Enterprise Users dialog box that you want to assign to the
SUPERVISOR_ROLErole, and click OK. -
Finish the creation of the master repository, as explained in "Creating the Master Repository".
Using the Roles Editor
The following sections explain how to use the Roles Editor to manage enterprise role integration with Oracle Data Integrator:
Start the Roles Editor
You can use the Roles Editor to create, update, and delete Oracle Data Integrator roles.
To start the Roles Editor:
-
In Oracle Data Integrator Studio, click Connect to Repository, if necessary, and enter the required credentials to connect to the repository you want to use.
-
In Studio, choose the Security Navigator and select the Roles accordion.
-
Start the Roles Editor in either of the following ways:
-
Click New Role in the toolbar of the Roles accordion. This enables you to create a new Oracle Data Integrator role.
-
From the list of roles that is displayed in the Roles accordion, right-click a role name and select Open. This enables you to update an existing role.
-
-
Right-click and select Open.
The Roles Editor is shown in Figure 25-11.
Create a Role in Oracle Data Integrator
To create an Oracle Data Integrator role:
-
Start the Roles Editor in Studio, if necessary.
-
Choose the Security Navigator and select the Roles accordion.
-
Click New Role in the toolbar of the Roles accordion.
-
In the Name field, enter the name of the Oracle Data Integrator role you want to create.
-
From the File main menu, select Save.
The new role name is displayed in the Roles accordion.
Map Enterprise Principals to Oracle Data Integrator Roles
To map enterprise principals to an Oracle Data Integrator role:
-
If the Oracle Integrator Role you want to modify is not already open in the Roles Editor, right-click the role name in the Roles accordion and select Open.
-
In the Add Principals to Role panel of the Roles Editor, click the Add button (plus sign) to display the Enterprise Roles and Users Retrieval dialog box.
From this dialog box, you can either:
-
Enter a filter expression to display the roles and users in the identity store that match the filter.
-
Search the identity store for a specific role or user name.
-
-
Do either or both of the following:
-
To select one or more enterprise roles to map to the Oracle Data Integrator role, expand the Enterprise Roles node and select those roles.
-
To select one or more enterprise users to map to the Oracle Data Integrator role, expand the Enterprise Users node and select those users.
-
-
From the File main menu, select Save.
Assign Privileges or Profiles to Oracle Data Integrator Roles
Studio supports two ways to assign privileges or profiles to an Oracle Data Integrator role:
-
Using the Roles Editor
-
Clicking and dragging privilege, profiles, and instance objects onto the role name in the Roles accordion
Using the Roles Editor:
-
If the Oracle Data Integrator role to which you want to assign privileges is not already open in the Roles Editor, right-click the role name in the Roles accordion and select Open.
-
If you want to assign supervisor privileges to the role, select Supervisor in the Supervisor Access Privileges section of the Roles Editor.
-
In the Role Profiles panel of the Roles Editor, select each profile you want to assign to the role.
Note:
If you have assigned supervisor privileges to the role, this step is unnecessary.
-
From the File main menu, select Save.
Clicking and Dragging:
Privileges on any of the following items can be added to a role by clicking it and dragging it onto a role name in the Roles accordion:
-
An object node, or an entry within an object node, listed in the Objects accordion.
-
A profile node, or an entry with a profile node, listed in the Profiles accordion.
-
An object instance listed in an accordion in the Designer, Operator, or Topology Navigator. Select the instance and drag it onto the desired role name the same way as you grant an object instance privilege to an Oracle Data Integrator user (see "Granting an Authorization by Object Instance").
After updating the privileges for an Oracle Data Integrator role, select Save from the File main menu.
Delete Oracle Data Integrator Roles
To delete an Oracle Data Integrator role:
-
In the Roles accordion of the Security Navigator, select the role you want to delete.
-
Right-click and select Delete.
-
When prompted to confirm your choice, click Yes.
Enforcing Password Policies
The password policies consist of a set of rules applied to user passwords when using internal authentication. This set of rules is applied when the password is defined or modified by the user.
To define the password policy:
-
From the Security Navigator toolbar menu, select Password Policy...
The Password Policy dialog appears. This dialog displays a list of rules.
-
If you want your password to expire automatically, check Password are valid for (days), and set a number of days after which passwords need to be modified.
-
Click Add a Policy. The Policy Definition dialog appears. A policy is a set of conditions that are checked on passwords.
-
Set a Name and a Description for this new policy.
-
In the Rules section, add several conditions on the password text or length. You can define, for example, a minimum length for the passwords.
-
From the Condition to match list, select whether you want the password to meet at least one or all conditions.
-
Click OK.
-
Add as many policies as necessary, and select Active for those of the rules that you want to keep active. Only passwords that meet all the policies are considered as valid for the current policy.
-
Click OK to update the password policy.
Configuring Single Sign-On (SSO) for Oracle Data Integrator Console and Enterprise Manager using Oracle Access Manager 11g
This section describes how to optionally configure Single Sign-On for Oracle Data Integrator Console and Enterprise Manager with Oracle Access Manager (OAM) 11g.
To configure Single Sign-On for Oracle Data Integrator Console and Enterprise Manager:
-
Log in to the OAM Console using your browser:
http://host:port/oamconsole
-
Go to Policy Configuration > Application Domains.
The Policy Manager pane displays.
-
Locate the application domain you created using the name while registering the WebGate agent.
-
Expand the Resources node and click Create.
The Resource page displays.
-
Add the resources that must be secured. For each resource:
-
Select
httpas the Resource Type. -
Select the Host Identifier created while registering the WebGate agent.
-
Enter the Resource URL as follows:
Resource URL ODI Component /odiconsole*ODI Console
/odiconsole/.../*ODI Console
/em*Enterprise Manager
/em/.../*Enterprise Manager
-
Enter a Description for the resource and click Apply.
-
-
Go to Authentication Policies > Protected Resource Policy and add the newly created resources.
-
Do the same under Authorization Policies > Protected Resource Policy.
-
In your WebTier, modify the
mod_wl_ohs.conffile (inWT_ORACLE_HOME/instances/<your_instance>/config/OHS/ohs1/) to include the ODI Console and Enterprise Manager, by adding two additional Location entries using the actual host ID for the WebCenter Portal Administration Server for WebLogicHost.<Location /odiconsole*> SetHandler weblogic-handler WebLogicHost webcenter.example.com WebLogicPort 7001 </Location> <Location /em*> SetHandler weblogic-handler WebLogicHost webcenter.example.com WebLogicPort 7001 </Location> -
Restart the Oracle HTTP Server for your changes to take effect.
You should now be able to access the ODI Console and Enterprise Manager with the following links:
http://host:OHS port/odiconsolehttp://host:OHS port/emand be prompted with the OAM SSO login form.
For more information about installing and configuring OAM 11g for ODI, see "Integrating ODI with Oracle Access Manager 11g" in the Installing and Configuring Oracle Data Integrator.
Best Security Practices for Oracle Data Integrator
Table 25-3 provides a list of best practices for securing the Oracle Data Integrator environment.
Table 25-3 Best Security Practices in an Oracle Data Integrator Environment
| Security Action | Description |
|---|---|
|
Secure Oracle Data Integrator Studio |
To provide optimal security for Oracle Data Integrator Studio, configure the following:
|
|
Configure the Standalone Agent to use a secure transport |
Clients communicate to the Standalone Agent to issue requests on executing Oracle Data Integrator jobs. By default, this communication is transmitted over HTTP. However, for production environments, Oracle recommends using a secure transport, such as HTTPS, for client communications with the Standalone Agent. You can use the WebLogic Server Administration Console to configure the secure transport used by the Standalone Agent. For example, in WebLogic Server you can:
For information about virtual hosting, see "Configuring Virtual Hosting" in Administering Server Environments for Oracle WebLogic Server. |
|
Configure the Oracle Data Integrator Console to use a secure transport |
Oracle recommends the use of a secure transport for access to the Oracle Data Integrator Console. For example, you can configure the Oracle Data Integrator Console to use port 7002, which is the default SSL listen port. Users would then access the Oracle Data Integrator Console using the following URL:
You can use the WebLogic Server Administration Console to secure the transport used for the Oracle Data Integrator Console. For information, see "Configuring SSL" in Administering Security for Oracle WebLogic Server. |
