Using PL/SQL APIs
This chapter covers the following topics:
- Overview of PL/SQL APIs
- Design-Time Tasks for PL/SQL APIs
- Creating a New SOA Composite Application with BPEL Process
- Adding Partner Links
- Adding a Partner Link for File Adapter
- Defining Wrapper APIs
- Declaring Parameters with a DEFAULT Clause
- Configuring the Invoke Activities
- Configuring a Transform Activity
- Configuring an Assign Activity
- Run-Time Tasks for PL/SQL APIs
- Deploying the SOA Composite Application with BPEL Process
- Testing the Deployed SOA Composite Application with BPEL Process
- Troubleshooting
Overview of PL/SQL APIs
Oracle E-Business Suite Adapter uses PL/SQL application programming interfaces (APIs) to insert and update data in Oracle E-Business Suite. APIs are stored procedures that enable you to insert and update data in applications. Additionally, you can use PL/SQL APIs to retrieve data. For example, by using PL/SQL APIs, you can insert a customer record in Oracle E-Business Suite.
Note: For more information about PL/SQL procedure limitations, refer to Oracle Fusion Middleware User's Guide for Technology Adapters.
Design-Time Tasks for PL/SQL APIs
This section describes how to configure the Oracle E-Business Suite Adapter to use PL/SQL APIs.
SOA Composite Application with BPEL Process Scenario
In this example, Oracle E-Business Suite Adapter exposes the following stored procedures as Web services in a BPEL process to update the 'quantity' field of an existing purchase order based on user input.
-
A custom Order Management stored procedure GET_G_MISS_LINE_REC (GET_G_MISS_LINE_REC) to initialize the purchase order
-
A PL/SQL Process Order Line (PROCESS_LINE) to update the existing purchase order
When a change order request is received, the purchase order information including order quantity and other line item details will be retrieved. Based on user input, a new order quantity will be updated in Oracle Order Management.
When the SOA Composite application with BPEL process has been successfully executed after deployment, you can validate the process by querying it directly from Order Management tables or validate it from the Formed-based Oracle Order Management application. The retrieved ordered_quantity value from the query table or you find in the Order Management application should be the same as the quantity value given by the user through changeorder_data.xml file.
Prerequisites to Configure PL/SQL APIs
Oracle E-Business Suite Adapter is deployed using the BPEL Process Manager (PM) in Oracle JDeveloper. The BPEL PM creates the WSDL interfaces for the API.
Populating Applications Context Header Variables
You need to populate certain variables in the BPEL PM in order to provide context information for Oracle E-Business Suite. The context information is required for an API transaction in order for an Oracle E-Business Suite user that has sufficient privileges to run the program.
The context is set taking into account the values passed for the header properties including Username, Responsibility, Responsibility Application, Security Group, and NLS Language. If the values for the new header properties Responsibility Application, Security Group, and NLS Language are not passed, context information will be determined based on Username and Responsibility.
The default Username is SYSADMIN, the default Responsibility is SYSTEM ADMINISTRATOR, the default Security Group Key is Standard, and the default NLS Language is US.
You can change the default values specified in the generated WSDL. This is a static way of changing the context information. These values would apply to all invocations of the deployed business process. However, if you need to provide different context information for different invocations of the business process, then you can dynamically populate the header values. The context information can be specified by configuring an Invoke activity.
For more information about applications context, see Supporting for Normalized Message Properties.
Populating Default Values for Record Types
Certain PL/SQL APIs exposed from Oracle E-Business Suite take record types as input. Such APIs expect default values to be populated for parameters within these record types for successful execution.
The default values are FND_API.G_MISS_CHAR for characters, FND_API.G_MISS_DATE for dates, and FND_API.G_MISS_NUM for numbers. Oracle E-Business Suite Adapter can default these values when the parameters within the record type are passed as nil values, for example, as shown below:
<PRICE_LIST_REC>
<ATTRIBUTE1 xsi:nil="true"/>
<ATTRIBUTE2 xsi:nil="true"/>
<ATTRIBUTE3 xsi:nil="true"/>
...
</PRICE_LIST_REC>
This can be achieved with the help of a function in a Transform activity, or by directly passing the XML input with nil values and then assigning them to the record types within an Assign activity.
Following is a list of the procedures required to accomplish the design-time tasks.
Creating a New SOA Composite Application with BPEL Process
To create a new SOA Composite application with BPEL process
-
Launch Oracle JDeveloper.
-
Click New Application in the Application Navigator.
The New Gallery page appears. Select SOA Application from the Items list.
The New Gallery Page
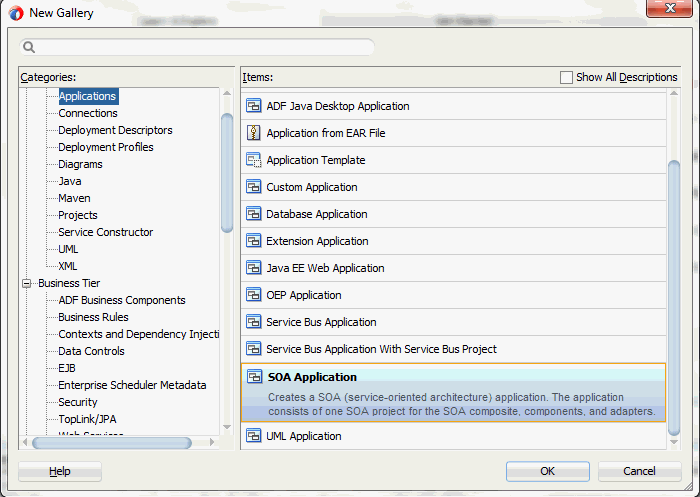
Click OK.
-
Click New Application in the Application Navigator.
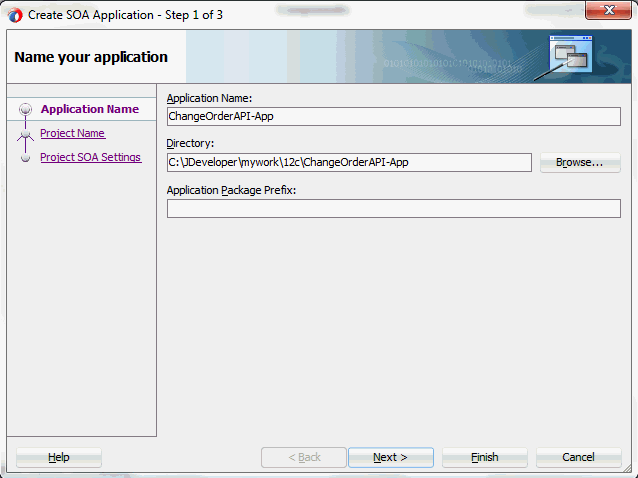
The Create SOA Application - Name your application page is displayed.
The Create SOA Application - Name your application Page
-
Enter an appropriate name for the application in the Application Name field.
Click Next. The Create SOA Application - Name your project page is displayed.
-
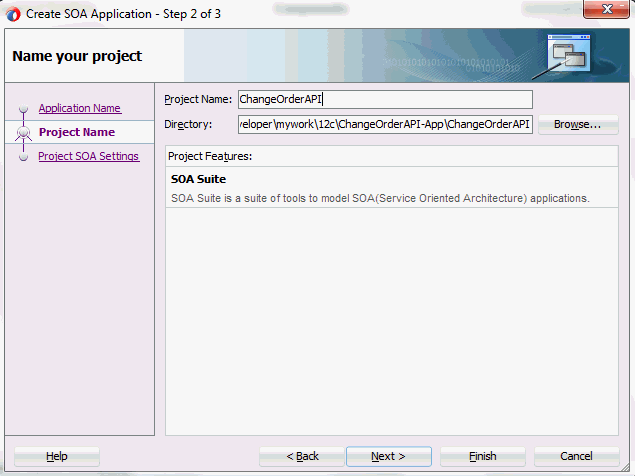
Enter an appropriate name for the project in the Project Name field. For example, ChangeOrderAPI.
Notice that SOA Suite is shown in the Project Features section.
The Create SOA Application - Name your project Page
-
Click Next. The Create SOA Application - Configure SOA settings page is displayed.
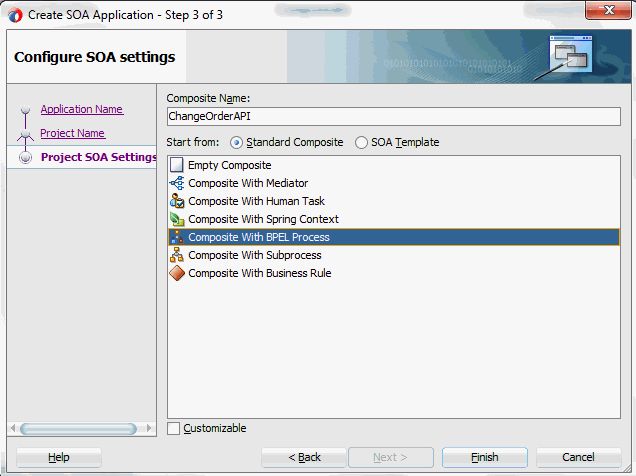
The Create SOA Application - Configure SOA settings Page
-
Leave the default Standard Composite selection unchanged for the Start from field.
Select Composite With BPEL Process from the Standard Composite list, and then click Finish. You have created a new application, and a SOA project. This automatically creates a SOA Composite.
The Create BPEL Process page is displayed.
-
Leave the default BPEL 2.0 Specification selection unchanged. This creates a BPEL project that supports the BPEL 2.0 specification.
Enter an appropriate name for the BPEL process in the Name field. For example, ChangeOrderAPI.
Select Asynchronous BPEL Process in the Template field. Click OK.
An asynchronous BPEL process is created with the Receive and Reply activities. The required source files including bpel and wsdl, using the name you specified (for example, ChangeOrderAPI.bpel and ChangeOrderAPI.wsdl) and ChangeOrderAPI (composite.xml) are also generated.
-
Navigate to SOA folder and click ChangeOrderAPI (composite.xml) to view the composite diagram.
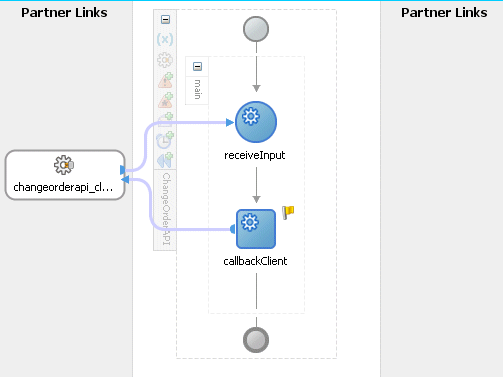
Double click on the ChangeOrderAPI component to open the BPEL process.
New BPEL Process
Adding Partner Links
The next task is to add a partner link to the BPEL process. This section describes how to create a partner link for the application service using a BPEL process. A BPEL partner link defines the link name, type, and the role of the BPEL process that interacts with the partner service.
Based on the BPEL process scenario discussed earlier, the following two partner links need to be configured:
-
Add the first partner link (initLineRec)to initialize the purchase order
-
Add the second partner link (OrderManagement) to update the existing purchase order
To add the first partner link
-
Click BPEL Services in the Component Palette.
Drag and drop Oracle E-Business Suite (formerly known as Oracle Applications) from the BPEL Services list into the right Partner Link swim lane of the process diagram. The Oracle E-Business Suite Reference page appears.
Enter a service name in the Name field. For example, initLineRec.
-
Click Next. The Service Connection dialog appears.
-
You can perform either one of the following options for your database connection:
Note: You need to connect to the database where Oracle E-Business Suite is running.
-
You can create a new database connection by clicking the Create a New Database Connection icon.
How to define a new database connection, see Create a New Database Connection.
-
You can select an existing database connection that you have configured earlier from the Connection drop-down list.
The Service Connection page will be displayed with the selected connection information. The JNDI (Java Naming and Directory Interface) name corresponding to the database connection appears automatically in the Database Server JNDI Name field. Alternatively, you can specify a JNDI name.
Note: When you specify a JNDI name, the deployment descriptor of the Oracle E-Business Suite Adapter must associate this JNDI name with configuration properties required by the adapter to access the database.
The JNDI name acts as a placeholder for the connection used when your service is deployed to the BPEL server. This enables you to use different databases for development and later for production.
Note: For more information about JNDI concepts, refer to Oracle Fusion Middleware User's Guide for Technology Adapters.
-
-
Once you have completed creating a new connection for the service, you can add a PL/SQL API by browsing through the list of APIs available in Oracle E-Business Suite.
Click Next.
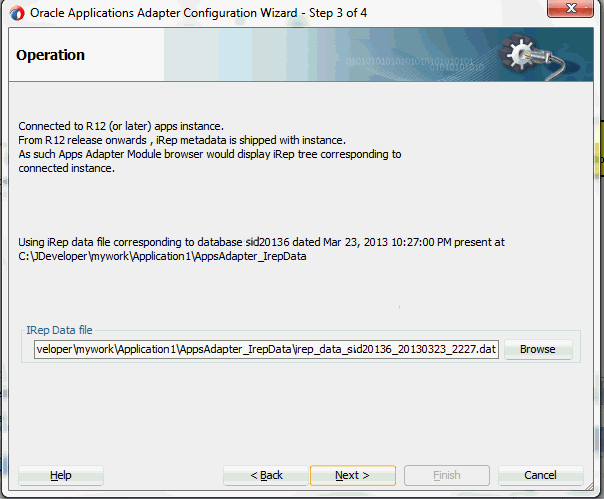
If you are connecting to Oracle E-Business Suite Release 12, then the IREP File not present dialog appears indicating that Adapter could not find the Oracle Integration Repository data file corresponding to the database you are connecting to Oracle E-Business Suite in your workspace. Absence of the data file would make browsing or searching of Integration Repository tree considerably slow. You can choose to extract the data file and create a local copy of the Integration Repository data file. Once it is created successfully, Adapter will pick it up automatically next time and retrieve data from your local Integration Repository.
You can select one of the following options:
-
Click Yes to extract the Integration Repository data file.
After the system successfully creates a local copy of the Integration Repository data file, next time when you connect to the database, you will find the IRep Data File field appears in the Operation dialog indicating where your local copy exists with the creation date and time as part of the file name.
Using the Local Integration Repository Data File
-
Click No to query the Integration Repository data file from the live database you are connecting to display the Integration Repository tree.
In this example, click No. Click Next in the Operation page to open the Oracle E-Business Suite Module Browser.
-
-
The Oracle E-Business Suite Module Browser combines interface data from Oracle Integration Repository with information about the additional interfaces supported by Oracle E-Business Suite Adapter, organized in a tree hierarchy.
Note: The Oracle E-Business Suite Module Browser includes the various product families that are available in Oracle E-Business Suite. Each product family contains the individual products. Each product contains the business entities associated with the product. Business entities contain the various application modules that are exposed for integration. These modules are grouped according to the interface they provide. PL/SQL APIs can be found under the PL/SQL category.
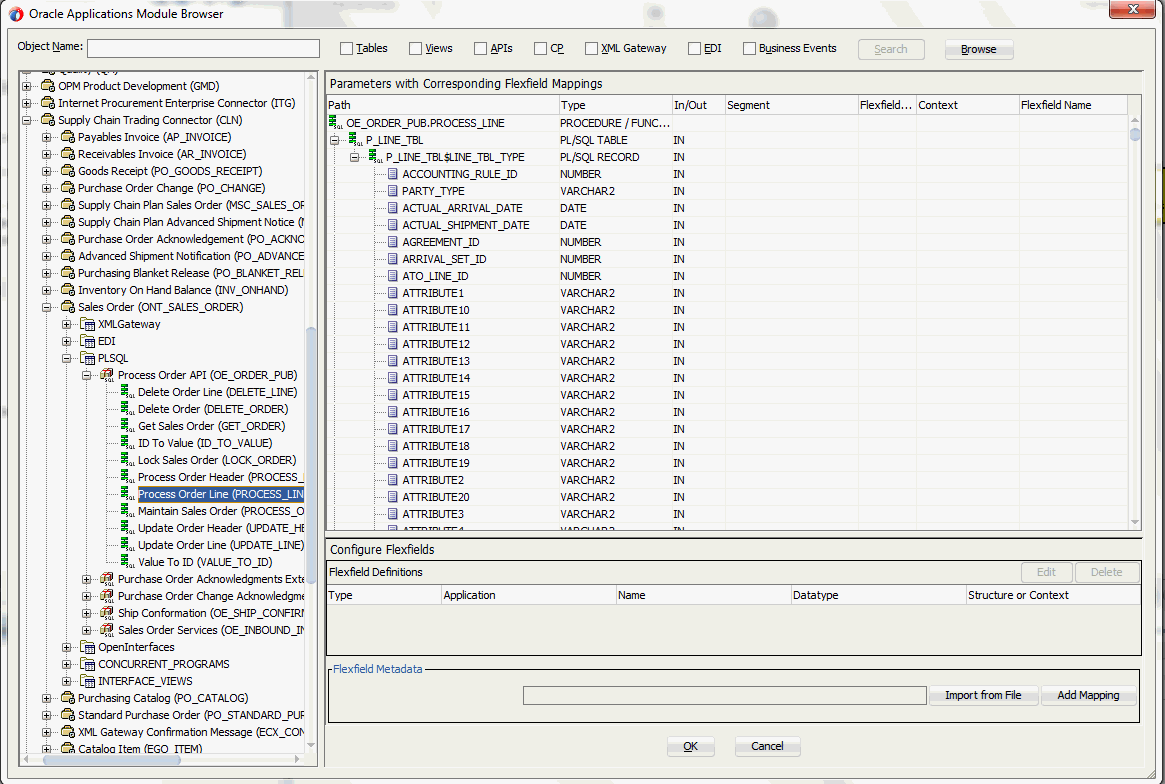
Navigate to Other Interfaces > Custom Objects >PLSQL APIs > OE_ORDER_PUB to select a custom stored procedure GET_G_MISS_LINE_REC.
Note: The GET_G_MISS_LINE_REC (GET_G_MISS_LINE_REC) stored procedure does not take any input but has a complex data type (PL/SQL Table) as output. Oracle E-Business Suite Adapter design-time automatically generates a wrapper stored procedure and loads it on the underlying database.
-
Oracle E-Business Suite Adapter provides flexfield support for PL/SQL APIs. Once the selected API is displayed in the module browser, you can either configure flexfield mappings for the API that has flexfields defined in Oracle E-Business Suite or use current data without further flexfield configuration.
Note: If a selected API has pre-configured flexfield mappings available, a pop-up window appears allowing you to decide if you want to use these pre-configured mappings. Click Yes to display these mappings as part of the flexfield definitions in the Configure Flexfields region. You can modify them later if needed.
Click No to indicate that you will not use these mappings and the pop-up window disappears.
Displaying Selected API in the Oracle E-Business Suite Module Browser
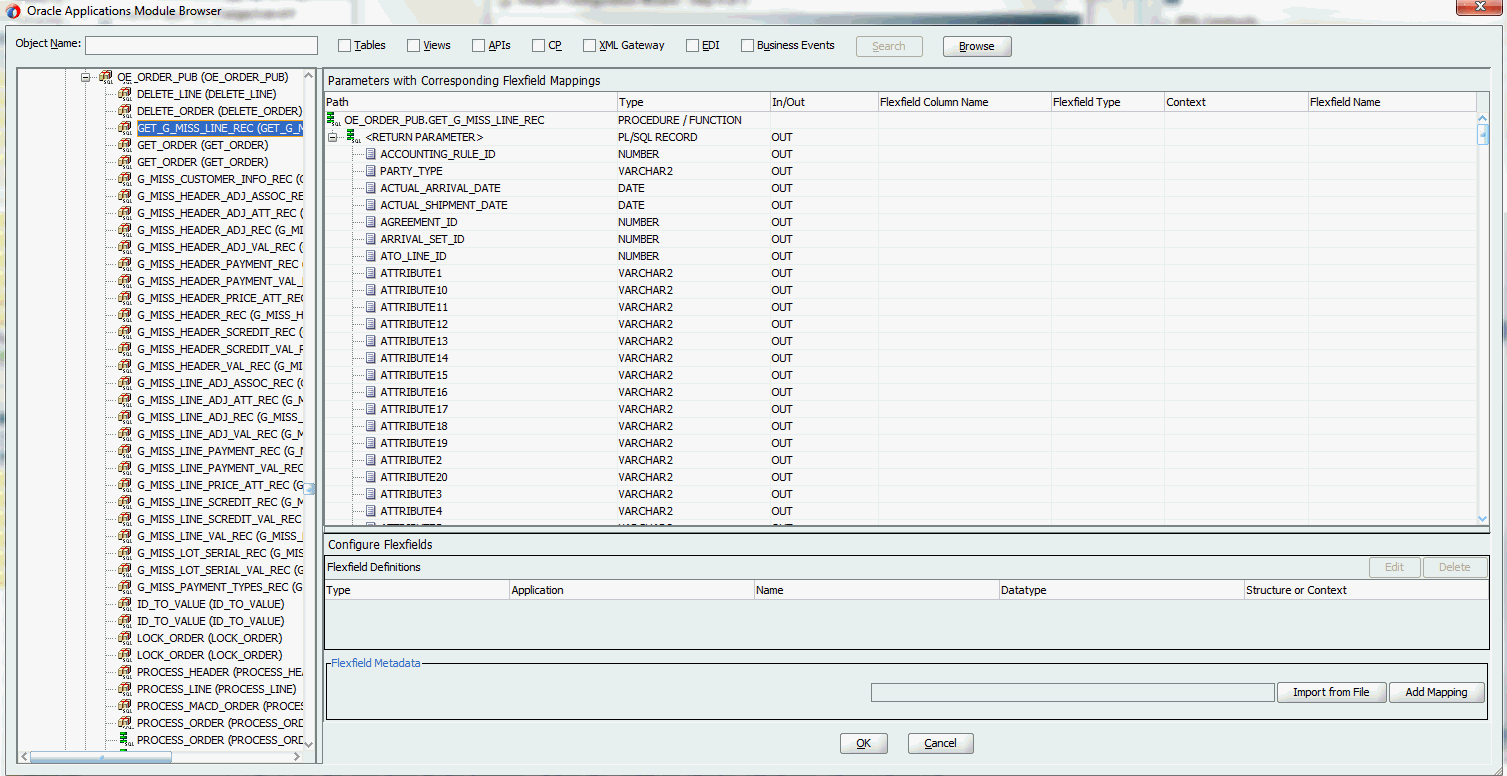
Configuring Flexfield Mapping Data for the Selected API
Perform either one of the following tasks in the Oracle E-Business Suite Module Browser:
-
Use the current data without further configuration by clicking OK to continue.
-
Configure flexfield mapping data by either using an existing flexfield mapping or creating a new mapping through a flexfield wizard if desired.
-
Creating a New Mapping
You can create a new mapping for a selected API by clicking Add Mapping in the Flexfield Metadata section. A new flexfield mapping wizard appears guiding you through each configuration page where you can add key and descriptive flexfields, as well as configure flexfield mapping between the selected API parameters and flexfields defined in the Oracle E-Business Suite instance. For more information on how to create a new mapping and configure flexfields for PL/SQL APIs, see:
-
Importing an Existing Mapping
Instead of creating a new mapping, you can use an existing mapping that has been created earlier by clicking Import from File in the Flexfield Metadata section. This lets you select a desired flexfield mapping for your selected API. Once a desired mapping is imported, you can modify the context values for a descriptive flexfield, and modify structure for a key flexfield if needed to meet your needs.
For more information on flexfield support for PL/SQL APIs and how to modify existing mappings, see Flexfield Support for PL/SQL APIs and Open Interface Tables.
-
In this example, click OK to continue.
Please note that the input and the output parameters of the Stored Procedure contains complex data types that are not readily mapped to JDBC types. The Adapter wizard provides a mechanism that detects when these types are used and then invokes Oracle JPublisher to generate the necessary wrappers automatically. Oracle JPublisher generates two SQL files, one to create schema objects, and another to drop them. The SQL that creates the schema objects is automatically executed from within the wizard to create the schema objects in the database schema before the XSD is generated.
The Adapter Service points to the wrapper Stored Procedure instead of the Process Order Line Stored Procedure. The Adapter design-time automatically loads the wrapper procedure onto the underlying database.
-
-
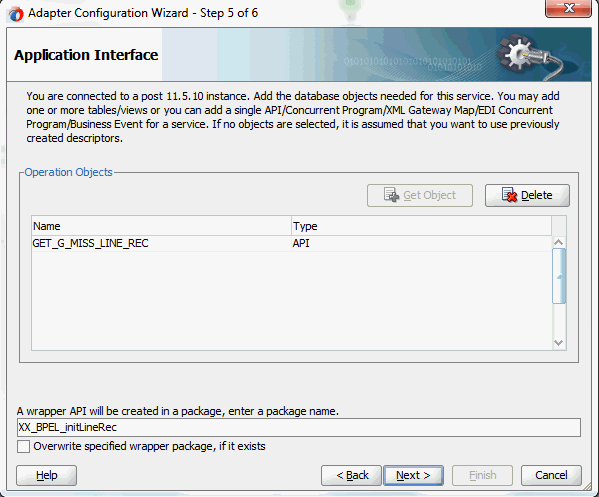
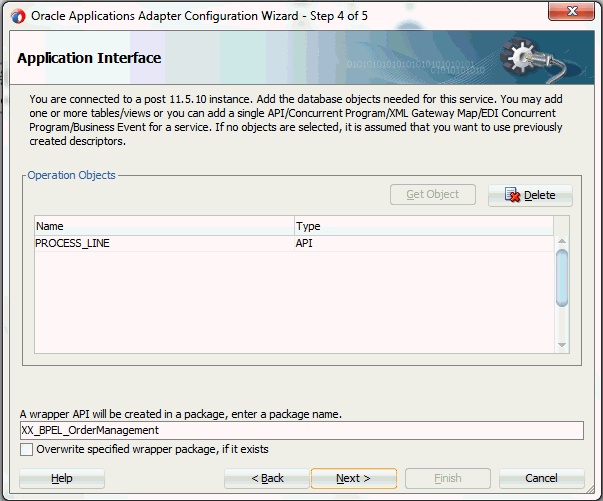
In the Application Interface page, click Next.
Application Interface Page
In the Finish page, click Finish to complete the partner link creation.
The wizard also generates the WSDL file corresponding to the XML schema. This WSDL file is now available for the partner link.
To add the second partner link
-
Click BPEL Services in the Component Palette.
Drag and drop Oracle E-Business Suite (formerly known as Oracle Applications) from the BPEL Services list into the right Partner Link swim lane of the process diagram. The Oracle E-Business Suite Reference page appears.
Enter a service name in the Name field. For example, OrderManagement.
-
Click Next. The Service Connection dialog appears.
-
You can perform either one of the following options for your database connection:
Note: You need to connect to the database where Oracle E-Business Suite is running.
-
You can create a new database connection by clicking Create a New Database Connection icon.
How to define a new database connection, see Create a New Database Connection.
-
You can select an existing database connection that you have configured earlier from the Connection drop-down list.
The Service Connection page will be displayed with the selected connection information. The JNDI (Java Naming and Directory Interface) name corresponding to the database connection appears automatically in the Database Server JNDI Name field. Alternatively, you can specify a JNDI name.
Note: When you specify a JNDI name, the deployment descriptor of the Oracle E-Business Suite Adapter must associate this JNDI name with configuration properties required by the adapter to access the database.
The JNDI name acts as a placeholder for the connection used when your service is deployed to the BPEL server. This enables you to use different databases for development and later for production.
Note: For more information about JNDI concepts, refer to Oracle Fusion Middleware User's Guide for Technology Adapters.
-
-
Once you have completed creating a new connection for the service, you can add a PL/SQL API by browsing through the list of APIs available in Oracle E-Business Suite.
Click Next.
If you are connecting to Oracle E-Business Suite Release 12, then the IREP File not present dialog appears indicating that Adapter could not find the Oracle Integration Repository data file corresponding to the database you are connecting in your workspace. Absence of the data file would make browsing or searching of Integration Repository tree considerably slow. You can choose to extract the data file and create a local copy of the Integration Repository data file. Once it is created successfully, Adapter will pick it up automatically next time and retrieve data from your local Integration Repository.
You can select one of the following options:
-
Click Yes to extract the Integration Repository data file.
After the system successfully creates a local copy of the Integration Repository data file, next time when you connect to the database, you will find the IRep Data File field appears in the Operation dialog indicating where your local copy exists with the creation date and time as part of the file name.
Using the Local Integration Repository Data File
-
Click No to query the Integration Repository data file from the live database you are connecting to display the Integration Repository tree.
In this example, click Next in the Operation page to open the Oracle E-Business Suite Module Browser.
-
-
Select a PL/SQL API. For example, select Process Order Line (PROCESS_LINE) API from Product Families > Supply Chain Management (SCM_PF)> Supply Chain Trading Connector(CLN) > Sales Order (ONT_SALES_ORDER) > PLSQL > Process Order API(OE_ORDER_PUB) > Process Order Line (PROCESS_LINE).
Note: Use the Search option to quickly find the required objects. Enter the required database object name in the Object Name field and select APIs. And then, click Search to retrieve the required database objects. When searching for a PL/SQL API, enter the package name, and not the procedure name. In contrast, when using the DB Adapter Wizard, the user must enter the name of the PL/SQL API while searching.
Selected API Displayed in the Oracle E-Business Suite Module Browser
Please note that Oracle E-Business Suite Adapter provides flexfield support for PL/SQL APIs. Once the selected API is displayed in the module browser, you can either configure flexfield mappings for the API that has flexfields defined in Oracle E-Business Suite or use current data without further flexfield configuration.
Configuring Flexfield Mapping Data for the Selected API
Perform either one of the following tasks in the Oracle E-Business Suite Module Browser:
-
Use the current data without flexfield mapping configuration by clicking OK to continue.
-
Configure flexfield mapping data by either using an existing flexfield mapping or creating a new mapping through a flexfield wizard if desired.
Creating a New Mapping
You can create a new mapping for a selected API by clicking Add Mapping in the Flexfield Metadata section. A new flexfield mapping wizard appears guiding you through each configuration page where you can add key and descriptive flexfields, as well as configure flexfield mapping between the selected API parameters and flexfields defined in the Oracle E-Business Suite instance. For more information on how to create a new mapping for PL/SQL APIs, see:
For more information on flexfield support for PL/SQL APIs and how to modify existing mapping configuration, see Flexfield Support for PL/SQL APIs and Open Interface Tables.
-
-
In this example, click OK to continue.
Please note that the input and the output parameters of the Stored Procedure contains complex data types that are not readily mapped to JDBC types. The Adapter wizard provides a mechanism that detects when these types are used and then invokes Oracle JPublisher to generate the necessary wrappers automatically. Oracle JPublisher generates two SQL files, one to create schema objects, and another to drop them. The SQL that creates the schema objects is automatically executed from within the wizard to create the schema objects in the database schema before the XSD is generated.
The Adapter Service points to the wrapper Stored Procedure instead of the Process Order Line Stored Procedure. The Adapter design-time automatically loads the wrapper procedure onto the underlying database.
-
In the Application Interface page, click Next.
Adapter Configuration Wizard - Application Interface Page
-
In the Finish page, click Finish to complete the process of configuring a partner link for an application service.
The wizard generates the WSDL file corresponding to the XML schema. This WSDL file is now available for the partner link.
Adding a Partner Link for File Adapter
Use this step to configure a BPEL process by synchronously reading an existing purchase order to obtain the order details.
To add a Partner Link for File Adapter to read order details:
-
In Oracle JDeveloper BPEL Designer, click BPEL Services in the Component Palette.
Drag and drop File Adapter from the BPEL Services list into the right Partner Link swim lane of the process diagram. The File Adapter Reference page appears.
Enter a name for the file adapter service, such as getOrderDetails.
-
Click Next. The Adapter Interface page appears.
Specifying the Adapter Interface
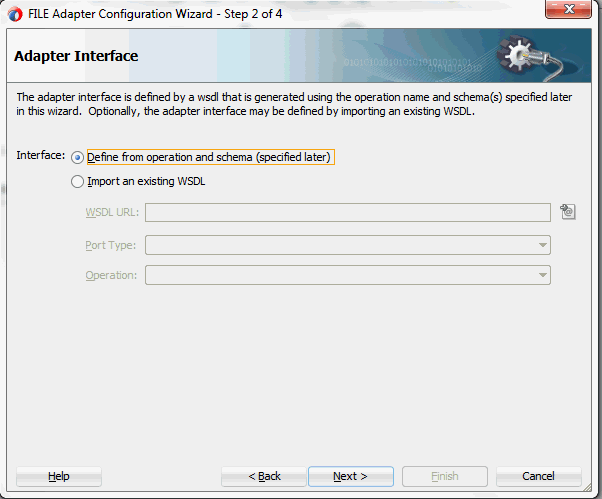
Select the Define from operation and schema (specified later) radio button and click Next.
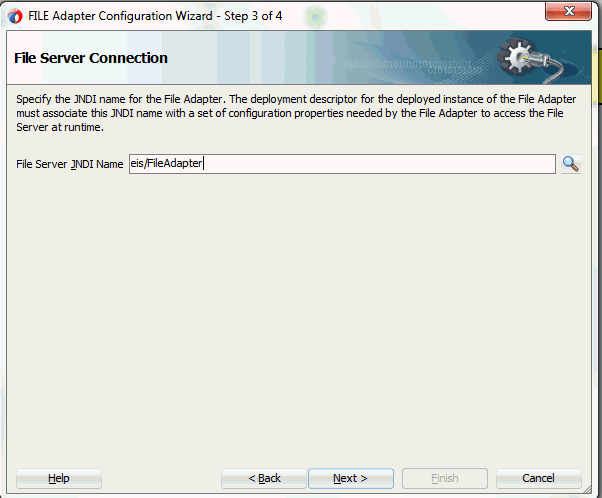
The File Server Connection page appears. Leave the default value unchanged for the File Server JNDI Name field.
Specifying File Server JNDI Name
-
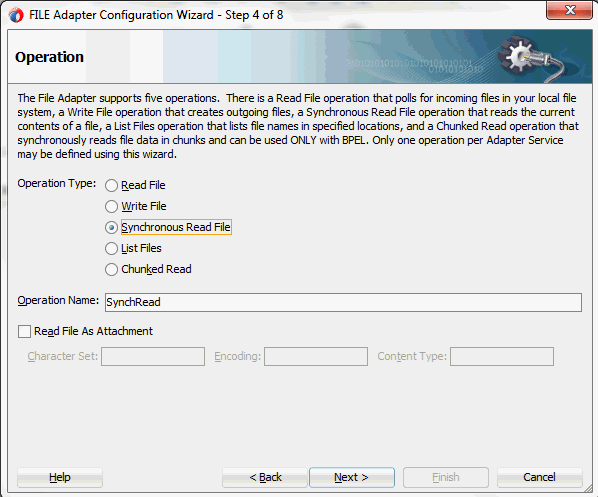
In the Operation page, specify the operation type. For example, select the Synchronous Read File radio button. This automatically populates the Operation Name field.
Specifying the Operation
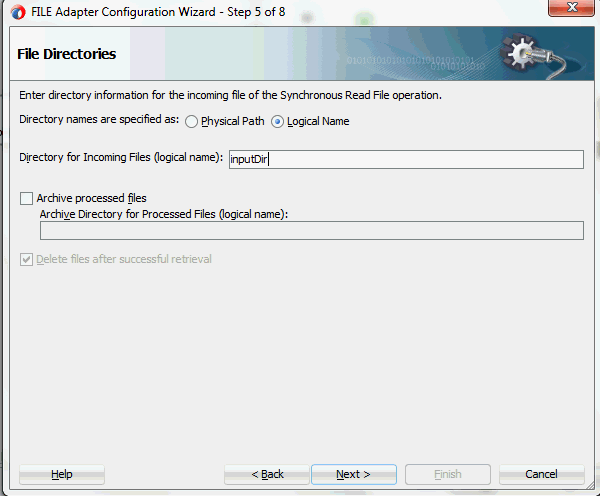
Click Next to access the File Directories page.
-
Select the Logical Name radio button and specify directory for incoming files, such as inputDir.
Ensure the Delete files after successful retrieval check box is not selected.
Configuring the Input File
Click Next to open the File Name page.
-
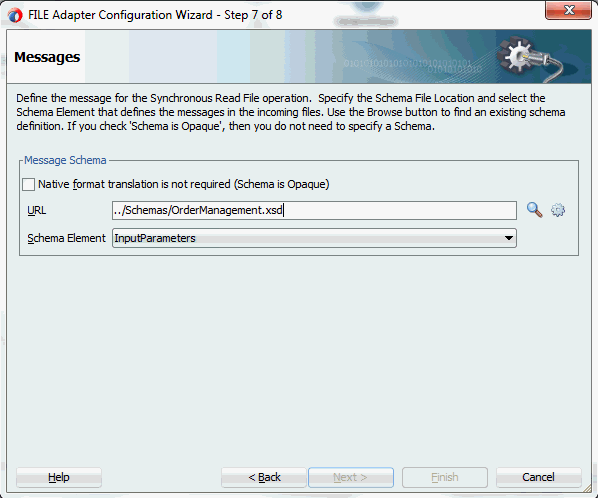
Enter the name of the file for the synchronous read file operation. For example, enter changeorder_data.xml. Click Next to open the Messages page.
-
Select the 'browse for schema file' icon on the top right corner to open the Type Chooser window.
Click Type Explorer and select Project WSDL Files > OrderManagement.wsdl > Inline Schemas > schema > InputParameters.
Note: If the selected API is configured with flexfields, select the flexfield schema (<servicename>_sp.xsd) instead from the Type Chooser.
For example, SynAccOrder partner link service is created with descriptive flexfields. Select Project Schema Files > SynAccOrder_sp.xsd > SynAccOrder_flex.xsd > InputParameters.
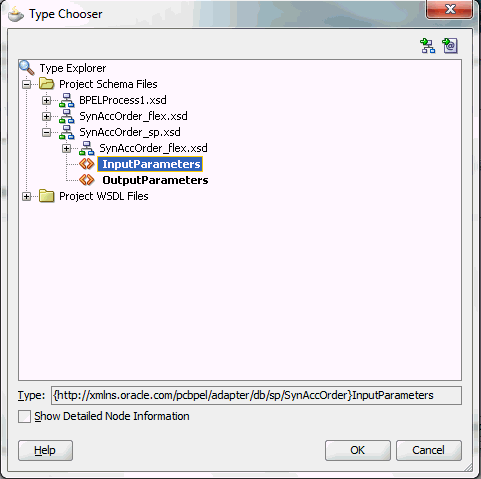
Click OK. The selected SynAccOrder_sp.xsd schema is displayed as URL and InputParameters is displayed as Schema Element.
For more information on flexfield support for PL/SQL APIs and how to modify existing configuration, see Flexfield Support for PL/SQL APIs.
The selected schema information will be automatically populated in the URL and Schema Element fields.
Specifying Message Schema
-
Click Next and then Finish. The wizard generates the WSDL file corresponding to the partner link. The main Create Partner Link dialog box appears, specifying the new WSDL file getOrderDetails.wsdl.
The getOrderDetails Partner Link appears in the BPEL process diagram.
Defining Wrapper APIs
The Adapter Configuration wizard generates a wrapper API when a PL/SQL API has arguments of data types, such as PL/SQL Boolean, PL/SQL Table, or PL/SQL Record. For generating the wrapper API, Oracle JPublisher is automatically invoked in the background. When a wrapper API is created, besides the WSDL and XSD files, two SQL files are created: one for creating the wrapper API, and necessary datatypes and another for deleting it. The two SQL files are saved in the same directory where the WSDL and XSD files are stored, and are available in the Project view.
Following is a sample code of a PL/SQL API that would require a wrapper to be generated:
package pkg is
    type rec is record (...);
    type tbl is table of .. index by ..;
    procedure proc(r rec, t tbl, b boolean);
end;
If the preceding PL/SQL API is selected in the wizard, then a wrapper API will be created, and loaded into the database. This wrapper API will be used instead of the originally selected PL/SQL API. For this reason, the content of the WSDL and XSD files represent the wrapper procedure, not the procedure originally selected.
The following are the types that will be created for the wrapper API:
-
Object type for PL/SQL RECORD
-
Nested table of the given type for PL/SQL TABLE. For example, the nested table of NUMBER.
-
INTEGER substituted for PL/SQL BOOLEAN
The generated SQL file that creates the wrapper API also creates the required schema objects. The types of the wrapper API's parameters will be those of the new schema object types. The wrapper package will contain conversion APIs to convert between the base PL/SQL type and the new schema object types.
Note: The SQLJUTL package contains the BOOL2INT and INT2BOOL conversion functions used for PL/SQL BOOLEAN arguments whose data types have been changed to INTEGER.
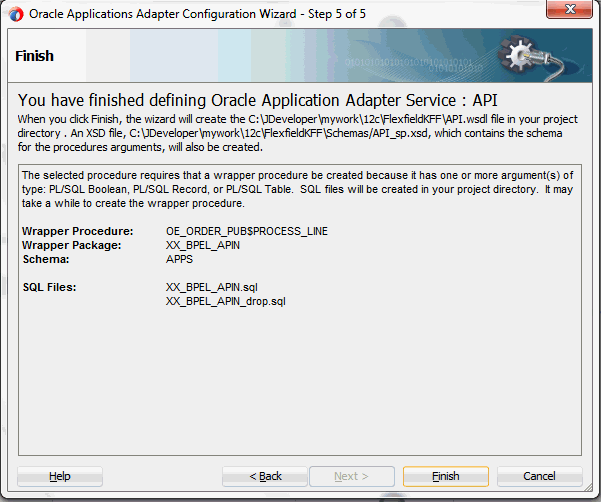
The wrapper API is created in a package. This package is named XX_BPEL_servicename.servicename is the name of the service that you entered in Step 2 of Adding a Partner Link. If this package already exists, then the wizard prompts for a different package name, or to select a checkbox, to overwrite the existing package. Overwriting an existing package causes all PL/SQL APIs in the specified package to be lost. When the wizard creates a package for the wrapper, only one API, that is, the wrapper API, is contained in it.
Note: Despite specifying to overwrite an existing package, if the wrapper API already exists in the specified package, the wizard will not re-create the wrapper API, as it would take some time. This means no SQL files will be created, Oracle JPublisher will not be run, and the WSDL and XSD files will be for the existing wrapper API. The Finish page of the wizard will indicate that these actions will take place, but it is possible that they will not, depending on whether the wrapper already exists.
Entering a Package Name for the Wrapper API

Note: The package name for the wrapper has a limit of 30 characters, and the wrapper API name has a limit of 29 characters. Thus, if the package name or the wrapper API name is longer than the maximum limit, it will be truncated accordingly.
The name of the wrapper API depends on whether the PL/SQL API that was originally selected is in a package or not. If the original PL/SQL API is a root-level API, that is, it does not belong in a package, then the name of the wrapper API will be, TOPLEVEL$original_api_name. If the originally selected PL/SQL API is in a package, then the name of the wrapper API will be original_package_name$original_api_name.
Wrapper APIs follow the naming convention of Oracle JPublisher. For example, if the original PL/SQL API was called CREATE_EMPLOYEE and was a root-level API, then the wrapper API would be named TOPLEVEL$CREATE_EMPLOYEE. If the original PL/SQL API is in a package called EMPLOYEE, then the wrapper API would be named EMPLOYEE$CREATE_EMPLOYEE.
The Finish page of the wizard is different when a wrapper API needs to be created. The Finish page informs you that a wrapper API is needed, and in addition, lists the name of the wrapper package, wrapper API, and the SQL files that will be created.
Note: When a wrapper API needs to be created, it may take a while before the wizard completes. However, the processing time for subsequent PL/SQL APIs in the same package would be much shorter.
The Finish Page
Note: The REF CURSOR type is not supported out of the box. However, for detailed steps to generate an adapter service for a PL/SQL API which takes REF CURSOR type, see the section "Support for REF CURSOR" in Oracle BPEL Process Manager Developer's Guide on OTN.
Overloaded APIs are not supported in release 11.5.10.
Declaring Parameters with a DEFAULT Clause
You can declare parameters of a stored procedure with a DEFAULT clause, so that when you invoke the procedure without that parameter, BPEL Process Manager will supply a default value for that parameter. For example:
PROCEDURE addEmployee (name VARCHAR2, country VARCHAR2 DEFAULT ‘US')
This procedure can be invoked in the following two ways:
-
addEmployee (‘John Smith') // country => ‘US'
-
addEmployee (‘John Smith', ‘France') // country => ‘France'
Omitting Parameters With a DEFAULT Clause
You can omit elements for parameters with default values in the instance XML. The procedure will be invoked without these parameters, allowing their default values to be used, as shown in the following example of input and runtime invocation.
Input
<db:InputParameters xmlns:db="…">
    <name>John Smith</name>
</db:InputParameters>
Runtime Invocation
BEGIN addEmployee (name=>?); END; // country => 'US'
If the input includes a value for the defaulted parameter, the value in the input will be used, rather than the default, as follows:
Input
<db:InputParameters xmlns:db="…">
    <name>John Smith</name>
    <country>France</country>
</db:InputParameters>
Runtime Invocation
BEGIN addEmployee (name=>?, country=>?); END; // country => 'France'
Omitting Parameters Without a DEFAULT Clause
The element in the XSD for parameters with a default clause is annotated with a special tag to indicate that the parameter has a default clause, as shown in the following example.
<element name="country" … db:default="true" …/>
This new functionality allows elements for parameters without a default clause also to be omitted in the instance XML. In these cases, the parameter is still included in the invocation of the stored procedure. A value of NULL is bound by default. Following is an example of a declaration where neither parameter has a DEFAULT clause:
PROCEDURE addEmployee (name VARCHAR2, country VARCHAR2)
In BPEL Process Manager release 10.1.2, elements for both parameters were required in the instance XML. If an element was omitted, it was presumed to have a DEFAULT clause, so the parameter was not included in the invocation of the procedure. In this case, the missing parameter resulted in a PL/SQL error stating that an incorrect number of arguments was passed to the procedure.
In the current BPEL Process Manager release, the missing parameter will be included in the invocation of the procedure. A NULL value will be bound, as shown in the following example:
Input
<db:InputParameters xmlns:db="…">
    <name>John Smith</name>
</db:InputParameters>
Runtime Invocation
BEGIN addEmployee (name =>?, country=>?); END; // country => NULL
Even though the element for country was not provided in the instance XML, it still appears in the call to the procedure. In this case, country will be NULL.
DEFAULT Clause Handling in Wrapper Procedures
If a procedure contains a special type requiring a wrapper to be generated, the default clauses on any of the original parameters will not be carried over to the wrapper, as shown in the following example:
PROCEDURE needsWrapper(isTrue BOOLEAN, value NUMBER DEFAULT 0)
Assuming that the procedure in the preceding example was defined at the top level, outside of a package, the generated wrapper will appear, as shown in the following example:
TOPLEVEL$NEEDSWRAPPER (isTrue INTEGER, value NUMBER)
In the preceding example, the BOOLEAN type has been replaced by INTEGER. The default clause on the value parameter is missing. In the current release, parameters of generated wrapper procedures will never have a default clause, even if these parameters did in the original procedure. If the element is missing in the instance XML, instead of defaulting to 0, then the value of the parameter will be NULL, as shown in the following example:
Input
<db:InputParameters xmlns:db="…">
    <isTrue>1</isTrue>
</db:InputParameters>
Runtime Invocation
BEGIN TOPLEVEL$NEEDSWRAPPER (isTrue =>?, value =>?); END; // value => NULL
To fix this, you can edit the generated SQL file, restoring the default clauses. You should then, run the SQL file to reload the wrapper definitions into the database schema. In addition, you should modify the generated XSD.
Following are the steps to fix the default clause with the wrapper generated for needsWrapper():
-
Change the signature in the following manner in the generated wrapper SQL file, from:
TOPLEVEL$NEEDSWRAPPER (isTrue INTEGER, value NUMBER)
To:
TOPLEVEL$NEEDSWRAPPER (isTrue INTEGER, value NUMBER DEFAULT 0)
-
Reload the modified wrapper SQL file mentioned in the preceding example into the appropriate database schema. For BOOLEAN parameters with DEFAULT clause, you need to map as follows:
DEFAULT TRUE(base) to DEFAULT 1 (wrapper)
DEFAULT FALSE (base) to DEFAULT 0 (wrapper)
For example, if the base stored procedure is PROCEDURE needsWrapper(isTrue BOOLEAN TRUE, value NUMBER DEFAULT 0), then the generated wrapper would be TOPLEVEL$NEEDSWRAPPER (isTrue INTEGER, value NUMBER). You should manually fix the store procedure to be TOPLEVEL$NEEDSWRAPPER (isTrue INTEGER DEFAULT 1, value NUMBER DEFAULT 0)
-
If a parameter has a default clause, then its corresponding element in the XSD must have an extra attribute, db:default="true". For example, if a parameter has a default clause TOPLEVEL$NEEDSWRAPPER(isTrue INTEGER DEFAULT 1, value NUMBER DEFAULT 0), then the elements in the XSD for isTrue and value need to have the following new attributes:
<element name="ISTRUE" ... db:default="true" .../>
<element name="VALUE" ... db:default="true" .../>
Configuring the Invoke Activities
This step is to configure three Invoke activities:
-
To get the order details that is received from the Receive activity by invoking the getOrderDetails partner link in an XML file.
-
To initialize the existing purchase order by invoking initLineRec partner link.
-
To update the purchase order quantity information to Oracle E-Business Suite by invoking OrderManagement partner link.
To add the first Invoke activity for a partner link to get order details:
-
In Oracle JDeveloper BPEL Designer, expand the BPEL Constructs from the Component Palette. Drag and drop the first Invoke activity from the Web Service section into the center swim lane of the process diagram, between the receiveInput and callbackClient activities.
-
Link the Invoke activity to the getOrderDetails service. The Edit Invoke dialog appears.
-
Enter a name for the Invoke activity. In the Input tab, ensure the Input Variable radio button is selected. Click the Create icon next to the Input Variable field to create a new variable. The Create Variable dialog box appears.
-
Select Global Variable, then enter a name for the variable. You can also accept the default name. Click OK.
-
In the Output tab, ensure the Output Variable radio button is selected. Click the Create icon next to the Output Variable field to create a new variable. The Create Variable dialog box appears.
Select Global Variable, then enter a name for the variable. You can also accept the default name. Click OK.
Click Apply and then OK in the Edit Invoke dialog to finish configuring the Invoke activity.
The Invoke activity appears in the process diagram.
To add the second Invoke activity for a partner link to initialize the existing purchase order:
-
In Oracle JDeveloper BPEL Designer, expand the BPEL Constructs from the Component Palette. Drag and drop the second Invoke activity from the Web Service section into the center swim lane of the process diagram, between the first Invoke and callbackClient activities.
-
Link the Invoke activity to the initLineRec service. The Edit Invoke dialog box appears.
-
Repeat Step 3 to Step 5 described in the first Invoke activity procedure to complete the second Invoke activity.
To add the third Invoke activity for a partner link to update the order quantity information to Oracle E-Business Suite:
-
In Oracle JDeveloper BPEL Designer, expand the BPEL Constructs from the Component Palette. Drag and drop the third Invoke activity from the Web Service section into the center swim lane of the process diagram, between the second Invoke and callbackClient activities.
-
Link the Invoke activity to the OrderManagement service. The Edit Invoke dialog box appears.
-
Repeat Step 3 to Step 5 described in the first Invoke activity procedure.
-
Setting Header Properties for Applications Context
Use the following steps to set the header message properties required to pass applications context required to complete the BPEL process:
-
Select the Properties tab in the Edit Invoke dialog box.
-
Click the Create icon. The To Property dialog appears.
-
Select the jca.apps.Username property from the Name drop-down list.
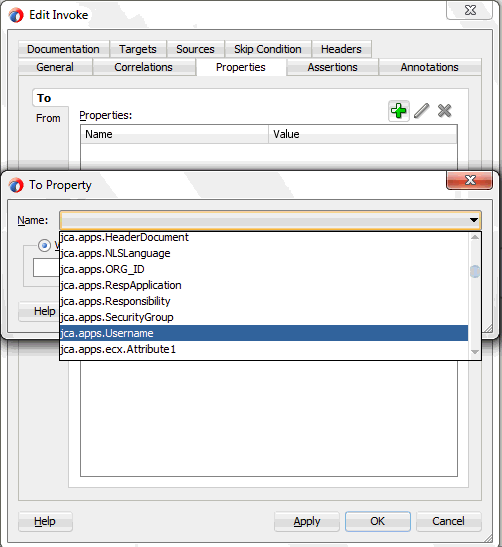
-
Select the Expression radio button and enter 'OPERATIONS' as the property value.
Click OK.
-
Repeat Step 2 to Step 4 to assign 'Order Management Super User, Vision Operations (USA)' for jca.apps.Responsibility.
-
-
Click Apply and then OK to complete the Invoke activity.
Configuring a Transform Activity
The Transform activity can be used to configure the parameters for the input and output variables. The Transform activity can also be used if variable values need to be transformed before updating them in Oracle E-Business Suite.
To configure a Transform activity
Before add a Transform activity, use the following steps to add variables:
-
From the structure panel, select ChangeOrderAPI.bpel > Variables > Process > Variables folder. Right click on Variables folder and select Create Variable from the drop-down menu.
-
In the Create Variable dialog, enter temp_miss_line in the variable Name field.
-
Select the Message Type radio button and click the Browse Message Type icon to open the Type Chooser.
Select args_in_msg from Message Types > Project WSDL Files > OrderManagement.wsdl > Message Types. Click OK to close the Type Chooser.
The selected information will be populated in the Message Type field in the Create Variable dialog.
Use the following step to configure the Transform activity:
-
In Oracle JDeveloper BPEL Designer, expand the Oracle Extensions from the Component Palette. Drag and drop Transform from the Transform section into center swim lane of the process map window. The Transform activity should be placed in between the second and thirdInvoke activities.
This Transform activity is used to set the output of initLineRec service to the input of the OrderManagement service.
-
Double-click Transform in the process map to open the Transform dialog. The Transformation tab is selected by default.
Click the General tab to name this Transform activity as set_Miss_Line.
-
In the Transformation tab, click the Create icon to open the Source Variable dialog.
Select the Invoke_initLineRec_OutputVariable from the Source Variable drop-down list, and select OutputParameters element as the Source Part value.
Click OK.
-
Select the Invoke_OrderManagement_InputVariable from the Target Variable drop-down list. The Target Part value of the variable is also selected.
-
Click the Create icon next to the Mapper File field to create a new transformation mapping file. Mapper File specifies the file in which you create the mappings using the XSLT Mapper Transformation tool.
-
The transformation mapping file appears. The Design view appears by default.
-
You can define the parameter values in the Design view. Drag a string function to the Design area. Connect the function to the appropriate parameter for which you want to define a value.
For example, link db:OE_ORDER_PUB-24GET_G_MISS_LINE from the source variable to db:P_LINE_TBL_ITEM as the target variable.
Note: You can use an input parameter value from the source variable, transform it using a string function, and use it as the input parameter value for the target variable.
-
Click OK to create the mapping from source variable to target variable.
Configuring an Assign Activity
Use the Assign activity to pass the output of getOrderDetails service and initLineRec service as an input to the OrderManagement service.
To add an Assign activity:
-
In Oracle JDeveloper BPEL Designer, expand the BPEL Constructs from the Component Palette. Drag and drop the Assign activity from the Basic Activities section into the center swim lane of the process diagram right after the Transform activity that you just created earlier.
-
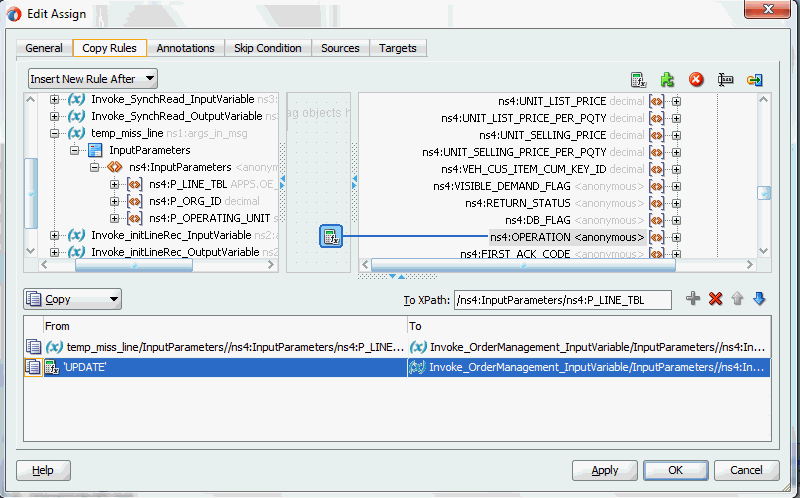
Double-click the Assign activity to access the Edit Assign dialog.
Click the General tab to enter a name for the Assign activity. For example, setOrderChanges.
-
Select the Copy Rules tab and expand the target trees:
-
In the From navigation tree, navigate to Variable > Process > Variables > Temp_miss_line >Input Parameters and select ns4:P_LINE_TBL.
-
In the To navigation tree, navigate to Variable > Process > Variables > Invoke_OrderManagement_InputVariable > Input Parameters and select ns4:P_LINE_TBL.
-
Click OK. The Edit Assign dialog box appears.
Drag the source node (ns4:P_LINE_TBL) to connect to the target node (ns4:P_LINE_TBL) that you just specified. This creates a line that connects the source and target nodes. The copy rule is displayed in the From and To sections at the bottom of the Edit Assign dialog box.
-
-
Enter the second pair of parameters:
-
Click the Expression icon to invoke the Expression Builder dialog.
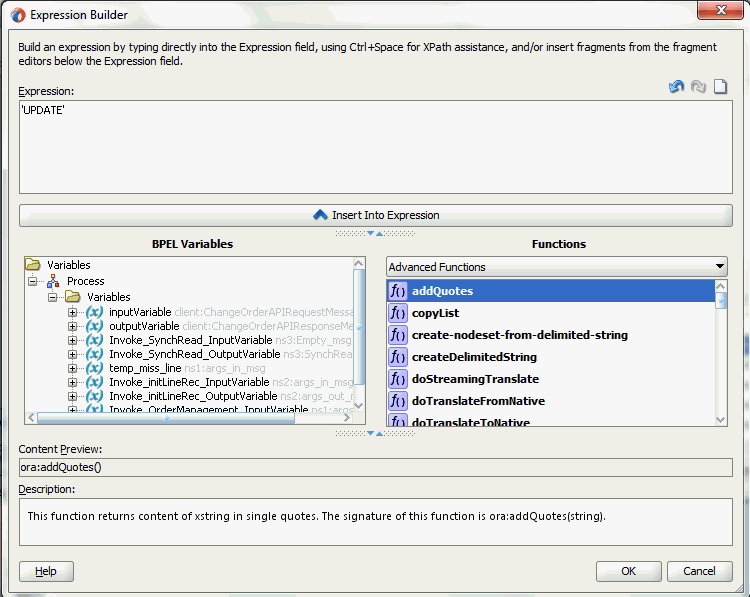
Enter 'UPDATE' in the Expression box. Click OK. The Expression icon with the expression value ('UPDATE') appears in the center of the Edit Assign dialog, between the From and To navigation tree nodes.
-
In the To navigation tree, navigate to Variable > Process > Variables > Invoke_OrderManagement_InputVariable > Input Parameters > P_LINE_TBL > P_LINE_TBL_ITEM and select ns4:OPERATION.
Drag the Expression icon to connect to the target node (ns4:OPERATION) that you just identified. This creates a line that connects the source and target nodes. The copy rule is displayed in the From and To sections at the bottom of the Edit Assign dialog box.
-
-
Enter the third pair of parameters:
-
Click the Expression icon to invoke the Expression Builder dialog. Enter 'Update Order Quantity' in the Expression box. Click OK. The Expression icon with the expression value ('Update Order Quantity') appears in the center of the Edit Assign dialog, between the From and To navigation tree nodes.
-
In the To navigation tree, navigate to Variable > Process > Variables > Invoke_OrderManagement_InputVariable > P_LINE_TBL > P_LINE_TBL_ITEM and select ns4:CHANGE_REASON.
Drag the Expression icon to connect to the target node (ns4:CHANGE_REASON) that you just identified. This creates a line that connects the source and target nodes. The copy rule is displayed in the From and To sections at the bottom of the Edit Assign dialog box.
-
-
Enter the fourth pair of parameters:
-
In the From navigation tree, navigate to Variable > Process > Variables > Invoke_SyncRead_OutputVariable>Input Parameters > P_LINE_TBL >P_LINE_TBL_ITEM and select ns4:LINE_ID.
-
In the To navigation tree, navigate to Variable > Process > Variables > Invoke_OrderManagement_InputVariable > P_LINE_TBL > P_LINE_TBL_ITEM and select ns4:LINE_ID.
Drag the source node (ns4:LINE_ID) to connect to the target node (ns4:LINE_ID) that you just specified. This creates a line that connects the source and target nodes. The copy rule is displayed in the From and To sections at the bottom of the Edit Assign dialog box.
-
-
Enter the fifth pair of parameters:
-
In the From navigation tree, navigate to Variable > Process > Variables > Invoke_SyncRead_OutputVariable>Input Parameters > P_LINE_TBL >P_LINE_TBL_ITEM and select ns4:ORDERED_QUANTITY.
-
In the To navigation tree, navigate to Variable > Process > Variables > Invoke_OrderManagement_InputVariable > P_LINE_TBL > P_LINE_TBL_ITEM and select ns4:ORDERED_QUANTITY.
Drag the source node (ns4:ORDERED_QUANTITY) to connect to the target node (nns4:ORDERED_QUANTITY) that you just specified. This creates a line that connects the source and target nodes. The copy rule is displayed in the From and To sections at the bottom of the Edit Assign dialog box.
-
-
Click Apply and then OK to complete the configuration of the Assign activity.
Run-Time Tasks for PL/SQL APIs
After designing the SOA Composite application with BPEL process, the next step is to deploy, run and monitor it.
Deploying the SOA Composite Application with BPEL Process
To invoke the services from the BPEL client contained in the SOA composite, the SOA composite needs to be deployed to the Oracle WebLogic managed server. This can be achieved using Oracle JDeveloper. Once the composite is deployed, it can be tested from the Oracle Enterprise Manager Fusion Middleware Control Console.
Prerequisites
Before deploying the SOA composite with BPEL process using Oracle JDeveloper, you must have established the connectivity between the design-time environment and the run-time server. For more information, see Configuring the Data Source in Oracle WebLogic Server and Creating an Application Server Connection.
Note: If a local instance of the WebLogic Server is used, start the WebLogic Server by selecting Run > Start Server Instance from Oracle JDeveloper. Once the WebLogic Admin Server "DefaultServer" instance is successfully started, the <Server started in Running mode> and DefaultServer started message in the Running:DefaultServer and Messages logs should appear.
To deploy the SOA Composite application with BPEL process
-
Select the SOA Composite project in the Applications window.
-
Right-click the project name, and then select Deploy > [project name] > [serverConnection] from the menu that appears.
For example, you can select Deploy > ChangeOrderAPI> soa-server1 to deploy the process if you have the connection set up appropriately.
Note: If this is the first time to set up server connection, then the Deployment Action window appears. Select 'Deploy to Application Server' and click Next.
In the Deploy Configuration window, ensure the following information is selected before clicking Next to add a new application server:
-
New Revision ID: 1.0
-
Mark composite revision as default: Select this check box.
-
Overwrite any existing composites with the same revision ID: Select this check box.
The steps to create a new Oracle WebLogic Server connection from JDeveloper are covered in Creating an Application Server Connection.
-
-
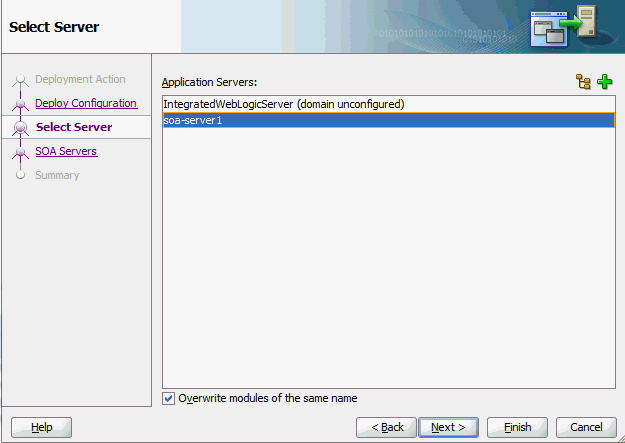
In the Select Server page, select 'soa-server1' that you have established the server connection earlier. Click Next.
-
In the SOA Servers page, accept the default target SOA Server ('soa-server1') selection.
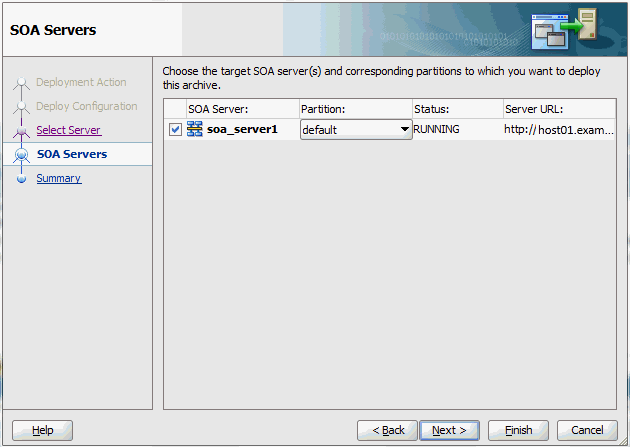
Click Next and Finish.
If you are deploying the composite for the first time from your Oracle JDeveloper session, the Authorization Request window appears. Enter username and password information specified during Oracle SOA Suite installation. Click OK.
-
Deployment processing starts. Monitor deployment progress and check for successful compilation in the SOA - Log window as well as in the Deployment - Log window.
Testing the Deployed SOA Composite Application with BPEL Process
Once the BPEL process contained in a SOA Composite application is deployed, you can manage and monitor the process from the Oracle Enterprise Manager Fusion Middleware Control Console. You can also test the process and the integration interface by manually initiating the process.
To test the deployed SOA Composite application with BPEL process
-
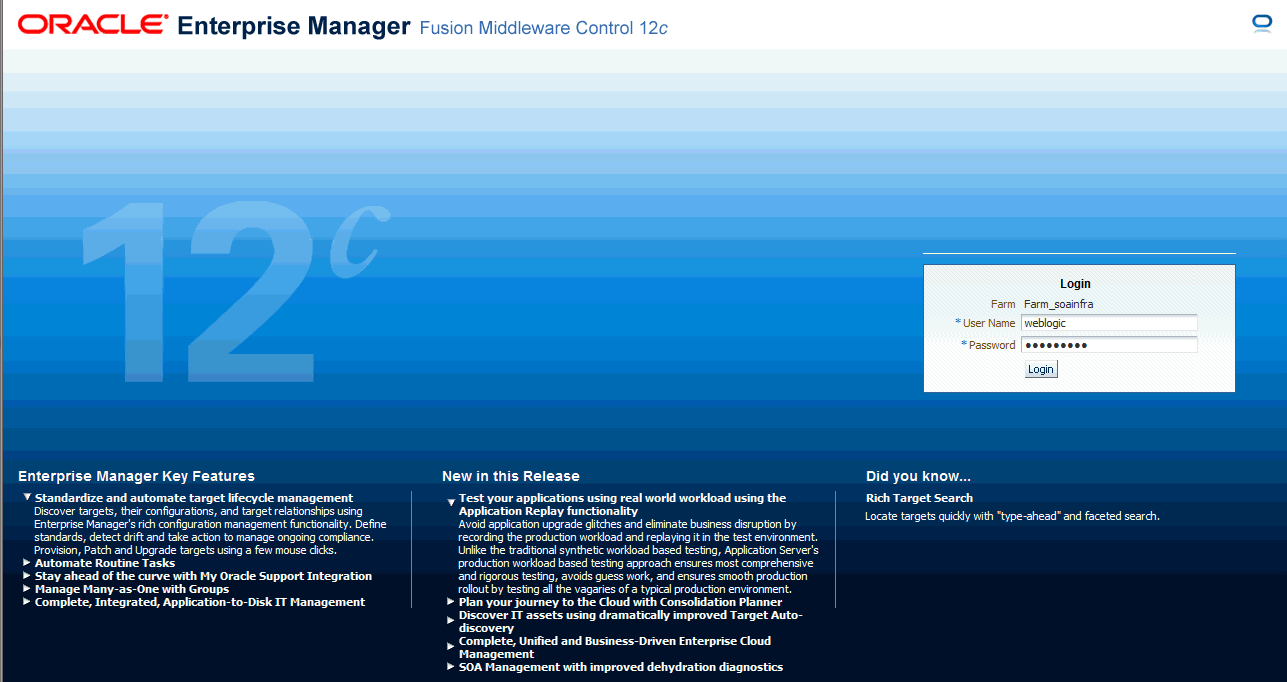
Navigate to Oracle Enterprise Manager Fusion Middleware Control Console (http://<servername>:<portnumber>/em). The composite you deployed is displayed in the Applications Navigation tree.
-
Enter username (such as weblogic) and password and click Login to log in to a farm.
You may need to select an appropriate target instance farm if there are multiple target Oracle Enterprise Manager Fusion Middleware Control Console farms.
-
From the Farm base domain, expand the SOA > soa-infra > soa-infra (soa_server1) > default to navigate through the SOA Infrastructure home page and menu to access your deployed SOA Composite applications running in the SOA Infrastructure for that managed server.
Note: The Farm menu always displays at the top of the navigator. As you expand the SOA folder in the navigator and click the links displayed beneath it, the SOA Infrastructure menu becomes available at the top of the page.
Click the SOA Composite application that you want to initiate (such as 'ChangeOrderAPI') from the SOA Infrastructure.
Click Test at the top of the page.
-
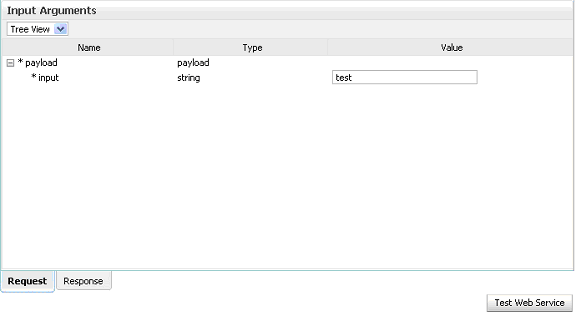
The Test Web Service page for initiating an instance appears. You can specify the XML payload data to use in the Input Arguments section.
Enter the input string required by the process and click Test Web Service to initiate the process.
Testing Web Service
The test results appear in the Response tab upon completion.
-
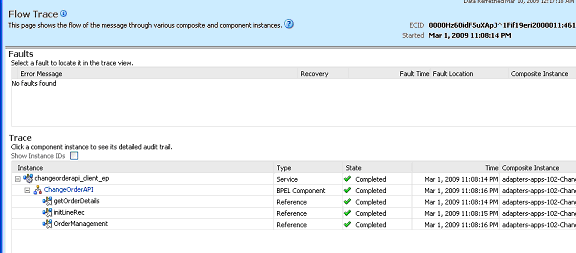
Click Launch Flow Trace in the Test Web Service page. The Flow Trace page is displayed.
In the Trace section, you should find the sequence of the message flow for the service binding component (changeorderapi_client_ep), BPEL component (ChangeOrderAPI), and reference binding components (getOrderDetails, initLineRec, and OrderManagement). All involved components have successfully received and processed messages.
Flow Trace Page
Click your BPEL service component instance link (such as ChangeOrderAPI) to display the Instances page where you can view execution details for the BPEL activities in the Audit Trail tab.
Click the Flow tab to check the BPEL process flow diagram. Click an activity of the process diagram to view the activity details and flow of the payload through the process.
Validating Records Using SQL
To confirm that the records have been written into the Oracle E-Business Suite applications, you can write SQL select l.ordered_quantity from oe_order_lines_all l,oe_order_headers_all h where h.orig_sys_document_ref='<ORDER_ID> and h.header_id=l.header_id; statements and fetch the results showing the ordered_quantity should be the same as the value provided in the changeorder_data.xml document.
Verifying Records in Oracle E-Business Suite
Alternatively, you can go to the specific module in Oracle E-Business Suite with Oracle Management Super User, Vision Operation (USA) responsibility.
To validate it in Oracle Order Management:
-
Log on to the Forms-based Oracle E-Business Suite applications with the Order Management, Super User responsibility.
-
Select Order Returns > Sales Order. Sales Order Forms would open up.
-
Search for an order by entering the order number in the Customer PO field. This would bring up the details of a newly created order.
-
Select the Line Items tab to check the quantity of the order. It should be the same as it is set in changeorder_data.xml file.
-
Troubleshooting
If you experience problems with your PL/SQL API integration, you can take the following troubleshooting steps:
-
If you designed your PL/SQL API integration in one instance of your Oracle E-Business Suite environment, and plan to run it in another instance, be sure to rerun the SQL scripts in the second instance to create the necessary PL/SQL wrappers.
-
Ensure that the JNDI location in weblogic-ra.xml is properly configured.
Enable logging for Adapter to see if the issue is on the middleware side. For information on how to enable logging, see Enabling Logging for Adapters.