23 Enabling Web-Service-Based Message Exchange
This chapter describes how to enable Web-service-based message (typically SOAP-based) exchange between trading partners in Oracle B2B.
The chapter contains the following sections:
23.1 Introduction to Web-Service-Based Message Exchange
Oracle B2B allows you to exchange Web service (SOAP) based messages between trading partners. You can exchange messages in both inbound and outbound direction. However, currently, this support is limited to SOAP 1.1 messages over HTTP only.
The Web service feature not only enables partners to receive or send messages, but also it is layered as a protocol implementation and supports other general features such as reporting, tracking, and auditing.
Many enterprises are increasingly having a requirement to integrate their trading partners file transfer and/or message exchange using Web service (in addition to B2B-specific protocols.)
Oracle B2B support for Web services is based on the following specifications, however, implementation may differ at times:
-
SOAP 1.1
-
WS Addressing 1.0
-
Attachment
23.2 Exchanging SOAP-Based Service Messages with Custom WSDL File
The support for SOAP-based messages is available for both inbound and outbound directions.
You need to create or upload a Web Service Definition Language (WSDL) file that you can customize according to your requirement.
23.2.1 Exchanging Outbound SOAP-Based Messages
To enable exchange of outbound SOAP-based messages, you need to perform the following tasks:
23.2.1.1 Uploading the WSDL
As the first task, you need to upload the WSDL file that is required to register a Web service to exchange messages. You can upload the WSDL in the either of the following ways:
-
Inline WSDL - a normal WSDL file where the XSD information is defined within the WSDL itself
-
A ZIP file containing a WSDL file and an XSD file
-
A ZIP file containing multiple WSDL and XSD files
To upload a WSDL:
-
Log on to the Oracle B2B console (http://<hostname>:<port>/b2bconsole), where hostname is the name of the computer where Oracle SOA Suite is hosted and port is typically
8001(in the case of a non-SSL connection). -
Click the Administration link and then click the WSDL tab.
-
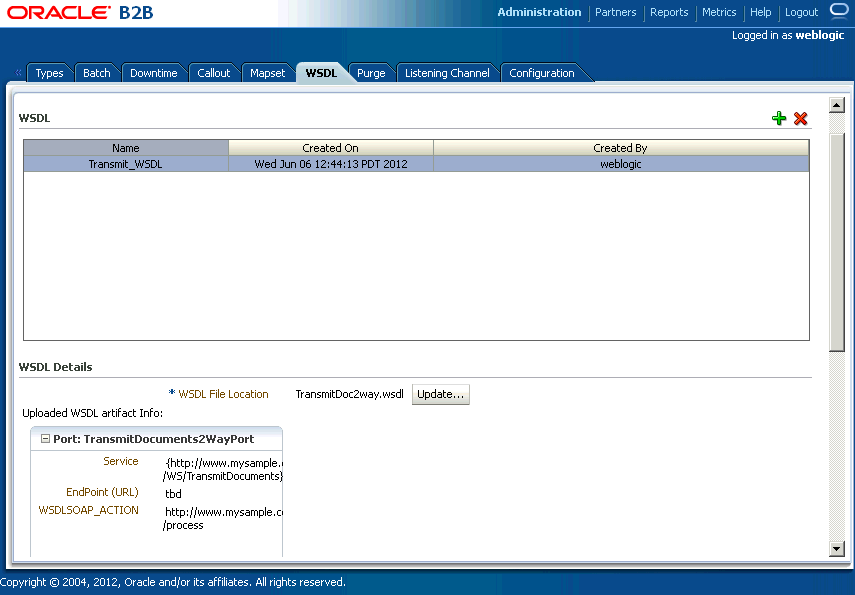
Click the + button (Add WSDL). An entry for the new WSDL gets created in the WSDL table.
-
Specify a name for the WSDL such as Transmit_WSDL. In case of multiple WSDLs that have been zipped and uploaded, the start WSDL or the root WSDL has to be selected.
-
In the WSDL section, click the Browse button to select the WSDL to be uploaded. For this example, the WSDL selected is TransmitDoc2way.wsdl. You can see the details of the WSDL is listed under the Uploaded WSDL artifact Info section as shown in Figure 23-1.
-
Click Save and then click OK in the confirmation dialog.
Note:
After the uploaded WSDL file is referenced by any other metadata such as channels and they are deployed as a part of agreements, any update to the WSDL is disabled. After these references are inactivated, only then you can update the uploaded WSDL.
23.2.1.2 Creating a document
The next task is to create a document for the outbound flow. Please note that currently, the only supported document type is custom.
To create a custom document:
-
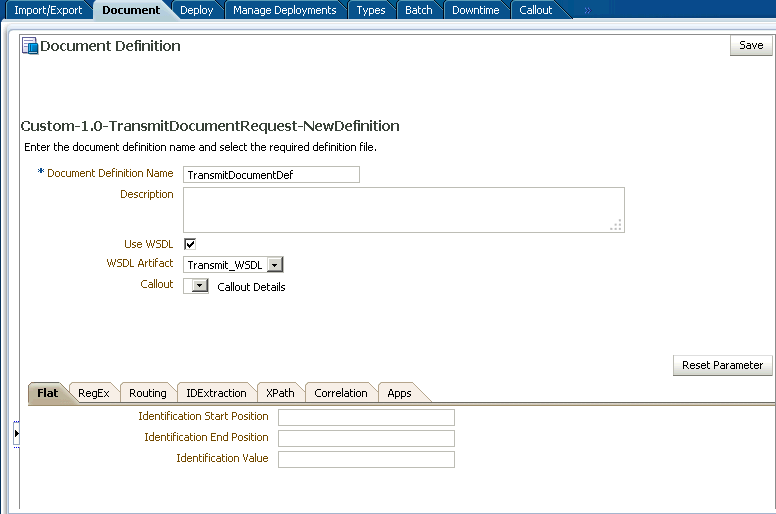
Create document definitions as specified in Creating Document Definitions. Specify:
-
Document Version - 1.0
-
Document Type - TransmitDocumentRequest
-
Document Definition - TransmitDocumentDef
-
-
Select Use WSDL.
-
Select the relevant WSDL Artifact, which in this case is Transmit_WSDL.
-
Select the required WSDL Message, which in this case is the TransmitDocumentsRequestMessage as shown in Figure 23-2.
-
Select any required callout from the Callout list.
-
Click Save.
23.2.1.3 Adding the document to as a part of partner documents
The third task is to add the newly created custom document as a part of the Partner documents.
To add the document:
-
Click the Partners link and then click the Documents tab.
-
Click to select the remote trading partner name (GlobalChips) under the partner section.
-
Under the Documents section on the right-hand pane, click the + button (Add Document Definition) to display the Select Document Definition window.
-
Navigate to the required document definition and click Add to add the document definition.
-
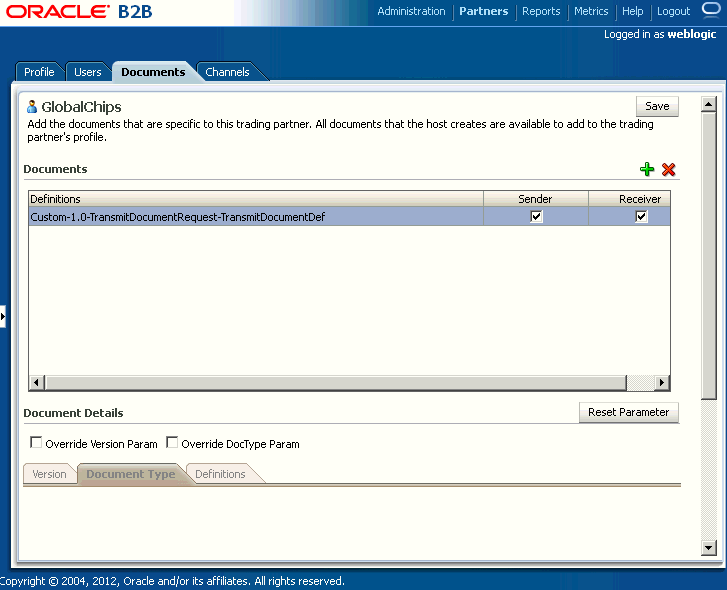
Click Save in the Documents tab.
The document gets added to the list of partner documents as shown in Figure 23-3.
23.2.1.4 Creating a Trading Partner Delivery Channel
After adding the documents, you need to create a trading partner delivery channel to send messages.
To add a trading partner delivery channel:
-
Click to select the trading partner (GlobalChips) under Partner on the left.
-
Click the Channels tab.
-
Click the + (Add Channel to Trading Partner) button.
-
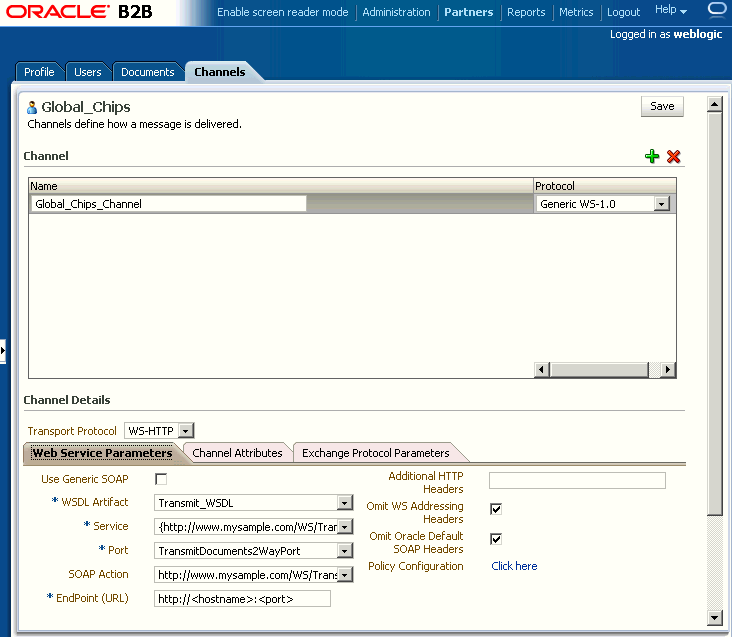
In the Channel section, specify a name for the channel (such as GlobalChips_Channel).
-
Select Generic WS-1.0 from the Protocol list.
-
In the Channel details section, in the Web Service Parameters tab:
-
Select Transmit_WSDL, the WSDL that you uploaded from WSDL Artifact from the WSDL Artifact list.
-
Select the available service (TransmitsDocumentService in this case).
Note:
Oracle B2B allows you to specify services, ports, and actions manually. This is useful when you want to specify additional service, port, or action beyond and over what is available as part of the selected WSDL. You can also provide string values for the preceding parameters manually. In the case of manually providing the service name, it should be in the following format, else there would be a validation error:
{namespace}ServiceName
The namespace must match the target namespace of the WSDL, else, the Security Policy Configuration will not be applied.
-
Select the available port (TransmitDocuments2WayPort).
-
Select the SOAP action (available from the WSDL).
-
Enter the URL where the server is listening as the Endpoint (URL), which is the URL of the GlobalChips trading partner.
-
Enter any additional HTTP headers, if required.
-
Select Omit WS Addressing Headers if you want to discard WS Addressing headers as a part of the message to be exchanged.
-
Select Omit Oracle Default SOAP Headers if you do not want Oracle B2B Web services outbound channel to send the default SOAP headers such as From, To, Doctype, and DocRevision as a part of the message.
-
Click the Policy Configuration Click here link to display the Policy Configuration window. The policy Configuration window lists all the available Web services security policies that you can attach to the channel locally. Attaching a policy locally to a channel provides granular control over the security of the channel as opposed to setting global policies at the Oracle Fusion Middleware Enterprise Manager Control console level.
-
In the Policy Configuration window, from the list of available Web services policies under Available Policies, select the policy that you want to attach to the channel. You can select multiple policies by pressing the Control key and clicking the policy names.
-
Click Attach to attach the selected policy or policies to the channel. You can click the Attach All button to attach all the available policies to the channel and click OK as shown in Figure 23-4.
Figure 23-4 Attaching Web Services Policies
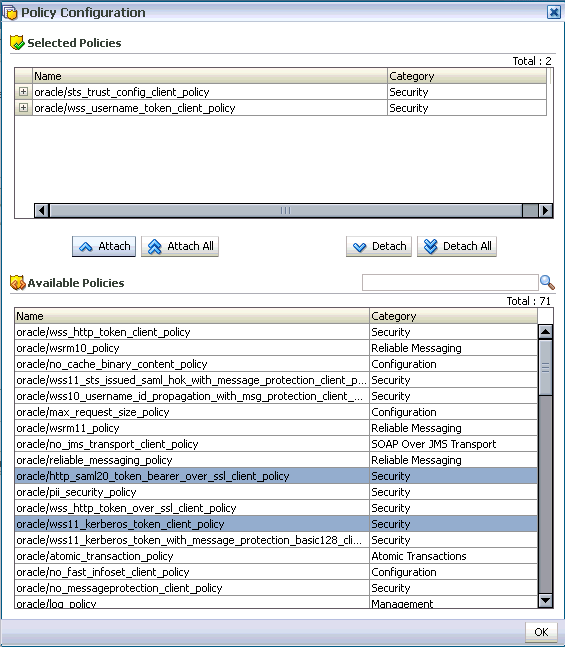
Description of "Figure 23-4 Attaching Web Services Policies"Note:
Some policies are contradictory to each other. If you try to attach such contradictory policies together to an endpoint, you will get an error.
See "Global Policy Attachments Using Policy Sets" in Oracle Fusion Middleware Understanding Oracle Web Services Manager for more information.
Note:
You can also set the parameters, such as Additional SOAP Headers and Payload XPath in the Exchange Protocol Parameters tab.
Select the Additional SOAP Headers option to specify any additional SOAP headers that you want to pass along with the message. The Payload XPath option helps to select the payload based on the XPath; rest of the SOAP body is ignored.
-
-
Click Save as shown in Figure 23-5.
Note:
If you do not want to upload and use a custom WSDL, you can select the Use Generic SOAP check box. This should enable you to send any XML document over SOAP and you do not need to associate any WSDL in Channel/Document page. Oracle B2B provides a preseeded generic WSDL that is used when you select Use Generic SOAP.
23.2.1.5 Creating and deploying an agreement
The last task is to create and deploy a trading partner agreement.
Refer to Creating and Deploying Trading Partner Agreements to learn more about creating and deploying an agreement.
23.2.2 Exchanging Inbound SOAP-Based Messages
To exchange inbound SOAP-based messages, you need to perform the following tasks:
Note:
After you create a listening channel and enable it, you cannot edit the channel to use a different WSDL. You need to delete the channel and create a new one.
23.2.4 Creating a document for the inbound flow
This task is the same as Creating a document of the outbound case.
23.2.5 Adding the document to as a part of partner documents
This task is the same as Adding the document to as a part of partner documents of the outbound case.
23.2.6 Creating a listening channel
The next task is to create a listening channel to receive the incoming messages.
To create a listening channel:
-
Click the Administration link and then click the Listening Channel tab.
-
Click the + (Add Channel to Trading Partner) button.
-
In the Listening Channel section, specify a name for the channel (such as Acme_ListeningChannel).
-
Select Generic WS-1.0 from the Protocol list.
-
In the Channel details section, in the Web Service Parameters tab:
-
Select Transmit_WSDL, the WSDL that you uploaded from WSDL Artifact from the WSDL Artifact list.
-
Select the available service (TransmitsDocumentService in this case).
-
Select the available port (TransmitDocuments2WayPort).
-
Enter the URL where the server is listening as the Endpoint (URL), which is the URL of the GlobalChips trading partner.
Note that the Endpoint (URL) gets populated automatically with the URL of the partner where the server is listening.
-
Click the Policy Configuration Click here link to display the Policy Configuration window. The policy Configuration window lists all the available Web services security policies that you can attach to the channel locally. Attaching a policy locally to a channel provides granular control over the security of the channel as opposed to setting global policies at the Oracle Fusion Middleware Enterprise Manager Control console level.
-
In the Policy Configuration window, from the list of available Web services policies under Available Policies, select the policy that you want to attach to the channel. You can select multiple policies by pressing the Control key and clicking the policy names.
-
Click Attach to attach the selected policy or policies to the channel. You can click the Attach All button to attach all the available policies to the channel and click OK.
-
-
Click the Channel Attributes tab and ensure that Enable Channel is selected.
-
Click Save.
Note:
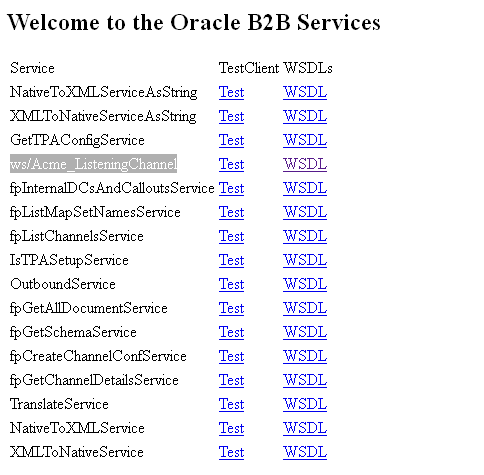
To ensure that the that the Web services have been registered for listening messages, access the following URL, log on by providing the user name and password, and check if the Web service is listed in the list of registered Web services:
http:<host>:<port>/b2b/services
You need to create users (along with their passwords) in the Oracle Weblogic Server console. Access the following link to know more about creating users in the Oracle Weblogic Server console:
http://docs.oracle.com/cd/E23943_01/apirefs.1111/e13952/taskhelp/security/ManageUsersAndGroups.htmlThe Web service is listed in the following format:
ws/Listening_Channel_Name
You can download the WSDL from the specific service by clicking the respective WSDL link as shown in the following graphic.
Note:
After you create a listening channel and enable it, you cannot edit the channel to use a different WSDL. You need to delete the channel and create a new one.
23.3 Configuring wsa.action
There are various way to configure the wsa.action.
-
wsa.actionin the case of fabric orWSA_ACTIONin the case of JMS can be sent from the back end and the same will be used aswsa.actionwhile sending the message. -
The SOAP action,
eventName=ACTION:test, can also be used aswsa.actionin casewsa.actionis not provided from the back end. -
The action configured as a part of the delivery channel will be used as
wsa.actionin casewsa.actionis not specified from the back end application.
23.4 Sending Custom SOAP Headers
Oracle B2B allows you to send custom SOAP headers as a part of your outbound Web-service-based messages.
In the case of an outbound JMS channel, the sender trading partner can send multi-level custom SOAP headers as the following sample:
<CustomSOAPHeader xmlns="http://schemas.xmlsoap.org/soap/envelope/">
   <hello xmlns="http://xmlns.oracle1.com/soa1/generic/soap">
       <name xmlns="http://MY_NAME_SPACE">
         <firstname>John</firstname>
         <lastname>Doe</lastname>
       </name>
    </hello>
</CustomSOAPHeader>
In the case of an outbound fabric, the sender can send multi-level custom headers as the following sample:
<bpelx:inputProperty name="b2b.customSOAPHeaders" expression="'<CustomSOAPHeader xmlns="http://schemas.xmlsoap.org/soap/envelope/">
   <hello xmlns="http://xmlns.oracle1.com/soa1/generic/soap">
       <name xmlns="http://MY_NAME_SPACE">
         <firstname>John</firstname>
         <lastname>Doe</lastname>
       </name>
    </hello>
</CustomSOAPHeader>
23.5 Attaching Policies to Web Services Using Enterprise Management
This section discusses how to attach policy sets to Web services by using the Oracle Fusion Middleware Enterprise Management Control console.
To create the UserName token policy and required credentials, you need to perform the following tasks:
23.5.1 Creating Default Credentials Map and Key
The first task is to create credentials.
To create credentials:
-
Log on to Oracle Fusion Middleware Enterprise Management Control console by accessing the following URL:
http://<hostname>:<port>/em
Where:
-
hostname: The name of the computer running the Oracle SOA Suite
-
port: The port number of the Admin server; typically
7001.
-
-
Expand the domain name, such as soainfra, under Weblogic Domain in the Target Navigation pane.
-
Right-click soainfra, and select Security > Credentials to display the Credentials page as displayed in Figure 23-6.
Figure 23-6 Accessing the Credentials Page
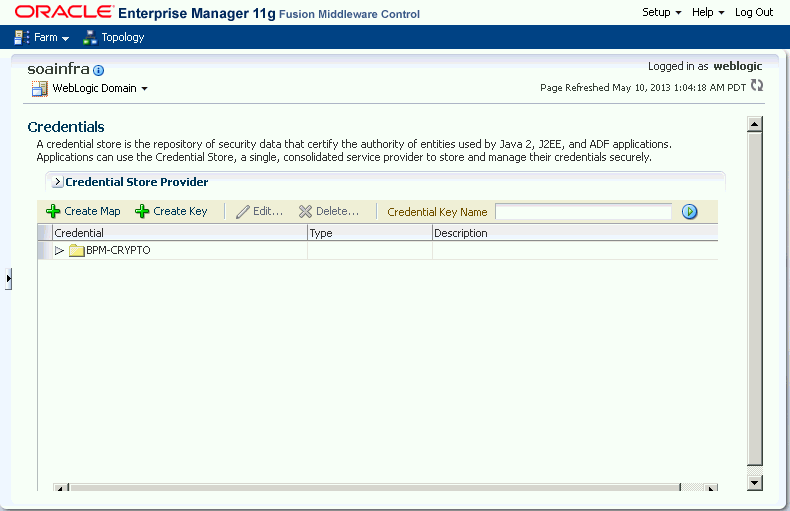
Description of "Figure 23-6 Accessing the Credentials Page" -
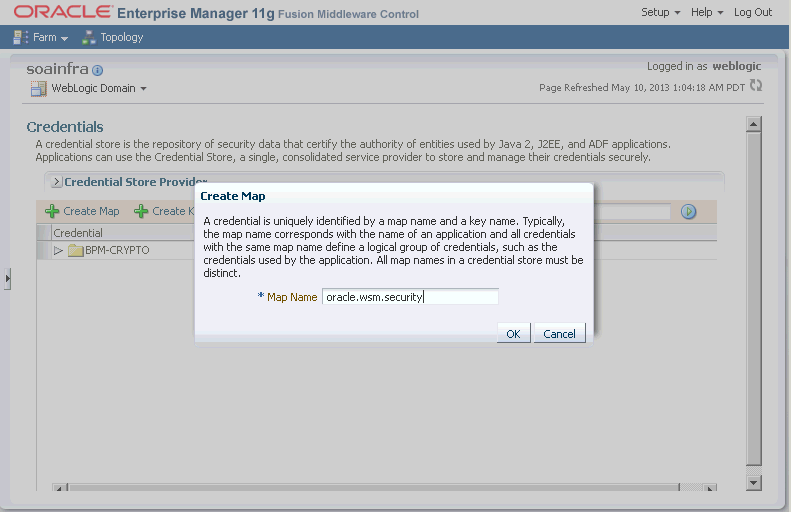
In the Credentials page, click Create Map.
-
In the Create Map dialog box, enter
oracle.wsm.securityas the map name as displayed in Figure 23-7 and click OK. -
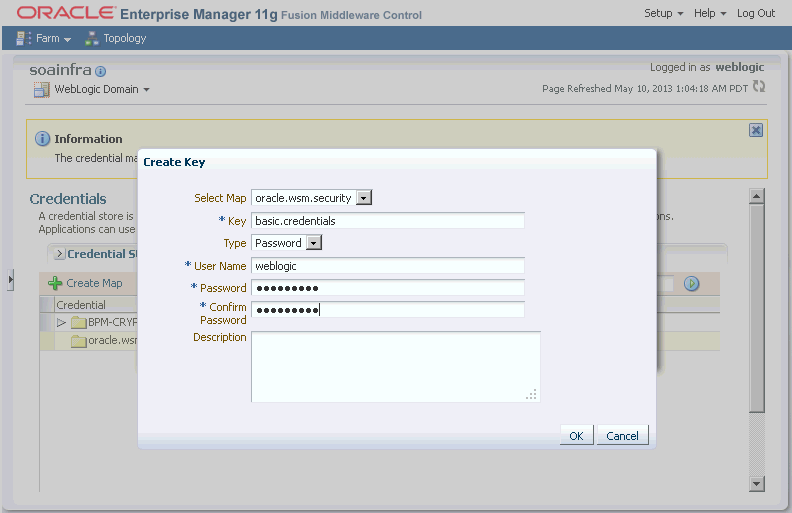
Select oracle.wsm.security (the map that you created) and click Create Key to display the Create Key dialog box.
-
In the Create Key dialog box, do the following as displayed in Figure 23-8:
-
Enter the key name as basic.credentials in the Key field.
-
Select Password as Type.
-
Enter the Admin user name, which in this case is
weblogic. -
Enter a password in the Password field.
-
Confirm the password that you have entered in the last step.
-
Click OK.
-
23.5.2 Creating and attaching outbound policy sets
The next task is to create and attach the outbound policy sets to the Web service.
To create an outbound policy set and attach it to Web services:
-
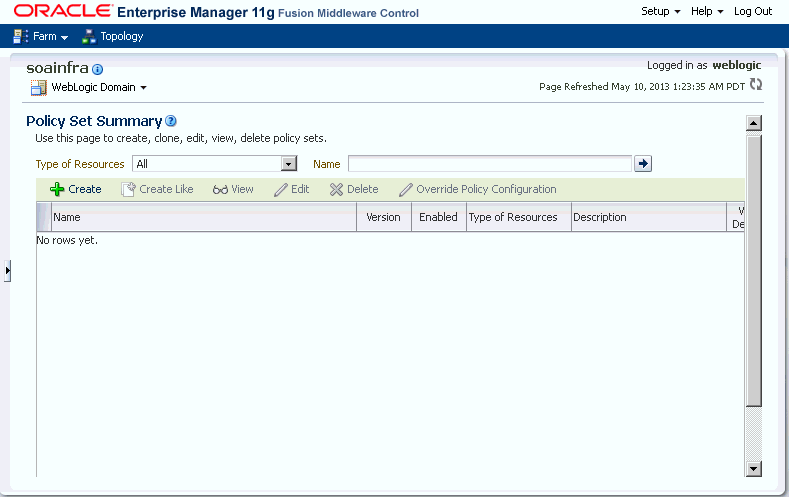
Click the Weblogic Domain list on the domain name (soainfra) page and select Web Services > Policy Sets to display the Policy Set Summary page as displayed in Figure 23-9.
-
In the Policy Set Summary page, click Create to display the Create Policy Set wizard.
-
Enter the name as
b2bOutboundTest, select Enabled, select Web Service Client from the Type of Resources list, and click Next as displayed in Figure 23-10.Figure 23-10 Create Policy Set - Enter General Information Page
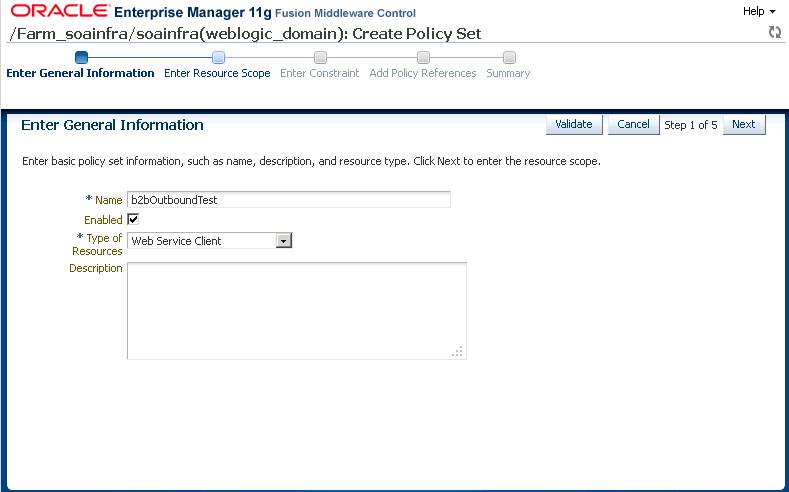
Description of "Figure 23-10 Create Policy Set - Enter General Information Page" -
In the Enter Resource Scope page, enter the following as displayed in Figure 23-11 and click Next:
-
The domain name, such as
soainfra -
The application name, such as
soainfra -
The application module name, such as
soainfra -
The SOA reference or Web service client name, such as
{http://www.spscommerce.com/WS/TransmitDocuments}TransmitDocumentsService -
The port name, such as
TransmitDocumentsSoapHttpPort
Figure 23-11 Create Policy Set - Enter Resource Scope Page
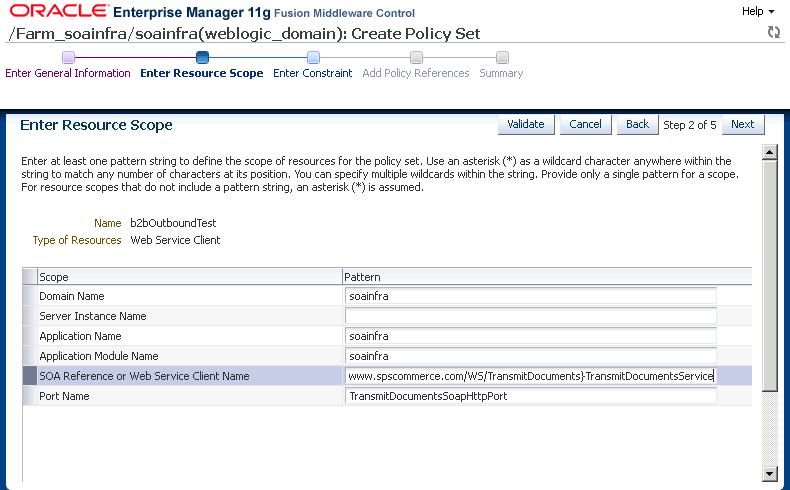
Description of "Figure 23-11 Create Policy Set - Enter Resource Scope Page" -
-
In the Enter Constraint page, click Next.
-
In the Add Policy References page, select the oracle/wss_username_token_client_policy from the Available Policies section, click Attach as displayed in Figure 23-12, and then click Next.
Figure 23-12 Create Policy Set - Add Policy References Page
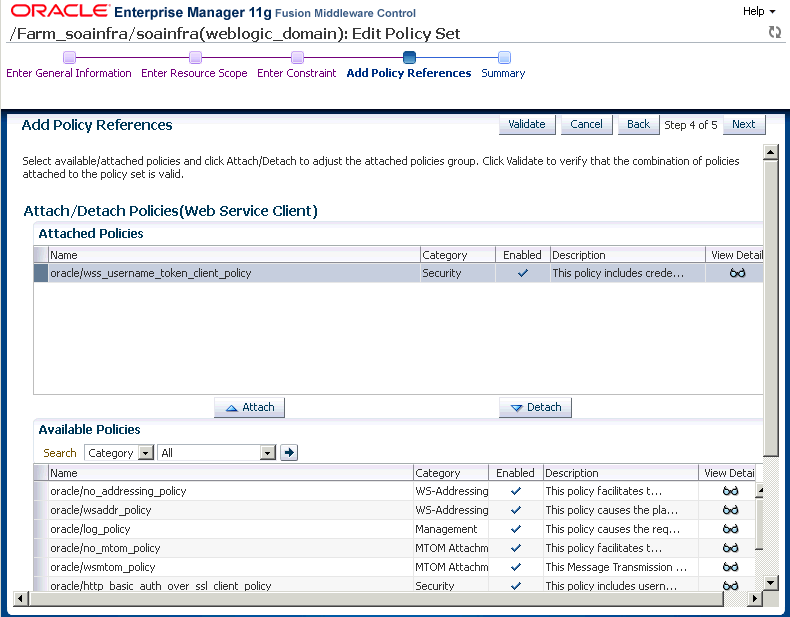
Description of "Figure 23-12 Create Policy Set - Add Policy References Page" -
In the Summary page, click Save to return to the Policy Set Summary page.
23.5.3 Creating and attaching inbound policy sets
The final task is to create and attach inbound policy sets.
To create an inbound policy set and attach it to Web services:
-
Repeat steps 1 and 2 from Creating and attaching outbound policy sets.
-
Enter the name as
b2bIutboundTest, select Enabled, select Web Service Endpoint from the Type of Resources list, and click Next as displayed in Figure 23-13.Figure 23-13 Create Policy Set - Enter General Information Page
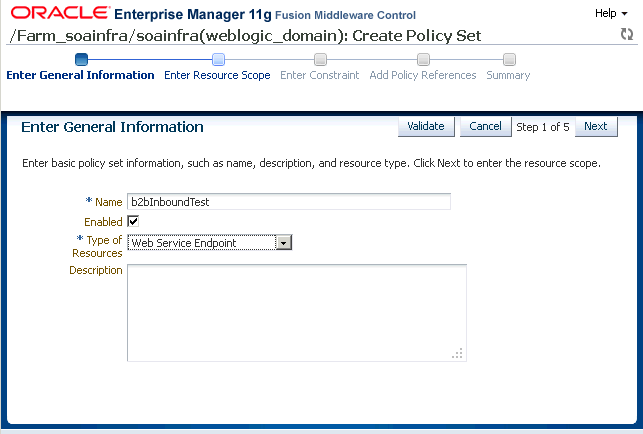
Description of "Figure 23-13 Create Policy Set - Enter General Information Page" -
In the Enter Resource Scope page, enter the following as displayed in Figure 23-14 and click Next:
-
The domain name, such as
soainfra -
The application name, such as
soainfra -
The application module name, such as
soainfra -
The SOA reference or Web service client name, such as
{http://www.spscommerce.com/WS/TransmitDocuments}TransmitDocumentsService -
The port name, such as
TransmitDocumentsSoapHttpPort
Figure 23-14 Create Policy Set - Enter Resource Scope Page
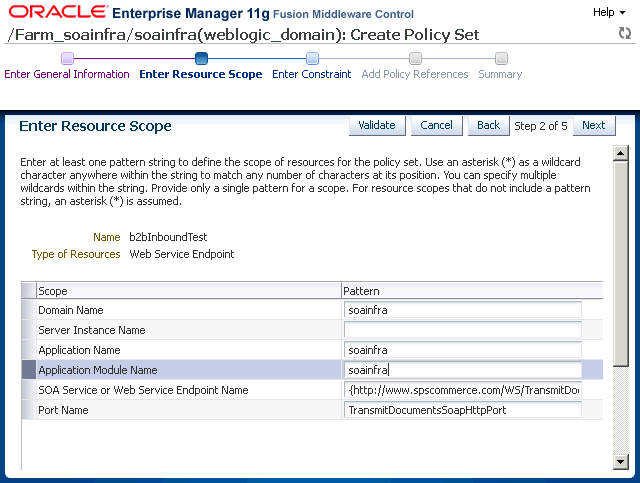
Description of "Figure 23-14 Create Policy Set - Enter Resource Scope Page" -
-
In the Enter Constraint page, click Next.
-
In the Add Policy References page, select the oracle/wss_username_token_service_policy from the Available Policies section, click Attach, and then click Next.
-
In the Summary page, click Save to return to the Policy Set Summary page.
23.6 Identifying Trading Partner at runtime
At runtime, you can identify the trading partner from which the message is received on the basis of various transport headers.
You can identify a trading partner by using the following information (listed in order of priority):
-
Matching the value of HTTP (From) Header Override with a Generic Identifier of the trading partner
-
Using XPath to identify
FROM_TPfound in the SOAP Header -
Matching the value of HTTP (From) Header with a Generic Identifier of the trading partner
-
Matching the value of SOAP (From) Header with a Generic Identifier of the trading partner
Note: In case you cannot use the predefined SOAP headers, you can override the same and use XPath to identify trading partner.
-
Matching the value of WS Security Authenticated User with a Generic Identifier of the trading partner
-
Matching the value of Remote HostName with a Generic Identifier of the trading partner
-
Matching the value of SOAP envelope header “PartyInfo” with the Generic Identifier of the trading partner.
23.7 Sample Request-Reply Scenarios
These scenarios are for synchronized request-reply when using a Web service or the Generic SOAP.
The section contains:
23.7.1 Outbound Synchronization: Composite
In the case of outbound synchronization with a composite:
-
Web Service: Relies on the composite to decide whether the synchronization is one-way, or if the request/reply pattern is used. If
soapActionis provided, it is used only to overwrite the HTTPsoapActionheaders.Resubmission of a synchronized request/reply message needs to be done from the composite. If any such message is resubmitted from the Oracle B2B console, it is be treated as a one-way message.
-
Generic SOAP: Relies on the composite to decide one-way or request/reply operation. The channel configuration (None/Sync) does not take effect.
23.7.2 Inbound Synchronization: Composite
In the case of inbound synchronization with a composite:
-
Web Service: Uses
soapActionfrom the HTTP header to decide whether it is a one-way or request/reply operation specified by the WSDL. IfsoapActionis not defined in the WSDL, then Oracle B2B falls back to the Channel configuration. In the case of a non-responsive payload, an error is reported for request/reply. -
Generic SOAP: Depends on the Channel configuration (None/Sync). In the case of a non-responsive payload, an error is reported for request/reply.
23.7.3 Outbound Synchronization: JMS Queues
In the case of outbound synchronization with a JMS queue:
-
Web Service: Uses
soapAction(provided from the back end or configured in the listening channel) to decide whether it is a one-way or request/reply operation specified by the WSDL. IfsoapActioncannot be located in the WSDL, Oracle B2B defaults to the Channel configuration. Reply is sent to the back end by using the inbound agreement configuration. -
Generic SOAP: Depends on the Channel configuration (None/Sync). If no reply comes back for Sync case, Oracle B2B reports an error. Reply is sent to the back end by using inbound agreement configuration.
23.7.4 Inbound Synchronization: JMS Queues
-
Web Service: Uses
soapActionfrom the HTTP header to decide whether it is a one-way or request/reply operation specified by the WSDL. IfsoapActionis not defined in the WSDL, Oracle B2B falls back to the Channel configuration (None/Sync). In the case of Sync, a reply needs to be generated in a Oracle B2B callout to be sent as response back to the trading partner.If the incoming request has WS-Addressing enabled, then the response message sends the ws-addressing mandatory headers.
-
Generic SOAP: Depends on the Channel configuration (None/Sync). In case of Sync, a reply needs to be generated in a Oracle B2B callout to be sent as response back to the trading partner.
