9 Managing Deployments
This chapter describes how to deploy an agreement to validate and activate a set of runtime data that is used for runtime transactions.
The chapter includes the following sections:
See Creating and Deploying Trading Partner Agreements, for more information about how to deploy an agreement.
9.1 Introduction to Agreement Deployment States
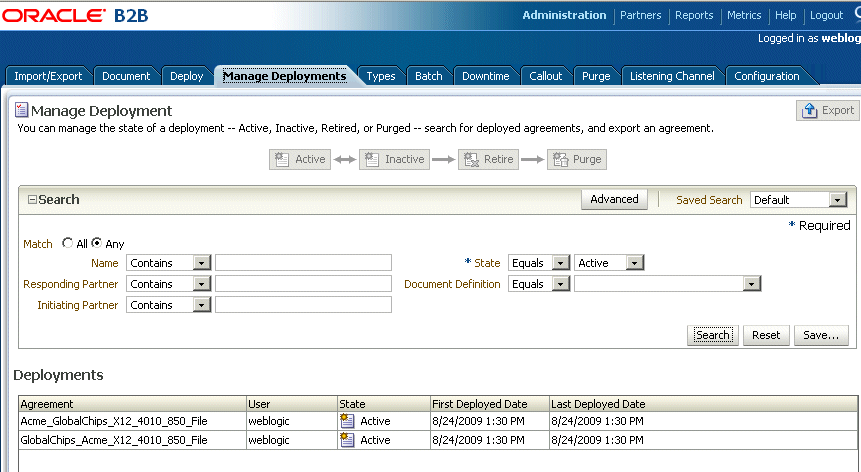
You can manage the state of a deployment—Active, Inactive, Retired, or Purged. You can also search on the deployed agreements in the runtime repository, as well as export an agreement.
Figure 9-1 shows the Manage Deployment tab.
9.2 Managing Deployed Agreements
A deployed agreement is initially in the Active state.
Table 9-1 describes the deployment states.
Table 9-1 Deployed Agreement States
| State | Description | When to Use |
|---|---|---|
|
Active |
The agreement has been successfully deployed and is ready to process messages. From an Active state, a deployed agreement can move to an Inactive state only. |
When you are ready to receive or send messages using the agreement. |
|
Inactive |
The agreement can be changed to Active or Retired states. The agreement will not accept any new messages. However, all in-flight messages will be processed successfully. From an Inactive state, a deployed agreement can be moved to a Retired state or can be moved back to an Active state. |
When a newer version of the same agreement is made Active, the previous version is changed to the Inactive state automatically. Also, when you do not want to receive new messages, but want to continue the in-flight messages, you can change the agreement to Inactive. |
|
Retired |
The agreement cannot be redeployed. No messages will be processed. From a Retired state, a deployed agreement can be purged only. |
When you no longer want to receive or send messages using this agreement |
|
Purged |
The agreement is deleted from the system. |
When you want to clean up unused agreements. Differs from Retired agreements, where you can still see the agreement in the system for information purposes. |
Table 9-2 describes the information displayed for a deployed agreement.
Table 9-2 Deployed Agreements
| Field | Description |
|---|---|
|
Agreement |
The name of the agreement, as created on the Partners > Agreement page. |
|
User |
The logged-in user name. |
|
State |
The state can be active, inactive, retired, or purged. |
|
First Deployed Date |
The date that the agreement was first deployed. |
|
Last Deployed Date |
The date that the agreement was last deployed. |
9.2.1 Searching for Deployed Agreements
You can search for deployed agreements using search parameters.
The search parameters aredescribed in Table 9-3.
Table 9-3 Search Parameters for Searching on Deployed Agreements
| Parameter | Description |
|---|---|
|
Name |
Enter a string that is contained in the agreement name, equals the name, or is at the end of the name. |
|
Responding Partner |
Enter a string that is contained in the responding partner name, equals the name, or is at the end of the name. |
|
Initiating Partner |
Enter a string that is contained in the initiating partner name, equals the name, or is at the end of the name. |
|
*State |
Select from All, Active, Inactive, or Retire. |
|
Document Definition |
Select from one of the document definitions you previously created. See Creating Document Definitions, for more information. |
-
Click Reset to return the search parameters shown in Table 9-3 to their previous settings.
-
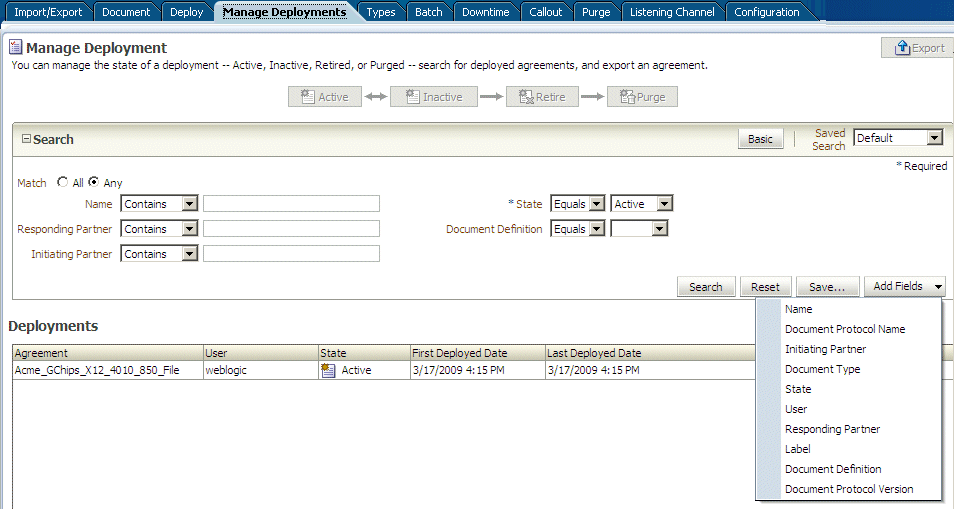
Click Advanced to select additional search parameters, as shown in Figure 9-2.
If you select the document search parameters from the Add Fields list, use them as follows: Select a document protocol name first to populate the list of document protocol versions; next select a document protocol version to populate the list of document types; and then select a document type to populate the list of document definitions.
The Saved Search feature is not available.
Note after the user has logged in, and the host trading partner is selected by default, no agreement is shown. The user can use quick search and advanced search to search for agreements in the system.To do so, the user can clear the quick search text, then search and no agreement is shown. If the user selects remote Trading Partner, all agreements related to that Trading Partner are shown, and quick search matches the names among only those agreements. Clear the quick search text, then search and all agreements related to that Trading Partner is shown.
9.2.3 Exporting an Active Agreement
You can export active agreements. For agreements that use HTTPS or digital signature and encryption, the key store password of the host trading partner is not included as part of the export file. This is because a key store is specific to each computer. Therefore, when the export file is imported on a different computer, you must re-create the key store password and update the key store location (if needed) for the host trading partner in the B2B interface. If the export file is imported back or the key store and its location have not changed on the target computer, then the key store password and location may be identical to the first key store and key store password you used. This applies only to the host trading partner.
Caution:
Do not manually edit exported files. If you do so, Oracle B2B cannot guarantee their integrity.
To export an active agreement:

