2 Working with Data Model Elements
This chapter describes the Oracle Business Rules data model comprising fact types, functions, globals, value sets, decision functions, and dictionary links.
The chapter includes the following sections:
2.1 Introduction to Working with Data Model Elements
To implement the data model portion of an Oracle Business Rules application you create a dictionary and add data model elements. To complete the dictionary, you create one or more rulesets containing rules that use or depend upon these data model elements.
For more information, see:
2.2 Introduction to Dictionaries and Dictionary Links
A dictionary is an Oracle Business Rules container for facts, functions, globals, valuesets, links, decision functions, and rulesets. A dictionary is an XML file that stores the rulesets and the data model for an application. Dictionaries can link to other dictionaries.
You can create as many dictionaries as you need. A dictionary may contain any number of rulesets and data model elements. A data model can be contained in one or more dictionaries. All the data model elements referenced by the rulesets must be available in the dictionary either directly or through links.
A dictionary is stored in a *.rules file.
2.2.1 Working with Dictionaries and Dictionary Links
When you create a dictionary, you give it a name and a package, similar to a Java class. You can create data model elements and rulesets inside this dictionary, and you can also reference the data models and rulesets of other dictionaries by creating a dictionary link and specifying the name and package of the target dictionary. Each dictionary logically contains the built-in dictionary. This dictionary includes standard functions and types that all Oracle Business Rules applications need. You cannot modify the built-in dictionary.
In addition to the main dictionary, you can create one or more application-specific dictionaries, such as PurchaseItems.rules. You can modify the properties of these dictionaries.
The complete data model defined by a dictionary and its linked dictionaries is called a combined data model. You can create multiple links to the same dictionary; in this case, all but the first link is ignored.
For more information, see What You Need to Know About Dictionary Linking.
2.2.2 How to Create a Dictionary in the SOA Tier Using Rules Designer
Oracle JDeveloper provides multiple ways to create dictionaries for Oracle Business Rules. You can create a dictionaries for use in a SOA applications. This section illustrates one way to create a dictionary in a SOA project.
A typical SOA composite design pattern provides each application with its own dictionaries. Each application is self-contained and can be deployed independently of other applications.
Sometimes multiple applications will require access to common parts of a common data model. In this case, use dictionary links to include a target application's dictionary in the source application. The source application copies the target application's dictionary and retains the contents of the copies linked to the source. When you use the linked elements, they are shown as local contents.
You can also create a dictionary in the business tier for use outside of a SOA application. For more information, see How to Create an Oracle Business Rules Dictionary in the Grades Project.
To create a dictionary in the SOA Tier using Rules Designer:
-
In the Application Navigator, select a SOA application and select or create a SOA project.
-
Click the down arrow, and select New, From Gallery from the list.
-
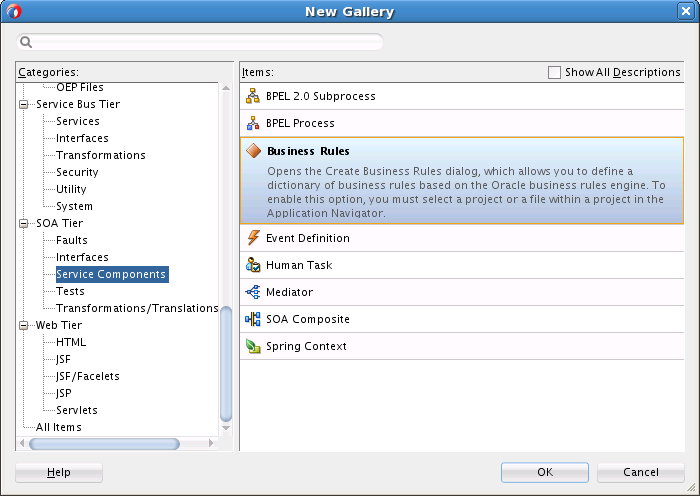
In the New Gallery dialog, expand SOA Tier as shown in Figure 2-1.
Figure 2-1 Creating a Business Rules Dictionary for a SOA Project
Description of "Figure 2-1 Creating a Business Rules Dictionary for a SOA Project" -
In the New Gallery window, select Business Rules.
-
Click OK. This displays the Create Business Rules dialog.
-
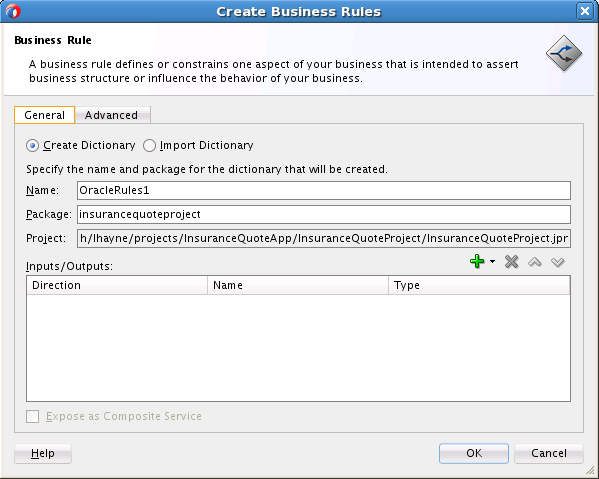
In the Create Business Rules dialog, enter fields as shown in Figure 2-2:
-
In the Name field, enter the name of your dictionary. For example, enter
PurchaseItems. -
In the Package field, enter the Java package to which your dictionary belongs. For example,
com.example.
-
-
To specify the inputs and outputs:
-
Click the Add button and select Input to create an input or Output, to create an output.
-
In the Type Chooser dialog, expand the appropriate XSD and select the appropriate type.
-
Click OK to close the Type Chooser dialog.
You can later add inputs or outputs, or remove the inputs or outputs. For more information, see Working with Decision Functions.
-
-
In the Create Business Rules dialog, click OK to create the Decision Component and the Oracle Business Rules dictionary.
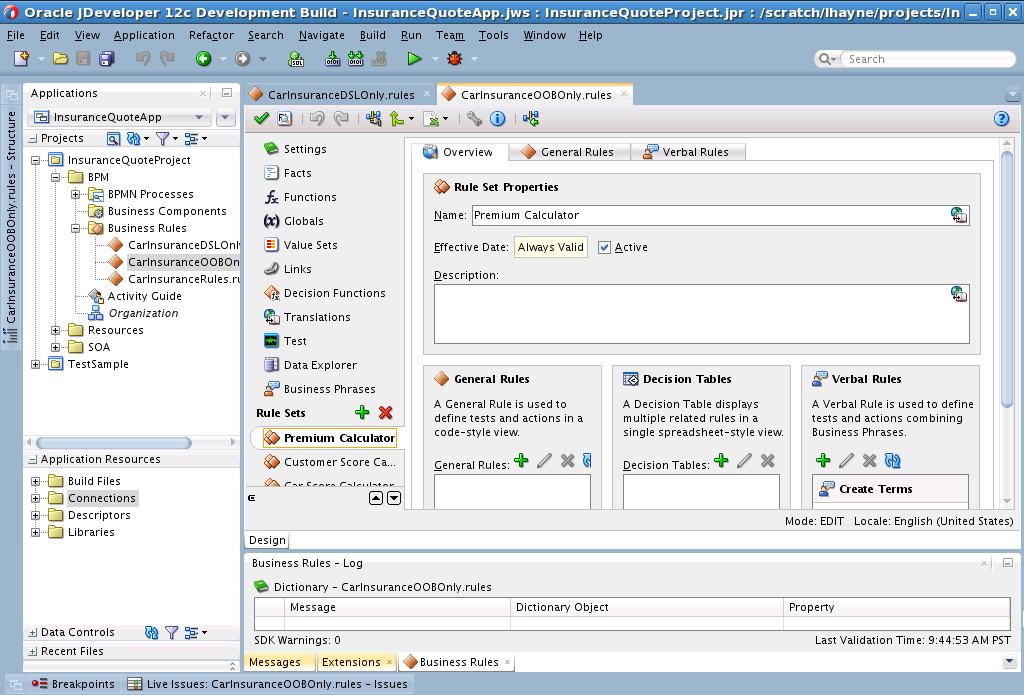
Oracle JDeveloper creates the dictionary in a file with a
.rulesextension, and starts Rules Designer as shown in Figure 2-3. Note the screen shot shows some BPM functionality that you may not have access to in SOA if you do not have BPM installed.Figure 2-3 Creating a New Oracle Business Rules Dictionary
Description of "Figure 2-3 Creating a New Oracle Business Rules Dictionary" -
Oracle JDeveloper also creates a Decision Component in composite.xml. To view this component double-click the
composite.xmlfile.
2.2.3 How to Create a Dictionary in the Business Tier Using Rules Designer
Use Rules Designer to create a rules dictionary for use in the business tier, outside of a SOA application. For information on using Oracle Business Rules without SOA, see Creating a Rule-enabled Non-SOA Java EE Application.
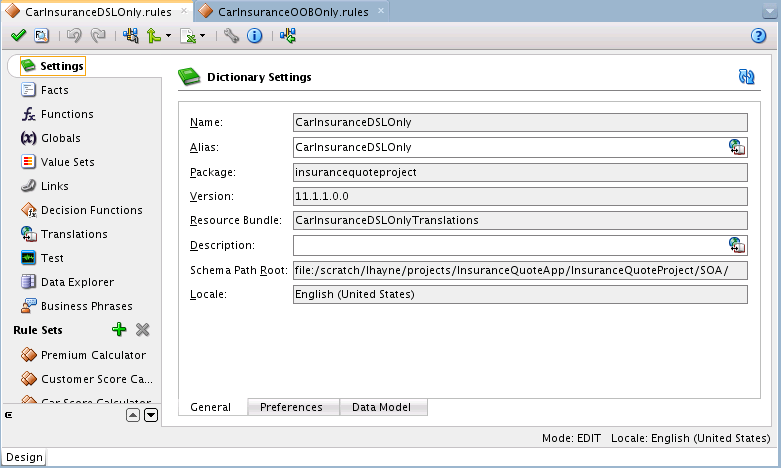
2.2.4 How to View and Edit Dictionary Settings
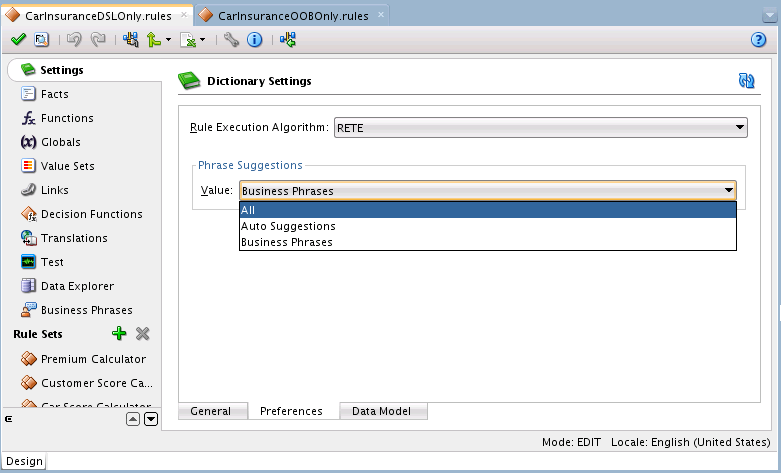
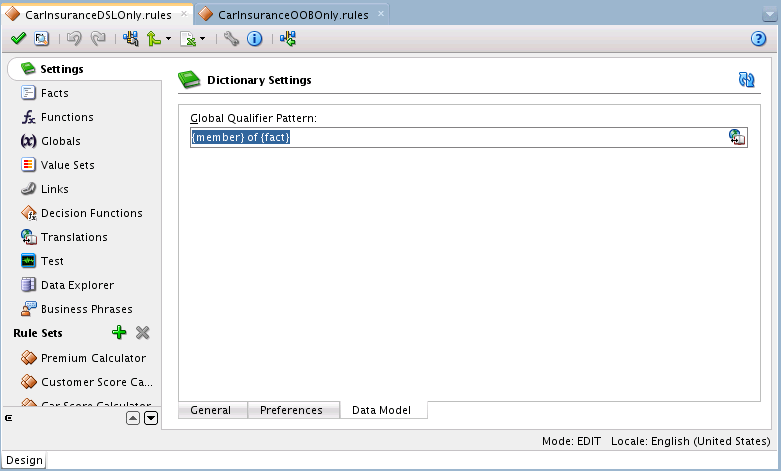
You can view and edit dictionary settings using the Settings tab. The Settings tab has three tabs: General, Preferences, and Data Model. Use the Preferences tab to select the execution algorithm and specify phrase suggestions that appear when you are using Verbal Rules. Use the Data Model tab to specify the global qualifier pattern, also for Verbal Rules. The pattern must contain two fragments: {member}, {fact}. For example, {member} of {fact}.
2.2.5 How to Link to a Dictionary
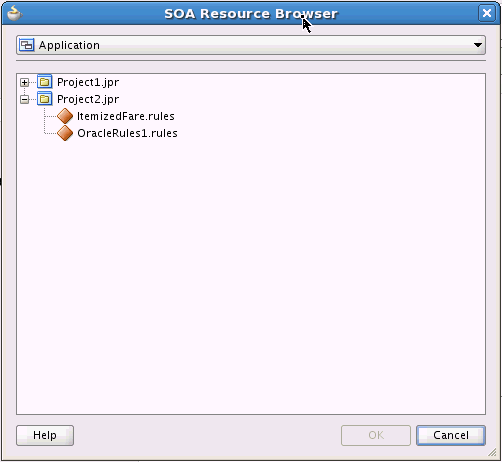
You can link to a dictionary in the same application using the Links navigation tab in Rules Designer. To link to another dictionary you need at least one other dictionary available.
To link to a dictionary using resource picker:
When you work with ADF Business Components Facts you should create a link to the Decision Point Dictionary. For more information, see Working with Oracle Business Rules and ADF Business Components.
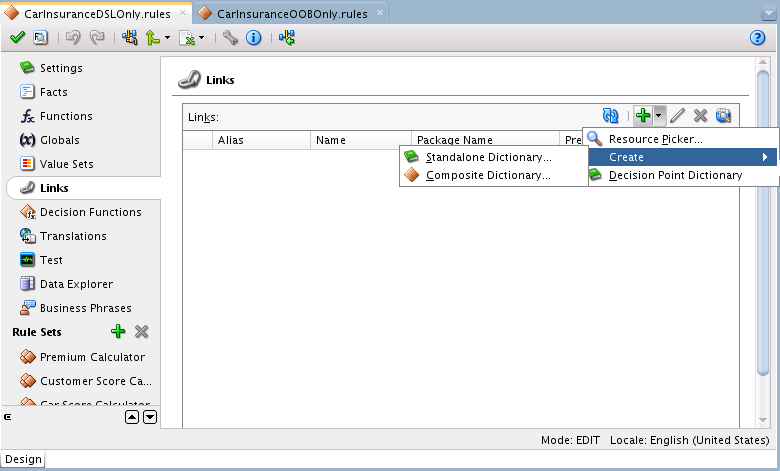
In order to link the decision point dictionary, click the Links navigation tab in Rules Designer. In the Links area, click Create and from the list select Decision Point Dictionary. This operation takes awhile. You need to wait for the Decision Point Dictionary to load.
2.2.6 How to Update a Linked Dictionary
When you have a dictionary, for example, Project_rules1 that links to another dictionary, for example, Shared_rules you need to see changes made to either dictionaries in both. For example, you can modify the Shared_rules dictionary and see those modifications in Project_rules1 by updating the Project_rules1 dictionary, or by closing and reopening the Rules Designer. Note that you can only see the changes in the linked dictionary from the dictionary which defines the link and not vice versa.
To update a linked dictionary:
- Using these sample dictionary names click the Save button to save the Shared_rules dictionary.
- Select the Project_rules1 dictionary.
- Select the Links navigation tab.
- Click the Dictionary Cache... button.
- In the Dictionary Finder Cache dialog, select the appropriate linked dictionary.
- Click the Clear button.
- In the Dictionary Finder Cache dialog, click Close.
- Click the Validate button.
2.2.7 What You Need to Know About Dictionary Linking
Using a dictionary with links to another dictionary is useful in the following cases:
-
Data Model Sharing, to share portions of a data model within a project. When you link to a dictionary in another project it is copied to the local project.
For example, consider a project where you would like to share some Oracle Business Rules Functions. You can create a dictionary that contains the functions, and name it
DictCommon. Then, you can create two dictionaries,DictApp1andDictApp2that both link toDictCommon, and both can use the same Oracle Business Rules functions. When you want to change one of the functions, you only change the version inDictCommon. Then, both dictionaries use the updated function the next time RL Language is generated from eitherDictApp1orDictApp2.
In Oracle Business Rules a fully qualified dictionary name is called a DictionaryFQN and this consists of two components:
-
Dictionary Package: The package name
-
Dictionary Name: The dictionary name
A dictionary refers to a linked dictionary using its DictionaryFQN and an alias. Oracle Business Rules uses the DictionaryFQN to find a linked dictionary.
The following are the naming constraints for combined dictionaries:
-
The full names of the dictionaries, including the package and name, must be distinct. In addition, the dictionary aliases must be distinct.
-
The aliases of data model definitions of a particular kind, for example, function, Oracle RL class, or value set, must be unique within a dictionary.
-
A definition may be qualified by the alias of its immediately containing dictionary. Definitions in the top and built-in dictionaries do not have to be qualified. Definitions in other dictionaries must be qualified and this qualification is controlled by the prefix linked names property of the dictionary link.
-
Ruleset names must be unique within a dictionary. When RL Language for a ruleset is generated, the dictionary alias is not part of any generated name. For example, if the dictionary named dict1 links to dict2 to create a combined dictionary, and dict1 contains ruleset_1 with rule_1 and dict2 also contains ruleset_1 with rule_2, then in the combined dictionary both of these rules, rule_1 and rule_2 are in the same ruleset (ruleset_1).
-
All rules and Decision Tables must have unique names within a ruleset.
For example, within a combined dictionary that includes dictionary d1 and dictionary d2, dictionary d1 may have a ruleset named
Ruleset_1with a rule rule_1. If dictionary d2 also has a ruleset namedRuleset_1with a rule_2, then when Oracle Business Rules generates RL Language from the combined, linked dictionaries, both rules rule_1 and rule_2 are in the single ruleset namedRuleset_1. If you violate this naming convention and do not use distinct names for the rules within a ruleset in a combined dictionary, Rules Designer reports a validation warning similar to the following:RUL-05920: Rule Set Ruleset_1 has two Rules with name rule_1
For more information, see Oracle Business Rules Files and Limitations.
2.2.8 What You Need to Know About Dictionary Linking and Dictionary Copies
When you create a dictionary link using the resource picker, the dictionary is copied to the source project (the project where the dictionary that you are linking from resides). Thus, this type of linking creates a local copy of the dictionary in the project. This is not a link to the original target, no matter where the target dictionary is. Thus, Rules Designer uses a copy operation for the link if you create a link with the resource picker.
Also note the following regarding linked dictionaries in SOA and non-SOA rule dictionaries:
-
SOA Applications
-
Only dictionaries from within the same project, system dictionaries seeded in soa/shared or dictionaries available in the classpath can be used as linked dictionaries.
-
If the same linked dictionary needs to be used across rules in multiple composites, then the linked dictionary should be referenced via the classpath.
-
-
Non_SOA Applications
-
Linked dictionaries can be located in the same application, in a shared location within MDS or the classpath. Appropriate dictionary finders need to be provided to locate and resolve the dictionaries.
-
2.2.9 What You Need to Know About Dictionary Linking to a Deployed Dictionary
When you are using Rules Designer you can browse a deployed composite application and any associated Oracle Business Rules dictionaries in the MDS connection. However, you cannot create a dictionary link to a dictionary deployed to MDS.
2.2.10 What You Need to Know About Business Rules Inputs and Outputs with BPEL
Decision function inputs are available as variables to the initial actions of the decision function. When the inputs are facts, the facts are asserted into working memory and rules must match the facts based on type and property values and not on decision function input name. For example, if you have inputs of same type, input1 and input2, rules distinguish these inputs based on type or property values and not on the different names they have.When the inputs are not visible facts, for example String or int, then a wrapper type named <decision function name> is created, and rules must match this type.
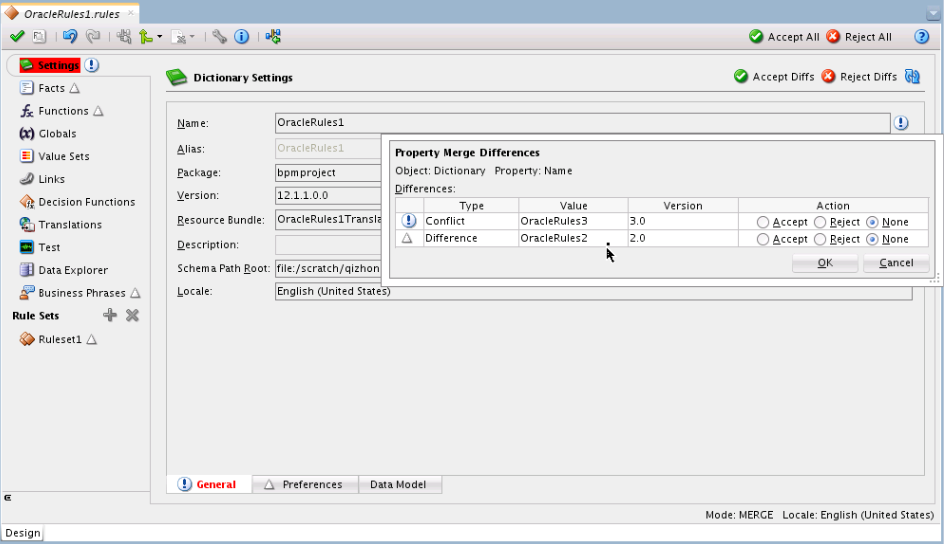
2.2.11 How to Compare or Merge Two or More Dictionaries
The Diff Dictionary feature enables you to review any differences in the latest revision of a dictionary against any previous revision and be able to roll back any changes since then. The differences are viewed from the perspective of the latest revision.
The Merge Dictionary feature enables you to review any differences between the base version and up to 3 changed versions and be able to resolve or merge the differences among them. The differences are viewed from the perspective of the changed versions.
Both Diff Dictionary and Merge Dictionary allow you to view and resolve the differences, but the basic difference between the two features is that you can Merge more than one dictionaries but you can not Diff more than one dictionaries.
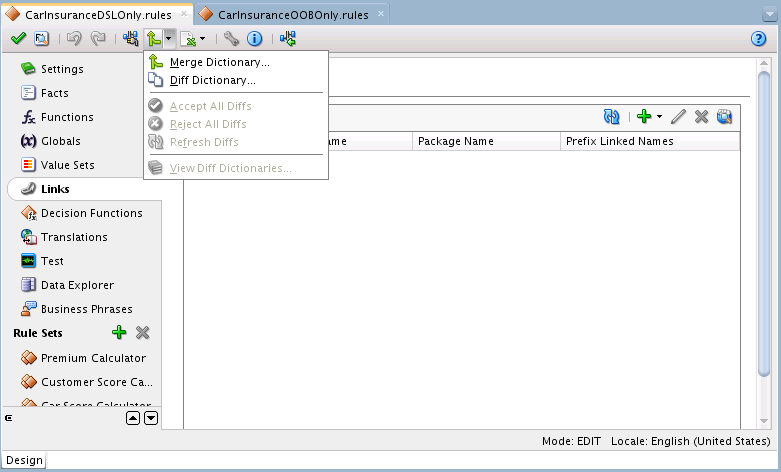
The Merge Dictionary and Diff Dictionary options are available in the Rules Designer toolbar, as shown in Figure 2-9.
You can compare up to three different dictionaries and merge into a fourth at design-time in Oracle JDeveloper. At runtime, you can use SOA Composer to do limited comparisons. For more information, see Using Oracle SOA Composer with Oracle Business Rules at Runtime.
In Rules Designer, you can compare a base version (which you must be editing) with two independently changed versions (relative to the base), and then merge selected changes into the base version (which must be saved as a new version).
WARNING:
Before you decide to run either of these features, you must be ready resolve all changes because the dictionary becomes read-only when in diff or merge mode.
Merging dictionaries should be done with care. You must identify and manage the different versions involved (base, version 1, version 2, and the results).
2.2.11.1 How to See Differences Between Dictionaries
When you want to compare dictionaries, you open the newer dictionary first in the Rules Designer, then use the Diff Dictionary dialog to select the older dictionary to compare with. Anything missing from the newer dictionary is flagged as a deletion from the newer version.
To see the differences between dictionaries:
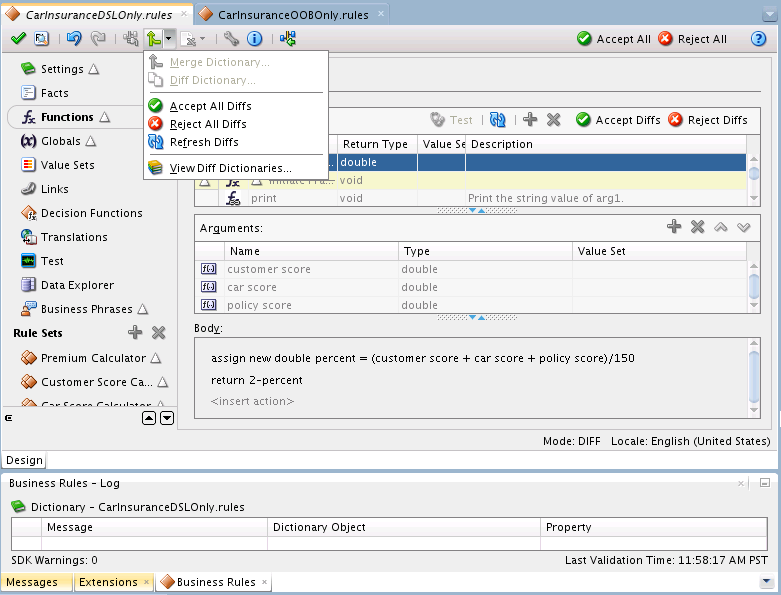
You can view the Diff Dictionaries option. This choice is available after you have compared dictionaries. The View Diff Dictionaries option, shown in Figure 2-10 lists information about the dictionaries being compared.
2.2.11.2 How to Merge Dictionaries
When you want to merge dictionaries, you open the older dictionary first in the Rules Designer, then use the Merge Dictionary dialog to select the newer dictionary to merge with. Anything missing from the old dictionary is flagged as an addition in the latest version.
This works with two or more dictionaries, so you should use oldest, then one or more newer, and finally save the result in newest.
Use care when merging dictionaries. Because general editing is disabled until all diffs are resolved, you may want to provisionally accept or reject conflicting values and then return to finish the editing after handling remaining diffs.
To merge dictionaries:
2.3 Working with Oracle Business Rules Globals
You can use Rules Designer to add Oracle Business Rules globals.
In Oracle Business Rules a global is similar to a public static variable in Java. You can specify that a global is a constant or is modifiable.
You can use global definitions to share information among several rules and functions. For example, if a 10% discount is used in several rules you can create and use a global Gold Discount, so that the appropriate discount is applied to all the rules using the global.
Using global definitions can make programs modular and easier to maintain.
2.3.1 How to Add Oracle Business Rules Globals
You can use Rules Designer to add globals.
To add a global:
2.3.2 How to Edit Oracle Business Rules Globals
You can use Rules Designer to edit globals.
To edit a Global:
- In Rules Designer, select the Globals navigation tab.
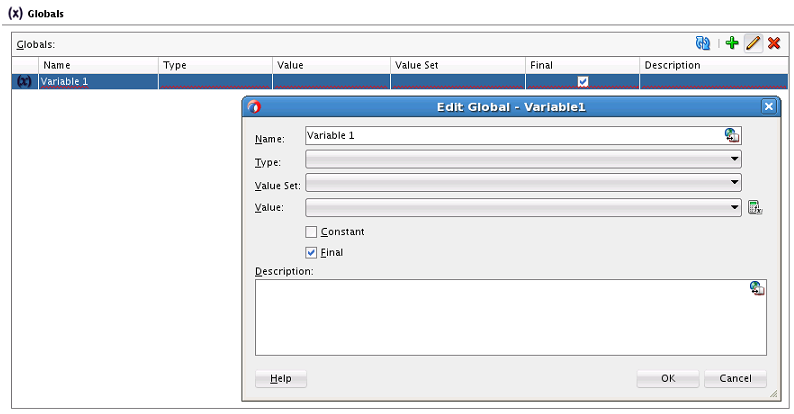
- Click the Edit button to open the Edit Global - Global Name window. In this window you can edit a global and change field values, including the Final field and the Constant field.
2.3.3 What You Need to Know About the Final and Constant Options
The Edit Global dialog shows the Constant and Final check boxes that you can select for a global.
Note the following when you use globals:
-
When you clear Final, this specifies that the global is modifiable, for instance, in an assign action.
-
When you select Final, this specifies that you can use the globals in a test in a rule (nonfinal globals cannot be used in a test in a rule).
-
When you select Final, this specifies that the global is initialized one time at runtime and cannot be changed.
When you select the Constant option in the Edit Global dialog, this specifies the global is a constant. In Oracle Business Rules a constant is a string or numeric literal, a final global whose value is a constant, or a simple expression involving constants and +, -, *, and /.
Selecting the Constant option for a global has three effects:
-
You do not have to surround string literals with double quotes.
-
Only constants appear in the expression value choice list.
-
The expression value must be a constant to be valid.
Selecting the Constant option is optional. Note that Value Set values, Value Set range endpoints, and ruleset filter values are always constant.
2.4 Working with Decision Functions
The data model includes decision functions.
For information on working with decision functions, see Introduction to Decision Functions.
2.5 Introduction to Oracle Business Rules Functions
Oracle Business Rules provides functions to hide complexity when you create rules. Oracle Business Rules lets you use built-in or user-defined functions in rule and Decision Table conditions and actions.
In Oracle Business Rules you define a function in a manner similar to a Java method, but an Oracle Business Rules function does not belong to a class. You can use Oracle Business Rules functions to extend a Java application object model so that users can perform operations in rules without modifying the original Java application code.
You can use an Oracle Business Rules function in a condition or in an action associated with a rule or a Decision Table.
You can also use an Oracle Business Rules function definition to share the same or a similar expression among several rules, and to return results to the application.
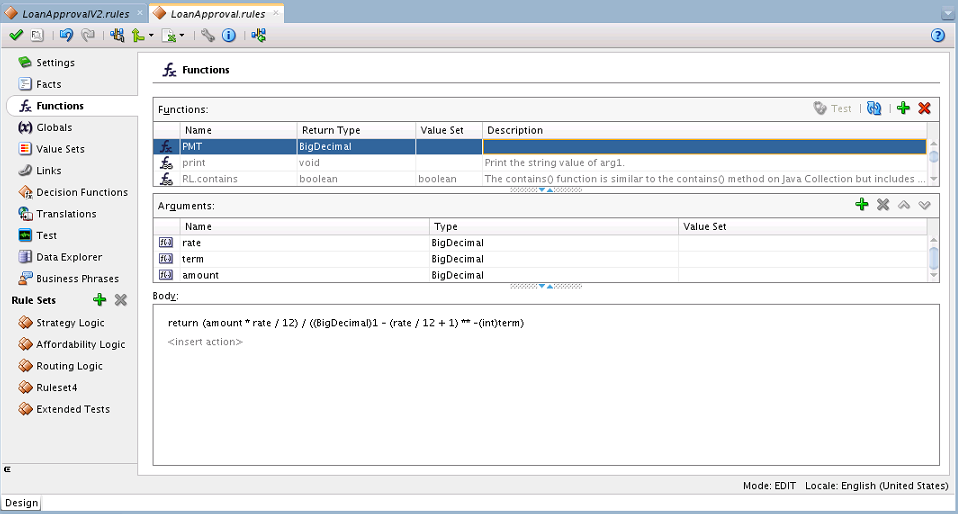
An Oracle Business Rules function includes the following:
-
Name: The Oracle Business Rules function name.
-
Return Type: A return type for the Oracle Business Rules function, or void if there is no return value.
-
Value Set: The value set to associate with the Oracle Business Rules function. This is optional.
-
Arguments: The function arguments. Each function argument includes a name and a type and an optional value set.
-
Function Body: The function body includes predefined actions. Using predefined actions Rules Designer assures that an Oracle Business Rules function is well formed and can be validated.
You can also use functions to test rules from within Rules Designer. For more information, see Testing Decision Functions Using a Rules Function.
2.6 Localizing Oracle Business Rule Resources
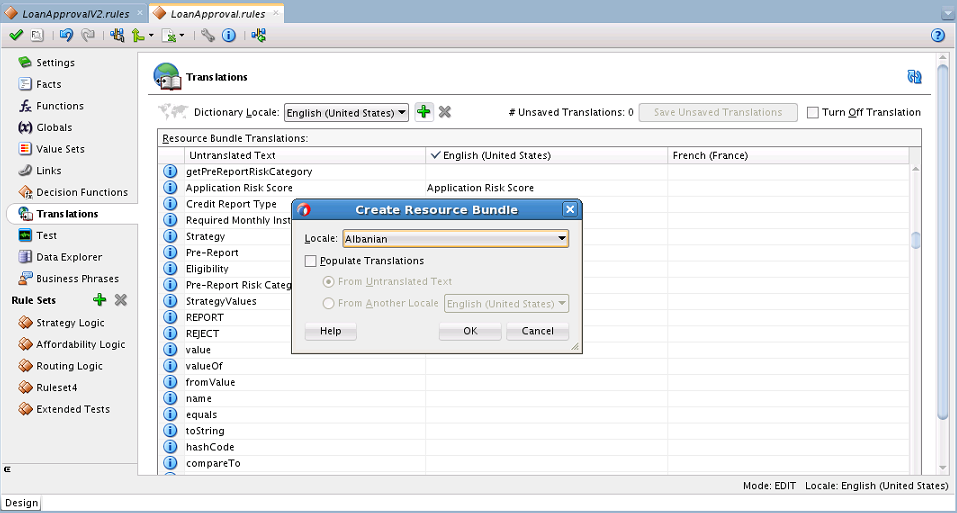
You can localize the names, aliases and descriptions of rules resources. This enables better control of these resources in Workspace and SOA Composer. You can localize most of the resources like Value Sets, Globals, Rulesets, Rules and so on. With Verbal Rules, you can also localize the value of Business Phrases.
When you create these resources, you can add locale-specific information from the Translations tab. Each locale is stored in a separate resource bundle.
Note:
You should not manually edit the resource bundle to add or edit localized strings. You must edit the resource bundle using the Translation tab of the Rules Designer in JDeveloper, BP Composer, or SOA Composer.
