3 Upgrading to 12c from a Previous Release
This chapter describes the process of upgrading to the Oracle Infrastructure 12c (12.1.3) from a previous Oracle Infrastructure 12c release.
This chapter contains the following topics:
-
Section 3.2, "Using the Upgrade Assistant to Upgrade Your 12c Schemas"
-
Section 3.3, "Using the Reconfiguration Wizard to Upgrade Your 12c Domain"
-
Section 3.4, "Using the Upgrade Assistant to Upgrade Your 12c Configurations"
Caution:
The tasks described in this chapter apply only when you are upgrading from an existing Infrastructure 12c release to the Infrastructure 12c (12.1.3) release. If you are upgrading an 11g environment to 12c (12.1.3), use the procedures documented in Part I, "Upgrading to Oracle Infrastructure 12c (12.1.3) from 11g".
3.1 Performing the Required Pre-Upgrade Tasks
When you upgraded to Infrastructure 12c, you were instructed to complete the pre-upgrade steps in Chapter 2 before starting the upgrade. Review those tasks and make sure that you have completed them.
While most of the pre-upgrade steps apply when upgrading from 11g, some of the steps, such as backing up your existing environment, will still apply - and are critical to the success of your upgrade. The list below describes the pre-upgrade steps you should complete before you upgrade your existing 12c Infrastructure:
-
Section 2.1, "Backing Up Your Existing Oracle Fusion Middleware 11g Environment"
Before any upgrade, be sure that you have created a complete backup of your current environment. If there is a problem with the upgrade, you may need to restore your environment and restart the upgrade process.
-
Section 2.2, "Upgrading the Oracle Database"
Review the latest system requirements and verify that your database is still supported.
-
Section 2.8, "Installing Oracle Fusion Middleware Infrastructure 12.1.3 on APPHOST"
You will need to install the 12.1.3 Infrastructure distribution before starting the upgrade.
-
Section 2.9, "Installing Oracle HTTP Server 12.1.3 on APPHOST"
If your 12c domain includes Oracle HTTP Server instances that are associated with the domain, you must upgrade to Oracle HTTP Server 12.1.3.
-
Section 2.10, "Stopping Servers and Processes"
The 12c upgrade is conducted completely offline. Make sure that all of the 12c servers and processes are stopped before starting the upgrade.
Note:
You can click the screen names in the tables below to get additional information about the fields or function of the screen.
3.2 Using the Upgrade Assistant to Upgrade Your 12c Schemas
Run the Upgrade Assistant (UA) to upgrade the STB, Audit and OPSS schemas:
$12.1.3_ORACLE_HOME/oracle_common/upgrade/bin
./ua
| Upgrade Assistant Screen | Description and Action Required |
|---|---|
|
This screen provides an overview of the Upgrade Assistant and some information about important pre-upgrade tasks. |
|
|
Select Schemas. |
|
|
This screen provides a list of installed Oracle Fusion Middleware components that have schemas that can be upgraded. When you select a component, the schemas and any dependencies are automatically selected. Select the following components (related schemas shown):
 |
|
|
Enter the absolute path to the existing 12c (12.1.2) WebLogic domain directory, or click Browse to navigate to and select the domain directory you are upgrading. |
|
|
Check each box if the prerequisites for schema upgrade are met. The Upgrade Assistant will not validate these prerequisites. |
|
|
Use this screen to enter database connection details for each of the schemas you are upgrading.
Notes:
The screen below shows the Service Table schema screen. 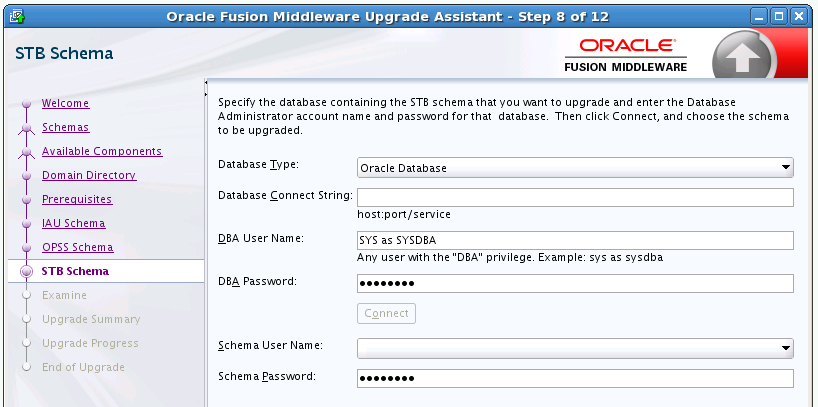 |
|
|
Verify that the Source Version is 12.1.2 for each schema. |
|
|
Before you click Upgrade, review the information on this screen to ensure you are upgrading the correct schemas. Specifically you should make sure that the source version is 12.1.3 and the target version is 12.1.3. |
|
|
This screen shows you the progress of the schema upgrade. The Upgrade Progress status bar represents the number of upgrade processes that have been completed. It is NOT meant to identify time remaining. Allow the Upgrade Assistant enough time to perform the upgrade. Do not cancel the upgrade operation unless absolutely necessary. |
|
|
This screen shows you the final result of the upgrade. Verify that each schema was successfully upgraded to 12.1.3. |
3.3 Using the Reconfiguration Wizard to Upgrade Your 12c Domain
Use the Reconfiguration Wizard to upgrade your existing 12c domain to the latest version.
UNIX Operating Systems, navigate to the following 12.1.3 directory to launch the Reconfiguration Wizard:
ORACLE_HOME/oracle_common/common/bin/reconfig.sh
Windows Operating Systems:
ORACLE_HOME\oracle_common\common\bin\reconfig.cmd
Table 3-1 Reconfiguration Wizard Screens
| Reconfiguration Wizard Screen | Description and Action Required |
|---|---|
|
Enter the absolute path to the existing 12.12 domain directory, or click Browse to navigate to and select the domain directory. 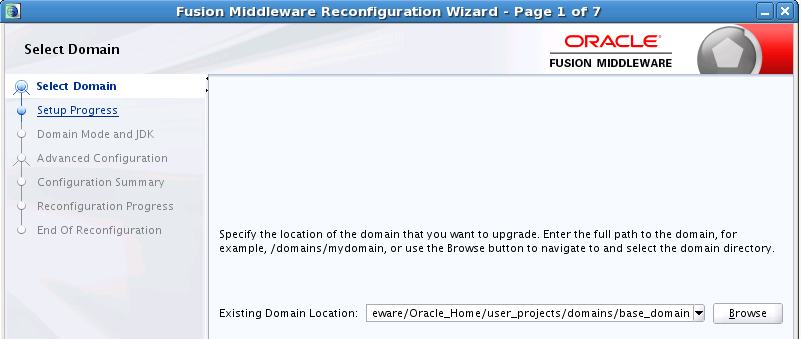 |
|
|
Shows the progress of the application of reconfiguration templates. |
|
|
Domain mode cannot be changed. This setting is imported from the mode specified when the domain was created using the Configuration Wizard. NOTE: Oracle recommends that you run a trial upgrade on a development domain first before upgrading a production domain. Any upgrade issues or errors should be resolved before upgrading the production environment. Select the JDK to use in the domain or click Browse to navigate to the JDK you want to use. Note that Oracle Fusion Middleware 12c requires Java SE 7. For more information, see "Verifying Certification and System Requirements" in Oracle Fusion Middleware Planning an Installation of Oracle Fusion Middleware. |
|
|
Use this screen to review the configuration of the JDBC data sources defined in your domain source. You should see the OPSS data source automatically configured in this screen. 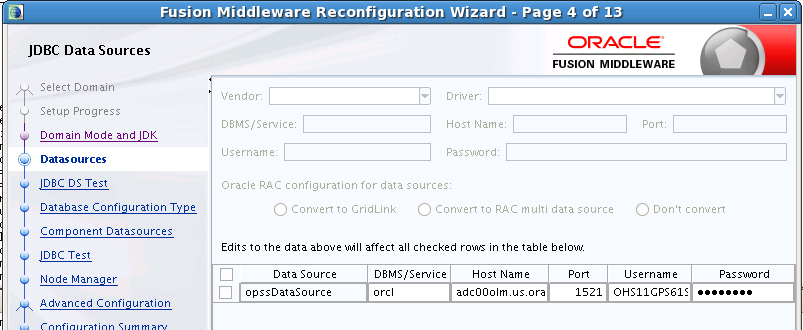
For information about the fields on this page, click Help, or refer to "JDBC Data Sources" in Upgrading Oracle WebLogic Server. |
|
|
Test the data source connections you configured on the JDBC Data Sources screen. 
For information about the fields on this page, click Help, or refer to "JDBC Data Sources Test" in Upgrading Oracle WebLogic Server. |
|
|
If you provided the data source connection details in the previous screen, the database connection details will be automatically entered. If the information was not provided on this screen, select RCU Data and provide the database credentials to retrieve the schema information for all 12.1.2 schemas that are included in the domain. If you select this option, the fields on this screen are activated. Fill in each field, using the connection information that you specified for the STB component in the Repository Creation Utility (RCU). When you have provided the connection information, click Get RCU Configuration to retrieve the schema information. 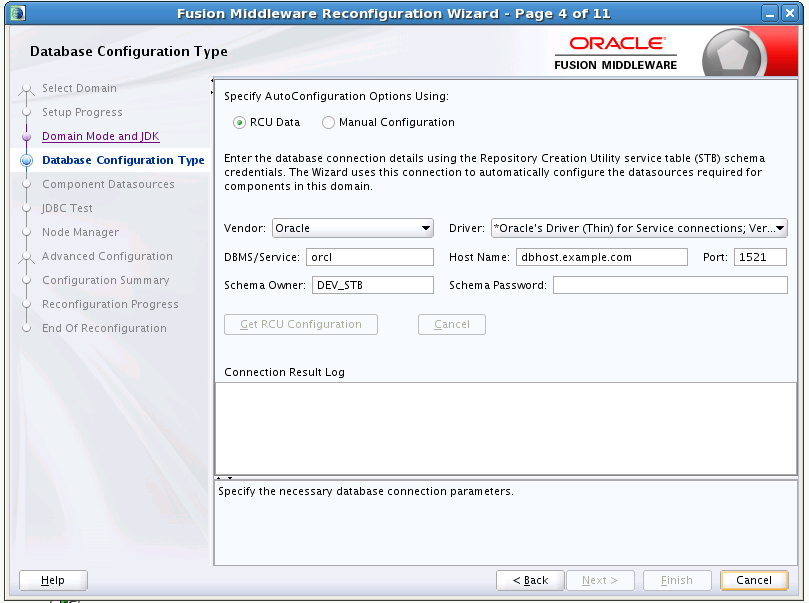
For more information, click Help, or refer to "Database Configuration Type" in Upgrading Oracle WebLogic Server. |
|
|
By default, the schema information will be displayed if you selected Get RCU Data on the previous screen and the schema owner is the same for all schemas. If you need to make changes to the data source settings for any of the schemas listed on the screen, select the check box adjacent to each schema name. The changes you make in the fields at the top of the screen will update the schema (or schemas) you have selected below. Make sure that you select only those schemas you want to modify. 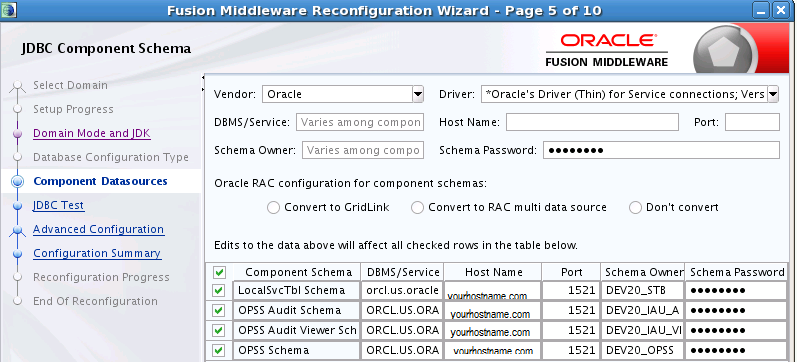
Notes:
|
|
|
Test the configurations that you specified for the data sources in the previous screen. Select the check boxes adjacent to the names of the schemas to test, and click Test Selected Connections. The result of the test is indicated in the Status column. Click Next when the test is successful for all the schemas. |
|
|
This screen is displayed only if the domain you are reconfiguring is currently using a Per Domain Default Location Node Manager. Select Migrate Existing Configuration and provide the location of the per domain default location. Enable Apply Oracle Recommended Defaults. Provide Node Manager Credentials. This is a new User that is being created to administer the Node Manager. The password will be required during start-up, for any components now handled by the Node Manager (including the OHS). Note: When upgrading a domain and changing from a per-host Node Manager configuration to a per-domain Node Manager configuration, if you are using custom scripts to start and stop the WebLogic Server environment, you must manually update the scripts to change the Node Manager home location to the new domain-based location. For more information on configuring the Node Manager, see "Default Node Manager Configuration" in Administering Node Manager for Oracle WebLogic Server. 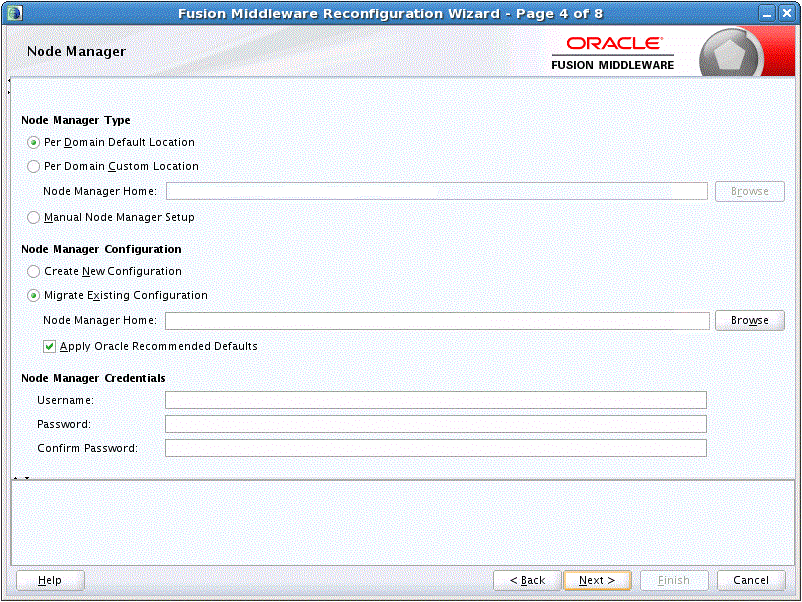 |
|
|
Select all categories (if any) for which you want to perform advanced configuration. For each category you select, the appropriate configuration screen is displayed to allow you to perform advanced configuration. If you do not select any items on this screen, the Configuration Summary screen is displayed next. 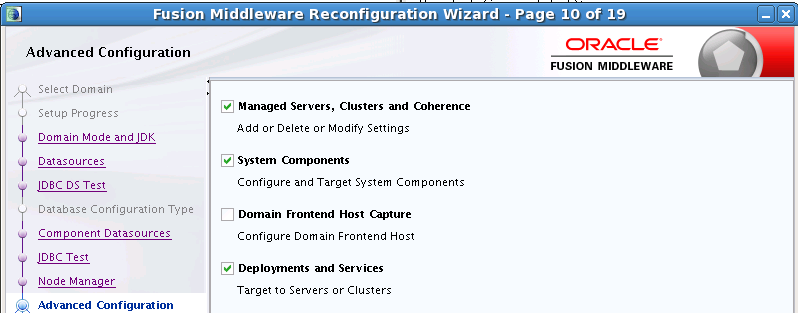
NOTE: If Node Manager is available and you do not select it, you must manually configure Node Manager as described in "Completing the Node Manager Configuration" in Upgrading Oracle WebLogic Server. The Node Manager advanced option is available only if you are reconfiguring a domain that is currently using a per-host Node Manager configuration. It enables you to switch to a per-domain Node Manager or continue using the existing per-host Node Manager. |
|
|
Use this screen to review the settings for an existing Managed Server(s), if any. |
|
|
Use this screen to review the settings for an existing Cluster(s), if any. |
|
|
This screen is displayed only if you included Coherence in the WebLogic Server installation. It lists the Coherence cluster that is automatically added to the domain. |
|
|
In a WebLogic domain, the machine definitions identify physical units of hardware and are associated with the WebLogic Server instances or system components (such as OHS servers) that they host. Use this screen to review the Host/Port settings of the existing Node Manager details that will be included in the reconfiguration as part of the upgrade. Make sure that an actual Listen Address is provided. Do not use Local Host. 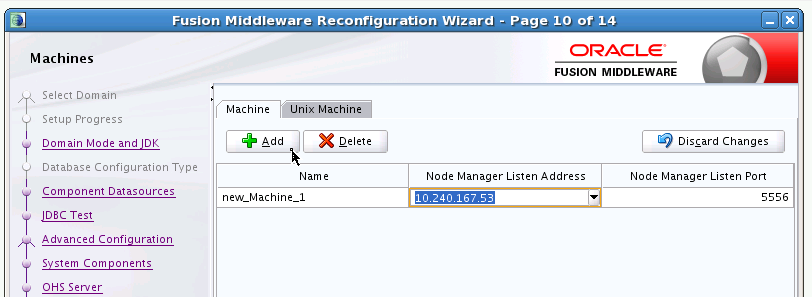 |
|
|
Use this screen to review the current settings for the existing OHS component that is being Reconfigured as part of the co-located upgrade process. To prevent upgrade errors, do not make any changes to the OHS setting on this screen. You can also use this screen to add or delete system components.  |
|
|
Use this screen to confirm that the Reconfiguration Wizard is picking up the correct Port details (that come from their Source Installation) for each OHS in the domain. NOTE: If you are reconfiguring a domain that includes more than one OHS instance, the "System Component" toggle option will appear at the at the top of this screen. Select this option to flip between the different instances, in order to update their configuration details during reconfiguration. Though the OHS servers can have the same Host details, each one must be assigned unique Port details. If they do not already show different Port Details on this screen, these details must be edited to make them different. 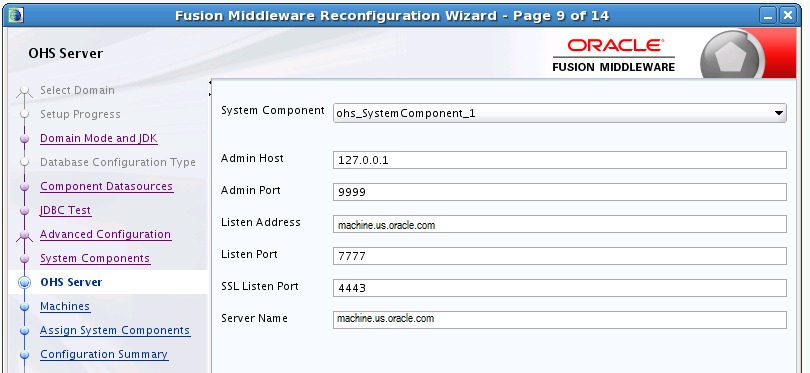 |
|
|
Use this screen to review the assignment of system components to machines that you defined. NOTE: This screen show the OHS component being assigned to the Node Manager. This will reconfigure the OHS Instance to assign it to the 12.1.3 Node Manager, which is required to Start/Stop the OHS instances. 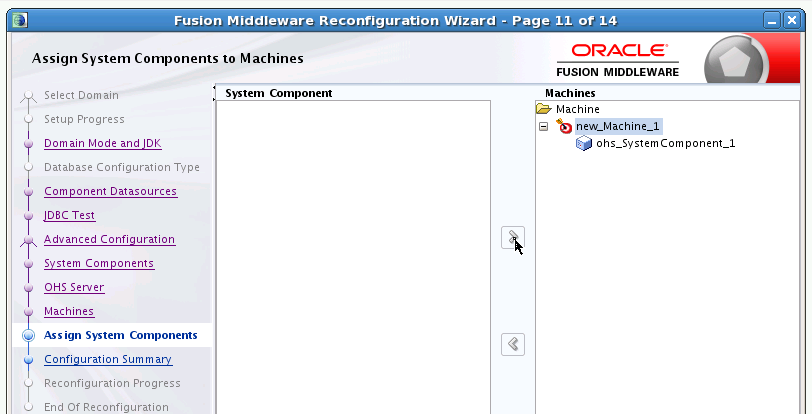 |
|
|
Applications associated with the product for which you are configuring the domain are targeted automatically to the Managed Server created for that product or to the cluster to which that Managed Server is assigned. In this screen, you can target applications to additional servers and clusters. Use this screen to review the deployment targeting in the domain. 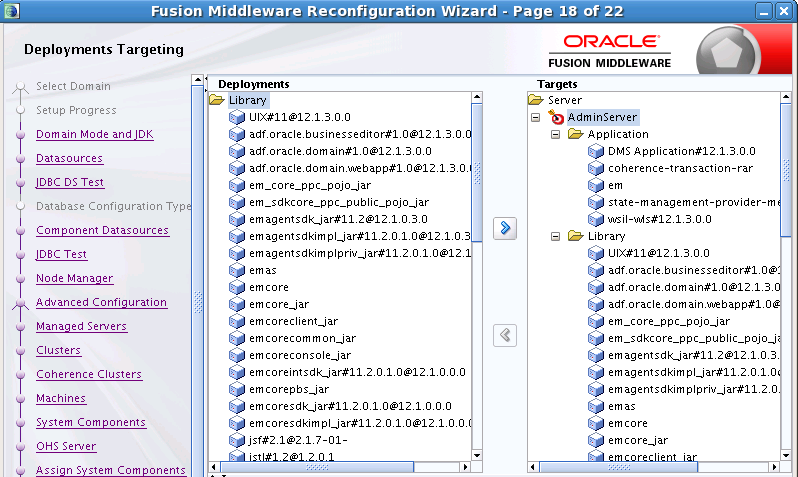 |
|
|
Services that are associated with the product for which you are configuring the domain are targeted automatically, to the Managed Server created for that product or to the cluster to which that Managed Server is assigned. In this screen, you can target services to additional servers and clusters. Use this screen to review the service targeting in the domain. 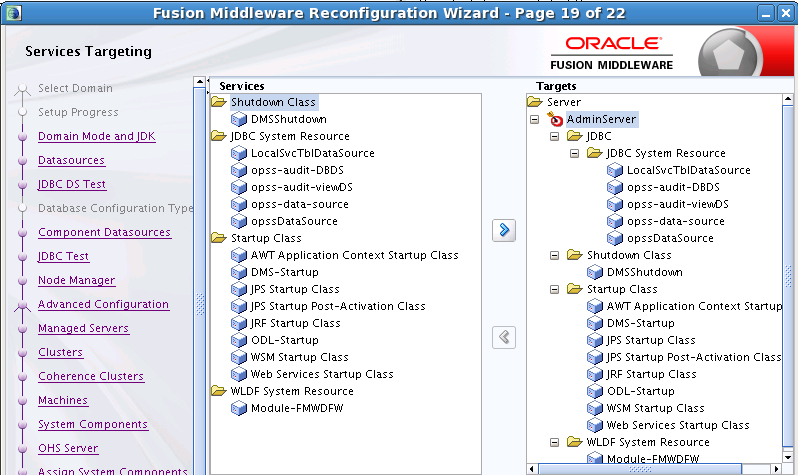 |
|
|
Review the detailed configuration settings of the domain before continuing. You can limit the items that are displayed in the right-most panel by selecting a filter option from the View drop-down list. Click Reconfig to reconfigure the domain, or click Back if you wish to change the configurations. |
|
|
Review the reconfiguration progress. Click Next when the process is complete.  |
|
|
Review the final status of the reconfiguration process. Click Finish to exit the Reconfiguration Wizard. |
3.4 Using the Upgrade Assistant to Upgrade Your 12c Configurations
Do the following to use the Upgrade Assistant to upgrade your existing 12c domain configurations:
Run the Upgrade Assistant (UA) from the 12.1.3 Oracle Home to upgrade the component configuration:
UNIX Operating Systems:
ORACLE_HOME/oracle_common/upgrade/bin/.ua
Windows Operating Systems:
ORACLE_HOME\oracle_common\upgrade\bin\ua.bat
| Upgrade Assistant Screen | Description and Action Required |
|---|---|
|
This screen provides an overview of the Upgrade Assistant and some information about important pre-upgrade tasks. |
|
|
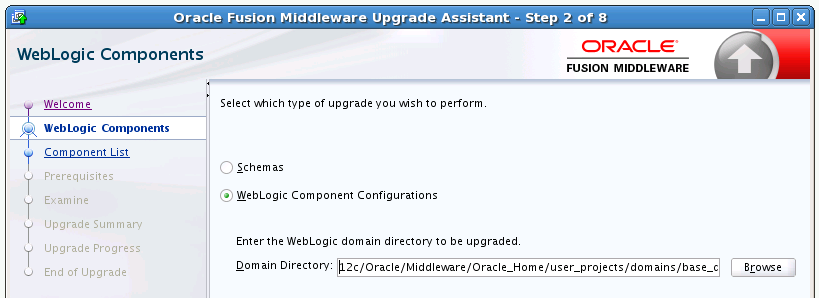
Select WebLogic Component Configurations. |
|
|
This screen provides a list of installed Oracle Fusion Middleware components that have domain configurations that will be upgraded. 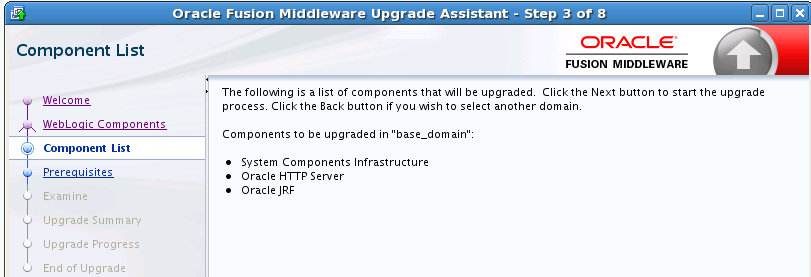 |
|
|
Check each box if the prerequisites for schema upgrade are met. The Upgrade Assistant will not validate these prerequisites. |
|
|
Verify that the upgrade is successful for each component. 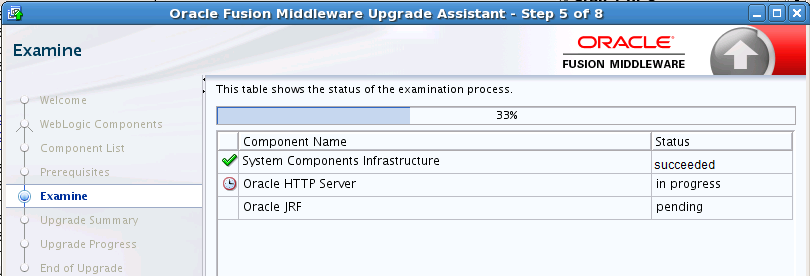 |
|
|
Before you click Upgrade, review the information on this screen. |
|
|
This screen shows you the progress of the upgrade. The Upgrade Progress status bar represents the number of upgrade processes that have been completed. It is NOT meant to identify time remaining. Allow the Upgrade Assistant enough time to perform the upgrade. Do not cancel the upgrade operation unless absolutely necessary. |
|
|
This screen shows you the final result of the upgrade. |
