6 Oracle Maps
Oracle Maps is the name for a suite of technologies for developing high-performance interactive web-based mapping applications. Oracle Maps is included with MapViewer.
This chapter contains the following major sections:
-
Section 6.9, "Transforming Data to a Spherical Mercator Coordinate System"
-
Section 6.10, "Dynamically Displaying an External Tile Layer"
6.1 Overview of Oracle Maps
Oracle Maps consists of the following main components:
-
A map tile server that caches and serves pregenerated map image tiles
-
A feature of interest (FOI) server that renders geospatial features that are managed by Oracle Spatial and Graph
-
An Ajax-based JavaScript mapping client. (Ajax is an acronym for asynchronous JavaScript and XML.) This client provides functions for browsing and interacting with maps, as well as a flexible application programming interface (API).
The map tile server (map image caching engine) automatically fetches and caches map image tiles rendered by Oracle MapViewer or other web-enabled map providers. It also serves cached map image tiles to the clients, which are web applications developed using the Oracle Maps client API. The clients can then automatically stitch multiple map image tiles into a seamless large map. Because the map image tiles are pregenerated and cached, the application users will experience fast map viewing performance.
The feature of interest (FOI) server (rendering engine) renders spatial feature layers managed by Oracle Spatial and Graph, as well as individual geospatial features of point, line, or polygon type that are created by an application. Such FOIs, which typically include both an image to be rendered and a set of associated attribute data, are then sent to the client where a user can interact with them. Unlike the cached image tiles, which typically represent static content, FOIs are dynamic and represent real-time database or application contents. The dynamic FOIs and the static cached map tiles enable you to build web mapping applications.
The JavaScript mapping client is a browser side map display engine that fetches map content from the servers and presents it to client applications. It also provides customizable map-related user interaction control, such as map dragging and clicking, for the application. The JavaScript mapping client can be easily integrated with any web application or portal.
Related subtopics:
6.1.1 Architecture for Oracle Maps Applications
Figure 6-1 shows the architecture of web mapping applications that are developed using Oracle Maps.
Figure 6-1 Architecture for Oracle Maps Applications
Description of ''Figure 6-1 Architecture for Oracle Maps Applications''
Referring to Figure 6-1, applications interact with the Oracle Maps architecture as follows:
-
The application is developed using JavaScript, and it runs inside the JavaScript engine of the web browser.
-
The application invokes the JavaScript map client to fetch the map image tiles from the map tile server, and then it displays the map in the web browser.
-
The application invokes the JavaScript map client to fetch dynamic spatial features from the FOI server and display them on top of the map tiles.
-
The JavaScript map client controls map-related user interaction for the application.
-
When the map tile server receives a map image tile request, it first checks to see if the requested tile is already cached. If the tile is cached, the cached tile is returned to the client. If the tile is not cached, the map tile server fetches the tile into the cache and returns it to the client. Tiles can be fetched either directly from the MapViewer map rendering engine or from an external web map services provider.
-
When the FOI server receives a request, it uses the MapViewer map rendering engine to generate the feature images and to send these images, along with feature attributes, to the client.
6.1.2 Simple Example Using Oracle Maps
Figure 6-2 shows the interface of a simple application created using the Oracle Maps JavaScript V1 API. This example, along with sample applications, tutorials, and API documentation, is included in a separate mvdemo.ear file, which can be downloaded from http://www.oracle.com/technetwork/middleware/mapviewer/. The mvdemo.ear file should be deployed into the same container as the mapviewer.ear file.
Note:
The Oracle Maps JavaScript V1 and V2 APIs are described in Section 6.6.Section 6.1.2.1, "Simple Application Using the V2 API" describes essentially the same simple example but implemented using the V2 API.
The simple application shown in Figure 6-2 can be accessed at http://host:port/mvdemo/fsmc/sampleApp.html. To run this application, follow the instructions in http://host:port/mvdemo/fsmc/tutorial/setup.html to set up the database schema and the necessary map tile layers.
Figure 6-2 Application Created Using Oracle Maps (V1 API)
Description of ''Figure 6-2 Application Created Using Oracle Maps (V1 API)''
The application shown in Figure 6-2 displays customers on the map. The map consists of two layers:
-
The map tile layer displays the ocean, county boundaries, cities, and highways. The whole map tile layer displayed in the web browser consists of multiple map image tiles that are rendered by the map tile server.
-
The FOI layer displays customers as red dot markers on top of the map tile layer. If the user clicks on the marker for a customer, an information window is displayed showing some attributes for that customer. The customer markers and attributes are rendered by the FOI server.
In addition to these two layers, a scale bar is displayed in the lower-left corner of the map, and a navigation panel is displayed in the upper-right corner.
The application user can use the mouse to drag the map. When this happens, new image tiles and FOIs are automatically fetched for the spatial region that the map currently covers. The user can also use the built-in map navigation tool to pan and zoom the image, and can show or hide the customers (red dot markers) by checking or unchecking the Show customers box.
Example 6-1 shows the complete source code for the simple application shown in Figure 6-2.
Example 6-1 Source Code for the Simple Application (V1 API)
<html>
<head>
<META http-equiv="Content-Type" content="text/html" charset=UTF-8">
<TITLE>A sample Oracle Maps Application</TITLE>
<script language="Javascript" src="jslib/oraclemaps.js"></script>
<script language=javascript>
var themebasedfoi=null
function on_load_mapview()
{
  var baseURL  = "http://"+document.location.host+"/mapviewer";
  // Create an MVMapView instance to display the map
  var mapview = new MVMapView(document.getElementById("map"), baseURL);
  // Add a map tile layer as background.
  mapview.addMapTileLayer(new MVMapTileLayer("mvdemo.demo_map"));
  // Add a theme-based FOI layer to display customers on the map
  themebasedfoi = new MVThemeBasedFOI('themebasedfoi1','mvdemo.customers');
  themebasedfoi.setBringToTopOnMouseOver(true);
  mapview.addThemeBasedFOI(themebasedfoi);
  // Set the initial map center and zoom level
  mapview.setCenter(MVSdoGeometry.createPoint(-122.45,37.7706,8307));
  mapview.setZoomLevel(4);
  // Add a navigation panel on the right side of the map
  mapview.addNavigationPanel('east');
  // Add a scale bar
  mapview.addScaleBar();
  // Display the map.
  mapview.display();
}
function setLayerVisible(checkBox)
{
  // Show the theme-based FOI layer if the check box is checked and
  // hide the theme-based FOI layer otherwise.
  if(checkBox.checked)
    themebasedfoi.setVisible(true) ;
  else
    themebasedfoi.setVisible(false);
}
</script>
</head>
<body onload= javascript:on_load_mapview() >
<h2> A sample Oracle Maps Application</h2>
<INPUT TYPE="checkbox" onclick="setLayerVisible(this)" checked/>Show customers
<div id="map" style="width: 600px; height: 500px"></div>
</body>
</html>
The components of this sample application and the process for creating a client application are described in Section 6.7.1.3.
6.1.2.1 Simple Application Using the V2 API
Figure 6-3 shows a simple example with the essentially the same logic as that shown in Figure 6-2, but using the Oracle Maps JavaScript V2 API.
Figure 6-3 Application Created Using Oracle Maps (V2 API)
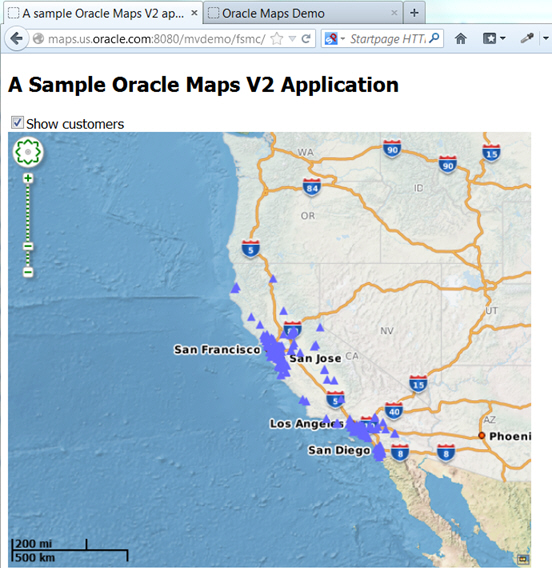
Description of ''Figure 6-3 Application Created Using Oracle Maps (V2 API)''
Example 6-2 shows the complete source code for the simple application shown in Figure 6-3.
Example 6-2 Source Code for the Simple Application (V2 API)
<!DOCTYPE HTML PUBLIC "-//W3C//DTD HTML 4.01//EN" "http://www.w3.org/TR/html4/strict.dtd">
<html>
<head>
<META http-equiv="Content-Type" content="text/html; charset=UTF-8">
<TITLE>A sample Oracle Maps V2 application</TITLE>
<script language="Javascript" src="/mapviewer/jslib/v2/oraclemapsv2.js"></script>
<script language=javascript>
var customersLayer=null;
function on_load_mapview()
{
  var baseURL  = "http://"+document.location.host+"/mapviewer";
  // Create an OM.Map instance to display the map
  var mapview = new OM.Map(document.getElementById("map"),
                           {
                             mapviewerURL:baseURL
                           });
  // Add a map tile layer as background.
  var tileLayer = new OM.layer.TileLayer(
        "baseMap",
        {
            dataSource:"mvdemo",
            tileLayer:"demo_map",
            tileServerURL:baseURL+"/mcserver"
        });
  mapview.addLayer(tileLayer);
  // Set the initial map center and zoom level
  var mapCenterLon = -122.45;
  var mapCenterLat = 37.7706;
  var mapZoom = 4;
  var mpoint = new OM.geometry.Point(mapCenterLon,mapCenterLat,8307);
  mapview.setMapCenter(mpoint);
  mapview.setMapZoomLevel(mapZoom);
  // Add a theme-based FOI layer to display customers on the map
  customersLayer = new OM.layer.VectorLayer("customers",
        {
            def:
                {
                type:OM.layer.VectorLayer.TYPE_PREDEFINED,
                dataSource:"mvdemo", theme:"customers",
                url: baseURL,
                loadOnDemand: false
                }
        });
  mapview.addLayer(customersLayer);

  // Add a navigation panel on the right side of the map
  var navigationPanelBar = new OM.control.NavigationPanelBar();
  navigationPanelBar.setStyle({backgroundColor:"#FFFFFF",buttonColor:"#008000",size:12});
  mapview.addMapDecoration(navigationPanelBar);
  // Add a scale bar
  var mapScaleBar = new OM.control.ScaleBar();
  mapview.addMapDecoration(mapScaleBar);
  // Display the map.
  // Note: Change from V1. In V2 initialization and display is done just once
  mapview.init();
}
function setLayerVisible(checkBox)
{
  // Show the customers vector layer if the check box is checked and
  // hide it otherwise.
  if(checkBox.checked)
    customersLayer.setVisible(true) ;
  else
    customersLayer.setVisible(false);
}
</script>
</head>
<body onload= javascript:on_load_mapview() >
<h2>A Sample Oracle Maps V2 Application</h2>
<INPUT TYPE="checkbox" onclick="setLayerVisible(this)" checked/>Show customers
<div id="map" style="width: 600px; height: 500px"></div>
</body>
</html>
6.1.3 How Map Content Is Organized
This section describes how the JavaScript client internally organizes various map contents when displayed a map inside a web browser. An application typically places one master HTML DIV object on a web page, and the JavaScript client adds various content layers inside this DIV object.
The map content displayed by the map client is organized by layers. When the application script invokes appropriate map client API, map layers are created inside a map container. The map container is a user-defined HTML DIV object. You can customize the size and the positioning of the map container inside the web page. Figure 6-4 shows the layout of the map layers.
As shown in Figure 6-4, there are five different types of map content layers: map tiles, theme-based FOI, user-defined FOI or redline, information window, and fixed figures. All layers except the fixed figures layer are moved as a whole when the user drags the map. These movable layers are automatically updated by the map client when the map is dragged or zoomed. (The fixed figures layer is never moved.).
Related subtopics:
6.1.3.1 Map Tile Layers
A typical Oracle Maps application has at least one map tile layer, which assembles and displays pregenerated map image tiles from the map tile server. The map tile layer displays static map content that does not change very often, and it is typically used as the background map by the client application. For example, in the sample application described in Section 6.1.2 and illustrated in Figure 6-2, the ocean, county boundaries, cities, and highways are all displayed as a map tile layer. Only limited user interaction, such as map dragging, can be performed with a map tile layer.
A map tile layer is usually associated with a MapViewer base map, and is managed by the MapViewer server. However, you can configure a map tile layer to cache map image tiles served by an external (non-MapViewer) map provider.
The Oracle Maps client can also display a custom or built-in external tile layer served directly by an external tile server. The built-in Google Maps and Microsoft Bing Maps tile layers are examples. For more information, see Section 6.8, "Using Google Maps and Bing Maps" and the JavaScript API documentation for class MVGoogleTileLayer and MVBingTileLayer. (If you need to overlay your own spatial data on top of the Google Maps or Bing Maps tile layer, see also Section 6.9, "Transforming Data to a Spherical Mercator Coordinate System".)
Map tile layers are always placed at the bottom of the layer hierarchy. These layers display static and background map contents. When multiple such layers are included, they must all have the same coordinate system and zoom level definitions.
Internally, the map tile layers are usually larger than the size of the map DIV container window. This allows additional tiles to be fetched and cached by the browser. As a result, these tiles will be immediately visible when the map layers are dragged around by the user.
6.1.3.2 Theme-Based FOI Layers
There can be one or more theme-based FOI layers. Each theme-based FOI layer consists of a collection of interactive FOIs that meet certain query criteria defined in a MapViewer predefined theme. FOIs can be points, lines, or polygons. For example, all stores with a sales volume greater than $100,000 can be displayed as a point theme-based FOI layer.
Users can interact with the FOIs by moving the mouse over them or clicking on them. The application can customize how the map client reacts to such user interaction.
All features (geographic and non-geographic) of a theme-based FOI layer are stored in the database. Features are queried and rendered by the FOI server when client applications request them. The query window for the theme-based FOI layers can be customized to be larger than the map DIV window, so that it gives some extra room for dragging the map without refreshing the theme-based FOI layers from server. For more information about theme-based FOI layers, see Section 6.4.1.
6.1.3.3 User-Defined FOI Layers
A user-defined FOI is an interactive feature defined on the client side. The FOI can be a point, line, or polygon feature. Users can interact with a user-defined FOIs in the same way they can with a theme-based FOIs. However, in contrast with a theme-based FOI layer which is rendered as a collection of features, each user-defined FOI is requested and rendered individually. All attributes of the user-defined FOI, including the geometry representation and rendering style, must be provided by the application. For example, a route geometry based on user specified start and end addresses should be displayed as a user-defined line FOI on the map.
The handling of user-defined FOI layers depends on web browser in which the application is running:
-
With Microsoft Internet Explorer, all user-defined individual FOIs added by the application are placed inside a layer directly above the theme-based FOI layers. There can be at most one such layer.
-
With Opera and Mozilla-based browsers such as Netscape and Firefox, all user-defined individual FOIs are placed inside two layers, one for point features and the other for non-point features such as polylines and polygons. The non-point feature layer is placed under the point feature layer.
6.1.3.4 Information Window Layer
An information window is a small pop-up window that displays customizable content in the map. All information windows, when displayed, are placed inside a layer directly above the user-defined individual FOI layer or layers. There can be at most one information window layer.
6.1.3.5 Fixed Figures Layer
The topmost layer contains any fixed figures, which are immovable elements such as copyright notes, a scale bar, a navigation panel, and user-defined map decoration features. (A user-defined map decoration feature is an application defined element that can contain any custom HTML content, such as a map title or a custom control button.) The fixed figures layer is displayed on top of everything else, and it is not moved when the user drags the map.
6.2 Map Tile Server
The map tile server is a map image caching engine that fetches, caches, and serves pregenerated, fixed-size map image tiles. It is implemented as a Java servlet that is part of the MapViewer server. The map tile server accepts requests that ask for map image tiles specified by tile zoom level and tile location (mesh code), and it sends the requested tiles back to clients.
Figure 6-5 shows the basic workflow of the map tile server.
Figure 6-5 Workflow of the Map Tile Server
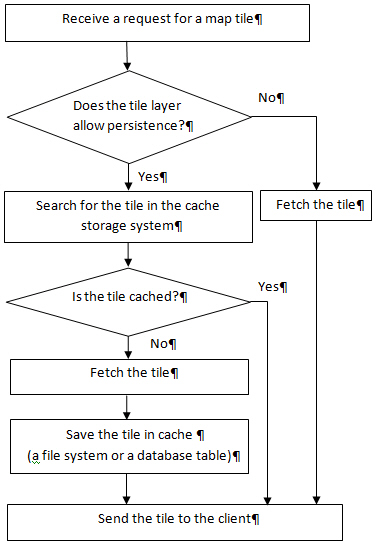
Description of ''Figure 6-5 Workflow of the Map Tile Server''
As shown in Figure 6-5, when the map tile server receives a request for a map tile, it searches for the tile in the cache storage system. If the tile is cached, the map tile server sends the tile to the client. If the tile is not cached, the map tile server fetches the tile, saves it in the cache, and sends it to the client.
You can use the MapViewer administration tool to manage the map tile server.
Related subtopics:
6.2.1 Map Tile Server Concepts
This section explains map tile server concepts that you need to know to be able to use Oracle Maps effectively.
Related subtopics:
6.2.1.1 Map Tile Layers and Map Tile Sources
All map tile layers are managed by the map tile server. The map tile server fetches and stores the map image tiles that belong to the map tile layer and returns map image tiles to the client. The map tile server can manage multiple map tile layers.
Each map tile layer can have multiple predefined zoom levels. Each zoom level is assigned a zoom level number ranging from 0 to n-1, where n is the total number of zoom levels. Zoom level 0 is the most zoomed out level and zoom level n-1 is the most zoomed in level.
The map is evenly divided into same-sized small map image tiles on each zoom level. Clients specify a map tile by its zoom level and tile mesh code.
A map tile layer can come from two different types of sources:
-
Internal MapViewer base maps rendered by the MapViewer map rendering engine. A MapViewer base map consists of a set of predefined themes and must be predefined in the database view USER_SDO_MAPS.
-
Maps rendered by an external web map services providers. An external web map services provider is a server that renders and serves maps upon client requests over the web. If you properly configure an adapter that can fetch maps from the external map services provider, the map tile server can fetch and cache map tiles generated by the external map services provider. (A MapViewer instance other than the MapViewer inside which the map tile server is running is also considered an external map services provider.)
6.2.1.2 Storage of Map Image Tiles
Oracle Maps has three options for handling the storage of map image tiles:
-
Store the tiles using the local file system.
If you use the local file system for caching, you can customize the path that is used for this storage as part of the map tile server configuration settings.
-
Store the tiles in a database table.
If you use a database table for caching, you must create the database table, and set the TILES_TABLE column to that table for the tile layer in the USER_SDO_CACHED_MAPS view.
-
Stream the tiles directly without storing them.
If you do not want to cache any image tiles, you must indicate that in the tile layer's definition.
6.2.1.2.1 Store the tiles using the local file system
In a file system, each tile layer has its own storage root directory, which is specified by the <cache_storage> element's root_path attribute in the tile layer definition. If that attribute is not specified, then the default storage location specified in the mapViewerConfig.xml file <tile_storage> element is used as the root path. For example, if the root path is defined as /scratch/tilecache/, and a data source named MVDEMO has a tile layer named DEMO_MAP with 19 zoom levels, after the server is instantiated the folder /scratch/tilecache/MVDEMO.DEMO_MAP is created, and it contains 19 subfolders (/0, /1, …, /18), each for storing the image tiles in that zoom level.
Under each zoom level, there are two options to organize its subfolders for map tiles. One is the default option, which uses a mesh code tree structure; the other, called xyz storage scheme, uses the tile's row and column values as subfolder and tile name to store the map tile. Both storage options start from the tile's mesh code value for each zoom level (see Section 6.2.1.4, "Tile Mesh Codes" for details about the tile mesh code). Each tile in a zoom level can be represented using its mesh code value pair (mx, my), where the mx and my are integer values in the horizontal and vertical directions respectively. The tile at the lower left corner has a value of (0, 0). A tile can also be located using its tile row and tile column value pair (tile_column, tile_row). A tile at the upper left corner has a value of (0, 0).
6.2.1.2.2 Store the tiles in a database table
Image tiles can be stored in a database table, as follows.
-
Create a table for storing the image tiles. For example:
CREATE TABLE tile_dbt (
  tile_layer varchar2(64),
  zoom_level number,
  x number,
  y number,
  modified TIMESTAMP,
  data BLOB);
COMMIT;
-
Update the TILES_TABLE column in USER_SDO_CACHED_MAPS view for the tile layer. For example, if you have a tile layer DEMP_MAP and you want to use the table created in step 1 to store its map tiles, then update the tile layer's TILES_TABLE column as follows:
UPDATE user_sdo_cached_maps SET tiles_table='tiles_dbt' WHERE name='DEMP_MAP';
-
Restart the MapViewer server to make the changes take effect.
Using this example, the map image tiles for tile layer DEMP_MAP will be stored in the database table TILE_DBT.
6.2.1.2.3 Stream the tiles directly without storing them
If the tile contents may change constantly (such as a real-time cloud cover satellite image map) or if you do not want to store the image tiles, you can stream the tiles directly without storing them.
To choose this option, set the persistent_tiles attribute to false in the <map_tile_layer> element in the tile layer's definition. (The default value for the persistent_tiles attribute is true.). Example 6-3 inserts a tile layer named DEMO_MAP, with the persistent_tiles attribute sets to false so that no map image tiles will be cached for this tile layer.
Example 6-3 Streaming Tiles Without Storing Them
INSERT INTO user_sdo_cached_maps values(
'DEMO_MAP',
'an example tile layer that does not cache image tiles',
'',
'YES',
'YES',
'<map_tile_layer name="DEMO_MAP_TREEMESH" image_format="PNG" http_header_expires="168.0" concurrent_fetching_threads="3" persistent_tiles="false">
   <internal_map_source data_source="mvdemo" base_map="DEMO_MAP" bgcolor="#dddddd" out_of_bounds_color="#eeddff"/>
   <tile_storage root_path="/temp" short_path="false" />
   <coordinate_system srid="8307" minX="-180.0" maxX="180.0" minY="-90.0" maxY="90.0"/>
   <tile_image width="256" height="256"/>
   <tile_dpi  value="90.7142857"/>
   <tile_meters_per_unit  value="111319.49079327358"/>
   <zoom_levels levels="19" min_scale="2132.729583849784" max_scale="559082264.0287178"/>
</map_tile_layer>',
'DEMO_MAP',
'');
COMMIT;
6.2.1.3 Coordinate System for Map Tiles
Map images are cached and managed by the map tile server as small same-size rectangular image tiles. Currently we support tiling on any two-dimensional Cartesian coordinate system. A geodetic coordinate system can also be supported when it is mapped as if it is a Cartesian coordinate system, where longitude and latitude are treated simply as two perpendicular axes, as shown in Figure 6-6.
Figure 6-6 Tiling with a Longitude/Latitude Coordinate System
Description of ''Figure 6-6 Tiling with a Longitude/Latitude Coordinate System''
On each zoom level, the map tiles are created by equally dividing the whole map coordinate system along the two dimensions (X and Y, which inFigure 6-6 represent latitude and longitude). The map tile server needs this dimensional information of the map coordinate system in order to create map image tiles, and therefore you must include this information in the map tile layer configuration settings.
The whole map coordinate system can be represented by a rectangle, and its boundary is specified by (Xmin, Ymin) and (Xmax, Ymax), where Xmin is the minimum X value allowed in the coordinate system, Ymin is the minimum Y value allowed, Xmax is the maximum X value allowed and Ymax is the maximum Y value allowed. In Figure 6-6, Xmin is –180, Ymin is –90, Xmax is 180, and Ymax is 90.
You must also specify the spatial referencing ID (SRID) of the coordinate system to enable the map tile server to calculate map scales.
6.2.1.4 Tile Mesh Codes
Each map tile is specified by a mesh code, which is defined as a pair of integers (Mx, My), where Mx specifies the X dimension index of the tile and My specifies the Y dimension index of the tile. If the tile is the ith tile on X dimension starting from Xmin, then Mx should be i-1. If the tile is the jth tile on Y dimension starting from Ymin, then My should be j-1. Figure 6-7 shows the mesh codes of the tiles on a map.
The JavaScript map client automatically calculates which tiles it needs for displaying the map in the web browser, and it sends requests with the mesh codes to the server. Mesh codes are transparent to the application, and application developers do not need to deal with mesh codes directly.
6.2.1.5 Tiling Rules
You must create tiling rules that determine how the map is divided and how tiles are created. The map tile server uses these tiling rules to divide the map into small map image tiles that are stored in the tile storage system. These rules are also used by the JavaScript map client.
Because all tiles on a given zoom level are the same size, the map tile server needs to know the following information to perform the tile division:
-
The map tile image size (width and height), specified in screen pixels. This is the physical size of the tile images.
-
The tile size specified according to the map coordinate system. For example, if the map uses a geodetic coordinate system, the tile width and height should be defined in degrees. The size can be specified either explicitly by tile width and height or implicitly by map scale. (Map scale, combined with tile image size, can be used to derive the tile width and height according to the map coordinate system.)
The preceding information constitutes the tiling rule for a given zoom level. Each zoom level must have its own tiling rule. You must define the tiling rules when you specify the configuration settings for the map tile server, as described in Section 6.2.2.
6.2.1.6 Tile Background Color and Out-of-Bounds Color
Two attributes in a tile layer metadata definition which affect a tile's color: bgcolor (background color) and out_of_bounds_color (out-of-bounds color). The bgcolor attribute value is used for filling areas within the valid data area of a tile layer (the valid data area is defined by minX, minY, maxY, maxY), while the out_of_bounds_color attribute value is used for filling areas that are outside the valid data area. Both attributes have the same default values (Color(192, 192, 192)).
If a tile-fetching process failed due to an exception on the attempt to generate a tile, then the tile filled with out-of-bounds color is used as its substitute, regardless of whether it is within the valid data area. However, such a substitute tile due to tile-fetching exception is not permanently stored on disk; rather, it is streamed to the client on a temporary basis. MapViewer will retry the tile generation on subsequent requests, if the temporary tile data in the client browser's cache is purged or if a different client initiates the request.
If bgcolor is set to none, then the tile becomes transparent; that is, the background color of the HTML page replaces the attribute values for both bgcolor and out_of_bounds_color.
6.2.2 Map Tile Server Configuration
Map tile server configuration settings are stored in local configuration files and in database views. You can customize these settings.
Related subtopics:
6.2.2.1 Global Map Tile Server Configuration
Global map tile server settings, such as logging options and the default cache storage directory, are stored in the MapViewer configuration file mapViewerConfig.xml, which is under the directory $MAPVIEWER_HOME/web/WEB-INF/conf.
The map tile server configuration settings are defined in element <map_tile_server> inside the top-level <mapperConfig> element, as shown in the following example:
<map_tile_server>
   <tile_storage default_root_path="/scratch/tilecache/"/>
</map_tile_server>
The <tile_storage> element specifies the map tiles storage settings. The default_root_path attribute specifies the default file system directory under which the cached tile images are to be stored. If the default root directory is not set or not valid, the default root directory is $MAPVIEWER_HOME/web/tilecache. A subdirectory under this directory will be created and used for a map tile layer if the map tile layer configuration does not specify the map tiles storage directory for itself. The name of the subdirectory will be the same as the name of the map tile layer.
6.2.2.2 Map Tile Layer Configuration
The configuration settings for a map tile layer are stored in the USER_SDO_CACHED_MAPS metadata view. You should normally not manipulate this view directly, but should instead use the MapViewer administration tool, which uses this view to configure map tile layers.
Each database user (schema) has its own USER_SDO_CACHED_MAPS view. Each entry in this view stores the configuration settings for one map tile layer. If the map tile layer is based on an internal MapViewer base map, the base map associated with the map tile layer must be defined in the same database schema where the map tile layer configuration settings are stored.
The map tile server obtains the map source configuration by querying the USER_SDO_CACHED_MAPS view using the database connections specified by MapViewer data sources. This happens when the map tile server is started or a new data source is added to MapViewer as the result of a MapViewer administration request.
The USER_SDO_CACHED_MAPS view has the columns listed in Table 6-1.
Table 6-1 USER_SDO_CACHED_MAPS View
| Column Name | Data Type | Description |
|---|---|---|
|
NAME |
VARCHAR2 |
Unique name of the cached map source |
|
DESCRIPTION |
VARCHAR2 |
Optional descriptive text about the cached map source |
|
TILES_TABLE |
VARCHAR2 |
(Not currently used) |
|
IS_ONLINE |
VARCHAR2 |
|
|
IS_INTERNAL |
VARCHAR2 |
|
|
DEFINITION |
CLOB |
XML definition of the map tile layer, as described later in this section. |
|
BASE_MAP |
VARCHAR2 |
Name of the cached MapViewer base map, if the map source is an internal map source |
|
MAP_ADAPTER |
BLOB |
The jar file that contains the adapter Java classes of the external map services provider, as described later in this section. |
For the DEFINITION column, the map source definition has the following general format:
  <map_tile_layer
     name = "map tile layer name"
     image_format ="tile-image-format">
    <internal_map_source
      data_source="name-of-data-source"
      base_map="name-of-MapViewer-base-map"
      bgcolor="base-map-background-color"
      antialias="whether-to-turn-on-antialiasing"
      />
    </internal_map_source>
    <external_map_source
       url="external-map-service-url"
       adapter_class="name-of-adapter-class"
       proxy_host=" proxy-server-host "
       proxy_port="proxy-server-port"
       timeout="request-timeout"
       request_method="http-request-method: 'GET'|'POST'">
      <properties>
        <property name="property-name" value="property-value"/>
        …
      </properties>
    </external_map_source>
    <tile_storage
       root_path="disk-path-of-cache-root-directory"
    </tile_storage>
    <coordinate_system
       srid="coordinate-system-srid"
       minX="minimum-allowed-X-value"
       maxX="maximum-allowed-X-value"
       minY="minimum-allowed-Y-value"
       maxY="maximum-allowed-Y-value">
    </coordinate_system>
    <tile_image
       width="tile-image-width-in-screen-pixels"
       height="tile-image-height-in-screen-pixels" >
    </tile_image>
    <tile_bound>
       <coordinates> … </coordinates>
    </tile_bound>
    <zoom_levels
       levels="number-of-zoom-levels"
       min_scale="map-scale-at-highest-zoom-level"
       max_scale="map-scale-at-lowest-zoom-level"
       min_tile_width="tile-width-specified-in-map-data-units-at-
                       highest-zoom-level"
       max_tile_width="tile-width-specified-in-map-data-units-at-
                       lowest-zoom-level">
      <zoom_level
         description="zoom-level-description"
         level_name="zoom-level-name"
         scale="map-scale-of-zoom-level"
         tile_width ="tile-width-specified-in-map-data-units"
         tile_height ="tile-height-specified-in-map-data-units">
        <tile_bound>
          <coordinates> … </coordinates>
        </tile_bound>
      </zoom_level>
      …
    </zoom_levels>
  </map_tile_layer>
The DTD of the map tile layer definition XML is listed in Section A.9.
Example 6-4 shows the XML definition of an internal map tile layer, and Example 6-5 shows the XML definition of an external map tile layer. Explanations of the <map_tile_layer> element and its subelements follow these examples.
Example 6-4 XML Definition of an Internal Map Tile Layer
<?xml version = '1.0'?>
<!-- XML definition of an internal map tile layer.
-->
   <map_tile_layer image_format="PNG">
      <internal_map_source base_map="demo_map"/>
      <tile_storage root_path="/scratch/mapcache/"/>
      <coordinate_system
         srid="8307"
         minX="-180" maxX="180"
         minY="-90" maxY="90"/>
      <tile_image width="250" height="250"/>
      <zoom_levels>
         <zoom_level description="continent level" scale="10000000"/>
         <zoom_level description="country level" scale="3000000"/>
         <zoom_level description="state level" scale="1000000"/>
         <zoom_level description="county level" scale="300000"/>
         <zoom_level description="city level" scale="100000"/>
         <zoom_level description="street level" scale="30000"/>
         <zoom_level description="local street level" scale="10000"/>
      </zoom_levels>
   </map_tile_layer>
Example 6-5 XML Definition of an External Map Tile Layer
<?xml version = '1.0'?>
<!-- XML definition of an external map tile layer.-->
<map_tile_layer name="TILELAYER1" image_format="PNG">
   <external_map_source
     url="http://mycorp.com:7001/mapviewer/wms/"
     request_method="GET"
     adapter_class="oracle.lbs.mapcache.adapter.WMSAdapter"
     adapter_class_path="">
      <properties>
         <property name="datasource" value="mvdemo"/>
         <property name="version" value="1.1.1"/>
         <property name="srs" value="EPSG:4326"/>
         <property name="layers" value="THEME_DEMO_COUNTIES,THEME_DEMO_HIGHWAYS"/>
         <property name="format" value="image/png"/>
         <property name="transparent" value="true"/>
      </properties>
   </external_map_source>
   <tile_storage root_path="/scratch/tmp/"/>
   <coordinate_system srid="8307" minX="-180.0" minY="-90.0" maxX="180.0" maxY="90.0"/>
   <tile_image width="256" height="256"/>
   <!—
         The following <zoom_levels> element does not have any
         <zoom_level> element inside it. But since it has its levels,
         min_scale and max_scale attributes set, map tile server will
         automatically generate the <zoom_level> elements for the 10
         zoom levels.
   -->
   <zoom_levels levels="10" min_scale="1000.0" max_scale="2.5E8">
   </zoom_levels>
</map_tile_layer>
The top-level element is <map_tile_layer>. The image_format attribute specifies the tile image format; the currently supported values for this attribute are PNG, GIF, and JPG. PNG and GIF images are generally better for vector base maps, while JPG images are generally better for raster maps, such as satellite imagery, because of a better compression ratio. Currently, only tile images in PNG format can have transparent background.
The <internal_map_source> element is required only if the map tiles are rendered by the local MapViewer instance. The base_map attribute is required and specifies the predefined MapViewer base map that is cached by the map tile server; its value should match an entry in the BASE_MAP column in the USER_SDO_CACHED_MAPS view. The bgcolor attribute is optional and specifies the background color of the map. If the value of this attribute is set to NONE, the background will be transparent. (Currently MapViewer can only render transparent PNG map tiles.)
The <external_map_source> element is required only if the map tiles are rendered by an external map services provider. This element has the following attributes:
-
The
urlattribute is required and specifies the map service URL from which the map tiles can be fetched (for example,http://myhost/mapviewer/omserver). -
The
adapter_classattribute is required and specifies the full name of the map adapter class, including the package names (for example,mcsadapter.MVAdapter). -
The
proxy_hostandproxy_portattributes are needed only if the external map provider server must be accessed through a proxy server; these attributes specify the host name and port number, respectively, of the proxy server. Ifproxy_hostis specified asNONE, all map tile requests will be sent directly to the remote server without going through any proxy server. Ifproxy_hostis omitted or specifies an empty string, the global MapViewer proxy setting defined in themapViewerConfig.xml filewill be used when map tile requests are sent. -
The
timeoutattribute is optional and specifies the number of milliseconds for which the map tile server must wait for an external map tile image before giving up the attempt. The default timeout value is 15000. -
The
request_methodattribute is optional and the HTTP request method for sending map tile requests; its value can bePOST(the default) orGET.
For more information about external map tile layers and an example, see Section 6.2.2.3, "Creating a Map Tile Layer Using an External Web Map Source".
The <properties> element in the <external_map_source> element can include multiple <property> elements, each of which specifies a user-defined parameter for use by the map adapter when it fetches map tiles. The same map source adapter can use different set of parameters to fetch different map tile layers. For example, the sample MapViewer adapter mcsadapter.MVAdapter shipped with MapViewer accepts parameters defined as follows:
<properties>
   <property name="data_source" value="elocation"/>
   <property name="base_map" value="us_base_map"/>
</properties>
However, by changing the value attribute values, you can use this adapter to fetch a different base map from the same data source or a different data source.
The <tile_storage> element specifies storage settings for the map tile layer. The optional root_path attribute specifies the file system directory to be used as the root directory of the tile storage. If this attribute is omitted or invalid, the default root directory defined in the mapViewerConfig.xml file is used.
The <coordinate_system> element specifies the map coordinate system, and it has several required attributes. The srid attribute specifies the spatial reference ID of the coordinate system. The minX attribute specifies the lower bound of the X dimension; the minY attribute specifies the lower bound of the Y dimension; the maxX attribute specifies the upper bound of the X dimension; and the maxY attribute specifies the upper bound of the Y dimension. For the standard longitude/latitude (WGS 84) coordinate system, the srid value is 8307; and the minX, minY, maxX, and maxY values are -180, -90, 180, and 90, respectively.
For an internal map tile layer, the map coordinate system can be different from the data coordinate system. If the two are different, the map tile server transforms the map data into the coordinate system defined in the <coordinate_system> element and renders map tile images using this coordinate system.
The <tile_image> element specifies the tile image size settings, and it has the following required attributes: width specifies the width of the tile images in screen pixels, and height specifies the height of the tile images in screen pixels.
The optional <tile_bound> element specifies the bounding box of the cached map tiles. The map tile server only fetches tiles inside this box, and returns a blank tile if the requested tile is outside this box. The bounding box is specified by a rectangle in the map data coordinate system. The rectangle is specified by a <coordinates> element in the following format:
<coordinates>minX, minY, maxX, maxY</coordinates>
The default cache bounding box is the same bounding box specified in the <coordinate_system> element.
The <zoom_levels> element specifies the predefined zoom levels. Only image tiles at predefined zoom levels will be cached and served by the map tile server. The <zoom_levels> element can have multiple <zoom_level> elements, each of which specifies one predefined zoom level. If there are no <zoom_level> elements, the map tile server automatically generates the <zoom_level> elements by using the following attributes inside the <zoom_levels> element. (These attributes can be omitted and will be ignored if any <zoom_level> elements exist.)
-
levels specifies the total number of zoom levels.
-
min_scale specifies the scale of map images at the highest (zoomed in the most) zoom level.
-
max_scale specifies the scale of map images at the lowest (zoomed out the most) zoom level.
-
min_tile_width specifies the width of map tiles at the highest zoom level. The width is specified in map data units.
-
max_tile_width specifies the width of the map tiles at the lowest zoom level. The width is specified in map data units.
For the map tile server to be able to generate the definitions of individual zoom levels automatically, you must specify either of the following combinations of the preceding attributes:
-
levels,min_scale, andmax_scale -
levels,min_tile_width, andmax_tile_width
When the zoom levels are defined this way, the map tile server automatically derives the definition of all the individual zoom levels and updates the XML definition with the <zoom_level> elements generated for the zoom levels. You can then make adjustments to each zoom level if you want.
Each zoom level is assigned a zoom level number by the map tile server based on the order in which the zoom levels are defined. The first zoom level defined in the <zoom_levels> element is zoom level 0, the second zoom level is zoom level 1, and so on. These zoom level numbers are used in the tile requests to refer to the predefined zoom levels.
The <zoom_level> element specifies a predefined zoom level, and it has several attributes. The description attribute is optional and specifies the text description of the zoom level. The level_name attribute is optional and specifies the name of the zoom level. The scale attribute specifies the map scale of the zoom level; it is required if the attributes tile_width and tile_height are not defined. The tile_width and tile_height attributes specify the tile width and height, respectively, in map data units. The fetch_larger_tiles attribute is optional and specifies whether to fetch larger map images instead of the small map image tiles; a value of TRUE (the default) means that larger map images that may consist multiple map tiles will be fetched and broken into small map image tiles, which might save network round trips between the map tile server and the map services provider.
In the <zoom_level> element, you must specify either the scale attribute or both the tile_width and tile_height elements.
The <tile_bound> element within the <zoom_level> element optionally specifies the bounding box of the cached map tiles for the zoom level. The map tile server only fetches tiles inside this box, and returns a blank tile if the requested tile is outside this box. The bounding box is specified by a rectangle specified in map data coordinate system. The rectangle is specified by a <coordinates> element (explained earlier in this section) If you specify the <tile_bound> element within the <zoom_level> element, it overrides the overall cache bounding box settings specified by the <tile_bound> element that is above it in the XML hierarchy.
6.2.2.3 Creating a Map Tile Layer Using an External Web Map Source
You can use an external web map source to create a map tile layer, as follows:
-
Log in to the MapViewer administrative console.
-
Click Create Tile Layer.
-
Select External as this tile layer's map image source, and click Continue.
-
On the Create a map tile layer for external map source page, enter the appropriate information:
Name: Tile layer name. Example:
TILELAYER1Data Source: Name of the data source for the tile layer. Example MVDEMO
Max browser tile cache age (hours): Maximum number of hours in the cache before a tile is refreshed. Example: 168
Map Service URL: Example:
http://mycorp.com:7001/mapviewer/wmsRequest Method:
HTTP GETAdapter class:
oracle.lbs.mapcache.adapter.WMSAdapterJar file location: Example:
adapterlibs/Background:
transparentAdapter properties: (Check it and click Add multiple times as appropriate, entering the values for the following each time.)
-
datasource: Example:
mvdemo -
version:
1.1.1 -
srs:
EPSG:4326 -
layers: Example:
THEME_DEMO_COUNTIES,THEME_DEMO_HIGHWAYS -
format:
image/png -
transparent:
true
Tile storage: Example:
C:\tempSRID:
8307Min X: -
180.0Max X:
180.0Min Y:
-90.0Max Y:
90.0Tile width (pixels):
256Tile height (pixels):
256File format:
PNG# Zoom Levels:
10Minimum map scale:
1000Maximum map scale:
250000000 -
-
Click Submit to create the tile layer.
The message Information: New map tile layer created successfully is displayed.
To verify the created layer, you can click Manage Tile Layers on the left, select the tile layer, and click View map / Manage tiles to preview the map.
6.2.3 External Map Source Adapter
An external map source adapter is the interface between a map tile server and an external map services provider. When a map image tile needs to be fetched from the external map services provider, the map tile server calls the adapter with information about the zoom level, size, and location of the tile. The adapter then constructs a provider-specific request, sends the request to the external map services provider, and return the resulting image tile to the map tile server.
The external map source adapter is a Java class that must extends the abstract Java class oracle.mapviewer.share.mapcache.MapSourceAdapter, which is defined as follows:
public abstract class MapSourceAdapter
{
   public abstract String getMapTileRequest(TileDefinition tile);
   public byte[] getTileImageBytes(TileDefinition tile) ;
   public Properties getProperties() ;
}
An adapter that extends this class must implement the following method:
-
public String getMapTileRequest(TileDefinition tile)This method should implement the logic to construct the HTTP request string that can be sent to the map services provider to fetch the map image tile. For example, if the URL of a map tile is
http://myhost/mymapserver?par1=v1&par2=v2&par3=v3, the HTTP request string returned by this method should bepar1_v1&par2=v2&par3=v3.When the map tile server cannot find a specific map tile, it calls the
getTileImageBytesmethod to fetch the binary data of the tile image, and that method calls thegetMapTileRequestmethod to construct the map tile request before fetching the tile. ThegetMapTileRequestmethod takes one parameter: aTileDefinitionobject that specifies the zoom level, bounding box, image size and image format of the requested tile. This method returns the HTTP request string.
The map source adapter also inherits all methods implemented in class MapSourceAdapter. Among them, the following methods are more important than the others:
-
public byte[] getTileImageBytes(TileDefinition tile)This method fetches the actual binary map tile image data from the external map service provider. This method is already implemented. It calls the abstract method
getMapTileRequestto construct the map tile request and sends the request to the external map services provider. If the map tiles cannot be fetched by sending HTTP requests, you can override this method to implement the appropriate logic to fetch an image tile from the map source. This method takes one parameter: aTileDefinitionobject that specifies the zoom level, bounding box, image size, and image format of the requested tile. This method returns the binary tile image data encoded in the image format specified in the map tile layer configuration settings. -
public Properties getProperties()This method returns the provider-specific parameters defined in the map tile layer configuration settings explained in Section 6.2.2.2.
The MapSourceAdapter and TileDefinition classes are packaged inside mvclient.jar, which can be found under the directory $MAPVIEWER_HOME/web/WEB/lib.
Example 6-6 shows an external map source adapter.
Example 6-6 External Map Source Adapter
/**
 * This is a sample map source adapter that can be used to fetch map
 * tiles from a MapViewer instance.
 */
package mcsadapter ;

import java.awt.Dimension;
import java.net.URL;
import java.util.Properties;
import oracle.lbs.mapclient.MapViewer;
import oracle.lbs.mapcommon.MapResponse;
import oracle.mapviewer.share.mapcache.*;

/**
 * The map source adapter must extend class
 * oracle.lbs.mapcache.cache.MapSourceAdapter.
 */

public class MVAdapter extends MapSourceAdapter
{
  /**
   * Gets the map tile request string that is to be sent to the map
   * service provider URL.
   * @param tile tile definition
   * @return request string
   */
  public String getMapTileRequest(TileDefinition tile)
  {
    // Get map source specified parameters
    Properties props = this.getProperties() ;
    String dataSource = props.getProperty("data_source") ;
    String baseMap = props.getProperty("base_map") ;
    // Use oracle.lbs.mapclient.MapViewer to construct the request string
    MapViewer mv = new MapViewer(this.getMapServiceURL()) ;
    mv.setDataSourceName(dataSource);
    mv.setBaseMapName(baseMap);
    mv.setDeviceSize(new Dimension(tile.getImageWidth(),
                                   tile.getImageHeight()));
    mv.setCenterAndSize(tile.getBoundingBox().getCenterX(),
                        tile.getBoundingBox().getCenterY(),
                        tile.getBoundingBox().getHeight());
    int format = MapResponse.FORMAT_PNG_STREAM ;
    String req = null ;
    switch(tile.getImageFormat())
    {
      case TileDefinition.FORMAT_GIF:
        mv.setImageFormat(MapResponse.FORMAT_GIF_URL);
        req = mv.getMapRequest().toXMLString().replaceFirst(
                        "format=\"GIF_URL\"", "format=\"GIF_STREAM\"") ;
        break ;
      case TileDefinition.FORMAT_PNG:
        mv.setImageFormat(MapResponse.FORMAT_PNG_URL);
        req = mv.getMapRequest().toXMLString().replaceFirst(
                        "format=\"PNG_URL\"", "format=\"PNG_STREAM\"") ;
        break ;
      case TileDefinition.FORMAT_JPEG:
        mv.setImageFormat(MapResponse.FORMAT_JPEG_URL);
        req = mv.getMapRequest().toXMLString().replaceFirst(
                        "format=\"JPEG_URL\"", "format=\"JPEG_STREAM\"");
        break ;
    }

    byte[] reqStr = null ;
    try
    {
      reqStr = req.getBytes("UTF8") ;
    }
    catch(Exception e)
    {}
    // Return the request string.
    return "xml_request="+ new String(reqStr);
  }
}
Example 6-7 shows the implementation of the MapSourceAdapter.getTileImageBytes method.
Example 6-7 MapSourceAdapter.getTileImageBytes Implementation
/**
 * Fetches the map image tile from the external map service provider by
 * sending the HTTP map tile request to the map service provider, and
 * return the binary tile image data. You can rewrite this method so that
 * the adapter can fetch the tile from an external map service provider
 * that does not accept HTTP requests at all.
 * @param tile the tile definition
 * @return the binary tile image data.
 * @throws Exception
 */
public byte[] getTileImageBytes(TileDefinition tile)
  throws Exception
{
  // construct request string
  String request = getMapTileRequest(tile) ;

  if(request == null)
  {
    throw new Exception("Null map tile request string in map source adapter!") ;
  }

  // set proxy settings
    Proxy proxy = null ;

  /* If the proxyHost is "NONE", the request is sent directly to the
   * external server. If the proxyHost is a valid host, that host will
   * be used as the proxy server. If the proxyHost is empty of omitted,
   * the global proxy setting in mapViewerConfig.xml will be in effect.
   */
  boolean noProxy = "NONE".equalsIgnoreCase(getProxyHost()) ;
  if(getProxyHost()!=null && !noProxy)
  {
    SocketAddress addr = new InetSocketAddress(proxyHost, proxyPort);
    proxy = new Proxy(Proxy.Type.HTTP, addr);
  }

  // send the request and get the tile image binary
  PrintWriter wr = null ;
  BufferedInputStream bis = null;
  try
  {
    String urlStr = mapServiceURL ;
    if("GET".equalsIgnoreCase(httpMethod))
      urlStr = mapServiceURL + "?" + request ;
    log.finest("http "+httpMethod+": "+urlStr);

    URL url = new URL(urlStr);
    // Open a URL connection based on current proxy setting
    URLConnection conn =
      proxy!=null? url.openConnection(proxy):
                   (noProxy? url.openConnection(Proxy.NO_PROXY):
                             url.openConnection()) ;
    conn.setConnectTimeout(timeOut);
    if("GET".equalsIgnoreCase(getHTTPMethod()))
      conn.connect();
    else
    {
      conn.setDoOutput(true);
      wr = new PrintWriter(conn.getOutputStream());
      wr.print(request);
      wr.flush();
      wr.close();
      wr = null ;
    }
    bis = new BufferedInputStream(conn.getInputStream());
    byte[] result = toBytes(bis) ;
    bis.close();
    bis = null ;
    return result;
  }
  catch(Exception ioe)
  {
    throw new Exception("Failed to fetch external map tile.", ioe);
  }
  finally
  {
    try
    {
      if(bis != null)
      {
        bis.close();
        bis = null;
      }
      if(wr != null)
      {
        wr.close();
        wr = null;
      }
    }
    catch(IOException ioee)
    {
      throw ioee;
    }
  }
}
6.3 Map Cache Auto-Update
The map cache auto-update feature periodically updates cached map tiles when they become "dirty". A cached map tile becomes dirty when data in base tables is changed by an update, insert, or delete operation, because such changes may affect the shape, annotation, or choice of rendering style for the already cached map tiles.Updating a dirty tile invokes one of the following operations: a) Refresh: delete the cached dirty tiles and then re-fetch them; or b) Clear: only delete the cached dirty tiles. To enable automatic updating for a tile layer, you perform the following major steps:
-
Add the <dirty_tile_auto_update> element to the mapViewerConfig.xml configuration file.
-
Create the dirty MBR table, base tables' log table, and triggers.
To test the automatic tile updating, follow the instructions in Section 6.3.4, "Start the MapViewer server and test the map cache auto-update feature".
6.3.1 Add the <dirty_tile_auto_update> element to the mapViewerConfig.xml configuration file
Add the <dirty_tile_auto_update> element as a child element of the <map_tile_server> element. For example:
<map_tile_server>
   <tile_storage default_root_path="/scratch/tilecache/"/>
   <dirty_tile_auto_update
     auto_update="true"
     auto_update_interval="1"
     recycle_interval="168"/>
</map_tile_server>
The auto_update attribute enables server's automatic update when set to true (the default is false). If this attribute is set to true, all qualified tile layers on the server will be automatically updated. To qualify, a tile layer must have a proper definition (see Section 6.3.2).
The auto_update_interval attribute sets the recurring interval for checking the base tables' log table and the dirty MBR table. Its value is in minutes, and the default value is 1. The value should not be more than a few minutes, and it should not be very large (even if you update the base tables far less frequently, such as daily or weekly). The base tables' log table and the dirty MBR table should be created before starting the MapViewer server. Sample scripts for creating these two tables and related sequences and triggers are included in Section 6.3.3.
The recycle_interval attribute specifies how long to keep a processed row in the log table and dirty MBR table. Its value is in hours, and the default value is 168. Processed rows older than that will be deleted.
When MapViewer starts, it loads the <dirty_tile_auto_update> element from mapViewerConfig.xml configuration file, and the element is applied to all tile layers of this server. If that element is not found, then the server disables any tile layer's auto-update capability.
6.3.2 Add the <auto_update> element to tile layer definition
Add an <auto_update> element after the <zoom_levels> element in a tile layer definition. You can add this element manually or using the MapViewer web console. For example:
 <auto_update
      finest_level_to_refresh="15"
      dirty_mbr_batch="100"
      dirty_mbr_cap="1000">
      <dirty_mbr_table name="mbr_mcau"/>
      <logtable name="log_mcau_tl"/>
   </auto_update>
The finest_level_to_refresh attribute specifies the finest level to refresh. Levels starting from level 0, level 1, level 2, …, until this specified level will be refreshed, and dirty tiles in the remaining zoom levels will be cleared. If the data modifications in the base tables are often geographically small features (as most data modifications should be), such as changing the name of a restaurant or inserting a newly developed street, the value can be the finest zoom level found in the tile layer definition. For example, if there are 19 zoom levels from 0 to 18, then this attribute can be set to 18.
The dirty_mbr_batch attribute specifies the maximum number of rows from the dirty MBR table for an update. The default value is 100. This value prevents the server from getting a very large number of tiles to update at one time. Instead, if a large number of dirty tiles need a refresh or clear operation, these tiles will be processed in many updates, and one interval processes just one batch. To determine an optimal value for this attribute, consider the following factors:
-
The
auto_update_intervalvalue (see Section 6.3.1)and how many tiles the server is able finish in the interval -
The amount of memory that the server can use
-
The number of tile layers that are enabled for map cache auto update and the frequency and magnitude of the changes in their base tables
Because there is no formula for a precise calculation of an optimal dirty_mbr_batch value, the best practice is to set up an environment to test different settings. When selecting a value, consider the worst case scenario. Two extreme scenarios to avoid are: a) the value is so small that the server is idling after finishing a refresh operation while the number of dirty MBR rows in the dirty MBR table keeps growing; or b) the value is so large that the server runs out of memory, throws an out-of-memory exception, and shuts down all services.
The dirty_mbr_cap attribute specifies the maximum number of dirty tiles for a log table to generate in one interval. This constraint may affect the finest zoom level for refresh operation, and the remaining zoom levels are then set for a clear operation. The accumulation counter for dirty tiles starts from zoom level 0, to level 1, level 2, and so on, until the cap is reached or the finest level to refresh is reached.
When a cap is reached at level n before reaching the specified finest level to refresh, the already counted tiles in level 0, level 1, level 2, …, and level n-1 are for a refresh operation (delete and then re-fetch), and the current zoom level (level n in this example) and all other finer levels are for a clear operation (delete from the map tile cache and no re-fetch). For example, if the cap is given a value of 1000, the dirty tile counter reaches the cap at zoom level 4, then all the counted dirty tiles from level 0 to level 3 are for refresh. After that, each dirty tile in level 3 will be used to define a rectangle (the rectangular area the tile covers on the ground), and this rectangle is taken as an MBR to clear all zoom levels starting from level 4, level 5, and all other finer levels in this tile layer.
The <dirty_mbr_table> element specifies the name of the dirty MBR table, where the dirty MBRs are to be stored, retrieved, and updated. You need to manually create this table before starting the MapViewer server (see the example in Section 6.3.3).
The <logtable> element specifies the name of the base table's log table. If a tile layer depends on more than one base table (as is often the case), then every change in each base table should be inserted into this log table by its trigger; if the schema is accessed by more than one data source defined in mapViewerConfig.xml, then one change in a base table should insert one row for each data source.
It is recommended that each tile layer have its own log table and its own dirty MBR table. Both tables should be manually created before starting the server (see the example in Section 6.3.3).
6.3.3 Create the dirty MBR table, base tables' log table, and triggers
This section contains examples that, when taken together, show the actions to create the dirty MBR table, base tables' log table, and triggers. The example segments assume that a base map named DEMO_MAP is already defined and that there is one data source named MVDEMO accessing the schema.
The example code segments include explanatory comments, and they perform the following actions:
-
Create a tile layer that includes an
<auto_update>element.insert into user_sdo_cached_maps values( 'MCAU_TL', 'a test case for map cache auto update', '', 'YES', 'YES', '<map_tile_layer name="MCAU_TL" image_format="PNG" http_header_expires="168.0" concurrent_fetching_threads="3" fetch_larger_tiles="false"> <internal_map_source data_source="mvdemo" base_map="DEMO_MAP"/> <coordinate_system srid="8307" minX="-180.0" maxX="180.0" minY="-90.0" maxY="90.0"/> <tile_image width="256" height="256"/> <tile_dpi value="90.7142857"/> <tile_meters_per_unit value="111319.49079327358"/> <zoom_levels levels="19" min_scale="2132.729583849784" max_scale="559082264.0287178"> </zoom_levels> <auto_update finest_level_to_refresh="15" dirty_mbr_batch="100" dirty_mbr_cap="1000"> <dirty_mbr_table name="mbr_MCAU_TL"/> <logtable name="log_MCAU_TL"/> </auto_update> </map_tile_layer>', 'DEMO_MAP', ''); commit;
-
Create a dirty MBR table and its trigger.
The dirty MBR table stores the dirty MBRs for refresh and clear operations. This table is populated using the geometries from the log table. There is also a sequence and a trigger created for generating unique IDs for this table's ID column.
-- create the dirty MBR table
CREATE TABLE mbr_MCAU_TL (     -- dirty MBR table name
  id             number,       -- id, used for tracking the status
  datasource     varchar2(32), -- data source name
  tile_layer     varchar2(32), -- tile layer name
  logtable       varchar2(32), -- basetable's log-table
  refresh_status varchar2(1),  -- n: not refreshed, y: refreshed, p:pending, f: failed
  clear_status   varchar2(1),  -- n: not cleared,   y: cleared,   p:pending, f: failed
  mbr_to_clear   varchar2(1),  -- y/n: use tile's mbr for clearing finer levels
  zoom_level     number,       -- zoom level of this tile
  mx             number,       -- mesh x ordinate
  my             number,       -- mesh Y ordinate
  minx           number,       -- tile's minimum x coordinate
  miny           number,       -- tile's minimum y coordinate
  maxx           number,       -- tile's maximum x coordinate
  maxy           number,       -- tile's maximum y coordinate
  insert_time    Date,         -- when the tile MBR was inserted into this table
  update_time    Date          -- most recent update (refresh/clear) time
  );

-- create a sequence for mbr_MCAU_TL
CREATE SEQUENCE mbr_MCAU_TL_seq
  START WITH 1
  INCREMENT BY 1
  CYCLE
  MAXVALUE 9999999999;

-- create a trigger to get a unique id
create or replace trigger mbr_MCAU_TL_br
 before insert on mbr_MCAU_TL   -- before inserting the row
 referencing new as new old as old
 for each row  -- for each row
begin
  select mbr_MCAU_TL_seq.nextval INTO :new.id FROM dual;
end;
/
-
Create a log table.
The base tables' log table is for recording the rows changed in the base tables of the tile layer. Because each tile layer depends on the data in its base tables when generating a map tile, any change made to the base table (such as modifications of geometries or changes to attributes values) may affect their representation in their corresponding map tile. The change log table records such changes through a trigger created on its base table.
The following statements create a log table, a sequence, and a trigger on the table using the sequence to generate unique ID values.
-- create the log table
create table log_MCAU_TL(
  id number,
  geomO sdo_geometry,  -- the affected geometry or its attributes, original geometry
  geomN sdo_geometry,  -- the affected geometry or its attributes, new geometry
  modified Date,       -- when the modified occurred
  status varchar2(1),  -- y: processed, n: not processed
  datasource varchar2(32), -- data source name, more than one ds may access the same log
  tile_layer varchar2(32), -- tile layer name
  basetable  varchar2(32) -- base table name, more than one base table may insert into this log
);

-- create a sequence for log_MCAU_TL
CREATE SEQUENCE log_MCAU_TL_seq
  START WITH 1
  INCREMENT BY 1
  CYCLE
  MAXVALUE 9999999999;

-- create a trigger for log_MCAU_TL to create a unique id
create or replace trigger log_MCAU_TL_br
 before insert on log_MCAU_TL   -- before inserting
 referencing new as new old as old
 for each row                          -- for each row
begin
  select log_MCAU_TL_seq.nextval INTO :new.id FROM dual;
end;
/
-
Create a trigger on each base table to insert changes into the log table.
In a base table's trigger, any geometries inserted into the log table are transformed into the same spatial reference system (coordinate system) as the tile layer. If there are multiple data sources defined in the
mapViewerConfig.xmlconfiguration file accessing the same schema, then one INSERT statement should be used for each of these data sources in each trigger definition.The following statements make these assumptions:
-
One data source named MVDEMO is accessing the schema that contains the MCAU_TL tile layer. (Thus, there is only one INSERT statement in each trigger definition.)
-
The tile layer's spatial reference system (SRID) is 8307 (WGS 84 longitude/latitude).
-
There are four base tables to monitor for this tile layer: states, counties, interstates, and cities.
--states trigger
create or replace trigger states_MCAU_TL_ar
 after insert or update or delete on states   -- any change
 referencing new as new old as old
 for each row
 when (old.geom IS NOT NULL OR new.geom IS NOT NULL)
declare
  oldGeom SDO_GEOMETRY;
  newGeom SDO_GEOMETRY;
  tileSRID  number;
begin
   tileSRID := 8307;
   oldGeom  := :old.geom;
   if (:old.geom IS NOT NULL) then
     if (:old.geom.SDO_SRID != tileSRID) then
       select sdo_cs.transform(:old.geom, tileSRID)  into oldGeom from dual;
     end if;
   end if;
   newGeom:=:new.geom;
   if (:new.geom IS NOT NULL) then
     if (:new.geom.SDO_SRID!= tileSRID) then
       select sdo_cs.transform(:new.geom, tileSRID)  into newGeom from dual;
     end if;
   end if;

   insert into log_MCAU_TL (id, geomO, geomN, modified, status, datasource, tile_layer, basetable)
        values(null, oldGeom, newGeom, sysdate, 'n', 'MVDEMO', 'MCAU_TL', 'states');
end;
/

--counties trigger
create or replace trigger counties_MCAU_TL_ar
 after insert or update or delete on counties
 referencing new as new old as old
 for each row
 when (old.geom IS NOT NULL OR new.geom IS NOT NULL)
declare
  oldGeom SDO_GEOMETRY;
  newGeom SDO_GEOMETRY;
  tileSRID  number;
begin
   tileSRID := 8307;
   oldGeom  := :old.geom;
   if (:old.geom IS NOT NULL) then
     if (:old.geom.SDO_SRID!=tileSRID) then
       select sdo_cs.transform(:old.geom, tileSRID)  into oldGeom from dual;
     end if;
   end if;
   newGeom:=:new.geom;
   if (:new.geom IS NOT NULL) then
     if (:new.geom.SDO_SRID!= tileSRID) then
       select sdo_cs.transform(:new.geom, tileSRID)  into newGeom from dual;
     end if;
   end if;
   insert into log_MCAU_TL (id, geomO, geomN, modified, status, datasource, tile_layer, basetable)
        values(null, oldGeom, newGeom, sysdate, 'n', 'MVDEMO', 'MCAU_TL', 'counties');
end;
/

--interstates trigger
create or replace trigger interstates_MCAU_TL_ar
 after insert or update or delete on interstates
 referencing new as new old as old
 for each row
 when (old.geom IS NOT NULL OR new.geom IS NOT NULL)
declare
  oldGeom SDO_GEOMETRY;
  newGeom SDO_GEOMETRY;
  tileSRID  number;
begin
   tileSRID := 8307;
   oldGeom  := :old.geom;
   if (:old.geom IS NOT NULL) then
     if (:old.geom.SDO_SRID!=tileSRID) then
       select sdo_cs.transform(:old.geom, tileSRID)  into oldGeom from dual;
     end if;
   end if;
   newGeom:=:new.geom;
   if (:new.geom IS NOT NULL) then
     if (:new.geom.SDO_SRID!= tileSRID) then
       select sdo_cs.transform(:new.geom, tileSRID)  into newGeom from dual;
     end if;
   end if;

   insert into log_MCAU_TL (id, geomO, geomN, modified, status, datasource, tile_layer, basetable)
        values(null, oldGeom, newGeom, sysdate, 'n', 'MVDEMO', 'MCAU_TL', 'interstates');

end;
/

--cities trigger
create or replace trigger cities_MCAU_TL_ar
 after insert or update or delete on cities
 referencing new as new old as old
 for each row
 when (old.location IS NOT NULL OR new.location IS NOT NULL)
declare
  oldGeom SDO_GEOMETRY;
  newGeom SDO_GEOMETRY;
  tileSRID  number;
begin
   tileSRID := 8307;
   oldGeom  := :old.location;
   if (:old.location IS NOT NULL) then
     if (:old.location.SDO_SRID!=tileSRID) then
       select sdo_cs.transform(:old.location, tileSRID)  into oldGeom from dual;
     end if;
   end if;
   newGeom:=:new.location;
   if (:new.location IS NOT NULL) then
     if (:new.location.SDO_SRID!= tileSRID) then
       select sdo_cs.transform(:new.location, tileSRID)  into newGeom from dual;
     end if;
   end if;

  insert into log_MCAU_TL (id, geomO, geomN, modified, status, datasource, tile_layer, basetable)
      values(null, oldGeom, newGeom, sysdate, 'n', 'MVDEMO', 'MCAU_TL', 'cities');
end;
/
commit;
-
6.3.4 Start the MapViewer server and test the map cache auto-update feature
To test the automatic tile updating, start the MapViewer server and then change one or more rows in the base table.
-
Modify a row in the base table. For example:
update cities set city='Worcester' where city='Worcester' and state_abrv='MA';
-
Check the log table. For example:
select * from log_mcau_tl;
The result should include a row that was just inserted by the base table's trigger.
-
Wait for about one interval (one minute in this example), then check the dirty MBR table. For example:
select count(*) from mbr_mcau_tl;
The result should include some dirty MBR rows inserted by the server.
You can also look for changes in the refresh_status column in the dirty MBR table. When rows are initially inserted, the status is set to n for not processed; then it changes to p for pending when they are being processed; and after the update is done, it changes to y for processed. Meanwhile, on the server you can see that the server has been updating the tiles (the server's logger needs to be set to finest level to see the finest logging information).
6.4 Feature of Interest (FOI) Server
A feature of interest (FOI) is a business entity or geographical feature that can be manipulated or interacted with by a JavaScript map client running in the web browser. FOI data is dynamically displayed and is not part of the map tile layer. FOIs can be any spatial geometry type, such as points, line strings, and polygons. The ability to search, browse, inspect, and interact with FOIs is essential for location-based services.
The FOI server is a Java servlet running inside MapViewer. It responds to FOI requests from a JavaScript map client by querying the database, rendering FOI images, and sending the FOI images along with FOI attribute data to the client. The JavaScript map client displays the FOI images to the end user and provides interaction with the images.
The FOI server accepts the following types of FOI requests: theme-based and user-defined. Each type of FOI request returns a data layer appropriate for the request type.
Related subtopics:
6.4.1 Theme-Based FOI Layers
A theme-based FOI layer is a collection of spatial features that have similar characteristics and that are stored in the database. The client fetches a theme-based FOI layer by sending a theme-based FOI layer request to the FOI server. The result of this request is a collection of FOI data entries that meets certain query criteria. Each FOI data entry contains the FOI image, as well as FOI attributes that can be used by the JavaScript map client to implement client-side interactivity.
A theme-based FOI layer is based on a predefined MapViewer theme (see Section 6.4.1.1) or a dynamic JDBC query theme (see Section 6.4.1.3, which defines all information necessary for FOI data rendering. The information includes the table in which the geometry features are stored, the criteria to use during the database query, the attributes that are part of the FOI data, and the style to use when rendering the FOI images. Predefined themes can be defined and configured using the Map Builder tool, which is described in Chapter 7.
Related subtopics:
6.4.1.1 Predefined Theme-Based FOI Layers
When the client requests FOI data using a predefined theme-based FOI request, it must specify the name of a predefined theme, the scale of the feature images, and the query window used to query the geometry features. The theme name must be defined by the application, while the scale of the feature images and the query window are automatically calculated by the JavaScript map client.
For example, a predefined theme named CUSTOMERS could be defined on a table named CUSTOMERS, which has the following definition:
SQL> DESCRIBE CUSTOMERS
 Name                              Null?  Type
 --------------------------------- ------ ----------------------------
 NAME                                      VARCHAR2(64 CHAR)
 CITY                                      VARCHAR2(64 CHAR)
 COUNTY                                    VARCHAR2(64 CHAR)
 STATE                                       VARCHAR2(64 CHAR)
 LOCATION                                  SDO_GEOMETRY
 SALES                                     NUMBER
The LOCATION column is the spatial column that is used for rendering the customer markers.
The XML styling rules for the CUSTOMERS theme are shown in Example 6-8.
Example 6-8 XML Styling Rules for Predefined Theme Used for FOI Layer
<?xml version="1.0" standalone="yes"?>
<styling_rules>
  <hidden_info>
    <field column="CITY" name="City"/>
    <field column="SALES" name="Sales"/>
  </hidden_info>
  <rule>
    <features style="M.CIRCLE"> </features>
    <label column="NAME" style="T.TEXT"> 1 </label>
  </rule>
</styling_rules>
The styling rules in Example 6-8 specify the following. To see how these specifications affect the map display, see Figure 6-2, "Application Created Using Oracle Maps (V1 API)" in Section 6.1.2.
-
The marker style
M.CIRCLEis used to render the customers. -
The NAME column is used as the labeling attribute (
label column="NAME"). The value in the NAME column (the name of the customer) is included in the information window that the JavaScript map client displays when the user moves the mouse over the customer marker. -
The information window also includes the values in columns specified in the
<hidden_info>element (CITY and SALES in this example) for that customer. Each<field>element specifies two attributes:columnto identify the database column andnameto identify a text string to be used in the information window.
6.4.1.2 Templated Predefined Themes
The predefined MapViewer theme can be a standard predefined theme or a templated predefined theme. Both types of predefined themes are defined in the USER_SDO_THEMES view. However, the query conditions of a standard predefined theme are fixed, whereas the query conditions of a templated predefined theme can contain dynamic binding variables whose values can be changed when the theme request is issued.
Example 6-9 shows the XML styling rules for a templated predefined theme that uses two binding variables (with the relevant text shown in bold in the <features> element).
Example 6-9 XML Styling Rules for a Templated Predefined Theme
<?xml version="1.0" standalone="yes"?>
<styling_rules>
  <hidden_info>
    <field column="NAME" name="Name"/>
    <field column="CITY" name="City"/>
    <field column="SALES" name="Sales"/>
  </hidden_info>
  <rule>
    <features style="M.CIRCLE">(city=:1 and sales>:2)</features>
    <label column="NAME" style="T.TEXT"> 1 </label>
  </rule>
</styling_rules>
In Example 6-9, the binding variable :1 specifies the name of the city in which the qualifying features must be located, and the binding variable :2 specifies the minimum sales volume of the qualifying features. (That is, only customers in a specified city and with sales above a certain minimum will have store markers displayed.) The values of these two binding variables are not fixed when the theme is defined; instead, they are provided in the requests that the client sends to the server.
6.4.1.3 Dynamic JDBC Query Theme-Based FOI Layers
When the client requests FOI data using a dynamic JDBC theme-based FOI request, it must specify the complete definition of the JDBC theme. The theme definition must specify the rendering style and the SQL query that is to be used to query FOI data, including all geometry and non-geometry attributes.
Example 6-10 shows some JavaScript client code to create an FOI layer that displays a buffer around each customer location.
Example 6-10 Theme for Dynamic JDBC Query
var theme = '<themes><theme name="JDBC_THEME" >' +
   '<jdbc_query asis="true" spatial_column="location"
        jdbc_srid="8307" render_style="C.RED"
        datasource="mvdemo">' +
   'select sdo_geom.sdo_buffer(A.location,1,0.005,'+
   '\'unit=mile arc_tolerance=0.005\') location '+
   ' from customers A' +
   '</jdbc_query></theme></themes>' ;
buffertheme = new MVThemeBasedFOI('buffertheme',theme);
6.4.2 User-Defined FOI Requests
A user-defined FOI is a feature defined on the client side. Unlike the theme-based FOI layer, which is rendered as a collection of features, the user-defined FOI is requested and rendered on an individual basis.
All attributes of the user-defined FOI, including the geometry representation and rendering style, must be provided by the application. The JavaScript map client sends the request, with the geometry representation and rendering style information, to the FOI server. The FOI server renders the FOI image and returns it to the client. The rendering style must be predefined in the USER_SDO_STYLES view.
6.5 Map Templates
A map template provides a self-contained, self-sufficient set of spatial data and mapping metadata so that MapViewer can provide an interactive, full-featured mapping experience without manual setup required of the application developer or end user. A map template provides a set of pre-defined styles, themes and tile layers that are ready to be plugged into a web page for thematic mapping purposes. The set of data layers often contain a pre-defined hierarchical relationship where applicable. The Oracle Maps V2 (HTML5) API can use a map template and set up mapping features automatically, such as layer controls, map legends, the order of layer display, and the initial map display center and zoom-level.
To create and maintain map templates, use the Oracle MapViewer Template Builder, which is described in Chapter 9.
To load a map template using the Oracle Maps V2 API, see Section 6.7.2.2.
A map template must follow these structural rules:
-
Each map template must have a single configuration file that contains all the metadata about it. The file should be in JSON format, and the file name should end with config.json. The configuration file will include a list of all available layers.
-
One or more GeoJSON files will contain the actual geospatial data layers. Typically, a GeoJSON file will contain all the data for a single layer; for example, a
states.jsonfile may contain all the states' geometries and attributes, while azipcodes.jsonfile may contain all the postal ZIP code boundaries and attributes. The name of each GeoJSON file should match (case-sensitive) the name in the corresponding<l;ayer>element in the main configuration file.
The map template configuration file can include the following:
-
Map properties: Properties that define the map area covered, including the default map center and zoom level. For example:
"init": { "center": [-100, 38], "zoomLevel": 4, "layers": ["us_states"], "tileLayer": "Oracle maps", "customUniverse": { "srid": 8307, "bounds": [-180, -90, 180, 90, 8307], "numberOfZoomLevels": 10 }, "copyright": { "anchorPosition": 5, "textValue": "©2014 Oracle Corp", "fontSize": 13, "fontFamily": "Times New Roman" }, "navigation": { "style": 2 } } -
Vector Layers: One or more vector layers, each corresponding to a single GeoJSON file. For example:
"vectorLayers": [ { "dn": "us_counties", "uri": "/mvdemo/datapacks/usa_counties.json", "cn": ["USA Counties", "US counties", "United States Counties", "Counties of USA"], "pl": ["us_states"], "styles": { "normal": "mutedColor1", "mouseOver": "hoverColor1", "selected": "selectedColor1" } }, { "dn": "us_states", "uri": "/mvdemo/datapacks/usa_states.json", "cn": ["USA States", "US states", "States of USA", "States"], "cl": ["us_counties", "us_airports"], "styles": { "normal": "mutedColor1", "mouseOver": "hoverColor1", "selected": "selectedColor1" } }, { "dn": "us_airports", "uri": "/mvdemo/datapacks/us_airports.json", "cn": ["Airports", "US airports", "Airports of USA"], "pl": ["us_states"], "styles": { "normal": "marker1", "mouseOver": "pulse1" } } ] -
Tile Layers: One or more tile layers to be used. Typically, a default tile layer is used as the starting background, while other tile layers (if any) can be selected and switched to at run time by an end user. For example:
"tileLayers": [ { "dn": "Oracle maps", "vendor": "oracle" }, { "dn": "Google maps", "vendor": "google" }, { "dn": "Bing maps", "key": "<your_bing_maps_key>", "vendor": "bing" }, { "dn": "Nokia maps", "vendor": "nokia", "mapTypes": "normal,terrain,satellite", "key": "<your_nokia_key>", "secondary_key": "<your_app_id>" } ] -
Styles: Used to specify the rendering and labeling style that can be used with vector layers. For example:
"styles": [
        {
            "dn": "mutedColor1",
            "type": "color",
            "def": {
                "fill": "#cccccc",
                "strokeThickness": 1,
                "stroke": "#444444",
                "fillOpacity": 0.4
            }
        },
        {
            "dn": "hoverColor1",
            "type": "color",
            "def": {
                "strokeThickness": 2.5,
                "stroke": "#ffff00"
            }
        },
        {
            "dn": "selectedColor1",
            "type": "color",
            "def": {
                "fill": "#cccc00",
                "fillOpacity": 0.3
            }
        }
]
6.6 Oracle Maps JavaScript API
The Oracle Maps JavaScript client is a browser-based map visualization engine that works on top of the map tile server and the FOI server. It implements the following functions:
-
Fetching map tiles from the map tile server and displaying them as a map tile layer in the web browser.
-
Sending FOI requests to the FOI server, and overlaying user-defined features and Oracle Spatial and Graph query-based features on top of the map tile layer.
-
Controlling user interaction, such as dragging for map navigation, clicking FOIs, drawing rectangles, and redlining.
Drawing a rectangle refers to the application user creating a rectangle by clicking and holding the mouse button at one corner of the rectangle, dragging the mouse to the diagonally opposite corner, and releasing the mouse button.
Redlining refers to the application user creating a polygon or polyline by clicking the mouse button and then moving the mouse and clicking multiple times, with each click extending the redline by a straight line. (Redline drawings are often rendered in red, although you can specify a line style that uses any color.)
To access these functions, use the JavaScript API, which consists of several JavaScript classes. The JavaScript API has two versions:
-
Version 1 (V1), the traditional API that is still supported, and described in Section 6.6.1, "JavaScript API V1"
-
Version 2 (V2), a new API introduced in Release 11.1.1.7, and described in Section 6.6.2, "JavaScript API V2"
For detailed information about all classes in the Oracle Maps JavaScript API (V1 and V2), see the Javadoc-style reference documentation, which is included in the mvdemo.ear file and is available at the following locations:
http://host:port/mvdemo/api/oracle_maps_api.jsp (for V1)
http://host:port/mvdemo/api/oracle_maps_html5_api.jsp (for V2)
Tutorials and demos for both the V1 and V2 APIs are available as a standalone packaged application with the root context path /mvdemo. The tutorials start with the basics (display a map tile layer, add a navigation panel, display interactive features and information windows) and move on to more complex topics such as registering event listeners, programmatically creating and using styles, and spatial filtering.
The tutorials are all based on the MVDEMO sample data set (available from the MapViewer page on the Oracle Technology Network) and assume a data source named mvdemo. The tutorial page has three panels. The left one lists the sample code, or demo, titles. Click on one and a map, or the result of executing that sample code, is displayed in the top right panel. The bottom panel has tabs titled JavaScript and HTML, which respectively show the JavaScript and HTML code fragments for the selected demo.
6.6.1 JavaScript API V1
To access the functions of the Oracle Maps JavaScript client, use the JavaScript API Version 1 (V1), which consists of several JavaScript classes, including the following:
-
The
MVMapViewclass is the main entry point of the API. It implements most of the map control interfaces. -
The
MVMapTileLayerclass (formerly called theMVBaseMapclass) defines a map tile layer that displays map tiles rendered by the map tile server. -
The
MVThemeBasedFOIclass defines and controls the theme based FOI layers. -
The
FOIclass defines and controls user-defined FOIs. -
The
MVSdoGeometryclass defines a geometry object. The geometry can be in any geometry type that is supported by Oracle Spatial and Graph. -
The
MVRedLineToolclass defines and controls the redline utility. -
The
MVRectangleToolclass defines and controls the rectangle tool. -
The
MVOverviewMapclass defines and controls the overview map that displays the miniature overview of the main map as a small rectangle (which is itself inside a rectangle tool). -
The
MVMapDecorationclass defines and controls map decorations.
MVMapView is the main entry class for all map operations inside the web browser. MVMapView and the other classes provide all essential interfaces for adding logic to your web mapping applications. These logical operations can include the following:
-
Create a map client instance and associate it with the map container DIV object created in the web page.
-
Configure map parameters such as map center and map zoom level.
-
Create and manipulate map tile layers.
-
Create and manipulate theme-based FOI layers.
-
Create and manipulate user-defined individual FOIs.
-
Display an information window on the map.
-
Create fixed map decorations, such as a map title, custom copyright notes, and control buttons.
-
Access built-in utilities such as the navigation bar, scale bar, rectangle tool, redline tool, and overview map.
-
Use event listeners to customize the event handling. You can add event listeners to the
MVMapView,MVThemeBasedFOI, andMVFOIclasses using the appropriate API methods.
6.6.2 JavaScript API V2
The Oracle Maps JavaScript API Version 2 (V2) takes advantage of the capabilities of modern browsers. Some of its features include:
-
Built-in support of various third party map tile services, such as maps.oracle.com, Nokia Maps, Bing Maps, OpenStreet Maps, and other mapping service providers
-
Rich client side rendering of geospatial data with on-the-fly application of rendering styles and effects such as gradients, animation, and drop-shadows
-
Autoclustering of large number of points and client side heat map generation
-
Client side feature filtering based on attribute values as well as spatial predicates (query windows)
-
A rich set of built-in map controls and tools, including a customizable navigation bar and information windows, configurable layer control, and red-lining and distance measurement tools
The V2 API is not backward compatible with the existing Oracle Maps JavaScript V1 API applications. If you want to use V2-specific features with existing V1 applications (that is, applications written with the V1 API using classes such as MVThemeBasedFOI), those applications will need to be migrated first.
Note, however, that existing server-side predefined styles and themes will work with the V2 API. For example, the following code snippet creates an interactive vector layer based on a predefined theme mvdemo.customers, which has an associated predefined style:
var baseURL  = "http://"+document.location.host+"/mapviewer";
var layer = new OM.layer.VectorLayer("layer1",
 {
     def:{
                type:OM.layer.VectorLayer.TYPE_PREDEFINED,
                dataSource:"mvdemo",
                theme:"customers",
                url: baseURL
            }
  });
The V2 API has the following top-level classes and subpackages, all of which are in the namespace OM:
-
The
Mapclass is the main class of the API. -
The
Featureclass represents individual geo features (or FOIs as they were known in V1). -
The
MapContextclass a top-level class encapsulating some essential contextual information, such as the current map center point and zoom level. It is typically passed into event listeners. -
The
controlpackage contains all the map controls, such as navigation bar and overview map. -
The
eventpackage contains all the map and layer event classes. -
The
filterpackage contains all the client-side filters (spatial or relational) for selecting, or subsetting, the displayed vector layer features. -
The
geometrypackage contains various geometry classes. -
The
layerpackage contains various tile and vector layer classes. The tile layer classes include access to a few online map services such as Oracle, Nokia, Bing, and OpenStreetMap. The vector layers are interactive feature layers and correspond to theMVThemeBasedFOIand MVFOIclassesof V1. -
The
infowindowpackage contains the customizable information windows and their styles. -
The
stylepackage contains styles applicable to vector data on the client side. It also includes visual effects such as animation, gradients, and drop shadows. -
The
toolpackage contains various map tools such as for distance measuring, red-lining, and geometry drawing. -
The
universepackage contains built-in, or predefined, map universes. A map universe defines the bounding box and set of zoom level definitions for the map content. It is similar to a tile layer configuration in the V1 API. -
The
utilpackage contains various utility classes. -
The
visualfilterpackage provides an interface for the various visual effects, such as gradients and drop shadows.
OM.Map is the main entry class for all map operations inside the web browser. This and other classes provide interfaces for adding application-specific logic, operations, and interactivity in web mapping applications. The application logic and operations can include the following:
-
Create a map client instance and associate it with the map container DIV object created in the web page.
-
Configure map parameters such as map center and map zoom level.
-
Optionally, create and manipulate map tile layers. Unlike in V1, a map tile layer is not required in V2. An application can have only interactive vector layers using a custom Universe that programmatically defines the zoom levels and scales.
-
Create and manipulate vector layers (known as FOIs in V1).
-
Display an information window on the map.
-
Create fixed map decorations, such as a map title, a copyright note, and map controls.
-
Access built-in utilities such as a navigation panel, rectangle or circle tool, scale bar, and overview map panel.
-
Use event listeners to customize event handling and thus map interactions.
For information about developing applications using the V2 API, see Section 6.7.2, "Using the V2 API" and the Oracle-supplied tutorials and demos.
6.6.3 V1 and V2 APIs: Similarities and Differences
Both V1 and V2 APIs have major similarities:
-
They have the same architecture and content organization. (Figure 6-1, "Architecture for Oracle Maps Applications" and Figure 6-4, "Layers in a Map" apply to both versions.)
-
They depend on Oracle Spatial and Graph or Locator for spatial analysis (proximity, containment, nearest neighbor, and distance queries) and coordinate system support (SRIDs and transformations).
However, there are some significant differences:
-
The V2 client-side rendering of interactive features (that is, using HTML5 Canvas or SVG) provides for a richer client interactivity and user experience.
-
The V1 "FOI server" is in V2 a data server that streams the vector geometries and attributes for features to the client for local rendering. Therefore, the V1 "FOI layers" and called vector layers in V2.
-
In V2, a background map tile layer is not required in order to display interactive vector layers. So in V2, for example, an application can display a thematic map of states (such as color-filled by population quintile) with no background tile layer.
-
The V2 API depends on and includes
JQueryandJQueryUI. So,oraclemapsv2.jsincludesjquery-1.7.2.min.jsandjquery-ui-1.8.16.min.js. If your application also uses JQuery and JQueryUI and includes them already, then use the fileoraclemapsv2_core.jsin the<script>tag instead to load the Oracle Maps V2 library. That is, use the following:<script src="/mapviewer/jslib/v2/oraclemapsv2_core.js"></script>instead of:
<script src="/mapviewer/jslib/v2/oraclemapsv2.js"></script>
Table 6-2 shows the general correspondence between the classes in V1 and V1, although the relationships are not always one-to-one.
Table 6-2 Correspondence Between V1 and V2 API Classes
| V1 API Class | V2 API Class |
|---|---|
|
|
|
|
|
|
|
|
Custom tile layers are not directly supported in the current release of V2. However, you can use custom tile layers by extending |
|
|
|
|
|
|
|
|
|
|
|
|
|
|
|
|
Styles ( |
|
|
Tools ( |
|
|
Decorations and controls ( |
|
6.7 Developing Oracle Maps Applications
If you have all your map data stored in an Oracle database and have MapViewer deployed in Oracle Fusion Middleware, you can develop a web-based mapping application using Oracle Maps by following the instructions in the section relevant to the API version that you are using:.
6.7.1 Using the V1 API
To develop Oracle Maps applications using the Version 1 (V1) API, follow the instructions in these sections:
6.7.1.1 Creating One or More Map Tile Layers
For each map tile layer displayed on the client side that is served by MapViewer, you must create the corresponding map tile layer on the MapViewer server side. For example, for the sample application described in Section 6.1.2, you must create a map tile layer on the server side to display oceans, county boundaries, cities and highways as a map tile layer on the client. However, if the tile layer is a custom or built-in eternal tile layer, you do not need to define the tile layer on the server side.
Before you can create a map tile layer, you must ensure that the map source from which the map tiles images are to be rendered is ready. If the map tile images are rendered based on map data stored in the database, you must create a MapViewer base map that consists of a set of predefined themes. (You can create the base map using the Map Builder tool, which is described in Chapter 7.) If the map tiles images are rendered by an external map provider, you must write a map source adapter that can fetch map images from the external server using the tile image definition specified by the map tile server.
When the map source is ready, you can create the map tile layer using the MapViewer administration page, as described in Section 1.6.3. When you create the map tile layer, you must provide proper coordinate system definition, map source definition (internal or external), and zoom level definition (number of zoom levels and map scales).
After you create the map tile layer, you can test it by using a JavaServer Page (JSP) demo application shipped with MapViewer. The JSP demo application can be accessed at http://host:port/mapviewer/fsmc/omaps.jsp. Based on your input, this application can display maps served by any map tile layer defined with the MapViewer instance.
6.7.1.2 Defining FOI Metadata
If your application needs to display dynamic features based on database query results as theme-based FOI layers, you must create a predefined MapViewer theme for each theme-based FOI layer. If your application needs to display individual dynamic features as user-defined FOIs, you must define the rendering style or styles used by the FOI server to render the FOI images. You can use the Map Builder tool (described in Chapter 7) to create predefined themes and rendering styles.
6.7.1.3 Creating the Client Application with the V1 API
Oracle Maps client applications running inside web browsers are pure HTML and JavaScript pages that do not require any plug-ins. Therefore, you can build the application using any web technology that delivers content as pure HTM. Such technologies include JavaServer Pages, Java Servlets, ASP, and .NET C#. This section discusses client application development only in pure HTML format, but you can easily apply this information to other web technologies.
As shown in Example 6-1 in Section 6.1.2, the source code for an Oracle Maps application is typically packaged in an HTML page, which consists of the following parts:
-
A
<script>element that loads the Oracle Maps client library into the browser JavaScript engine. In Example 6-1, this element is:<script language="Javascript" src="jslib/oraclemaps.js"></script>
-
An HTML DIV element that is used as the map container in the web page. The size and positioning of the DIV element can be customized to suit your needs. In Example 6-1, this element is:
<div id="map" style="left:10; top:60;width: 600px; height: 500px"></div>
-
JavaScript code that creates and initializes the map client instance. It creates the map client instance, sets up the initial map content (map tile layer, FOI layers, and so on), sets the initial map center and zoom level, implements application-specific logic, displays the map, and implements other application-specific logic.
This code should be packaged inside a JavaScript function, which is executed when the HTML page is loaded from the server to the client web browser. In Example 6-1, this function is named
on_load_mapview:function on_load_mapview() { var baseURL = "http://"+document.location.host+"/mapviewer"; // Create an MVMapView instance to display the map var mapview = new MVMapView(document.getElementById("map"), baseURL); // Add a map tile layer as background. mapview.addMapTileLayer(new MVMapTileLayer("mvdemo.demo_map")); // Add a theme-based FOI layer to display customers on the map var themebasedfoi = new MVThemeBasedFOI('themebasedfoi1','mvdemo.customers'); themebasedfoi.setBringToTopOnMouseOver(true); mapview.addThemeBasedFOI(themebasedfoi); // Set the initial map center and zoom level mapview.setCenter(MVSdoGeometry.createPoint(-122.45,37.7706,8307)); mapview.setZoomLevel(4); // Add a navigation panel on the right side of the map mapview.addNavigationPanel('east'); // Add a scale bar mapview.addScaleBar(); // Display the map. mapview.display(); }This function is specified in the
onloadattribute of the<body>element, so that it is executed after the web page is loaded. In Example 6-1, this code is as follows:<body onload= JavaScript:on_load_mapview() >
-
Additional HTML elements and JavaScript code implement other application-specific user interfaces and control logic. In Example 6-1 in Section 6.1.2, a JavaScript function
setLayerVisibleis implemented to show or hide the theme-based FOI layer when the user checks or unchecks the Show customers check box. The setLayerVisible function is coded as follows:function setLayerVisible(checkBox) { // Show the theme-based FOI layer if the check box is checked // and hide the theme-based FOI layer otherwise. if(checkBox.checked) themebasedfoi.setVisible(true) ; else themebasedfoi.setVisible(false); }This function is specified in the
onclickattribute of the<INPUT>element that defines the check box, so that it is executed whenever the user clicks on the check box. In Example 6-1, this code is as follows:<INPUT TYPE="checkbox" onclick="setLayerVisible(this)" checked/>Show customers
6.7.2 Using the V2 API
Developing applications with the V2 API is similar to the process for the V1 API. If all the spatial data used for base maps, map tile layers, and interactive layers or themes is stored in an Oracle database, then the map authoring process using the Map Builder tool is the same for both APIs.
If the underlying base map and layers are managed in an Oracle database, each map tile layer displayed in the client application must have a corresponding database metadata entry in the USER_SDO_CACHED_MAPS metadata view (described in Section 6.2.2.2) . Similarly, if an interactive layer is based on database content, it must have a metadata entry in the USER_SDO_THEMES view (described in Section 2.9, especially Section 2.9.2). These tile and interactive layers, and the styles and styling rules for them, can be defined using the Map Builder tool (described in Chapter 7).
To develop Oracle Maps applications using the Version 2 (V2) API, follow these basic steps:
-
Import the
oraclemapsv2.jslibrary.The API is provided in a single JavaScript library packaged as part of the MapViewer EAR archive.
-
After MapViewer is deployed and started, load the library through a
<script>tag, for example:<script type="text/javascript" url="http://localhost:8080/mapviewer/jslib/v2/oraclemapsv2.js"/>
-
Create a
<DIV>tag in the HTML page, which will contain the interactive map. (This is the same as in the V1 API.) -
Create a client-side map instance that will handle all map display functions.
The class is named
OM.Mapand is the main entry point of the V2 API. So,OM.Mapin V2 is equivalent toMVMApViewin V1. -
Set up a map universe (unless you also do the optional next step).
A map universe basically defines the overall map extent, the number of zoom levels, and optionally the resolution (in map units per pixel) at each zoom level. In the V1 API, this information is contained in a tile layer definition. Those will continue to work in V2; however, in V2 a predefined tile layer is not necessary in order to display interactive vector layers or themes. For example, an interactive thematic map of sales by region does not need to have a background map, or tile layer.
-
(Optional) Add a tile layer that serves as the background map.
The tile layer can be from the database, such as
mvdemo.demo_map, or from a supported service, such as Nokia Maps. Adding a tile layer also implicitly defines a map universe, and therefore the preceding step (setting up a map universe) is not necessary in this case. -
Add one or more interactive vector layers.
An
OM.layer.VectorLayeris equivalent toMVThemeBasedFOIin the V1 API. The main difference in thatOM.VectorLayeruses HTML5 (Canvas or SVG) technology to render all the data in the browser. So, unless specified otherwise, all vector layer content is loaded once and there are no subsequent database queries, or data fetching, on map zoom or pan operations. -
Add one or more map controls, tools, and other application-specific UI controls so that users can set the displayed layers, styling, and visual effects.
If you need to prevent themes from being streamed by default, you must protect them is by adding authentication, that is, by adding a security constraint in the MapViewer web.xml file and by configuring the mds.xml file to authorize access to various themes. For information, see Section 1.6.2.16, "Configuring and Securing the Map Data Server for the HTML5 API".
For detailed instructions and related information about using the V2 API, see the Oracle-supplied tutorials and demos.
Related subtopics:
6.7.2.1 Creating the Client Application with the V2 API
Oracle Maps V2 applications run inside web browsers and require only HTML5 (Canvas) support and JavaScript enabled. No additional plugins are required.
As shown in Example 6-1, "Source Code for the Simple Application (V1 API)"in Section 6.1.2, the source for an Oracle Maps application is typically packaged in an HTML page, which consists of the following parts:
-
A
<script>element that loads the Oracle Maps V2 client library into the browser's JavaScript engine. For example:<script src="/mapviewer/jslib/v2/oraclemapsv2.js"></script>
-
An HTML
<div>element that will contain the map. For example:<div id="map" style="width: 600px; height: 500px"></div>
-
JavaScript code that creates the map client instance and sets the initial map content (tile and vector layer), the initial center and zoom, and map controls. This code should be packaged inside a function which is executed when the HTML page is loaded or ready. The function is specified in the
onloadattribute of the<body>element of the HTML page. For example:function on_load_mapview() { var baseURL = "http://"+document.location.host+"/mapviewer"; // Create an OM.Map instance to display the map var mapview = new OM.Map(document.getElementById("map"), { mapviewerURL:baseURL }); // Add a map tile layer as background. var tileLayer = new OM.layer.TileLayer( "baseMap", { dataSource:"mvdemo", tileLayer:"demo_map", tileServerURL:baseURL+"/mcserver" }); mapview.addLayer(tileLayer); // Set the initial map center and zoom level var mapCenterLon = -122.45; var mapCenterLat = 37.7706; var mapZoom = 4; var mpoint = new OM.geometry.Point(mapCenterLon,mapCenterLat,8307); mapview.setMapCenter(mpoint); mapview.setMapZoomLevel(mapZoom); // Add a theme-based FOI layer to display customers on the map customersLayer = new OM.layer.VectorLayer("customers", { def: { type:OM.layer.VectorLayer.TYPE_PREDEFINED, dataSource:"mvdemo", theme:"customers", url: baseURL, loadOnDemand: false } }); mapview.addLayer(customersLayer); // Add a navigation panel on the right side of the map var navigationPanelBar = new OM.control.NavigationPanelBar(); navigationPanelBar.setStyle( {backgroundColor:"#FFFFFF",buttonColor:"#008000",size:12}); mapview.addMapDecoration(navigationPanelBar); // Add a scale bar var mapScaleBar = new OM.control.ScaleBar(); mapview.addMapDecoration(mapScaleBar); // Display the map. // Note: Change from V1. In V2 initialization and display is done just once mapview.init(); } -
Additional HTML elements and JavaScript code that implement other application-specific user interface and control logic. For example, the HTML
<input>element and JavaScript functionsetLayerVisibletogether implement a layer visibility control. ThesetLayerVisiblefunction is coded as follows:function setLayerVisible(checkBox) { // Show the customers vector layer if the check box is checked and // hide it otherwise. if(checkBox.checked) customersLayer.setVisible(true) ; else customersLayer.setVisible(false); }The function is specified in the
onclickattribute of the<input>element defining the checkbox. In the following example, the function is executed whenever the user clicks on the Show Customers check box:<INPUT TYPE="checkbox" onclick="setLayerVisible(this)" checked/>Show Customers
6.7.2.2 Loading a Map Template with the V2 API
The Oracle Maps V2 API lets you load the contents of a map template configuration file (explained in Section 6.5, "Map Templates"). Users can then create applications with the contents of this map template.
The following example initializes the map template, associates it with the current map instance, and adds the template vector layers to the map instance.
<script type="text/javascript">
 var mapper;
 var subLayer;

  $(document).ready(function() {

  mapper = new OM.Map(
    document.getElementById('map'),
    {mapviewerURL: "http://" + document.location.host + "/mapviewer"}
  );

  var template = new OM.template.Template({
      name: "myTemplate",
      url: "config.json"
  });

  //this call initializes the template and binds it to the current map instance
  template.setupMapControls(mapper);

  ...

 // add layers to map instance
    var tc = template.getConfig();
    var layers = tc.vectorLayerList();
    for (var i = 0; i < layers.length; i++)
    {
      if (layers[i] === 'us_states')
       continue;

      myLayer = template.getVectorLayer(layers[i], layers[i]);
      myLayer.setVisible(false);
      mapper.addLayer(myLayer);
     }

  ...

  mapper(init);

  // associate events with a vector layer
  /adds a right-click listener to the us_states layer that displays the child layer of the clicked state.

  var statesLayer = mapper.getLayerByName("us_states");

  statesLayer.addListener(OM.event.MouseEvent.MOUSE_RIGHT_CLICK, function(evt) {
     mapper.removeLayer(mapper.getLayerByName(subLayer));
     var targetFeature = evt.feature,
        targetStyle = targetFeature.getRenderingStyle(),
        state_abrv = targetFeature.getAttributes()["STATE_ABRV"];
     subLayer = state_abrv + " Counties";

     //gets the child layer, but only those in state_abrv.
       var vector = template.getChildLayer(subLayer, "us_states", "Counties of USA", [state_abrv]);
       vector.setRenderingStyle(targetStyle);
       mapper.addLayer(vector);
     });

  ...
     }
</script>
6.8 Using Google Maps and Bing Maps
Applications can display Google Maps tiles or Microsoft Bing Maps tiles as a built-in map tile layer, by creating and adding to the map window an instance of MVGoogleTileLayer or MVBingTileLayer, respectively. Internally, the Oracle Maps client uses the official Google Maps or Bing Maps API to display the map that is directly served by the Google Maps or Microsoft Bing Maps server.
-
To use the Google Maps tiles, your usage of the tiles must meet the terms of service specified by Google (see
https://developers.google.com/readme/terms). -
To use the Bing Maps tiles, you must get a Bing Maps account. Your usage must meet the licensing requirement specified by Microsoft (see
http://www.microsoft.com/maps/).
If you need to overlay your own spatial data on top of the Google Maps or Microsoft Bing Maps tile layer, see also Section 6.9, "Transforming Data to a Spherical Mercator Coordinate System".)
The following sections describe the two options for using built-in map tile layers:
-
Section 6.8.1, "Defining Google Maps and Bing Maps Tile Layers on the Client Side"
-
Section 6.8.2, "Defining the Built-In Map Tile Layers on the Server Side"
6.8.1 Defining Google Maps and Bing Maps Tile Layers on the Client Side
To define a built-in map tile layer on the client side, you need to create a MVGoogleTileLayer or MVBingTileLayer object, and add it to the MVMapView object. (As of Oracle Fusion Middleware Release 11.1.1.6, MVGoogleTileLayer uses the Google Maps Version 3 API by default, and MVBingTileLayer uses the Bing Maps Version 7 API by default.)
For example, to use Google tiles, add the Google tile layer to your map:
mapview = new MVMapView(document.getElementById("map"), baseURL);
tileLayer = new MVGoogleTileLayer() ;
mapview.addMapTileLayer(tileLayer);
In your application, you can invoke the method MVGoogleTileLayer.setMapType or MVBingTileLayer.setMapType to set the map type to be one of the types supported by the map providers, such as road, satellite, or hybrid.
For usage examples and more information, see the JavaScript API documentation for MVGoogleTileLayer and MVBingTileLayer, and the tutorial demos Built-in Google Maps Tile Layer and Built-in Bing Maps Tile Layer.
6.8.2 Defining the Built-In Map Tile Layers on the Server Side
You can define a built=-in map tile layer on the server side and use it as a regular MapViewer tile layer on the client side. To define a built-in map tile layer on the server side, follow these steps:
-
Log into the MapViewer Administration Page (explained in Section 1.6.1).
-
Select the Manage Map Tile Layers tab and click Create.
-
When you are asked to select the type of map source, choose Google Maps or Bing Maps and click Continue.
-
Select the data source where the tile layer is to be defined.
-
Set the license key that you have obtained from the map provider.
-
Click Submit to create the tile layer.
After you have created the built-in map tile layer on the server side, you can use it like any other tile layer served by MapViewer. You do not need to add any <script> tag to load the external JavaScript library.
The following example shows a Bing Maps tile layer defined on the server side:
mapview = new MVMapView(document.getElementById("map"), baseURL);
// The Bing tile layer is defined in data source "mvdemo".
tileLayer = new MVMapTileLayer("mvdemo.BING_MAP") ;
mapview.addMapTileLayer(tileLayer);
In your application, you can invoke the method MVMapTileLayer.setMapType to set the map type to be one of the types supported by the map providers, such as road, satellite, or hybrid.
6.9 Transforming Data to a Spherical Mercator Coordinate System
Popular online map services such as Google Maps and Microsoft Bing Maps use a spherical Mercator projection for their maps. If you are using an Oracle Database release earlier than 11.1.0.7, and if you need to overlay your own spatial data on top of such a tile layer, such as a Google Maps or Microsoft Bing Maps tile layer, you must set up the database to properly handle coordinate system transformation between the coordinate system of that tile layer and your own data coordinate system, if the two coordinate systems are not the same.
Note:
To perform the actions in this section, your database must be Release 10.2.0.1 or later.Google Maps uses a Spherical Mercator coordinate system (EPSG: 3785), which is also widely used among commercial API providers such as Yahoo! Maps and Microsoft Bing Maps. This coordinate system (SRID 3785) was not provided with Oracle Spatial and Graph before Release 11.1.0.7. In order to enable MapViewer and Oracle Spatial and Graph to transform your own data to this coordinate system, you must first add this coordinate system definition into your Oracle database if it is not already defined.
To check if this coordinate system is defined, you can enter the following statement:
SELECT srid FROM mdsys.cs_srs WHERE srid=3785;
If the preceding statement returns a row, you do not need to perform the actions in this section. If the preceding statement does not return a row, you must perform the actions in this section in order to be able to overlay your own spatial data on top of the tile layer.
Follow these steps:
-
Connect to the database as a privileged user, such as one with the DBA role.
-
Run the
csdefinition.sqlscript, as follows. (Replace$OC4J_HOMEwith the root directory of the OC4J instance where your MapViewer is deployed, and enter the command on a single line.)-
Linux:
$OC4J_HOME/j2ee/home/applications/mapviewer/web/WEB-INF/admin/csdefinition.sql -
Windows:
$OC4J_HOME\j2ee\home\applications\mapviewer\web\WEB-INF\admin\csdefinition.sql
-
-
If necessary, create a transformation rule to cause Oracle Spatial and Graph to skip datum conversion when transforming data from a specified coordinate system to the Spherical Mercator system. To find out if you need to create such a transformation rule, see Section 6.9.1.
-
Either pre-transform your spatial data for better performance, or let MapViewer transform the data at runtime ("on the fly"). Note that if your database release is earlier than 10.2.0.4, pre-transforming is the only option.
-
To pre-transform all your data into the Spherical Mercator coordinate system, use the SDO_CS.TRANSFORM_LAYER procedure on all the data, and use the transformed data for mapping. (See the SDO_CS.TRANSFORM_LAYER reference section in Oracle Spatial and Graph Developer's Guide.)
-
To let MapViewer transform the data at runtime, do not transform the data before using it for mapping.
-
6.9.1 Creating a Transformation Rule to Skip Datum Conversion
Spatial data is often in a coordinate system based on an ellipsoid datum, such as WGS84 or BNG. In such cases, Oracle Spatial and Graph by default applies datum conversion when transforming the data into the Spherical Mercator system. This will introduce a small amount of mismatch or error between your data and the Google Maps other map service tiles. If you want to address this issue, you can create transformation rules that tell Oracle Spatial and Graph to skip datum conversion when transforming data from a specified coordinate system to the Spherical Mercator system.
Example 6-11 shows SQL statements that are included in the csdefinition.sql script and that create such transformations rules. However, if the coordinate system of your spatial data is not covered by the rules shown in Example 6-11, you can create your own rule if the coordinate system of your data is not covered by these rules. (For more information about creating coordinate system transformation rules, see Oracle Spatial and Graph Developer's Guide.)
Example 6-11 Transformation Rules Defined in the csdefinition.sql Script
-- Create the tfm_plans, that is, the transformation rules.
-- Note: This will result in an incorrect conversion since it ignores a datum
-- datum between the ellipsoid and the sphere. However, the data will match
-- up better on Google Maps.

-- For wgs84 (8307)
call sdo_cs.create_pref_concatenated_op( 83073785, 'CONCATENATED OPERATION 8307 3785', TFM_PLAN(SDO_TFM_CHAIN(8307, 1000000000, 4055, 19847, 3785)), NULL);

-- For 4326, EPSG equivalent of 8307
call sdo_cs.create_pref_concatenated_op( 43263785, 'CONCATENATED_OPERATION_4326_3785', TFM_PLAN(SDO_TFM_CHAIN(4326, 1000000000, 4055, 19847, 3785)), NULL);

-- For OS BNG, Oracle SRID 81989
call sdo_cs.create_pref_concatenated_op( 819893785, 'CONCATENATED OPERATION 81989 3785', TFM_PLAN(SDO_TFM_CHAIN(81989, -19916, 2000021, 1000000000, 4055, 19847, 3785)), NULL);

-- For 27700, EPSG equivalent of 81989
call sdo_cs.create_pref_concatenated_op( 277003785, 'CONCATENATED_OPERATION_27700_3785', TFM_PLAN(SDO_TFM_CHAIN(27700, -19916, 4277, 1000000000, 4055, 19847, 3785)), NULL);
commit;
6.10 Dynamically Displaying an External Tile Layer
The Oracle Maps JavaScript API supports dynamically defining an external tile layer without needing any server-side storage of either the definition or the tile images. Basically, you can use the class MVCustomTileLayer to reference and display tile layers served directly from any external map tile server on the web, such as the ESRI ArcGIS tile server, the OpenStreet map tile server, or other vendor-specific map tile servers.
To do so, you need to do the following when creating a new MVCustomTileLayer instance:.
-
Know the configuration of the map tile layer, specifically its coordinate system, boundary, and zoom level.
-
Supply a function that can translate a tile request from Oracle Maps into a tile URL from the external tile server.
The configuration of a tile layer takes the form of a JSON object, and is generally in the format illustrated by the following example:
var mapConfig = {mapTileLayer:"custom_map", format:"PNG",
coordSys:{srid:8307,type:"GEODETIC",distConvFactor:0.0, minX:-180.0,minY:-90.0,maxX:180.0,maxY:90.0},
zoomLevels:
[{zoomLevel:0,name:"level0",tileWidth:15.286028158107968,tileHeight:15.286028158107968,tileImageWidth:256,tileImageHeight:256},
{zoomLevel:1,name:"level1",tileWidth:4.961746909541633,tileHeight:4.961746909541633,tileImageWidth:256,tileImageHeight:256},
{zoomLevel:2,name:"level2",tileWidth:1.6105512127664132,tileHeight:1.6105512127664132,tileImageWidth:256,tileImageHeight:256},
{zoomLevel:3,name:"level3",tileWidth:0.5227742142726501,tileHeight:0.5227742142726501,tileImageWidth:256,tileImageHeight:256},
{zoomLevel:4,name:"level4",tileWidth:0.16968897570090388,tileHeight:0.16968897570090388,tileImageWidth:256,tileImageHeight:256},
{zoomLevel:5,name:"level5",tileWidth:0.05507983954154727,tileHeight:0.05507983954154727,tileImageWidth:256,tileImageHeight:256},
{zoomLevel:6,name:"level6",tileWidth:0.017878538533723076,tileHeight:0.017878538533723076,tileImageWidth:256,tileImageHeight:256},
{zoomLevel:7,name:"level7",tileWidth:0.005803187729944108,tileHeight:0.005803187729944108,tileImageWidth:256,tileImageHeight:256},
{zoomLevel:8,name:"level8",tileWidth:0.0018832386690789012,tileHeight:0.0018832386690789012,tileImageWidth:256,tileImageHeight:26},
{zoomLevel:9,name:"level9",tileWidth:6.114411263243185E-4,tileHeight:6.114411263243185E-4,tileImageWidth:256,tileImageHeight:256} ]
};
For the a function that can translate a tile request from Oracle Maps into a tile URL from the external tile server, specify a function such as the following example:
function getMapTileURL(minx, miny, width, height, level)
{
 var x = (minx-mapConfig.coordSys.minX)/mapConfig.zoomLevels[level].tileWidth ;
var y = (miny-mapConfig.coordSys.minY)/mapConfig.zoomLevels[level].tileHeight ;
return "http://localhost:8888/mapviewer/mcserver?request=gettile&format=" + mapConfig.format + "&zoomlevel="+level+"&mapcache=mvdemo.demo_map&mx=" + Math.round(x) + "&my=" + Math.round(y) ;
}
In the preceding example, the function getMapTileURL() is implemented by the application to supply a valid URL from the external tile server that fetches a map tile image whose top-left corner will be positioned at the map location (minx,miny) by the Oracle Maps client. Each map tile image is expected to have the specified size (width,height), and it should be for the specified zoom level (level). This specific example is actually returning a gettile URL from the local MapViewer tile server; however the approach also applies to any non-MapViewer tile servers.
The new custom tile layer is added to the client mapViewer just like a built-in map tile layer.