7 Installing and Configuring Hudson for Continuous Integration
Hudson is a popular continuous integration server product. It enables you to define build jobs and manages the execution of those jobs for you. If necessary, it has the ability to scale up to a farm of build servers.
This chapter describes how to install and configure Hudson to automate the build process and how to integrate Hudson with Maven.
This chapter contains the following sections:
7.1 Prerequisites for Installing and Configuring Hudson
Ensure that you have the following components of the continuous integration system configured before you begin installing:
-
Subversion server configured and running, as directed in Chapter 3.
-
Archiva configured and running as directed in Chapter 4, which implies that you have an Oracle Fusion Middleware product installed in an Oracle home and have run the Oracle Maven synchronization plug-in to populate Archiva.
-
JDK 1.6 or higher installed on the Hudson host.
-
Maven 3 installed on the Hudson host.
7.2 Downloading Hudson
The latest production version of Hudson can be downloaded directly from the following location:
Hudson is distributed in two distinct versions:
-
WAR file, which can either run as standalone or can be added to an existing application server installation.
-
Linux RPMs compiled for specific operating systems. Package management support in the form of appropriate repositories are available to install the RPM and necessary dependencies.
This document focuses on Oracle Linux and Windows installation. Details for the other operating systems may vary from these. For instructions on various types of installations, see http://wiki.eclipse.org/Hudson-ci/Installing_Hudson.
7.3 Installing Hudson
This section contains the following topics:
7.3.1 Installing Hudson on Linux
On a Linux computer supporting YUM, run the following commands:
sudo wget -O /etc/yum.repos.d/hudson.repo http://hudson-ci.org/redhat/hudson.repo
sudo yum check-update
sudo yum install hudson
This installs Hudson as a daemon and creates a Hudson user. This user is used by the server to perform build job-related activities.
7.3.2 Installing Hudson on Windows
You must download the Hudson WAR distribution and start it in standalone mode by running the following command:
java -jar hudson-3.2.1.war
When Hudson starts:
-
Open the following URL in a web browser:
http://localhost:8080
-
Navigate to Manage Hudson, then Install as Windows Service. This enables you to configure Hudson as a standard Windows service.
For instructions, see
http://wiki.eclipse.org/Hudson-ci/Installing_Hudson_Windows_Service
7.4 Configuring the HTTP Port
If you are using a single host for your artifact repository and continuous integration server, you must change the HTTP port used by Hudson.
-
On Linux
This value is located in the
/etc/sysconfig/hudsondirectory withHUDSON_PORT. -
On Windows
This value is located in the
c:\ciroot\hudson\etc\sysconfig\hudsondirectory.
7.5 Starting Hudson
To start Hudson:
-
On Linux
If you have installed Hudson as a service, you can start the application by running the following command:
/etc/init.d/hudson start
Start up can be monitored on Linux by checking the logs in the following directory:
/var/log/hudson/hudson.log
Run the following command to monitor logs:
tail -f /var/log/hudson/hudson.log
-
On Windows
Start Hudson on Windows as a normal service:
-
Go to Control Panel.
-
Navigate to Administrative Tools, then Services.
-
Select the Hudson service and click Start.
Hudson logs are available in the following location:
HUDSON_HOME/logs -
7.6 Configuring Maven After Startup
This section contains the following topics:
7.6.1 First Time Startup
The first time you start Hudson, go to the home page to complete the installation:
-
Open a browser and go to
http://localhost:8080(change the port if you modified it during installation). -
In the list of plug-ins that is presented, scroll down to find the Subversion, Maven 3 and Maven 3 SNAPSHOT Monitor options and select these options.
-
Scroll down to the bottom and click Install.
-
Click Finish to move to the Hudson home page.
The rest of the configuration in this section is continued from the Hudson home page.
7.6.2 Configuring the JDK
You must configure the JDK you intend to use for direct Java build configurations. To configure:
-
Log in to Hudson:
http://HOSTNAME:HUDSON_PORT
-
Navigate to Manage Hudson, then Configure System.
-
In the Configure System screen, scroll down to the JDK section and click Add JDK, deselect the option Install automatically and then enter a name, for example,
jdk1.7.0and add the complete path of your installed JDK.For example:
/ciroot/product_binaries/jdk1.7.0. -
Scroll down to the bottom of the page and click Save.
7.6.3 Specifying the Maven Home
You must specify the Maven 3 location so that Hudson knows where Maven is located. To do so:
-
Log in to Hudson:
http://HOSTNAME:HUDSON_PORT
-
Navigate to Manage Hudson, then Configure System.
-
On the Configure System screen, scroll down to the section Maven 3.
-
Click Add Maven, then deselect the option Install automatically and enter a name and the path to the Maven installation, as shown in the following image:
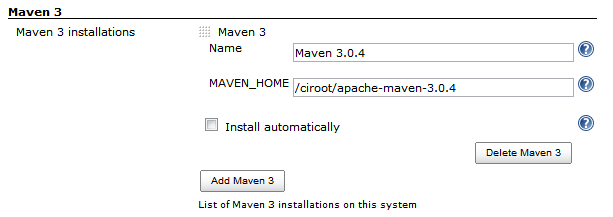
Description of the illustration maven3.png
-
Scroll down to the bottom of the page and click Save.
7.6.4 Setting Up Maven for Use by Hudson
To utilize Maven settings from Hudson, embed the settings.xml content into a settings object in Hudson's global Maven configuration:
-
Log in to Hudson:
http://HOSTNAME:HUDSON_PORT
-
Go to Manage Hudson, then Maven 3 Configuration.
-
Click Add.
-
For Type, select SETTINGS.
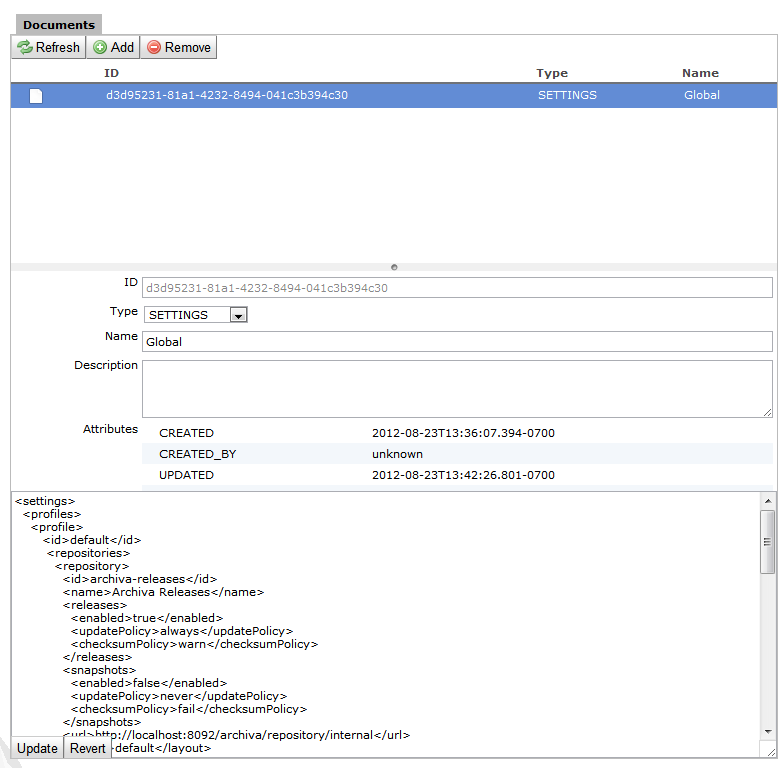
Description of the illustration maven-settings.png
-
Provide a name and optional description.
-
Find the settings.xml on your file system (that you have configured in Chapter 5) and copy the contents into the large text field at the bottom of the page. It is located at
/$HOME/.m2/settings.xml. -
Click Save.
Note:
Oracle recommends that you replace any localhost URL references in the settings.xml with fully qualified domain names or IP addresses because Hudson builds can eventually occur on non-local build hosts.7.6.5 Installing Hudson Plug-Ins
Hudson jobs may require job-specific customizations of environment variables. Because Hudson does not support this by default, you must install an additional plug-in. To install the plug-in:
-
Log in to Hudson:
http://HOSTNAME:HUDSON_PORT
-
Go to Manage Hudson, then Manage Plugins.
-
Select Available.
-
Select Hudson Setenv Plugin.
-
Click Install.
-
After the installation completes, use the restart option in Hudson to enable the plug-in.
7.6.6 Integrating the Repository
To configure automatic builds when changes are checked in, you must configure Hudson to monitor the artifact repository for SNAPSHOT deployment changes. Such changes trigger builds of affected components that have dependencies on the changed artifacts. To configure Hudson to monitor the artifact repository:
-
Log in to Hudson using the following URL:
http://HOSTNAME:HUDSON_PORT
-
Navigate to Manage Hudson, then System Configuration.
-
In the main system configuration panel under System Configuration, select Maven 3 SNAPSHOT Monitor. In the Archiva configuration instructions, you must have created a continuous integration specific user for continuous integration server access to the repository. Enter the path to Maven repository.

Description of the illustration maven3-monitor.png
-
Set the User and Password for the continuous integration user.
7.6.7 Monitoring Subversion
In addition to monitoring the artifact repository for updated dependencies, the continuous integration server must constantly check the source control system for updates and trigger project builds accordingly. Unlike repository monitoring, software configuration management monitoring must be uniquely configured per build configuration. As you create new build configurations, you must set the Subversion location information for the related project. For more information, see Section 16.3.
Subversion support comes with the base Hudson distribution. Other source control systems may require separate Hudson plug-in installation.
7.7 More Information About Hudson
You can find the primary source of the official documentation on Hudson in the following location:
http://wiki.hudson-ci.org/display/HUDSON/Use+Hudson
For new users, you can find introductory guides to Hudson in the following location:
http://wiki.eclipse.org/Hudson-ci/Using_Hudson
The Hudson book is located in the following location: