7 Running a Sample Application
This chapter describes how to load and run a sample application for the Oracle SOA Suite Quick Start distribution using the Integrated WebLogic Server's default domain. It also tells you how to find sample applications for Oracle Process Management Suite and how to begin a project for Oracle Event Processing.
This chapter includes the following sections:
-
Running the ProcessOrder Oracle SOA Suite Sample Application
-
Creating an Oracle Business Process Management Suite Sample Application
7.1 Running the ProcessOrder Oracle SOA Suite Sample Application
This section guides you through running a sample application using Oracle SOA Suite components in a SOA Quick Start default domain. You will use the Integrated WebLogic Server, SOA composites, and Oracle Service Bus projects to run an application that can process an order, including credit card validation.
- Task 1 Download and unzip the application files.
-
-
Go to
http://www.oracle.com/technetwork/middleware/soasuite/learnmore/soasuitesamplestutorials-2765831.html. Download e2e-1201-sample.zip. -
Unzip e2e-1201-sample.zip into a folder outside of your Oracle home so that you can deinstall an Oracle JDeveloper installation without losing project files. The zip contains e2e-1201-composites-sample.zip, e2e-1201-servicebus-sample.zip, and SampleOrder.xml.
-
Unzip e2e-1201-composites-sample.zip and e2e-1201-servicebus-sample.zip into the same directory. Your directory should now contain the OrderSample.xml and two subfolders: e2e-1201-composites and e2e-1201-servicebus.
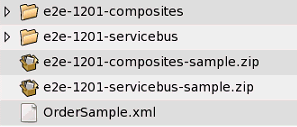
Description of the illustration ''samplefoldertop.gif''
The subfolder e2e-1201-composites contains the following directory structure:
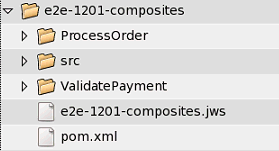
Description of the illustration ''sampledirectorycomposites.gif''
The subfolder e2e-1201-servicebus contains the following directory structure:
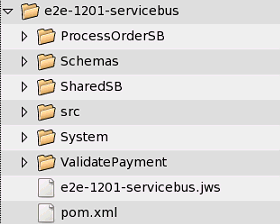
Description of the illustration ''sampledirectoryservicebus.gif''
-
- Task 2 Launch JDeveloper and the Integrated WebLogic Server.
-
Launch JDeveloper using the following command.
Environment Run Command Linux cd ORACLE_HOME/jdeveloper/jdev/bin ./jdevWindows CD ORACLE_HOME\jdeveloper\jdev\bin jdeveloper.exeLaunch the Integrated WebLogic Server by choosing Run from top menu bar. Select Start Server Instance from the drop-down menu, as seen in Figure 7-1.
Figure 7-1 Starting the Integrated WebLogic Server
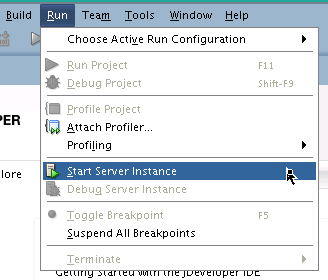
Description of ''Figure 7-1 Starting the Integrated WebLogic Server''
When you see the following messages appear in the log, the Integrated WebLogic Server has launched successfully.
[SOA Platform is running and accepting requests
[IntegratedWebLogicServer started.]
- Task 3 Load the project files.
-
-
Load e2e-1201-composites.jws from folder e2e-1201-composites.
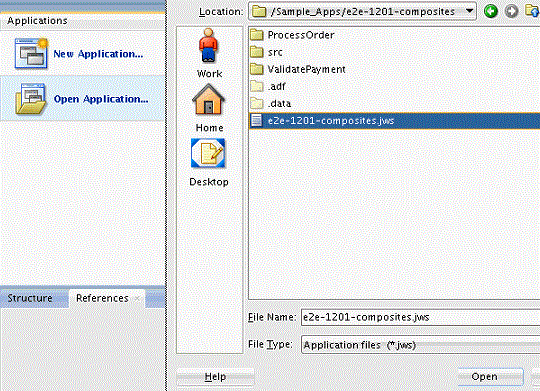
Description of the illustration ''opencompositeapp.gif''
A dialogue box titled Open Warning will pop up and warn you that you will b e converting the application files into Oracle JDeveloper 12.1.3.0.0 file format. Click Yes to migrate the files.
After the files have migrated successfully, the contents of e2e-1201-composites will be listed in the Applications pane.
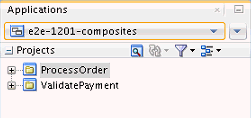
Description of the illustration ''loadedcomposites.gif''
-
Click on the composite's name to trigger a drop-down menu with Open Application as an option.
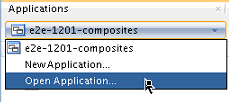
Description of the illustration ''openappmenu.gif''
Use that option to load e2e-1201-servicebus.jws from the subfolder e2e-1201-servicebus.
The contents of e2e-1201-servicebus.jws loads in the same Applications pane as e2e-1201-servicebus.
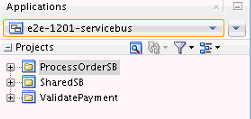
Description of the illustration ''loadedservicebus.gif''
You can switch between the two applications using the same drop-down menu you used to access the Open Application option.
-
- Task 4 Deploy ValidatePayment for the SOA composites.
-
This task involves several steps.
-
Switch to e2e-1201-composites using the Applications drop-down menu.
-
Right-click on validatePayment in the content list and highlight Deploy from the pop-up menu. Then select validatePayment to launch the Deployment Action prompt.
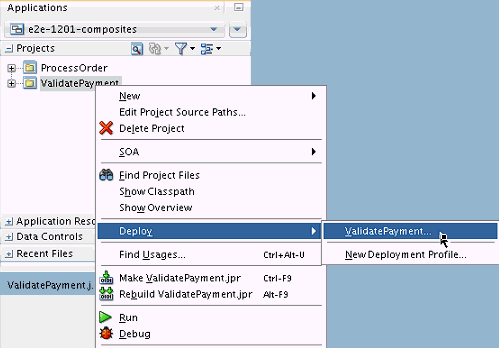
Description of the illustration ''deploycompositesvp.gif''
-
The Deployment Action prompt has five screens.
-
On the Deployment Action screen, Deploy to Application Server is automatically highlighted. Click Next.
-
On the Deploy Configuration screen, review the information on the screen. Leave Mark composite revision as default selected and click Next.
-
The Select Server screen lists available servers. Select the IntegratedWebLogicServer if it is not selected by default. Click Next.
-
The SOA Server page allows you to target a specific server if more than one is available. The DefaultServer is automatically selected. Click Next.
-
The Summary screen allows you to review the deployment options that you have selected. Click Finish.
-
-
When you see the following text in the Messages - Log pane at the bottom of the JDeveloper screen, the composite has deployed successfully:
Compilation of project 'ValidatePayment.jpr' finished.
Successful compilation: 0 errors, 0 warnings.
-
- Task 5 Deploy ValidatePayment from the Service Bus project.
-
Use the Applications drop-down menu to switch to e2e-1201-servicebus.
Right-click on ValidatePayment in the content list and highlight Deploy from the pop-up menu. Then select e2e-1201-servicebus_ValidatePayment_ServiceBusProjectProfile to launch the Deployment Action prompt.
The Deployment Action prompt has three screens.
-
On the Deployment Action screen, Deploy to Service Bus Server is automatically highlighted. Click Next.
-
On the Select Server screen, select IntegratedWebLogicServer if it is not selected by default. Click Next.
-
The Summary screen allows you to review the deployment options that you have selected. Click Finish.
-
- Task 6 Deploy ProcessOrder from the SOA composites.
-
Select e2e-1201-composites from the application dropdown menu. Right-click on ProcessOrder and highlight Deploy from the pop-up menu. Then select ProcessOrder... to launch the Deployment Action prompt.
The Deployment Action prompt has five screens.
-
On the Deployment Action screen, Deploy to Application Server is automatically highlighted. Click Next.
-
On the Deploy Configuration screen, review the information on the screen. Leave Mark composite revision as default selected and click Next.
-
The Select Server screen lists available servers. Select the IntegratedWebLogicServer if it is not selected by default. Click Next.
-
The SOA Server page allows you to target a specific server if more than one is available. The DefaultServer is automatically selected. Click Next.
-
The Summary screen allows you to review the deployment options that you have selected. Click Finish.
-
- Task 7 Deploy ProcessOrderSB from the Service Bus project.
-
Select e2e-1201-servicebus from the application dropdown menu. Right-click on ProcessOrderSB and highlight Deploy.
The Deployment Action prompt has three screens.
-
On the Deployment Action screen, Deploy to Service Bus Server is automatically highlighted. Click Next.
-
On the Select Server screen, select IntegratedWebLogicServer if it is not selected by default. Click Next.
-
The Summary screen allows you to review the deployment options that you have selected. Click Finish.
-
- Task 8 Open the Service Bus overview.
-
Uncollapse the ProcessOrderSB node under e2e-1201-servicebus. Right-click on ProcessOrderSB and select Open.
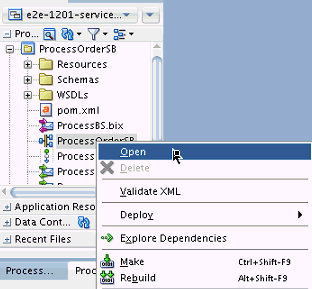
Description of the illustration ''openprocessordersb.gif''
This will open the project overview in the main project canvas.
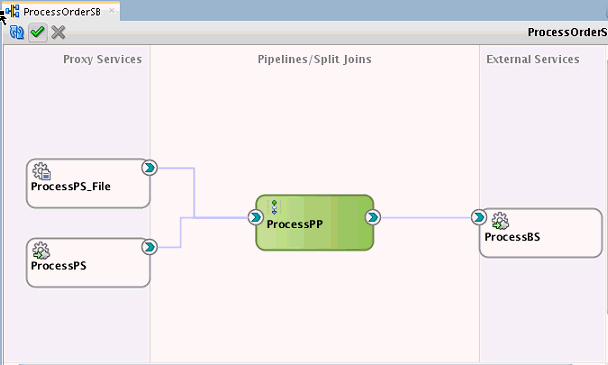
Description of the illustration ''processordersb.gif''
Right-click on the ProcessPS box in the Proxy Services swim lane and select Run. This will launch the Proxy Service Testing application in a web browser.
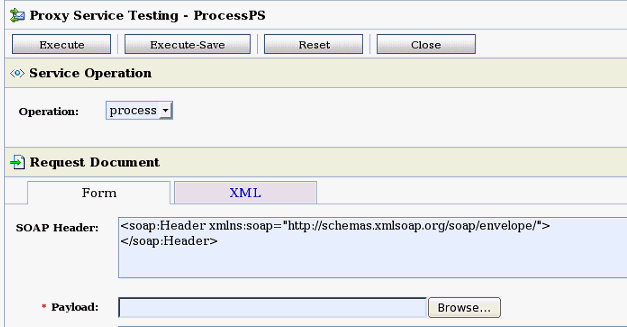
Description of the illustration ''testpage.gif''
- Task 9 Enter the sample payload.
-
Use the Browse button next to the Payload field and find SampleOrder.xml. Then click the Execute button at the top of the page.
A pop-up window will appear that says it is executing your application.
When the page refreshes, you should see all of the billing information filled out in the xml form. Scroll down to the Response Document heading and look to see if an OrderNumber was generated. If it has, your application executed successfully.
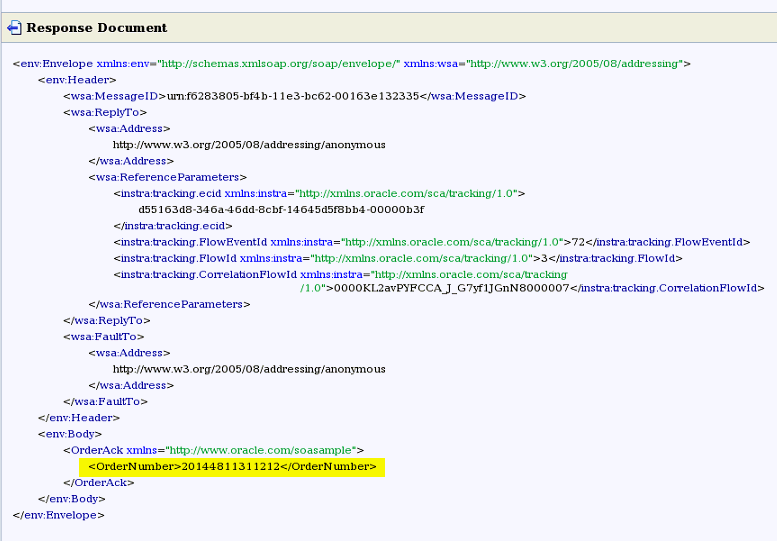
Description of the illustration ''sampleresponse.gif''
You have completed this sample application. You can download the SOA 12c End-to-end (e2e) Tutorial to learn more about the new features in SOA 12c at http://www.oracle.com/technetwork/middleware/soasuite/learnmore/soasuitesamplestutorials-2765831.html.
7.2 Creating an Oracle Business Process Management Suite Sample Application
You can find an Oracle Business Process Management Suite tutorial for building an end-to-end loan application at the following URL:
7.3 Creating an Oracle Event Processing Project in JDeveloper
Beginning in 12c (12.1.3), Oracle JDeveloper and Oracle Event Processing are now compatible. To build and run Oracle Event Processing projects in Oracle JDeveloper, see "Create an Oracle Event Processing Project" in Getting Started with Oracle Event Processing.
7.4 Next Steps
After you have successfully run a sample application, you can do any of the following actions:
| Action | Resource |
|---|---|
| Make or test an application of your own. | See "Getting Started with Developing Applications with Oracle JDeveloper" in Developing Applications with Oracle JDeveloper. |
| Deinstall your current Quick Start distribution. | See Chapter 8 of this book. |
| Install a different Quick Start distribution. | See Chapter 1 of this book for other Quick Start distributions you can install. |