6 Adding Components to a Quick Start Installation
This chapter reviews the processes for adding Oracle Enterprise Scheduler, Oracle B2B, Oracle Healthcare, Oracle Business Activity Monitoring, and Oracle Managed File Transfer to your Quick Start installation. It also describes how to obtain an Oracle Event Processing runtime environment.
You should use this chapter to walk through the installation process for each component that you can add to a Quick Start installation. You can also use this chapter to add components to a completely configured compact domain.
This chapter includes the following sections:
6.1 About Adding Components to a Quick Start Installation
Certain components do not work in a standard Quick Start installation because they require an Oracle database. Configuring your Quick Start installation to use an Oracle database is covered in Chapter 3 for Oracle SOA Suite or Chapter 5 for Oracle Business Process Management Suite.
To add B2B, Healthcare, or Managed File Transfer, you need to download the installers for Oracle B2B, Oracle Healthcare, and Oracle Managed File Transfer. These installers are discussed in Section 6.2. There are not separate Quick Start installers for these components, so you will download the same installers designed for a full Production installation of Oracle® Fusion Middleware.
Oracle Business Activity Monitoring and Oracle Enterprise Scheduler do not have separate installers. The compact domain can be configured for these components directly in the domain configuration wizard. Using the domain configuration wizard to update a compact domain is covered in Section 6.3.
Tip:
To minimize the number of times you have to invoke the Repository Creation Utility and the Fusion Middleware Configuration Wizard, run all installers for all of the components that you want to add before launching the RCU or the Configuration Wizard. Each installer will activate a set of product-specific schemas and provide a set of product-specific configuration templates.You may also want a runtime environment that can run applications using Oracle Event Processing components. This process is reviewed in Section 6.4.
6.2 Installing Oracle B2B, Oracle SOA Suite for healthcare integration, or Oracle Managed File Transfer for Quick Start
This section assumes that you have already installed one of the Quick Start distributions described in Chapter 1 and want to add Oracle B2B, Oracle SOA Suite for healthcare integration, or Oracle Managed File Transfer to your distribution. For these components, you need to download and run installers before configuring a compact domain.
This section covers the following installation processes:
6.2.1 Installing Oracle B2B for Quick Start
This section covers how to install Oracle B2B for Quick Start. Make sure you understand the installation options for Oracle B2B, as described in Section 1.5.2.
The section contains the following topics:
6.2.1.1 Activating a Limited Oracle B2B Interface Without Configuring a Compact Domain
To activate a limited Oracle B2B user interface without installing Oracle B2B in a compact domain, set the following Oracle B2B property in Oracle Enterprise Manager Fusion Middleware Control:
b2b.docPluginList=Custom
If you do not set this property, inbound documents will fail with an XEngine lookup error. You will be able to use Custom Documents with this interface.
For more information about using the MBean browser, see "Getting Started Using the Fusion Middleware Control MBean Browsers" in Administering Oracle Fusion Middleware.
6.2.1.2 Installing Oracle B2B for Quick Start
Oracle B2B and Oracle SOA Suite for healthcare integration share the same installer. Obtain the installer zip file labeled fmw_12.1.3.0.0_b2b_Disk1_1of1.zip.
Using the command prompt, navigate to the directory where you downloaded the installer. Unzip the contents. You may have several .jar files, but you will only need to launch fmw_12.1.3.0.0_b2bhealthcare.jar.
Launch the installation wizard with the appropriate command.
| Installer | Run Command |
|---|---|
| Generic Installer for UNIX |
%JAVA_HOME/bin/java -jar fmw_12.1.3.0.0_b2bhealthcare.jar
|
| Generic Installer for Windows | Search for cmd.exein the Start Menu. Right-click the cmd.exe and select Run as Administrator.
In the command prompt, use the Java executable from the JDK on your system. Your command may look like this:
%JAVA_HOME%\bin\java -jar fmw_12.1.3.0.0_b2bhealthcare.jar
|
Once you have launched the installer, the installation wizard displays the screens listed and described sequentially in Table 6-1.
Table 6-1 Oracle B2B Install Screens
| Screen | Description |
|---|---|
|
This screen introduces you to the product installer. |
|
|
Use this screen to specify the location of your Quick Start's Oracle home. You are not creating a new Oracle home. |
|
|
Select the B2B option. This will install the Oracle B2B user interface and XEngine |
|
|
This screen verifies that your system meets the minimum necessary requirements. |
|
|
Use this screen to verify the installation options you selected. If you want to save these options to a response file, click Save Response File and provide the location and name of the response file. Response files can be used later in a silent installation situation. |
|
|
This screen allows you to see the progress of the installation. |
|
|
This screen appears when the installation is complete. Review the information on this screen. |
When you have exited the installation wizard, an Oracle B2B template will now be a selectable option during domain configuration.
6.2.2 Installing Oracle SOA Suite for healthcare integration for Quick Start
This section covers how to configure your Quick Start installation for Oracle SOA Suite for healthcare integration. Make sure you have understood the different configuration options for Oracle SOA Suite for healthcare integration described in Section 1.5.3 before proceeding.
Note for BPM Users:
Healthcare Integration cannot be used with Oracle Business Process Management Suite.
The section contains the following topics:
-
Installing Oracle SOA Suite for healthcare integration for Quick Start
-
Activating the Oracle SOA Suite for healthcare integration User Interface
6.2.2.1 Installing Oracle SOA Suite for healthcare integration for Quick Start
Oracle B2B and Oracle SOA Suite for healthcare integration share the same installer. Obtain the installer zip file labeled fmw_12.1.3.0.0_b2b_Disk1_1of1.zip.
Using the command prompt, navigate to the directory where you downloaded the installer. Unzip the contents. You may have several .jar files, but you will only need to launch fmw_12.1.3.0.0_b2bhealthcare.jar.
Launch the installation wizard with the appropriate command.
| Installer | Run Command |
|---|---|
| Generic Installer for UNIX |
%JAVA_HOME/bin/java -jar fmw_12.1.3.0.0_b2bhealthcare.jar
|
| Generic Installer for Windows | Search for cmd.exe in the Start Menu. Right-click the cmd.exe and select Run as Administrator.
In the command prompt, use the Java executable from the JDK on your system. Your command may look like this:
%JAVA_HOME%\bin\java -jar fmw_12.1.3.0.0_b2bhealthcare.jar
|
Once you have launched the installer, the installation wizard displays the screens listed and described sequentially in Table 6-2.
Table 6-2 Oracle SOA Suite for Healthcare Install Screens
| Screen | Description |
|---|---|
|
This screen introduces you to the product installer. |
|
|
Use this screen to specify the location of your Quick Start's Oracle home. You are not creating a new Oracle home. |
|
|
Select the B2B with Healthcare to install the B2B user interface, the Healthcare user interface, XEngine, and Healthcare libraries. |
|
|
This screen verifies that your system meets the minimum necessary requirements. |
|
|
Use this screen to verify the installation options you selected. If you want to save these options to a response file, click Save Response File and provide the location and name of the response file. Response files can be used later in a silent installation situation. |
|
|
This screen allows you to see the progress of the installation. |
|
|
This screen appears when the installation is complete. Review the information on this screen. |
When you exit the installation wizard, a Oracle SOA Suite for healthcare integration template will now be available during domain configuration.
If you want to use the Oracle SOA Suite for healthcare integration user interface to exchange healthcare documents, you should run the RCU as described in Section 6.2.4. You can also review all of the post-installation steps required to activate the Healthcare user interface in Section 6.2.2.2.
6.2.2.2 Activating the Oracle SOA Suite for healthcare integration User Interface
This section describes how to activate the Oracle SOA Suite for healthcare integration user interface to replace the default Oracle B2B interface. Make sure you understand the user interface options described in Section 1.5.3 before proceeding.
You should have already run the Oracle SOA Suite for healthcare integration installer and chosen the B2B with Healthcare installation option. If you have done so, complete the following steps:
-
Run the RCU. On the Custom Variables screen, input Yes for the Healthcare Integration variable. This creates additional materialized views required by the Healthcare integration software.
If you do not set this custom variable when creating the SOA schemas for your domain, the Healthcare Integration User Interface will not function properly.
Note:
If you already ran the RCU for a previous component and did not inputYESfor the Healthcare Integration custom variable, you can still set this variable by running the following SQL script on the database:ORACLE_HOME/common/sql/soainfra/sql/oracle/b2b_mv.sqlFor more information about the Healthcare Integration variable you set in RCU, see "About the Custom Variables Required for the SOA Suite Schemas" in Installing and Configuring Oracle SOA Suite and Business Process Management
-
Run the domain configuration wizard. On the Templates screen, select the Oracle SOA Suite for healthcare integration - 12.1.3.0 [soa] template. This changes the default message delivery mode from AQ to JMS, as Healthcare is not supported in AQ mode.
For more information on the Oracle SOA Suite for healthcare integration user interface's functionality, see "Using the Oracle SOA Suite for Healthcare Integration User Interface" in Healthcare Integration User's Guide for Oracle SOA Suite.
6.2.3 Installing Oracle Managed File Transfer for Quick Start
This section reviews the installation process for Oracle Managed File Transfer. You need to run this installer before you can configure a Quick Start compact domain with Oracle Managed File Transfer runtime components.
Obtain the installer zip file labeled fmw_12.1.3.0.0_mft_Disk1_1of1.zip.
Using the command prompt, navigate to the directory where you downloaded the installer. Unzip the contents. You may have several .jar files, but you will only need to launch fmw_12.1.3.0.0_mft.jar
Launch the installation wizard with the appropriate command.
| Installer | Run Command |
|---|---|
| Generic Installer for UNIX |
%JAVA_HOME/bin/java -jar fmw_12.1.3.0.0_mft.jar
|
| Generic Installer for Windows | Search for cmd.exe in the Start Menu. Right-click the cmd.exe and select Run as Administrator.
In the command prompt, use the Java executable from the JDK on your system. Your command may look like this:
%JAVA_HOME%\bin\java -jar fmw_12.1.3.0.0_mft.jar
|
Once you have launched the installer, the installation wizard displays the screens listed and described sequentially in Table 6-3.
Table 6-3 Oracle Managed File Transfer Install Screens
| Screen | Description |
|---|---|
|
This screen introduces you to the product installer. |
|
|
Use this screen to specify the location of your Quick Start's Oracle home. You are not creating a new Oracle home. |
|
|
This screen verifies that your system meets the minimum necessary requirements. |
|
|
Use this screen to verify the installation options you selected. If you want to save these options to a response file, click Save Response File and provide the location and name of the response file. Response files can be used later in a silent installation situation. |
|
|
This screen allows you to see the progress of the installation. |
|
|
This screen appears when the installation is complete. Review the information on this screen. |
You now need to run the RCU to configure schemas for Oracle Managed File Transfer. See Section 6.2.4.
6.2.4 Using the RCU to Create Schemas or Set Custom Variables
This section describes how to use the RCU to create schemas for Oracle Managed File Transfer or to set the Oracle SOA Suite for healthcare integration variable for Oracle Healthcare.
Invoke the RCU packaged with your Quick Start installation. Do not download or use any other version of RCU to configure a database with Quick Start.
If you have defined the ORACLE_HOME variable to point to your Oracle Home, you can use the following command to launch the RCU:
| Environment | Run Command |
|---|---|
| UNIX |
cd ORACLE_HOME/oracle_common/bin
./rcu
|
| Windows |
cd ORACLE_HOME\oracle_common\bin
rcu.bat
|
Navigate through the following screens. For more information about the options on a specific screen, click the screen's name or see "Understanding Repository Creation Utility Screens" in Creating Schemas with the Repository Creation Utility.
Table 6-4 RCU Schema Creation Screens
| Screen | Description |
|---|---|
|
This screen provides an introduction to what RCU is and its purpose. Click Next. |
|
|
Choose Create Repository and System Load and Product Load Concurrently. If the second option doesn't appear for you, you do not have the necessary permissions or privileges to perform DBA activities. |
|
|
Fill the Host Name, Username, and Password blanks with the credentials for your Oracle database. Your Service Name and Port number were created when you installed your database. Click Next. |
|
|
Checking Prerequisites |
This screen will pop up with a progress indicator bar. When the prerequisites are checked off, click OK to continue. |
|
Specify an intuitive prefix for your new schemas, such as SOAQS, so you can target them easily when you are configuring a domain. Select AS Common Schemes and SOA Suite to select all of their dependencies. 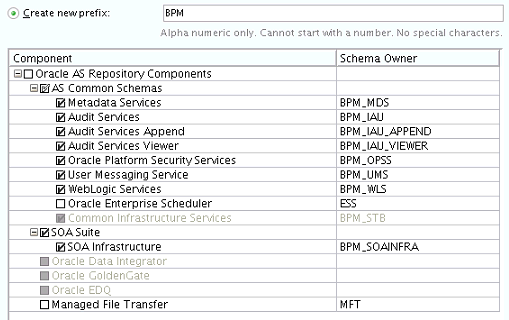 Description of the illustration ''bpmcreateschemas.gif'' If you are installing Oracle Managed File Transfer, select Managed File Transfer from the list. You will not see this option listed if you have not run the corresponding installer yet. Click Next. |
|
|
Checking Prerequisites |
This screen will pop up with a progress indicator bar. When the prerequisites are checked off, click OK to continue. |
|
Select Use same passwords for all schemas. Then create a password you will remember. |
|
|
Custom Variables |
This screen will show up because you are installing SOA Infrastructure. If you are installing Oracle SOA Suite for healthcare integration, change the Value field for Healthcare Integration to Yes.  Description of the illustration ''customvariables.gif'' For more information about the variables on this page, see "About the Custom Variables Required for the SOA Suite Schemas" in Installing and Configuring Oracle SOA Suite and Business Process Management. Otherwise, keep the defaults and press Next. |
|
This screen displays default and temporary tablespaces for the components you want to create schemas for. You can review this information and click Next Click OK through the next two confirmation dialogues. Then click Next again to progress to the next screen. |
|
|
This screen summarizes the component schemas that will be created. Take note of the Database details at the top for domain configuration. Then click Create to begin schema creation. |
|
|
This screen displays the log files created with the database schemas. You can open any of the log files to review information or to troubleshoot a creation issue. If any operation failed, you can check the Cleanup for failed components box. Upon clicking Close, this option will drop failed schemas from your database. When you click Close, schema creation is complete. |
If you encountered any problems during schema creation, first make sure you are using the RCU included in your SOA Suite Quick Start installation. You can then troubleshoot the issue using the log files generated on the Completion Summary screen.
Once your schemas are successfully created, you can run the domain configuration wizard.
6.3 Updating a Compact Domain
This section describes the actions you can take to reconfigure your compact domain for additional components. If you have not finished configuring a compact domain for the first time, you should return to Chapter 3 for Oracle SOA Suite and Chapter 5 for Oracle Business Process Management.
Otherwise, make sure you have run the appropriate installers for Oracle B2B, Healthcare, or Managed File Transfer before beginning this process.
- Task 1 Launching the Domain Configuration Wizard
-
Go to ORACLE_HOME
/oracle_common/common/binfor your Quick Start distribution and launch the configuration wizard.Example commands for this task are as follows:
UNIX cd ORACLE_HOME/oracle_common/common/bin ./config.shWindows cd ORACLE_HOME\oracle_common\common\bin config.cmdThen navigate through the following configuration screens.
- Task 2 Selecting the Domain Type and Domain Home Location
-
On the Configuration Type screen, select Update an existing domain.
In the Domain Location field, select the location of the compact domain that you want to update.
- Task 3 Selecting the Configuration Template
-
On the Templates screen, make sure Update Domain Using Product Templates is selected. The templates that you have installed already will be greyed out.
Select the templates for the components you want to add to your installation:
-
Oracle SOA Suite for healthcare integration - 12.1.3.0 [soa]
Note for Healthcare Users:
You need to select both the Oracle SOA Suite for healthcare integration - 12.1.3.0 [soa] template and Oracle B2B - 12.1.3.0 [soa] template. -
Oracle B2B - 12.1.3.0 [soa]
-
Oracle Managed File Transfer - 12.1.3.0 [mft]
-
Oracle Business Activity Manager - 12.1.3.0 [soa]
-
Oracle Enterprise Scheduler Service Basic - 12.1.3.0 [oracle_common]
-
Oracle Enterprise Manager Plugin for ESS - 12.1.3.0 [em]
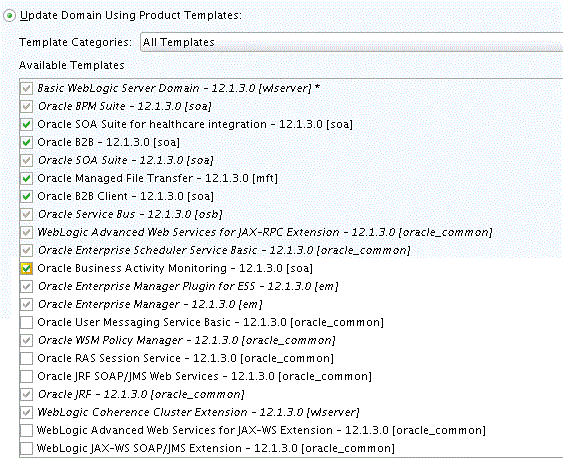
Description of the illustration ''updatingdomainbpm.gif''
-
- Task 4 Specifying the Datasource Configuration Type
-
Select RCU Data to activate the fields on this screen. All of the fields should auto-populate with the values you specified when you first configured your domain.
Click Get RCU Configuration. The following output in the Connection Result Log indicates that the operation succeeded:
Connecting to the database server...OK
Retrieving schema data from database server...OK
Binding local schema components with retrieved data...OK

Successfully Done.
Tip:
More information about the RCU Data option can be found in "Understanding the Service Table Schema" in Creating Schemas with the Repository Creation Utility.More information about the other options on this screen can be found under "Database Configuration Types" in Creating WebLogic Domains Using the Configuration Wizard
- Task 5 Verifying the Component Datasources
-
Verify that the values on the Component Datasource screen are correct for all schemas. If you selected RCU Data on the previous screen, the schema table should already be populated appropriately.
- Task 6 Testing the JDBC Connections
-
Use the JDBC Component Schema Test screen to test the datasource connections you have just configured.
A green check mark in the Status column indicates a successful test. If you encounter any issues, see the error message in the Connection Result Log section of the screen, fix the problem, then try to test the connection again.
Tip:
More information about the other options on this screen can be found under "JDBC Component Schema Test" in Creating WebLogic Domains Using the Configuration Wizard - Task 7 Selecting Advanced Configuration
-
You do not need any advanced configuration for a compact domain. You can skip through this screen without selecting anything.
- Task 8 Configuring the Domain
-
This screen will show you the final directory structure and the components and extensions with which your compact domain will be configured. Review this information and click Update.
The configuration progress bar will appear on the next screen.
- Task 9 Reviewing Your Domain Location
-
Upon successful configuration, the wizard will give you the directory location of your domain and the URL for your administration console access. Take note of both and click Close.
6.4 Understanding Oracle Event Processing Design Time
Starting in 12c (12.1.3), Oracle Event Processing Design time is included as a JDeveloper extension when you install a Quick Start distribution. However, Oracle Event Processing does not run on the Integrated WebLogic Server. You must install a separate Oracle Event Processing Oracle home and launch the Oracle Event Processing-specific server from there to create a compatible runtime environment.
For more information on how to install Oracle Event Processing, see Installing Oracle Event Processing. Then see "Standalone-Server Domains" in Administering Oracle Event Processing to configure an Oracle Event Processing domain.
6.5 Next Steps
Once you have verified your Quick Start installation and compact domain connection, you can take any of the following actions:
| Action | Resource |
|---|---|
| Deploy a sample application. | See Chapter 7 in this book. |
| Make or test an application of your own. | See "Getting Started with Developing Applications with Oracle JDeveloper" in Developing Applications with Oracle JDeveloper. |
| Delete your installation. | If you have tested your installation out and are done, see Chapter 8 in this book. |