4 Configuring Oracle Data Service Integrator Resources
This chapter describes how to configure an Oracle Data Service Integrator dataspace including tasks such as creating administrative properties, managing memory, and enabling cache. It contains the following sections:
-
Section 4.1, "Configuring the Cache and Log for a Dataspace "
-
Section 4.5, "Using Work Managers With Oracle Data Service Integrator"
-
Section 4.9, "Preloading Oracle Data Service Integrator Projects and Dataspaces"
4.1 Configuring the Cache and Log for a Dataspace
You can view and configure settings for a dataspace such as caching and logging using the General tab in the System Administration category.
To configure general dataspace settings:
-
Select the System Administration category and then the dataspace from the navigation tree. The General tab appears as shown in Figure 4-1.
Figure 4-1 General Dataspace Settings Page
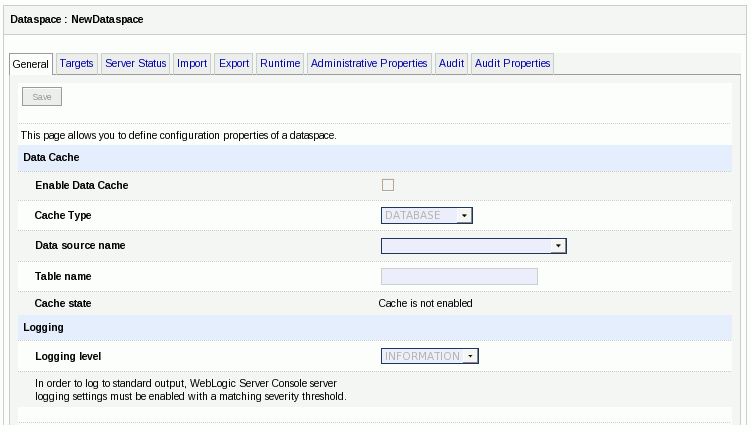
Description of ''Figure 4-1 General Dataspace Settings Page''
-
Acquire the lock to make changes to the general configuration of the dataspace.
-
You can enable data caching and logging level details using this page. For more information on data caching, refer to Chapter 8, "Configuring Query Results Cache." For more information on logging, refer to Chapter 9, "Working With Audit and Log Information."
-
Click Save > Activate Changes.
4.2 Using the Physical Sources Category
The Physical Sources category allows you to configure and modify the resource end points, view the location of physical data sources, and create substitute SQL statements.
This section provides details about configuring each of these features using the Physical Sources category on the Oracle Data Service Integrator Administration Console. It includes the following topics:
4.2.1 Viewing Physical Data Source Locations
You can view a list of data services and function libraries that use the defined relational databases. Click the Where Used tab to view the list of data services and the corresponding paths (Figure 4-2).
Figure 4-2 Physical Data Services Relational Dependencies
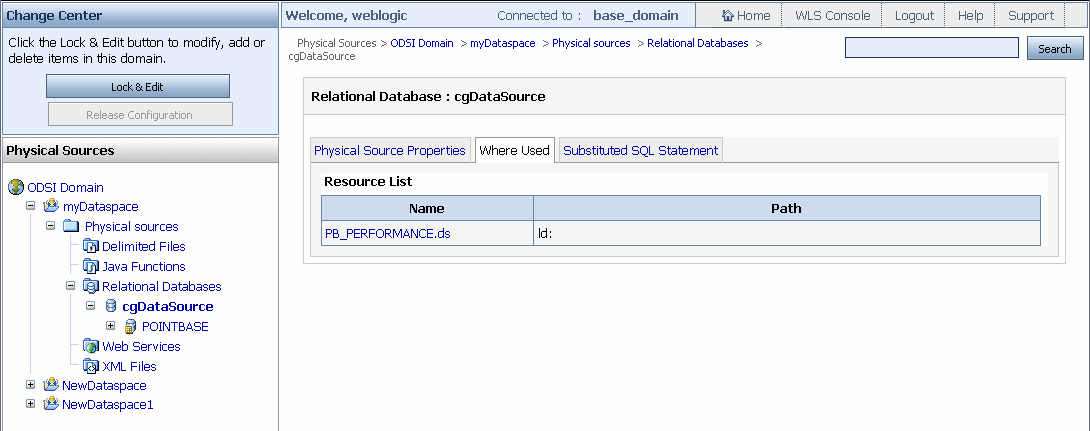
Description of ''Figure 4-2 Physical Data Services Relational Dependencies''
You can select a data service from the Resource List to view the metadata about the data service.
4.2.2 Modifying Data Source End Points
When you move dataspaces from development to production server, you may need to change the location of data sources or names of other artifacts. For example, if you are using sample data sources during development to protect confidential or otherwise secured information, you need to substitute a new data source with the actual data for the test version.
You can make these changes through the Physical Sources category as shown in Figure 4-3.
Figure 4-3 Setting End Points for Relational Sources
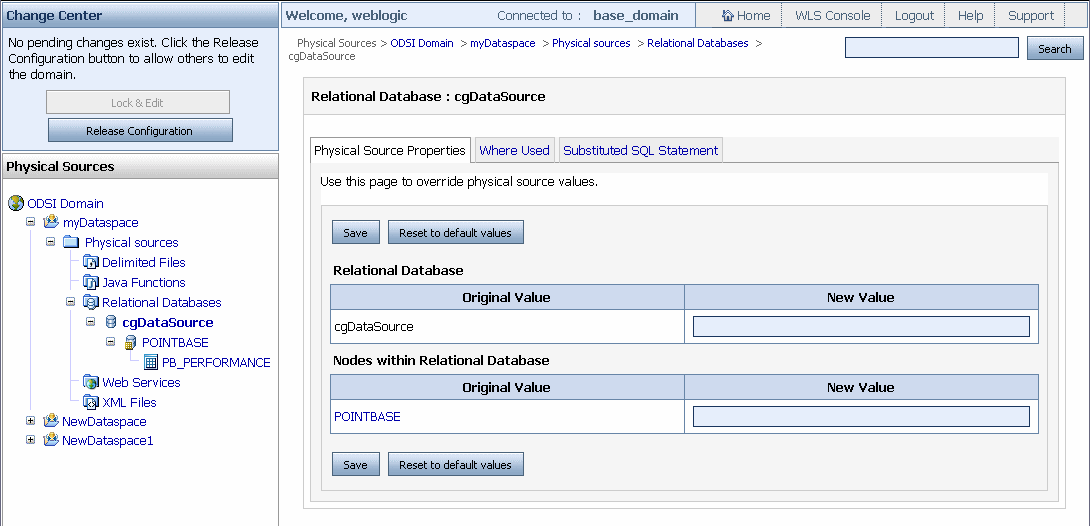
Description of ''Figure 4-3 Setting End Points for Relational Sources''
By modifying the data source endpoints, you can change the name and location of a data source as well as the target names of subordinate artifacts. In the case of relational sources this includes names of catalogs, schemas, packages, tables, stored procedures, views, and relational functions.
End point modifications are effective until they are further modified or reverted to the original value.
To reset the original value to the end point name:
-
Acquire the lock by clicking Lock & Edit.
-
Click Reset to original value. This option will not revert the value to the previous setting, instead it will directly revert it to the original name. If you assign some intermediate target names and click Reset to original value, the values revert to the same values as those in the Original Value column.
-
Click Save > Activate Changes.
Note:
If you change the end point for an artifact, some of the properties for the artifact should match with the old source. For example, the Vendor type and version properties for a relational data source should be identical with the old source.
Table 4-1 identifies the artifacts whose end point settings can be changed.
Table 4-1 Artifacts for which End Points can be Modified Through the Oracle Data Service Integrator Administration Console
| Data Source Type | Artifact |
|---|---|
|
Relational |
Data source name and location |
|
Catalog |
|
|
Schema |
|
|
Package |
|
|
Table |
|
|
Views |
|
|
Relational functions |
|
|
Stored procedure |
|
|
Web Service |
Web service name and location |
|
Service |
|
|
Port |
|
|
Operation |
|
|
XML Content |
Data source name and location |
|
Delimited File Content |
Data source name and location |
4.2.3 Substituting SQL Statements
Oracle Data Service Integrator uses SQL to access relational data sources. At compilation time, the built-in query optimizer determines the best execution strategy for backend sources. Then SQL queries are generated and submitted to underlying databases.
SQL queries generated by the relational wrapper are specific to each underlying database. While the SQL queries that are generated typically produce good results, there are cases when further optimization of the generated queries is desirable. In most RDBMS systems, such optimization is done through execution hints.
SQL statement substitution allows you to add hints to generated SQL queries by providing edited SQL statements that will be executed instead of the query that is generated by Oracle Data Service Integrator by default.
Note:
Unlike SQL statements generated by Oracle Data Service Integrator, substituted SQL statements are passed to the underlying database without validation. For this reason, users are strongly advised against using this feature for any purpose other than providing hints to the database. It is also recommended that prior to deployment any substituted SQL statement be tested against its generated counterpart to make sure that the expected performance advantage is obtained.Substitute SQL statements are created and registered in the Oracle Data Service Integrator Administration Console using the Substituted SQL Statements tab available through the Physical Sources category as shown in Figure 4-4.
This section includes the following sections:
Figure 4-4 Substituted SQL Statement Dialog Box
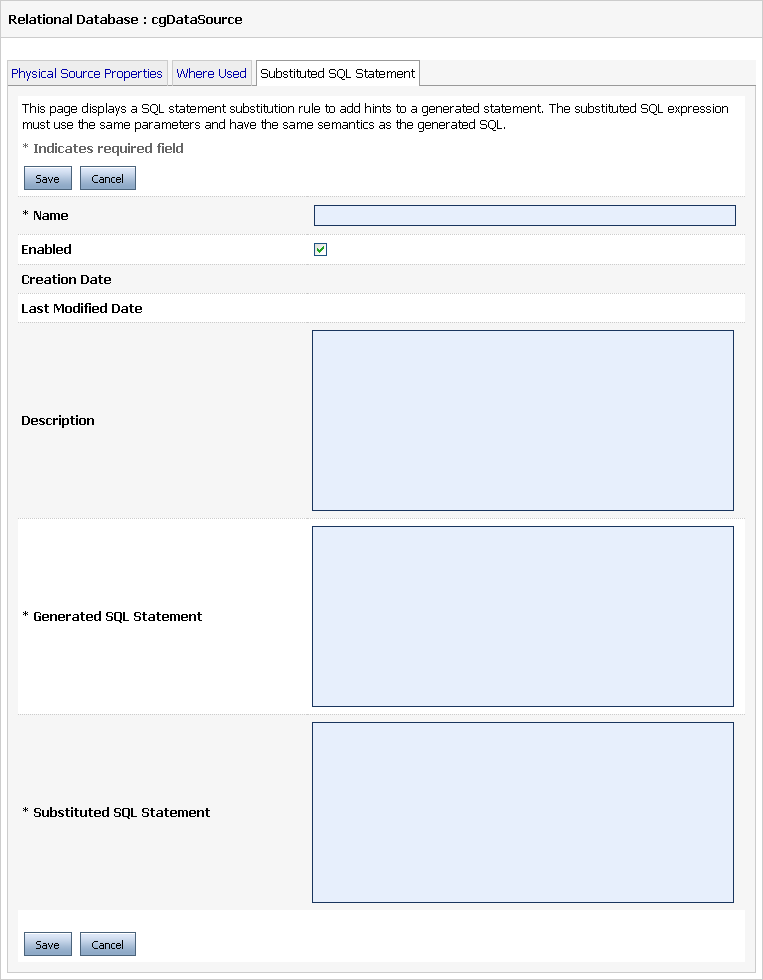
Description of ''Figure 4-4 Substituted SQL Statement Dialog Box''
4.2.3.1 How SQL Statement Substitution Works
Oracle Data Service Integrator server maintains a substitution table between the original generated SQL queries and any replacement queries supplied by the user. Only SQL queries specified by user will be substituted.
The Oracle Data Service Integrator administrator defines and maintains substitution queries through the Oracle Data Service Integrator Administration Console.
The replacement query is executed instead of the original SQL query. The Oracle Data Service Integrator runtime engine reads the SQL result set using type/column information of the original query. Potential problems related to incorrect substitution, which violates the conditions listed in Section 4.2.3.2, "Requirements for SQL Statement Substitution" include the following problems:
-
Incorrect result returned by XQuery, for example, incorrect data, no result at all, incorrect order of the result, are among the possible unwanted outcomes.
-
Error generated by the runtime engine during SQL statements execution, for example, problems with parameter binding and reading the result.
Supporting Externalized End Points in Substituted Queries
In both the generated and substitute queries, a special syntax is used to support externalized end points (see "Modifying Data Source End Points" on page 4-5 for details). The following substituted queries show this syntax (emphasis added):
SELECT /*+ FIRST_ROWS (10)*/ t1."BILL_TO_ID" AS c1, t1."C_ID" AS c2, t1."DATE_INT"
AS c3, t1."ESTIMATED_SHIP_DT" AS c4,
t1."HANDLING_CHRG_AMT" AS c5, t1."ORDER_DT" AS c6, t1."ORDER_ID" AS c7, t1."SALE_
TAX_AMT" AS c8,
t1."SHIP_METHOD_DSC" AS c9, t1."SHIP_TO_ID" AS c10, t1."SHIP_TO_NM" AS c11,
t1."STATUS" AS c12,
t1."SUBTOTAL_AMT" AS c13, t1."TOTAL_ORDER_AMT" AS c14, t1."TRACKING_NO" AS c15
FROM {RTLAPPLOMS}.{CUSTOMER_ORDER} t1
Note:
If you are adding SQL fragments (such as string literals) in your substituted SQL statement, you also need to use the convention of doubling opening curlie braces.For example:
SELECT t1.ID FROM CUSTOMER() WHERE $i/ID > 'a{bee}c' return $i/ID
is translated to:
SELECT t1.ID FROM {CUSTOMER} t1 WHERE t1.ID > 'a{{bee}c'
Depending on your requirement, specify replacement queries using the same name placeholders as the original query. At the end of the SQL generation stage the original names are replaced with the current end-point names. The original names are used if no end-point setting is found.
4.2.3.2 Requirements for SQL Statement Substitution
There are several requirements regarding the substituted SQL query:
-
The query must return same data, with same number of columns and column types.
-
Columns must be listed in the same order as the original query.
-
The query must have the same number of parameters, in the same order, as the original query.
-
The expected parameter types must match that of the original query.
-
Alias column names must be exactly the same as in the original query.
Note:
For queries using sub-queries, the column aliases need to be preserved by only the outermost subquery and not the inner subqueries. -
If the original query contained an ORDER BY clause, the same ordering result must be required.
4.2.3.3 Creating Substitute SQL Query Statements
To create a substitute SQL query:
-
Click Lock & Edit to acquire the lock.
-
Select the Physical Sources category from the category list and then select the relational databases option from the navigation pane.
-
Navigate and select the relational data source for which you want to create the substitute query and then select the Substituted SQL Statement tab.
-
Click New. This displays the page where you can specify the SQL statement substitution rule as shown in Figure 4-5.
Figure 4-5 Rules for SQL Statement Substitution
Description of ''Figure 4-5 Rules for SQL Statement Substitution''
-
Specify the following details on this page:
-
Name of the substitute query
-
Enable the substitute query
-
An optional description of the query
-
The SQL statement generated by Oracle Data Service Integrator
-
The substituted SQL statement
-
The system automatically tracks creation and last modified dates. An example for using the substitute query is available at Section 4.2.3.4, "SQL Statement Substitution Example."
4.2.3.4 SQL Statement Substitution Example
The order in which SQL statement substitutions are established is not fixed. Therefore, the example in this section and the steps involved are only one approach to creating and testing SQL statement substitution.
-
Setup your environment with these actions:
-
Eclipse IDE is open with the Oracle Data Service Integrator perspective and the dataspace has been successfully built and deployed.
-
Oracle WebLogic Server is running.
-
Your Oracle Data Service Integrator Administration Console is open. In the sample dataspace the URI is:
http://localhost:7001/odsiconsole
-
Auditing is enabled. (For details on activating and using auditing see Chapter 9, "Working With Audit and Log Information.")
-
-
Set the base SQL statement audit property to Always (Figure 4-6), which means that the base SQL statement will always be returned. (See also Section 9.1.3, "Setting Individual Auditing Properties.")
Figure 4-6 Setting the basesql Property to Always be Returned
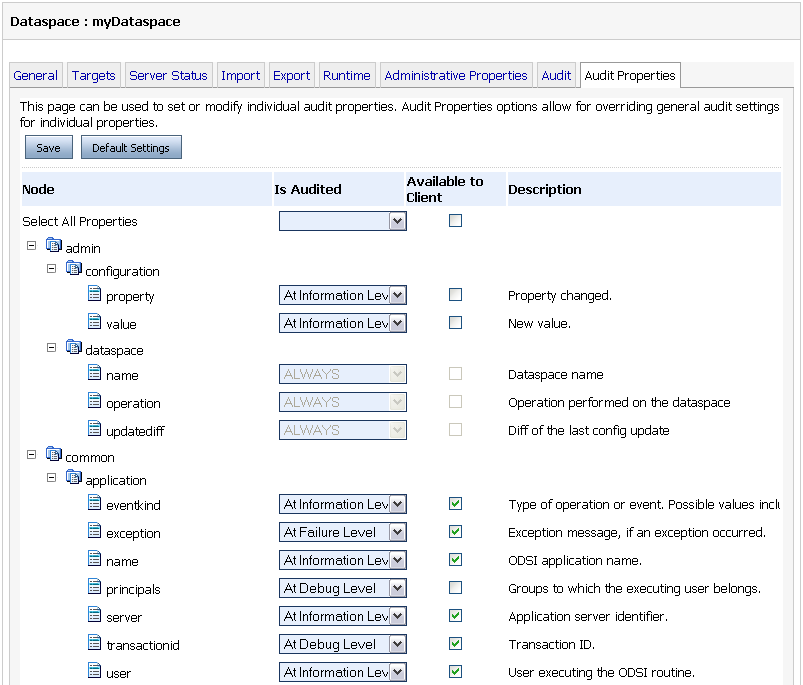
Description of ''Figure 4-6 Setting the basesql Property to Always be Returned''
-
Select your relational data source in the Oracle Data Service Integrator Administration Console (Figure 4-4).
-
Select the Substituted SQL statements option.
-
Click New and enter the following in the resulting dialog box:
-
Name you want to assign to your substitute query.
-
An optional description.
-
Enable (or disable) the substitution logic for the query you are about to create using the Enabled checkbox
-
-
Click Save > Activate Changes.
-
In your Eclipse IDE dataspace, run your query (such as CUSTOMER) in Test. Notice (Figure 4-7) that a basesql version of generated SQL statement is created.
Figure 4-7 Output from RTLApp CUSTOMER_ORDER() Query with basesql Result Highlighted
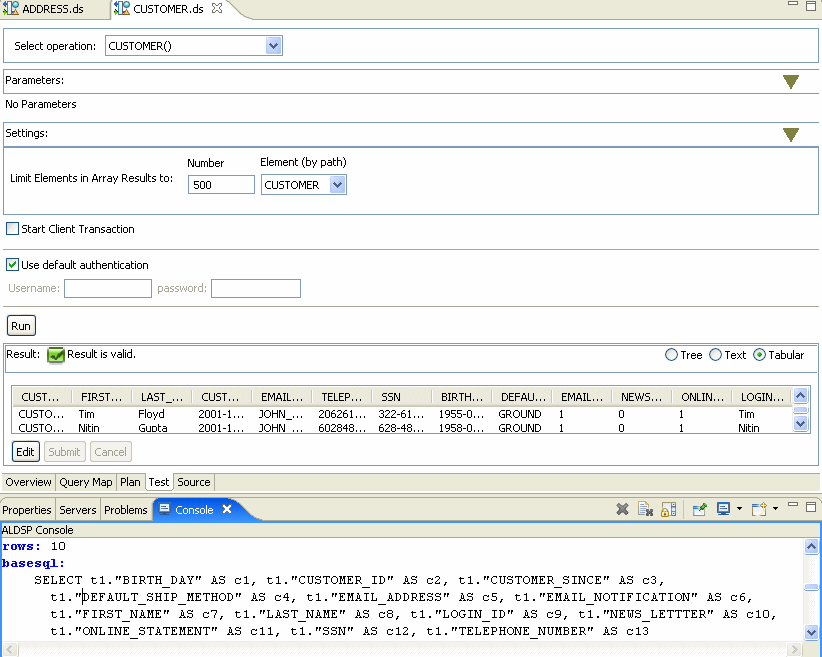
Description of ''Figure 4-7 Output from RTLApp CUSTOMER_ORDER() Query with basesql Result Highlighted''
-
On the Console tab scroll down until you locate the basesql version of the query you just generated (also shown in Figure 4-7). Copy this version of the query to your clipboard. A sample query appears below:
SELECT t1."BIRTH_DAY" AS c1, t1."CUSTOMER_ID" AS c2, t1."CUSTOMER_SINCE" AS c3, t1."DEFAULT_SHIP_METHOD" AS c4, t1."EMAIL_ADDRESS" AS c5, t1."EMAIL_NOTIFICATION" AS c6, t1."FIRST_NAME" AS c7, t1."LAST_NAME" AS c8, t1."LOGIN_ID" AS c9, t1."NEWS_LETTTER" AS c10, t1."ONLINE_STATEMENT" AS c11, t1."SSN" AS c12, t1."TELEPHONE_NUMBER" AS c13 FROM {RTLCUSTOMER}.{CUSTOMER} t1 -
Return to the Oracle Data Service Integrator Administration Console, Substituted SQL Statements area and paste the basesql statement into the field labeled Generated SQL Statement.
-
Paste the basesql statement into the field labeled Substituted SQL statement.
-
Edit the substituted statement based on supported hints provided by the underlying database. A sample edited query restricting results to the first 10 rows in an Oracle database (emphasis added) — appears below:
SELECT /*+ FIRST_ROWS (10)*/ t1."BIRTH_DAY" AS c1, t1."CUSTOMER_ID" AS c2, t1."CUSTOMER_SINCE" AS c3, t1."DEFAULT_SHIP_METHOD" AS c4, t1."EMAIL_ADDRESS" AS c5, t1."EMAIL_NOTIFICATION" AS c6, t1."FIRST_NAME" AS c7, t1."LAST_NAME" AS c8, t1."LOGIN_ID" AS c9, t1."NEWS_LETTTER" AS c10, t1."ONLINE_STATEMENT" AS c11, t1."SSN" AS c12, t1."TELEPHONE_NUMBER" AS c13 FROM {RTLCUSTOMER}.{CUSTOMER} t1 -
Click Save > Activate Changes.
-
Return to the Eclipse IDE and re-run your query in Test mode. Notice in the Output pane that your substitute query appears in the SQL Statement area.
-
Select the CUSTOMER () query from the Plan view. Click Show Query Plan. Notice that the resulting plan contains the substituted SQL as well as the named of the substituted SQL statement.
Figure 4-8 Query Plan Displaying Substituted SQL Query
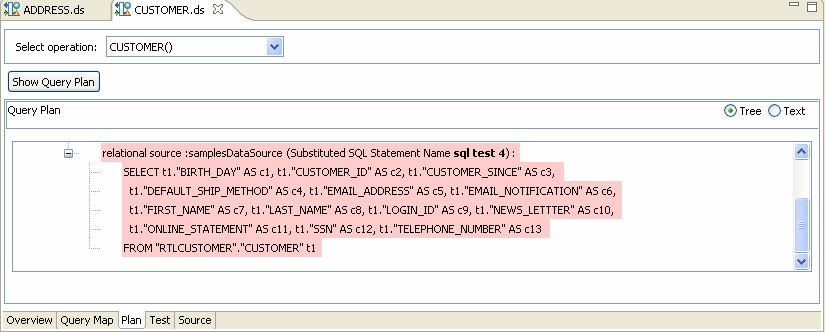
Description of ''Figure 4-8 Query Plan Displaying Substituted SQL Query''
4.3 Setting the Server Resources
Configuring server resources optimally depends on the physical resources of the machine on which you deploy Oracle Data Service Integrator, the anticipated load, and the type of dataspace you are deploying. Although the cached query plan count accelerates processing, it also consumes memory.
Oracle Data Service Integrator Administration Console allows you to control server resources using the following options:
-
Maximum number of query plans cached: The number of query plans that can be stored in cache for faster access.
-
Maximum threads for one query: Restricts the maximum number of parallel web service calls to the backend.
-
Enable memory management: Enables memory-managed operators.
-
Maximum operators: The maximum number of concurrent memory-managed operators per dataspace; if exceeded, the request is rejected.
-
Maximum items in memory per operator: The maximum number of items per operator that can be in memory before temporary file system space is used.
-
Capacity: Limits active streaming result sessions. When this capacity is exhausted, new requests are rejected immediately.
-
Age limit: The number of seconds a streaming result handle should be kept active. Zero seconds means forever.
-
Idle limit: The number of seconds an idling streaming result handle should be kept alive. Zero seconds means forever.
To set the server resources:
-
Select the Runtime tab from the System Administration category.
-
Acquire the lock.
-
In the Server Resources section, specify the value for the maximum number of query plans cached and the maximum number of threads for a single query, as shown in Figure 4-9.
-
In the Memory section, specify whether to enable memory-managed operators, set the maximum number of operators, and specify the maximum number of items per operator in memory.. For more information, see Section 4.4, "Item-based Memory Management."
-
In the Streaming Result section, specify the capacity, the age limit (in seconds), and the idle limit (in seconds) for streaming results.
Figure 4-9 Oracle Data Service Integrator Administration Console: Runtime Tab
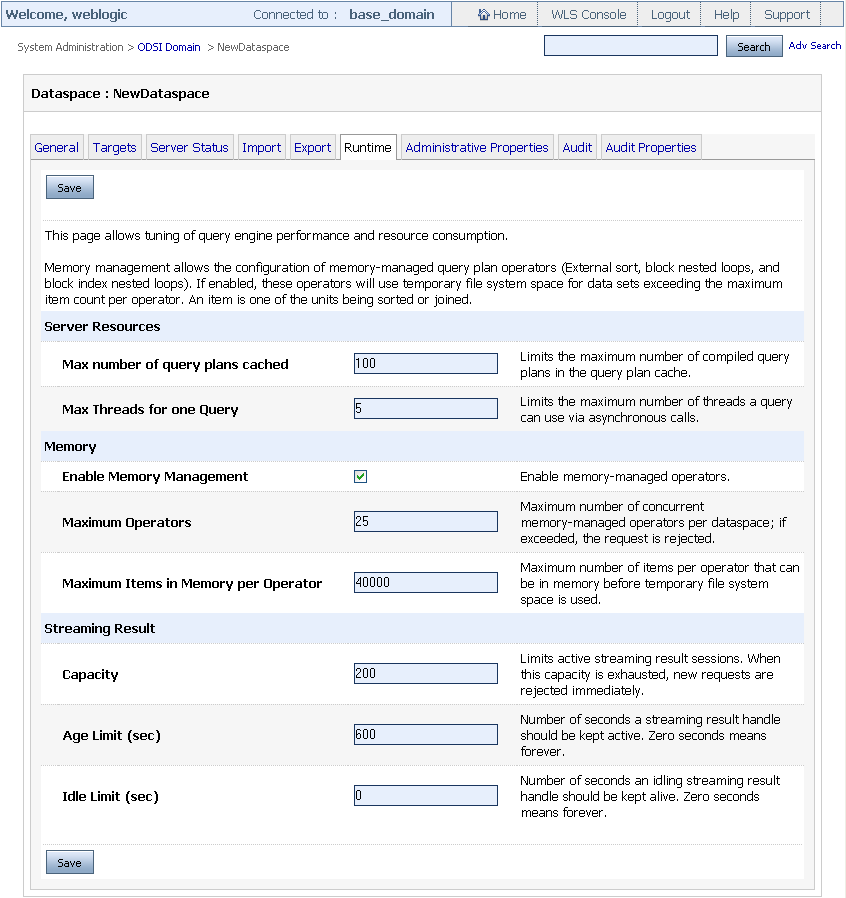
Description of ''Figure 4-9 Oracle Data Service Integrator Administration Console: Runtime Tab''
-
Click Save > Activate Changes.
For more information on tuning performance for WebLogic Server, refer to the WebLogic Server Performance and Tuning guide at http://download.oracle.com/docs/cd/E12840_01/wls/docs103/perform/index.html.
4.4 Item-based Memory Management
When memory management is enabled, Oracle Data Service Integrator uses memory-managed sort and join operators. A memory-managed operator uses the disk to limit memory consumption in the presence of large datasets.
Note:
The disk files are created in the <tmpdir>/serverName>/<dataSpaceName> folder. The tmpdir is set by the java.io.tmpdir system property, unless you overwrite this using the aldsp.tmpdir system property. The <tmpdir>/serverName>/<dataSpaceName> folder is deleted when the dataspace is no longer active or when the dataspace is deleted. Therefore, ensure that this folder is not shared by multiple Oracle Data Service Integrator servers with same name and with the same dataspaces.Each operator is only allowed to have up to a set maximum number of items in memory at a time. If the number of items to be processed exceeds the maximum then the operator must use the disk to complete its task. Here "items" are things that are being operated upon (joined or sorted).
Note:
Different query workloads usually involve different size items.For example, consider a query plan that contains two sort operators and three join operators. Assume that the maximum number of items per operator is 40,000. Regardless of the overall amount of data being processed by the query, this query plan will result in at most (2 + 3) * 40,000 = 200,000 items being held in memory at a time.
The maximum number of operators refers to the overall number of operators that may be concurrently running across all query plans being processed at a given time by the Oracle Data Service Integrator-enabled server.
The maximum number of operators and the maximum number of items together provide a means to control the overall memory consumption of the server and can help guard against out-of-memory exceptions. When needed, these values should be adjusted based on workload and data characteristics, as the item count is only a coarse metric for memory consumption because item sizes affect the actual memory used as well.
To enable and configure memory management:
-
Click the Runtime tab from the System Administration category.
-
Acquire the lock.
-
From the Memory section (Figure 4-9), select Enable Memory Management.
-
Specify the limit for the maximum number of operators per dataspace using the Maximum Operators box. This allows you to restrict the memory usage by operators per dataspace.
-
Specify the limit for the maximum units that can be sorted or joined (items) by a single operator in memory. If this limit exceeds, then the item is stored in the temporary file system space.
-
Click Save > Activate Changes.
4.5 Using Work Managers With Oracle Data Service Integrator
WebLogic Server prioritizes work and allocates threads based on administrator-defined parameters and actual run-time performance and throughput. Using Work Managers, you can configure scheduling guidelines and associate them with one or more applications, or with particular application components. This enables you to configure how an application prioritizes the execution of its work.
Using Oracle Data Service Integrator, you can similarly use a Work Manager associated with a dataspace to specify scheduling guidelines. This enables you to configure the minimum or maximum number of threads allocated to a dataspace, for example.
You could also define a Work Manager to specify the request class which enables you to ensure that high priority work is scheduled before less important work, even if the lower priority work was submitted first.
This section includes the following topics:
4.5.1 Creating and Configuring Work Managers
You can create a custom Work Manager for an Oracle Data Service Integrator dataspace project using the WebLogic Server Administration Console. When creating a Work Manager, you must use the following format when assigning a name to the Work Manager:
wm/dataspace_name-default-workmanager
where dataspace_name is the name of the Oracle Data Service Integrator dataspace project.
It is recommended that you create and configure a custom Work Manager before creating the associated dataspace project. If you create the dataspace project before creating the Work Manager, you will need to restart WebLogic Server to have the dataspace become associated with the custom Work Manager. You can then use the WebLogic Server Administration Console to modify the parameters of the Work Manager, as required.
WebLogic Server uses the global default Work Manager if a custom Work Manager does not exist. For more information about using WebLogic Server Administration Console to manage Work Managers and their associated constraints and request classes, see Using Work Managers to Optimize Scheduled Work at http://download.oracle.com/docs/cd/E12840_01/wls/docs103/config_wls/self_tuned.html.
4.5.2 Sharing Work Manager Constraints
Multiple Oracle Data Service Integrator dataspace projects cannot share the same Work Manager, but you can create two or more Work Managers that share the same underlying constraints. You might want to do this if you have two dataspace projects that need to access a particular JDBC connection pool, for example, and you want to prevent simultaneous access to the JDBC connection pool from exceeding the size of the pool.
To share Work Manager constraints in this case, do the following:
-
Create a global max-threads-constraint associated with the JDBC connection pool.
-
Create a separate Work Manager for each dataspace project associated with the max-threads-constraint.
-
Create the dataspace projects (or restart WebLogic Server if the dataspace projects already exist).
4.6 Using Administrative Properties
An administrative property is a user-defined property that you can configure using the Oracle Data Service Integrator Administration Console. The value of an administrative property can be used in XQuery functions, either in data service functions or XQuery functions for security.
For information on XQuery functions for security, see Chapter 5, "Securing Oracle Data Service Integrator Resources."
An administrative property allows you to specify function parameters that can be easily changed by the administrator, without modifying the body of either the data service function or XQuery function for security.
Any data service within a dataspace can use the administrative property value. The property value can be accessed using XQuery with the Oracle function get-property(). The function takes the name of the property as an argument and returns the value as a string. It also takes an argument that serves as the default value for the parameter. This value is used if the property is not configured in the console.
The following example illustrates an XQuery Function Library function that uses an administrative property:
declare function f1:getMaximumAccountViewable() as xsd:decimal {
   let $amount := fn-bea:get-property("maxAccountValue", "1000.00")
      cast as xsd:decimal
   return $amount
};
To manage administrative properties:
-
Click the name of the dataspace in the Navigation pane.
-
Click the Administrative Properties tab from the System Administration category. The list of property names currently defined appears in the table, as illustrated in Figure 4-10.
Figure 4-10 Administrative Properties Tab
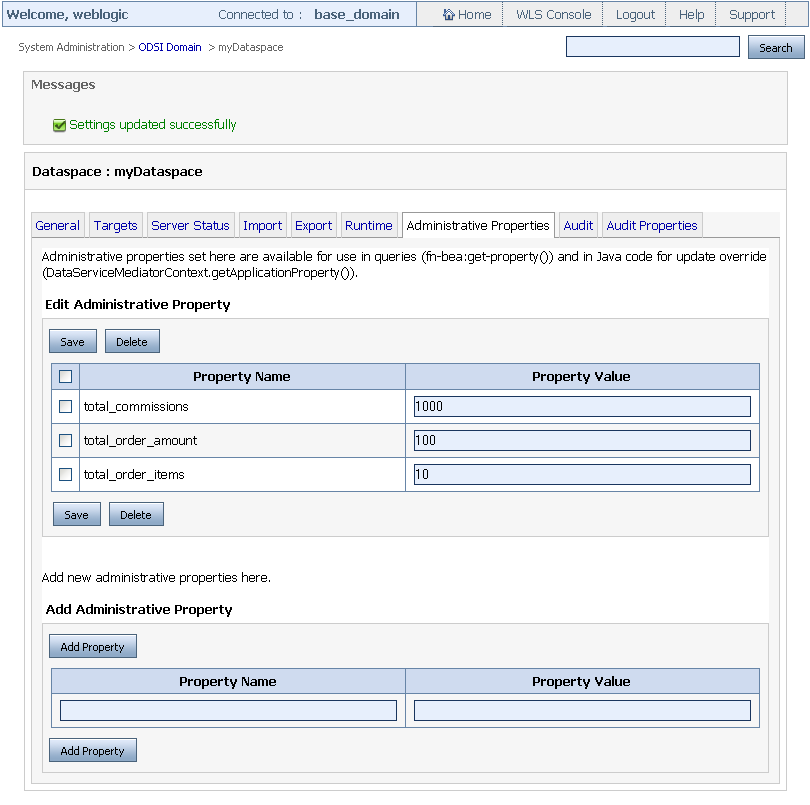
Description of ''Figure 4-10 Administrative Properties Tab''
-
Acquire the lock by selecting Lock & Edit.
-
To add a property, complete the following:
-
Enter a name for the property in the Property Name field of the Add Administrative Property table.
The name must match the name property passed to the
get-property()function used to access the properties value. For example:fn-bea:get-property("maxAccountValue", "1") -
Optionally, enter an initial value for the property.
You can change this value later, if required.
-
Click Add Property.
The property appears in the Edit Administrative Property table.
-
-
To change a property value:
-
Acquire the lock.
-
Enter a new value in the Property Value field of the Edit Administrative Property table.
-
Click Save > Activate Changes.
-
-
To delete a property:
-
Acquire the lock and select the property from the Edit Administrative Property table.
-
Click Delete.
-
Click Activate Changes to confirm deletion of the property.
Note:
The default value for the property is used in any get-property() call using the deleted property.
-
4.7 Monitoring Active Queries and Updates
Using the Operations category in the console, you can monitor long-running active queries and updates for a dataspace. The Operations category pertains to the runtime monitoring of deployed artifacts. In other words, the Operations category depends on the core (deployed) session. By contrast, other categories such as Service Explorer and Security relate to the session in progress.
Figure 4-11 illustrates an active ad hoc query running on the server for the RTLApp dataspace.
Note:
Active queries and updates can be monitored only at the dataspace level.Figure 4-11 Monitoring the Status of Active Ad Hoc Queries
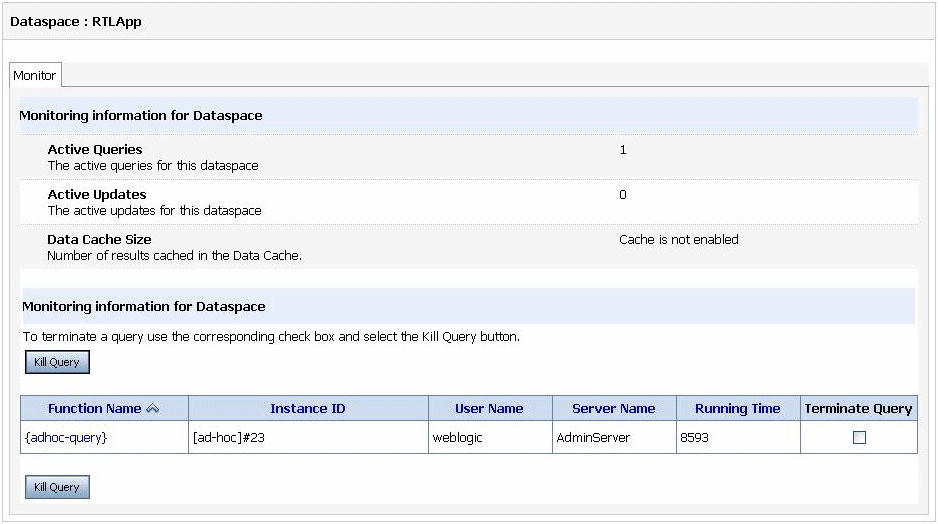
Description of ''Figure 4-11 Monitoring the Status of Active Ad Hoc Queries''
If an active query or an update is running for a long time on the server then the information is displayed in the table. This table lists the XQuery functions under the Function Name field.
If a query is taking longer than the expected time to retrieve data, you can also kill a query by clicking Kill Query.
In case of ad hoc queries, you can view the ad hoc query by clicking the function name in the Function field. This allows you to view the ad hoc query that is running on the server as shown in Figure 4-11.
Figure 4-12 Ad Hoc Query Displayed on Oracle Data Service Integrator Administration Console
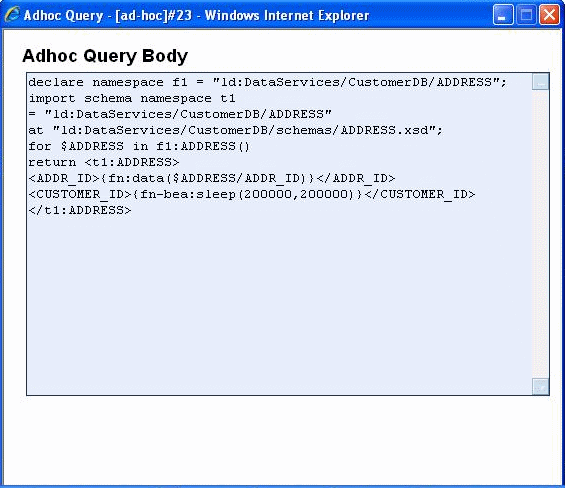
Description of ''Figure 4-12 Ad Hoc Query Displayed on Oracle Data Service Integrator Administration Console''
You can monitor active updates the same way as active queries.
4.8 Setting the Transaction Isolation Level
In some instances, Oracle Data Service Integrator may not be able to read data from a database table because another dataspace has locked the table, causing queries issued by Oracle Data Service Integrator to be queued until the dataspace releases the lock. To prevent this, you can set the transaction isolation to read uncommitted in the JDBC connection pool on your WebLogic Server.
To set the transaction isolation level:
-
Start the WebLogic Server Administration Console in a web browser by opening the following URL:
http://<HostName>:<Port>/console
For example, to start the Administration Console for a local instance of WebLogic Server (running on your own machine), type the following URL in a web browser address field:
http://localhost:7001/console/
-
Expand Services > JDBC > Data Sources > <datasourcename>.
-
Select the Connection Pool tab as illustrated in Figure 4-13.
Figure 4-13 WebLogic Server Administration Console Connections Tab
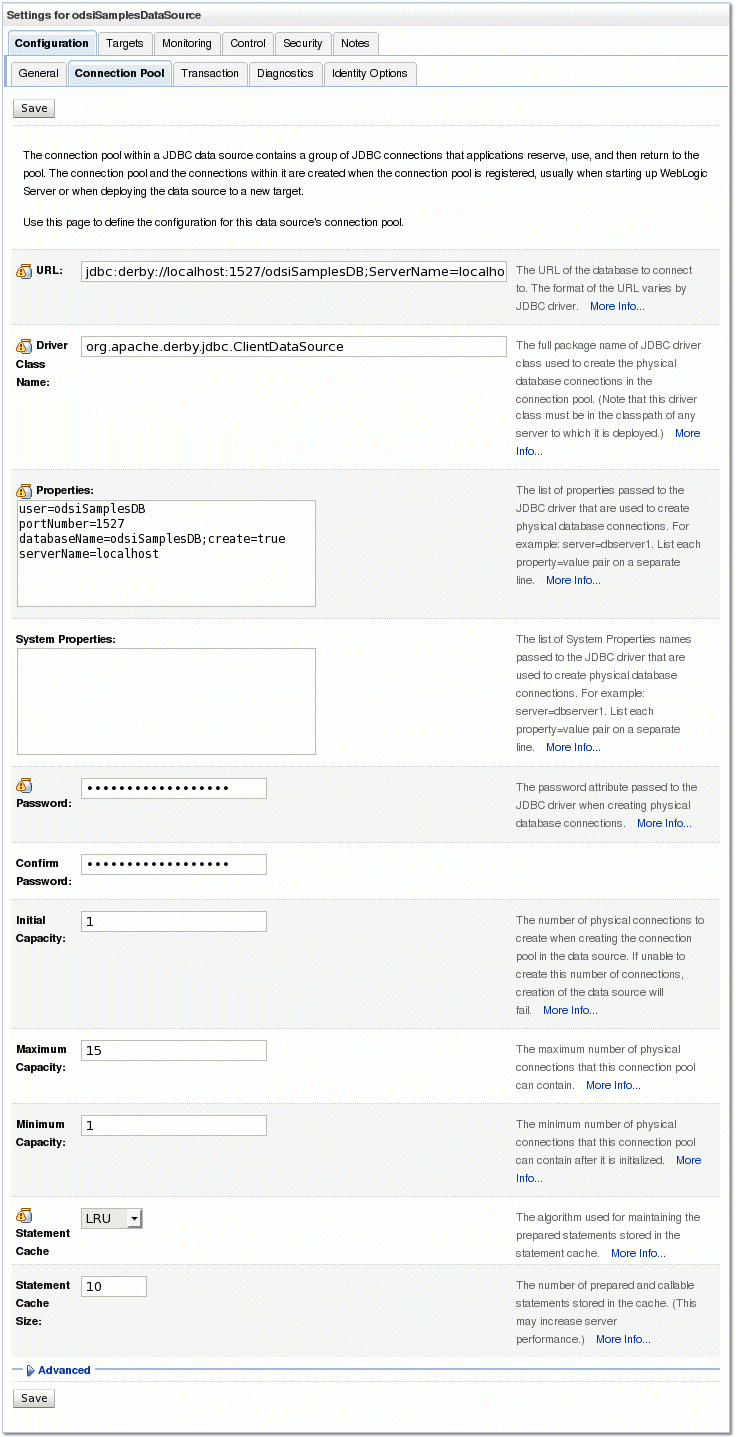
Description of ''Figure 4-13 WebLogic Server Administration Console Connections Tab''
-
Expand the Advanced section. The page expands to include the Advanced Options section.
-
Acquire the lock.
-
In the Init SQL field, enter the following:
SQL SET TRANSACTION ISOLATION LEVEL READ UNCOMMITTED
-
Click Save > Activate Changes.
4.9 Preloading Oracle Data Service Integrator Projects and Dataspaces
You can preload Oracle Data Service Integrator projects and the dataspaces they contain whenever an Oracle Data Service Integrator-enabled server is started by adding a property to the setDomainEnv.cmd file. If you have many projects and/or dataspaces, doing this can significantly improve initial Console performance.
To add this system property:
-
Stop the Oracle Data Service Integrator-enabled server if it is running.
-
Open the
setDomainEnv.cmdfile located in:<BEA_HOME>\user_projects\domains\base_domain\bin -
Add the following as a VM startup property:
-Dcom.bea.dsp.oam.console.common.warmupTree=true
-
Save and close this file.
-
Start or restart your server.