3 Creating and Updating Physical Data Services
This chapter includes how-to information about a wide range of tasks pertaining to sources such as relation tables and views, stored procedures, SQL statements, and Java functions.
This chapter has the following sections:
3.1 Concepts
This section describes the following topics:
-
Section 3.1.1, "Creating Physical Data Services by Importing Source Metadata"
-
Section 3.1.2, "Physical Data Services from Java Functions Overview"
3.1.1 Creating Physical Data Services by Importing Source Metadata
In Oracle Data Service Integrator metadata around a particular data source is developed during the process of creating a physical data service. For example, a list of the tables and columns in a relational database is metadata. A list of operations in a Web service is metadata.
In Oracle Data Service Integrator, a physical data service is typically primarily based on metadata describing the structure of those physical data sources.
Physical data services are the building blocks for the creation of logical data services.
Table 3-1 Data Source Support for Creating Physical Data Services
| Source Type | Venue |
|---|---|
|
Relational (including tables, views, stored procedures, and SQL) |
JDBC |
|
Web services (WSDL files) |
URI, UDDI, WSDL |
|
Delimited (CSV files) |
File-based data, such as spreadsheets. |
|
Java functions (.java) |
Programmatic |
|
XML (XML files) |
File- or data stream-based XML |
When information about physical data is developed during the creation of physical data services, two things happen:
-
A physical data service (extension
.ds) is created in your Oracle Data Service Integrator-based project. -
A companion schema of the same name (extension.xsd), is created. This schema describes quite exactly the XML type of the data service. Such schemas are placed in a directory named schemas which is a sub-directory of your newly created data service.
3.1.1.1 Source View
The introspection process is done through the Physical Data Service Creation wizard. This wizard introspects available data sources and identifies data objects that can be rendered as operations for either entity or library data services. Once created, physical data services become the building-blocks for queries and logical data services through a series of programs created in the query source.
For example, the following source resulted from importing a Web service operation:
(::pragma function <f:function xmlns:f="urn:annotations.ld.oracle.com" kind="read"
nativeName="getCustomerOrderByOrderID"nativeLevel1Container="ElecDBTest"
nativeLevel2Container="ElecDBTestSoap" style="document"/>:

declare function f1:getCustomerOrderByOrderID($x1 as element(t1:getCustomerOrderByOrderID))
as schema-element(t1:getCustomerOrderByOrderIDResponse) external;
Notice that the imported Web service is described as a "read" function in the pragma. "External" refers to the fact that the schema is in a separate file.
For some data sources such as web services imported metadata represents functions which typically return void (in other words, these functions do something other than return data). Such routines are sometimes called side-effecting functions or procedures.
The following source resulted from importing Web service metadata that includes an operation that has been identified as a side-effecting procedure:
(::pragma function <f:function xmlns:f="urn:annotations.ld.oracle.com"
kind="hasSideEffects" nativeName="setCustomerOrder" style="document"/>:

declare function f1:setCustomerOrder($x1 as element(t3:setCustomerOrder))
as schema-element(t3:setCustomerOrderResponse) external;
In the above pragma the function is identified as "hasSideEffects".
3.1.2 Physical Data Services from Java Functions Overview
In Oracle Data Service Integrator, you can create physical data services based on user-defined functions implemented as Java classes. Oracle Data Service Integrator supports Java functions returning the following types:
-
Java primitive types and single-dimension arrays
-
Global elements and global element arrays through XMLBean classes
-
Global elements and global element arrays through SDO DataObjects
Oracle Data Service Integrator packages operations marked as create, update, or delete functions in an Entity data service. Otherwise, the resulting data service is of type Library. Functions determined to return void are automatically marked as library procedures. When creating a new physical data service, you can change the nominated function type.
The Java method name, when used in an XQuery, becomes the XQuery function name qualified with a namespace.
Note:
The following restrictions apply to Java functions:
-
Java functions intended for import into a data service must be declared as static
-
Function overloading is based on the number of arguments, not the parameter types
-
Array support is restricted to single-dimension arrays only
-
In functions returning complex types, the return element needs to be extracted from a valid XML document
3.1.2.1 Simple Java Types and Their XQuery Counterparts
The following outlines the mapping between simple Java types and the corresponding XQuery or schema types:
Table 3-2 Java Types and Corresponding XQuery or Schema Types
| Java Simple or Defined Type | XQuery/Schema Type |
|---|---|
|
boolean |
xs:boolean |
|
byte |
xs:byte |
|
char |
xs:char |
|
double |
xs:double |
|
float |
xs:float |
|
int |
xs:int |
|
long |
xs:long |
|
short |
xs:short |
|
string |
xd:string |
|
java.lang.Date |
xs:datetime |
|
java.lang.Boolean |
xs:boolean |
|
java.math.BigInteger |
xs:integer |
|
java.math.BigDecimal |
xs:decimal |
|
java.lang.Byte |
xs.byte |
|
java.lang.Char |
xs:char |
|
java.lang.Double |
xs:double |
|
java.lang.Float |
xs:float |
|
java.lang.Integer |
xs:integer |
|
java.lang.Long |
xs:long |
|
java.lang.Short |
xs:short |
|
java.sql.Date |
xs:date |
|
java.sql.Time |
xs:time |
|
java.sql.Timestamp |
xs:datetime |
|
java.util.Calendar |
xs:datetime |
Java functions can consume parameters and return values of the following types:
-
Java primitives and types listed in the previous table
-
Apache XMLBeans
-
Oracle XMLBeans
-
SDO DataObject (typed or untyped)
Note:
The elements or types referred to in the schema should be global elements.
3.1.2.2 Physical Data Service from a Java Function - Example Code
This topic provides examples showing the use of imported Java functions in an XQuery and the processing of complex types.
3.1.2.2.1 Using a Function Returning an Array of Java Primitives
As an example, the Java function getRunningTotal can be defined as follows:
public static float[] getRunningTotal(float[] list) {
   if (null == list || 1 >= list.length)
      return list;
   for (int i = 1; i < list.length; i++) {
      list[i] = list[i-1] + list[i];
   }
   return list;
}
The corresponding XQuery for executing the above function is as follows:
Declare namespace f1="ld:javaFunc/float"
Let $y := (2.0, 4.0, 6.0, 8.0, 10.0)
Let $x := f1:getRunningTotal($y)
Return $x
The results of the query is as follows:
2.0, 6.0, 12.0, 20.0, 30.0
3.1.2.2.2 Processing complex types represented via XMLBeans
Consider a schema called Customer (customer.xsd), as shown in the following:
<?xml version="1.0" encoding="UTF-8" ?>
   <xs:schema targetNamespace="ld:xml/cust:/BEA_BB10000"
     xmlns:xs="http://www.w3.org/2001/XMLSchema">
   <xs:element name="CUSTOMER">
      <xs:complexType>
         <xs:sequence>
            <xs:element name="FIRST_NAME" type="xs:string" minOccurs="1"/>
            <xs:element name="LAST_NAME" type="xs:string" minOccurs="1"/>
         </xs:sequence>
      </xs:complexType>
   </xs:element>
</xs:schema>
You could compile the schema using XMLBeans to generate a Java class corresponding to the types in the schema.
xml.cust.beaBB10000.CUSTOMERDocument.CUSTOMER
For more information, see http://xmlbeans.apache.org.
Following this, you can use the CUSTOMER element as shown in the following:
public static xml.cust.beaBB10000.CUSTOMERDocument.CUSTOMER[]
      getCustomerListGivenCustomerList(xml.cust.beaBB10000.CUSTOMERDocument.CUSTOMER[]
          ipListOfCust)
      throws XmlException {
   xml.cust.beaBB10000.CUSTOMERDocument.CUSTOMER [] mylocalver = pListOfCust;
   return mylocalver;
}
The resulting metadata information produced by the New Physical Data Service wizard will be:
(::pragma function <f:function xmlns:f="urn:annotations.ld.oracle.com" kind="datasource"
     access="public">
<params>
<param nativeType="[Lxml.cust.beaBB10000.CUSTOMERDocument$CUSTOMER;"/>
</params>
</f:function>::)

declare function f1:getCustomerListGivenCustomerList($x1 as element(t1:CUSTOMER)*) as
element(t1:CUSTOMER)* external;
The corresponding XQuery for executing the above function is:
declare namespace f1 = "ld:javaFunc/CUSTOMER";
let $z := (
validate(<n:CUSTOMER xmlns:n="ld:xml/cust:/BEA_BB10000"><FIRST_NAME>John2</FIRST_NAME>
<LAST_NAME>Smith2</LAST_NAME>
</n:CUSTOMER>),

validate(<n:CUSTOMER xmlns:n="ld:xml/cust:/BEA_BB10000"><FIRST_NAME>John2</FIRST_NAME>
<LAST_NAME>Smith2</LAST_NAME>
</n:CUSTOMER>),

validate(<n:CUSTOMER xmlns:n="ld:xml/cust:/BEA_BB10000"><FIRST_NAME>John2</FIRST_NAME>
<LAST_NAME>Smith2</LAST_NAME>
</n:CUSTOMER>),

for $zz in $z
return
3.2 How to Create Physical Data Services
This section describes the following topics:
-
Section 3.2.1, "How To Create Physical Data Services from Relational Tables and Views"
-
Section 3.2.2, "How To Create Physical Data Services from Stored Procedures"
-
Section 3.2.3, "How To Create Physical Data Services Based on SQL Statements"
-
Section 3.2.4, "How To Create Physical Data Services Based on Database Functions"
-
Section 3.2.5, "How To Create a Physical Data Service from a Web Service"
-
Section 3.2.6, "Preparing to Create Physical Data Services From Java Functions"
-
Section 3.2.7, "How To Create a Physical Data Service from a Java Function"
-
Section 3.2.8, "How To Create a Physical Data Service from XML Data"
-
Section 3.2.9, "How To Create a Physical Data Service from a Delimited File"
3.2.1 How To Create Physical Data Services from Relational Tables and Views
The following topics describe how to create physical data services from relational tables and views:
-
Section 3.2.1.1, "Setting Up the Physical Data Service Creation Wizard"
-
Section 3.2.1.2, "Setting Up the Import Wizard for Relational Objects"
-
Section 3.2.1.3, "Selecting SQL Table and View Objects for Import"
-
Section 3.2.1.4, "Setting Properties for New Data Service Operations"
-
Section 3.2.1.6, "Database-specific Catalog and Schema Considerations"
3.2.1.1 Setting Up the Physical Data Service Creation Wizard
Physical data services are created using a wizard.
Figure 3-1 Physical Data Service Creation Wizard
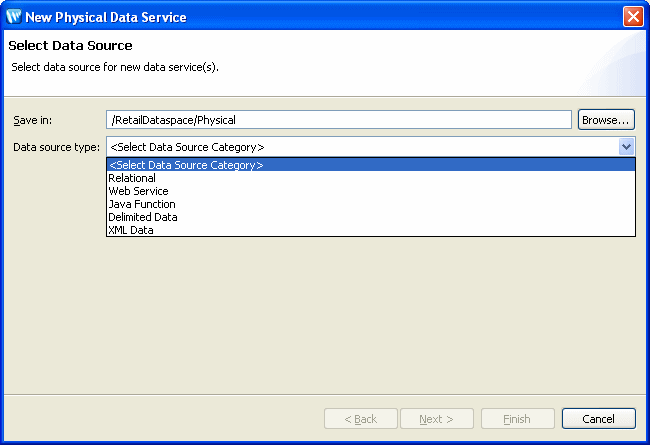
Description of "Figure 3-1 Physical Data Service Creation Wizard"
3.2.1.1.1 Starting the Wizard
To start the physical data service creation wizard:
-
Right-click on your dataspace project or any folder in your project.
-
Choose New > Physical Data Service
Figure 3-2 Creating a New Physical Data Service
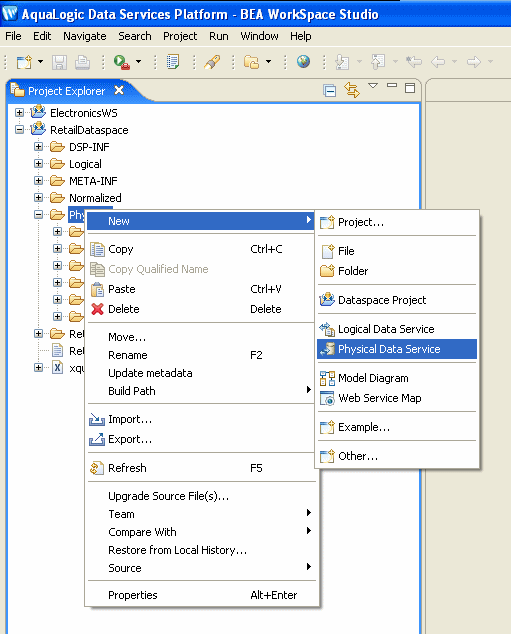
Description of "Figure 3-2 Creating a New Physical Data Service"
3.2.1.2 Setting Up the Import Wizard for Relational Objects
When importing a relational object available options include the ability to:
-
Set a location for your new data service to be saved within your project.
-
Select a data source from the dropdown listbox.
-
Select the database type for the selected source (PointBase for the sample RDBMS) from the dropdown listbox.
-
Select among the relational source types listed in the following table.
Table 3-3 Types of available relational data sources
| Relational Type | Description |
|---|---|
|
Tables and Views |
Displays all public tables and views in the selected data source. |
|
Stored Procedures |
Displays all public stored procedures in the selected data source. |
|
SQL Statement |
Allows creation of a SQL statement for extracting relational data from the data source. |
|
Database Function |
Allows creation of an XQuery function in a library data service based on build-in or custom database functions. |
3.2.1.3 Selecting SQL Table and View Objects for Import
To create a physical data service based on a relational table or view:
-
Select the Tables and Views option
-
Click Next.
A list of available database table and view SQL objects appears.
Objects are grouped based on the relational data sources catalog and/or schema.
In the example of an RTLCUSTOMER catalog, the ADDRESS and CUSTOMER tables both become physical data services.
For more information, see "Database-specific Catalog and Schema Considerations".
Simply check the desired objects or their container, which will select all enclosed tables or views.
Figure 3-3 Table and View Objects Selected for Import
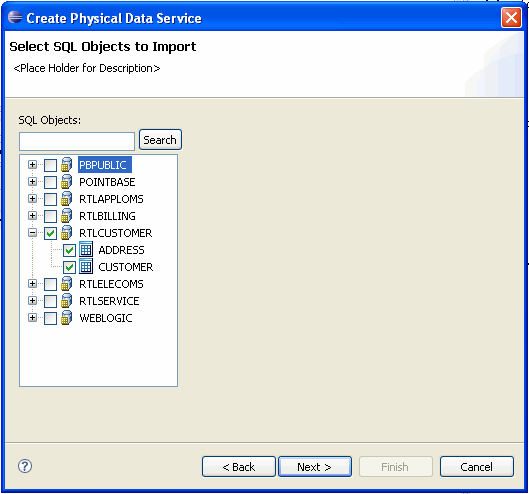
Description of "Figure 3-3 Table and View Objects Selected for Import"
If you click on an individual object such as ADDRESS or CUSTOMER, information describing the database's primary key(s), column name, type and nullability appears. For example the CUSTOMER table contains a CUSTOMER_ID field of type VARCHAR. That column is not nullable, meaning that it must be supplied with any updates.
Figure 3-4 Physical Data Service Properties
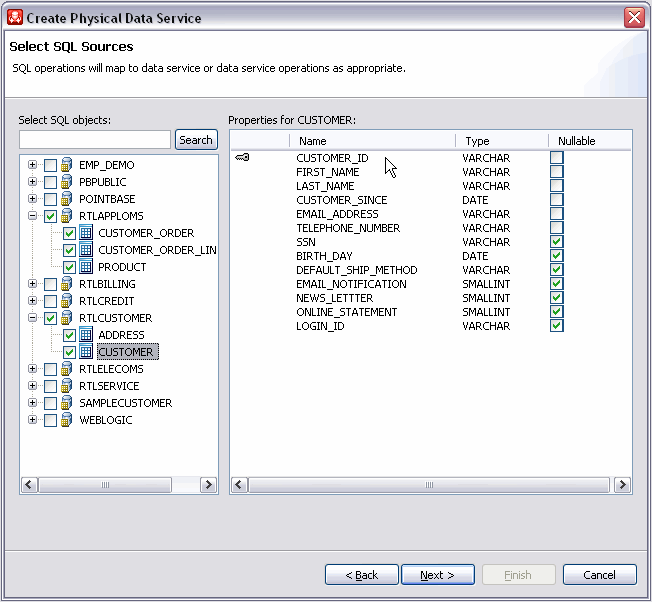
Description of "Figure 3-4 Physical Data Service Properties"
3.2.1.3.1 Filtering SQL Objects Using Search
The Search option available when creating a physical data service can be especially useful when:
-
You know specific names of the data source objects you want to turn into data services.
-
Your data source may be so large that a filter is needed.
-
You may be looking for objects with specific naming characteristics such as:
%audit2003%
The above search command retrieves all objects that contain the enclosed string.
3.2.1.3.2 Using JDBC Syntax to Search SQL Objects
You can search through available SQL objects using standard JDBC wildcard syntax.
-
An underscore (_) creates a wildcard for an individual character.
-
A percentage sign (%) indicates a wildcard for a string. Entries are case-sensitive.
Another example:
CUST%, PAY%
entered in the Tables/Views field the above search string returns all tables and views starting with either CUST or PAY.
3.2.1.3.3 Special Considerations When Searching Stored Procedures
If no items are entered for a particular field, all matching items are retrieved. For example, if no filtering entry is made for the Procedure field, all stored procedures in the data object will be retrieved.
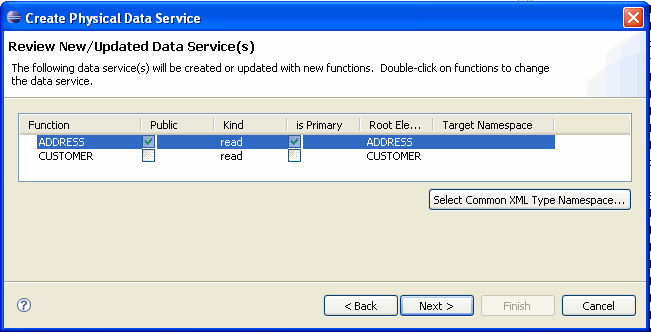
3.2.1.4 Setting Properties for New Data Service Operations
Each new entity data service is created with a Read function that contains all the metadata elements identified during data service creation. It can be thought of as comparable to the following construct in the relational world:
select * from <table>
Use the Properties dialog to:
-
Optionally modify the operation name.
-
Set the Public option (check if you want your function to be available to client applications).
-
Set the kind of operation (in some cases only Read will be available).
-
Set the Primary option (check if you want your function to be the primary of its type).
Note:
In some cases this option may not be available.
-
Select a common XML namespace for the entire data service or individual target namespaces for specific operations.
-
Set the target namespace.
The root element, which is read-only, is also displayed.
Note:
Initially the root element name matches the name of the data service.
Figure 3-5 Setting Properties for New Data Service Functions
Description of "Figure 3-5 Setting Properties for New Data Service Functions"
3.2.1.4.1 Default Naming Conventions
There are several default naming conventions associated with new data services:
-
When a table, view, or other data source object is the source for a data service, the nominated name is wherever possible the same as the source object name. In some cases, however, names are adjusted to conform with XML naming conventions.
-
Initially the root element name matches the name of the data service.
For more information, see XML Name Conversion Considerations.
3.2.1.5 Verifying Data Service Composition
On the Review New Data Service(s) page you can set, confirm or, optionally, change suggested data service names depending on the type of physical data service you are creating.
3.2.1.5.1 Default Physical Data Service Names
The nominated name for a new data service is, wherever possible, the same as the source object name. In some cases, however, names are adjusted to conform with XML naming conventions.
3.2.1.5.2 About Automatic Data Service Name Changes
Name conflicts occur when there is a data service of the same name present in the target directory. Name conflicts are highlighted in red.
There are several situations where you will need to change the name of your data service:
-
There already is a data service of the same name in your application.
-
You are trying to create multiple data services with the same name.
Data services always have the file extension:
.ds
3.2.1.6 Database-specific Catalog and Schema Considerations
Database vendors variously support database catalogs and schemas.
Table 3-4 Vendor Support for Catalog and Schema Objects
| Vendor | Catalog | Schema |
|---|---|---|
|
Oracle |
Does not support catalogs. When specifying database objects, the catalog field should be left blank. |
Typically the name of an Oracle user ID. |
|
DB2 |
If specifying database objects, the catalog field should be left blank. |
Schema name corresponds to the catalog owner of the database, such as db2admin. |
|
Sybase |
Catalog name is the database name. |
Schema name corresponds to the database owner. |
|
Microsoft SQL Server |
Catalog name is the database name. |
Schema name corresponds to the catalog owner, such as dbo. The schema name must match the catalog or database owner for the database to which you are connected. |
|
Informix |
Does not support catalogs. If specifying database objects, the catalog field should be left blank. |
Not needed. |
|
PointBase |
PointBase database systems do not support catalogs. If specifying database objects, the catalog field should be left blank. |
Schema name corresponds to a database name. |
3.2.1.7 XML Name Conversion Considerations
When a source name is encountered that does not fit within XML naming conventions, default generated names are converted according to rules described by the SQLX standard. Generally speaking, an invalid XML name character is replaced by its hexadecimal escape sequence (having the form xUUUU).
For additional details see section 9.1 of the W3C draft version of this standard:
http://www.sqlx.org/SQL-XML-documents/5WD-14-XML-2003-12.pdf
3.2.2 How To Create Physical Data Services from Stored Procedures
Stored procedures are database objects that group an executable set of SQL and native database programming language statements together to perform a specific task locally. Advanced DBMS systems utilize stored procedures to improve query performance, manage and schedule data operations, enhance security, and so forth.
In Oracle Data Service Integrator you can, for specifically supported databases, create physical data services based on stored procedures.
It is often convenient to leverage independent routines as part of managing enterprise information through a data service. An obvious example would be to leverage standalone update or security functions through data services. Such functions have no XML type; in fact, they typically return nothing (or void).
Stored procedures are very often side-effecting from the perspective of the data service, since they perform internal operations on data. In such cases all you need to do is identify the stored procedures as a data service procedure when your physical data service is created.
After you have identified the stored procedures that you want to add to your data service, you also have an opportunity to identify which of these should be identified as data service procedures.
Each stored procedure that is imported becomes a separate data service. In other words, if you have five stored procedures, you will create five data services.
The following topics describe how to create a physical data service from a stored procedure:
-
Section 3.2.2.2, "Setting Up the Physical Data Service Creation Wizard"
-
Section 3.2.2.3, "Setting Up the Import Wizard for Relational Objects"
-
Section 3.2.2.4, "Selecting Stored Procedure Objects for Import"
-
Section 3.2.2.7, "Setting Properties for New Data Service Operations"
-
Section 3.2.2.9, "Adding Operations to an Existing Data Service"
-
Section 3.2.2.10, "Support for Stored Procedures in Popular Databases"
3.2.2.1 Importing Stored Procedure Metadata Using the Physical Data Service Creation Wizard
The following topics cover the actions necessary to create physical data services from relational stored procedures.
3.2.2.2 Setting Up the Physical Data Service Creation Wizard
Physical data services are created using a wizard.
Figure 3-6 Physical Data Service Creation Wizard

Description of "Figure 3-6 Physical Data Service Creation Wizard"
3.2.2.2.1 Starting the Wizard
To start the physical data service creation wizard:
-
Right-click on your dataspace project or any folder in your project.
-
Choose New > Physical Data Service
Figure 3-7 Creating a New Physical Data Service

Description of "Figure 3-7 Creating a New Physical Data Service"
3.2.2.3 Setting Up the Import Wizard for Relational Objects
When importing a relational object available options include the ability to:
-
Set a location for your new data service to be saved within your project.
-
Select a data source from the dropdown listbox.
-
Select the database type for the selected source (PointBase for the sample RDBMS) from the dropdown listbox.
-
Select among the relational source types listed in the following table.
Table 3-5 Types of available relational data sources
| Relational Type | Description |
|---|---|
|
Tables and Views |
Displays all public tables and views in the selected data source. |
|
Stored Procedures |
Displays all public stored procedures in the selected data source. |
|
SQL Statement |
Allows creation of a SQL statement for extracting relational data from the data source. |
|
Database Function |
Allows creation of an XQuery function in a library data service based on build-in or custom database functions. |
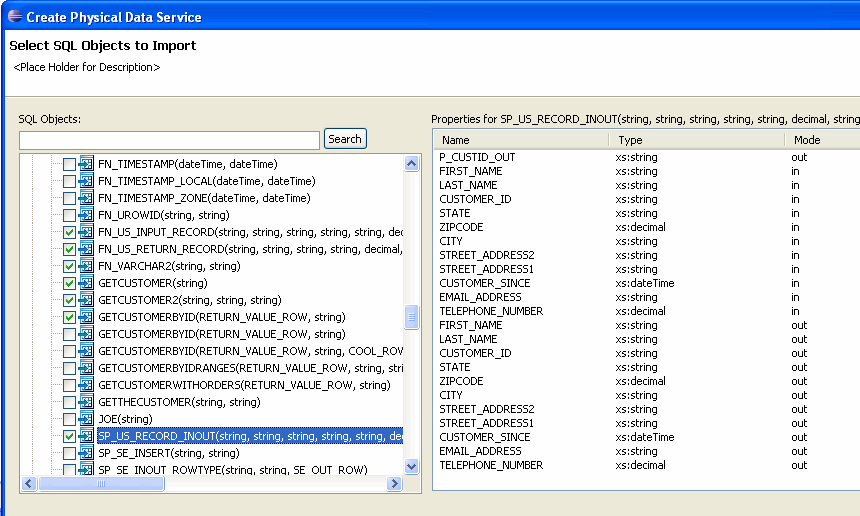
3.2.2.4 Selecting Stored Procedure Objects for Import
To create physical data services based on stored procedures:
-
Select the Stored Procedures option.
-
Click Next.
A list of available stored procedures appears.
Objects are grouped based on the relational data sources catalog and/or schema.
You can use wildcards to support importing metadata on internal stored procedures. For example, entering the following string as a stored procedure filter:
%TRIM%
retrieves metadata on the system stored procedure:
STANDARD.TRIM
In such a situation you may want to make a "nonsense" entry in the Table/View field in order to avoid retrieving all tables and views in the database.
For more information, see "Database-specific Catalog and Schema Considerations".
Simply check the desired objects or their container, which will select all enclosed stored procedures.
Figure 3-8 Stored Procedure Objects Selected for Import
Description of "Figure 3-8 Stored Procedure Objects Selected for Import"
3.2.2.4.1 Filtering SQL Objects Using Search
The Search option available when creating a physical data service can be especially useful when:
-
You know specific names of the data source objects you want to turn into data services.
-
Your data source may be so large that a filter is needed.
-
You may be looking for objects with specific naming characteristics such as:
%audit2003%
3.2.2.4.2 Using JDBC Syntax to Search SQL Objects
You can search through available SQL objects using standard JDBC wildcard syntax.
-
An underscore (_) creates a wildcard for an individual character.
-
A percentage sign (%) indicates a wildcard for a string. Entries are case-sensitive.
Another example:
CUST%, PAY%
entered in the Tables/Views field the above search string returns all tables and views starting with either CUST or PAY.
3.2.2.4.3 Special Considerations When Searching Stored Procedures
If no items are entered for a particular field, all matching items are retrieved. For example, if no filtering entry is made for the Procedure field, all stored procedures in the data object will be retrieved.
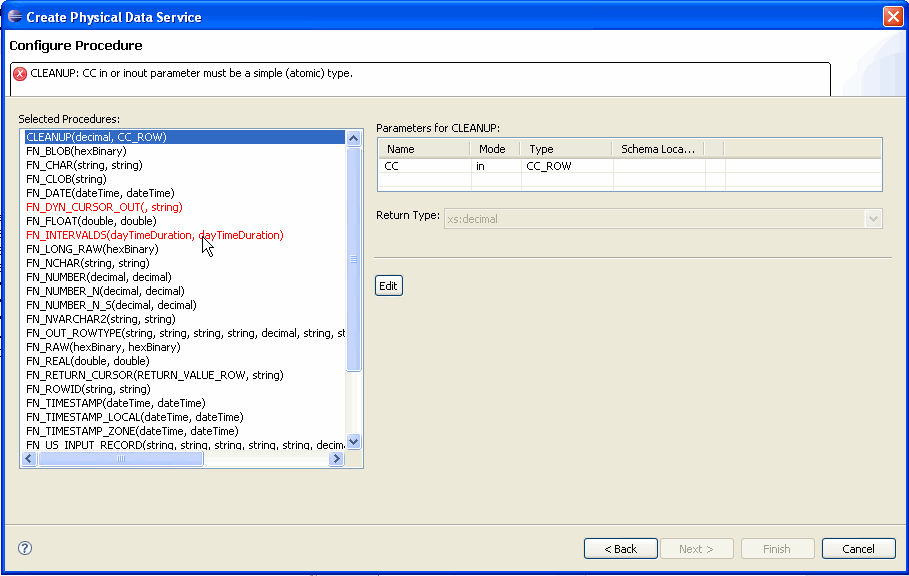
3.2.2.5 Configuring Selected Stored Procedures
When Oracle Data Service Integrator introspects a stored procedure, the process may not be complete. For example, a required item of information such as a schema file or type cannot be determined. When such introspection problems occur, the stored procedure in question is highlighted in red. This setting means that additional information about the procedure must be provided by the user before the data service can be created.
Your goal in correcting an "<unknown>" condition associated with a stored procedure is to bring the metadata obtained by the import wizard into conformance with the actual metadata of the stored procedure. In some cases this will be by correcting the location of the return type. In others you will need to adjust the type associated with an element of the procedure or add elements that were not found during the initial introspection of the stored procedure.
Figure 3-9 Configure Stored Procedure Dialog
Description of "Figure 3-9 Configure Stored Procedure Dialog"
When several stored procedures are selected at the same time for physical data service creation, all the selected procedures must be adequately configured before any data services based on the procedures can be created.
Note:
An alternative to configuring a incomplete stored procedure before proceeding is to use the wizard Back button to de-select the procedure in question.
Here are the steps involved in editing a set of stored procedures that will be imported as data services:
-
Scroll through the list of selected procedures.
-
For each procedure in red type, use the Edit button to correct the configuration settings.
-
Make any other changes. (In some cases the data architect may know of requirements that are not identified during the introspection process.)
-
Click Next when all the procedures in the selected set are valid.
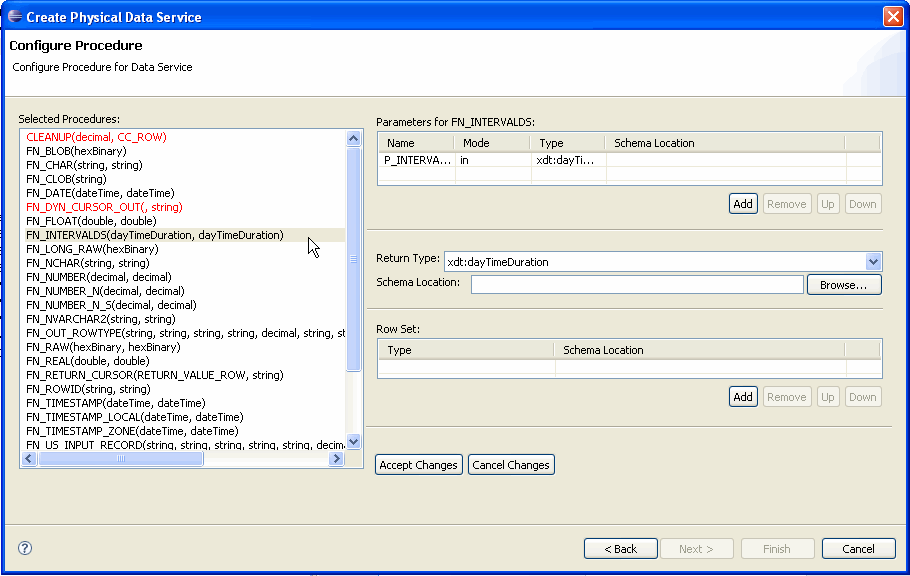
3.2.2.5.1 Editing Stored Procedure Configurations
Stored procedure configuration can be complicated. An understanding of the characteristics of the stored procedure in your database is an essential prerequisite. This section describes stored procedure options in detail.
Figure 3-10 Stored Procedure Metadata Editing Options
Description of "Figure 3-10 Stored Procedure Metadata Editing Options"
Once in stored procedure configuration edit mode, options are available in three general areas:
-
Parameters. Stored procedures requiring complex parameters can only be turned into data services once a schema has been identified. In addition, retrieved information on parameters required by a stored procedure may be incorrect. For example, additional parameters may be needed.
-
Return type. Stored procedures returning complex data require a local schema to handle data returned from the call. In addition, retrieved information on stored procedure return types may be incorrect or it may be the case that no returned data is wanted.
-
Row set. A row set identifies a schema and its associated library data service to hold information returned by a stored procedure. In some cases multiple row sets may need to be specified.
Table 3-6 Stored Procedure Editing Options
| Category | Options | Settings | Discussion |
|---|---|---|---|
|
Parameters |
Name |
Parameter name |
Editable |
|
Mode |
on/out/inout |
||
|
Type |
XQuery type |
May be derived from the stored procedure. Primitive XQuery type settings are also available. |
|
|
Schema location |
XSD file |
Schema file must be in the project. |
|
|
Return type |
Type |
XQuery type or global type from selected schema |
|
|
Schema location |
XSD file |
Schema file must be in the project. |
|
|
Row set |
Type |
Data service |
Derived from selected schema. |
|
Schema location |
XSD file |
Schema file must be in the project. |
3.2.2.6 Stored Procedure Configuration Reference
The following topics provide detailed information regarding various configuration options associated with creating data services based on stored procedures.
3.2.2.6.1 In Mode, Out Mode, Inout Mode
In, Out, and Inout mode settings determine how a parameter passed to a stored procedure is handled.
| Parameter Mode | Effect |
|---|---|
|
In |
Parameter is passed by reference or value. |
|
Inout |
Parameter is passed by reference. |
|
Out |
Parameter is passed by reference. However the parameter being passed is first initialized to a default value. If your stored procedure has an OUT parameter requiring a complex element, you may need to provide a schema. |
3.2.2.6.2 Procedure Profile
Each element in a stored procedure is associated with a type. If the item is a simple type, you can simply choose from the pop-up list of types. If the type is complex, you may need to supply an appropriate schema. Click on the schema location button and either enter a schema pathname or browse to a schema. The schema must reside in your application.
After selecting a schema, both the path to the schema file and the URI appear.
3.2.2.6.3 Complex Parameter Types
Complex parameter types are supported under only three conditions:
-
As the output parameter
-
As the Return type
-
As a rowset
3.2.2.6.4 About Rowsets
A rowset type is a complex type.
In some cases the wizard can automatically detect the structure of a rowset and create an element structure. However, if the structure is unknown, you will need to provide it.
Note:
All rowset-type definitions must conform to this structure.
The name of the rowset type can be:
-
The parameter name (in case of a input/output or output only parameter).
-
An assigned name.
-
The referenced element name (result rowsets) in a user-specified schema.
Not all databases support rowsets. In addition, JDBC does not report information related to defined rowsets.
3.2.2.6.5 Using Rowset Information
In order to create data services from stored procedures that use rowset information, you need to supply the correct ordinal (matching number) and a schema. If the schema has multiple global elements, select the one you want from the Type column. Otherwise the type used match the first global element in your schema file.
The order of rowset information is significant; it must match the order in your data source. Use the Move Up / Move Down commands to adjust the ordinal number assigned to the rowset.
Note:
XML types in data services generated from stored procedures do not display native types. However, you can view the native type in the Source editor; it is located in the pragma section.
3.2.2.6.6 Stored Procedure Version Support
Only the most recent version of a particular stored procedure can be imported into Oracle Data Service Integrator. For this reason you cannot identify a stored procedure version number when creating a physical data service based on a stored procedure. Similarly, adding a version number for your stored procedure in the Source editor will result in a query exception.
3.2.2.6.7 Supporting Stored Procedures with Nullable Input Parameter(s)
If you know that an input parameter of a stored procedure is nullable (can accept null values), you can change the signature of the function in Source View to make such parameters optional by adding a question mark at end of the parameter.
For example (question-mark (?) shown in bold):
function myProc($arg1 as xs:string) ...
would become:
function myProc($arg1 as xs:string?) ...
3.2.2.7 Setting Properties for New Data Service Operations
Each new entity data service is created with a Read function that contains all the metadata elements identified during data service creation. It can be thought of as comparable to the following construct in the relational world:
select * from <table>
Use the Properties dialog to:
-
Optionally modify the operation name.
-
Set the Public option (check if you want your function to be available to client applications).
-
Set the kind of operation (in some cases only Read will be available).
-
Set the Primary option (check if you want your function to be the primary of its type).
Note:
In some cased this option may not be available.
-
Select a common XML namespace for the entire data service or individual target namespaces for specific operations.
-
Set the target namespace.
The root element, which is read-only, is also displayed.
Note:
Initially the root element name matches the name of the data service.
Figure 3-11 Setting Properties for New Data Service Functions

Description of "Figure 3-11 Setting Properties for New Data Service Functions"
3.2.2.7.1 Default Naming Conventions
There are several default naming conventions associated with new data services:
-
When a table, view, or other data source object is the source for a data service, the nominated name is wherever possible the same as the source object name. In some cases, however, names are adjusted to conform with XML naming conventions.
-
Initially the root element name matches the name of the data service.
For more information, see XML Name Conversion Considerations.
3.2.2.8 Verifying Data Service Composition
On the Review New Data Service(s) page you can set, confirm or, optionally, change suggested data service names depending on the type of physical data service you are creating.
3.2.2.8.1 Default Physical Data Service Names
The nominated name for a new data service is, wherever possible, the same as the source object name. In some cases, however, names are adjusted to conform with XML naming conventions.
For more information, see XML Name Conversion Considerations.
3.2.2.8.2 About Automatic Data Service Name Changes
Name conflicts occur when there is a data service of the same name present in the target directory. Name conflicts are highlighted in red.
There are several situations where you will need to change the name of your data service:
-
There already is a data service of the same name in your application.
-
You are trying to create multiple data services with the same name.
Data services always have the file extension:
.ds
3.2.2.9 Adding Operations to an Existing Data Service
You can add SQL statement or stored procedure operations based on the same data source to an existing physical data service based a stored procedure.
For more information, see "How To Add an External Function to an Existing Physical Data Service".
Figure 3-12 Adding a Stored Procedure or SQL Statement to a Data Service
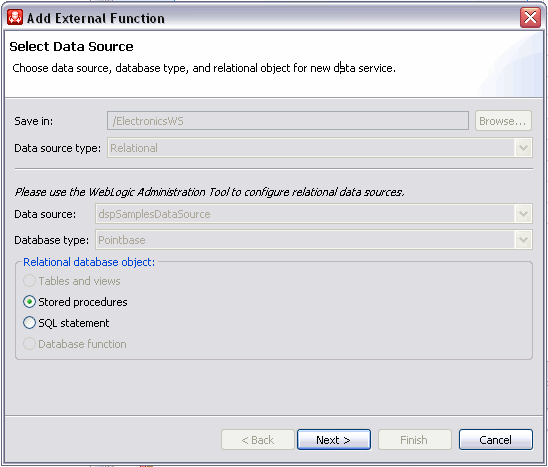
Description of "Figure 3-12 Adding a Stored Procedure or SQL Statement to a Data Service "
3.2.2.10 Support for Stored Procedures in Popular Databases
Each database vendor approaches stored procedures differently. Oracle Data Service Integrator support limitations generally reflect JDBC driver limitations.
3.2.2.10.1 General Restrictions
There are several restrictions that apply to stored procedures generally:
-
Oracle Data Service Integrator does not support rowset as an input parameter.
-
Only data types supported by Oracle Data Service Integrator can be imported as part of stored procedures.
Note:
For a list of database types supported by Oracle Data Service Integrator XQuery-SQL Mapping Reference.
3.2.2.10.2 Oracle Stored Procedure Support
The following table describes data service creation support for Oracle stored procedures.
| Term | Usage |
|---|---|
|
Procedure types |
|
|
Parameter modes |
|
|
Parameter data types |
Any Oracle PL/SQL data type except:
Note: When defining function signatures, note that the Oracle %TYPE and %ROWTYPE types must be translated to XQuery types that match the true types underlying the stored procedure's %TYPE and %ROWTYPE declarations. %TYPE declarations map to simple types; %ROWTYPE declarations map to rowset types. |
|
Data returned from a function |
Oracle supports returning PL/SQL data types such as NUMBER, VARCHAR, %TYPE, and %ROWTYPE as parameters. |
|
Comments |
The following identifies limitations associated with importing Oracle database procedure metadata.
|
3.2.2.10.3 Sybase Stored Procedure Support
The following table describes data service creation support for Sybase stored procedures.
| Term | Usage |
|---|---|
|
Procedure types |
|
|
Parameter modes |
|
|
Parameter data types |
For a list of database types supported by Oracle Data Service Integrator, see the XQuery-SQL Mapping Reference. |
|
Data returned from a function |
Sybase functions supports returning a single value or a table. Procedures return data in the following ways:
|
|
Comments |
The following identifies limitations associated with importing Sybase database procedure metadata:
|
3.2.2.10.4 IBM DB2 Stored Procedure Support
The following table describes data service creation support for IBM DB2 stored procedures.
| Term | Usage |
|---|---|
|
Procedure types |
|
|
Parameter modes |
|
|
Parameter data types |
For a list of database types supported by Oracle Data Service Integrator see the XQuery-SQL Mapping Reference. For a list of database types supported by Oracle Data Service Integrator, see the XQuery-SQL Mapping Reference. |
|
Data returned from a function |
DB2 supports returning a single value, a row of values, or a table. |
|
Comments |
The following identifies limitations associated with creating physical data services based on DB2 stored procedures:
|
3.2.2.10.5 Microsoft SQL Server Stored Procedure Support
The following table describes data service creation support for Microsoft stored procedures.
| Term | Usage |
|---|---|
|
Procedure types |
SQL Server supports procedures, grouped procedures, and functions. Each function is also categorized as a scalar or inline table-valued and multi-statement table-valued function. Inline table-valued and multi-statement table-valued functions return rowsets. |
|
Parameter modes |
SQL Server supports input only and output only parameters. |
|
Parameter data types |
SQL Server procedures/functions support any SQL Server data type as a parameter. For a list of database types supported by Oracle Data Service Integrator, see the XQuery-SQL Mapping Reference. |
|
Data returned from a function |
SQL Server functions supports returning a single value or a table. Data can be returned in the following ways:
|
|
Comments |
The following identifies limitations associated with importing SQL Server procedure metadata.
|
3.2.3 How To Create Physical Data Services Based on SQL Statements
The following topics cover the actions necessary to create physical data services from SQL statements:
-
Section 3.2.3.1, "Setting Up the Physical Data Service Creation Wizard"
-
Section 3.2.3.2, "Setting Up the Import Wizard for Relational Objects"
-
Section 3.2.3.4, "Setting Properties for New Library Functions"
3.2.3.1 Setting Up the Physical Data Service Creation Wizard
Physical data services are created using a wizard.
Figure 3-13 Physical Data Service Creation Wizard

Description of "Figure 3-13 Physical Data Service Creation Wizard"
3.2.3.1.1 Starting the Wizard
To start the physical data service creation wizard:
-
Right-click on your dataspace project or any folder in your project.
-
Choose New > Physical Data Service.
Figure 3-14 Creating a New Physical Data Service

Description of "Figure 3-14 Creating a New Physical Data Service"
3.2.3.2 Setting Up the Import Wizard for Relational Objects
When importing a relational object available options include the ability to:
-
Set a location for your new data service to be saved within your project.
-
Select a data source from the dropdown listbox.
-
Select the database type for the selected source (PointBase for the sample RDBMS) from the dropdown listbox.
-
Select among the relational source types listed in the following table.
Table 3-7 Types of available relational data sources
| Relational Type | Description |
|---|---|
|
Tables and Views |
Displays all public tables and views in the selected data source. |
|
Stored Procedures |
Displays all public stored procedures in the selected data source. |
|
SQL Statement |
Allows creation of a SQL statement for extracting relational data from the data source. |
|
Database Function |
Allows creation of an XQuery function in a library data service based on build-in or custom database functions. |
3.2.3.3 Entering a SQL Statement
You can build library data service functions based on SQL statements. The XQuery engine uses the statement to retrieve metadata which is, in turn, formulated into a function that can be used by other data services or made public.
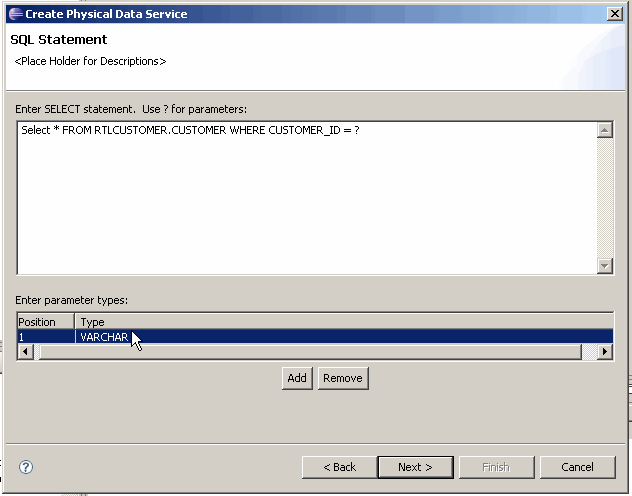
After selecting the SQL Statement option the next page of the wizard allows you to enter a SELECT statement and any necessary parameters.
You can type or paste your SELECT statement into the SELECT statement box, indicating parameters with a question-mark symbol.
?
Using one of the Oracle Data Service Integrator samples, the following SELECT statement can be used:
SELECT * FROM RTLCUSTOMER.CUSTOMER WHERE CUSTOMER_ID = ?
For the parameter field, you would need to select a data type. In this case, CHAR or VARCHAR.
-
Click Add to insert a new row into the parameter table, which indicates a parameter for the SQL statement.
-
Select Parameter Type from the drop-down combo box.
Notes:
-
When you run your query under Test View, you will need to supply the parameter in order for the query to run successfully.
-
Oracle Data Service Integrator needs to be able to refer to the columns of the result of your SQL statement by name. To ensure that this is possible, you should use aliases as needed to ensure that computed columns indeed have usable names.
-
The position of the parameter is significant.
-
-
In Test view run your query, supplying a parameter such as
CUSTOMER3.
3.2.3.3.1 Adding Operations to an Existing Data Service
You can add SQL statement or stored procedure operations based on the same data source to an existing physical data service based a SQL statement.
For more information, see "How To Add an External Function to an Existing Physical Data Service".
Figure 3-16 Adding a Stored Procedure or SQL Statement to a Data Service

Description of "Figure 3-16 Adding a Stored Procedure or SQL Statement to a Data Service "
3.2.3.4 Setting Properties for New Library Functions
This general topic applies to setting properties for all types of library data service functions.
Use the Review New Data Service Operations page to:
-
Change the function name.
-
Set the Public option (check if you want your function to be available to client applications).
-
Set the kind of function (in some cases only one option will be available).
-
Set the Primary option (check if you want your function to be the primary of its type).
Note:
In some cases this option may not be available.
-
Select a common XML namespace for the entire data service.
-
Set the target namespace.
3.2.3.5 Verifying Data Service Composition
On the Review New Data Service(s) page you can set, confirm or, optionally, change suggested data service names depending on the type of physical data service you are creating.
3.2.3.5.1 Default Physical Data Service Names
The nominated name for a new data service is, wherever possible, the same as the source object name. In some cases, however, names are adjusted to conform with XML naming conventions.
For more information, see "XML Name Conversion Considerations".
3.2.3.5.2 About Automatic Data Service Name Changes
Name conflicts occur when there is a data service of the same name present in the target directory. Name conflicts are highlighted in red.
There are several situations where you will need to change the name of your data service:
-
There already is a data service of the same name in your application.
-
You are trying to create multiple data services with the same name.
Data services always have the file extension:
.ds
3.2.4 How To Create Physical Data Services Based on Database Functions
You can create library physical data services based on two types of database functions:
-
Functions that are provided with your database.
-
Custom functions that you have created and stored in your database.
Note:
A library data service created based on database functions is restricted to that type of function. For example, a library function based on a stored procedure cannot be added to a library data service that contains database functions.
A library data service created based on database functions is restricted to that type of function. For example, a library function based on a stored procedure cannot be added to a library data service that contains database functions.
-
Section 3.2.4.1, "Setting Up the Physical Data Service Creation Wizard"
-
Section 3.2.4.2, "Setting Up the Import Wizard for Relational Objects"
You can use the physical data service creation wizard to:
-
Select relational as the Data Source type.
-
Select a data source from available relational sources.
-
Choose a database type. Database types listed would be drawn from the list of available database providers for your data source. By default Generic, the base platform provider, and Pointbase are provided.
-
Select the Database function option.
3.2.4.1 Setting Up the Physical Data Service Creation Wizard
Physical data services are created using a wizard.
Figure 3-17 Physical Data Service Creation Wizard

Description of "Figure 3-17 Physical Data Service Creation Wizard"
To start the physical data service creation wizard:
-
Right-click on your dataspace project or any folder in your project.
-
Choose New > Physical Data Service
Figure 3-18 Creating a New Physical Data Service

Description of "Figure 3-18 Creating a New Physical Data Service"
3.2.4.2 Setting Up the Import Wizard for Relational Objects
When importing a relational object available options include the ability to:
-
Set a location for your new data service to be saved within your project.
-
Select a data source from the dropdown listbox.
-
Select the database type for the selected source (PointBase for the sample RDBMS) from the dropdown listbox.
-
Select among the relational source types listed in the following table.
Table 3-8 Types of available relational data sources
| Relational Type | Relational Type |
|---|---|
|
Tables and Views |
Displays all public tables and views in the selected data source. |
|
Stored Procedures |
Displays all public stored procedures in the selected data source. |
|
SQL Statement |
Allows creation of a SQL statement for extracting relational data from the data source. |
|
Database Function |
Allows creation of an XQuery function in a library data service based on build-in or custom database functions. |
-
In the Select a Data Source dialog choose Database function.
-
Click Next.
Figure 3-19 Importing Database Function Metadata
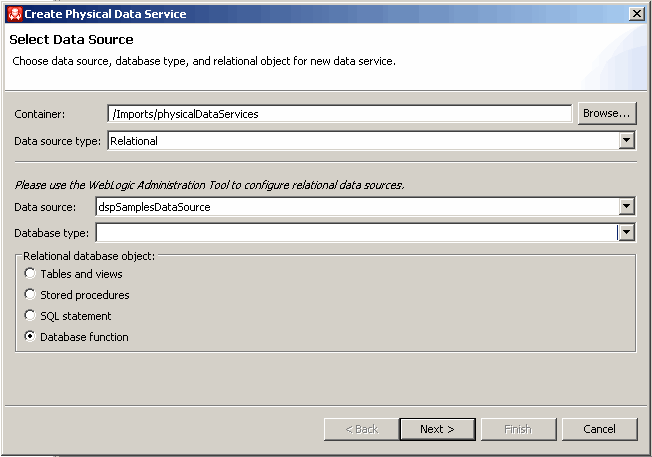
Description of "Figure 3-19 Importing Database Function Metadata "
3.2.4.3 Providing Database Function Details
Here are instructions for how to provide database function information.
-
Select a data source from the dropdown list of data sources available to your server. You should identify a data source that contains the built-in or user-defined database functions you want to access through your data services.
-
Enter the information necessary to identify your database function.
-
Complete the function definition including identifying parameters in Source view.
Figure 3-20 Entering Database Function Information
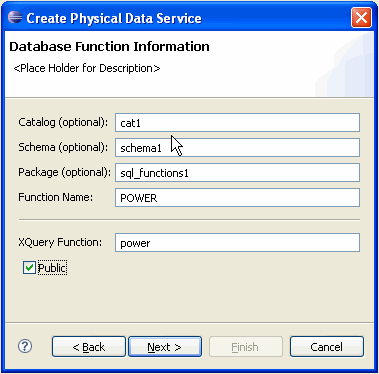
Description of "Figure 3-20 Entering Database Function Information"
Table 3-9 Database Function Information Dialog Options
| Option | Action | Comment/Reference |
|---|---|---|
|
Catalog: |
Enter catalog name, if needed by your RDBMS |
|
|
Schema: |
Enter schema name, if needed by your RDBMS |
|
|
Package: |
Enter package name, if needed by your RDBMS |
|
|
Function name: |
Database function name |
Required. |
|
XQuery function |
XQuery function name |
Required; will invoke the database function. |
|
Public |
Select, if you want to make your operation public |
Default for created XQuery functions is protected. |
|
Click Next |
||
|
Review |
Enter library data service name |
If the name of an existing library data service is provided. |
3.2.4.4 Verifying Data Service Composition
On the Review New Data Service(s) page you can set, confirm or, optionally, change suggested data service names depending on the type of physical data service you are creating.
3.2.4.4.1 Default Physical Data Service Names
For more information, see "XML Name Conversion Considerations".
3.2.4.4.2 About Automatic Data Service Name Changes
Name conflicts occur when there is a data service of the same name present in the target directory. Name conflicts are highlighted in red.
There are several situations where you will need to change the name of your data service:
-
There already is a data service of the same name in your application.
-
You are trying to create multiple data services with the same name.
Data services always have the file extension:
.ds
3.2.5 How To Create a Physical Data Service from a Web Service
In Oracle Data Service Integrator, three top-level provider types are identified:
-
WSDL File
-
URI
-
ALSB Proxy
A Web service is a self-contained, platform-independent unit of business logic that is accessible through application adaptors, as well as standards-based Internet protocols such as HTTP or SOAP.
Web services greatly facilitate application-to-application communication. As such they are increasingly central to enterprise data resources. A familiar example of an externalized Web service is a frequent-update weather portlet or stock quotes portlet that can easily be integrated into a Web application.
Similarly, a Web service can be effectively used to track a drop shipment order from a seller to a manufacturer.
This section describes the following topics:
-
Section 3.2.5.1, "Setting Up the Physical Data Service Creation Wizard"
-
Section 3.2.5.3, "Selecting Web Service Operations to Import"
-
Section 3.2.5.4, "Setting Characteristics of Imported Web Service Operations"
3.2.5.1 Setting Up the Physical Data Service Creation Wizard
Physical data services are created using a wizard.
Figure 3-21 Physical Data Service Creation Wizard

Description of "Figure 3-21 Physical Data Service Creation Wizard"
3.2.5.1.1 Starting the Wizard
To start the physical data service creation wizard:
-
Right-click on your dataspace project or any folder in your project.
-
Choose New > Physical Data Service
Figure 3-22 Creating a New Physical Data Service

Description of "Figure 3-22 Creating a New Physical Data Service"
3.2.5.2 Accessing a Web Service
After you select web service as your data source, you are given the option of specifying a WSDL file, URI, or ALSB proxy service.
Figure 3-23 Selecting Web Service as a Data Source
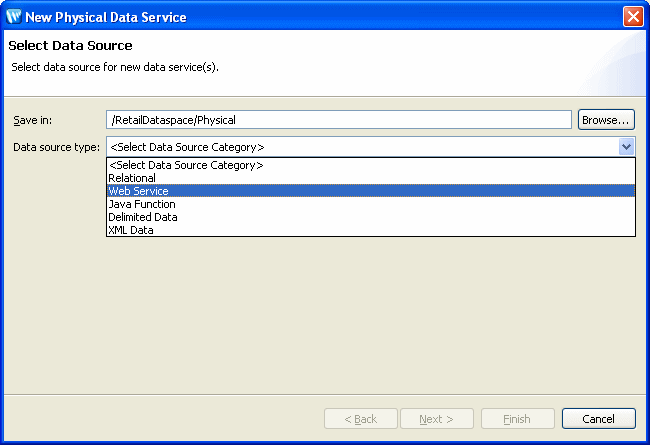
Description of "Figure 3-23 Selecting Web Service as a Data Source"
There are several ways to access a specific web service:
-
From a Web Service Description Language (WSDL) file located in your current OSDI Studio project or through the AquaLogic Service Consumption Framework (SCF).
-
From a WSDL accessible via a URL.
-
Through an ALSB proxy service.
3.2.5.2.1 Locating a WSDL File
You can select a WSDL file in two ways:
-
From your project using the Browse button or
-
By downloading a WSDL to your project through the consumption framework
3.2.5.2.2 Browsing to a WSDL
Click Browse to navigate to a WSDL in your current dataspace project.
3.2.5.2.3 Downloading a WSDL File via the Service Consumption Framework
To download a WSDL file using the Service Consumption Framework:
-
Click on Download WSDL...
-
Select from available Service Resource Options.
-
Click OK. A SCF message indicating success or failure will appear.
-
Click Next.
-
Choose from available operations.
Note:
Downloading a WSDL is similar to downloading a text file. Once it is in your project, you can treat it as local and make changes. Changes made to such a WSDL will not be reflected in the source WSDL. Similarly, any changes to the source WSDL (new operations or changes to the signature) would only be reflected if the WSDL was again downloaded and re-imported.
Figure 3-24 Using the Service Consumption Framework to Access a WSDL
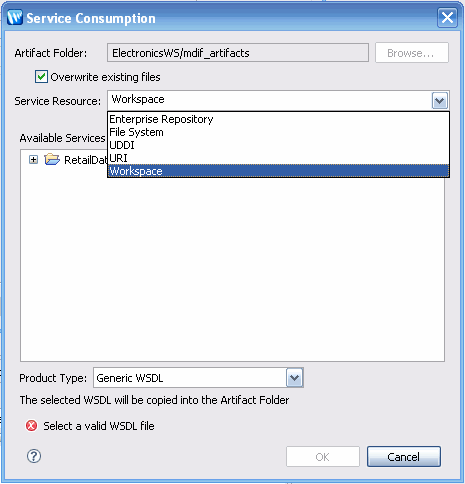
Description of "Figure 3-24 Using the Service Consumption Framework to Access a WSDL"
The following table briefly describe available service resources:
| Resource | Description |
|---|---|
|
Enterprise Repository |
WSDLs in the associated artifacts folder of the Enterprise Repository |
|
UDDI |
UDDI resources registered with the UDDI registry. |
|
URI |
Any valid WSDL accessible via URI (alternatively, use the URI option from the primary dialog) |
|
File System |
A WSDL retrievable from the local file system |
|
Workspace |
WSDLs or services in other projects in the Workspace (alternatively, use the Browse button for WSDLs in the current project on the primary dialog). |
3.2.5.2.4 Selecting the Product Type
For a Workspace service resource, services can be consumed from several types of products. By default, three product types are available:
-
Generic WSDL
-
SAM (Service Assembly Modeler)
-
AquaLogic Data Services Platform
Figure 3-25 Selecting a WSDL from an OSDI Studio Workspace
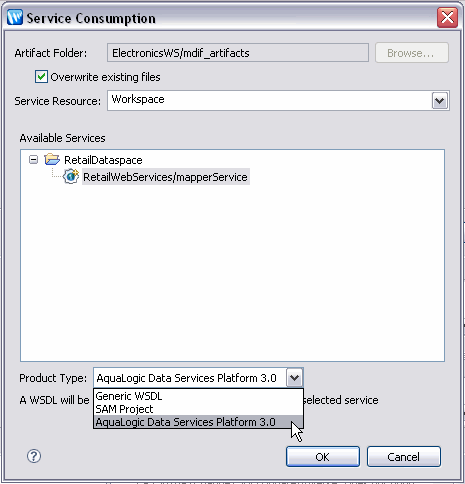
Description of "Figure 3-25 Selecting a WSDL from an OSDI Studio Workspace"
If you download a WSDL via SCF through either the Enterprise Repository or Workspace option and you are using the OSDI Studio or ALSB product type, you can locate and view the originated service of the WSDL using the Navigate to External Service right-click menu option on the WSDL file in the Project Explorer.
3.2.5.2.5 Specifying a WSDL URI
Specifying a WSDL URI
You can test the ability to create a physical data service based on a web service using the following WSDL (available as of this writing):
http://www.whitemesa.net/wsdl/r2/base.wsdl
Figure 3-26 Importing Metadata from a WSDL
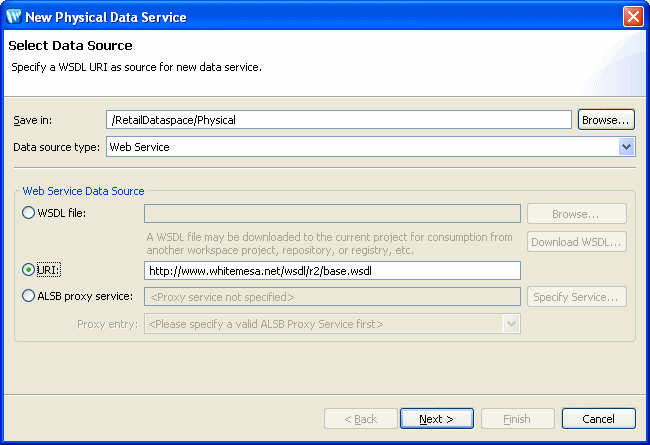
Description of "Figure 3-26 Importing Metadata from a WSDL"
3.2.5.2.6 The ALSB Proxy Service Option
To access web services through AquaLogic Service Bus (ALSB) you need to:
-
Provide access and credential information to AquaLogic Service Bus.
-
Select a proxy service (if there is more than one).
AquaLogic Service Bus access requires providing the following:
-
Server name
-
Port number
-
User name
-
Password
This information should be available from your AquaLogic Service Bus administrator.
Note:
-
You must configure the ALSB proxy service to use the sb transport protocol to enable access through OSDI Studio.
-
The Select Proxy list only shows the WSDL-based AquaLogic Service Bus transport proxies in the ALSB server you are connected to.
After the required information is provided, the WSDL will become available using the name of the selected proxy service.
3.2.5.2.7 Steps in Importing a Web Service
-
Specify a Web service URL, local WSDL file, or ALSB proxy service.
-
Click Next.
3.2.5.3 Selecting Web Service Operations to Import
From the list of available webservice operations grouped by serviceName and portname, choose the operation that you want to turn into data service operation.
Figure 3-27 Selecting Web Service Operations
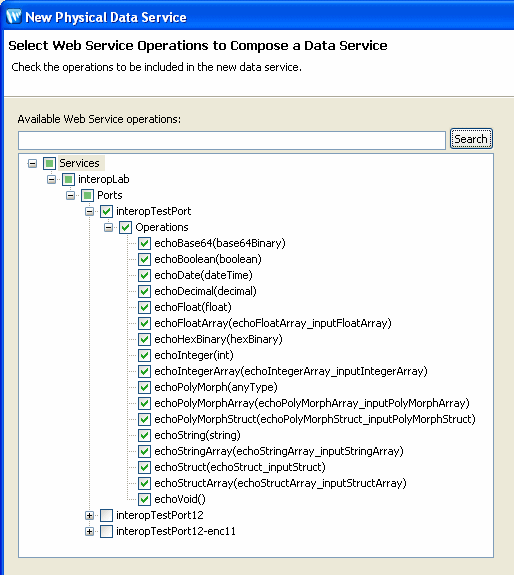
Description of "Figure 3-27 Selecting Web Service Operations"
Note:
During the import process you will be choosing the operations you want to import, setting names and other characteristics. These choices will determine whether a Library or Entity data service will be created. Thus a familiarity with the operations of your Web service is needed.
3.2.5.3.1 Adding Operations to an Existing Data Service
You can add operations to an existing physical data service based a web service by adding an external function from the same WSDL.
For more information, see "How To Add an External Function to an Existing Physical Data Service".
Figure 3-28 Adding an External Operation to a Data Service
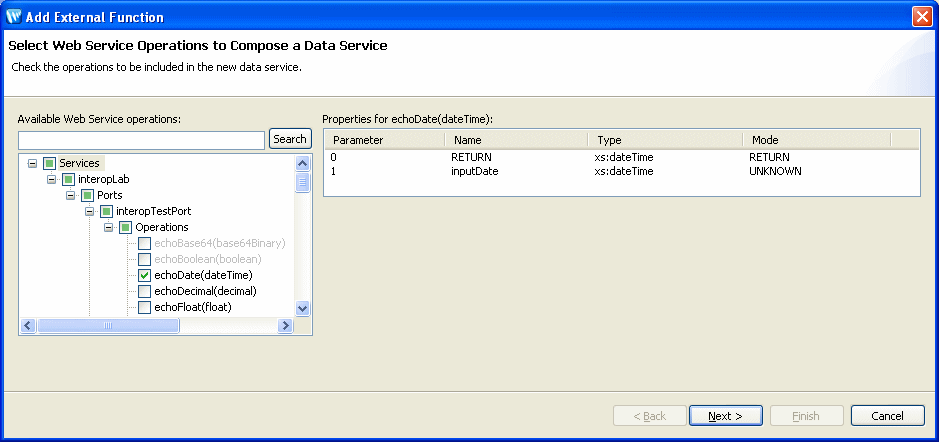
Description of "Figure 3-28 Adding an External Operation to a Data Service "
3.2.5.4 Setting Characteristics of Imported Web Service Operations
The following table describes available options for each operation you have selected to import.
Table 3-10 Options Available for Imported Web Service Operations
| Characteristic | Options | Comment |
|---|---|---|
|
Operation |
adjust as needed |
You can change the nominated name to any legal XML name using the built-in line editor. |
|
Public |
Boolean |
By default Web service-derived operations are protected. A checkbox allows you to mark any function or procedure as public. (Once in a data service, operations can be marked private as needed.) |
|
Kind |
|
Operations determined to return void are automatically marked as library procedures. You can change the nominated function type. The wizard attempts to correctly set the function type being imported. Note: Operations marked as create, update, or delete functions will be packaged in an Entity data service. Otherwise, the resulting data service will be of type Library. |
|
Primary |
Boolean |
Not applicable for web service operations. |
|
Root Element |
Root element of the operation |
For complex data types the topmost element is listed. In case of RPC-style web services the top-most generated element is listed. |
|
Target Namespace |
imported value |
This represents the target namespace of the generated data service. |
Figure 3-29 Setting Characteristics of Imported Web Service Operations
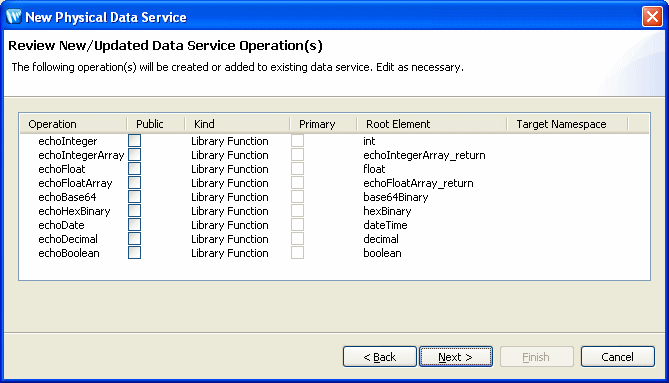
Description of "Figure 3-29 Setting Characteristics of Imported Web Service Operations "
3.2.5.5 Setting the Data Service Name
You can change the name of your data service to any legal name that does not conflict with another name in the current data space.
In addition, if there already is a data service in your project based on the same WSDL an option to add the new operation to the existing data service appears.
Note:
When importing a web service operation that itself has one or more dependent (or referenced) schemas, the wizard creates second-level schemas according to internal naming conventions. If several operations reference the same secondary schemas, the generated name for the secondary schema may change if you re-import or synchronize with the Web service.
3.2.5.5.1 Implementation Notes
This section contains implementation notes.
3.2.5.5.2 Special Considerations when Creating a Data Service Based on a RPC-Style Web Service
In case of RPC-style web services, results are return as qualified or unqualified based on the setting of the schema attribute:
elementFormDefault
In the general case of web services, elementFormDefault can be overridden by setting the form attribute for any child element. However, such individual settings are ignored for RPC-style web services since only the global setting (qualified or unqualified) is taken into account.
For example:
<s:schema elementFormDefault="qualified"
   targetNamespace="http://temp.openuri.org/SampleApp/CustomerOrder.xsd"
   xmlns:s0="http://temp.openuri.org/SampleApp/CustomerOrder.xsd"
   xmlns:s="http://www.w3.org/2001/XMLSchema">
  <s:complexType name="ORDER">
    <s:sequence>
      <s:element minOccurs="0" maxOccurs="1" form="unqualified" name="ORDER_ID" type="s:string"/>
      <s:element minOccurs="0" maxOccurs="1" form="unqualified" name="CUSTOMER_ID"
       type="s:string"/>
    </s:sequence>
  </s:complexType>
</s:schema>
In the above code the global element is qualified but a child element (ORDER_ID) is unqualified.
In the standard case, the special setting of "unqualified" for ORDER_ID will be honored. In the case of RPC-style web services, however, the runtime will generate "qualified" attributes for all the elements, including ORDER_ID.
Note:
RPC-style web services such as those generated by ADO.NET may contain child elements with "form" attributes which do not match the schema's elementFormDefault declaration. In order for such web services to be turned into executable data service operations, make sure that all form element attributes and the elementFormDefault attribute are in agreement (either "qualified" or "unqualified").
3.2.5.5.3 Multi-dimensional Arrays in RPC Mode
Multi-dimensional arrays in RPC mode are not supported.
3.2.5.5.4 See Also
For more information, see How to Create SOAP Handlers for Imported WSDLs.
3.2.6 Preparing to Create Physical Data Services From Java Functions
This topic provides an overview of how to create a new physical data service from Java functions.
Before you can create physical data services based on custom Java functions, you need to create a Java class containing both the schema and function information. The entire process involves the following:
-
Using Apache XMLBeans, Oracle XMLBeans, or SDO DataObjects, create a schema of the data that is being used as parameters and return values by the Java functions.
-
Create the XMLBean classes or SDO DataObject classes and package them in a JAR file.
Tip:
For more information, see Creating XMLBean Support for Java Functions.
-
Place the JAR file in the
DSP-INF/libfolder of the project in which you want to create the new Physical Data Service. -
Create the new Physical Data Service based on your custom Java functions by importing the corresponding
.classfile.
3.2.7 How To Create a Physical Data Service from a Java Function
The following sections describe how to create physical data services based on custom Java functions that return both simple and complex types.
Note:
Before you can create physical data services based on custom Java functions, you must create a Java class containing both the schema and function information. For more information, see "Preparing to Create Physical Data Services From Java Functions".
For more information about supported Java types and the corresponding generated data services, see "Physical Data Services from Java Functions Overview".
-
Section 3.2.7.1, "Setting Up the Physical Data Service Creation Wizard"
-
Section 3.2.7.1, "Setting Up the Physical Data Service Creation Wizard"
-
Section 3.2.7.4, "Setting Characteristics of Imported Java Functions"
3.2.7.1 Setting Up the Physical Data Service Creation Wizard
Physical data services are created using a wizard.
Figure 3-30 Physical Data Service Creation Wizard

Description of "Figure 3-30 Physical Data Service Creation Wizard"
3.2.7.1.1 Starting the Wizard
To start the physical data service creation wizard:
-
Right-click on your dataspace project or any folder in your project.
-
Choose New > Physical Data Service.
Figure 3-31 Creating a New Physical Data Service

Description of "Figure 3-31 Creating a New Physical Data Service"
3.2.7.2 Accessing Java Functions
After you choose Java Function as your data source, you need to specify a class name containing the Java functions.
Figure 3-32 Choosing Java Function as a Data Source
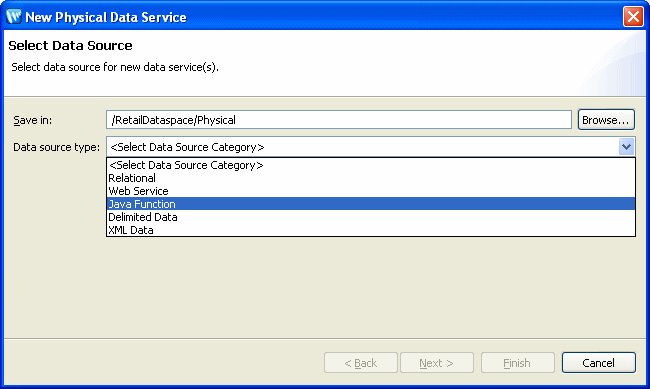
Description of "Figure 3-32 Choosing Java Function as a Data Source"
3.2.7.2.1 Choosing the Java class:
To choose the Java class containing the Java functions:
-
Choose Java Function from the Data source type drop-down list.
-
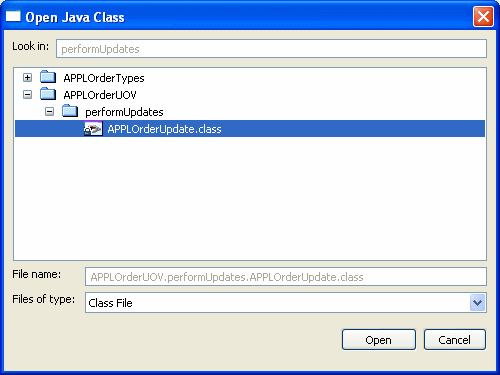
Click Browse. The Open Java Class dialog appears.
-
Select the Java
.classfile and click Open.The
.classfile must reside in the same dataspace into which you are importing the Java functions. -
Click Next.
3.2.7.3 Selecting Java Functions to Import
After you select Java Function as your data source, you need to select the Java functions to import.
Figure 3-34 Selecting Java Function Dialog

Description of "Figure 3-34 Selecting Java Function Dialog"
To select the Java functions to import:
-
Select the Java functions you want to import by checking the corresponding box.
Select With Change Summary to have Oracle Data Service Integrator declare the parameter or return value as changed-element enabling you to use it with update operations. This option is only available for SDO DataObject-generated classes.
-
Click Next.
3.2.7.4 Setting Characteristics of Imported Java Functions
After choosing the Java functions to import, you can optionally set the characteristics of the functions.
Figure 3-35 Setting Characteristics of Imported Java Functions
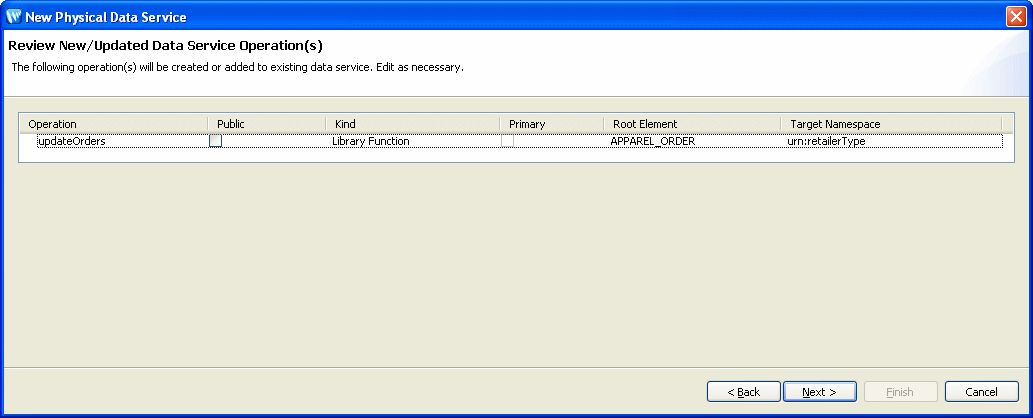
Description of "Figure 3-35 Setting Characteristics of Imported Java Functions "
The following table describes the available options for each function you have selected to import.
Table 3-11 Options Available for Imported Java Functions
| Characteristic | Options | Comment |
|---|---|---|
|
Operation name |
Adjust as needed |
You can change the nominated name to any legal XML name using the built-in line editor. |
|
Public |
Boolean |
By default Java function-derived operations are protected. A checkbox allows you to mark any function or procedure as public. (Once in a data service, operations can be marked private as needed.) |
|
Kind |
|
Functions determined to return void are automatically marked as library procedures. You can change the nominated function type. The wizard attempts to correctly set the function type being imported. Note: Operations marked as create, update, or delete functions will be packaged in an Entity data service. Otherwise, the resulting data service will be of type Library. |
|
is Primary |
Boolean |
Not applicable for Java functions. |
|
Root Element |
Root element of the operation |
For complex data types the topmost element is listed. |
|
Target Namespace |
Imported value |
This represents the target namespace of the generated data service. |
To set the characteristics of imported Java functions:
-
Optionally edit the details of each operation:
-
Click Next.
3.2.7.5 Setting the Physical Data Service Name
You can set the name of your data service to any legal name that does not conflict with another name in the current dataspace.
To complete the wizard:
-
Type the name of the data service in the Data service name field.
-
Click Finish.
Oracle Data Service Integrator creates a pragma (visible in Source view) that defines the function signature and relevant schema type for complex types such as schema elements or SDO types.
If there are existing data services in your project, you have the option of adding functions and procedures to that library or creating a new library for them. All the Java file functions are located in the same data service.
Note:
When importing a Java function that itself has one or more dependent (or referenced) schemas, the wizard creates second-level schemas according to internal naming conventions. If several operations reference the same secondary schemas, the generated name for the secondary schema may change if you re-import or synchronize with the Java class.
3.2.8 How To Create a Physical Data Service from XML Data
XML files are a convenient means of handling hierarchical data. XML files and associated schemas are easily turned into library data service functions.
The following topics cover the actions necessary to create physical data services from XML data:
-
Section 3.2.8.1, "Setting Up the Physical Data Service Creation Wizard"
-
Section 3.2.8.3, "Setting Properties for New Library Functions"
You can use the physical data service creation wizard to:
-
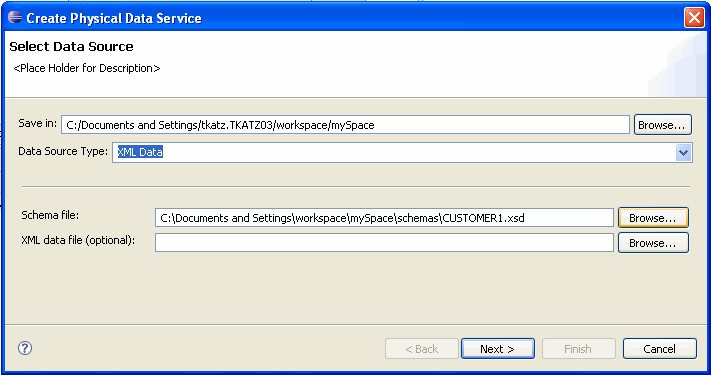
Select XML Data as the Data Source type.
-
Select a schema file and option data file.
-
Create a Library data service based on the XML data.
3.2.8.1 Setting Up the Physical Data Service Creation Wizard
Physical data services are created using a wizard.
Figure 3-36 Physical Data Service Creation Wizard

Description of "Figure 3-36 Physical Data Service Creation Wizard"
3.2.8.1.1 Starting the Wizard
To start the physical data service creation wizard:
-
Right-click on your dataspace project or any folder in your project.
-
Choose New > Physical Data Service
Figure 3-37 Creating a New Physical Data Service

Description of "Figure 3-37 Creating a New Physical Data Service"
3.2.8.2 Specifying XML Data Schema and File
A physical data service based on XML data requires identification of a valid XML schema and, optionally, a data source.
The scheme must be available in your dataspace.
The data source can be:
-
File-based
-
URI-based
In most cases the XML data will be available at runtime, through a URI.
However, in cases where the XML data is also in your project you can specify an absolute location for the file. You can also import data from any XML file on your system using an absolute path prepended with the following:
file:///
For example, on Windows systems you can access an XML file such as Orders.xml from the root C: directory using the following URI:
file:///c:/Orders.xml
On a UNIX system, you would access such a file with the following URI:
file:///home/Orders.xml
3.2.8.3 Setting Properties for New Library Functions
This general topic applies to setting properties for all types of library data service functions.
Use the Review New Data Service Operations page to:
-
Change the function name.
-
Set the Public option (check if you want your function to be available to client applications).
-
Set the kind of function (in some cases only one option will be available).
-
Set the Primary option (check if you want your function to be the primary of its type).
Note:
In some cases this option may not be available.
-
Select a common XML namespace for the entire data service.
-
Select a common XML namespace for the entire data service.
-
Set the target namespace.
The root element, which is read only, is also displayed.
3.2.8.4 Verifying Data Service Composition
On the Review New Data Service(s) page you can set, confirm or, optionally, change suggested data service names depending on the type of physical data service you are creating.
3.2.8.4.1 Default Physical Data Service Names
The nominated name for a new data service is, wherever possible, the same as the source object name. In some cases, however, names are adjusted to conform with XML naming conventions.
When a source name is encountered that does not fit within XML naming conventions, default generated names are converted according to rules described by the SQLX standard.
Generally speaking, an invalid XML name character is replaced by its hexadecimal escape sequence (having the form xUUUU).
3.2.8.4.2 About Automatic Data Service Name Changes
Name conflicts occur when there is a data service of the same name present in the target directory. Name conflicts are highlighted in red.
There are several situations where you will need to change the name of your data service:
-
There already is a data service of the same name in your application.
-
You are trying to create multiple data services with the same name.
Data services always have the file extension:
.ds
3.2.8.5 XML File Import Sample
An XML file import sample can be found in the sample RTLApp directory:
DataServices/Demo
3.2.8.5.1 Testing the Import Wizard with an XML Data Source
When you create metadata for an XML data source but do not supply a data source name, you will need to identify the URI of your data source as a parameter when you execute the data service's read function.
The identification takes the form of:
<uri>/path/filename.xml
where uri is representative of a path or path alias, path represents the directory and filename.xml represents the filename. The .xml extension is required.
3.2.9 How To Create a Physical Data Service from a Delimited File
Spreadsheets offer a highly adaptable means of storing and manipulating information, especially information which needs to be changed quickly. You can easily turn such spreadsheet data into a data services.
Figure 3-39 Physical Data Service Creation Wizard

Description of "Figure 3-39 Physical Data Service Creation Wizard"
You can use the physical data service creation wizard to:
-
Select a delimited file as the Data Source type.
-
Select either a schema file or a file with delimited data.
-
Specify whether the information has a header or not.
-
Specify delimiter.
-
Specify a fixed width value for each column.
The following topics cover the actions necessary to create physical data services from delimited files:
-
Section 3.2.9.1, "Setting Up the Physical Data Service Creation Wizard"
-
Section 3.2.9.3, "Setting Properties for New Library Functions"
3.2.9.1 Setting Up the Physical Data Service Creation Wizard
Physical data services are created using a wizard.
Figure 3-40 Physical Data Service Creation Wizard

Description of "Figure 3-40 Physical Data Service Creation Wizard"
3.2.9.1.1 Starting the Wizard
To start the physical data service creation wizard:
-
Right-click on your dataspace project or any folder in your project.
-
Choose New > Physical Data Service.
Figure 3-41 Creating a New Physical Data Service

Description of "Figure 3-41 Creating a New Physical Data Service"
3.2.9.2 Specifying Delimited File Information
A Library data service based on delimited data requires:
-
Schema in your project and/or a
-
Location of the delimited data file
Figure 3-42 Import Delimited File Data Wizard
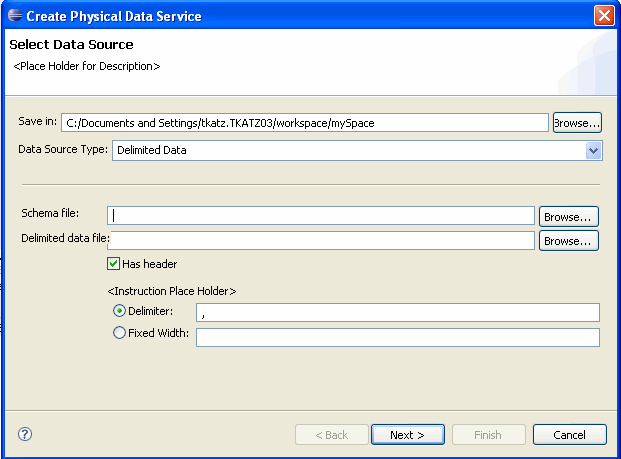
Description of "Figure 3-42 Import Delimited File Data Wizard"
The schema and data file must be available in your dataspace.
3.2.9.2.1 Providing a Document Name, a Schema Name, or Both
There are several approaches to developing metadata around delimited information, depending on your needs and the nature of the source.
-
Provide a delimited document name only. If you supply the import wizard with the name of a valid CSV file, the wizard will automatically create a schema based on the columns in the document. All the columns will be of type string, although you can later modify the generated schema with more accurate type information. The generated schema will have the same name as the source file.
-
Providing a schema name only. This option is typically used when the source file is dynamic; for example, when data is streamed.
-
Providing both a schema and a document name. Providing a schema with a CSV file gives you the ability to more accurately type information in the columns of a delimited document.
3.2.9.2.2 Locating the CSV File
Using the import wizard you can browse to any file in your project. You can also import data from any CSV file on your system using an absolute path prepended with:
file:///
For example, on Windows systems you can access an XML file such as Orders.xml from the root C: directory using the following URI:
file:///<c:/home>/Orders.csv
On a UNIX system, you would access such a file with the URI:
file:///<home>/Orders.csv
3.2.9.2.3 Import Delimited Data Options
There are two options:
-
Header. Indicates whether the delimited file contains header data. Header data is located in the first row of the spreadsheet. If you check this option, the first row will not be treated as imported data.
-
Delimited or Fixed Width. Data in your file is either separated by a specific character (such as a comma) or is of a fixed width (such as 10 spaces). If the data is delimited, you also need to provide the delimited character. By default the character is a comma.
3.2.9.2.4 Supported Datatypes
The following datatypes are supported for delimited file metadata import operations:
XMLSchemaType.BASE64BINARY
XMLSchemaType.BOOLEAN
XMLSchemaType.DATE
XMLSchemaType.DATETIME
XMLSchemaType.DECIMAL
XMLSchemaType.DOUBLE
XMLSchemaType.FLOAT
XMLSchemaType.INT
XMLSchemaType.INTEGER
XMLSchemaType.LONG
XMLSchemaType.STRING
XMLSchemaType.SHORT
3.2.9.2.5 Additional Considerations
Consider the following:
-
The number of delimiters in each row must match the number of header columns in your source minus one (# of columns-1). If subsequent rows contain more than the maximum number of delimiters (fields), subsequent use of the data service will not be successful.
-
If the delimited file has rows with a variable number of delimiters (fields), you can supply a schema that contains optional elements for the trailing set of extra elements.
-
Not all characters are handled the same way. Some characters may need special escape sequences before spreadsheet data can be accessed at runtime.
3.2.9.3 Setting Properties for New Library Functions
This general topic applies to setting properties for all types of library data service functions.
Use the Review New Data Service Operations page to:
-
Change the function name.
-
Set the Public option (check if you want your function to be available to client applications).
-
Set the kind of function (in some cases only one option will be available).
Note:
In some cases this option may not be available.
-
Select a common XML namespace for the entire data service.
-
Set the target namespace.
The root element, which is read only, is also displayed.
3.2.9.4 Verifying Data Service Composition
On the Review New Data Service(s) page you can set, confirm or, optionally, change suggested data service names depending on the type of physical data service you are creating.
3.2.9.4.1 Default Physical Data Service Names
The nominated name for a new data service is, wherever possible, the same as the source object name. In some cases, however, names are adjusted to conform with XML naming conventions.
For more information, see XML Name Conversion Considerations.
3.2.9.4.2 About Automatic Data Service Name Changes
Name conflicts occur when there is a data service of the same name present in the target directory. Name conflicts are highlighted in red.
There are several situations where you will need to change the name of your data service:
-
There already is a data service of the same name in your application.
-
You are trying to create multiple data services with the same name.
Data services always have the file extension:
.ds
3.3 How to
These sections describe procedures to create and update physical data services:
-
Section 3.3.2, "How To Update Physical Data Service Metadata"
-
Section 3.3.4, "Creating XMLBean Support for Java Functions"
-
Section 3.3.6, "Physical Data Service from a Java Function - Example Code"
3.3.1 How To Enable Optimistic Locking
These sections describe how to enable optimistic locking in order to update a physical relational data source.
3.3.1.1 Set the Locking Policy
Define the optimistic locking policy on the physical data sources that support your logical data service before you attempt to test an update in Test view or use an update map. Optimistic locking is used with physical data sources that are relational.
The current value of optimistic locking is defined in the Optimistic Locking Fields property. You can see this property in the Properties tab in Overview mode.
Figure 3-43 Checking the Optimistic Locking Policy
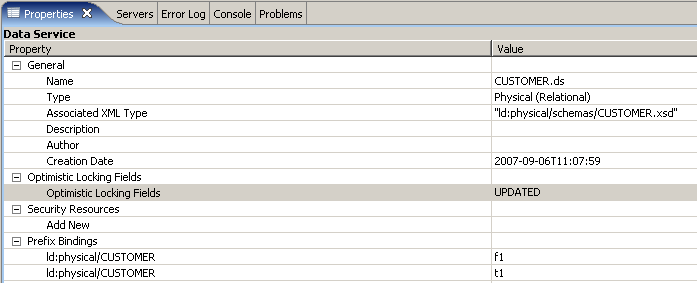
Description of "Figure 3-43 Checking the Optimistic Locking Policy"
Updates to relational data sources use a special XML structure called a data graph. The root element of data graph is <sdo:datagraph>, and the data graph also has a <changeSummary> element.
You can use any of these values for Optimistic Locking Fields. They describe how the elements in the data graph compare to fields in the relational data source.
| Value of Optimistic Locking Fields | Effect |
|---|---|
|
PROJECTED |
All elements in the data graph are mapped to the data source to verify whether it can be updated. Default value. |
|
UPDATED |
Only elements that have changed in your data graph are used to verify whether the data source has changed. |
|
SELECTED FIELDS |
Selected elements are used to verify whether the data source has changed. The elements must be non-key elements. |
To set the locking policy:
-
Open a physical data service in OSDI Studio.
-
Click the Overview tab, then below it, the Properties tab.
-
At Optimistic Locking Fields, click in the Value column, then choose a value.
3.3.1.2 Select the Locking Fields
If you choose SELECTED FIELDS, you must also select the fields used to verify changes in the data source. You can select any number of non-key fields. The key fields are used to identify the data records to be updated. If you select a complex element, its child elements also become selected elements.
You can also disable a field once it is selected.
Figure 3-44 Choosing Fields for Optimistic Locking
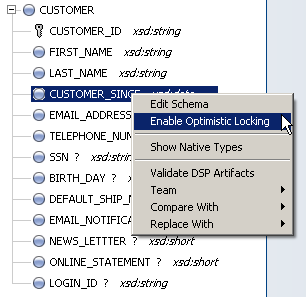
Description of "Figure 3-44 Choosing Fields for Optimistic Locking"
To select the fields used for optimistic locking:
-
Click the Overview tab.
-
Right-click a non-key element in the return type.
Key elements are marked with a key symbol.
-
Choose Enable Optimistic Locking.
When you enable optimistic locking for a field, its icon (in the return type in the Overview tab) changes to. You can also see the optimistic locking fields in the pragma statement at the top of the service's Source tab:
(::pragma  xds <x:xds targetType="t:CREDITRATING" xmlns:x="urn:annotations.ld.oracle.com"
 xmlns:t="ld:physical/CREDITRATING"> ... <optimisticLockingFields>   <field name="RATING"/>
 </optimisticLockingFields>
3.3.2 How To Update Physical Data Service Metadata
When you first create a physical data service its underlying metadata is, by definition, consistent with its data source. Over time, however, your metadata may become "out of sync" for several reasons:
-
The structure of underlying data sources may have changed, in which case it is important to be able to identify those changes so that you can determine when and if you need to update your metadata.
-
You have modified schemas or added relationships to your data service.
In some cases relationships between data services will be preserved during metadata update. See "Using the Update Source Metadata Wizard" for details.
This section describes the following topics:
-
Section 3.3.2.3, "Important Considerations When Updating Source Metadata"
-
Section 3.3.2.5, "Inspecting and Reverting Changes Using Local History"
3.3.2.1 Topics
This section describes the following topics:
-
Scope of Metadata Update
-
Important Considerations When Updating Source Metadata
-
Using the Update Source Metadata Wizard
-
Inspecting and Reverting Changes Using Local History
In Project Explorer you can use the right-click menu option Update metadata to see if there are any differences between your source metadata files and the underlying source.
Figure 3-45 Update Metadata Option in Project Explorer
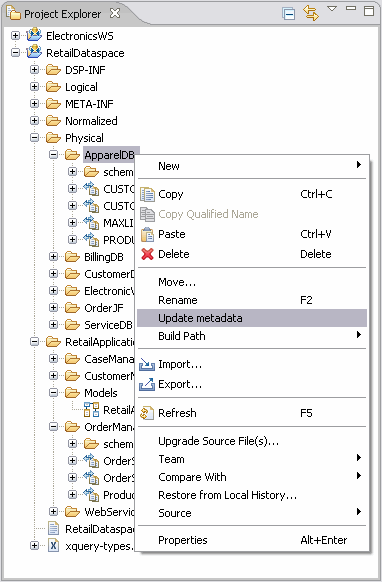
Description of "Figure 3-45 Update Metadata Option in Project Explorer"
The Update metadata option can be used with:
-
Relational table and view associated with changes to the relational database including providerID, the sourceBindingProviderClassName, columns, and optimistic locking fields.
-
Web services
-
Java functions
-
Delimited files
Metadata update cannot be applied to data services based on:
-
Relational stored procedures
-
XML files
3.3.2.2 Scope of Metadata Update
When you run the Metadata update option, differences between your physical data service and the underlying data source are categorized according to the following scheme:
| Category | Meaning |
|---|---|
|
Objects added |
The data source contains one or more objects that are not currently represented in the physical data service. From the perspective of the data source, information from the existing data service is added back after the metadata update. Another way to look at this is from the perspective of the data service. In this view, certain artifacts are retained. A typical example is a relationship with another data service. Existing relationships are identified and retained, the metadata is updated to reflect the current data source, and the relationships are added back to the data service. |
|
Objects deleted |
One or more objects in the physical data service is not found in the underlying data source. A typical artifact that will be marked for deletion would be a schema that is referenced by an operation (such as a relationship function) in the data service. Objects marked for delete generally appear together. Note: You should carefully inspect the update wizard for items marked for deletion. In the case of schemas, in particular, a prudent course of action would be to retain the schema (uncheck the delete option) unless you are certain that it is not needed by an operation in your data service. Deleting a needed schema will make your data service invalid and undeployable. |
|
Objects changed |
One or more objects in the physical data service and the underlying data source do not match and an adjustment will be made. An example of an artifact that will be marked as changed would be if the relational providerID underlying the data source has changed or is unavailable. |
|
Source unavailable |
The data source underlying the physical data service could not be accessed. |
3.3.2.3 Important Considerations When Updating Source Metadata
The update metadata operation can have both direct and indirect consequences.
Source metadata should be updated with care by someone who is quite familiar with the underlying data source. For example, if you have added a relationship between two physical data services, updating your source metadata may remove the relationship from both data services. If the relationship appears in a model diagram, the relationship line will appear in red, indicating that the relationship is no longer described by the respective data services.
3.3.2.3.1 Direct and Indirect Effects
Direct effects apply to physical data services. Indirect effects occur to logical data services, since such services are themselves based — at least indirectly — on physical data services.
For example, if you have created a new relationship between a physical and a logical data service (not a recommended practice), updating the physical data service can invalidate the relationship. In the case of the physical data service, there will be no relationship reference. The logical data service will retain the code describing the relationship but it will be invalid if the opposite relationship notations is no longer be present.
3.3.2.4 Using the Update Source Metadata Wizard
The Update metadata wizard allows you to update your source metadata.
Note:
Before attempting to update source metadata you should make sure that your build project has no errors.
You can perform a metadata update on your entire dataspace project, folders from the project, or any qualified data service. Generally speaking, metadata updates should be performed as specifically as possible.
Note:
Use Shift-click or Ctrl-click to select multiple data services or folders in a single dataspace.
After you select your target(s), the wizard identifies the metadata that will be verified and any differences between your metadata and the underlying source.
You can select/deselect any data service listed in the dialog using the checkbox to the left of the name. You can also choose to select/deselect specific changes for the data service using the checkbox to the left of the change description.
Figure 3-47 Original Source and Refactored Source Details
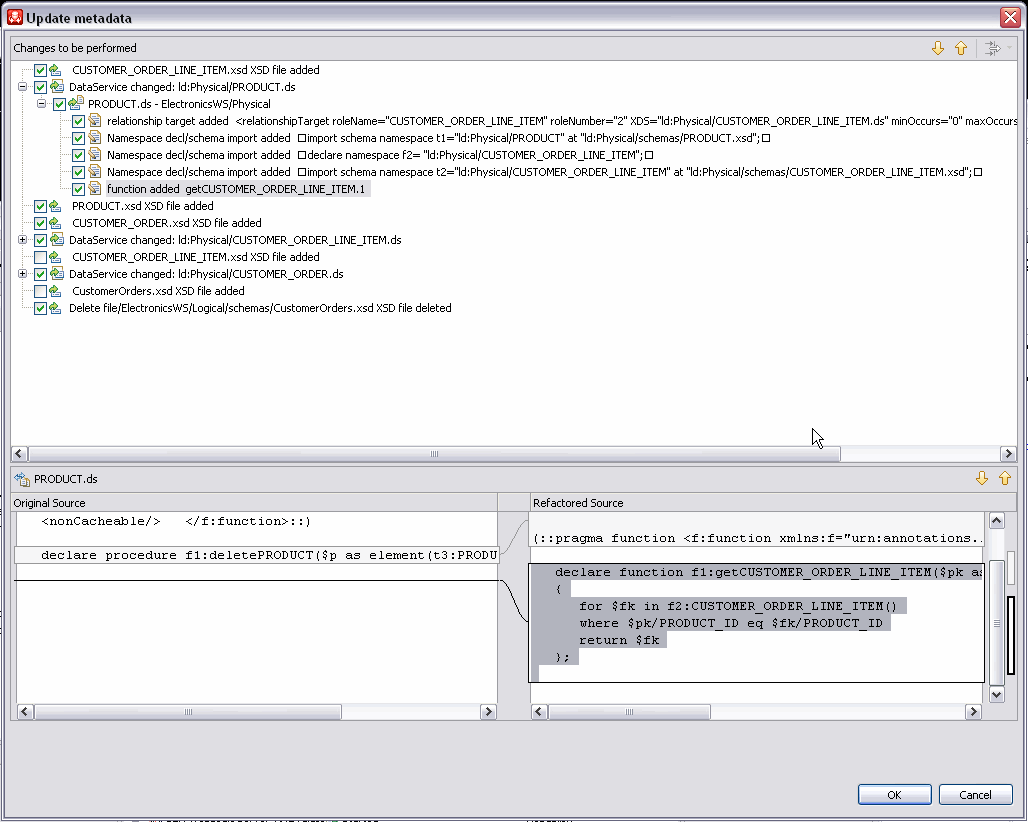
Description of "Figure 3-47 Original Source and Refactored Source Details"
The upper portion of the Update metadata plan shows the changes to be performed. In some cases items are presented and selected (checked). In other cases items are presented but unchecked.
In the details view, the left-hand side shows the current source (called Original Source). The right-hand side shows what the result will be after metadata update (called Refactored Source).
Your only options in the dialog are to select or deselect specific changes using the adjacent checkboxes.
Up/down arrows are available on the Update Metadata titlebar to move through the possible changes. (The Filter Changes option icon next to the arrows is not applicable to metadata update and is not active.
Figure 3-48 Update Metadata Wizard Navigation Arrows

Description of "Figure 3-48 Update Metadata Wizard Navigation Arrows"
3.3.2.5 Inspecting and Reverting Changes Using Local History
You can use the Local History option provided with Eclipse to review changes that have been made through the Metadata Update Wizard.
Here are the steps involved:
-
In the Project Explorer right-click on your data service.
-
Select:
Compare With > Local History...
The Compare With Local History window will open. If there have been several changes made, each will be identified through a timestamp.
It is also often possible to revert a metadata update using a similar mechanism:
-
In the Project Explorer right-click on your data service.
-
Select:
Replace With > Local History...
The Replace With Local History window will open. If there have been several changes made, each will be identified through a timestamp.
Note:
If you just want to revert to the immediate previous change, use the right-click option:
Replace With > Previous from Local History...
3.3.3 Creating SOAP Handlers for Imported WSDLs
When you import metadata from web services for Oracle Data Service Integrator, you can create SOAP handler for intercepting SOAP requests and responses. The handler will be invoked when a web service method is called. You can chain handlers that are invoked one after another in a specific sequence by defining the sequence in a configuration file.
To create and chain handlers, the following steps are involved:
-
Create a Java Class Implementing the Generic Handler Interface.
-
Compile your intercept handler into a JAR file.
-
Define a Configuration File.
-
Define the Interceptor Configuration.
-
Concluding Actions.
3.3.3.1 Create a Java Class Implementing the Generic Handler Interface
The GenericHandler interface is:
javax.xml.rpc.handler.GenericHandler
The following code illustrates an example of implementing a generic handler.
package WShandler;

import java.util.Iterator;
import javax.xml.rpc.handler.MessageContext;
import javax.xml.rpc.handler.MessageContext;
import javax.xml.soap.SOAPElement;
import javax.xml.rpc.handler.HandlerInfo;
import javax.xml.rpc.handler.GenericHandler;
import javax.xml.namespace.QName;

/**
* Purpose: Log all messages to the Server console
*/
public class WShandler extends GenericHandler
{
  HandlerInfo hinfo = null;

 public void init (HandlerInfo hinfo) {
    this.hinfo = hinfo;
    System.out.println("*****************************");
    System.out.println("ConsoleLoggingHandler r: init");
    System.out.println(
          "ConsoleLoggingHandler : init HandlerInfo" + hinfo.toString());
    System.out.println("*****************************");
   }
For more information, see Creating and Using Client-Side SOAP Message Handlers in Oracle WebLogic documentation.
3.3.3.2 Compile your intercept handler into a JAR file.
The steps are to compile your intercept handler and JAR the class file.
3.3.3.2.1 Define a Configuration File
The configuration file specifies the handler chain and the order in which the handlers will be invoked.
The following is an example of the handler chain configuration. The handler-class attribute specifies the fully-qualified name of the handler.
Example 3-1 Code Sample: Handler Chain Configuration
<weblogic-wsee-clientHandlerChain
xmlns="http://www.oracle.com/ns/weblogic/90/"
xmlns:xsi="http://www.w3.org/2001/XMLSchema-instance"
xmlns:j2ee="http://java.sun.com/xml/ns/j2ee">
<handler>
     <j2ee:handler-name>sampleHandler</j2ee:handler-name>
     <j2ee:handler-class>WShandler.WShandler</j2ee:handler-class>
     <j2ee:init-param>
          <j2ee:param-name>ClientParam1</j2ee:param-name>
          <j2ee:param-value>value1</j2ee:param-value>
     </j2ee:init-param>
</handler>
</weblogic-wsee-clientHandlerChain>
3.3.3.2.2 Define the Interceptor Configuration
In your Oracle Data Service Integrator application, define the interceptor configuration for the method in the data service to which you want to attach the handler.
Example 3-2 Code Sample: Intercept Configuration
xquery version "1.0" encoding "WINDOWS-1252";

(::pragma xds <x:xds xmlns:x="urn:annotations.ld.bea.com"
 targetType="t:echoStringArray_return"
 xmlns:t="ld:SampleWS/echoStringArray_return">
<creationDate>2005-05-24T12:56:38</creationDate>
<webService targetNamespace=
"http://soapinterop.org/WSDLInteropTestRpcEnc"
wsdl="http://webservice.bea.com:7001/rpc/WSDLInteropTestRpcEncService?WSDL"/></x:xds>::)

declare namespace f1 = "ld:SampleWS/echoStringArray_return";

import schema namespace t1 = "ld:AnilExplainsWS/echoStringArray_return" at
 "ld:SampleWS/schemas/echoStringArray_param0.xsd";

(::pragma function <f:function xmlns:f="urn:annotations.ld.bea.com" kind="read"
 nativeName="echoStringArray" nativeLevel1Container="WSDLInteropTestRpcEncService"
 nativeLevel2Container="WSDLInteropTestRpcEncPort" style="rpc">
<params>
  <param nativeType="null"/>

<interceptorConfiguration aliasName="LoggingHandler"
 fileName="ld:SampleWS/handlerConfiguration.xml" />
  </f:function>::)

declare function f1:echoStringArray($x1 as element(t1:echoStringArray_param0)) as
 schema-element(t1:echoStringArray_return) external;
<interceptorConfiguration aliasName="LoggingHandler"
 fileName="ld:testHandlerWS/handlerConfiguration.xml">
In the file the aliasName attribute specifies the name of the handler chain to be invoked and the fileName attribute specifies the location of the configuration file.
3.3.4 Creating XMLBean Support for Java Functions
Before you can create a Physical Data Service from Java functions, you need to create a .class file that contains XMLBean classes based on global elements and compiled versions of your Java functions. This topic describes how to create XMLBean classes based on a schema of your data.
3.3.4.1 Supported XMLBean Standards
Imported Java functions containing complex types must have a schema that conforms to one of the following XMLBean standards:
| Version | URL |
|---|---|
|
Apache |
org.apache.xmlbeans |
|
Oracle |
com.bea.xml |
If your Java routines were compiled under previous versions, they will need to be recompiled before they can be imported.
Note:
The New Physical Data Service wizard requires that all the complex parameter or return types used by the functions correspond to XMLBean global element types whose content model is an anonymous type. Thus only functions referring to a top level element are imported.
3.3.4.2 Creating XMLBean Classes for Java Functions
This topic describes how to create XMLBean classes based on a schema of your data.
3.3.4.2.1 Creating a New Project
You need to create a new project to build the XMLBean classes.
To create a new project:
-
Using Eclipse for WebLogic, create a new project by right-clicking in the Project Explorer and choosing New > Project in the menu. The New Project wizard is launched.
-
Choose Java > Java Project and click Next.
-
Type a name for the project and select Create separate source and output folders in the Project layout area.
-
Click Finish. Eclipse for WebLogic creates a new project in the Project Explorer.
3.3.4.2.2 Enabling XMLBeans Builder
You need to enable the XMLBeans Builder in the project to allow it to create classes based on the Java source and XML schema files.
To enable XMLBeans Builder:
-
Right-click the new project, and choose Properties from the menu. The Properties dialog appears.
-
Click XMLBeans, select the Enable XMLBeans Builder checkbox, and click OK.
3.3.4.2.3 Importing Schema and Java Source Files
You need to import the schema files and Java source files into the project.
To import the schema and Java source files:
-
Copy the schema files representing the data used by the Java functions along with the Java source files into the
srcfolder.
3.3.4.2.4 Creating a Project Reference
The final step involves creating a reference to your XMLBeans-based project from the dataspace in which you want to use the Java functions.
To create the project reference:
-
Right-click the dataspace project in which you want to use the Java functions and choose Properties from the menu.
-
Select Project References in the Properties dialog.
-
Select your XMLBeans-based project, and click OK.
When your project is deployed, Oracle Data Service Integrator does the following:
-
Rebuilds your XMLBeans-based project, if required, and generates a JAR file
-
Copies the JAR file to the
DSP-INF/libfolder in the dataspace project
3.3.5 How To Browse and Select a Schema Type
This topic describes how to use the Schema Type Browser to locate and associate schema types within your dataspace projects.
3.3.5.1 Browsing and Selecting Schema Types
When developing Oracle Data Service Integrator dataspace projects, it is typically the case that the associated schema documents are distributed throughout multiple directories within the project. You can use the Schema Type Browser in Eclipse for WebLogic to quickly locate schema types and associate a schema type with a data service without having to remember the specific schema document that contains the type.
3.3.5.2 Browsing Schema Types
You can browse the schema types within your dataspace projects using the Schema Type Browser. Browsing for schema types enables you to search for global types declared in schema files in the selected project or in all available dataspace projects.
To browse the schema types:
-
Select a dataspace project, a folder in the project, or an
.xsdfile using the Project Explorer.This serves as the initial scope within the Schema Type Browser.
-
Choose Navigate > Open Schema Type from the main menu.
Alternatively, you can right-click the entity in the Project Explorer and choose Open Schema Type from the context-sensitive menu. The Open Schema Type dialog appears.
-
Type a search string for the namespace and the name, as appropriate, in the respective fields.
You can use the wildcard character "?" to represent any character and "*" to represent any string.
-
Select the global types, including elements and attributes, user-defined types, and built-in types, to include in the search.
-
Select the scope of the search.
By default, the scope of the search is the project or folder selected when you opened the Schema Type Browser. You can select all projects or choose a specific folder by clicking the Change button. The schema types matching the search criteria appear in the Matching types list, along with the namespace and associated icon. The number of matches appears below the list. The results are updated as you specify new search criteria.
-
Select a type in the list to display the location of the schema file in which the type is declared.
Click Show Details to enable this additional information to be displayed about the selected type.
-
Double-click a type (or select the type and click OK) to display the type using the default XML schema editor.
3.3.5.3 Selecting a Schema Type
You can select schema types within your Oracle Data Service Integrator dataspace projects using the Schema Type Browser when specifying the signature for an operation or when associating an XML type with a data service.
3.3.5.3.1 Editing a Signature
You can select a schema type directly from an input field in cases, for instance, when you are adding an operation or editing an operation signature and need to associate a type directly with a parameter. When selecting a schema type in this manner, the schema scope is restricted to the specific project and the matches return only element types.
To select a schema type when editing a signature or adding an operation:
-
Click the browse button that appears in a schema type field.
For example, you could click the browse button in the Type field when adding a new data service operation.
The Select Schema Type dialog appears.
-
Type a search string for the namespace and the name, as appropriate, in the respective fields.
You can use the wildcard character "?" to represent any character and "*" to represent any string.
-
Select the global types, including elements, simple types, and built-in types, to include in the search.
-
Select the scope of the search.
By default, the scope of the search is the current dataspace project. You can choose a specific folder by clicking the Change button. The schema types matching the search criteria appear in the Matching types list, along with the namespace and associated icon. The number of matches appears below the list. The results are updated as you specify new search criteria.
-
Select a type in the list to display the location of the schema file in which the type is declared.
Click Show Details to enable this additional information to be displayed about the selected type.
-
Double-click a type (or select the type and click OK) to populate the field with the selected type.
3.3.5.3.2 Associating a Type with a Data Service
You can associate an XML type with a data service using the Select Schema Type dialog.
To associate an XML type:
-
Open a data service using the Project Explorer.
-
Right-click in the data service and choose Associate XML Type from the context-sensitive menu.
The Select Schema Type dialog appears.
-
Select the scope of the search.
By default, the scope of the search is the project selected when you opened the Schema Type Browser. You can choose a specific folder by clicking the Change button. The schema types matching the search criteria appear in the Matching types list, along with the namespace and associated icon. The number of matches appears below the list. The results are updated as you specify new search criteria.
-
Select a type in the list to display the location of the schema file in which the type is declared.
Click Show Details to enable this additional information to be displayed about the selected type.
-
Double-click a type (or select the type and click OK) to associate the XML type with the data service.
3.3.6 Physical Data Service from a Java Function - Example Code
This topic provides examples showing the use of imported Java functions in an XQuery and the processing of complex types.
3.3.6.1 Using a Function Returning an Array of Java Primitives
As an example, the Java function getRunningTotal can be defined as follows:
public static float[] getRunningTotal(float[] list) {
   if (null == list || 1 >= list.length)
      return list;
   for (int i = 1; i < list.length; i++) {
      list[i] = list[i-1] + list[i];
   }
   return list;
}
The corresponding XQuery for executing the above function is as follows:
Declare namespace f1="ld:javaFunc/float"
Let $y := (2.0, 4.0, 6.0, 8.0, 10.0)
Let $x := f1:getRunningTotal($y)
Return $x
The results of the query is as follows:
2.0, 6.0, 12.0, 20.0, 30.0
3.3.6.2 Processing complex types represented via XMLBeans
Consider a schema called Customer (customer.xsd), as shown in the following:
<?xml version="1.0" encoding="UTF-8" ?>
   <xs:schema targetNamespace="ld:xml/cust:/BEA_BB10000"
   xmlns:xs="http://www.w3.org/2001/XMLSchema">
   <xs:element name="CUSTOMER">
      <xs:complexType>
         <xs:sequence>
            <xs:element name="FIRST_NAME" type="xs:string" minOccurs="1"/>
            <xs:element name="LAST_NAME" type="xs:string" minOccurs="1"/>
         </xs:sequence>
      </xs:complexType>
   </xs:element>
</xs:schema>
You could compile the schema using XMLBeans to generate a Java class corresponding to the types in the schema.
xml.cust.beaBB10000.CUSTOMERDocument.CUSTOMER
For more information, see http://xmlbeans.apache.org.
Following this, you can use the CUSTOMER element as shown in the following:
public static xml.cust.beaBB10000.CUSTOMERDocument.CUSTOMER[]
      getCustomerListGivenCustomerList(xml.cust.beaBB10000.CUSTOMERDocument.CUSTOMER[]
      ipListOfCust) throws XmlException {
   xml.cust.beaBB10000.CUSTOMERDocument.CUSTOMER [] mylocalver = pListOfCust;
   return mylocalver;
}
The resulting metadata information produced by the New Physical Data Service wizard will be:
(::pragma function <f:function xmlns:f="urn:annotations.ld.oracle.com"
 kind="datasource" access="public">
   xml.cust.beaBB10000.CUSTOMERDocument.CUSTOMER [] mylocalver = pListOfCust;
  return mylocalver;
}
The corresponding XQuery for executing the above function is:
declare namespace f1 = "ld:javaFunc/CUSTOMER";
let $z := (
validate(<n:CUSTOMER xmlns:n="ld:xml/cust:/BEA_BB10000"><FIRST_NAME>John2
</FIRST_NAME><LAST_NAME>Smith2</LAST_NAME>
</n:CUSTOMER>),

validate(<n:CUSTOMER xmlns:n="ld:xml/cust:/BEA_BB10000"><FIRST_NAME>John2
</FIRST_NAME><LAST_NAME>Smith2</LAST_NAME>
</n:CUSTOMER>),

validate(<n:CUSTOMER xmlns:n="ld:xml/cust:/BEA_BB10000"><FIRST_NAME>John2
</FIRST_NAME><LAST_NAME>Smith2</LAST_NAME>
</n:CUSTOMER>),

validate(<n:CUSTOMER xmlns:n="ld:xml/cust:/BEA_BB10000"><FIRST_NAME>John2
</FIRST_NAME><LAST_NAME>Smith2</LAST_NAME>
</n:CUSTOMER>))

for $zz in $z
return
3.4 Example: XMLBeans Example Using a Metadata-rich Java Class
This topic shows an example of an XMLBeans-based Java function that can be imported into a dataspace project. Importing the Java function into a physical data service results in data service functions corresponding to the source Java functions.
The topic provides the following source listings for the example:
3.4.1 Java Source
The Java code in the following listing calculates the price of all the items in ORDER_LINE_ITEM to determine the total order amount.
Example 3-3 Java Source Listing
package performUpdates;

import java.math.BigDecimal;
import java.util.List;
import java.util.Iterator;

import org.openuri.temp.sampleapp.customerorder.ELEC_ORDER;
import org.openuri.temp.sampleapp.customerorder.ELEC_ORDER;
import org.openuri.temp.sampleapp.customerorder.ELEC_ORDER.ITEMS.ORDER_LINE_ITEM;

public class ELECOrderUpdate {

   // Change the TotalOrderAmount based on the updated LINE ITEMS.
   // Input and return are the Data objects

   public static ELEC_ORDER[] updateOrders(ELEC_ORDER[] custOrders) {
      System.out.println("\n\n>>> ELECOrderUpdate updateTotalAmount started.");

      if (custOrders == null)
         return custOrders;

      int size = custOrders.length;
      for (int i=0; i<size; i++) {
         ELEC_ORDER order = (ELEC_ORDER)custOrders[i];
         BigDecimal subTotal = new BigDecimal(0);
         BigDecimal totalOrderAmount = new BigDecimal(0);
         BigDecimal saleTax = new BigDecimal(0);

         ITEMS items = order.getITEMS();
         List itemlist = items.getORDER_LINE_ITEM();
         Iterator item = itemlist.iterator();

         String maxID = "0";

         // Calculate the subTotal and totalOrderAmount
         while (item.hasNext()) {
            ORDER_LINE_ITEM lineitem = (ORDER_LINE_ITEM)item.next();
            BigDecimal quantity = new BigDecimal(Integer.toString(lineitem.getQUANTITY()));
            subTotal = subTotal.add(quantity.multiply(lineitem.getPRICE()));

            lineitem.setLINE_ID(maxID);
            maxID = Integer.toString(new Integer(maxID).intValue() + 1);
        }

     System.out.println(">>> ELECOrderUpdate updateTotalAmount completed.\n\n");
     return custOrders;
   }
}
3.4.2 Schema Definition
The schema used to create XMLBeans is shown below. It simply models the structure of the complex element; it could have been obtained by first introspecting the data directly.
Example 3-4 Schema Definition for ELEC_ORDER
<_p_r_e_:schema targetNamespace="http://temp.openuri.org/SampleApp/CustomerOrder.xsd"
elementFormDefault="qualified" attributeFormDefault="unqualified"
xmlns="http://temp.openuri.org/SampleApp/CustomerOrder.xsd" xmlns:_p_r_e_
="http://www.w3.org/2001/XMLSchema" xmlns:xsd="http://www.w3.org/2001/XMLSchema"
xmlns:conv="http://www.openuri.org/2002/04/soap/conversation/"   xmlns:s0="http://www.openuri.org/"
xmlns:cw="http://www.openuri.org/2002/04/wsdl/conversation/"
xmlns:http="http://schemas.xmlsoap.org/wsdl/http/" xmlns:s0="http://www.openuri.org/"
xmlns:jms="http://www.openuri.org/2002/04/wsdl/jms/"
xmlns:mime="http://schemas.xmlsoap.org/wsdl/mime/" xmlns:s="http://www.w3.org/2001/XMLSchema"
xmlns:s0="http://www.openuri.org/" xmlns:soap="http://schemas.xmlsoap.org/wsdl/soap/"
xmlns:s0="http://www.openuri.org/" xmlns:soap="http://schemas.xmlsoap.org/wsdl/soap/" xmlns:soapenc="http://schemas.xmlsoap.org/soap/encoding/">
  <s:element name="ELEC_ORDER">
    <s:complexType>
      <s:sequence>
        <s:element name="ORDER_ID" type="xsd:string" minOccurs="1"/>
        <s:element name="CUSTOMER_ID" type="xsd:string" minOccurs="1"/>
        <s:element name="ORDER_DATE" type="xsd:date" minOccurs="1"/>
        <s:element name="SHIPMENT_METHOD" type="xsd:string" minOccurs="1"/>
        <s:element name="HANDLING_CHARGE" type="xsd:decimal" minOccurs="1"/>
        <s:element name="SUBTOTAL" type="xsd:decimal" minOccurs="1"/>
        <s:element name="TOTAL_ORDER_AMOUNT" type="xsd:decimal" minOccurs="1"/>
        <s:element name="SALE_TAX" type="xsd:decimal" minOccurs="1"/>
        <s:element name="SHIP_TO" type="xsd:string" minOccurs="1"/>
        <s:element name="SHIP_TO_NAME" type="xsd:string" minOccurs="1"/>
        <s:element name="BILL_TO" type="xsd:string" minOccurs="1"/>
        <s:element name="ESTIMATED_SHIP_DATE" type="xsd:date" minOccurs="1"/>
        <s:element name="STATUS" type="xsd:string" minOccurs="1"/>
        <s:element name="TRACKING_NUMBER" type="xsd:string" minOccurs="0" nillable="true"/>
        <s:element name="ITEMS">
          <s:complexType>
                  <s:sequence>
                    <s:element name="LINE_ID" type="xsd:string" minOccurs="1"/>
                    <s:element name="ORDER_ID" type="xsd:string" minOccurs="1"/>
                    <s:element name="PROD_ID" type="xsd:string" minOccurs="1"/>
                    <s:element name="PROD_DESC" type="xsd:string" minOccurs="1"/>
                    <s:element name="QUANTITY" type="xsd:int" minOccurs="1"/>
                    <s:element name="PRICE" type="xsd:decimal" minOccurs="1"/>
                    <s:element name="STATUS" type="xsd:string" minOccurs="1"/>
                  </s:sequence>
                </s:complexType>
              </s:element>
            </s:sequence>
          </s:complexType>
        </s:element>
      </s:sequence>
    </s:complexType>
  </s:element>
</_p_r_e_:schema>
3.4.3 Data Service Function
The following listing shows the generated data service function based on the imported Java code.
Example 3-5 Generated Data Service Function
xquery version "1.0" encoding "UTF-8";

(::pragma xfl <x:xfl xmlns:x="urn:annotations.ld.bea.com">
<creationDate>2008-04-23T10:40:54</creationDate>
<creationDate>2008-04-23T10:40:54</creationDate>
<javaFunction class="performUpdates.ELECOrderUpdate"/>
</x:xfl>::)

declare namespace f1 = "ld:UpdateOrder";

import schema namespace t1 = "http://temp.openuri.org/SampleApp/CustomerOrder.xsd" at
"ld:schemas/CustomerOrders.xsd";

(::pragma function <f:function xmlns:f="urn:annotations.ld.bea.com" visibility="protected"
kind="library" isPrimary="false" nativeName="updateOrders">

<params>
   <param nativeType="[Lorg.openuri.temp.sampleapp.customerorder.ELEC_ORDER;"/>
</params>
</f:function>::)

declare function f1:updateOrders($parameter1 as element(t1:ELEC_ORDER)*) as
schema-element(t1:ELEC_ORDER)* external;
3.5 Reference
The following are reference sections for creating and updating physical data services:
3.5.1 Stored Procedure Configuration Reference
The following topics provide detailed information regarding various configuration options associated with creating data services based on stored procedures.
3.5.1.1 In Mode, Out Mode, Inout Mode
In, Out, and Inout mode settings determine how a parameter passed to a stored procedure is handled.
| Parameter Mode | Effect |
|---|---|
|
In |
Parameter is passed by reference or value. |
|
Inout |
Parameter is passed by reference. |
|
Out |
Parameter is passed by reference. However the parameter being passed is first initialized to a default value. If your stored procedure has an OUT parameter requiring a complex element, you may need to provide a schema. |
3.5.1.2 Procedure Profile
Each element in a stored procedure is associated with a type. If the item is a simple type, you can simply choose from the pop-up list of types. If the type is complex, you may need to supply an appropriate schema. Click on the schema location button and either enter a schema pathname or browse to a schema. The schema must reside in your application.
After selecting a schema, both the path to the schema file and the URI appear.
3.5.1.2.1 Complex Parameter Types
Complex parameter types are supported under only three conditions:
-
As the output parameter
-
As the Return type
-
As a rowset
3.5.1.2.2 About Rowsets
A rowset type is a complex type.
The rowset type contains a sequence of a repeatable elements (for example called CUSTOMER) with the fields of the rowset.
In some cases the wizard can automatically detect the structure of a rowset and create an element structure. However, if the structure is unknown, you will need to provide it.
Note:
All rowset-type definitions must conform to this structure.
The name of the rowset type can be:
-
The parameter name (in case of a input/output or output only parameter).
-
An assigned name.
-
The referenced element name (result rowsets) in a user-specified schema.
Not all databases support rowsets. In addition, JDBC does not report information related to defined rowsets.
3.5.1.2.3 Using Rowset Information
In order to create data services from stored procedures that use rowset information, you need to supply the correct ordinal (matching number) and a schema. If the schema has multiple global elements, select the one you want from the Type column. Otherwise the type used match the first global element in your schema file.
The order of rowset information is significant; it must match the order in your data source. Use the Move Up / Move Down commands to adjust the ordinal number assigned to the rowset.
Note:
XML types in data services generated from stored procedures do not display native types. However, you can view the native type in the Source editor; it is located in the pragma section.
3.5.1.2.4 Stored Procedure Version Support
Only the most recent version of a particular stored procedure can be imported into Oracle Data Service Integrator. For this reason you cannot identify a stored procedure version number when creating a physical data service based on a stored procedure. Similarly, adding a version number for your stored procedure in the Source editor will result in a query exception.
3.5.1.3 Supporting Stored Procedures with Nullable Input Parameter(s)
If you know that an input parameter of a stored procedure is nullable (can accept null values), you can change the signature of the function in Source View to make such parameters optional by adding a question mark at end of the parameter.
For example (question-mark (?)):
function myProc($arg1 as xs:string) ...
would become:
function myProc($arg1 as xs:string?) ...
3.5.2 Simple Java Types and Their XQuery Counterparts
The following outlines the mapping between simple Java types and the corresponding XQuery or schema types:
| Java Simple or Defined Type | XQuery/Schema Type |
|---|---|
|
boolean |
xs:boolean |
|
byte |
xs:byte |
|
char |
xs:char |
|
double |
xs:double |
|
float |
xs:float |
|
int |
xs:int |
|
long |
xs:long |
|
short |
xs:short |
|
string |
xd:string |
|
java.lang.Date |
xs:datetime |
|
java.lang.Boolean |
xs:boolean |
|
java.math.BigInteger |
xs:integer |
|
java.math.BigDecimal |
xs:decimal |
|
java.lang.Byte |
xs.byte |
|
java.lang.Char |
xs:char |
|
java.lang.Double |
xs:double |
|
java.lang.Float |
xs:float |
|
java.lang.Integer |
xs:integer |
|
java.lang.Long |
xs:long |
|
java.lang.Short |
xs:short |
|
java.sql.Date |
xs:date |
|
java.sql.Time |
xs:time |
|
java.sql.Timestamp |
xs:datetime |
|
java.util.Calendar |
xs:datetime |
Java functions can consume parameters and return values of the following types:
-
Java primitives and types listed in the previous table
-
Apache XMLBeans
-
Oracle XMLBeans
-
SDO DataObject (typed or untyped)
Note:
The elements or types referred to in the schema should be global elements.
3.6 Related Topics
The following section describes how to add an external function to an existing physical data service.
3.6.1 How To Add an External Function to an Existing Physical Data Service
You can add qualified external operations (functions and procedures) from the same data source to existing physical data services based on:
-
Relational
-
Web service
-
Java functions
This is a very convenient way of enhancing a data service based on changes in underlying data or other business needs.
The steps involved in adding an external function to a qualified data service are:
-
Open the data service in Project Explorer.
-
Select Overview mode.
-
Right click > Add External Function...
-
A wizard appropriate to the data service type will appear. Complete the steps as you would when creating a data service. For example, select from the set of currently unselected operations in the WSDL that underlies a web service-based data service.
Figure 3-57 Adding an External Function to a Data Service
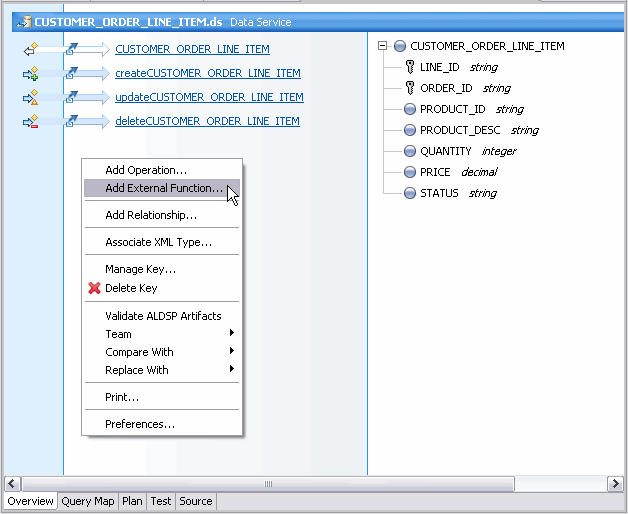
Description of "Figure 3-57 Adding an External Function to a Data Service"
External operations cannot be added to physical data services based on:
-
XML data
-
Delimited data
Table 3-12 Qualified Operation and Physical Data Service Type Matrix
| Artifact | Physical Data Service Type | Comment |
|---|---|---|
|
Operation |
Web Service |
Only visible operations will be from the WSDL that underlies the physical data service. |
|
Function |
Java |
Only functions from the Java class defined by the underlying data service will be visible. |
|
Stored Procedure |
Relational |
Only stored procedures from the same data source defined by the underlying data service will be visible. |
|
SQL Statement |
Relational |
Query must be to the same database as that underlying the data service. |
