4 Designing Logical Data Services
Logical dataservices let you create a new loosely coupled architecture by piecing together the data assets you already have. This means combining data from relational data sources, web services, XML files, other files, or Java functions.
This chapter describes the following topics:
4.1 Concepts
This section describes the following topics:
4.1.1 Building Logical Entity Data Services
This topic introduces you to logical entity data services.
4.1.1.1 The Benefits of Logical Services
The benefit of data services is the ability to combine multiple data sources of different types into service-oriented architectures. Enterprise data is often stored in relational databases, non-relational databases, packaged applications (such as SAP, PeopleSoft, Siebel, and others), custom applications, or files of various types. You might also be accessing data from web services.
The goal is to create a new loosely coupled architecture by piecing together the data assets you already have. In a practical sense, this means combining data from relational data sources, web services, XML files, other files, or Java functions. Logical data services are of two types, entity and library.
Logical entity services allow you to design, model, and create a data view from many underlying data sources. Logical library services are simply a collection of related functions and procedures within a data service container. This topic introduces logical entity services.
On a tangible level, a logical entity service is an XQuery source file with functions and procedures that act on data. A logical entity service has:
-
Exactly one XML schema that represents the data the service returns (its return type).
-
Any number of create, update, or delete procedures, where up to one of each type is primary.
-
Any number of library functions and procedures.
-
Any number of relationships with other entity services.
In addition, a logical entity service must have a primary read function if you want the service to have an update map.
4.1.1.2 Design View
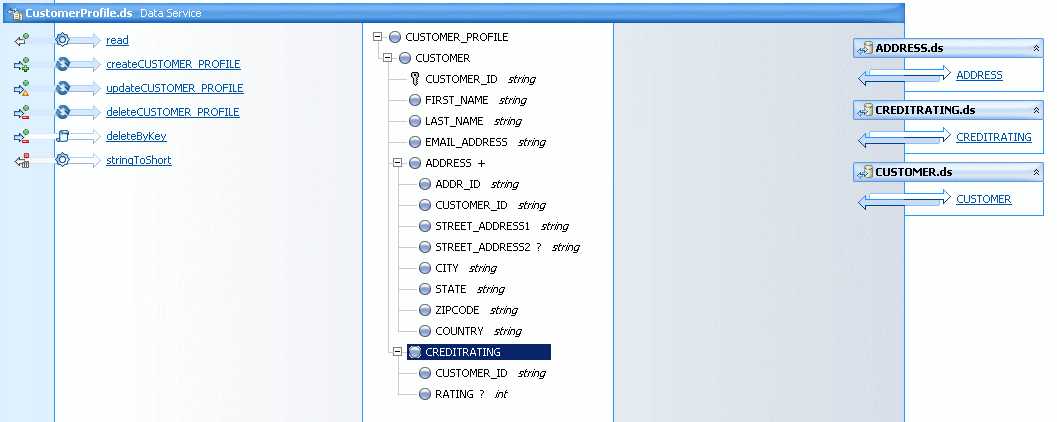
Logical data services have their foundation in XML web services. The backbone of a logical data service is its return type, which is a combination of data you design expressed as an XML schema.
You can see the return type in the Overview tab in Eclipse for WebLogic.
Figure 4-1 Design View of a Logical Data Service
Description of "Figure 4-1 Design View of a Logical Data Service"
The underlying data services can be physical or logical.
The beauty of a logical data service is that a return type is a model. Logical models capture the complexity of data integration once, and allow you to write clients that remain the same even when underlying physical data sources change.
The structure of a return type does not need to match the structure of the underlying data sources. Here, the CUSTOMER element has a 1-to-many relationship with its child element ADDRESS, and a 1-to-1 relationship with its other child element, CREDITRATING. Each complex element represents a separate physical data source.
Example 4-1 The Return Type Schema
<?xml version="1.0" encoding="UTF-8" ?>
<xs:schema targetNamespace="ld:logical/CustomerProfile"
xmlns:xs="http://www.w3.org/2001/XMLSchema">
  <xs:element name="CUSTOMER_PROFILE">
    <xs:complexType>
      <xs:sequence>
        <xs:element name="CUSTOMER">
          <xs:complexType>
            <xs:sequence>
               <xs:element name="CUSTOMER_ID" type="xs:string"/>
               <xs:element name="FIRST_NAME" type="xs:string"/>
               <xs:element name="LAST_NAME" type="xs:string"/>
               <xs:element name="EMAIL_ADDRESS" type="xs:string"/>
               <xs:element name="ADDRESS" maxOccurs="unbounded">
                 <xs:complexType>
                   <xs:sequence>
                      <xs:element name="ADDR_ID" type="xs:string"/>
                      <xs:element name="CUSTOMER_ID" type="xs:string"/>
                      <xs:element name="STREET_ADDRESS1" type="xs:string"/>
                      <xs:element name="STREET_ADDRESS2" type="xs:string" minOccurs="0"/>
                      <xs:element name="CITY" type="xs:string"/>
                      <xs:element name="STATE" type="xs:string"/>
                      <xs:element name="ZIPCODE" type="xs:string"/>
                      <xs:element name="COUNTRY" type="xs:string"/>
                  </xs:sequence>
                </xs:complexType>
             </xs:element>
             <xs:element name="CREDITRATING" maxOccurs="1">
                <xs:complexType>
                  <xs:sequence>
                     <xs:element name="CUSTOMER_ID" type="xs:string"/>
                     <xs:element name="RATING" type="xs:int" minOccurs="0"/>
                 </xs:sequence>
               </xs:complexType>
              </xs:element>
            </xs:sequence>
           </xs:complexType>
         </xs:element>
       </xs:sequence>
     </xs:complexType>
   </xs:element>
</xs:schema>
However, this structure is only by design. You could also have designed the return type with fewer elements, or in a flat structure, depending on how you want the service to return data.
4.1.1.2.1 The Primary Read Function
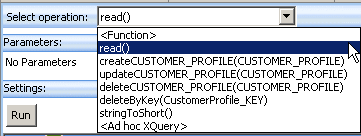
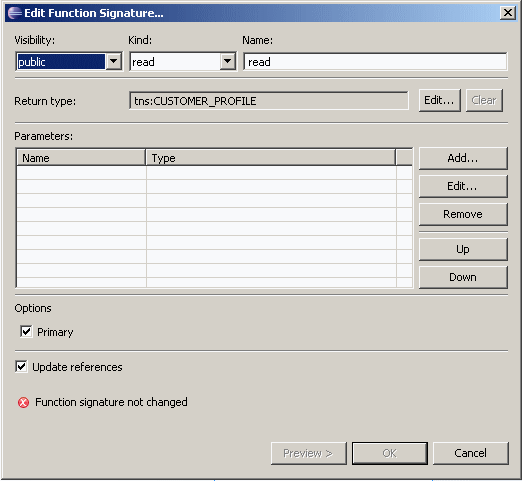
The functions and procedures in a logical entity service are implemented in XQuery, which queries XML data much as SQL queries relational data. You can get information about any function or procedure by right-clicking it in the Overview tab.
A read function, for example, often takes no parameters and returns an instance of the return type.
Figure 4-2 Viewing the Signature of a Read Function
Description of "Figure 4-2 Viewing the Signature of a Read Function"
In a logical entity service, you can designate one read function as primary. A primary read function captures the main data integration logic in the service. Oracle Data Service Integrator generates the create, update, and delete procedures and the update map from the primary read function.
You can see the source code of the primary read function in the Source tab.
Example 4-2 Checking the Primary Read Function Source
declare function tns:read() as element(tns:CUSTOMER_PROFILE)*{
for $CUSTOMER in cus1:CUSTOMER()
return
        <tns:CUSTOMER_PROFILE>
            <CUSTOMER>
                <CUSTOMER_ID>{fn:data($CUSTOMER/CUSTOMER_ID)}</CUSTOMER_ID>
                <FIRST_NAME>{fn:data($CUSTOMER/FIRST_NAME)}</FIRST_NAME>
                <LAST_NAME>{fn:data($CUSTOMER/LAST_NAME)}</LAST_NAME>
                <EMAIL_ADDRESS>{fn:data($CUSTOMER/EMAIL_ADDRESS)}</EMAIL_ADDRESS>
                {
                    for $ADDRESS in add:ADDRESS()
                    where $CUSTOMER/CUSTOMER_ID eq $ADDRESS/CUSTOMER_ID
                    return
                    <ADDRESS>
                        <ADDR_ID>{fn:data($ADDRESS/ADDR_ID)}</ADDR_ID>
                        <CUSTOMER_ID>{fn:data($ADDRESS/CUSTOMER_ID)}</CUSTOMER_ID>
                        <STREET_ADDRESS1>{fn:data($ADDRESS/STREET_ADDRESS1)}</STREET_ADDRESS1>
                        <STREET_ADDRESS2?>{fn:data($ADDRESS/STREET_ADDRESS2)}</STREET_ADDRESS2>
                        <CITY>{fn:data($ADDRESS/CITY)}</CITY>
                        <STATE>{fn:data($ADDRESS/STATE)}</STATE>
                        <ZIPCODE>{fn:data($ADDRESS/ZIPCODE)}</ZIPCODE>
                        <COUNTRY>{fn:data($ADDRESS/COUNTRY)}</COUNTRY>
                    </ADDRESS>
                }
                {
                        for $CREDITRATING in cre:CREDITRATING()
                        where $CUSTOMER/CUSTOMER_ID eq $CREDITRATING/CUSTOMER_ID
                        return
                        <CREDITRATING>
                           <CUSTOMER_ID>{fn:data($CREDITRATING/CUSTOMER_ID)}</CUSTOMER_ID>
                           <RATING?>{fn:data($CREDITRATING/RATING)}</RATING>
                        </CREDITRATING>
                }
            </CUSTOMER>
        </tns:CUSTOMER_PROFILE>
};
This read function returns a CUSTOMER_PROFILE element with a nested CUSTOMER element. Each CUSTOMER element has some number of ADDRESS elements and some number of CREDITRATING elements, where the CUSTOMER_ID in ADDRESS or CREDITRATING matches the CUSTOMER_ID in CUSTOMER. (The XQuery where clauses create table joins; see "Add a Where Clause to a Query").
4.1.1.2.2 Create, Update, and Delete Procedures
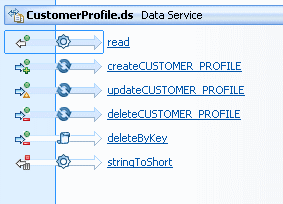
A logical entity service also typically has create, update, and delete procedures that act on underlying data sources. (The difference between a function and a procedure is that a procedure can have side effects, while a function cannot; see "Data Service Types and Functions").
Figure 4-3 Viewing Functions and Procedures
Description of "Figure 4-3 Viewing Functions and Procedures"
4.1.1.3 Query Map View
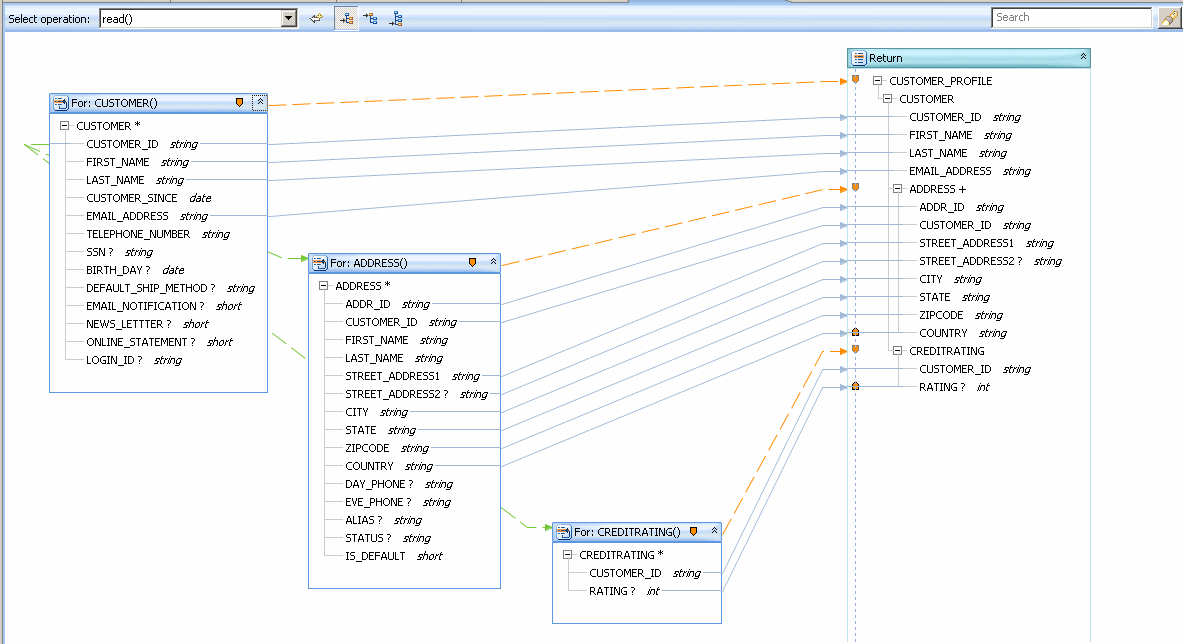
The Query Map view maps elements in data sources to the return type.
Figure 4-4 Mapping Data Sources to the Return Type
Description of "Figure 4-4 Mapping Data Sources to the Return Type"
The green dashed lines between the data source blocks create joins, which become where clauses in the XQuery source, for example:
for $ADDRESS in add:ADDRESS()
where $CUSTOMER/CUSTOMER_ID eq $ADDRESS/CUSTOMER_ID
return
If you click a data element (not a container element) in the return type, you see its XQuery expression in the expression editor.
Figure 4-5 Mapping Data in an XQuery Expression

Description of "Figure 4-5 Mapping Data in an XQuery Expression"
Notice that the mapping expressions use the built-in XQuery function fn:data, which extracts the data value from an XML element.
As you map elements visually in the Query Map, Oracle Data Service Integrator creates XQuery source (for example, the read function shown above). The XQuery source is later converted to SQL queries, which you can see in Plan view.
Figure 4-6 Viewing a SQL Query in Plan View
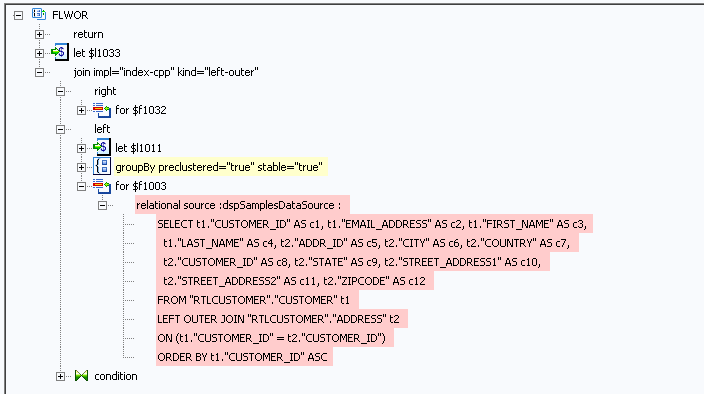
Description of "Figure 4-6 Viewing a SQL Query in Plan View"
When you build XQuery functions and procedures visually in Query Map view or by editing in Source view, you can test and run them on an Oracle Data Service Integrator server. During server runtime, the functions and procedures are compiled into an executable query plan. Examine the query plan before you finalize the queries. Query Plan view gives you a peek into a query's execution logic and flags potential performance and memory problems. Building XQuery functions is an iterative process of test, view plan, and edit.
4.1.1.4 Update Map View
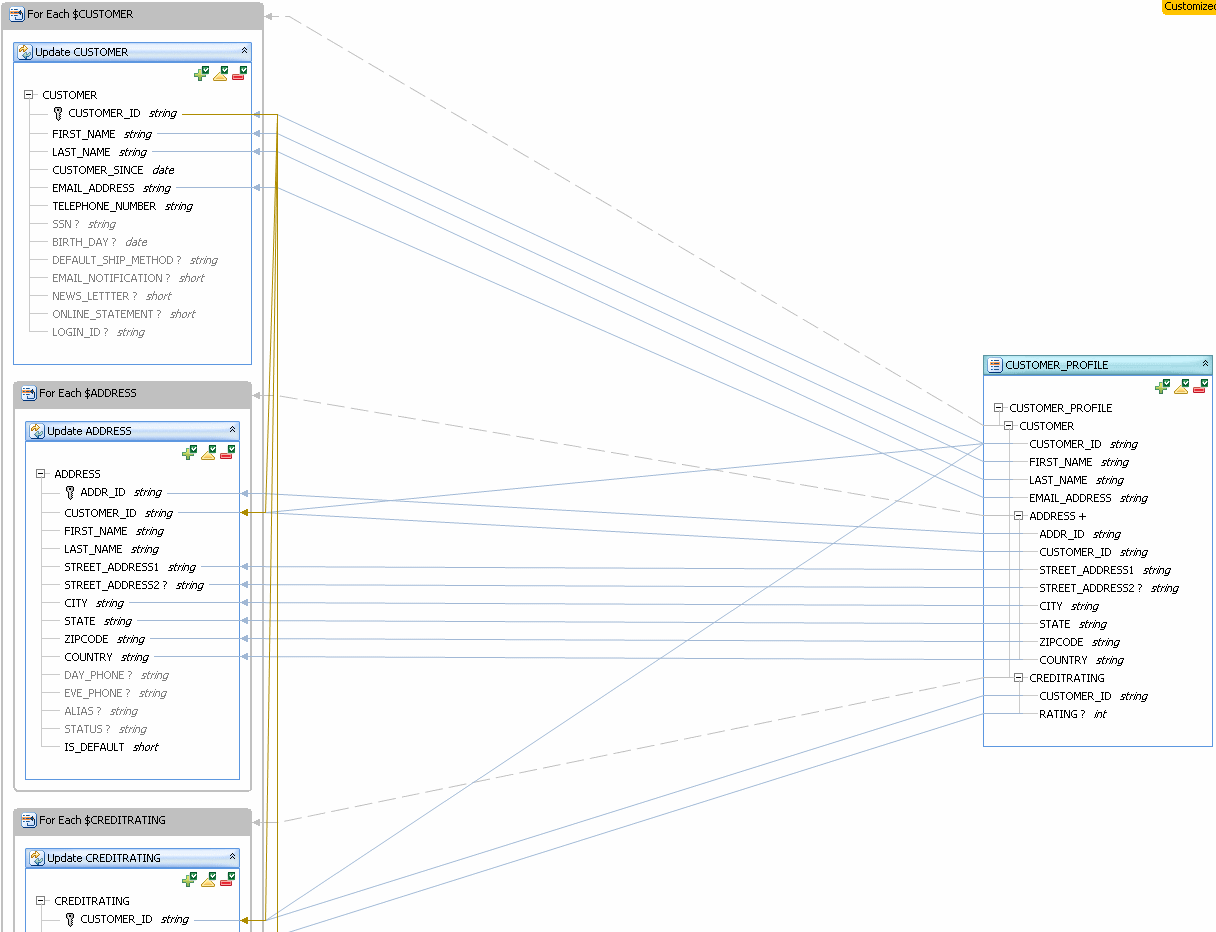
While Query Map view shows how a service reads from data sources, Update Map view shows how the service writes data to them.
The return type is available to client applications, where users update data.
The blocks on the left are update blocks. Each mapped element in an update block has an XQuery expression that defines how the element is updated. You can see the expression in the expression editor below the mapping area.
Oracle Data Service Integrator generates the update map for you when you create a logical data service under these conditions:
-
Your service has a primary read function
-
Your service has a primary read function
(If you are using other data source types, you must edit the update template.)
You can then customize the update map and test it in Test view, without programming.
An application client uses the Service Data Objects programming model to update data sources. SDO is an application framework that allows you to update data sources while disconnected from them, using a flexible, optimistic concurrency model. You use only one API, the SDO API, to update multiple data sources -- relational, web service, XML files, and so on.
4.1.1.5 Test View
The Test view available in Eclipse for WebLogic works like a built-in client where you can easily test any function or procedure in the data service, before you build a custom client.
Testing a read function, for example, returns data as the service would to a client, in the shape of the return type.
Figure 4-10 Reading Customer Profile Data
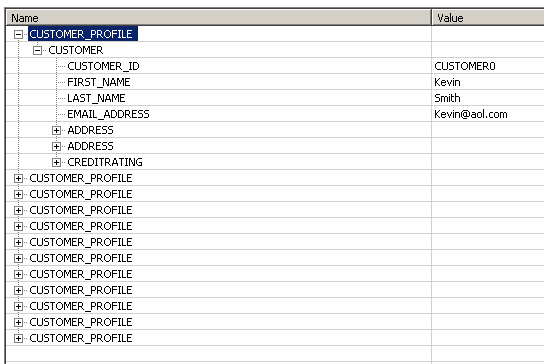
Description of "Figure 4-10 Reading Customer Profile Data"
To test a simple update, click the Edit button, edit some data in the result, then click Submit. When you test the read function again, the results show the change.
You can also test an SDO update by submitting a datagraph with a change summary (see Test an Update Procedure).
4.1.1.6 See Also
For more information, see the following sources:
Concepts:
How tos:
Reference:
Other Source:
-
Introduction to Service Data Objects (ibm.com)
4.1.2 Data Service Keys
This topic describes what data service keys are and how they are used.
4.1.2.1 Overview
You are probably familiar with the concept of keys from relational databases, where a key is a set of one or more columns whose combined values are unique among all occurrences in a table.
When you create a physical data service, Oracle Data Service Integrator computes keys by introspecting the physical data sources. A physical data service key can have one or more fields, which are elements taken from the service's return type. Tangibly, a key is defined as an XML schema in an XSD file.
You can see the physical data service keys in your dataspace project in Eclipse for WebLogic. They appear in schema files with names such as:
datasource_KEY.xsd
Figure 4-11 Physical Data Service Keys in Eclipse for WebLogic
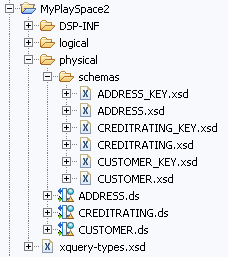
Description of "Figure 4-11 Physical Data Service Keys in Eclipse for WebLogic"
In the generated XSD file, a key for a physical data service looks something like this.
Example 4-3 Key for the CUSTOMER Table
<?xml version="1.0" encoding="UTF-8" ?>
<xs:schema targetNamespace="ld:physical/CUSTOMER" xmlns:xs="http://www.w3.org/2001/XMLSchema">
   <xs:element name="CUSTOMER_KEY">
      <xs:complexType>
         <xs:sequence>
            <xs:element name="CUSTOMER_ID" type="xs:string"/>
         </xs:sequence>
      </xs:complexType>
   </xs:element>
</xs:schema>
In this case, CUSTOMER_ID is the primary key in a relational table named CUSTOMER.
In a logical data service, a key also uniquely defines a data record. However, the data in the record can originate from multiple data sources of different types and can have a structure unlike the underlying physical data sources.
For a logical entity service, you must create the key. You can choose one of these options:
-
Have Oracle Data Service Integrator generate the key based on the service's primary read function. Oracle Data Service Integrator generates a minimal key.
-
Select the fields that make up the key. The elements that comprise the key must have a cardinality of 0 or 1 in the service's return type (with
maxOccurs="1"ormaxOccurs="0", but notmaxOccurs="unbounded").
4.1.2.2 Parts of a Key
Suppose a logical service has a nested return type where a parent element with single cardinality can have multiple child elements, say one CUSTOMER element with many CUSTOMER_ORDER child elements.
Example 4-4 A Nested Return Type with a One-to-Many Relationship
<?xml version="1.0" encoding="UTF-8" ?>
<xs:schema targetNamespace="ld:logical/CustomersAndOrders"
xmlns:xs="http://www.w3.org/2001/XMLSchema">
  <xs:element name="CustomersAndOrders">
    <xs:complexType>
      <xs:sequence>
        <xs:element name="CUSTOMER">
          <xs:complexType>
            <xs:sequence>
              <xs:element name="CUSTOMER_ID" type="xs:string"/>
              <xs:element name="FIRST_NAME" type="xs:string"/>
              <xs:element name="LAST_NAME" type="xs:string"/>
              <xs:element name="SSN" type="xs:string" minOccurs="0"/>
              <xs:element name="CUSTOMER_ORDER" maxOccurs="unbounded">
                <xs:complexType>
                  <xs:sequence>
                    <xs:element name="ORDER_ID" type="xs:string"/>
                    <xs:element name="C_ID" type="xs:string"/>
                  </xs:sequence>
                </xs:complexType>
              </xs:element>
            </xs:sequence>
          </xs:complexType>
        </xs:element>
      </xs:sequence>
    </xs:complexType>
  </xs:element>
</xs:schema>
This is the key that Oracle Data Service Integrator auto-generates from this return type, from the unique CUSTOMER_ID field:
Example 4-5 An Auto-Generated Simple Key
<?xml version="1.0" encoding="UTF-8"?>
<xs:schema targetNamespace="ld:logical/CustomerOrder" xmlns:xs="http://www.w3.org/2001/XMLSchema">
  <xs:element name="CustomersAndOrders_KEY">
    <xs:complexType>
      <xs:sequence>
        <xs:element name="CUSTOMER_ID" type="xs:string"/>
      </xs:sequence>
    </xs:complexType>
  </xs:element>
</xs:schema>
If you choose to select the key fields, you need to use a unique field or fields with single cardinality. You can choose CUSTOMER_ID or SSN, or both. You cannot define the key on ORDER_ID or C_ID, because they belong to the CUSTOMER_ORDER element, which has multiple cardinality.
If you choose SSN, the key schema file looks like this.
Example 4-6 A Manually Selected Key
<?xml version="1.0" encoding="UTF-8"?>
<xs:schema targetNamespace="ld:logical/CustomerOrder" xmlns:xs="http://www.w3.org/2001/XMLSchema">
  <xs:element name="CustomersAndOrders_KEY">
    <xs:complexType>
      <xs:sequence>
        <xs:element name="SSN" maxOccurs="1" minOccurs="0" type="xs:string"/>
      </xs:sequence>
    </xs:complexType>
  </xs:element>
</xs:schema>
A data service key has distinct parts:
-
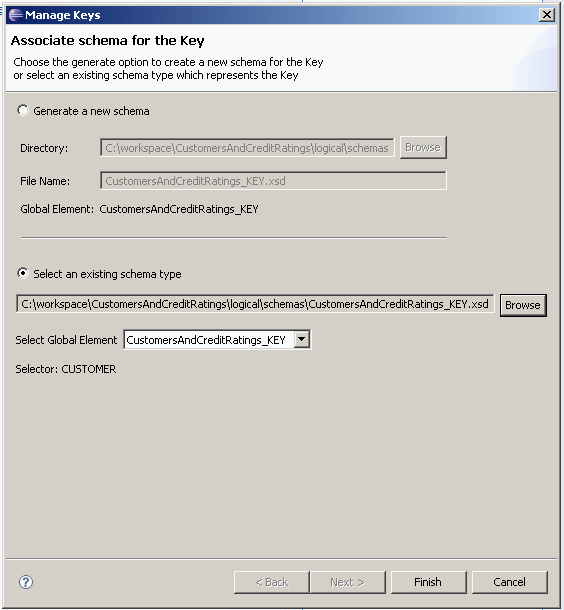
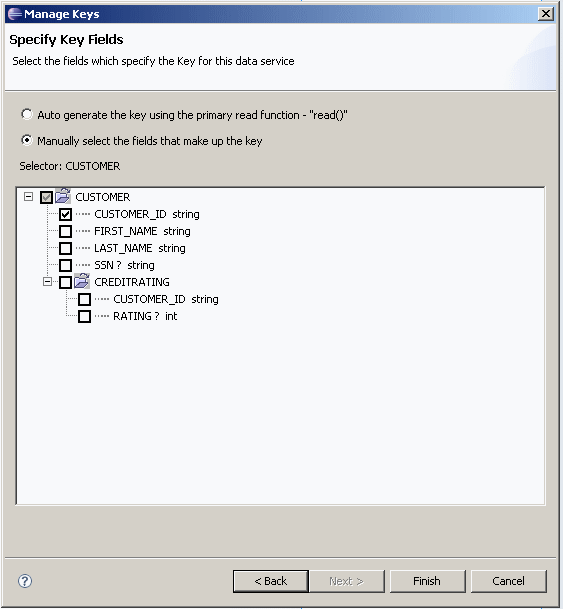
A selector. A key selector identifies a collection of data records. A key's selector is the element that contains the key field in the service's return type. You can see a key's selector in the Manage Key dialog when you create the key (below, it's the
CUSTOMERelement):You can see that the
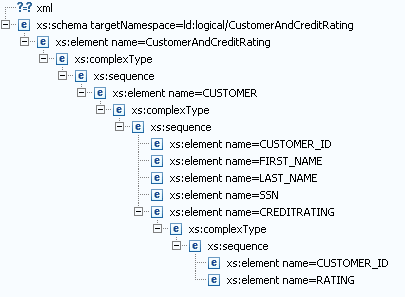
CUSTOMERelement is the root element of the return type: -
The key fields. The fields that make up the key uniquely identify an element in the collection. For example, one customer identified by a
CUSTOMER_IDvalue. Within Oracle Data Service Integrator, a key field is stored as a path which must not contain any repeating elements. Therefore, you cannot use elements with multiple cardinality in keys.
4.1.2.3 Composite Keys
With a logical service, a key can also be a composite key of multiple elements, as long as the elements have single cardinality in the return type. This is especially easy with a flat return type.
Example 4-7 A Flat, Non-Nested Return Type
<?xml version="1.0" encoding="UTF-8" ?>
<xs:schema targetNamespace="ld:logical/MyFlatOne" xmlns:xs="http://www.w3.org/2001/XMLSchema">
  <xs:element name="CUSTOMERORDER">
    <xs:complexType>
      <xs:sequence>
        <xs:element name="CUSTOMER_ID" type="xs:string"/>
        <xs:element name="FIRST_NAME" type="xs:string"/>
        <xs:element name="LAST_NAME" type="xs:string"/>
        <xs:element name="EMAIL_ADDRESS" type="xs:string"/>
        <xs:element name="ORDER_ID" type="xs:string"/>
        <xs:element name="ORDER_DT" type="xs:date"/>
        <xs:element name="TOTAL_ORDER_AMT" type="xs:decimal"/>
      </xs:sequence>
    </xs:complexType>
  </xs:element>
</xs:schema>
Oracle Data Service Integrator auto-generates a composite key using the key fields from the underlying physical data sources (in this example, CUSTOMER_ID and ORDER_ID). The composite key generated from this return type is shown below.
Example 4-8 An Auto-Generated Composite Key
<?xml version="1.0" encoding="UTF-8"?>
<xs:schema targetNamespace="ld:logical/MyFlatOne" xmlns:xs="http://www.w3.org/2001/XMLSchema">
  <xs:element name="MyFlatOne_KEY">
    <xs:complexType>
      <xs:sequence>
        <xs:element name="CUSTOMER_ID" type="xs:string"/>
        <xs:element name="ORDER_ID" type="xs:string"/>
      </xs:sequence>
    </xs:complexType>
  </xs:element>
</xs:schema>
This key allows you to identify a unique combination of Customer and Order, that is, one order for one customer.
4.1.3 XML Types and Return Types
In entity data services there are two types of types:
-
Return types
-
XML types
XML types and return types are very closely related. In data service operations involving entity data services, XML types define the shape of the data service.
Physically XML Types are represented a global elements in XML schemas (XSD files.) In other words, the XML types represents in hierarchical form the shape of the data service.
A way to think of these two artifacts is to first consider the class and the instance of the class in such languages as Java.
XML types can be thought of as a class from which objects in the form of functions are created. In many cases the information needed by these functions is either:
-
A subset of the overall XML types -- for example, a function that returns last name and address but not first name or social security number.
-
In need of further specification -- for example, adjusting a query to list all orders inside each customer rather than to repeat customer information each time.
Note:
Return and XML types can be see in action in the following example:
Creating Your First Data Services
4.1.3.1 Where XML Types are Used
Oracle Data Service Integrator uses XML types in its model diagrams, entity data services, query editor, update mapper, and metadata browser.
4.1.3.2 Where Return Types are Used
Return types are sometimes called target schemas.
Return types can be thought of as the backbone of both data services and data models. Programmatically, return types are the "r" in FLWR (for-let-where-return) queries.
Return types have the following main purposes:
-
Provide a template for the mapping of data from a variety of data sources and, in the case of updates, back to those data sources.
-
Help determine the arrangement of the XML document generated by the XQuery.
Return types describes the structure or shape of data that a query produces when it is run.
Note:
In order to maintain the integrity of Oracle Data Service Integrator queries used by your application, it is important that the query return type match the XML type in the containing data service. Thus if you make changes in the return type, you should use the XQuery Editor's Save and associate schema command to make the data service's XML type consistent with query-level changes. Alternatively, create a new data service based on your return type. For details see Creating a Simple Data Service Function.
4.2 How-to
This section describes the following topics:
4.2.1 How To Add a Read Function
This topic describes how to add a read function to a logical entity service.
4.2.1.1 Overview
A read function in a logical entity service retrieves data from underlying data sources, either physical or logical, and returns XML elements in the shape of the service's return type. You can build a logical service without a read function. However, the service must have at least one read function, marked primary, to have an update map. Only one read function in a service can be primary.
A read function is associated with exactly one XML schema, which is the service's return type. The read function must return the return type, but cannot take any other actions or have any side effects.
When you create a primary read function visually in Eclipse for WebLogic, Oracle Data Service Integrator generates a pragma annotation and XQuery source. The pragma looks something like this:
(::pragma  function <f:function kind="read" visibility="public" isPrimary="true"
 xmlns:f="urn:annotations.ld.bea.com"/>::)
The initial XQuery source, before you map data types in Query Map view, shows that the read function returns an instance of the service's return type:
declare function tns:read() as element(tns:CustomerAndAddress)*{
    <tns:CustomerAndAddress>
        <CUSTOMER>
            <CUSTOMER_ID></CUSTOMER_ID>
            <FIRST_NAME></FIRST_NAME>
            <LAST_NAME></LAST_NAME>
            <SSN?></SSN>
            {
                <ADDRESS>
                    <ADDR_ID></ADDR_ID>
                   <FIRST_NAME></FIRST_NAME>
                    <ZIPCODE></ZIPCODE>
                    <COUNTRY></COUNTRY>
                </ADDRESS>
            }
        </CUSTOMER>
    </tns:CustomerAndAddress>
};
At this point, the return type has no values. The values are added after you map data sources to the return type in Query Map view:
declare function tns:read() as element(tns:CustomerAndAddress)*{
for $CUSTOMER in cus1:CUSTOMER()
return
        <tns:CustomerAndAddress>
            <CUSTOMER>
                <CUSTOMER_ID>{fn:data($CUSTOMER/CUSTOMER_ID)}</CUSTOMER_ID>
               <FIRST_NAME>{fn:data($CUSTOMER/FIRST_NAME)}</FIRST_NAME>
                <LAST_NAME>{fn:data($CUSTOMER/LAST_NAME)}</LAST_NAME>
                <SSN?>{fn:data($CUSTOMER/SSN)}</SSN>
                {
                    for $ADDRESS in add:ADDRESS()
                    return
                    <ADDRESS>
                        <ADDR_ID>{fn:data($ADDRESS/ADDR_ID)}</ADDR_ID>
                        <CUSTOMER_ID>{fn:data($ADDRESS/CUSTOMER_ID)}</CUSTOMER_ID>
                        <FIRST_NAME>{fn:data($ADDRESS/FIRST_NAME)}</FIRST_NAME>
                        <ZIPCODE>{fn:data($ADDRESS/ZIPCODE)}</ZIPCODE>
                        <COUNTRY>{fn:data($ADDRESS/COUNTRY)}</COUNTRY>
                    </ADDRESS>
                }
            </CUSTOMER>
        </tns:CustomerAndAddress>
};
4.2.1.2 Create the Function in Eclipse for WebLogic
Follow these steps to create the function:
-
Create a logical entity service. See Section 1.3, "Example: How to Create Your First Data Services"
-
In the Overview tab, right-click at the left, right, or top, and choose Add Operation.
-
At Visibility, choose an access level.
Public means the procedure can be called from the same dataspace and from client APIs; protected, only from the same dataspace; private, only from the same data service.
-
At Kind, choose read.
-
Enter a name for the function.
-
At Return Type, click Edit.
-
Click Complex Type, and choose a schema file.
-
At Kind, choose element.
-
At Occurrence, choose Zero or More.
-
Select Primary, and click OK.
4.2.1.3 See Also
How Tos
-
Test a Read Function and Simple Update
Concepts
4.2.2 How To Add a Library Function or Procedure
This topic describes how to add a library function or procedure to a data service.
4.2.2.1 Overview
Library functions and procedures are utility operations that you can add to any service, physical, logical, or library. Library functions and procedures:
-
Have a kind of library
-
Are not marked as primary or non-primary
-
Have a visibility of public, protected or private
4.2.2.2 Add the Function or Procedure
The example in this section is a library function that casts a value from xs:integer to xs:string.
-
Open the service and click the Overview tab.
-
Right-click at the left, right, or top, and choose Add Operation.
-
Select a value at Visibility (public = call from anywhere; protected = from the same dataspace; private = from the same data service).
-
At Kind, choose
libraryFunctionorlibraryProcedure.Figure 4-14 Add Operation - Library Function
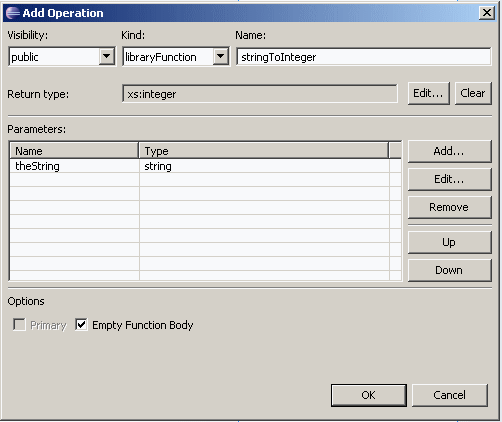
Description of "Figure 4-14 Add Operation - Library Function"
-
Give your function or procedure a name.
-
At Return Type, click Edit and choose a simple or complex return type. Click OK.
-
At Parameters, click Edit. Enter a parameter name, and choose a simple or complex return type. Click OK.
-
Click Empty Function Body, then OK.
-
Click the Source tab.
Oracle Data Service Integrator has generated a pragma statement and an empty function or procedure body, like this:
(::pragma function <f:function kind="library" visibility="public" isPrimary="false" xmlns:f="urn:annotations.ld.bea.com"/>::) declare function cus2:integerToString($theInt as xs:positiveInteger) as xs:string* { $var-bea:tbd }; -
In the function body, delete
$var-bea:tbdand add your own XQuery code, for example:declare function cus2:integerToString($theInt as xs:positiveInteger) as xs:string* { };
4.2.2.3 Test in Eclipse for WebLogic
You can test the library function or procedure directly in Eclipse for WebLogic, before you use it from a client application.
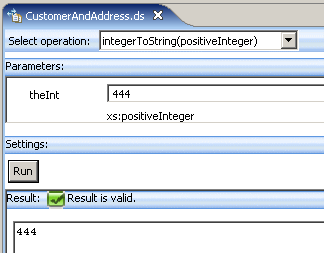
-
Open the service, and click the Test tab.
-
At Select Operation, choose the library function or procedure you want to test.
-
Enter a value in the Parameters box.
-
(Optional) Expand Settings and enter new values for results, transactions, and authentication.
-
Click Run.
If the function or procedure works, you see valid results.
If not, you see an exception message that provides details, so that you can correct the error.
Figure 4-15 Result Validation in Eclipse for WebLogic
Description of "Figure 4-15 Result Validation in Eclipse for WebLogic"
4.2.3 How To Create Logical Data Service Keys
This topic describes how to create a key for a logical data service.
A logical data service key uniquely identifies a data record the logical service defines. Because a logical service combines data from various physical and logical services, its key can combine or be different from the keys defined on underlying data sources.
For example, you might have a logical data service with a flat return type that combines data from two relational tables, CUSTOMER and ORDER. These tables have keys CUSTOMER_ID and ORDER_ID, respectively. In your logical data service, each data record is a unique combination of Customer and Order, so you create a composite key that combines CUSTOMER_ID and ORDER_ID.
Create procedures return a key to identify the data record that was inserted. Update and Delete procedures act on the data record the key identifies. A logical data service can have one key, although you can have multiple key schema files from which you select the key. You can have Oracle Data Service Integrator auto-generate the key, choose the elements you want in the key, or select an available schema (XSD) file to use for the key. The key definition requires specific knowledge of your data and the update map the service uses.
You can create a key for any logical data service that has a primary Read function. Once you create the key, you can view it in an update map and test it.
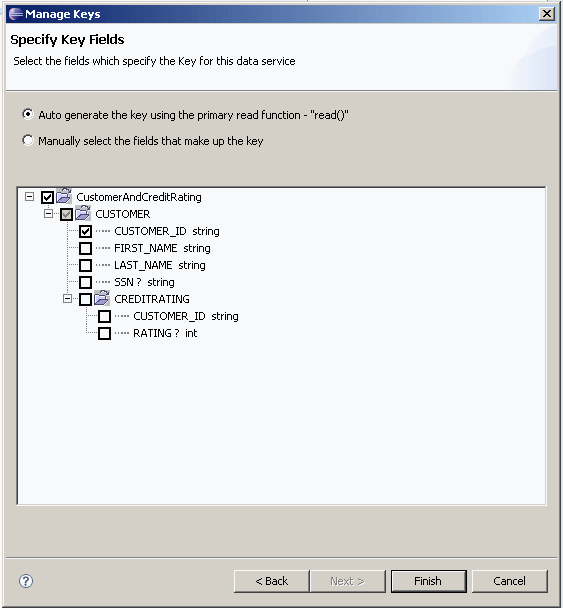
4.2.3.1 Generate a Key
To auto-generate the key:
-
Be sure the logical data service has a primary Read function.
-
Open the logical data service in Eclipse for WebLogic, and click the Overview tab.
-
Right-click in the service name bar, or at the left or right of the screen, and choose Manage Key.
-
Select Generate a New Schema.
-
Accept the default key name, or give your key a name ending in
.xsd. -
Click Next.
-
Select Auto Generate the Key, then click Finish.
Figure 4-16 Auto-Generating a Logical Data Service Key
Description of "Figure 4-16 Auto-Generating a Logical Data Service Key"
You can now use the key as an argument or return type to an update map procedure, such as a Create, Update, or Delete procedure.
If you create a key, then delete it and create another one, you need to edit the signature of your Create procedure to return the new key:
Overview tab > right-click > Edit Signature
4.2.3.2 Select Elements for a Key
When you select elements for a key, you can add any element with single (1..1) or zero (0..1) cardinality, whether or not it is a key element in the underlying data source. An element with zero cardinality is optional and might contain null values, but you can use it as a key element. This allows you to create a wider variety of keys.
For example, you might have two data sources, one using a Social Security Number to identify records, and the other, a tax identification number. Your logical data service might have a return type that joins the two sources, so that a data record has either a social security number or a tax ID number. In the return type, both the social security number and the tax ID number are optional. The key can use either element to identify the record.
Note:
You cannot select an element that has multiple (0..m or 1..m) cardinality to be part of a key.
To create a key with elements that you select:
-
Be sure the logical data service has a primary Read function.
-
Open the logical data service in Eclipse for WebLogic.
-
Click the Overview tab.
-
Right-click in the service name bar, or the left or right of the screen, and choose Manage Keys.
-
Click Generate a New Schema.
-
Give your key schema a name ending in
.xsd. -
Click Manually select the fields that make up the key.
-
Select the key fields you want, then click Finish.
4.2.3.3 Select a Key Schema File
You can also select an existing schema (XSD) file to use as the key:
-
Be sure the logical data service has a primary Read function.
-
Open the logical data service in Eclipse for WebLogic.
-
Click the Overview tab.
-
Right-click in the service name bar, or the left or right of the screen, and choose Manage Key.
-
Click Select an existing schema type, then Browse.
The Manage Keys dialog shows you the key schema's global element and selector element.
-
Click Finish.
The schema in the Overview tab now displays a key icon next to the current key element or elements.
4.2.3.4 View and Map a Key
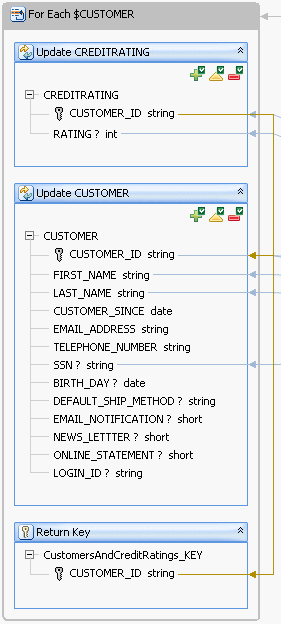
Once you create the key (whether by auto-generating, identifying key fields, or selecting a key schema file), you can see the key elements in the service's update map, at the lower left.
Figure 4-19 Viewing the Key in the Update Map

Description of "Figure 4-19 Viewing the Key in the Update Map"
The Return Key block represents the key elements a Create procedure returns when a new data record is added. In most cases, the key fields are automatically mapped to elements in the data sources on the left. If they are not mapped, you can add a mapping.
-
Locate the Update block on the left that contains the key element.
-
Drag from the key element in the Update block to the key element in the Return Key block.
Figure 4-20 Mapping a Key Element from an Update Block to the Return Key
Description of "Figure 4-20 Mapping a Key Element from an Update Block to the Return Key"
Note:
Map the key element from an update block on the left, not from the return type on the right. If you map the key from the return type on the right, you allow the key value to be updated from data a user enters.
Once the key element is mapped, you can test it (preferably using sample data):
-
Click the Test tab.
-
At Select operation, choose one of the service's Create procedures.
-
Enter data in the XML template in the Parameters box.
-
Click Run.
The key value is returned in the Result box:
You can also view the key schema file by locating the key in the Project Explorer, right-clicking, and choosing an XML editor to open the file. A key schema looks like this:
<?xml version="1.0" encoding="UTF-8"?>
<xs:schema targetNamespace="ld:logical/CustomerOrder" xmlns:xs="http://www.w3.org/2001/XMLSchema">
  <xs:element name="CustomersAndOrders_KEY">
    <xs:complexType>
      <xs:sequence>
        <xs:element name="CUSTOMER_ID" type="xs:string"/>
      </xs:sequence>
    </xs:complexType>
  </xs:element>
</xs:schema>
In the key schema, all elements must be in the same namespace as the root element. In the previous example, the namespace of the root element is:
ld:logical/CustomerOrder
A key schema cannot contain elements in different namespaces.
Note:
If you have key schema files from a previous version of Oracle Data Service Integrator that you want to reuse, be sure that all elements within the schema are in the same namespace.
4.2.4 How To Declare a Security Resource in Eclipse for WebLogic
This topic describes how to add a security resource to a data service, so that the service returns data only if the caller has proper access.
4.2.4.1 Choose a Technique
You can add a security resource to a data service in two ways:
-
The first way is to use the Oracle Data Service Integrator Console to set elements and attributes that should be secured based on a security policy set by an administrator. This technique works in most cases for which you want to add a security policy.
-
The other way, described here, is to create a custom security resource for an entity or library data service in Eclipse for WebLogic. The custom security resource is used directly in an XQuery expression to secure all or part of the service's return type. You can use the same custom security resource more than once in a single data service.
You can add a security resource to any data service, physical or logical, entity or library.
4.2.4.2 Create the Security Resource
You add a security resource to a logical entity service in Eclipse for WebLogic and then activate it using the Oracle Data Service Integrator Console.
Note:
You can follow these steps on a physical or logical entity service. Be sure the service has a query map and a primary read function.
To create a security resource:
-
Open the service in Eclipse for WebLogic.
-
Make sure the Properties tab is displayed:
Window > Show View > Properties
-
Click Overview, then Properties.
-
Expand the schema in the center. Locate the element you want to add the security resource to.
-
In the Properties tab, locate Security Resources.
-
Click the Add New field below it, then click the plus sign.
-
In the Value column, enter the name of the element you want to secure.
Use just an element name (
CUSTOMER), not a pathname (CUSTOMER_PROFILE/CUSTOMER) or a variable ($CUSTOMER). You can use a simple element, a complex element, or the root element of the return type. -
If needed, add more security resources and elements.
-
Click the Source tab.
The pragma statement at the top of the XQuery source file shows the new security resource:
(::pragma  xds <x:xds targetType="cus:CustomerOrder"
 xmlns:x="urn:annotations.ld.oracle.com" xmlns:cus="ld:logical/CustomerOrder">
<creationDate>2007-10-22T13:36:48</creationDate>
<userDefinedView/>
<key name="DefaultKey" inferred="true" inferredSchema="true"
type="cus:CustomersAndOrders_KEY">
  <selector xpath="CUSTOMER"/>
</key>
<secureResources>
  <secureResource>CUSTOMER</secureResource>
</secureResources>
</x:xds>::-)
4.2.4.3 Use the Security Resource in XQuery
The next step is to add a condition to the return type so that it is returned only if the caller has access. To do this, make changes visually in the Query Map. You want to add a conditional statement to the service's primary read function, something like this:
declare function tns:read() as element(cus:CustomerOrder)*{
for $CUSTOMER in cus1:CUSTOMER()
return
        <cus:CustomerOrder>
            {
            if (add-authentication-expression-here) then
               <CUSTOMER>
                        return type here ..
                </CUSTOMER>
            else
               <CUSTOMER>{return nothing here}</CUSTOMER>
            }
        </cus:CustomerOrder>
The following example shows how to create a security resource on an element in the return type, using the primary read function.
4.2.4.3.1 Create the If Condition
-
Click the Query Map tab.
-
At Select Operation, choose the primary read function.
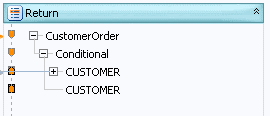
-
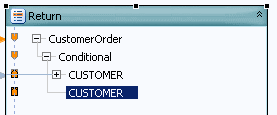
In the return type, right-click the element for which you created a security resource in the Properties tab. Choose Make Conditional.
A node named Conditional is added to the return type.
Figure 4-24 Adding a Conditional Return Type
Description of "Figure 4-24 Adding a Conditional Return Type"
-
Click the Conditional node.
You see the default conditional expression, (
true), in the expression editor. -
Make sure the Design Palette is displayed (Window > Show View > Design Palette), then click it.
-
Expand:
XQuery Functions > Data Services Access Control Functions
-
In the mapping area, click the double arrow icon to open the expression editor.
-
Click the expression label in the editor.
-
Double-click (
true), then delete it. -
Drag the function
fn-bea:is-access-allowedfrom the Design Palette to the editor.fn-bea:is-access-allowed($label, $data_service)
-
For the
$labelargument, enter the name of your security resource as a string within quotes.Use the same name you used in the Properties tab.
-
For the
$data_serviceargument, enter the namespace-qualified name of your data service as a string within quotes:fn-bea:is-access-allowed("CustomerOrder/CUSTOMER", "ld:logical/CustomersAndOrders.ds") -
Click the Source tab, and check the read function. Make sure it has no errors.
Notice that the new expression is added to the if expression in the read function:
declare function tns:read() as element(cus:CustomerOrder)*{ for $CUSTOMER in cus1:CUSTOMER() return <cus:CustomerOrder> { if (fn-bea:is-access-allowed("CUSTOMER", "ld:logical/CustomersAndOrders.ds")) then <CUSTOMER> ... </CUSTOMER> else <CUSTOMER> ... </CUSTOMER> } -
Click Save.
You now need to define what is returned in the else clause.
4.2.4.3.2 Create the Else Condition
-
Click the Query Map tab.
-
In the return type, click the second conditional element.
-
In the expression editor, enter "NA", and click Save.
-
Click the Source tab.
The read function now shows the return value for the else clause as the string "NA".
declare function tns:read() as element(cus:CustomerOrder)*{
for $CUSTOMER in cus1:CUSTOMER()
return
        <cus:CustomerOrder>
            {
            if (fn-bea:is-access-allowed("CUSTOMER",
             "ld:logical/CustomersAndOrders.ds")) then
                <CUSTOMER>
                   <CUSTOMER_ID>{fn:data($CUSTOMER/CUSTOMER_ID)}</CUSTOMER_ID>
                   <FIRST_NAME>{fn:data($CUSTOMER/FIRST_NAME)}</FIRST_NAME>
                   <LAST_NAME>{fn:data($CUSTOMER/LAST_NAME)}</LAST_NAME>
                   <SSN?>{fn:data($CUSTOMER/SSN)}</SSN>
                   ...
              </CUSTOMER>
            else
              <CUSTOMER>{"NA"}</CUSTOMER>
            }
        </cus:CustomerOrder>
}
4.2.4.4 Assign Security Resources
The next step is to use the Oracle Data Service Integrator console to create a security policy.
For more information, see Securing Oracle Data Service Integrator Platform Resources
All you need to do in the Oracle Data Service Integrator console is create a security policy. You have already created a custom security resource and added it to an XQuery function or procedure.
4.2.4.5 Test Security
Once you establish security resources, you should test security in Test view.
To test a security resource:
-
Open the service in Eclipse for WebLogic.
-
Click the Test tab.
-
At Select Operation, choose the function you want to test.
-
Enter any parameters the function requires.
-
Expand Settings and enter the authentication credentials you want to use.
-
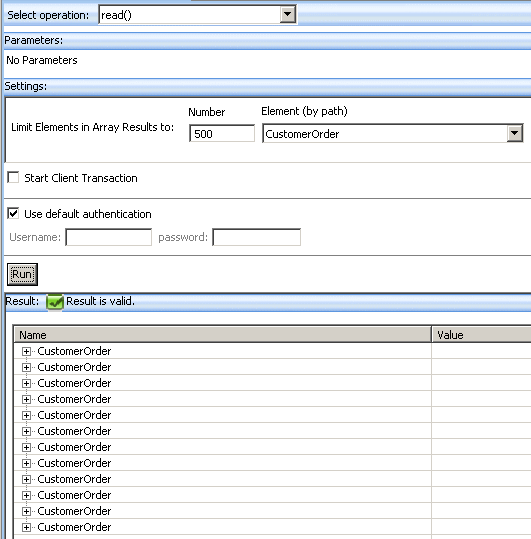
Click Run.
Check that the function returns either valid results if the authentication credential passes the security policy, or the string NA if it is not.
Figure 4-27 Testing the Read Function in Test View
Description of "Figure 4-27 Testing the Read Function in Test View"
4.2.4.6 See Also
-
Securing Oracle Data Service Integrator Resources
4.3 Examples
This section describes the following topics:
4.3.1 How to Create a Logical Data Service with a Group By Clause
This topic shows how to add a group by clause to a logical data service, using the Oracle extensions to XQuery.
4.3.1.1 Overview
In relational data sources, a SQL GROUP BY statement is used with aggregate functions to group retrieved data by one or more columns. If you want to retrieve a list of distinct customers and the total amount of all orders each customer has placed from a relational data source, you might use a SQL statement like this:
SELECT CUSTOMER_ID, SUM(TOTAL_ORDER_AMOUNT) FROM ORDERS
    GROUP BY CUSTOMER_ID
The output produced groups all orders by customer and then totals the order amounts for each:
| CUSTOMER_ID | TOTAL_OF_ALL_ORDERS |
|---|---|
|
Customer0 |
9155.10 |
|
Customer1 |
5336.5 |
|
Customer2 |
11245.05 |
|
Customer3 |
1419.95 |
Oracle Data Service Integrator logical data services use XQuery 1.0 to query data. XQuery, as defined by the W3C standard, does not support group by clauses. However, Oracle Data Service Integrator has extended XQuery to allow a group by clause in an XQuery FLWOR statement:
declare function tns:read() as element(ord1:ORDER_GROUP_BY)*{
for $CUSTOMER_ORDER in cus:CUSTOMER_ORDER()
group $CUSTOMER_ORDER as $CUSTOMER_ORDER_group by $CUSTOMER_ORDER/CUSTOMER_ID as $CUSTOMER_ID_group
return ...
You can add the XQuery group by statement to a logical data service visually in Eclipse for WebLogic. You should first make sure the service has a return type that supports the group by.
Suppose that after you retrieve all customer orders, group them by customer, and find the total amount of all orders each customer has placed, you also want a list of order IDs for each customer. You can design a logical data service to do this, doing part of the work in the mapping editor (in Eclipse for WebLogic) and part in the XQuery source.
4.3.1.2 Design the Return Type Schema
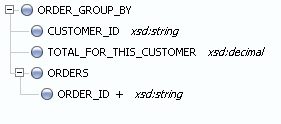
The return type schema needs an element to group by, such as a customer ID, and an element to hold an aggregate value, such as a sum or an average. The return type can also have a complex element that contains additional elements that provide information. This example provides the list of order IDs that are totalled for each customer, as one element with multiple cardinality within a complex element.
Figure 4-28 Return Type Schema for a Group By
Description of "Figure 4-28 Return Type Schema for a Group By"
If you want to design the schema top down using an XML editor, you can start with code like this and refactor it for your use case:
<?xml version="1.0" encoding="UTF-8"?>
<xs:schema xmlns:xs="http://www.w3.org/2001/XMLSchema" targetNamespace="ld:logical/OrderGroupBy">
   <xs:element name="ORDER_GROUP_BY">
      <xs:complexType>
            <xs:element name="CUSTOMER_ID" type="xs:string"/>
            <xs:element name="TOTAL_FOR_THIS_CUSTOMER" type="xs:decimal"/>
            <xs:element name="ORDERS">
                 <xs:complexType>
                 <xs:sequence>
                    <xs:element name="ORDER_ID" type="xs:string" maxOccurs="unbounded"
                    form="unqualified" />                      </xs:sequence>
              </xs:complexType>
           </xs:element>
         </xs:sequence>
      </xs:complexType>
   </xs:element>
</xs:schema>
You can also create the return type bottom up, as you design the query map (see Example: How to Create Your First Data Services).
4.3.1.3 Create the Logical Data Service
Once you have defined the return type, create the logical data service and add the group by statement visually, using the mapping editor.
-
Create a new data space and import physical data sources (see "Example: How to Create Your First Data Services").
-
Create a new logical data service.
-
Click Overview, right-click the name bar, choose Associate XML Type, and select the schema file for the return type.
-
Create a primary Read function.
-
Click Query Map. Drag the primary Read function from the relevant physical data source.
4.3.1.4 Create the Group By Node
Now create the group by node visually:
-
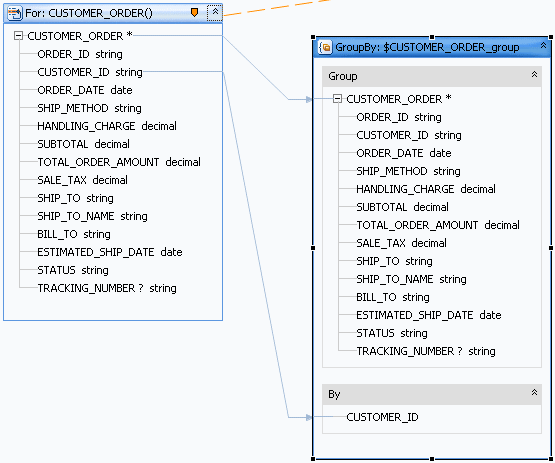
Right-click the element in the For block that you want to use as a grouping element, and select Create Group By.
A Group By node is created, and mappings are automatically drawn to it. The lower section of the Group By block shows the grouping element.
-
Drag a mapping from the grouping element in the By section of the Group By node to the grouping element in the return type (here, from
GroupByCUSTOMER_IDtoReturnCUSTOMER_ID). -
Drag a mapping from the appropriate element in the top section of the Group By node to the aggregate element in the return type (here, from
Group By TOTAL_ORDER_AMOUNTto ReturnTOTAL_FOR_THIS_CUSTOMER).Figure 4-30 Mapping from the Group By Node
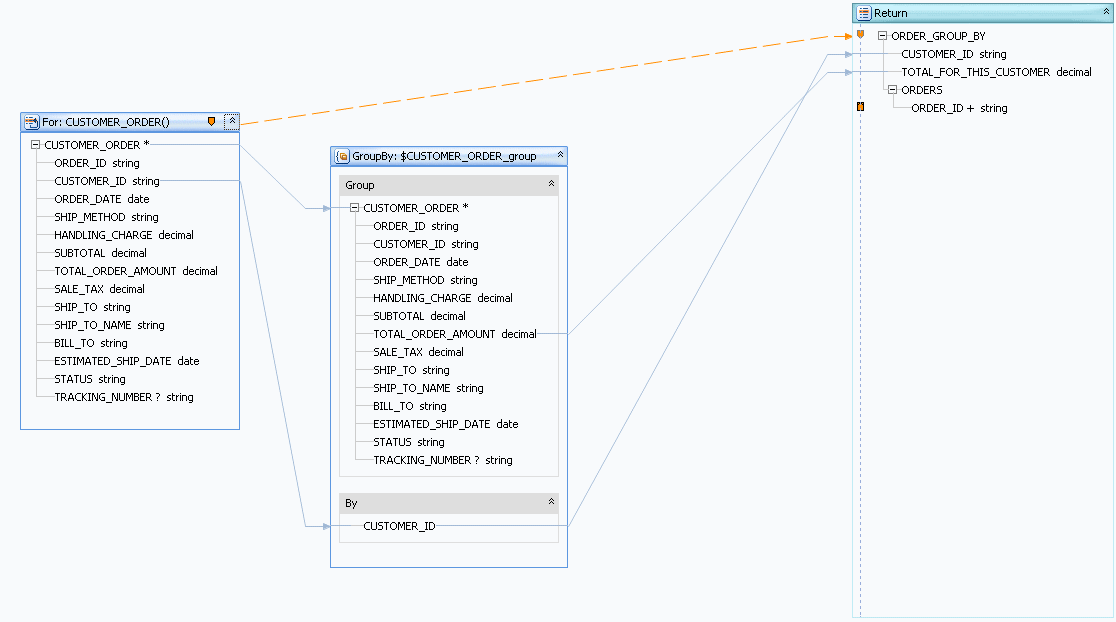
Description of "Figure 4-30 Mapping from the Group By Node"
4.3.1.5 Create the For Node
To map the information element, edit the XQuery code in the Source tab.
-
In the Source tab, add an XQuery for clause to the correct node in the primary Read function (here, the ORDERS node):
declare function tns:read() as element(ord1:ORDER_GROUP_BY)*{
for $CUSTOMER_ORDER in cus:CUSTOMER_ORDER()
group $CUSTOMER_ORDER as $CUSTOMER_ORDER_group by $CUSTOMER_ORDER/CUSTOMER_ID as $CUSTOMER_ID_group
return
        <ord1:ORDER_GROUP_BY>
            <CUSTOMER_ID>{fn:data($CUSTOMER_ID_group)}</CUSTOMER_ID>
            <TOTAL_FOR_THIS_CUSTOMER>{fn:data($CUSTOMER_ORDER_group/
            TOTAL_ORDER_AMOUNT)}</TOTAL_FOR_THIS_CUSTOMER>
            <ORDERS>  {
                      for $order in $CUSTOMER_ORDER_group/ORDER_ID
                      return
                      <ORDER_ID>{fn:data($order)}</ORDER_ID>
                }
            </ORDERS>
        </ord1:ORDER_GROUP_BY>
};
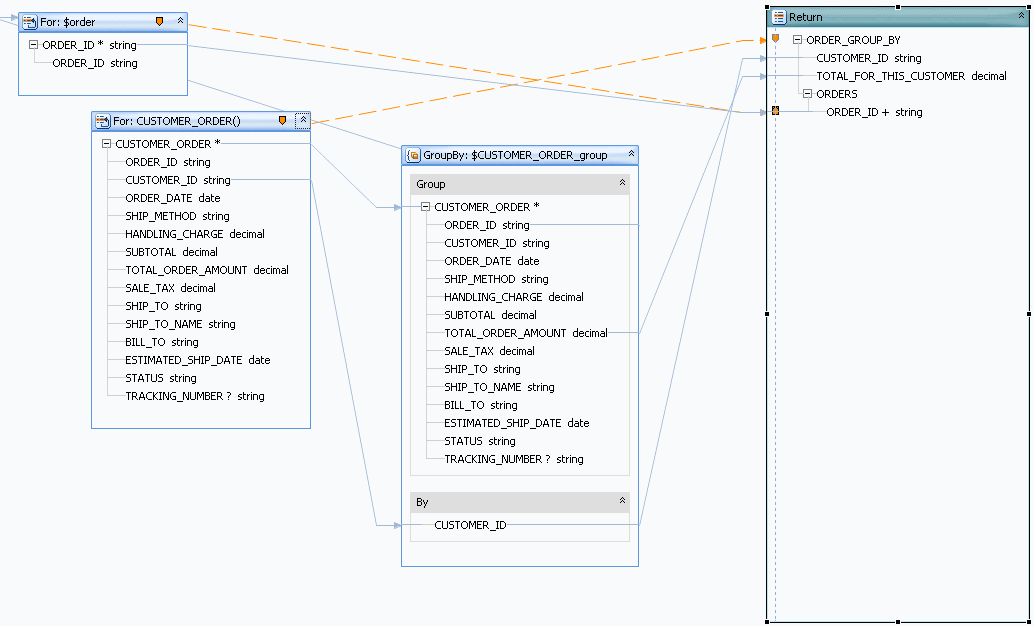
The for statement declares a variable (here $order) and then looks for an element ($
CUSTOMER_ORDER_group/ORDER_ID) in the first group the group by statement declares (CUSTOMER_ORDER_group). Theforclause then returns the value of the element using the fn:data function. -
Click Query Map. Notice that a For node has been added.
Figure 4-31 Adding a For Node to a Group By
Description of "Figure 4-31 Adding a For Node to a Group By"
4.3.1.6 Add an Aggregate Function
Last, add an aggregate function to the aggregate element in the return type (here, TOTAL_FOR_THIS_CUSTOMER).
-
In Query Map, click the aggregate element in the return type.
Notice that it uses the fn:data function, for example:
{fn:data($CUSTOMER_ORDER_group/TOTAL_ORDER_AMOUNT)} -
Click in the expression. Make sure the Save and Cancel icons are enabled.
-
Click the Design Palette (Window > Show View > Design Palette).
-
Expand XQuery Functions, then Aggregate Functions.
-
Choose a function (here, the
fn:sumfunction with one argument) and drag it to the expression editor. Leave the existing expression there. -
Edit the expression to use the existing expression as an argument to the aggregate function, for example:
{fn:sum( fn:data($CUSTOMER_ORDER_group/TOTAL_ORDER_AMOUNT) ) } -
Click Save.
4.3.1.7 Test the Service
The only way to test a logical data service with a group clause is to run the primary Read function in the Test tab. This type of data service does not have an update map, so you cannot edit data and submit it or test an Update procedure. Likewise, you cannot test a Create procedure.
-
Click Test.
-
At Select Operation, choose the primary Read function.
-
Click Run.
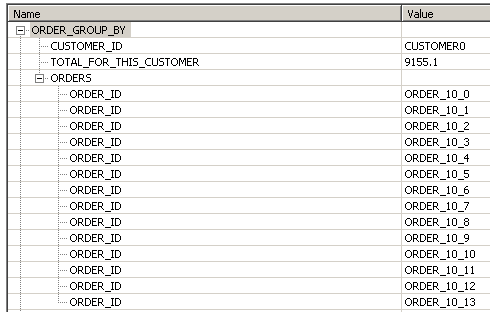
You should see data grouped by the grouping element, with a result for the aggregate element, and containing a number of information elements.
Figure 4-32 Results of a Group By Statement
Description of "Figure 4-32 Results of a Group By Statement"
4.3.1.8 See Also
Examples
Other Resources
-
W3C XQuery Language Specification
-
Extending XQuery for Grouping, Duplicate Elimination, and Outer Joins
4.3.2 How To Create a Data Service with a Flat Return Type
This topic shows you how to create an update map from a logical data service with a flat, non-nested return type, using the sample database that ships with Oracle Data Service Integrator.
4.3.2.1 Overview
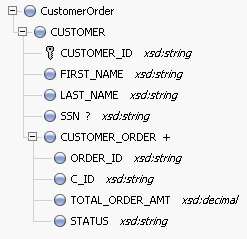
A return type can be non-nested, or flat, even if it joins two relational tables, where one table has a one-to-many relationship with the other table. An example is one customer in a CUSTOMER table with many Orders in an ORDERS table. One approach to the return type is to nest an Orders element of multiple cardinality beneath the Customer element.
Figure 4-33 A Nested Customer-and-Orders Schema
Description of "Figure 4-33 A Nested Customer-and-Orders Schema"
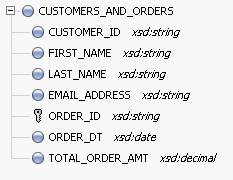
Because you can design a logical data service with any structure, regardless of the underlying data sources, it is just as valid to define a flat return type to model the relationship between Customers and Orders.
Figure 4-34 A Flat Customer-and-Orders Schema
Description of "Figure 4-34 A Flat Customer-and-Orders Schema"
4.3.2.2 Create a Dataspace Project
First, create a new dataspace project to contain your physical and logical data services:
-
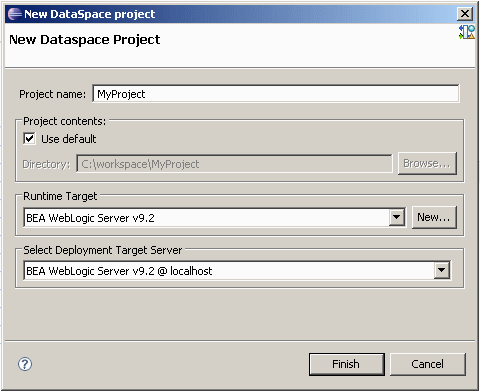
In Eclipse for WebLogic, choose File > New > Dataspace Project.
-
Enter a project name such as
FlatReturnType, then click Finish. -
Right-click the new dataspace project name, and choose New > Folder.
-
Create folders named physical and logical. Within logical, create a folder named schemas.
Using separate folders for physical and logical services helps separate the physical and logical integration layers.
4.3.2.3 Create the Return Type
The return type the logical data service uses combines data from the CUSTOMER table and the ORDERS table. It has a non-nested XML structure, even though the data shows that customers and orders have a one-to-many relationship.
You can define the return type by creating an XML schema (XSD) file. In an XML editor, create a schema file like this one:
<?xml version="1.0" encoding="UTF-8" ?>
<xs:schema targetNamespace="ld:logical/FlatReturnType" xmlns:xs="http://www.w3.org/2001/XMLSchema">
   <xs:element name="CUSTOMERS_AND_ORDERS">
      <xs:complexType>
            <xs:element name="CUSTOMER_ID" type="xs:string"/>
            <xs:element name="FIRST_NAME" type="xs:string"/>
            <xs:element name="LAST_NAME" type="xs:string"/>
           <xs:element name="EMAIL_ADDRESS" type="xs:string"/>
            <xs:element name="ORDER_ID" type="xs:string"/>
            <xs:element name="ORDER_DT" type="xs:date"/>
            <xs:element name="TOTAL_ORDER_AMT" type="xs:decimal"/>
         </xs:sequence>
      </xs:complexType>
   </xs:element>
</xs:schema>
Be sure to:
-
Define
targetNamespaceto make sense for your dataspace project.Make sure you have only one top-level element of the name you choose (here,
CUSTOMERORDER) in your target namespace. You can give thetargetNamespacethe same name as the dataspace project, but you are not required to. -
Save the schema file in the logical/schemas folder within your dataspace project.
Note that the cardinality of all elements uses the default values, minOccurs="1" and maxOccurs="1". Each customer has many orders, but there is only one combination of customer and order, so the cardinality of the order elements (ORDER_ID, ORDER_DT, and TOTAL_ORDER_AMT) is still 1.
4.3.2.4 Create Physical Data Services
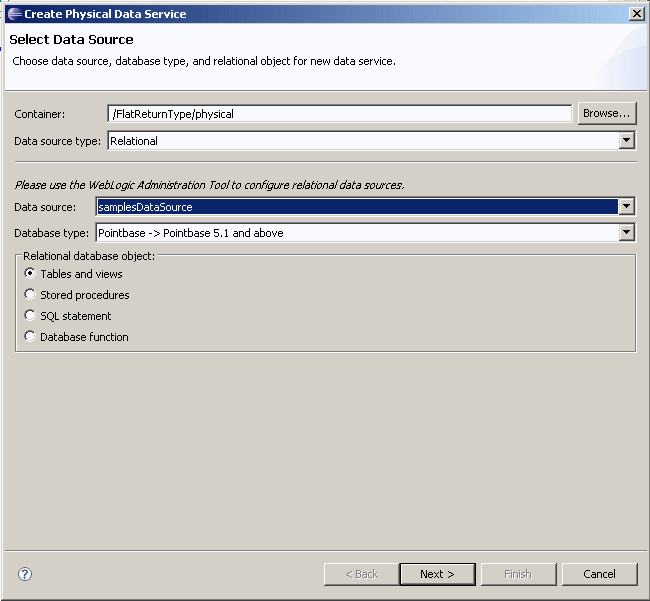
Now, create physical data services based on the sample database or your own physical data sources.
-
In Project Explorer, right-click the physical folder in your dataspace project.
-
Choose New > Physical Data Service.
-
Choose Relational for Data source type and dspSamplesDataSource for Data source, then click Next.
-
Expand RTLCUSTOMER and select CUSTOMER.
-
Expand RTLAPPLOMS and select CUSTOMER_ORDER, then click Next.
-
Select Public for both CUSTOMER and CUSTOMER_ORDER, then click Next.
-
Click Finish.
-
When asked if you want to open the new data services, click No.
Figure 4-36 Adding Physical Data Services
Description of "Figure 4-36 Adding Physical Data Services"
4.3.2.5 Create a Logical Data Service
Now that you have physical data services and a schema for the return type, you can create the logical data service.
-
Right-click the logical folder, then choose New > Logical Data Service.
-
Enter a name for the service, such as
FlatCustomersAndOrders. -
Make sure Entity Data Service is selected, then click Finish.
Now associate a return type with the service:
-
Right-click in the Overview tab and choose Associate XML Type.
-
Select the schema and click OK.
Figure 4-37 A New Logical Data Service with a Return Type

Description of "Figure 4-37 A New Logical Data Service with a Return Type"
You also need to define a primary Read function, in order to create both the query map and update map.
-
Right-click in the service name bar at the top, and choose Add Operation.
-
Make sure Kind is set to read, then enter a function name, such as read.
-
Make sure Primary is selected, then click OK.
Figure 4-38 Creating a Primary Read Function
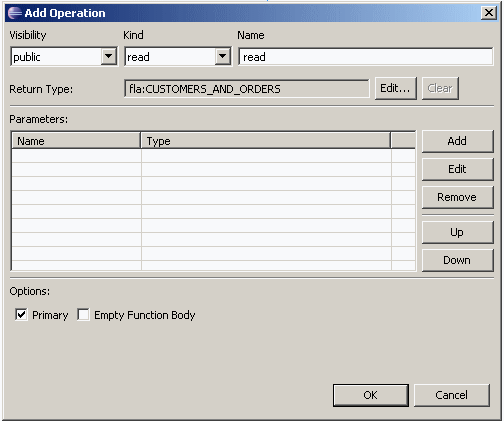
Description of "Figure 4-38 Creating a Primary Read Function"
4.3.2.6 Create the Query Map
Now you need to create the query map visually in Eclipse for WebLogic, which in turn generates an update map.
-
Click the Query Map tab.
-
In Project Explorer, expand the physical data services
CUSTOMER.dsandCUSTOMER_ORDER.ds. -
Drag the Read function from each physical service to the mapping area.
Notice that you cannot scope the
CUSTOMER_ORDERblock to a subtype in the return type, because the return type has no subtypes. -
Drag mappings from the
CUSTOMERblock on the left to the return type forCUSTOMER_ID,FIRST_NAME,LAST_NAME, andEMAIL_ADDRESS. -
Drag mappings from the
CUSTOMER_ORDERblock on the left to the return type forORDER_ID,ORDER_DT, andTOTAL_ORDER_AMT. -
In the For blocks, drag from
CUSTOMER/CUSTOMER_IDtoCUSTOMER_ORDER/CUSTOMER_ID.This creates a join between the two data sources.
Figure 4-39 A Query Map with Mappings and a Join
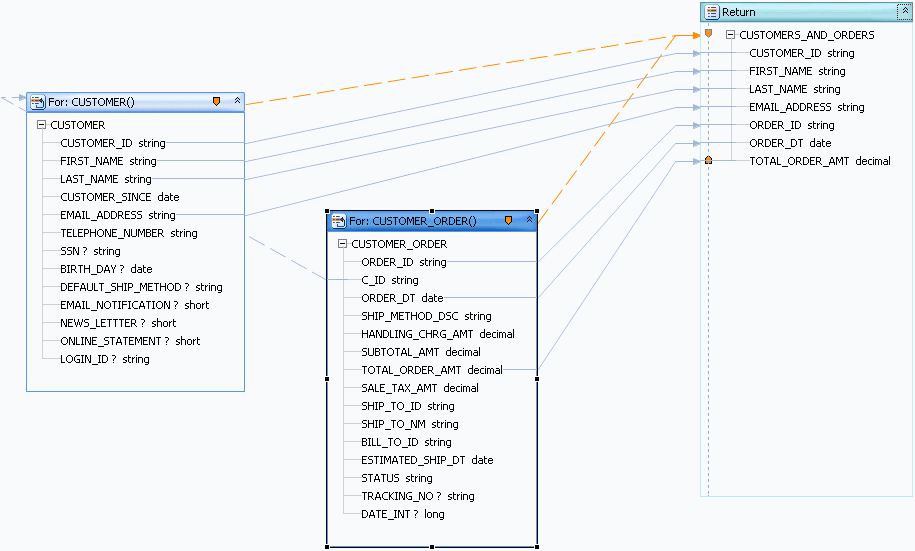
Description of "Figure 4-39 A Query Map with Mappings and a Join"
If you click the Source tab and expand the Read function, you see XQuery code like this:
declare function tns:read() as element(fla:CUSTOMERS_AND_ORDERS)*{
for $CUSTOMER_ORDER in cus1:CUSTOMER_ORDER()
for $CUSTOMER in cus:CUSTOMER()
where $CUSTOMER/CUSTOMER_ID eq $CUSTOMER_ORDER/C_ID
return
        <fla:CUSTOMERS_AND_ORDERS>
            <CUSTOMER_ID>{fn:data($CUSTOMER/CUSTOMER_ID)}</CUSTOMER_ID>
            <FIRST_NAME>{fn:data($CUSTOMER/FIRST_NAME)}</FIRST_NAME>
            <LAST_NAME>{fn:data($CUSTOMER/LAST_NAME)}</LAST_NAME>
            <EMAIL_ADDRESS>{fn:data($CUSTOMER/EMAIL_ADDRESS)}</EMAIL_ADDRESS>
            <ORDER_ID>{fn:data($CUSTOMER_ORDER/ORDER_ID)}</ORDER_ID>
            <ORDER_DT>{fn:data($CUSTOMER_ORDER/ORDER_DT)}</ORDER_DT>
            <TOTAL_ORDER_AMT>{fn:data($CUSTOMER_ORDER/TOTAL_ORDER_AMT)}</TOTAL_ORDER_AMT>
        </fla:CUSTOMERS_AND_ORDERS>
};
Notice that the XQuery code has a for statement nested directly within another for statement. This creates an inner join between the two tables in SQL. To confirm the SQL that is created:
-
Click the Test tab.
-
At Select operation, make sure the primary Read function is selected.
-
Click Run (saving your data service as necessary).
You should see an XQuery FLWOR statement node. If you expand it, you should see a SQL query like this, showing an inner join:
SELECT t1."ORDER_DT" AS c1, t1."ORDER_ID" AS c2, t1."TOTAL_ORDER_AMT" AS c3,
  t2."CUSTOMER_ID" AS c4, t2."EMAIL_ADDRESS" AS c5, t2."FIRST_NAME" AS c6, t2."LAST_NAME" AS c7
FROM "RTLAPPLOMS"."CUSTOMER_ORDER" t1
JOIN "RTLCUSTOMER"."CUSTOMER" t2
ON (t2."CUSTOMER_ID" = t1."C_ID"
The inner join is created because the logical data service has a flat return type. When you mouse over the SQL query, you see this message:
Generated SQL query does not have a WHERE clause. This may cause the query to take longer to finish
and use excessive memory resources.
4.3.2.7 See Also
4.4 Reference
The following example is for your reference.
4.4.1 XQuery Source of a Logical Entity Service
This topic shows sample XQuery source code for a logical entity data service.
4.4.1.1 Source Code
xquery version "1.0" encoding "UTF-8";
(::pragma  xds <x:xds targetType="cus:CUSTOMER_PROFILE"
xmlns:x="urn:annotations.ld.oracle.com" xmlns:cus="ld:logical/CustomerProfile">
    <creationDate>2007-10-05T10:29:01</creationDate>
    <userDefinedView/>
    <key name="DefaultKey" inferred="true" inferredSchema="true" type="cus:CustomerProfile_KEY">
        <selector xpath="CUSTOMER"/>
    </key>
</x:xds>::)

import schema namespace cus="ld:logical/CustomerProfile" at
 "ld:logical/schemas/CustomerProfile.xsd";

declare namespace cus1= "ld:physical/CUSTOMER";

declare namespace add= "ld:physical/ADDRESS";

declare namespace cre= "ld:physical/CREDITRATING";

import schema namespace cus2="ld:logical/CustomerProfile" at
"ld:logical/schemas/CustomerProfile_KEY.xsd";

declare namespace tns="ld:logical/CustomerProfile";

declare function tns:stringToShort($theString) as xs:short {
        xs:short($theString)
};

(::pragma  function <f:function kind="read" visibility="public" isPrimary="true"
 xmlns:f="urn:annotations.ld.oracle.com">
   <uiProperties>
        <component identifier="returnNode" minimized="false" x="842" y="11" w="244" h="601">
            <treeInfo id="0">
                <collapsedNodes>
                    <collapsedNode>CUSTOMER_PROFILE\CUSTOMER</collapsedNode>
                    <collapsedNode>CUSTOMER_PROFILE\CUSTOMER\ADDRESS</collapsedNode>
                    <collapsedNode>CUSTOMER_PROFILE\CUSTOMER\CREDITRATING</collapsedNode>
                </collapsedNodes>
            </treeInfo>
        </component>
        <component identifier="CUSTOMER" x="44" y="56" h="300" w="219" minimized="false"/>
        <component identifier="ADDRESS" x="303" y="216" h="336" w="193" minimized="false"/>
        <component identifier="CREDITRATING" x="547" y="485" h="102" w="170" minimized="false"/>
    </uiProperties>
</f:function>::)

declare function tns:read() as element(tns:CUSTOMER_PROFILE)*{
for $CUSTOMER in cus1:CUSTOMER()
return
        <tns:CUSTOMER_PROFILE>
            <CUSTOMER>
                <CUSTOMER_ID>{fn:data($CUSTOMER/CUSTOMER_ID)}</CUSTOMER_ID>
                <FIRST_NAME>{fn:data($CUSTOMER/FIRST_NAME)}</FIRST_NAME>
                <LAST_NAME>{fn:data($CUSTOMER/LAST_NAME)}</LAST_NAME>
                <EMAIL_ADDRESS>{fn:data($CUSTOMER/EMAIL_ADDRESS)}</EMAIL_ADDRESS>
                {
                    for $ADDRESS in add:ADDRESS()
                    where $CUSTOMER/CUSTOMER_ID eq $ADDRESS/CUSTOMER_ID
                    return
                    <ADDRESS>
                        <ADDR_ID>{fn:data($ADDRESS/ADDR_ID)}</ADDR_ID>
                        <CUSTOMER_ID>{fn:data($ADDRESS/CUSTOMER_ID)}</CUSTOMER_ID>
                        <STREET_ADDRESS1>{fn:data($ADDRESS/STREET_ADDRESS1)}</STREET_ADDRESS1>
                        <CITY>{fn:data($ADDRESS/CITY)}</CITY>
                        <STATE>{fn:data($ADDRESS/STATE)}</STATE>
                        <ZIPCODE>{fn:data($ADDRESS/ZIPCODE)}</ZIPCODE>
                        <COUNTRY>{fn:data($ADDRESS/COUNTRY)}</COUNTRY>
                    </ADDRESS>
                }
                {
                   for $CREDITRATING in cre:CREDITRATING()
                   where $CUSTOMER/CUSTOMER_ID eq $CREDITRATING/CUSTOMER_ID
                   return
                   <CREDITRATING>
                       <CUSTOMER_ID>{fn:data($CREDITRATING/CUSTOMER_ID)}</CUSTOMER_ID>
                       <RATING?>{fn:data($CREDITRATING/RATING)}</RATING>
                   </CREDITRATING>
                }
            </CUSTOMER>
        </tns:CUSTOMER_PROFILE>

};

(::pragma  function <f:function kind="delete" visibility="public" isPrimary="true" xmlns:f="urn:annotations.ld.oracle.com">
    <nonCacheable/>
    <implementation>
        <updateTemplate/>
    </implementation>
</f:function>::)

declare procedure tns:createCUSTOMER_PROFILE($arg as element(tns:CUSTOMER_PROFILE)*) as
 element(tns:CustomerProfile_KEY)* external;

(::pragma  function <f:function kind="create" visibility="public" isPrimary="true"
 xmlns:f="urn:annotations.ld.oracle.com">
    <nonCacheable/>
    <implementation>
        <updateTemplate/>
    </implementation>
</f:function>::)

(::pragma  function <f:function kind="update" visibility="public" isPrimary="true"
 xmlns:f="urn:annotations.ld.oracle.com">
    <nonCacheable/>
    <implementation>
        <updateTemplate/>
    </implementation>
</f:function>::)

declare procedure tns:updateCUSTOMER_PROFILE($arg as changed-element(tns:CUSTOMER_PROFILE)*) as
 empty() external;

(::pragma  function <f:function kind="delete" visibility="public" isPrimary="false"
xmlns:f="urn:annotations.ld.oracle.com"/>::)

declare procedure tns:deleteByKey($arg0 as element(tns:CustomerProfile_KEY)){
 do return ();
};
4.4.1.2 See Also
Concepts
How Tos
4.5 Related Topics
For more information, refer to the following sources.
How Tos:
-
Test a Read Function and Simple Update
-
Test a Create or Delete Procedure
Concepts:
-
Data Service Types and Functions
