15 Extending the Domain with Oracle Enterprise Scheduler
This chapter describes how to extend the enterprise deployment domain with the Oracle Enterprise Scheduler software.
This chapter contains the following sections:
-
Overview of Adding Oracle Enterprise Scheduler to a SOA Domain
-
Extending the SOA Domain to Include Oracle Enterprise Scheduler
-
Configuring a Default Persistence Store for Transaction Recovery
-
Propagating the Extended Domain to the Domain Directories and Machines
-
Validating the Location and Creation of the Transaction Logs
-
Configuring Oracle HTTP Server for the WLS_ESS Managed Servers
-
Validating Access to Oracle Enterprise Scheduler Through the Hardware Load Balancer
15.1 Variables Used in This Chapter
As you perform the tasks in this chapter, you will be asked to enter the following values for several directory variables defined in Section 7.4, "File System and Directory Variables Used in This Guide".
-
ORACLE_HOME
-
ASERVER_HOME
-
MSERVER_HOME
In addition, you'll be referencing the following virtual IP (VIP) addresses defined in Section 5.2.3, "Physical and Virtual IP Addresses Required by the Enterprise Topology":
-
ADMINVHN
Actions in this chapter will be performed on the following host computers:
-
SOAHOST1
-
SOAHOST2
-
WEBHOST1
-
WEBHOST2
15.2 Overview of Adding Oracle Enterprise Scheduler to a SOA Domain
This section provides an overview of adding Oracle Enterprise Scheduler to a SOA domain. Table 15-1 lists and describes to high-level steps for extending a SOA domain with Oracle Enterprise Scheduler.
Table 15-1 Steps for Extending a SOA Domain to Include Oracle Enterprise Scheduler
| Step | Description | More Information |
|---|---|---|
|
Create Database Schemas for ESS |
Navigate the RCU screens to create the database schemas. |
|
|
Run the Configuration Wizard to Extend the Domain |
Extend the SOA/OSB domain to contain Oracle Enterprise Scheduler components |
Section 15.4, "Extending the SOA Domain to Include Oracle Enterprise Scheduler" |
|
Configure a Default Persistence Store for Transaction Recovery |
To leverage the migration capability of the Transaction Recovery Service for the servers within a cluster, store the transaction log in a location accessible to a server and its backup servers. |
Section 15.5, "Configuring a Default Persistence Store for Transaction Recovery" |
|
Propagate the Domain Configuration to the Managed Server Directory in SOAHOST1 and to SOAHOST2 |
Oracle Enterprise Scheduler requires some updates to the WebLogic Server start scripts. Propagate these changes using the pack and unpack commands. |
Section 15.6, "Propagating the Extended Domain to the Domain Directories and Machines" |
|
Start the Oracle Enterprise Scheduler Servers |
Oracle Enterprise Scheduler servers extend an already existing domain. As a result, the Administration Server and respective Node Managers are already running in SOAHOST1 and SOAHOST2. |
|
|
Validate the WLS_ESS Managed Servers |
Verify that the server status is reported as Running in the Admin Console and access URLs to verify status of servers. |
Section 15.9, "Starting and Validating the WLS_ESS2 Managed Server" |
|
Configuring Oracle HTTP Server for the WLS_ESSn Managed Servers |
To enable Oracle HTTP Server to route to Oracle Enterprise Scheduler console and service, set the WebLogicCluster parameter to the list of nodes in the cluster. |
Section 15.11, "Configuring Oracle HTTP Server for the WLS_ESS Managed Servers" |
|
Validating Access Through Oracle HTTP Server |
Verify that the server status is reported as Running. |
Section 15.13, "Validating Access to Oracle Enterprise Scheduler Through the Hardware Load Balancer" |
|
Backing up the Oracle Enterprise Scheduler |
To back up the domain configuration for immediate restoration in case of failures in future procedures. |
Section 15.14, "Backing Up the Oracle Enterprise Scheduler Configuration" |
15.3 Creating the Database Schemas for ESS
Before you can configure an Oracle ESS server, you must install the required schemas on a certified database for use with this release of Oracle Fusion Middleware.
Follow the instructions in these sections to install the schemas:
-
Section 15.3.1, "Starting the Repository Creation Utility (RCU)"
-
Section 15.3.2, "Navigating the RCU Screens to Create the Schemas"
15.3.1 Starting the Repository Creation Utility (RCU)
To start the Repository Creation Utility (RCU):
-
Navigate to the
ORACLE_HOME/oracle_common/bindirectory on your system. -
Make sure the
JAVA_HOMEenvironment variable is set to the location of a certified JDK on your system. The location should be up to but not including thebindirectory. For example, if your JDK is located in/u01/oracle/products/jdk1.7.0_55:On UNIX operating systems:
export JAVA_HOME=/u01/oracle/products/jdk1.7.0_55
-
Start RCU:
On UNIX operating systems:
./rcu
15.3.2 Navigating the RCU Screens to Create the Schemas
Schema creation involves the following tasks:
- Task 1 Introducing RCU
-
Click Next.
- Task 2 Selecting a Method of Schema Creation
-
If you have the necessary permission and privileges to perform DBA activities on your database, select System Load and Product Load Concurrently. This procedure assumes that you have the necessary privileges.
If you do not have the necessary permission or privileges to perform DBA activities in the database, you must select Prepare Scripts for System Load on this screen. This option will generate a SQL script, which can be provided to your database administrator. See "Understanding System Load and Product Load" in Creating Schemas with the Repository Creation Utility.
- Task 3 Providing Database Connection Details
-
Provide the database connection details for RCU to connect to your database. In the host name enter the scan address of your RAC DB.
Click Next to proceed, then click OK on the dialog window confirming that connection to the database was successful.
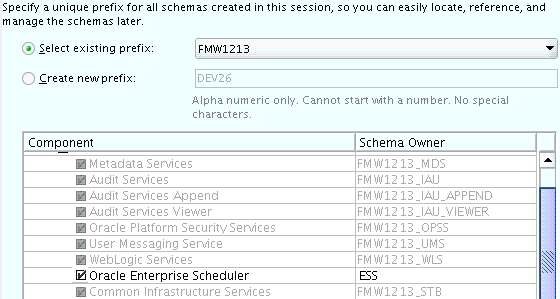
- Task 4 Specifying a Custom Prefix and Selecting Schemas
-
Select Select existing prefix and specify the prefix you used for the original domain creation schemas.
Expand the Oracle AS Common Schemas and then select the Oracle Enterprise Scheduler in the component list.
The custom prefix is used to logically group these schemas together for use in this domain only; you must create a unique set of schemas for each domain as schema sharing across domains is not supported.
Tip:
For more information about custom prefixes, see "Understanding Custom Prefixes" in Creating Schemas with the Repository Creation Utility.For more information about how to organize your schemas in a multi-domain environment, see "Planning Your Schema Creation" in Creating Schemas with the Repository Creation Utility.
Tip:
You must make a note of the custom prefix you choose to enter here; you will need this later on during the domain creation process.Click Next to proceed, then click OK on the dialog window confirming that prerequisite checking for schema creation was successful.
- Task 5 Specifying Schema Passwords
-
Specify how you want to set the schema passwords on your database, then specify and confirm your passwords.
Tip:
You must make a note of the passwords you set on this screen; you will need them later on during the domain creation process. - Task 6 Specifying Custom Variables
-
Click Next in the Default and temporary tablespaces selection (accept defaults) and click in the Confirmation Pop up window warning about tablespaces being created.
- Task 7 Completing Schema Creation
-
Navigate through the remainder of the RCU screens to complete schema creation. When you reach the Completion Summary screen, click Close to dismiss RCU.
15.4 Extending the SOA Domain to Include Oracle Enterprise Scheduler
This section provides instructions for extending the existing enterprise deployment SOA domain with the Oracle Enterprise Scheduler.
Extending the domain involves the following:
15.4.1 Starting the Configuration Wizard
Note:
If you added any customizations directly to the start scripts in the domain, those will be overwritten by the configuration wizard. To customize server startup parameters that apply to all servers in a domain, you can create a file calledsetUserOverrides.sh and configure it, for example, add custom libraries to the WebLogic Server classpath, specify additional java command line options for running the servers, or specify additional environment variables. Any customizations you add to this file are preserved during domain upgrade operations, and are carried over to remote servers when using the pack and unpack commands.To begin domain configuration:
-
Shut down the Administration Server to prevent any configuration locks, saves, or activations from occurring during the configuration of the domain.
For more information, see the instructions for shutting down the Administration Server with Node Manager in Section 11.3.1.
-
Navigate to the following directory and start the WebLogic Server Configuration Wizard.
ORACLE_HOME/oracle_common/common/bin
./config.sh
15.4.2 Navigating the Configuration Wizard Screens to Extend the Domain with Oracle Enterprise Scheduler
In this step, you extend the domain created in Chapter 12, "Extending the Domain with Oracle SOA Suite" to contain Oracle Enterprise Scheduler components.
The steps reflected in this section are very similar to the steps required to extend an Oracle Fusion Middleware Infrastructure domain directly, but some of the options, libraries, and components shown in the screens will vary.
Domain creation and configuration includes the following tasks:
-
Task 1, "Selecting the Domain Type and Domain Home Location"
-
Task 13, "Reviewing Your Configuration Specifications and Configuring the Domain"
- Task 1 Selecting the Domain Type and Domain Home Location
-
On the Configuration Type screen, select Update an existing domain.
In the Domain Location field, select the value of the ASERVER_HOME variable, which represents the complete path to the Administration Server domain home you created in Chapter 10.
For more information about the directory location variables, see Section 7.4, "File System and Directory Variables Used in This Guide"
Tip:
More information about the other options on this screen can be found in Configuration Type in Creating WebLogic Domains Using the Configuration Wizard. - Task 2 Selecting the Configuration Template
-
On the Templates screen, make sure Update Domain Using Product Templates is selected, then select the following templates:
Oracle Enterprise Scheduler Service Basic - 12.1.3.0 [oracle_common]
Oracle Enterprise Manager Plugin for ESS - 12.1.3.0 [em]
Click Next.
- Task 3 Specifying the Datasource Configuration Type
-
Note:
Any custom datasources that were created before the extension (like LEASING datasources) will show up before this screen. Check the Datasources row and click Next. The test datasource screen will verify its validity. Click Next.All fields are pre-populated, because you already configured the domain to reference the Fusion Middleware schemas that are required for the Infrastructure domain. Verify and ensure that credentials in all the fields are the same that you have provided while configuring Oracle Fusion Middleware Infrastructure.
Click Get RCU Configuration after you finish verifying the database connection information. The following output in the Connection Result Log indicates that the operation succeeded:
Connecting to the database server...OK
Retrieving schema data from database server...OK
Binding local schema components with retrieved data...OK
Successfully Done.
Tip:
More information about the RCU Data option can be found in "Understanding the Service Table Schema" in Creating Schemas with the Repository Creation Utility.More information about the other options on this screen can be found in "Datasource Defaults" in Creating WebLogic Domains Using the Configuration Wizard.
- Task 4 Specifying JDBC Component Schema Information
-
Select the ESS Schema and ESS MDS Schema component schema, mark the Convert to Gridlink option and click Next.
Enter values for the following fields, specifying the connect information for the Oracle RAC database that was seeded with RCU:
-
Driver: Select Oracle's driver (Thin) for GridLinkConnections,Versions:10 and later.
-
Service Name: Enter the service name of the database using lowercase characters. For example:
soaedg.mycompany.com
-
The Schema Owner and Schema Password should be pre-polutated by RCU information
-
Make sure that the FAN option is selected and that Enable SSL is unchecked (alternatively if ssl is selected for ONS notifications to be encrypted, provide the appropriate wallet and wallet password).
SQL>show parameter remote_listener;
NAME TYPE VALUE
-------------------------------------------------------------
remote_listener string db-scan.mycompany.com:1521
-
ONS Host: Enter the SCAN address for the Oracle RAC database and the ONS remote port as reported by the database:
[orcl@db-scan1 ~]$ srvctl config nodeapps -sONS exists: Local port 6100, remote port 6200, EM port 2016
Click Next.
-
- Task 5 Testing the JDBC Connections
-
On the Test JDBC Data Sources screen, confirm that all connections were successful.
The connections are tested automatically. The Status column displays the results. If all connections are not successful, click Previous to return to the previous screen and correct your entries.
Click Next when all the connections are successful.
- Task 6 Selecting Advanced Configuration
-
On the Select Advanced Configuration screen, select the following:
Managed Servers, Clusters, and Coherence
Click Next.
- Task 7 Configuring Managed Servers
-
On the Managed Servers screen, add the required managed servers for Enterprise Scheduler.
-
Select the automatically created server and click Rename to change the name to WLS_ESS1.
-
Click Add to add another new server and enter WLS_ESS2 as the server name.
-
Give servers WLS_ESS1 and WLS_ESS2 the attributes listed in Table 15-2.
Click Next.
Name Listen Address Listen Port SSL Listen Port SSL Enabled Server Groups WLS_SOA1Foot 1
SOAHOST1VHN1
8001
n/a
No
SOA-MGD-SVRS-ONLY
WLS_SOA2
SOAHOST2VHN1
8001
n/a
No
SOA-MGD-SVRS-ONLY
WLS_WSM1
SOAHOST1
7010
n/a
No
JRF-MAN-SVR
WSMPM-MAN-SVR
WSM-CACHE-SVR
WLS_WSM2
SOAHOST2
7010
n/a
No
JRF-MAN-SVR
WSMPM-MAN-SVR
WSM-CACHE-SVR
WLS_OSB1Foot 2
SOAHOST1VHN2
8011
n/a
No
OSB-MGD-SVRS-ONLY
WLS_OSB2
SOAHOST2VHN2
8011
n/a
No
OSB-MGD-SVRS-ONLY
WLS_ESS1
SOAHOST1
8021
n/a
No
ESS-MGD-SVRS
WLS_ESS2
SOAHOST2
8021
n/a
No
ESS-MGD-SVRS
Footnote 1 The WLS_SOA Managed Servers appear only if you are extending a domain where Oracle SOA Suite has been configured.
Footnote 2 The WLS_OSB Managed Servers appear only if you are extending a domain where Oracle Service Bus has been configured.
-
- Task 8 Configuring a Cluster
-
On the Configure Clusters screen, add the Enterprise Scheduler cluster, using the values for each property shown in Table 15-3.
Click Next.
Table 15-3 Clusters on the Configure Clusters Screen When Adding the ESS_Cluster
Name Cluster Adress Front end host Frontend HTTP Port Frontend HTTPs SOA_ClusterFoot 1
Leave it empty.
soa.example.com
80
443
WSM-PM_Cluster
Leave it empty
Leave it empty
Leave it empty
Leave it empty
OSB_ClusterFoot 2
Leave it empty
osb.example.com
80
443
ESS_Cluster
Leave it empty
soa.example.com
80
443
Footnote 1 The SOA_Cluster cluster appears only if you are extending a domain where Oracle SOA Suite has been configured.
Footnote 2 The OSB_Cluster cluster appears only if you are extending a domain where Oracle Service Bus has been configured.
- Task 9 Assigning Managed Servers to the Cluster
-
On the Assign Servers to Clusters screen, assign servers to clusters as follows:
-
SOA_Cluster - If you are extending a SOA domain.
-
WLS_SOA1
-
WLS_SOA2
-
-
WSM-PM_Cluster:
-
WLS_WSM1
-
WLS_WSM2
-
-
OSB_Cluster - If you are extending an OSB domain:
-
WLS_OSB1
-
WLS_OSB2
-
-
ESS_Cluster:
-
WLS_ESS1
-
WLS_ESS2
-
Click Next.
-
- Task 10 Configuring Coherence Clusters
-
Use the Coherence Clusters screen to configure the Coherence cluster that is automatically added to the domain. Leave the port number value at 9991, as it was defined during the initial Infrastructure domain creation.
- Task 11 Verifying the Existing Machines
-
On the Unix Machines tab, confirm that the following entries appear:
Name Node Manager Listen Address SOAHOST1
SOAHOST1
SOAHOST2
SOAHOST2
ADMINHOST
ADMINVHN
WEBHOST1
WEBHOST1
WEBHOST2
WEBHOST2
Leave all other fields to their default values.
Click Next.
- Task 12 Assigning Servers to Machines
-
On the Assign Servers to Machines screen, assign servers to machines as follows:
-
ADMINHOST:
-
AdminServer
-
-
SOAHOST1
-
WLS_SOA1 (if extending a SOA domain)
-
WLS_WSM1
-
WLS_OSB1 (if extending an OSB domain)
-
WLS_ESS1
-
-
SOAHOST2
-
WLS_SOA2 (if extending a SOA domain)
-
WLS_WSM2
-
WLS_OSB2 (if extending an OSB domain)
-
WLS_ESS2
-
Click Next.
-
- Task 13 Reviewing Your Configuration Specifications and Configuring the Domain
-
The Configuration Summary screen contains the detailed configuration information for the domain you are about to create. Review the details of each item on the screen and verify that the information is correct.
Click Update.
In the Extending Domain screen, click Done.
- Task 14 Start the Administration Server
-
Start the Administration Server to ensure the changes you have made to the domain have been applied.
15.5 Configuring a Default Persistence Store for Transaction Recovery
Each Managed Server uses a transaction log that stores information about committed transactions that are coordinated by the server and that may not have been completed.
Oracle WebLogic Server uses this transaction log for recovery from system crashes or network failures. To leverage the migration capability of the Transaction Recovery Service for the Managed Servers within a cluster, store the transaction log in a location accessible to the Managed Server and its backup servers.
Note:
To enable migration of the Transaction Recovery Service, specify a location on a persistent storage solution that is available to other servers in the cluster. Both WLS_SOA1 and WLS_SOA2 must be able to access this directory. This directory must also exist before you restart the server.The recommended location is a dual-ported SCSI disk or on a Storage Area Network (SAN).
To set the location for the default persistence stores:
-
Log into the Oracle WebLogic Server Administration Console:
ADMINVHN:7001/console -
In the Change Center section, click Lock & Edit.
-
For each of the WLS_ESS Managed Servers:
-
In the Domain Structure window, expand the Environment node, and then click the Servers node.
The Summary of Servers page appears.
-
Click the name of the server (represented as a hyperlink) in Name column of the table.
The settings page for the selected server appears and defaults to the Configuration tab.
-
On the Configuration tab, click the Services tab.
-
In the Default Store section of the page, enter the path to the folder where the default persistent stores will store its data files.
For the enterprise deployment, Oracle recommends creating a new subdirectory in the Administration Server domain home called
ESS_Cluster. This subdirectory can server as the central, shared location for transaction logs.For example:
ASERVER_HOME/ESS_Cluster/tlogs -
Click Save.
-
-
Shut down the WLS_WSM Managed Servers in the domain, and optionally, the WLS_SOA and WLS_OSB domains:
-
On the Summary of Servers page, select the the Managed Servers you want to shut down; do not select the Administration Server (AdminServer).
-
Click Shutdown and then select When Work Completes or Force Shutdown, depending on whether or not you believe the affected Managed Servers are actively processing requests.
-
-
Click Save and Activate Changes.
-
Start the Managed Servers that you shut down.
Note:
You will validate the location and the creation of the transaction logs later in the configuration procedure. For more information, see Section 15.10.15.6 Propagating the Extended Domain to the Domain Directories and Machines
After you have extended the domain with the ESS instances, and you have restarted the Administration Server on SOAHOST1, you must then propagate the domain changes to the domain directories and machines.
Table 15-5 summarizes the steps required to propagate the changes to all the domain directories and machines.
Note that there is no need to propagate the updated domain to the WEBHOST1 and WEBHOST2 machines, because there are no changes to the Oracle HTTP Server instances on those host computers.
Table 15-5 Summary of Tasks Required to Propagate the Domain Changes to Domain Directories and Machines
| Task | Description | More Information |
|---|---|---|
|
Pack up the Extended Domain on SOAHOST1 |
Use the Pack command to create a new template jar file that contains the new ESS Servers configuration. When you pack up the domain, create a template jar file called |
Section 11.4.1, "Packing Up the Extended Domain on SOAHOST1" |
|
Unpack the Domain in the Managed Servers Directory on SOAHOST1 |
Unpack the template jar file in the Managed Servers directory on SOAHOST1 local storage. |
Section 12.7.1, "Unpacking the Domain in the Managed Servers Domain Directory on SOAHOST1" |
|
Unpack the Domain on SOAHOST2 |
Unpack the template jar file in the Managed Servers directory on the SOAHOST2 local storage. |
15.7 Adding the ESSAdmin Role to the SOA Administrators Group
Before you validate the Oracle Enterprise Scheduler configuration on the WLS_ESS1 Managed Server, add the ESSAdmin role to the enterprise deployment administration group (SOA Administrators).
To perform this task, refer to Section 18.2.1, "Configuring Roles for Administration of Oracle SOA Suite Products".
15.8 Starting WLS_ESS1 Managed Server
Now that you have extended the domain, restarted the Administration Server, and propagated the domain to the other hosts, you can start the newly configured ESS servers:
-
Enter the following URL into a browser to display the Fusion Middleware Control login screen:
http://ADMINVHN:7001/emIn this example:
-
Replace ADMINVHN with the host name assigned to the ADMINVHN Virtual IP address in Section 5.3, "Identifying and Obtaining Software Downloads for an Enterprise Deployment".
-
Port 7001 is the typical port used for the Administration Server console and Fusion Middleware Control. However, you should use the actual URL that was displayed at the end of the Configuration Wizard session when you created the domain.
-
-
Log in to Fusion Middleware Control using the Administration Server credentials.
-
In the Target Navigation pane, expand the domain to view the Managed Servers in the domain.
-
Select only the WLS_ESS1 Managed Server and click Start Up on the Oracle WebLogic Server tool bar.
Note:
SOA Servers depend on the policy access service to be functional. This implies that the WSM-PM servers in the domain need to be reachable before the SOA ones are started -
When the startup operation is complete, navigate to the Domain home page and verify that the WLS_ESS1 Managed Server is up and running.
-
To verify the ESS software is configured, enter the following URL in the browser:
http://SOAHOST1:8021/EssHealthCheckWith the default installation, this should be the HTTP response, as shown in Figure 15-1
Figure 15-3 Oracle Enterprise Scheduler Health Check Response Screen
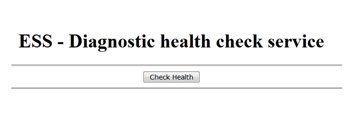
Description of ''Figure 15-3 Oracle Enterprise Scheduler Health Check Response Screen''
Click on the Check Health button, and then log in using the
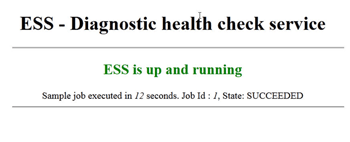
welogic_soaadministration credentials.The reply should report that Oracle Enterprise Schedule (ESS) is up and running, as shown in Section 15.8, "ESS Up and Running Response", as shown in Figure 15-4.

15.9 Starting and Validating the WLS_ESS2 Managed Server
Follow similar steps as in the previous section for WLS_ESS2.
-
Log in to Fusion Middleware Control using the Administration Server credentials.
-
In the Target Navigation pane, expand the domain to view the Managed Servers in the domain.
-
Select only the WLS_ESS2 Managed Server and click Start Up on the Oracle WebLogic Server tool bar.
-
When the startup operation is complete, navigate to the Domain home page and verify that the WLS_ESS2 Managed Server is up and running, access the equivalent URLs for the WLS_ESS2:
http://SOAHOST2:8021/EssHealthCheck
Click the Check Health button, and then log in using the
welogic_soaadministration credentials.The reply should report that Oracle Enterprise Scheduler is up and running, as shown in Figure 15-4.
15.10 Validating the Location and Creation of the Transaction Logs
After WLS_ESS1 and WLS_ESS2 are up and running, verify that the transaction log directory and transaction logs were created as expected, based on the steps you performed in Section 15.5, "Configuring a Default Persistence Store for Transaction Recovery":
ASERVER_HOME/ESS_Cluster/tlogs
-
_WLS_WLS_ESS1000000.DAT -
_WLS_WLS_ESS2000000.DAT
15.11 Configuring Oracle HTTP Server for the WLS_ESS Managed Servers
Make the following modifications to the Oracle HTTP Server instance configuration files to ensure that the Oracle HTTP Server instances in the Web tier can route Oracle Enterprise Scheduler requests correctly to the WLS_ESS Managed Servers on SOHOST1 and SOAHOST2.
To enable Oracle HTTP Server to route Oracle Enterprise Scheduler requests to the application tier:
-
Log in to SOAHOST1 and change directory to the configuration directory for the first Oracle HTTP Server instance (OHS_1):
cd ASERVER_HOME/config/fmwconfig/components/OHS/OHS_1/
-
Add the following directives inside the
<VirtualHost>tag in thesoa_vh.conffile:<Location /ess > SetHandler weblogic-handler WebLogicCluster SOAHOST1:8021,SOAHOST2:8021 WLProxySSL ON WLProxySSLPassThrough ON </Location> <Location /EssHealthCheck > SetHandler weblogic-handler WebLogicCluster SOAHOST1:8021,SOAHOST2:8021 WLProxySSL ON WLProxySSLPassThrough ON </Location>
-
Change directory to the following location so you can update the configuration file for the second Oracle HTTP Server instance (OHS_2):
cd ASERVER_HOME/config/fmwconfig/components/OHS/OHS_2/
-
Open the
soa_vh.conffile and add the Oracle Business Process Management directives to the<VirualHost>tag. -
Restart the Administration Server.
-
After the Administration Server is running, review the files in the following directories on both WEBHOST1 and WEBHOST2 to be sure they contain the modifications made in the Administration Server domain directory:
MSERVER_HOME/config/fmwconfig/components/OHS/instances/OHS_1/MSERVER_HOME/config/fmwconfig/components/OHS/instances/OHS_2/ -
Restart Oracle HTTP Servers on WEBHOST1 and WEBHOST2.
15.12 Configuring the WebLogic Proxy Plug-In
To set the WebLogic Plug-In Enabled parameter for the ESS cluster:
-
Log in to the Oracle WebLogic Server Administration console.
-
In the Domain Structure pane, expand the Environment node.
-
Click on Clusters.
-
Select the ESS_Cluster cluster to which you want to proxy requests from Oracle HTTP Server.
The Configuration: General tab is displayed.
-
Scroll down to the Advanced section, expand it.
-
Click Lock and Edit.
-
Set the WebLogic Plug-In Enabled to yes.
-
Click Save and Activate the Changes.
-
Restart the ESS servers for the changes to be effective.
15.13 Validating Access to Oracle Enterprise Scheduler Through the Hardware Load Balancer
Verify the URLs to ensure that appropriate routing and failover is working from the HTTP Server to the Oracle ESS components.
For information on configuring system access through the load balancer, see Section 3.3, "Configuring the Load Balancers."
To verify the URLs:
-
While WLS_ESS1 is running, stop WLS_ESS2 using the Oracle WebLogic Server Administration Console.
-
Access the following URL from your Web browser, and verify the HTTP response as indicated in Section 15.9, "Starting and Validating the WLS_ESS2 Managed Server":
http://soa.example.com/EssHealthCheck
-
Start WLS_ESS2 from the Oracle WebLogic Server Administration Console.
-
Stop WLS_ESS1 from the Oracle WebLogic Server Administration Console.
-
Verify these URLs using your load balancer address:
https://soa.example.com:443/EssHealthCheck
15.14 Backing Up the Oracle Enterprise Scheduler Configuration
It is an Oracle best practices recommendation to create a backup after successfully extending a domain or at another logical point. Create a backup after verifying that the installation so far is successful. This is a quick backup for the express purpose of immediate restoration in case of problems in later steps.
The backup destination is the local disk. You can discard this backup when the enterprise deployment setup is complete. After the enterprise deployment setup is complete, you can initiate the regular deployment-specific Backup and Recovery process.
For information about backing up your configuration, see Section 18.2.6, "Performing Backups and Recoveries in the SOA Enterprise Deployments."