7 Managing Partitions and Work Manager Groups
This chapter includes the following sections:
For information about monitoring the overall status of a specific partition, see Monitoring the Overall Status of the SOA Infrastructure or Individual Partition.
For information about tracking the status of business flow instances in a specific partition, see Tracking Business Flow Instances .
For information about performing error recovery in a specific partition, see Recovering From Faults in the Error Hospital.
7.1 Managing Partitions
You can deploy SOA composite applications into separate sections of the SOA Infrastructure known as partitions. Deploying composites to partitions enables you to:
-
Logically group SOA composites
-
Perform the following bulk lifecycle management tasks on all SOA composite applications within a specific partition:
-
Start all composites
-
Shut down all composites
-
Retire all composites
-
Activate all composites
-
Undeploy all composites
-
-
Secure access to partitions
At least one partition is required for deploying SOA composite applications. A default partition named default is automatically included with Oracle SOA Suite. You can delete the default partition. You cannot rename existing partitions; only creation and deletion of partitions is supported.
Partitions are not associated with a particular state such as started, stopped, activated, or retired. Only the composites within the partition are associated with a particular state. Therefore, you cannot start, stop, activate, or retire a partition.
Note:
If SOA composite applications using the same inbound resource are deployed to different partitions, it cannot be guaranteed which partition picks up the message for processing.
For example, assume you are using the file adapter and /home/Directory1 is the inbound directory for the composite SOAComposite1. If this composite is deployed to both Partition1 and Partition2, when a file is placed in /home/Directory1, either the composite in Partition1 or Partition2 may pick up the file.
With the socket adapter, however, there is a limitation that does not permit you to deploy any composite that uses the same inbound port. In that case, an exception is thrown indicating that the inbound port is in use.
To manage partitions:
Access the Manage Partitions page through one of the following options:
| From the SOA Infrastructure Menu... | From the SOA Folder in the Navigator... |
|---|---|
|
|
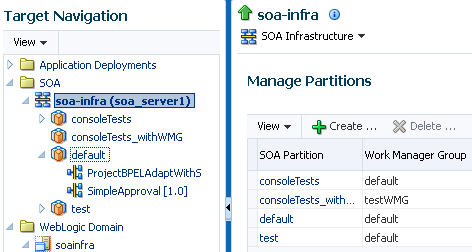
The Manage Partitions page displays the following details:
-
A utility for searching for a specific partition. Enter a full or partial partition name and click the Search icon or press the Return key. The search is not case-sensitive.
-
Links for creating, deleting, and editing partitions.
-
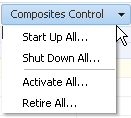
A Composite Control list for starting up, shutting down, activating, and retiring all composites in the selected partition.
-
A Deployment list for deploying to this partition or undeploying all from this partition.
-
A table that lists each partition, the work manager group, the number of active and retired SOA composite application revisions in each partition, and the name of the composites contained in each partition (under the View link).
You can perform the following partition management tasks:
For more conceptual information about partitions, see Introduction to Partitions.
7.1.1 Creating Partitions
You can create partitions from the Manage Partitions page.
Note:
You must ensure that the Session Lock on the Change Center in the Oracle WebLogic Server Administration Console is released before creating a partition.
To create a partition:
-
Access the Manage Partitions page as described in Managing Partitions.
-
Click Create.
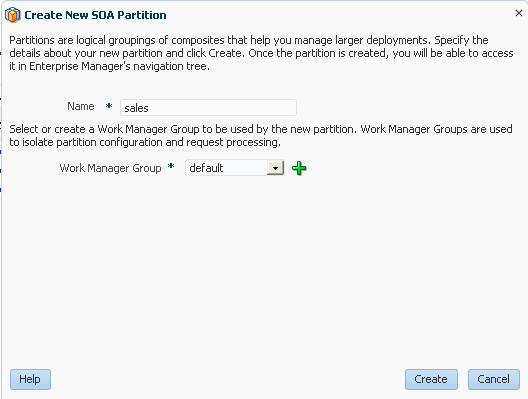
The Create New SOA Partition dialog is displayed.
-
In the Name field, enter a partition name.
Note:
The name must conform to the following conventions:
-
ASCII letters and numbers are permitted.
-
Underscores (
_) are permitted. -
Hyphens (
-) are permitted (except as the first character). -
Non-ASCII letters are permitted.
-
Spaces are not permitted.
Examples of valid names are
mypartition,partition2,dept-a,customer_services, and22. Examples of invalid names are-part2,/partition, and null or empty names. -
-
From the Work Manager Group list, select an existing work manager group or click Add to create a new work manager group. To create a new work manager group, see Viewing and Creating Work Manager Groups.
You cannot rename an existing partition or later transfer the composite applications you deployed to it to a different partition.
-
-
Click Create.
The new partition is displayed in both the navigator under soa-infra and the SOA Partition column of the Manage Partitions page. You can now deploy composites to this partition by selecting Deploy to This Partition from the Deployment dropdown list or right-clicking a specific partition in the navigator and clicking Deploy to This Partition.
When a composite is deployed to a partition, it is displayed beneath the partition in the navigator. Once deployed, a composite cannot be transferred to a different partition.
For information about performing bulk lifecycle management tasks from the Composites Control and Deployment lists, see Performing Bulk Lifecycle Management Tasks on Composites in Partitions.
You can also create partitions with the Oracle WebLogic Scripting Tool (WLST) and ant commands. For information, see WLST Command Reference for SOA Suite and Developing SOA Applications with Oracle SOA Suite.
7.1.2 Deleting Partitions
Note:
You must have at least one partition. If you delete all partitions, you cannot deploy a SOA composite application.
You can delete partitions from the Manage Partitions page.
Note the following:
-
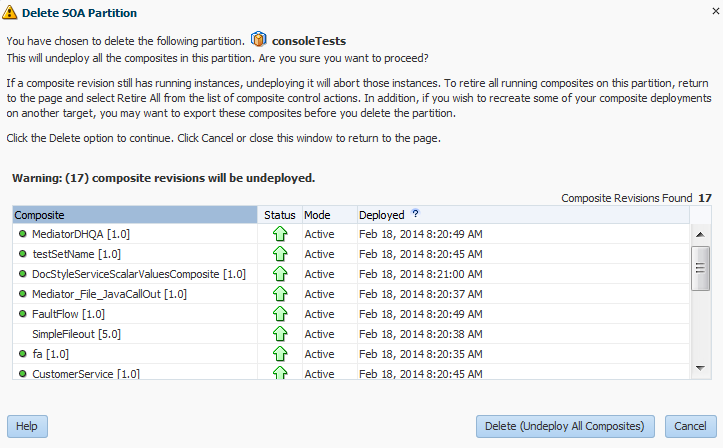
If you want to re-create some of your composite deployments in another partition, you can export those composites to a JAR file before you delete this partition.
-
Before deleting the selected partition, all SOA composite application revisions in the partition are undeployed. The states of all active instances of undeployed composites are changed to aborted.
To delete a partition:
7.1.3 Changing the Work Manager Group of a Partition
You can change the work manger group associated with a partition by either selecting an existing group or creating a new group.
Note:
You must ensure that the Session Lock on the Change Center in the Oracle WebLogic Server Administration Console is released before changing the work manager group of a partition.
To change the work manager group of a partition:
7.1.4 Performing Bulk Lifecycle Management Tasks on Composites in Partitions
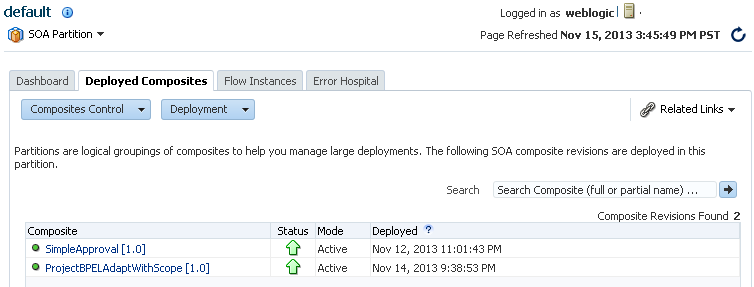
You can perform bulk lifecycle management tasks on all SOA composite applications in a specific partition on the Manage Partitions page, on the Deployed Composites page of a specific partition, and from the menu that is displayed when you right-click a partition in the navigator.
Bulk lifecycle management tasks impact not one, but many, composites at once. If a composite has running instances and a lifecycle changing operation is performed on the composite, the instances may not complete. For information about how different lifecycle operations impact the business flow instances, Managing the State of All Applications at the SOA Infrastructure Level.
To perform bulk lifecycle management tasks on all SOA composite applications in a specific partition:
-
Access either of the following pages:
-
Access the Manage Partitions page as described in Managing Partitions.
-
Access the Deployed Composites page by clicking a partition in the navigator and clicking the Deployed Composites tab.
Note:
As a shortcut, you can also right-click a specific partition in the navigator to display a menu for selecting the bulk lifecycle management actions described in this section. For more information about this menu, see Step 3 of Navigating Through the Partition Home Page and Menu.
Two dropdown lists that are displayed on either the Manage Partitions page or the Deployed Composites page enable you to perform bulk lifecycle management actions:
-
Composites Control list
-
Deployment list
On the Deployed Composites page of a specific partition, these lists are displayed at the top of the page.
On the Manage Partitions page, these lists are displayed above the SOA Partition table:
Note:
You can also select to deploy composites to a partition and perform bulk lifecycle management tasks by selecting the SOA Partition menu at the top of the partition home page.
-
-
To perform one of the following bulk lifecycle management tasks for all SOA composite applications contained in the selected partition, select the Composites Control list:
-
Start all composites.
-
Shut down all composites.
-
Activate all composites.
-
Retire all composites.
-
Select an operation to perform.
A dialog is displayed that prompts you to confirm your selection. When the operation completes, a confirmation message is displayed at the top of the page.
-
Click OK to continue.
Note:
Be aware that when you select Retire All from the Composite Control list, all composites in that partition are retired with no warning message to indicate that the default, last active composite is being retired.
This is the expected behavior when performing a bulk retirement of all composites in a partition.
-
-
To perform one of the following management tasks, select the Deployment list:
-
Specify a composite to deploy to this partition. This selection invokes the Deploy SOA Composite wizard where you specify a composite revision to deploy.
-
Undeploy all composites in this partition.
A dialog is displayed that prompts you to confirm your selection. When the operation completes, a confirmation message is displayed at the top of the page.
-
7.2 Managing Work Manager Groups
Each partition must be associated with a work manager group that consists of work managers. A work manager is an Oracle WebLogic Server entity that represents a logical thread pool. It is similar to a queue in which work items line up for processing. You can define priorities for the work to be processed by work managers. Work managers manage thread pools internally and automatically, providing for optimal scheduling. Work managers provide the following capabilities:
-
A single internal global pool.
-
A multiple, priority-based, work request queue. The priority is computed internally based on the work manager constraints.
-
New threads that are automatically added and removed based on the work load.
Oracle WebLogic Server manages the thread pool on behalf of Oracle SOA Suite. It automatically controls the number of threads required based on defined criteria. You define the priority and Oracle WebLogic Server determines if more threads are required.
There are two ways to define work priorities in the Oracle WebLogic Server Administration Console.
-
Request classes:
-
Defines the necessary percentage of server resources to share
-
Defines the necessary application response times
-
-
Constraints:
-
Maximum thread constraints: Once reached, the server does not schedule requests of this type until the number of concurrent executions falls below the limit. If you do not specify a value, the default value is unlimited.
-
Minimum thread constraints: Ensures the number of threads the server allocates to impacted requests to avoid deadlocks. The default value is zero.
-
Capacity: Causes the server to reject requests when it has reached its capacity.
Note:
The minimum and maximum threads are defined using the work manager names and they can be shared by multiple work managers. Work managers are defined at the domain level.
-
Oracle WebLogic Server includes a number of Oracle SOA Suite work managers. You can create Oracle SOA Suite work manager groups that are automatically associated with these work managers. A work manager group consists of work managers dedicated to processing Oracle SOA Suite background work for a given partition. Work manager groups isolate partition configuration and request processing. A work manager group can be shared by multiple partitions.
The mapping works as follows:
-
Mapping between a service engine thread pool (for example, a BPEL invoke pool) and a work manager in a work manager group.
-
Mapping between a partition and a single work manager group. A work manager group comprises all logical thread pools for background processing tasks in a given partition. Multiple partitions can share a single work manager group. For example:
-
The default and HR partitions can be associated with a standard work manager group.
-
The sales partition can be associated with a high priority work manager group.
However, each partition is associated with only one work manager group.
-
7.2.1 Viewing and Configuring Work Manager Properties
You can view and configure work manager properties through one of the following options:
-
Configure the following properties:
-
The SOADataSource property in the Oracle WebLogic Server Administration Console to configure the number of database connections in the data source.
-
The SOAMaxThreadsConfig property in the System MBean Browser to allocate percentages for the various work managers in the group.
Maximum thread constraints are automatically created based on these settings. For information, see Configuring Database-bound Processing Threads.
-
-
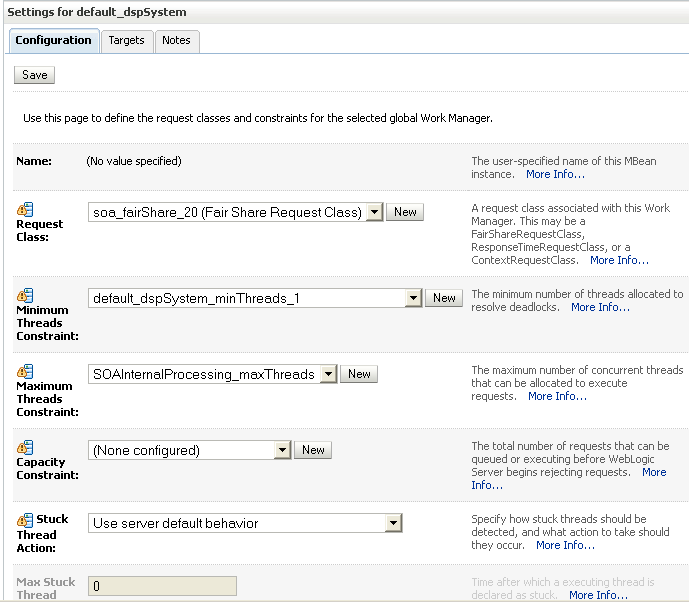
Configure work manager properties such as minimum thread, maximum thread, and capacity constraints from Oracle WebLogic Server Administration Console. This option is a more advanced method than the first one. For information, see Viewing and Configuring Work Manager Constraints.
7.2.2 Viewing Work Manager Pending and Completed Requests
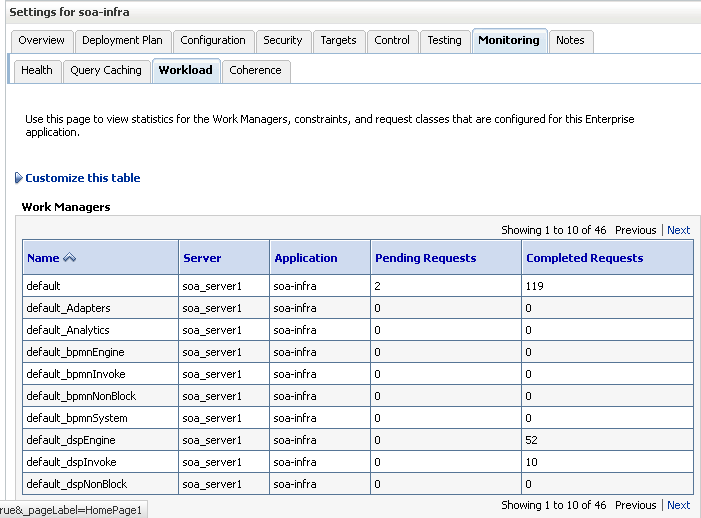
You can view the number of pending and completed requests of each work manager.
For information about exception messages caused by the unavailability of work manager threads, see Unavailability of Work Manager Threads for Incoming Processing.
7.2.3 Viewing and Creating Work Manager Groups
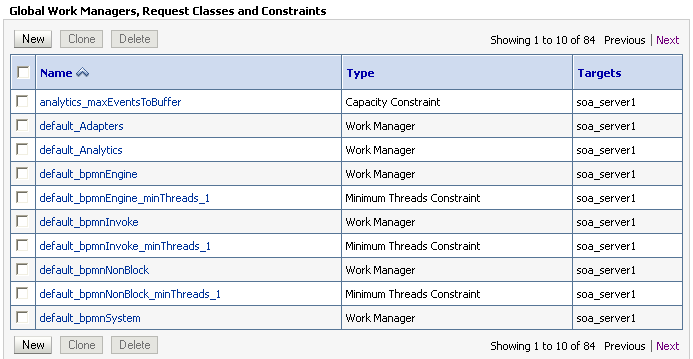
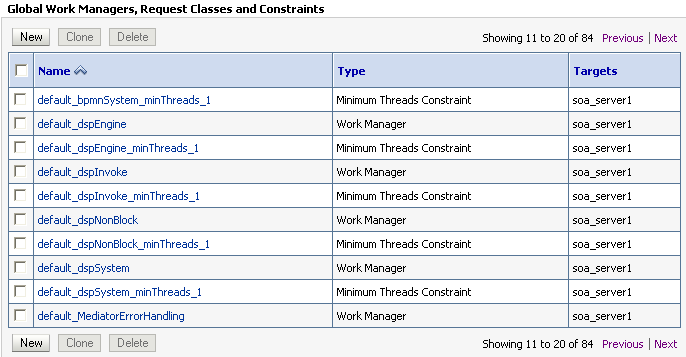
You can create work manager groups for each partition. When you create a group, the Oracle SOA Suite work managers shown in Managing Work Manager Groups are automatically added to the group. A default work manager group named default is automatically included with Oracle SOA Suite.
Note:
You must ensure that the Session Lock on the Change Center in the Oracle WebLogic Server Administration Console is released before creating or deleting work manager groups.
To create work manager groups:
-
Access this page through one of the following options:
From the SOA Infrastructure Menu... From the SOA Folder in the Navigator... -
Select Work Manager Groups.
-
Right-click soa-infra > server_name.
-
Select Work Manager Groups.
The Manage Work Groups page is displayed.
-
-
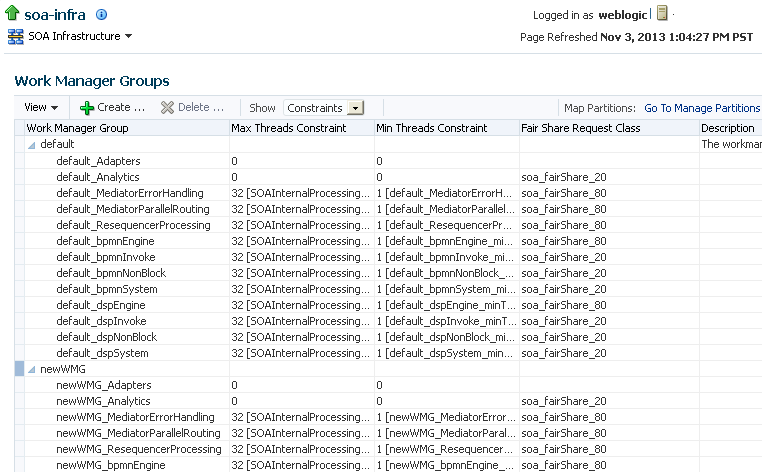
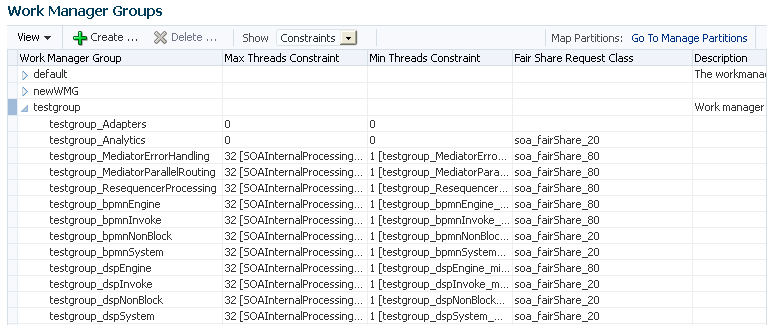
Expand the work manager groups to display the work managers automatically created with each group, the maximum thread constraint values and classes, the minimum thread constraint values and classes, and the fair share request classes. Constraints define the configuration values for work to be processed by work managers.
A fair share request class expresses a scheduling guideline that Oracle WebLogic Server uses to allocate threads to requests. Request classes ensure that high priority work is scheduled before less important work, even if the high priority work is submitted after the lower priority work. Oracle WebLogic Server takes into account how long it takes for requests to each module to complete.
A fair share request class specifies the average thread-use time required to process requests. The value of a fair share request class is specified as a relative value, not a percentage. Therefore, if two request classes are defined as 400 and 100, they have the same relative values as 80 and 20 or 4 and 1, respectively.
For example, RequestClass1, RequestClass2, and RequestClass3 have the fair share values of 10, 20, and 50, respectively. There is a 12.5% (10/80) chance that the next free thread performs work for RequestClass1. Similarly, there is a 25% (20/80) chance it next services RequestClass2 and a 62.5% (50/80) chance it next services RequestClass3.
-
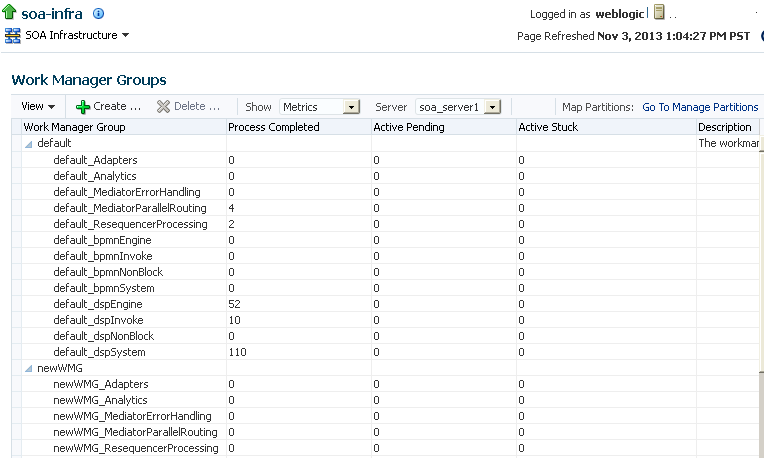
From the View list, select Metrics to display the number of processes:
-
Completed
-
Active and pending
-
Active and stuck
-
-
From the Server list, select a managed server in a cluster for which to view statistics.
-
Click Create.
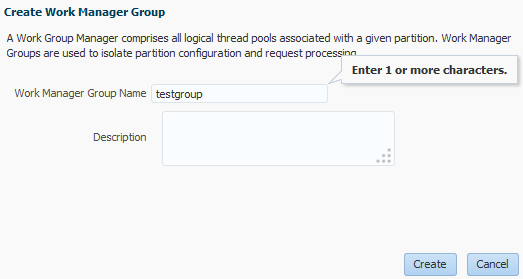
The Create Work Manager Group dialog is displayed.
-
Enter a name and an optional description, and click OK.
The work manager group is displayed in the table (for this example, testgroup). The Oracle SOA Suite work managers are automatically included in the work manager group, and display beneath the work manager group name.
-
From the SOA Infrastructure menu, select Manage Partitions.
-
Assign the work manager group to a partition in either of the following ways:
-
Click Create to create a new partition to which you assign the work manager group, as described in Creating Partitions.
-
Click Edit to change the work manager group of the selected partition, as described in Changing the Work Manager Group of a Partition.
This change requires a server restart.
Note:
You cannot delete a work manager group that is currently associated with a partition.
-
7.3 Securing Access to Partitions
All partitions are automatically secured with application roles and partition roles. Partition-based security provides the following benefits:
-
Administrative access control
-
Access control of information is provided at partition levels. You can only view the partition and composites to which you have access. For example, a user with access to only Partition1 can only see Partition1 and its deployed composites. This user cannot see any other partitions.
-
Association of different users to separate roles for each partition.
-
-
Striping of instance data by partitions
-
Oracle Enterprise Manager Fusion Middleware Control pages such as Flow Instances and Error Hospital show instance data filtered by partition.
-
The audit trail is displayed based on access control.
-
-
Partition level resource management
-
Separate thread pools and work managers are configured per partition. For more information, see Managing Work Manager Groups.
-
Application roles and partition roles consist of various combinations of Java permission classes and actions.
Table 7-1 shows the Oracle SOA Suite-wide application roles. These applications roles are not limited to a specific partition.
Table 7-1 Application Roles
| Application Role | Description |
|---|---|
|
|
This role provides the following capabilities:
|
|
|
This role provides the following capabilities:
|
Table 7-2 describes the roles available with each partition. These partition-specific roles include various combinations of permission classes and actions.
Table 7-2 Partition Roles
| Partition Role | Description |
|---|---|
|
|
For making changes to SOA composite application artifacts, such as business rules, security policies, fault policies, and so on. |
|
|
For deploying new SOA composite applications, upgrading existing SOA composite applications, and managing the continuous integration and build process. |
|
|
For performing testing on preproduction systems typically using a combination of command line tools, Oracle Enterprise Manager Fusion Middleware Control, and custom user interfaces. |
|
|
For the successful operation of deployed SOA composite applications in the partition. |
|
|
For handling user complaints and making decisions on requests that result in faults in the automated process. An administrator receives notifications regarding these transactions and can take steps to recover from the fault or terminate the transaction. Note: This role does not include the |
You can perform the following partition access management tasks:
7.3.1 Viewing Partition Roles
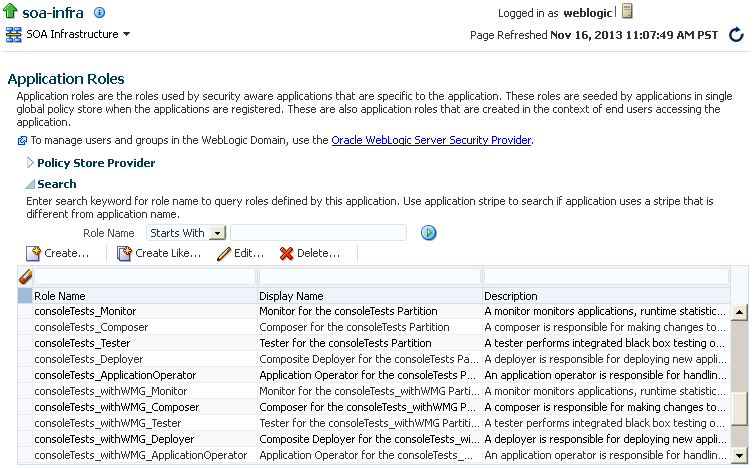
You can view the roles associated with each partition on the Application Roles page.
-
Access this page through one of the following options:
From the SOA Infrastructure Menu... From the SOA Folder in the Navigator... -
Select Security > Application Roles.
-
Expand SOA.
-
Right-click soa-infra (server_name).
-
Select Security > Application Roles.
The Application Roles page is displayed.
-
-
Click the Search application roles icon.
For each partition, the roles described in Table 7-2 are displayed:
-
partition_name_Monitor
-
partition_name_Composer
-
partition_name_Tester
-
partition_name_Deployer
-
partition_name_ApplicationOperator
-
7.3.2 Viewing the Permissions Assigned to Each Partition Role
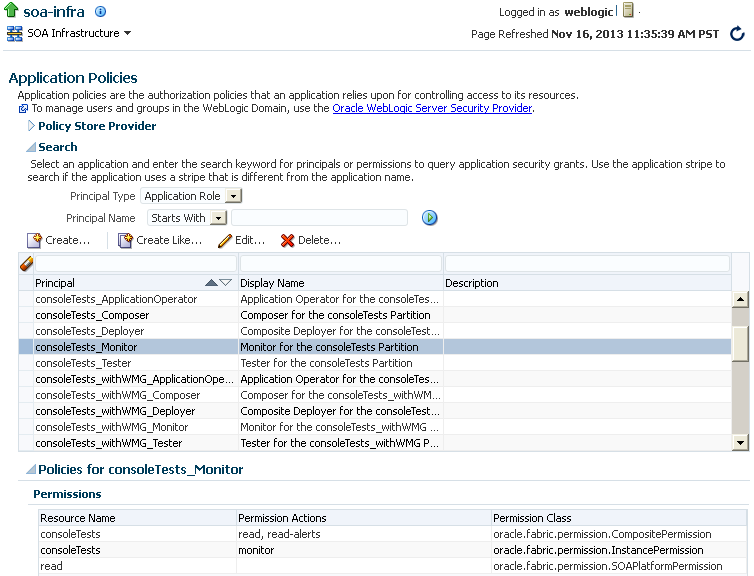
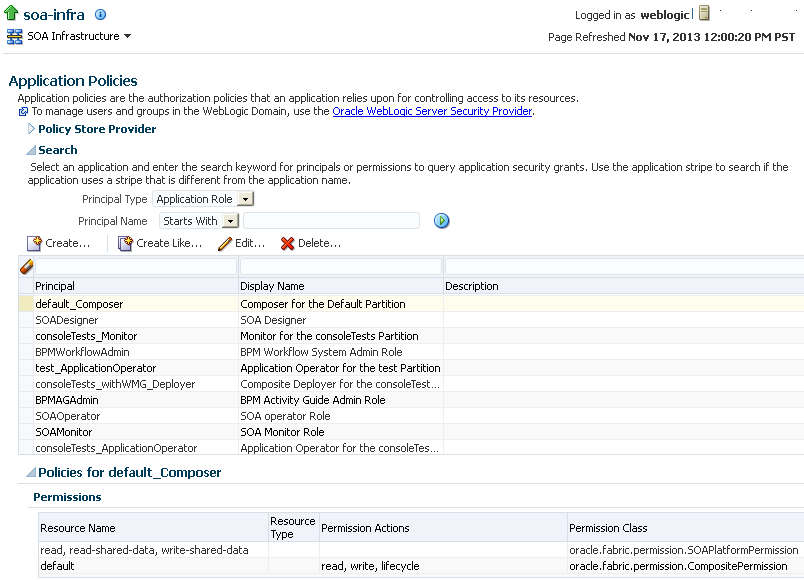
You can view the permissions assigned to each partition role on the Application Policies page.
Note:
Oracle SOA Suite roles grant Oracle Enterprise Scheduler permissions to those roles. These permissions are permission sets. Permission sets are not currently displayed in Oracle Enterprise Manager Fusion Middleware Control.
-
Access this page through one of the following options:
From the SOA Infrastructure Menu... From the SOA Folder in the Navigator... -
Select Security > Application Policies.
-
Expand SOA.
-
Right-click soa-infra (server_name).
-
Select Security > Application Policies.
-
-
Select a partition role in the table.
The bottom of the page is refreshed to display the permission class and actions assigned to the selected partition role.
7.3.3 Assigning Users to Partition Roles
You can assign the specific partition roles you want a user to possess on a partition. These roles determine the tasks that a user can perform in Oracle Enterprise Manager Fusion Middleware Control.
Note the following authorization checking changes for Release 12c:
-
Authorization checking occurs against permissions, which allows for finely granular Oracle SOA Suite roles based on these permissions.
-
Only the Oracle WebLogic Server monitor role and appropriate Oracle SOA Suite roles are required for Oracle Enterprise Manager Fusion Middleware Control access.
-
Avoid granting WLSOperator and WLSAdmin with added privileges for Oracle SOA Suite monitoring.
Support for partition level permissions and roles:
-
In Release 11g, Oracle SOA Suite APIs and runtime were protected using Oracle SOA Suite application roles and Oracle Enterprise Manager Fusion Middleware Control was protecting user actions with the Oracle WebLogic Server enterprise role. Role mapping was required.
-
In Release 12c, Oracle SOA Suite APIs and runtime and Oracle Enterprise Manager Fusion Middleware Control both protect the action and user interface using Oracle SOA Suite permissions. (Oracle SOA Suite application roles consist of a set of permissions.) Therefore, mapping a user to one of the application roles gives them the required permissions.
To assign users to partition roles:
-
Create a user in which to assign partition roles:
-
In the Navigator, select WebLogic Domain > soainfra.
-
From the WebLogic Domain menu, select Security > Users and Groups.
-
In the Users tab, click the Create icon to create a user.
-
Create the user name and password, and click OK.
Note:
When you create users in Oracle WebLogic Server Administration Console, partition-specific users only require the
Monitorrole. This role enables these users to access Oracle Enterprise Manager Fusion Middleware Control. Only the system administrator or super user requires theAdministratorrole. -
-
Log in to Oracle Enterprise Manager Fusion Middleware Control with a user account that includes the Oracle WebLogic Server Admin role. Application policies are controlled by Oracle Platform Security Services. You directly access Oracle Platform Security Services to create SOA roles. This role enables you to view and map application roles to the user you created in Step 1.
-
Access the Application Roles page through one of the following options:
From the SOA Infrastructure Menu... From the SOA Folder in the Navigator... -
Select Security > Application Roles.
-
Expand SOA > soa-infra.
-
Right-click soa-infra (server_name).
-
Select Security > Application Roles.
-
-
Click the Search application roles icon.
-
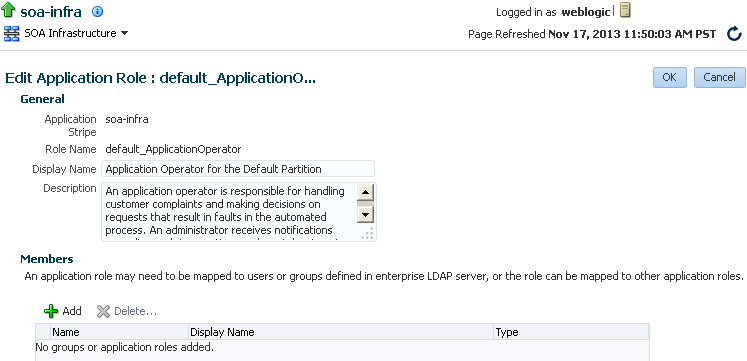
Select the partition role to which to map to the user, and click Edit.
For this example, the ApplicationOperator role in the partition consoleTests is selected. For all partitions, the partition roles shown in Table 7-2 are automatically assigned.
The Edit Application Role page is displayed.
-
Click Add.
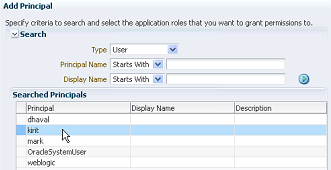
The Add Principal dialog is displayed.
-
From the Type list, select User. This becomes the user assigned to this permission.
-
To the right of the Display Name field, click the Search icon.
-
From the list that is displayed, select the user you created in Step 1, and click OK.
This adds the selected user to the partition role ApplicationOperator for the partition consoleTests.
-
Select additional application roles, as necessary, and click Edit to add more users.
-
Log out of Oracle Enterprise Manager Fusion Middleware Control.
-
Log in to Oracle Enterprise Manager Fusion Middleware Control as the user you assigned to the partition role in Step 9.
Because the user was given permissions on only the consoleTests partition, they:
-
Cannot expand non-SOA folders in the Application Navigator.
-
Can only see the consoleTests partition in the Application Navigator of which they are a member. All partitions to which they do not belong are hidden from view.
-
Cannot create other partitions.
-
Cannot change properties in the SOA Infrastructure Common Properties page.
-
Note:
When you create an application role and assign it a user on the Application Roles page, it is not immediately visible during a search on the Application Policies page. For the role to be visible, create a policy on the Application Policies page and assign it the application role and some permissions. These actions make the role visible.
7.3.4 Understanding Additional Permission and Role Behavior Scenarios
This section describes additional permission and role behavior scenarios.
7.3.4.1 Understanding Permissions on Initiating and Participating Composites in Different Partitions
The administration operations that you can perform on initiating and participating SOA composite applications in different partitions are based on the initiating composite in the business flow instance, and not on the participating composite.
For example, assume you perform the following steps:
7.3.4.2 Viewing Oracle SOA Composer Permission Actions in a Partition
Oracle SOA Composer users have the following permission actions by default for any artifact (domain value maps (DVMs), business rules, composite sensors, and so on) in that partition:
-
CompositePermissionwith thereadpermission action for inspecting any artifact in that partition. -
CompositePermissionwith thewritepermission action for changing any artifact in that partition. -
SOAPlatformPermissionwith theread-shared-datapermission action for inspecting any artifact in the shared folder. The shared folder is the location for all shared artifacts between SOA composite applications that can span multiple partitions. -
SOAPlatformPermissionwith thewrite-shared-datapermission action for changing any artifact in the shared data folder.
For more information about shared data, see Chapter "Managing Shared Data with the SOA Design-Time MDS Repository" of Developing SOA Applications with Oracle SOA Suite.
To view Oracle SOA Composer permission actions for a partition.
7.3.4.3 Understanding the MDS Configuration Page and Oracle SOA Suite Permissions
The MDS Configuration page in Oracle Enterprise Manager Fusion Middleware Control does not understand Oracle SOA Suite permissions. For example, assume you perform the following steps:
- Create and assign a user to the Monitor group in Oracle WebLogic Server Administration Console.
- Log in to Oracle Enterprise Manager Fusion Middleware Control and assign the default_Composer role to that user on the Application Roles page (where default represents the partition for this example).
- Log back in to Oracle Enterprise Manager Fusion Middleware Control as that user, and select Administration > MDS Configuration from the SOA Infrastructure menu.
- Note that the Import and Export options are disabled. This is the expected behavior.
As a workaround, Oracle SOA Suite users can read and write shared data using the SOA Deployment and Export operations available from the SOA Composite menu for a specific SOA composite application in Oracle Enterprise Manager Fusion Middleware Control.

