Using Business Events
This chapter covers the following topics:
- Overview of Business Events
- Design-Time Tasks for Outbound Business Events
- Creating a New SOA Composite Application with BPEL Process
- Creating a Partner Link
- Configuring the Receive Activity
- Adding a Partner Link for the File Adapter
- Configuring an Invoke Activity
- Configuring an Assign Activity
- Run-Time Tasks for Outbound Business Events
- Deploying the SOA Composite Application with BPEL Process
- Testing the SOA Composite Application with BPEL Process
- Troubleshooting
Overview of Business Events
The Oracle Workflow Business Event System (BES) is an application service that leverages the Oracle Advanced Queuing (AQ) infrastructure to communicate business events between systems. The Business Event System consists of the Event Manager and workflow process event activities.
The Event Manager contains a registry of business events, systems, named communication agents within those systems, and subscriptions indicating that an event is significant to a particular system. Events can be raised locally or received from an external system or the local system through AQ. When a local event occurs, the subscribing code is executed in the same transaction as the code that raised the event, unless the subscriptions are deferred.
Subscriptions can include the following types of processing:
-
Executing custom code on the event information
-
Sending event information to a workflow process
-
Sending event information to other queues or systems
Each business event represents a ready to use integration or extension point. Oracle E-Business Suite currently ships preconfigured with over 900 business events.
The uses of the Business Event System include:
-
System integration messaging hubs - Business Event System can serve as a messaging hub for complex system integration scenarios. The Event Manager can be used to "hard–wire" routing between systems based on event and originator.
-
Distributed applications messaging - Applications can supply Generate and Receive event message handlers for their business entities. For example, message handlers can be used to implement Master/Copy replication for distributed applications.
-
Message-based system integration - You can set up subscriptions, which cause messages to be sent from one system to another when business events occur. In this way, you can use the Event Manager to implement point–to–point messaging integration.
-
Business–event based workflow processes - You can develop sophisticated workflow processes that include advanced routing or processing based on the content of business events.
-
Non-invasive customization of packaged applications - Analysts can register interesting business events for their Internet or intranet applications. Users of those applications can register subscriptions to those events to trigger custom code or workflow processes.
Business Events Concepts
Event
A business event is an occurrence in an Internet or intranet application or program that might be significant to other objects in a system or to external agents. For instance, the creation of a purchase order is an example of a business event in a purchasing application.
Event Key
A string that uniquely identifies an instance of an event. Together, the event name, event key, and event data fully communicate what occurred in the event.
Event Message
A standard Workflow structure for communicating business events, defined by the datatype WF_EVENT_T. The event message contains the event data as well as several header properties, including the event name, event key, addressing attributes, and error information.
Event Activity
A business event modeled as an activity so that it can be included in a workflow process.
Event Data
A set of additional details describing an event. The event data can be structured as an XML document. Together, the event name, event key, and event data fully communicate what occurred in the event.
Event Subscription
A registration indicating that a particular event is significant to a system and specifying the processing to perform when the triggering event occurs. Subscription processing can include calling custom code, sending the event message to a workflow process, or sending the event message to an agent.
Deferred Subscription Processing
If you do not want subscriptions for an event to be executed immediately when the event occurs, you can defer the subscriptions. In this way you can return control more quickly to the calling application and let the Event Manager execute any costly subscription processing at a later time.
Agent
An agent is a named point of communication within a system. Communication within and between systems is accomplished by sending a message from one agent to another. A single system can have several different agents representing different communication alternatives. For example, a system may have different agents to support inbound and outbound communication, communication by different protocols, different propagation frequencies, or other alternatives.
Business Event Groups
A business event group is a type of event that contains multiple individual business events. Once an event group is defined, a subscription that is registered for an event group will be executed when any of the individual events within it is triggered.
With the support for business event groups, different business events belonging to an even group can be handled through a single partner link. A service created for an event group would be able to dequeue payloads corresponding to any of the events within the group.
To support existing partner links for outbound business events which are part of an event group, a workaround has to be followed. For detailed information, see Support for Business Events through Existing Partner Links.
Note: If individual events under a group are subscribed, then two messages would be enqueued into the WF_BPEL_Q queue. Users requiring only one message would need to disable the subscription for the individual event which enqueues the messages into WF_BPEL_Q.
For information about creating a partner link with a business event group, see Creating a Partner Link with a Business Event Group.
Design-Time Tasks for Outbound Business Events
This section describes the tasks required to configure Oracle E-Business Suite Adapter using the Adapter Configuration Wizard in Oracle JDeveloper.
Creating Service Artifacts for Business Event Consumption
While creating a partner link for listening to a business event, the following tasks are performed behind the scenes:
-
Creation of WF_BPEL_Q queue
-
Creation of an entry for WF_BPEL_Q in WF_AGENTS table
-
Creation of a subscription for the event being listened to
To facilitate re-creating the above entries on a different Oracle E-Business Suite instance, a script is generated in the project folder. In addition, a drop script is created which can be run manually on the corresponding instance to clean up all the tasks performed above. Running the drop script is optional, and is not recommended. The drop script would delete the WF_BPEL_Q queue, which can impact other composites, listening to events on the same Oracle E-Business Suite instance.
Multiple BPEL Processes Consuming the Same Business Event
Oracle E-Business Suite Adapter can handle multiple BPEL processes consuming the same business event. Oracle E-Business Suite Adapter creates only single subscription for a particular business event regardless of the number of BPEL process consuming it. Internally, this subscription forwards business event message to a multi-consumer AQ. Since each BPEL process is an unique consumer for the event, when the message is placed in the queue, all BPEL processes are notified. Therefore, as a user you do not need to create a separate subscription for each BPEL process. All you need to do is to create the service for the event, and Oracle E-Business Suite Adapter will take care of message delivery to each BPEL process.
For example, if there are three BPEL processes (BPEL1, BPEL2, and BPEL3) that want to consume the same business event (such as BE1 event). For each BPEL process, you create a service for the BE1 event using Oracle E-Business Suite Adapter. Oracle E-Business Suite Adapter in turn creates a single subscription for all the three BPEL processes - BPEL1, BPEL2, and BPEL3. This subscription puts BE1 event message in multi-consumer AQ.
At run time, when a BE1 event is raised, since the subscription is applicable to all the three BPEL processes, all these three deployed BPEL processes will be activated and would receive the same BE1 event message.
SOA Composite Application with BPEL Process Scenario
Take a PO XML Raise business event as an example.
When a purchase order is created and approved, a purchase order approved business event oracle.apps.po.evnt.xmlpo is raised. The subscription to this event is created in the background to listen to the business event and get event details. The event data will be passed through BPEL process activities and then written in XML file as an output file.
When the SOA Composite application with BPEL process has been successfully executed after deployment, you should get the same purchase order information from the output file once a purchase order is approved.
Prerequisites to Configure Outbound Business Events
-
The WF_Deferred Agent Listener must be up and running on the target instance.
-
The event should be enabled for BPEL to subscribe to it. The event should not be in the disabled mode.
SOA Composite Application with BPEL Process Creation Flow
Based on the PO XML Raise business event scenario, the following design-time tasks are discussed in this chapter:
Creating a New SOA Composite Application with BPEL Process
To create a new SOA Composite application with BPEL process
-
Launch Oracle JDeveloper.
-
Click New Application in the Application Navigator.
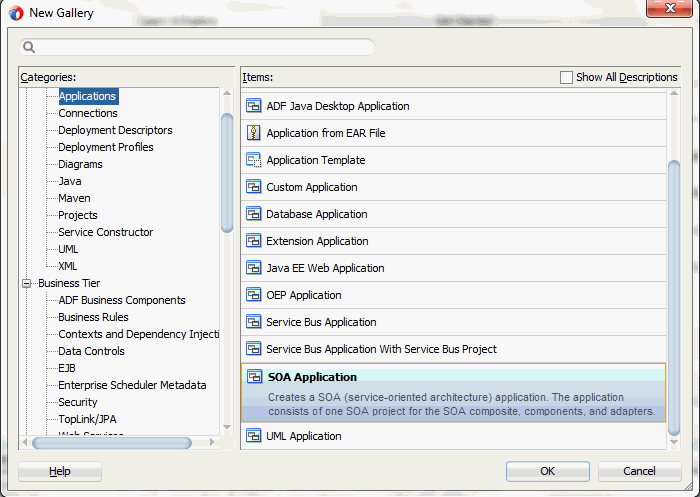
The New Gallery page appears. Select SOA Application from the Items list.
The New Gallery Page
Click OK.
-
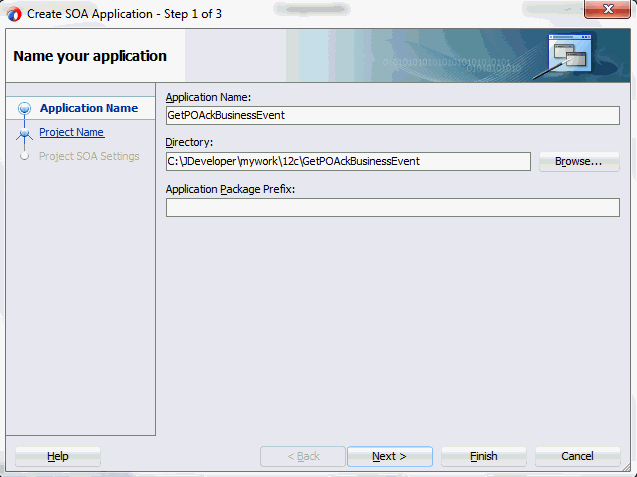
The Create SOA Application - Name your application page is displayed.
The Create SOA Application - Name your application Page
-
Enter an appropriate name for the application in the Application Name field.
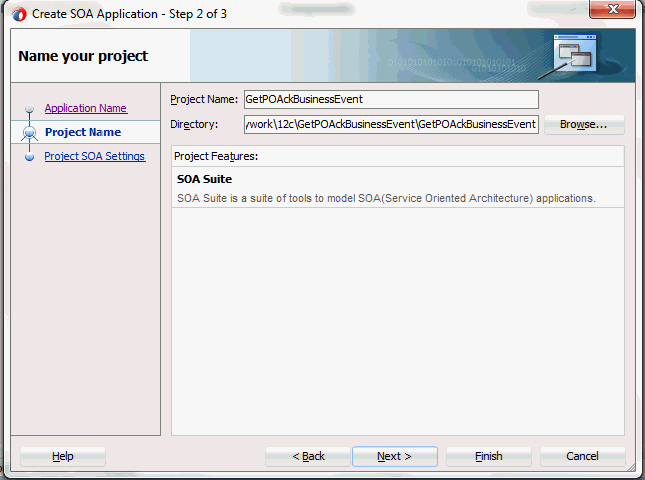
Click Next. The Create SOA Application - Name your project page is displayed.
The Create SOA Application - Name your project Page
-
Enter an appropriate name for the project in the Project Name field. For example, GetPOAckBusinessEvent.
Notice that SOA Suite is shown in the Project Features section.
-
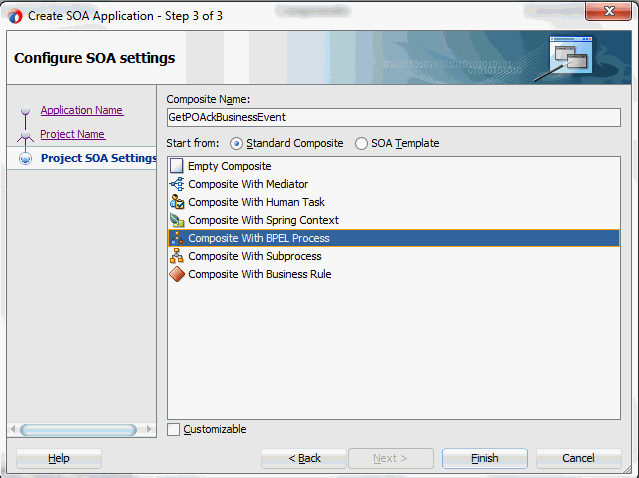
Click Next. The Create SOA Application - Configure SOA settings page is displayed.
The Create SOA Application - Configure SOA settings Page
-
Leave the default Standard Composite selection unchanged for the Start from field.
Select Composite With BPEL Process from the Standard Composite list, and then click Finish. You have created a new application, and a SOA project. This automatically creates a SOA Composite.
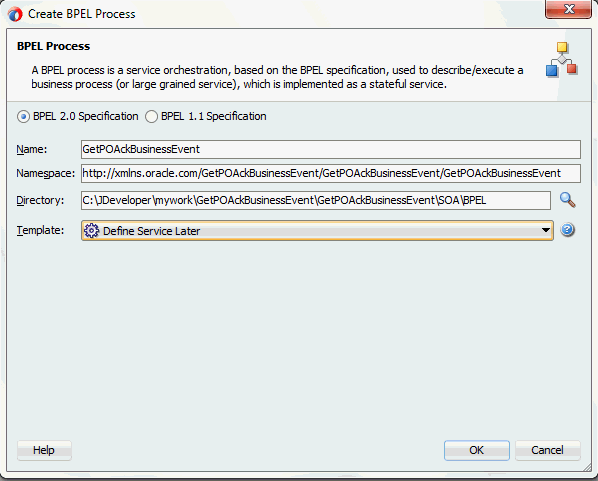
The Create BPEL Process page is displayed.
The Create BPEL Process Page
-
Leave the default BPEL 2.0 Specification selection unchanged. This creates a BPEL project that supports the BPEL 2.0 specification.
Enter an appropriate name for the BPEL process in the Name field. For example, GetPOAckBusinessEvent.
Select Define Service Later from the Template field. Click OK.
An empty BPEL process is created. The required source files including bpel and wsdl, using the name you specified (for example, GetPOAckBusinessEvent.bpel and GetPOAckBusinessEvent.wsdl) and GetPOAckBusinessEvent (composite.xml) are also generated.
Creating a Partner Link
Configuring an outbound business event requires creating a partner link to allow the outbound event to be published.
This task adds a partner link to the BPEL process. A partner link defines the link name, type, and the role of the BPEL process that interacts with the partner service.
To add a partner link
-
Click BPEL Services in the Component palette.
Drag and drop Oracle E-Business Suite (formerly known as Oracle Applications) from the BPEL Services list into the right Partner Link swim lane of the process diagram. The Oracle E-Business Suite Reference page appears.
Enter a reference name in the Name field. For example, GetPOApprovalEvent.
-
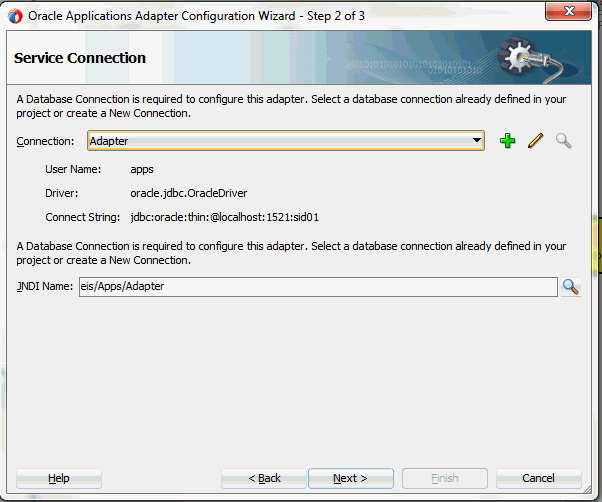
Click Next. The Service Connection dialog appears.
Specifying a Database Service Connection
-
You can perform either one of the following options for your database connection:
Note: You need to connect to the database where Oracle E-Business Suite is running.
-
You can create a new database connection by clicking the Create a New Database Connection icon.
How to define a new database connection, see Create a New Database Connection.
-
You can select an existing database connection that you have configured earlier from the Connection drop-down list.
The Service Connection page will be displayed with the selected connection information. The JNDI (Java Naming and Directory Interface) name corresponding to the database connection appears automatically in the Database Server JNDI Name field. Alternatively, you can specify a JNDI name.
Note: When you specify a JNDI name, the deployment descriptor of the Oracle E-Business Suite Adapter must associate this JNDI name with configuration properties required by the adapter to access the database.
The JNDI name acts as a placeholder for the connection used when your service is deployed to the BPEL server. This enables you to use different databases for development and later for production.
Note: For more information about JNDI concepts, refer to Oracle Fusion Middleware User's Guide for Technology Adapters.
-
-
Once you have completed creating a new connection for the service, you can add a business event by browsing through the list available in Oracle E-Business Suite.
Click Next.
If you are connecting to Oracle E-Business Suite Release 12, then the IREP File not present dialog appears indicating that Adapter could not find the Oracle Integration Repository data file corresponding to the database you are connecting in your workspace. Absence of the data file would make browsing or searching of Integration Repository tree considerably slow. You can choose to extract the data file and create a local copy of the Integration Repository data file. Once it is created successfully, Adapter will pick it up automatically next time and retrieve data from your local Integration Repository.
You can select one of the following options:
-
Click Yes to extract the Integration Repository data file.
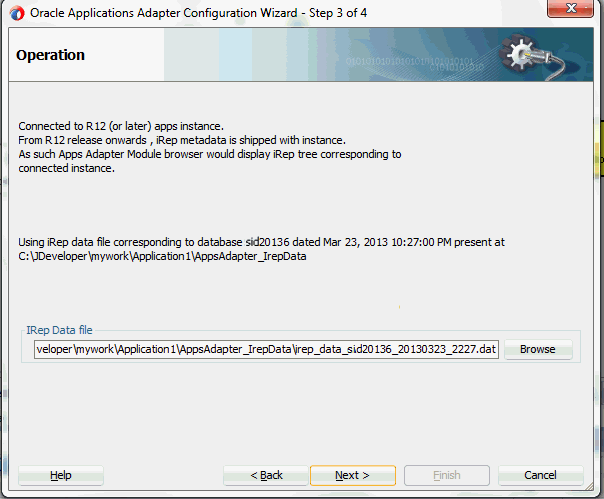
After the system successfully creates a local copy of the Integration Repository data file, next time when you connect to the database, you will find the IRep Data File field appears in the Operation dialog indicating where your local copy exists with the creation date and time as part of the file name.
Using the Local Integration Repository Data File
-
Click No to query the Integration Repository data file from the live database you are connecting to display the Integration Repository tree.
In this example, click No. Click Next in the Operation page to open the Oracle E-Business Suite Module Browser.
-
-
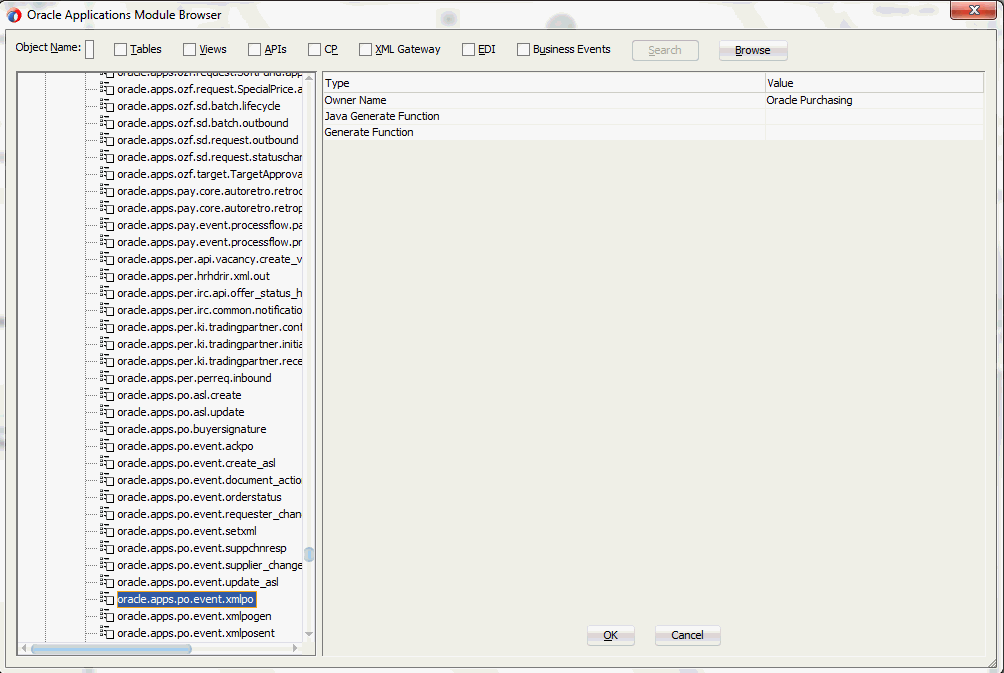
The Oracle E-Business Suite Module Browser combines interface data from Oracle Integration Repository with information about the additional interfaces supported by Oracle E-Business Suite Adapter, organized in a tree hierarchy.
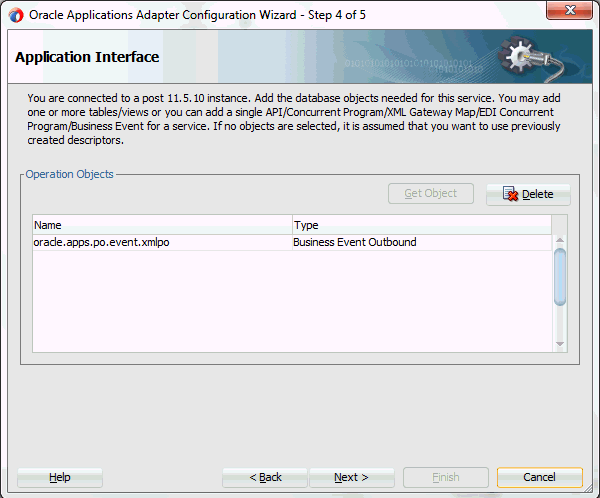
To select a business event, expand the navigation tree to Product Families > Other Interfaces > Business Events > Outbound. The direction outbound is from the Oracle E-Business Suite perspective, in this case listening to business events from Oracle E-Business Suite. Select the appropriate business event, for example, oracle.apps.po.event.xmlpo, and click OK. The Application Interface page is displayed with selected business event.
Selecting a Business Event from the Module Browser
Note: Creating a Partner Link with a Business Event Group
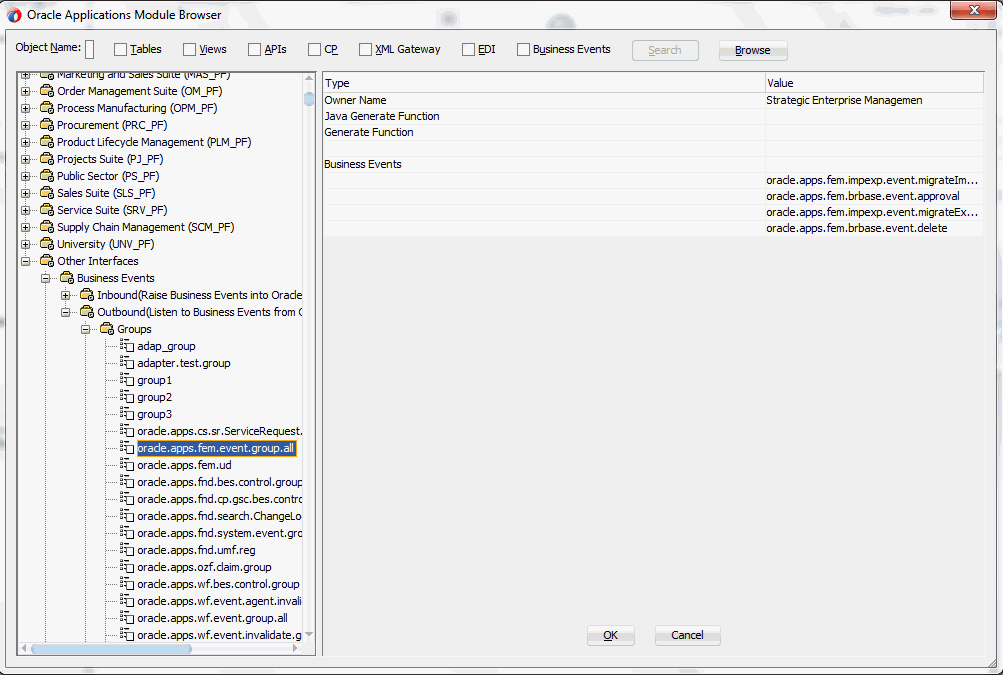
Business event groups appear under the Other Interfaces > Business Events > Outbound > Groups node from the Oracle E-Business Suite Module Browser.
If a business event group (such as oracle.apps.fem.event.group.all) is selected from the Groups node, detailed event group information including the event group owner name, generate function information if any, and each individual event contained in the selected event group is listed in the right pane of the Oracle E-Business Suite Module Browser window.
Selecting a Business Event Group from the Oracle E-Business Suite Module Browser
Additionally, select 'Any Schema' in the WF Event Schema Definition page later on for the business event payload. This allows XML payload of any schema to be attached to event payload. You can also verify the JCA Property "MessageSelectorRule" for the selected event group (described in Step 10) once the partner link is created.
This feature applies to Oracle E-Business Suite Release 12 and Release 11.5.10. For more information about business event groups, see Business Event Groups.
-
Click OK to display the Application Interface page.
Adapter Configuration Wizard - Application Interface Page
-
Click Next in the Application Interface page. The WF Event Schema Definition page for business event payload appears.
-
Specifying Event Schema
You must specify one of the following options to be used for the business event payload:
Note: When you select either the 'No Schema' or 'Any Schema' option, there is no need to further specify the schema information for your business event, and you will proceed to the next step.
-
No Schema
If you select the No Schema option, then the payload data would be available in the form of string. This option also allows you to receive non-XML event payload.
-
Any Schema
If you select the Any Schema option, then XML payload of any schema could be attached to event payload. You should select this option if you know the payload is XML, but not sure of its schema.
Note: If a business event group is selected for the partner link creation, select the 'Any Schema' option. This allows any schema to be attached to a business event group.
-
Specify Schema
If you select the Specify Schema option, then the Schema Location and Schema Element fields become visible. You must specify the location of schema file and then select the schema element that defines the payload of outbound business event.
Selecting Business Event Payload Schema
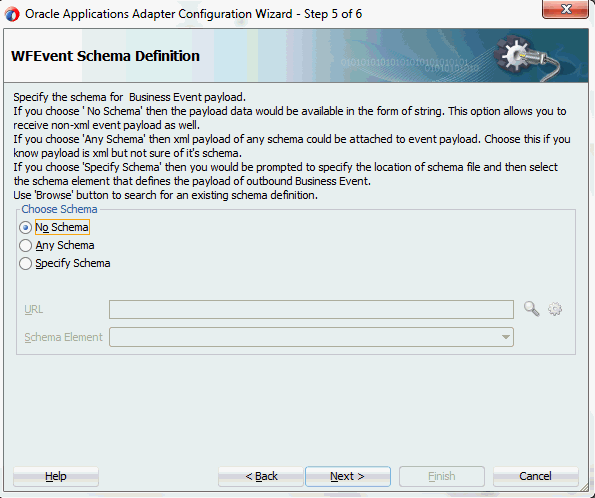
Select 'No Schema' and click Next.
-
-
The Finish page appears indicating that you have finished defining the business event service.
-
The Set Transaction Properties of BPEL Service dialog appears. Ensure that 'sync' is selected in the Delivery field and 'required' is selected in the Transaction field.
Setting the Transaction Properties of BPEL Service

Click OK to complete the partner link configuration.
The wizard generates the GetPOApprovalEvent WSDL file corresponding to the oracle.apps.po.event.xmlpo business event service.
The partner link is created with the required WSDL settings, and is represented in the BPEL project by a new icon in the border area of the process diagram.
-
Verifying JCA Property "MessageSelectorRule" for an Event Group Partner Link
If a business event group is selected for the partner link creation, you can verify the business event group Jca property by selecting the partner link service (such as BE_Group_apps.jca from the SOA Content > Adapters folder.
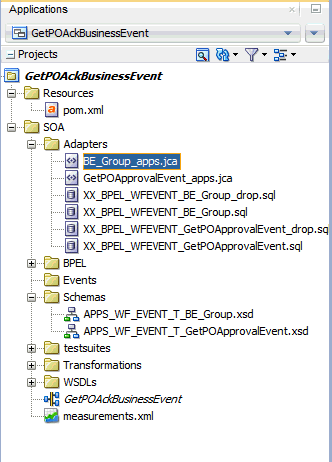
Click the Source tab to display the .jca file. Notice that the JCA property "MessageSelectorRule" contains the value of
value="tab.user_data.getvalueforparameter ('GROUP') = 'oracle.apps.fem.event.group.all'".

Configuring the Receive Activity
The next task is to configure a Receive activity to receive event details from the partner link that you just configured for the adapter service as an input to the Assign activity.
To configure the Receive activity
-
In JDeveloper BPEL Designer, expand the BPEL Constructs from the Component Palette. Drag and drop Receive from the Web Service section into the center swim lane of the process diagram.
-
Link the Receive activity to the partner link GetPOApprovalEvent that you just created earlier.
Associating the Receive Activity with the Partner Link
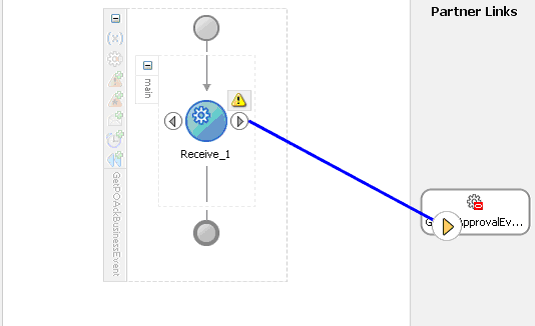
The Receive dialog appears.
-
Enter an appropriate name for the Receive activity.
The Dequeue Operation is automatically selected since the partner link has been configured with an outbound business event.
-
Specify a Variable to receive the message data from the partner link by clicking the Create icon to the right of the Variable field. The Create Variable dialog box appears.
-
Click OK to accept the default name.
Configuring the Receive Activity
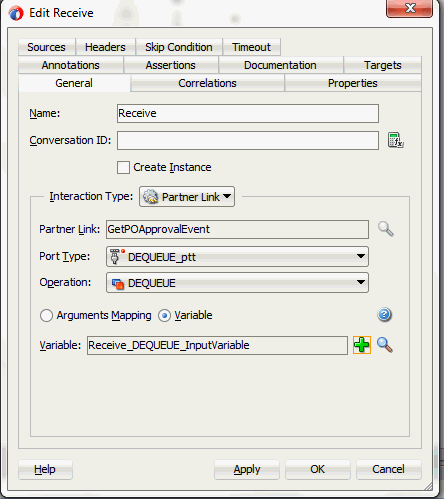
-
Click Apply in the Receive dialog, then click OK.
Adding a Partner Link for the File Adapter
If you are configuring an outbound business event, you need to add another partner link for the file adapter. This allows the outbound business event to write the data to the XML file.
To add a partner link for the file adapter
-
In Oracle JDeveloper BPEL Designer, click BPEL Services in the Component palette.
Drag and drop File Adapter from the BPEL Services list into the right Partner Link swim lane of the process diagram. The File Adapter Reference page appears.
The File Adapter Reference Page
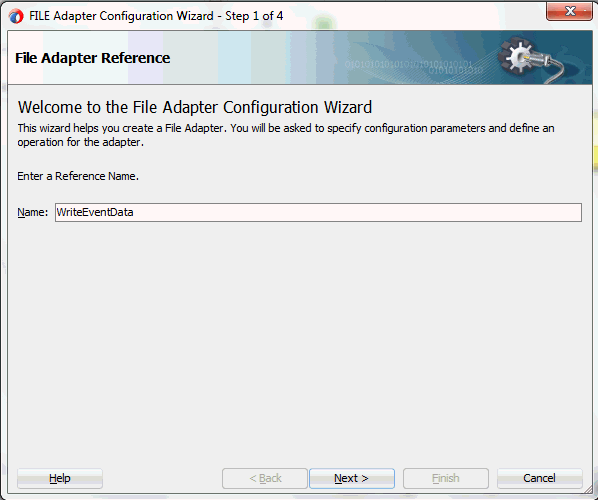
Enter a name for the file adapter service. For example, enter WriteEventData.
-
Click Next. The Adapter Interface page appears.
Specifying the Adapter Interface
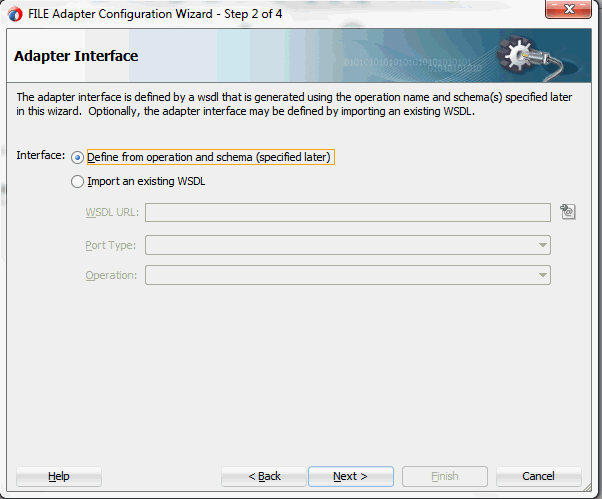
Select the Define from operation and schema (specified later) radio button and click Next.
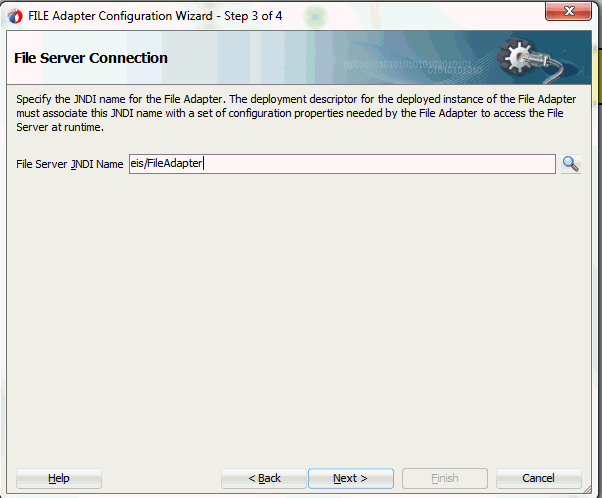
The File Server Connection page appears. Leave the default value unchanged for the File Server JNDI Name field.
Click Next
-
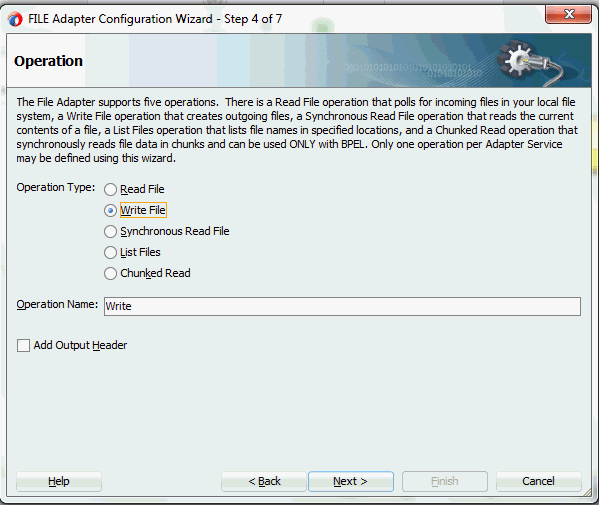
In the Operation page, specify the operation type. For example, select the Write File radio button. This automatically populates the Operation Name field.
Specifying the Operation
-
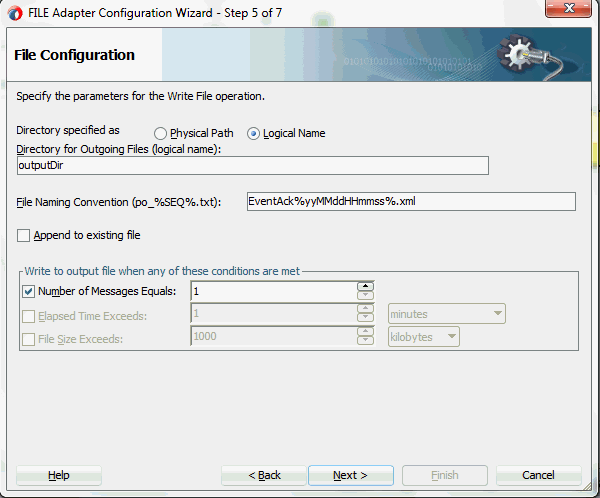
Click Next to access the File Configuration page.
Configuring the Output File
-
For the Directory specified as field, select the Logical Name radio button. Enter outputDir as the Directory for Outgoing Files (logical name) and specify a naming convention for the output file, such as EventAck%yyMMddHHmmss%.xml.
Tip: When you type a percent sign (%), you can choose from a list of date variables or a sequence number variable (SEQ) as part of the filename.
Confirm the default write condition: Number of Messages Equals 1.
-
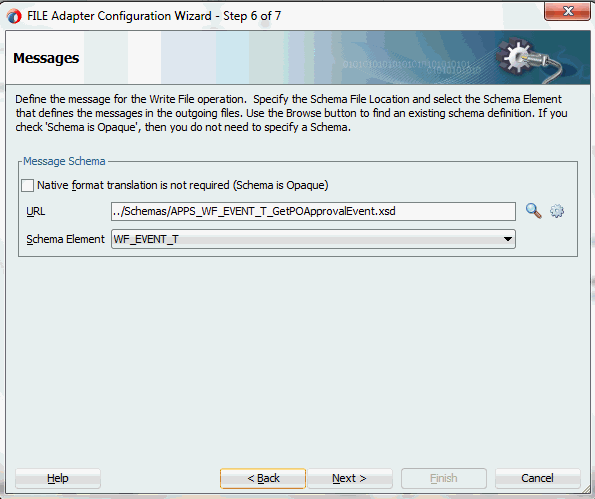
Click Next, and the Messages page appears. For the output file to be written, you must provide a schema.
-
Click Browse to access the Type Chooser.
-
Expand the node by clicking Project Schema Files > WF_EVENT_T_GetPOApprovalEvent.xsd. Select WF_EVENT_T as the element and click OK.
The selected schema information will be automatically populated in the URL and Schema Element fields.
Populating the Selected Message Schema
-
Click Next and then Finish. This completes the configuration and creates the partner link with the required WSDL settings for the File Adapter service. The wizard also generates the WriteEventData.wsdl WSDL file corresponding to the partner link.
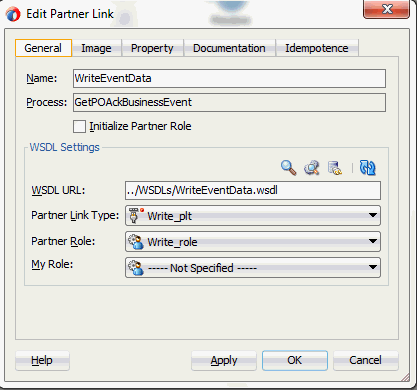
The WriteEventData Partner Link appears in the BPEL process diagram. Double click the Partner Link service icon to open the Edit Partner Link dialog and view the details.
Completing the Partner Link Configuration
Configuring an Invoke Activity
After adding the File Adapter partner link, you need to configure an Invoke activity to associate it with the File Adapter link.
Through the Invoke activity, the business event information can be written to the XML file you specified as the output directory.
To configure an Invoke activity
-
In Oracle JDeveloper BPEL Designer, expand the BPEL Constructs from the Component Palette. Drag and drop an Invoke activity from the Web Service section into the center swim lane of the process diagram after the Receive activity.
-
Link the Invoke activity to the WriteEventData File Adapter service.
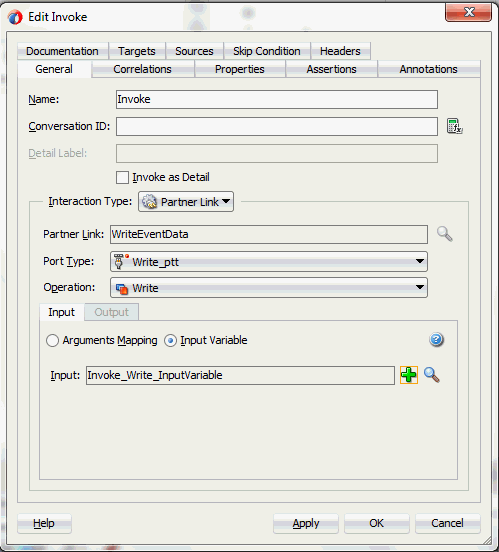
The Invoke activity will send event data to the partner link. The Edit Invoke dialog appears.
-
Enter a name for the Invoke activity. In the Input tab, ensure the Input Variable radio button is selected. Click the Create icon next to the Input Variable field to create a new variable. The Create Variable dialog box appears.
-
Select Global Variable, then enter a name for the variable. You can also accept the default name. Click OK to return to the Edit Invoke dialog.
Editing the Invoke Activity
Click Apply and then OK to finish configuring the Invoke activity.
Configuring an Assign Activity
Use the Assign activity to take the output from the Receive activity and to provide input to the invoke activity.
To configure an Assign activity
-
In Oracle JDeveloper BPEL Designer, expand the BPEL Constructs from the Component Palette. Drag and drop the Assign activity from the Basic Activities section into the center swim lane of the process diagram, between the Receive activity and the Invoke activity.
-
Double-click the Assign activity to access the Edit Assign dialog.
Click the General tab to enter a name for the Assign activity. For example, setEventData.
-
Select the Copy Rules tab and expand the target trees:
-
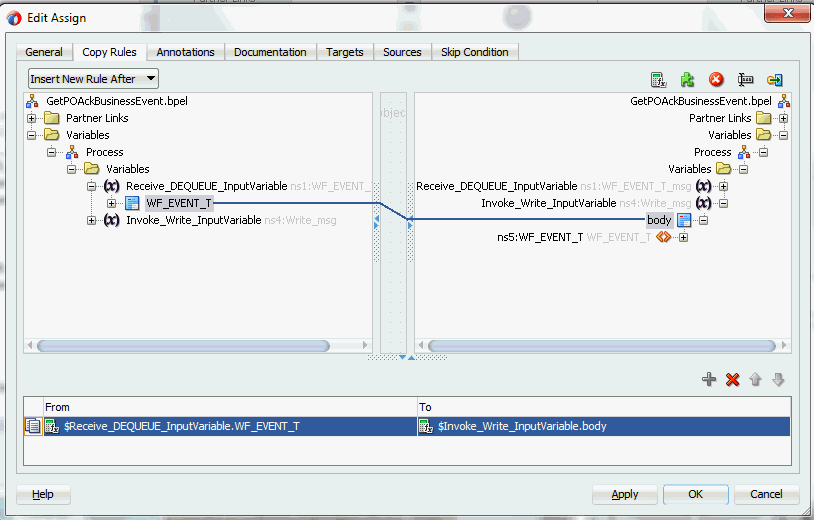
In the From navigation tree, navigate to Variable > Process > Variables > Receive_DEQUEUE_InputVariable and select WF_EVENT_T.
-
In the To navigation tree, navigate to Variable > Process > Variables > Invoke_Write_InputVariable > body > ns3:WF_EVENT_T.
Drag the source node (WF_EVENT_T) to connect to the target node (body) that you just specified. This creates a line that connects the source and target nodes. The copy rule is displayed in the From and To sections at the bottom of the Edit Assign dialog box.
Assigning Parameters
-
-
Click Apply and then OK in the Edit Assign dialog box to complete the configuration of the Assign activity.
Completed Outbound Business Event BPEL Process Project
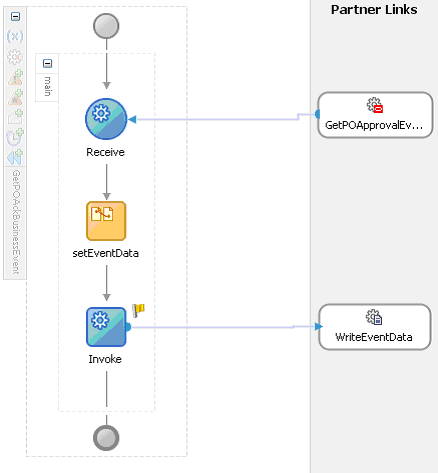
Click the GetPOApprovalEvent (composite.xml) to display the Oracle JDeveloper composite diagram:
Note: Click the Source tab of GetPOApprovalEvent (composite.xml) to enter a value for the physical directory outputDir for the reference WriteEventData (such as /usr/tmp).
<property name="outputDir" type="xs:string" many="false" override="may">/usr/tmp</property>
Specifying the Physical Directory for the Property
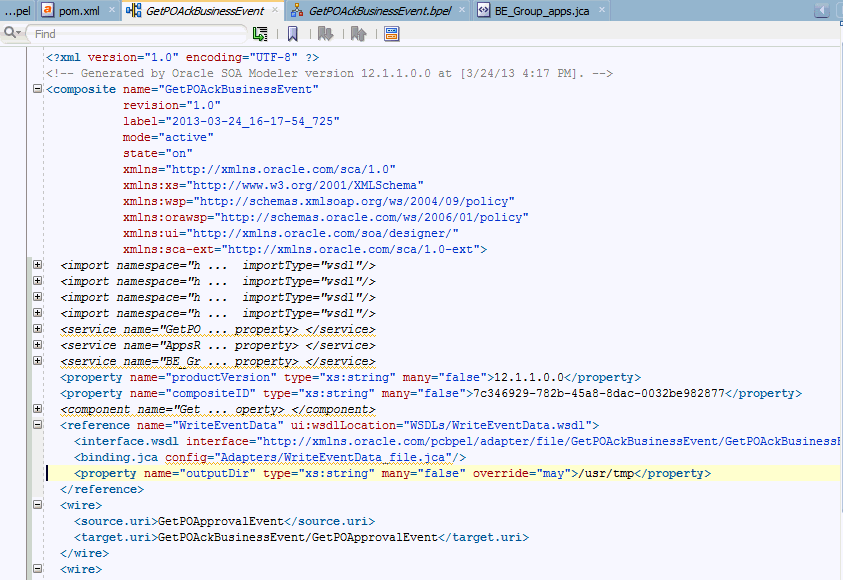
Oracle JDeveloper Composite Diagram

Run-Time Tasks for Outbound Business Events
After designing the SOA Composite with BPEL process, you can compile, deploy and test it.
Deploying the SOA Composite Application with BPEL Process
To invoke the service (GetPOApprovalEvent) from the BPEL client contained in the SOA composite, the SOA composite needs to be deployed to the Oracle WebLogic managed server. This can be achieved using Oracle JDeveloper. Once the composite is deployed, it can be tested from the Oracle Enterprise Manager Fusion Middleware Control Console.
Prerequisites
Before deploying the SOA composite with BPEL process using Oracle JDeveloper, you must have established the connectivity between the design-time environment and the run-time server. For more information, see Configuring the Data Source in Oracle WebLogic Server and Creating an Application Server Connection.
Note: If a local instance of the WebLogic Server is used, start the WebLogic Server by selecting Run > Start Server Instance from Oracle JDeveloper. Once the WebLogic Admin Server "DefaultServer" instance is successfully started, the <Server started in Running mode> and DefaultServer started message in the Running:DefaultServer and Messages logs should appear.
To deploy the SOA Composite application with BPEL process
-
In the Applications Navigator of JDeveloper BPEL Designer, select your SOA Composite project name (such as GetPOAckBusinessEvent).
-
Right-click the project name, and then select Deploy > [project name] > [serverConnection] from the menu that appears.
For example, you can select Deploy > GetPOAckBusinessEvent > soa-server1 to deploy the process if you have the connection set up appropriately.
Note: If this is the first time to set up server connection, then the Deployment Action window appears. Select 'Deploy to Application Server' and click Next.
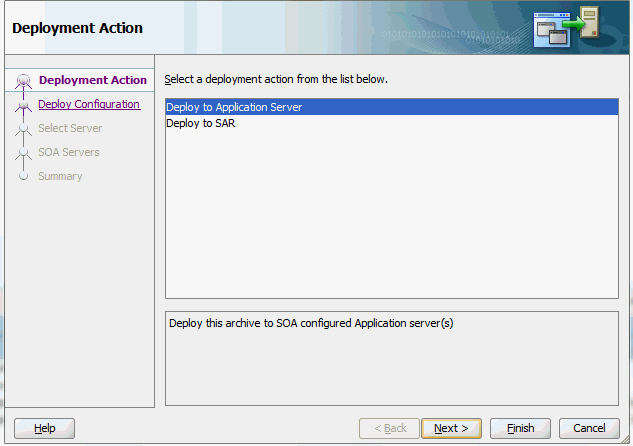
In the Deploy Configuration window, ensure the following information is selected before clicking Next to add a new application server:
-
New Revision ID: 1.0
-
Mark composite revision as default: Select this check box.
-
Overwrite any existing composites with the same revision ID: Select this check box.
The steps to create a new Oracle WebLogic Server connection from JDeveloper are covered inCreating an Application Server Connection.
-
-
In the Select Server page, select 'soa-server1' that you have established the server connection earlier. Click Next.
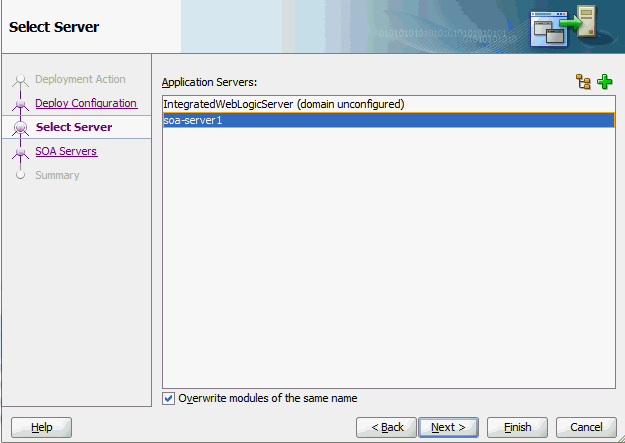
-
In the SOA Servers page, accept the default target SOA Server ('soa-server1') selection.
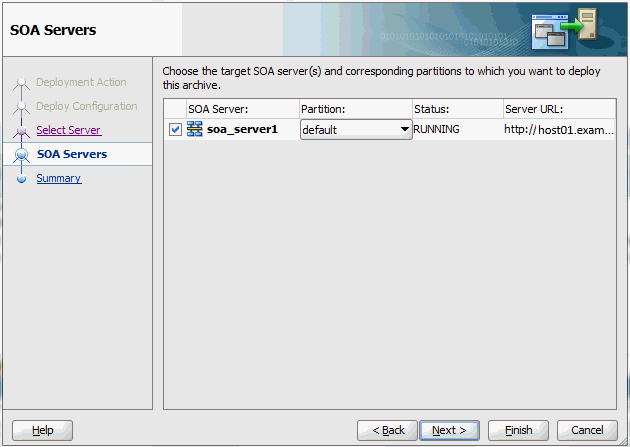
Click Next and Finish.
If you are deploying the composite for the first time from your Oracle JDeveloper session, the Authorization Request window appears. Enter username and password information specified during Oracle SOA Suite installation. Click OK.
-
Deployment processing starts. Monitor deployment progress and check for successful compilation in the SOA - Log window as well as in the Deployment - Log window.
Testing the SOA Composite Application with BPEL Process
Once the SOA Composite application with BPEL process is deployed, you can manage and monitor the process from the Oracle Enterprise Manager Fusion Middleware Control Console. You can also test the process by manually initiating it.
To test the SOA Composite application with BPEL process
-
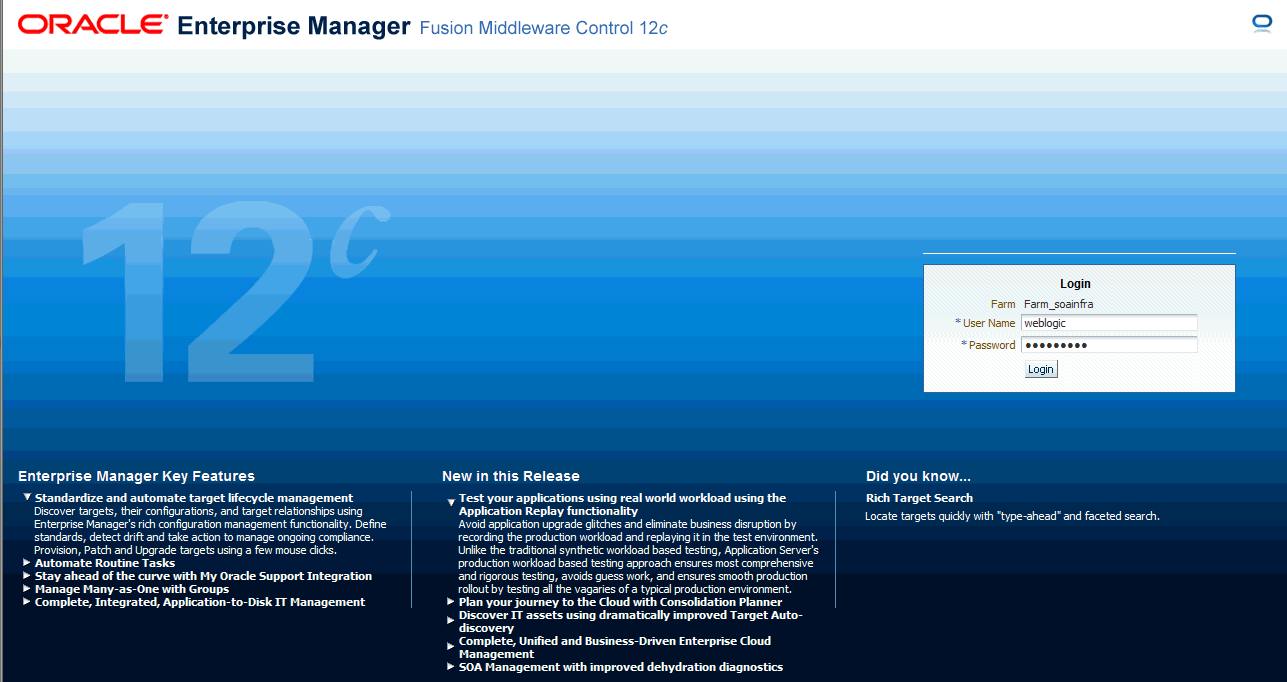
Navigate to Oracle Enterprise Manager Fusion Middleware Control Console (http://<servername>:<portnumber>/em). The composite you deployed is displayed in the Applications Navigation tree.
-
Enter username (such as weblogic) and password and click Login to log in to a farm.
You may need to select an appropriate target instance farm if there are multiple target Oracle Enterprise Manager Fusion Middleware Control Console farms.
-
From the Farm base domain, expand the SOA > soa-infra > soa-infra (soa_server1) > default to navigate through the SOA Infrastructure home page and menu to access your deployed SOA Composite applications running in the SOA Infrastructure for that managed server.
Note: The Farm menu always displays at the top of the navigator. When you expand the SOA folder in the navigator and click the links displayed beneath it, the SOA Infrastructure menu becomes available at the top of the page.
-
Log on to Oracle E-Business Suite with the XML Gateway responsibility.
This is to ensure that the XML Gateway trading partner is set up correctly so that a purchase order can have a valid supplier that has been defined.
-
Select Define Trading Partner from the navigation menu to access the Trading Partner Setup window.
-
Enter the header values on the Trading Partner Setup form as follows:
-
Trading Partner Type: Supplier
-
Trading Partner Name: Advanced Network Devices
-
Trading Partner Site: Enter a trading partner site information, such as 2000 Century Way, Santa Clara, CA 95613-4565.
-
Company Admin Email: Enter a valid e-mail address.
-
-
Enter the following trading partner details:
-
Transaction Type: PO
-
Transaction SubType: PRO
-
Standard Code: OAG
-
External Transaction Type: PO
-
External Transaction SubType: Process
-
Direction: Out
-
Map: itg_process_po_007_out
-
Connection / Hub: DIRECT
-
Protocol Type: HTTP
-
Username: 'operation'
-
Password: Enter the associated password twice.
-
Protocol Address: 'http://appsadapter.sample.com'
-
Source Trading partner location code: STPLC
Trading Partner Setup Form
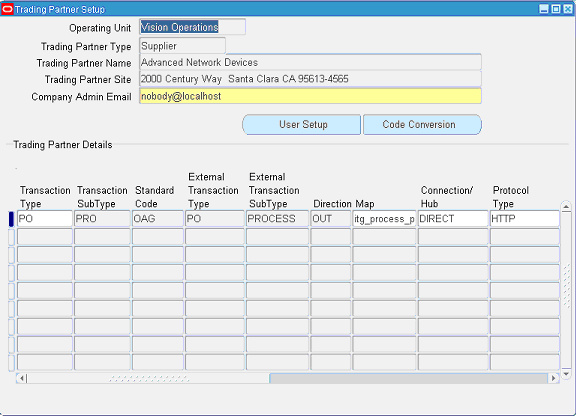
Save the trading partner details.
-
-
Switch responsibility by selecting the Purchasing, Vision Operations (USA) and select Purchase Order from the navigation menu.
The Purchase Order forms is displayed.
-
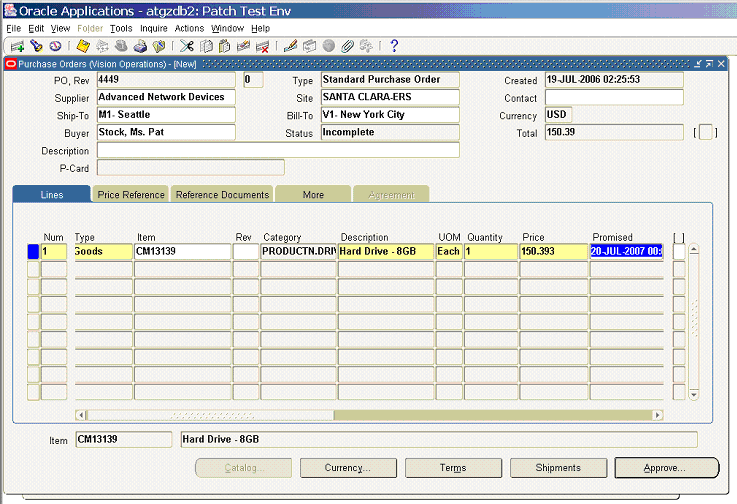
Create a purchase order with the header values reflecting the trading partner you previously defined in the Purchase Order window:
-
Supplier: Enter a supplier information, such as 'Advanced Network Devices'.
-
Site: Select a site information, such as 'SANTA CLARA-ERS'.
-
-
On the Lines tab, enter a data row with the following values:
-
Type: Goods
-
Item: CM13139
-
Quantity: 1
-
Description: Hard Drive - 8GB
-
Promised: Enter any future date in the format of dd-mmm-yyyy (such as 23-JUN-2009).
-
-
Save your purchase order. The status of the purchase order is 'Incomplete'.
Setting Up a Purchase Order
-
Click Approve. The Approve Document form appears.
Approving the Purchase Order
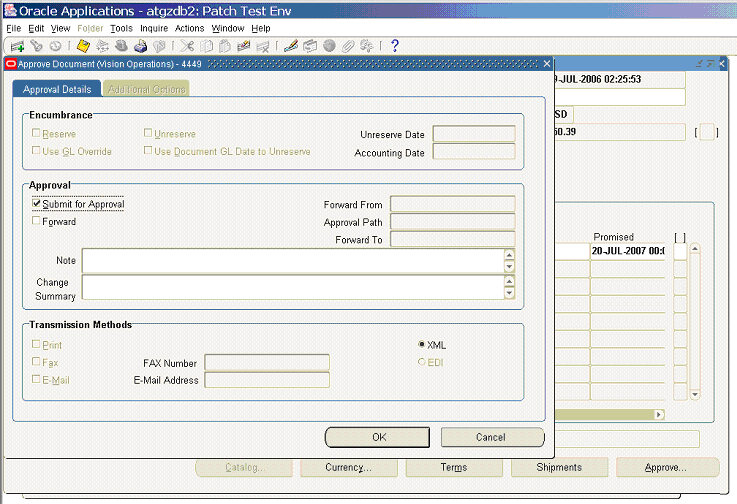
Click OK to confirm the approval.
Note: Because the trading partner is set up and valid, the transmission method is automatically set to XML.
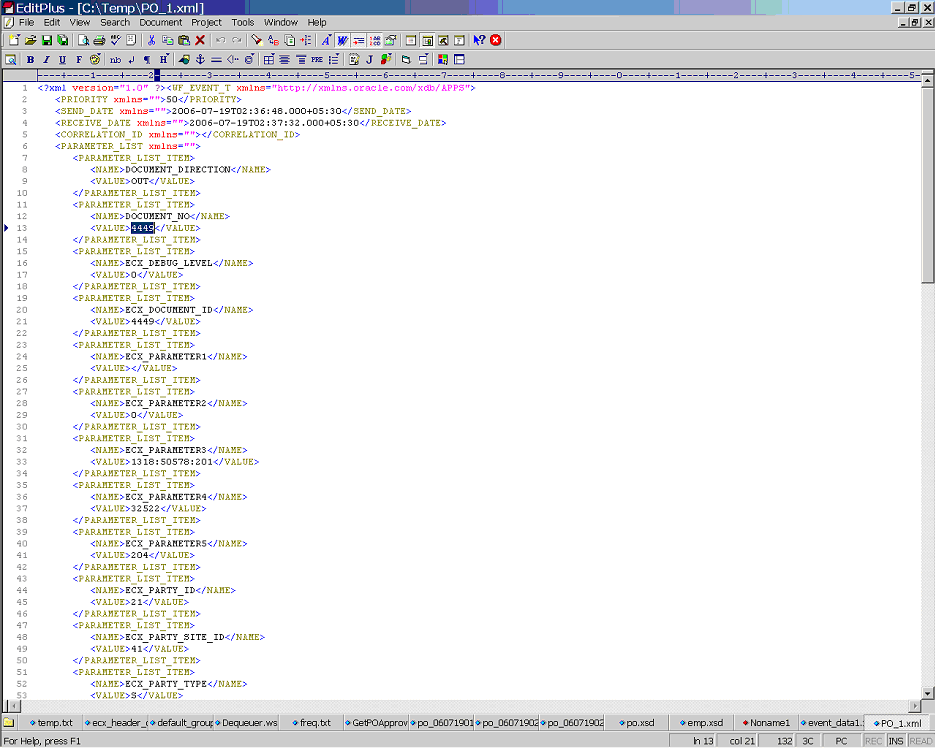
The status of the purchase order is now changed to 'Approved'. For future reference, record the value of the PO, Rev field (for example, the PO number 4449 in this case).
Once the purchase order is approved, the business event oracle.apps.po.event.xmlpo is raised.
-
Use the following steps to ensure that the WF_Deferred Agent Listener is running on the target database.
-
Log on to Oracle E-Business Suite with the System Administrator responsibility.
-
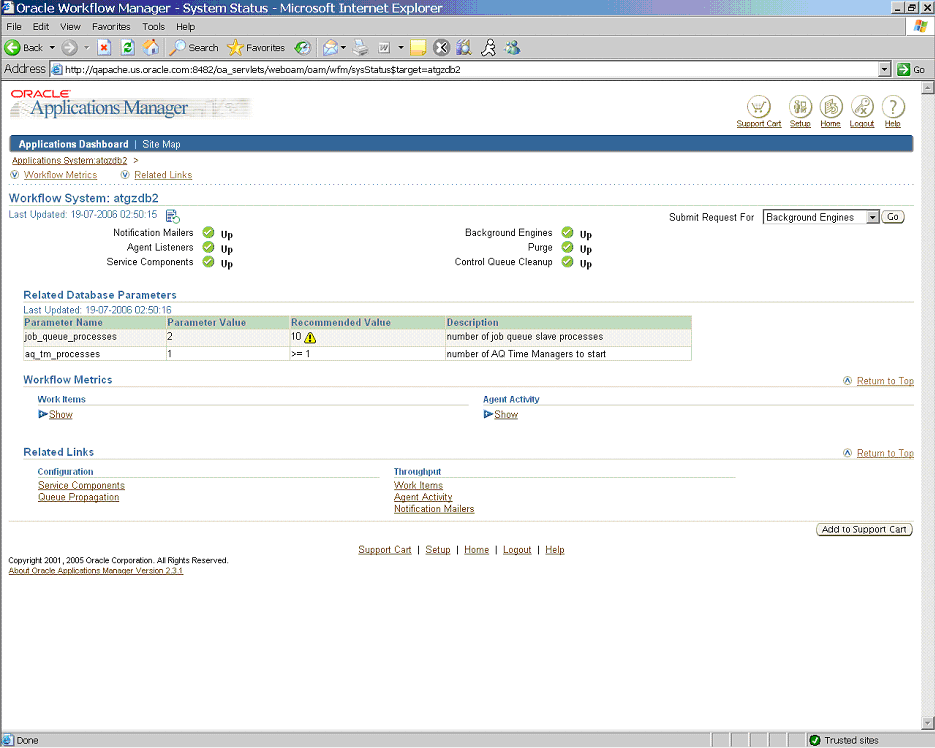
Select the Workflow Administrator Web Applications responsibility and choose Oracle Applications Manager > Workflow Manager from the menu.
-
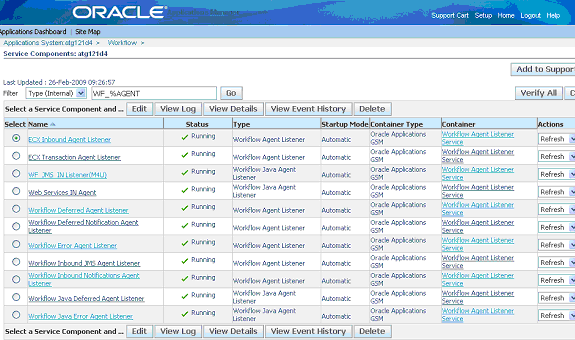
On the Applications Manager page, click the Agent Listeners icon. The Service Components page appears, containing a list of the installed agent listeners.
Reviewing Agent Listener status
-
Confirm that the Workflow Deferred Agent Listener is in Running status.
-
-
At this time, your deployed BPEL process contained in a SOA Composite is listening for oracle.apps.po.event.xmlpo business event. Please allow 2 to 3 minutes for the BPEL process to activate after the event is raised.
-
Go to the directory, for example outputDir (typically under c:\temp) you specified for the write operation. Open the output file (such as EventAck%yyMMddHHmmss.xml), and confirm that the order number is same as that of the approved purchase order.
Confirming the Output Order Number
Troubleshooting
If you experience problems with your Business Event System integration, you can check the following troubleshooting steps:
-
Confirm that Workflow Deferred Agent Listener is up and running.
-
Ensure that business events are raised after the Composite is deployed.
-
If the partner link of Oracle E-Business Suite Adapter is created on one instance of Oracle E-Business Suite and deployed on another, ensure the following on the target database:
-
WF_BPEL_Q queue exists
-
A custom subscription for the business event being raised is present
Note: The above two can be easily re-created by running the XX_BPEL_WFEVENT_<parnerlink_name>.sql (located in the project folder) on the target Oracle E-Business Suite database.
-
-
Enable logging for Adapter to see if the issue is on the middleware side. For information on enabling logging for Oracle E-Business Suite Adapter, see Enabling Logging for Adapters.