B MUD Case Study: Eden Corporation
This appendix describes a fictional case study that shows how the Oracle Business Intelligence multiuser development environment might be used for a particular business case.
This appendix contains the following topics:
About the Eden Corporation Fictional Case Study
Eden Corporation (a fictional company) recently purchased Oracle Business Intelligence. They have two divisions that are licensed and plan to use the product.
Because of this, the company has two separate initiatives:
-
Initiative S: The Sales Division wants to use Oracle Business Intelligence for dashboarding and analysis of revenue versus plan. They want to deploy an initial phase to production quickly to meet an immediate need. Then, they want to roll out more functionality in Phases II and III. Initiative S is large enough that they will have two developers working on it.
-
Initiative H: The Human Resources Division (HR) needs to do dashboarding and analysis of HR data. Initiative H is a smaller initiative, so it will have only one developer. They plan to deliver their application to production between Initiative S Phases II and III.
Note that the Sales developers and the HR developers are not allowed to see each others' data or metadata. The metadata administrator is the only person who has security privileges for all the metadata.
As in all organizations, there will also be a steady stream of urgent requests and occasional bugs from production. The developers will need to deliver fixes for these within days, even though the longer-term initiatives S and H are in development at the same time.
About the Technical Team Roles and Responsibilities
Eden Corporation has staffed the team as follows:
-
Adam Straight - MUD Administrator
-
Sally Andre - Developer for Sales Division, Revenue project
-
Scott Baker - Developer for Sales Division, Quota project
-
Helen Rowe - Developer for HR Division
About the Eden Corporation Development Phases
Eden Corporation plans to deploy RPDs to production based on the following timeline:
-
January - Sales Phase I (projects Revenue and Quota)
-
February - Sales Phase II (add project Target, extend projects Revenue and Quota)
-
March - HR (one project used)
-
April - Sales Phase III (extend all three projects)
About the Eden Corporation Topology
Eden Corporation plans to use the following systems for their multiuser development environment:
-
MUD Administrator - NT computer with a share
-
Sally Andre - NT computer for Administration Tool client, and Linux computer to run the Oracle Business Intelligence stack
-
Scott Baker - high-powered NT computer
-
Helen Rowe - either of the above
-
Test - Linux computer
-
Production - Clustered Linux computers
About the Repository Architecture
Because of Eden Corporation's business structure and initiatives, they need to have two independent semantic models in their repository: one for Sales and one for HR. Each of these models can have multiple projects.
Planning the Repository Structure
Eden Corporation knows that it is important to plan the structure of their repository file so that it will be able to support the multiuser development needs of their organization. They assigned owners to major objects, so the developers know who to go to when conflicts arise, and which objects they should not modify on their own.
Tip: When hosting multiple independent semantic models, be sure to itemize the names of top-level objects to prevent duplicate names.
Table B-1 and Table B-2 show the high-level repository objects in main.rpd for both Initiative S and Initiative H, mapped to projects and owners. Note that Adam is the overall owner of both Initiative S and Initiative H.
Table B-1 Initiative S Repository Objects Mapped to Projects and Owners
| Object Type | Object | Owner | ProjRevenue | ProjQuota | ProjTarget |
|---|---|---|---|---|---|
|
physical database |
Sample App Data |
Sally |
Yes |
Yes |
Yes |
|
business model |
Sales |
Sally |
n/a |
n/a |
n/a |
|
logical fact table 1 |
F10 Billed Rev |
Sally |
Yes |
Yes |
No |
|
logical fact table 2 |
F30 Facts Targets |
Scott |
No |
No |
Yes |
|
logical fact table 3 |
F50 Facts Quotas |
Scott |
No |
Yes |
No |
|
logical dimension |
(various) |
Sally |
Yes |
Yes |
Yes |
|
subject area (1) |
Sales Quota |
Scott |
No |
Yes |
No |
|
subject area (2) |
Sales Revenue |
Sally |
Yes |
No |
No |
|
subject area (3) |
Sales Target |
Scott |
No |
No |
Yes |
|
variable |
S_Last_Load |
Sally |
Yes |
Yes |
Yes |
|
initialization block |
S_Last_Load |
Sally |
Yes |
Yes |
Yes |
|
application role (1) |
Sales Management |
Sally |
Yes |
Yes |
Yes |
|
application role (2) |
Sales Rep |
Sally |
Yes |
Yes |
Yes |
Table B-2 Initiative H Repository Objects Mapped to Projects and Owners
| Object Type | Object | Owner | ProjHR |
|---|---|---|---|
|
physical database |
Human Resources Data |
Helen |
Yes |
|
business model |
HR |
Helen |
n/a |
|
logical fact table (1) |
Payroll Facts |
Helen |
Yes |
|
logical fact table (2) |
Medical Ins Facts |
Helen |
Yes |
|
logical dimension |
(various) |
Helen |
Yes |
|
subject area (1) |
HR Payroll |
Helen |
Yes |
|
subject area (2) |
HR Medical |
Helen |
Yes |
|
variable |
H_Last_Load |
Helen |
Yes |
|
initialization block |
H_Last_Load |
Helen |
Yes |
|
application role (1) |
HR Management |
Helen |
Yes |
|
application role (2) |
HR Rep |
Helen |
Yes |
Phase I - Initiating Multiuser Development (MUD)
In the first phase, both Sally Andre and Scott Baker will develop in parallel. Sally will create the starter content, which Adam Straight will divide into projects. He will then create the MUD directory so that Sally and Scott can check out and perform their development. After unit testing, they merge and publish their changes, and then Adam migrates the repository to the test environment. After a bug fix cycle, Adam promotes the repository to production.
The following sections describe Phase I development:
-
First Developer Publishes Changes to the Master MUD Repository
-
Second Developer Publishes Changes to the Master MUD Repository
Starting Initiative S
Sally Andre starts off Initiative S from an empty RPD. Because it is easier to divide the repository into MUD projects if you define some logical stars and subject areas first, she begins by developing the physical model needed for Phase I. She includes connection pool details for her own local test data sources.
Tip: The physical model should include the physical tables, the best practice of aliasing all the physical tables to give them meaningful names, and joins.
Figure B-1 shows the physical model for Initiative S.
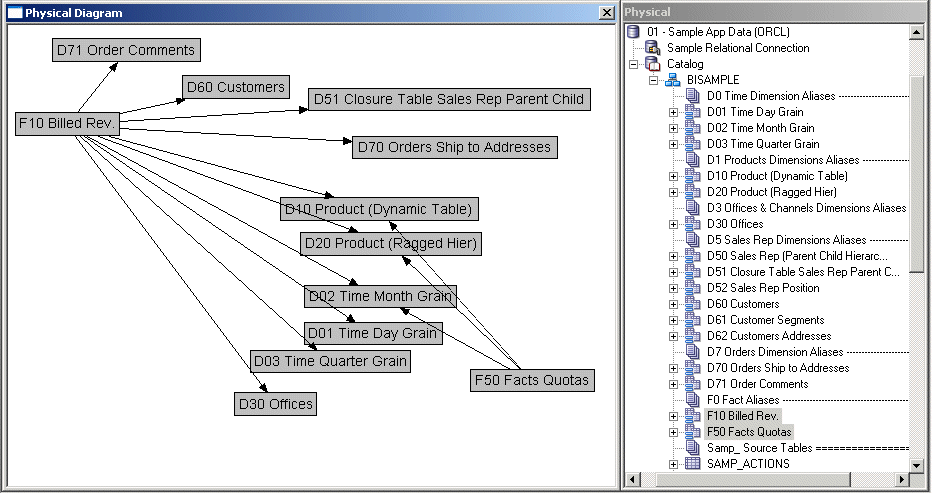
Sally drags the Physical layer to the Business Model and Mapping layer to create some starter content. She removes unneeded tables, and ensures that the star joins are correct. She also ensures that all the physical tables that will be needed during development have mappings from the starter logical tables, so that they will be included in the projects when they are checked out. For Sally, these steps create two logical fact tables, F10 Revenue and F50 Quotas, that can act as the basis for the projects.
Sally also needs to have some subject areas to map to the projects in the business model. She could drag the entire business model, but a convenient way to accomplish this is to instead right-click the business model and select Create Subject Areas for Logical Stars and Snowflakes. This feature creates a subject area from each logical fact table.
Sally does not need to be concerned about the contents of the subject areas yet. All that matters is that each subject area maps to the logical fact table for the same project. However, she does name the subject areas based on the plan agreed to in the governance meeting: Sales Quota and Sales Revenue.
Sally now has enough content for the MUD administrator to create the first two projects based on the Revenue and Quota fact tables. To review, Sally has made sure that she meets the following criteria at a minimum:
-
At least one logical fact table according to the governance plan, to anchor the projects. The columns of the logical fact tables need not be complete or even properly named, but they do need to be complete enough to map all the physical content.
-
Enough logical dimensions so that the repository will pass the consistency check.
-
Physical content that maps to one or more logical fact tables, so they will be included in projects.
-
The subject areas needed according to the governance plan.
Setting Up MUD Projects
The MUD administrator for Eden Corporation, Adam Straight, now handles the next few steps to create the projects and get them ready for checkout.
First, he creates the MUD directory, RPD_main, where the master RPD will be stored. This master RPD contains the superset of content for the developers. The users will check their projects out of the master, and merge them back in when they want to share their changes. Sally copies her started RPD to the master folder so that Adam can create the first two projects, ProjRevenue and ProjQuota.
First, Adam opens the master RPD in the Administration Tool and selects Manage > Projects. Then, in the Project Manager, he selects Action > New Project. Adam names the project "ProjRevenue" and proceeds to pick the logical fact tables at the center of the project. The top object in the list expands to show the logical fact tables, but he has a choice of seeing them grouped by the Business Model to which they belong, or by Subject Area.
Figure B-2 shows the different ways Adam can view the logical fact tables.
Figure B-2 Project Dialog with Facts Grouped by Business Model and Subject Area
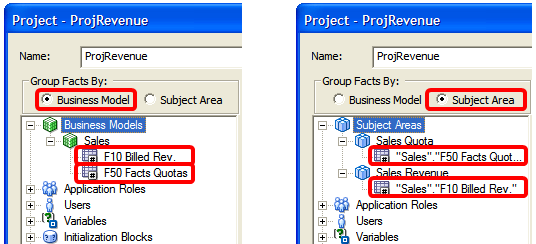
Description of ''Figure B-2 Project Dialog with Facts Grouped by Business Model and Subject Area''
Adam decides to group facts by Business Model for convenience, although he could have used the Subject Area grouping to select the same fact table. He adds the fact table, plus the default application roles and subject areas specified for this project. Because there are no custom-defined application roles, users, variables, or initialization blocks yet, he cannot yet add them to the project. Adam repeats this process for ProjQuota, the second project.
Tip: Note that some of the explicit objects are the same in both projects, because both projects share application roles. Similarly, many of the implicit project objects are shared, particularly dimension tables in both the logical and physical models. Keep in mind that projects are a convenience for creating small subsets that are easy to work with; they are not for security. It is critical in your governance process that the owner of each top-level object is assigned and documented for the whole team, because this enables developers to avoid conflicts.
Adam included the logical fact table F10 Bill Rev in the project, even though it is owned by Sally Andre, not by Scott Baker, the owner of this project. He did this because Scott needs to create a measure that derives from measures in both fact tables (Sales percent of quota). Again, the point is to provide the user with the subset of content they need to implement their requirements, not just the objects they own.
Adam saves the master RPD to the shared drive, RPD_Main, as "sales.rpd". It is now ready for users to check out projects and begin working in parallel.
First Developer Checks Out
Now, the two developers will set up their Administration Tool clients for the master repository, check out their projects, and begin working. Sally starts by setting up her Administration Tool client to use the master repository. To do this, she selects Tools > Options, and then selects the Multiuser tab. There, she sets up the pointer to the master repository directory. She also enters her full name, which will be useful in logs and locks. Next, she checks out her project and begins working on it.
Meanwhile, in the Master Repository directory, two new files have been created: sales.000 and sales.mhl. Figure B-3 shows the new files.
Figure B-3 Two New Files in the Master Repository Directory
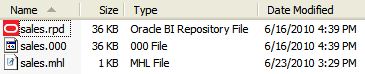
Description of ''Figure B-3 Two New Files in the Master Repository Directory''
The sales.000 file is an automatic backup created for sales.rpd when Sally checked it out. This file can be used to roll back if problems occur. The sales.mhl file tracks her checkout status and parameters, including project, computer, and user.
Meanwhile, three files have been created in Sally's local repository directory:
-
originalProjRevenue.rpd: This file is the project subset RPD at the time of checkout. It will be used later as the original in the three-way merge process, and also if Sally discards her changes.
-
ProjRevenue.rpd: This file contains only the self-consistent subset project (ProjRevenue). This is the file that is open for editing.
-
ProjRevenue.rpd.Log: This file is the log file for this editing session in the Administration Tool. You can view its contents in the Administration Tool using File > Multiuser > History.
Figure B-4 shows the three files in the local repository directory.
Figure B-4 Three New Files in the Local Repository Directory

Description of ''Figure B-4 Three New Files in the Local Repository Directory''
Now, Sally begins to work on the model for her application in offline mode. She does not need to change her connection pool settings because she used her own test data source connection pool details when she created the starter content.
Sally starts by opening her fact table and deleting the unused keys based on the modeling best practice. Then, she adds SUM aggregation rules to three measures, Discnt_Value, Revenue, and Units. She also changes the name of Discnt_Value to "Discount Amount," Units to "Units Sold," and Revenue to "Sales Revenue."
Sally also needs to add a new column to the D10 Product table, an upper-case version of the Prod_Dsc column called "PRODUCT DESCRIPTION." It uses the following expression: Upper("Sales"."D10 Product (Dynamic Table)"."Prod_Dsc"). She also adds dimension hierarchies, creates a variable called "Constant One", and initializes it to the value 1. She uses it to create a new measure, Constant One. Finally, she saves her work.
Sally starts her sandbox Oracle Business Intelligence stack so that she can add application roles, and then test her repository using Answers. She follows these steps to start her components in the right order and to configure her system environment:
-
Start the database containing the RCU schema, using its standard controls. This database is the local sandbox developer database.
-
Start the sandbox Oracle WebLogic Server Administration Server. For example, on Windows, select Start > Programs > Oracle WebLogic > User Projects > bifoundation_domain > Start Admin Server for WebLogic Server Domain and enter the user and password created during installation when prompted.
Note that if you used an Enterprise or Software-Only install type, you must also start the Oracle WebLogic Server Managed Server using the Oracle WebLogic Server Administration Console. Typically, you use the Simple install type when installing development sandboxes.
-
Log in to the local sandbox Fusion Middleware Control and upload the repository file, making sure to enter the correct repository password. You upload the local subset repository (in Sally's case, the MUD checked-out repository, ProjRevenue.rpd), not the master repository.
-
Also in Fusion Middleware Control, turn off Oracle BI Server caching, so that interpreting the query log is simpler.
-
Still in Fusion Middleware Control, start the system components from the Business Intelligence Overview page.
Oracle Fusion Middleware System Administrator's Guide for Oracle Business Intelligence Enterprise Edition provides more information about steps 2 - 5.
Because Sally's Oracle BI Server is on a Linux system, she must set up ODBC connectivity on her Windows computer so that her Administration Tool client can access the BI Server there.
Sally manually adds an Oracle BI Server ODBC DSN pointing to the Oracle BI Server on the Linux computer. See "Integrating Other Clients with Oracle Business Intelligence" in Oracle Fusion Middleware Integrator's Guide for Oracle Business Intelligence Enterprise Edition for information about how to create an ODBC DSN for the Oracle BI Server.
Sally is using the Oracle WebLogic Server embedded policy store and needs to add two application roles, "Sales Management" and "Sales Rep." To add the roles, she opens a Web browser on her Windows computer and logs in to Fusion Middleware Control (pointing to her Oracle Business Intelligence stack on Linux). She uses Fusion Middleware Control to create the new roles, maps it to the appropriate users, groups, or other roles, and grants the appropriate permissions to the role.
Tip: See "Creating an Application Role" in Oracle Fusion Middleware Security Guide for Oracle Business Intelligence Enterprise Edition for more information.
Next, Sally needs to add the new application roles to her repository, and then use them for object permissions and data access filters. To accomplish this, Sally does the following:
-
Sally opens the Administration Tool and selects File > Open > Online. She picks the local Windows ODBC DSN that connects to her local Oracle Business Intelligence stack, enters her repository password, and also enters the default user name and password for administering her stack that she created upon install.
-
Next, Sally selects Manage, and then selects Identity to open the Identity Manager. She clicks BI Repository in the navigation tree and then clicks the Application Roles tab. She sees the five default application roles, as well as the new ones she just created.
-
Sally double-clicks the Sales Rep application role, and then clicks Permissions. On the Data Filters tab, she adds a data filter with an expression that only allows users who belong to this role to see sales that they themselves have made. On the Object Permissions tab, she sets Read, Read/Write, or No Access permissions that allow Sales Rep users to see revenue, but not quota or cost information. On the Query Limits tab, she keeps the defaults for Max Rows and Max Time, and does not set any time restrictions. She clicks OK to return to the Identity Manager.
-
Next, Sally double-clicks the Sales Management application role and sets up Data Filters, Object Permissions, and Query Limits appropriate for this role, based on the decisions of the governance committee.
-
Finally, Sally exits the Identity Manager.
-
Sally commits the changes she made in online mode by using the Check In Changes menu option. Note that this action propagates the online mode changes to her local subset repository (ProjRevenue.rpd), but does not commit them to the master MUD repository. Sally will publish her changes to the master repository in a later step.
For the new variable and application roles to be in Sally's project the next time she checks it out, she must add them to the project before she checks in her changes. To do this, she performs the same steps that Adam did when he created the projects: She selects Manage > Projects, selects her project, selects the new objects in the left pane, and clicks Add.
Second Developer Checks Out
While Sally Andre is working on the ProjRevenue project, Scott Baker is getting started on ProjQuota. He set up his Administration Tool options for MUD, checked out his project, and started working.
Scott prefers to work in online mode. Doing this tightens the development/unit test loop, because he is modifying the repository while it is running in the Oracle BI Server. Every time he clicks Check In Changes in the Administration Tool toolbar, his changes are applied to the running server. He can then immediately move to Answers and test the changes there. Note that when he adds, deletes, renames, or reorganizes Presentation layer objects, he must reload metadata in the Answers criteria tab to refresh the tree visible there.
First, Scott starts his local Oracle Business Intelligence stack, and uploads his checked-out subset repository. He restarts the Oracle BI Server, opens the Administration Tool, and opens his repository in online mode.
Scott must change the connection pool settings to point to his local test database, because the master repository contains Sally's settings. Note that in the merge process, these connection pool changes will be overridden by the connection pools already in the master repository. Therefore, the next time Scott checks out, he will need to apply his local test connection pool changes again.
Tip: Use the Oracle BI Server XML API to automate connection pool changes required during migrations to production and other environments. See "Moving from Test to Production Environments" in Oracle Fusion Middleware XML Schema Reference for Oracle Business Intelligence Enterprise Edition for more information.
Scott's next task is to clean up his logical fact table by removing keys. He also gives a measure a SUM aggregation rule and a business-friendly name (Quota Amount).
Scott does not change anything in the F10 logical table because it is owned by Sally. After she merges and publishes her changes to the master RPD, he will do the same. Then he will check out again, picking up her changes.
Next, Scott adds a new measure called "Sales percent of quota" to the F50 table. It derives from both fact tables with the following expression:
"Sales"."F10 Billed Rev."."Revenue" / "Sales"."F50 Facts Quotas"."Quota Amount"
Note that even if Sally changes the name of Revenue in her project, the merge will identify it as the same object and use the new name in Scott's expression. The merge logic can identify the name change because the upgrade ID of the object is still the same as the original.
Finally, Scott forgets what he learned in the Governance Committee meeting, that all the dimensions are owned by Sally. He has a requirement for an all-capitals version of the D10 Product.Prod_Dsc column called PRODUCT DESCRIPTION. He creates a column identical to the one Sally created. This mistake will be detected and resolved through the merge process during the publishing step in a few moments.
Scott does not need to upload his repository and restart his system because he is working in online mode. Instead, he unit tests his work immediately after committing his changes using Check In Changes. Meanwhile, Sally has finished testing her changes.
First Developer Publishes Changes to the Master MUD Repository
Sally has finished creating and unit testing her first batch of changes, so she saves her work and prepares to merge it into the master repository. She chooses File > Multiuser > Publish to Network. If she forgot to add any new objects to a project, a detailed warning is displayed so that she can add the objects to her project and try the merge again. Otherwise, the objects are not extracted the next time she checks out the project.
Next, the Administration Tool locks the master repository so that Sally can merge her changes without any chance of corruption from other users' merges.
Tip: For logging purposes, it is a best practice to use the comment field to provide a description of the changes you are publishing. Publishing frequently, or performing a subset refresh, also makes it easier to keep track of changes, and easier to audit the history later. Finally, it is a best practice in Administration Tool modeling to work incrementally, which simplifies testing and reduces the complexity of each task.
Sally's changes cause no conflicts, so they do not appear in the Define Merge Strategy step that is displayed next. However, aliases for presentation objects are a special case where you can choose to keep either the modified (your local version) or current (the master), or merge the two. The aliases were automatically created when Sally changed the column names, so that reports written to the old names would not break when she put the new names into production. Because Eden Corporation has no reports yet, Sally keeps the aliases empty by selecting Current. She does this for "Sales Revenue," "Units Sold," and "Discount Amount."
Tip: Sometimes, there can be a series of aliases if names change more than once. Because there might be a set of reports using the older names, you can select Merge Choices in the Define Merge Strategy screen to keep any aliases already in Current as well as the new ones in Modified.
When the merge step is complete, the master sales.rpd is overwritten with the changes from Sally. A merge log is also stored.
Second Developer Publishes Changes to the Master MUD Repository
Now that Scott has completed his development work for this phase, he selects File > Multiuser > Refresh Subset to perform a subset refresh to merge his changes with the latest version of the master repository. The Define Merge Strategy screen asks whether to keep the alias created on the presentation column "Quota Amount." Like Sally, Scott chooses to keep the current repository value, which does not use the alias.
After the subset refresh, Scott unit tests again briefly. Upon inspection, he also notices his mistake of creating the same PRODUCT DESCRIPTION column that Sally did. Because Scott's column was created separately, its internal upgrade ID is different than the one in Sally's. Therefore, even though the name is the same, the merge logic knows it is a different column, and renames it rather than overwriting it by appending #1 (PRODUCT DESCRIPTION#1).
Scott deletes the extra column, connects his logic to Sally's PRODUCT DESCRIPTION column, tests again briefly, and publishes his changes to the network master repository.
Note that if Scott had deleted or modified a different user's object, the error might have been more difficult to resolve. It might have required re-creating and equalizing the object, or rolling back to a backup version of the repository and re-creating his own changes.
MUD Administrator Test Migration Activities
To prepare the repository for the test environment, the MUD administrator, Adam Straight, must now perform several tasks directly on the master repository. In other words, he will use File > Open > Offline rather than File > Multiuser > Checkout.
Adam begins by opening the Administration Tool and then opening sales.rpd in offline mode. As soon as he does this, other users are locked out, and will get Windows permissions errors if they try to check out projects. If Adam needed to open and close the file several times, he would need to remove the RPD from the shared directory while modifying it elsewhere, so that other users would not be able to check out between his changes.
Adam changes the connection pool settings to match the test environment. Note that when Administration Tool users check out projects, connection pool parameters are not included in the checkout. Usually, the master repository in the MUD directory contains the test connection pools, but each individual developer might need different settings for connecting to their own test databases. At merge and publish, the connection pools in the master repository are not overwritten by developer changes, so that they can continue to point at the shared test databases.
Adam must also ensure that the new application roles are migrated to the test system. Because there are only two, he decides to reenter them in Fusion Middleware Control on the test system. Adam also provisions some test users or groups to the new application roles so the security filters, permissions, and query limits can be tested.
Finally, Adam uploads the repository to the test system and restarts the Oracle BI Server. Using his local Administration Tool, he connects to the test Oracle BI Server in online mode and runs the consistency checker. If any application roles referenced by this repository are missing or incorrect, the consistency checker will list errors for them.
Phase I Testing
The test team can now test the repository. During testing, the test team discovers a bug: "Sales"."F50 Facts Quotas"."Sales percent of quota" was erroneously created with the expression quota/sales instead of sales/quota. The test team writes a bug report, and Scott Baker is assigned to fix the bug.
Scott opens the Administration Tool, checks out ProjQuota, makes the change, changes the connection pool to point to his local test database, and tests on his own sandbox. Then he publishes the changes to the shared MUD directory. He informs Adam that the bug is fixed and that the repository is ready for him to send to test again.
Adam notes that the connection pools are still pointed at the correct test system, because the MUD feature isolates the master repository from connection pool changes in checked out projects. Adam uploads the repository, and restarts the Oracle BI Server.
The test team tests to completion, and the repository is cleared for production.
Phase I Migration to Production
After the repository has passed the testing phase, it needs its database connection parameters updated and can then be uploaded to production. Also, the application roles must be migrated and provisioned.
Based on the plan provided by the governance team, the production operations team knows the new application roles needed. They create them as Adam did for the test environment. They also provision users or groups to those application roles, based on the security specification from the governance team.
Before migrating to production, Adam has to change the connection pool parameters to the values needed for the production database. In Eden Corporation, Adam has the privilege to see the production connection pools, but the repository developers do not. Therefore, Adam cannot change from the test to production connection pools and leave the repository in the master directory, because the developers have Windows permissions to read and write to it. Instead, he creates an XML patch of the connection pools needed for Production. Then, he copies sales.rpd to a secure directory and applies the patch, and then tests to be sure it really does connect to the production data sources. He then uploads the repository to the production system, and starts the production cluster of servers.
Tip: Use the Oracle BI Server XML API to automate connection pool changes required during migrations to production and other environments. See "Moving from Test to Production Environments" in Oracle Fusion Middleware XML Schema Reference for Oracle Business Intelligence Enterprise Edition for more information.
Because the master repository still points to the test databases, the Administration Tool users can still be allowed to see it. Meanwhile, new versions of the production repository can be built at any time by applying the connection pool changes in the XML patch file.
Production validations are now performed. Similar to the migration to the test system, an important validation is to run the consistency checker in online mode to ensure that the application roles are all correct. When this validation is complete, Phase I is in production.
Phase I Summary
Figure B-5 shows the parallel activities for Phase I.
Figure B-5 Summary of Phase I Activities
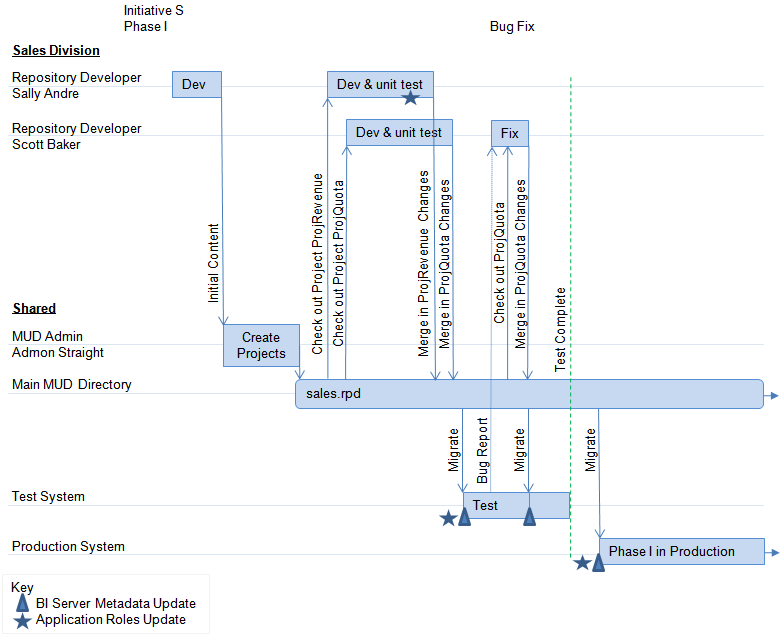
Description of ''Figure B-5 Summary of Phase I Activities''
Phase II - Branching, Fixing, and Patching
In Phase II, development will continue on a new Phase II branch, while a Main branch will track the production application. To manage this work, Adam will add a branch project, and set up a second master repository shared directly, one for Main, and one for the new Phase II branch.
Sally will add more content to ProjRevenue. While she works on that, Scott will add brand new content. After Scott merges and publishes, Adam will create the new project, ProjTarget, and move Scott's new content into it. Meanwhile, they will have to handle any bugs that occur in production, which is still on the main sales.rpd branch.
The following sections describe Phase II development:
Setting Up the Second Branch
Adam begins by creating another MUD directory to hold the master for the new branch. He sets the Windows share security so that Sally and Scott can read or write to it.
Next, Adam places the main repository into the main MUD directory. He adds a new project for the branch, which encompasses all the existing functionality. Then, he closes the repository, and checks out the branch project in his local Administration Tool repository folder. He copies it to the branch MUD directory, where it now serves as the master for the branch.
Developers Check Out Projects
Sally and Scott check out their projects again, and begin developing Sales Initiative Phase II in parallel with each other, and in parallel with Phase I being in production. Because Scott is adding new content that will become a new project, he needs to check out one or more other projects that will provide the shared objects to which he needs to map or join in the new content. He chooses to check out ProjQuota.
Patch Fix for the Main Branch
While Sally and Scott are developing Phase II, an urgent CEO request is escalated to them. The CEO wants the key sales managers to see a new measure called "Sales Quota Variance" on their dashboards within two days.
Scott closes his work on the new project on the Phase II branch; it will stay checked out. Then, he checks out the project that will contain the new measure, ProjQuote, from the main branch master repository (sales.rpd). He creates the new measure and corresponding presentation column, tests it locally, and publishes the changes back to the main branch.
Scott then reopens the checked-out Phase II repository from his local drive and continues development.
Meanwhile, Adam sends the new sales.rpd to the test environment, where the test team validates the fix.
Next, Adam prepares to send the fixed repository to Production. Rather than send the entire repository, however, he sends a patch of the change.
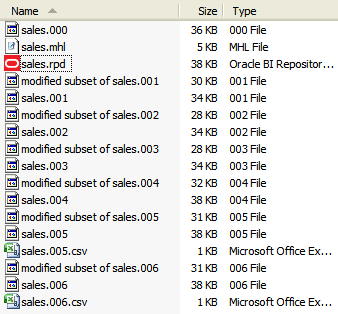
To create the patch, Adam compares the modified repository to the one that is currently running in production. The repository running in production is the same as the main repository just before the new changes were merged in, so it is one of the backup repositories in the MUD directory. The current repository running in production is the backup called sales.006, the same one he identified as the original for the upcoming branch merge. He copies this to sales.006.rpd so the Administration Tool can see and open the file. (He cannot simply rename it, because it may be needed for another merge later.)
Figure B-6 shows the files in the MUD directory, including sales.rpd and sales.006.
Figure B-6 Renaming sales.006 to sales.006.rpd
Description of ''Figure B-6 Renaming sales.006 to sales.006.rpd''
Next, Adam opens the repository containing the update, sales.rpd. He selects File > Compare, and chooses the sales.006.rpd as the old version to compare. The Compare repositories dialog shows the differences between versions that will be included in the patch.
Figure B-7 shows the Compare repositories dialog.
Figure B-7 Compare Repositories Dialog for sales.rpd and sales.006.rpd
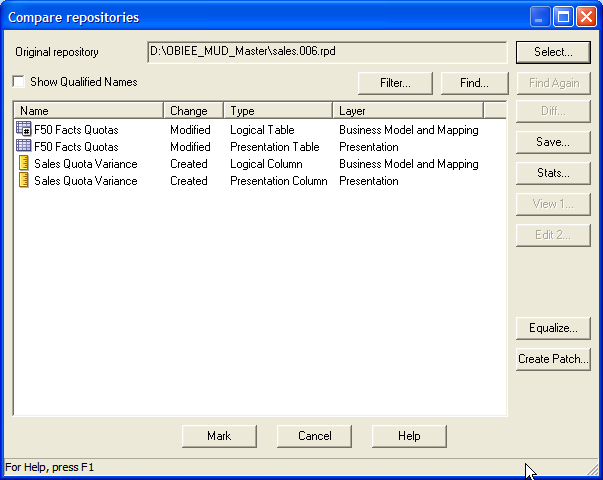
Description of ''Figure B-7 Compare Repositories Dialog for sales.rpd and sales.006.rpd''
Next, Adam clicks Create Patch and saves the result as Patch_variance.xml. The patch contains just the objects needed to apply the two new columns, and their associated interconnections.
Tip: More complex patches might also delete objects, or overwrite objects to merge in new property values.
Adam's patch appears as follows:
<?xml version="1.0" encoding="ISO-8859-1"?>
<Repository xmlns:xsi="http://www.w3.org/2001/XMLSchema-instance">
<DECLARE>
<LogicalTable name="F50 Facts Quotas" parentName=""Sales""
parentId="2000:68667" parentUid="2160843965" id="2035:69454" uid="2160843966"
x="718" y="288">
<Description/>
<Columns>
<RefLogicalColumn id="2006:69460" uid="2160844041"
qualifiedName=""Sales"."F50 Facts Quotas"."Quota
Amount""/>
<RefLogicalColumn id="2006:69786" uid="2160845070" qualifiedName=
""Sales"."F50 Facts Quotas"."
Sales percent of quota""/>
<RefLogicalColumn id="2006:70033" uid="2160845342" qualifiedName=
""Sales"."F50 Facts Quotas"."
Sales Quota Variance""/>
</Columns>
<TableSources>
<RefLogicalTableSource id="2037:69456" uid="2160844747"
qualifiedName=""Sales"."F50 Facts Quotas"."
F50 Facts Quotas""/>
</TableSources>
</LogicalTable>
<LogicalColumn name="Sales Quota Variance" parentName=
""Sales"."F50 Facts Quotas"" parentId="2035:69454"
parentUid="2160843966" id="2006:70033" uid="2160845342" isDerived="true"
isWriteable="false">
<Description><![CDATA[quota - sales]]></Description>
<Expr><![CDATA["Sales"."F50 Facts Quotas"."Quota Amount" - "Sales".
"F10 Billed Rev."."Sales Revenue" ]]></Expr>
</LogicalColumn>
<PresentationTable name="F50 Facts Quotas" parentName=
""Sales Quota"."""
parentId="4004:69706" parentUid="2160844968" id="4008:69707"
uid="2160844969" hasDispName="false" hasDispDescription="false">
<Description/>
<Columns>
<RefPresentationColumn id="4010:69711" uid="2160844973" qualifiedName=
""Sales Quota".."F50 Facts Quotas"."
Quota Amount""/>
<RefPresentationColumn id="4010:70032" uid="2160845338" qualifiedName=
""Sales Quota".."F50 Facts Quotas"."
Sales percent of quota""/>
<RefPresentationColumn id="4010:70036" uid="2160845345" qualifiedName=
""Sales Quota".."F50 Facts Quotas"."
Sales Quota Variance""/>
</Columns>
</PresentationTable>
<PresentationColumn name="Sales Quota Variance" parentName="
"Sales Quota".."F50 Facts Quotas"" parentId=
"4008:69707" parentUid="2160844969" id="4010:70036" uid="2160845345"
hasDispName="false" hasDispDescription="false" overrideLogicalName="false">
<Description><![CDATA[quota - sales]]></Description>
<RefLogicalColumn id="2006:70033" uid="2160845342" qualifiedName=
""Sales"."F50 Facts Quotas".
"Sales Quota Variance""/>
</PresentationColumn>
</DECLARE>
</Repository>
Tip: Unlike migrating an entire repository, there is no need to make any connection pool changes before applying this patch. The correct connection pool settings are already in the repository running in production. The patch will not affect this logic, so the connection pools will stay correct without an intervention.
Finally, Adam must have this patch migrated and applied to the production system. There are several ways to accomplish this:
-
Patch main repository offline and upload. Adam can apply the patch to a copy of the production repository locally on his Windows computer by using the Administration Tool to perform a patch merge. Then, he can upload the repository to the production system, like Sally did earlier in her sandbox. Because the production system is clustered, he must restart all the Oracle BI Servers after uploading the repository. Adam can restart manually through Fusion Middleware Control, one server at a time. If he performs a rolling restart in this way, end users do not see any unavailability. Alternatively, Adam or one of the operations staff can write a script using the BI Systems Management API to automate a rolling restart.
-
Patch production repository in place using patchrpd utility: The operations staff can log onto a production system directly, and apply the XML patch using the
patchrpdutility. Note that if any conflict occurs, the utility will cancel the update and exit without making changes. If the update is successful, the operations staff can then perform a rolling restart, as described in the previous paragraph. -
Patch running system using biserverxmlcli utility: This method is not recommended for production systems.
Tip: If you have privileges to log on to a production Oracle BI Server using the Administration Tool in online mode, you can use File > Copy As to copy it to your local drive.
Finishing and Merging Phase II Branch
Sally and Scott complete their changes in the new branch and publish them.
Adam now adds Scott's new content to a new project, projTarget. He performs the same steps as before to send the branch repository to the testing team.
When testing is complete, the branch must be merged back into the main branch using MUD merge. Doing this merges the production patch with the newly developed content, so that can be moved to production later.
Now, sales.rpd contains all the changes, and the branch is no longer needed. Sales.rpd is sent to integrated test, to ensure the merged content does not cause any bugs in the existing content. When integrated testing is complete, Adam creates another patch containing the changes, and has the operations staff apply it to the running production system. Sales Initiative Phase II is now in production.
Phase II Summary
Figure B-8 shows the parallel activities for Phase II.
Figure B-8 Summary of Phase II Activities
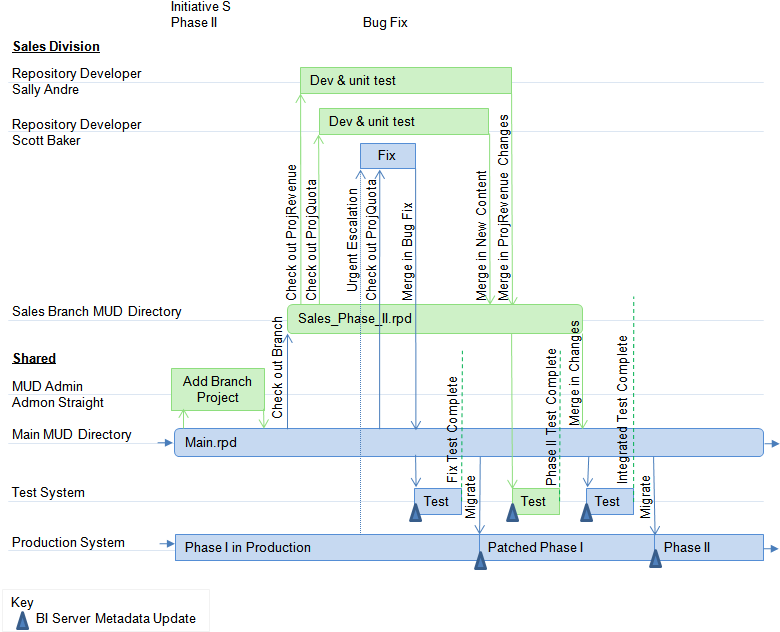
Description of ''Figure B-8 Summary of Phase II Activities''
Phase III - Independent Semantic Model Development
In the next phase, Sally and Scott begin development of Phase III of the Sales initiative. Meanwhile, Helen Rowe builds the first phase of the HR initiative and brings this new independent semantic model into production.
The following sections describe Phase III development:
Security Considerations for Multiple Independent Semantic Models
Helen's application has highly sensitive personal information, such as salaries and medical information. Meanwhile, the Sales application has legally sensitive financial information. Due to corporate security compliance, these two teams are not allowed to see each other's data or metadata. They also have little content they could share, other than generic dimensions like time dimensions. Finally, they have different business drivers, budgets, and schedules.
For these reasons, the Eden Corporation governance committee decided to use independent semantic models in the repository: one for Sales, and the other for HR. This approach requires the two teams to ensure that there are not any shared objects, and there can be no conflicts between their content. The easiest way to ensure this is to make sure that the names for all top-level objects do not conflict. Even variables and application roles must be different.
Tip: Some governance committees ensure that top-level objects do not conflict by requiring developers to put a prefix specific to each semantic model before the name of each top-level object, such as S_ for Sales and H_ for HR. This practice makes it easy to see which objects belong to which organizations. Other committees prefer to keep a master list of top-level objects, and require new applications to submit top-level object names for review to ensure there are no conflicts. In addition, two-way merges can catch any mistakes before overwrites can damage content or cause unexpected object name changes.
Another security requirement is the need to apply security to the separate MUD directories so that only the correct developers have access to each repository. Sally and Scott can only see and check out from the Sales MUD directory, and Helen can only see and check out from the HR MUD directory. The Main directory continues to exist, since it must hold the merged master that is actually in production, but now only Adam has privileges to see or modify that directory.
At Eden Corporation, a final security requirement is to disable the ability for independent semantic model developers to access the running repository in online mode after the merge. There is only a single repository password, so a developer who has the password and access to the repository can see and modify all its contents in offline mode. However, in online mode, the developer also needs a data access user name and password to log on to the Oracle BI Server. To enforce this security requirement, Adam must ensure that the developers have no privileges to log on to the production or test system in this way. Alternatively, the production operations staff can change the repository password to one that only they know, but this task must be performed on a Windows computer because repository passwords are changed using the Administration Tool.
Sales Semantic Model Developers Check Out
Sally and Scott check out their projects from the new, secure sales branch MUD directory. They begin their work.
HR Semantic Model Developer Builds Content
Because Helen is working alone on her secure, independent semantic model, she does not yet need to check out a project. In fact, she needs to start building her content from a new, blank repository on her local computer. She follows the usual steps of building and unit testing content incrementally.
When she is done with unit testing, Helen has a complete, free-standing repository. She sends it to Adam, who manually updates the master repository or performs a two-way merge in a separate location. Adam uses one of the following merge methods:
Manually updates the repository
-
First, Adam equalizes the two repositories to reassign IDs honoring the different names given to the top-level objects. This practice ensures that there will be no conflicts during the merge.
-
Next, Adam copies the master repository out of the MUD directory and into a local directory, performs the required manual updates to add the contents of Helen's repository into the master repository, and then copies the master repository back into the master directory.
Performs a two-way merge in a separate location
-
First, Adam equalizes the two repositories to reassign IDs honoring the different names given to the top-level objects. This practice ensures that there will be no conflicts during the merge.
-
Next, Adam copies the master repository out of the MUD directory and into a local directory, performs a two-way merge by using the Merge Repository Wizard, and then copies the master repository back into the master directory.
Tip: To create a blank repository, select File > New Repository. Then, provide a name (such as blank.rpd) and a repository password. Choose No for Import Metadata and then click Finish.
After the merge, Adam creates a new project for managing the content going forward, hr_payroll. He adds Helen's content to the project. Adam then checks it out of main and posts it to the HR Branch MUD directory. Using a project checkout makes managing IDs and merges easier later.
Adam adjusts connection pool parameters, and migrates the repository to the test computer. When a bug is found, Helen checks out the hr_payroll project, fixes it, unit tests it, and publishes it. (Note that she checks her functional project out of the checked-out branch project.) Adam migrates it to the test system for further testing. When testing is complete, he merges the completed HR branch repository back into the main branch, and sends the integrated repository to integration testing on the test system.
When the integrated repository completes testing, it is ready for migration to production. Again, the options are complete repository migration, or applying a patch to the production environment using patchrpd. Both methods require a rolling restart.
After this step, the production repository contains content for both Initiative S and Initiative H.
Phase III Summary
Figure B-9 shows the parallel activities for Phase III.
Figure B-9 Summary of Phase III Activities
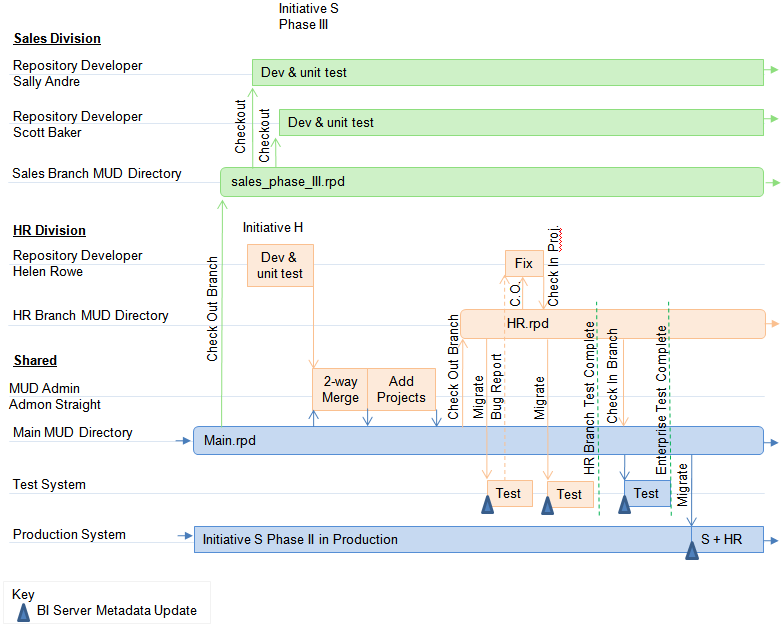
Description of ''Figure B-9 Summary of Phase III Activities''