2 Managing Security Using a Default Security Configuration
This chapter explains how to deploy Oracle Business Intelligence security using the embedded WebLogic LDAP Server with the sample application.
Note:
For a detailed list of security setup steps, see Section 1.7, "Detailed List of Steps for Setting Up Security in Oracle Business Intelligence".By deploying the default embedded WebLogic LDAP Server with the sample application, you can use its default users, groups, and application roles. You can also develop your own users, groups, and application roles.
This chapter contains the following sections:
-
An Example Security Setup of Users, Groups, and Application Roles
-
Managing Users and Groups in the Embedded WebLogic LDAP Server
-
Managing Application Roles and Application Policies Using Fusion Middleware Control
-
Managing Metadata Repository Privileges Using the Oracle BI Administration Tool
-
Managing Presentation Services Privileges Using Application Roles
-
Managing Data Source Access Permissions Using Oracle BI Publisher
-
Enabling High Availability of the Default Embedded Oracle WebLogic Server LDAP Identity Store
You can migrate users (with their encrypted passwords), groups, roles and policies from the embedded WebLogic LDAP server and into another one. For more information, see "Exporting and Importing Information in the Embedded LDAP Server" in Oracle Fusion Middleware Securing Oracle WebLogic Server.
2.1 Working with Users, Groups, and Application Roles
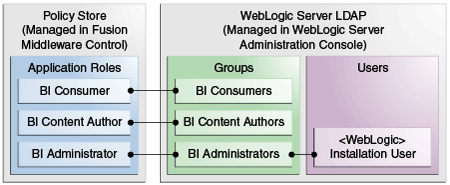
When you configure Oracle Business Intelligence with the Sample Application made available with the BI installation a number of application roles are provided for you to use in order to provision users and groups to be able to use BI functionality and access BI folders, reports, data columns and other objects. For example, following a fresh installation of Oracle BI Enterprise Edition, if you have selected to populate your initial service instance using the sample application, the user specified for creating the BI domain during the configuration step will be assigned to an application role named BIServiceAdministrator. In addition to the BIServiceAdministrator application role, the from the sample application, these sample application roles have been preconfigured to work together. For example, a user who is a member of the BIServiceAdministrator application role will automatically inherit the BIContentAuthor and BIConsumer application roles and will therefore be provisioned with all the privileges and permissions associated with all of these application roles. For a detailed description of this security configuration, refer to Appendix B, "Understanding the Default Security Configuration".
The sample application roles have appropriate permissions and privileges to enable them to work with the sample Oracle BI Presentation Catalog, BI Repository, and Policy Store. For example, the application role BIContentAuthor is preconfigured with permissions and privileges that are required to create dashboards, reports, actions, and so on.
Figure 2-1 shows application roles, groups and users that are preconfigured in the sample and starter applications installation.
When you initially configure your BI domain, a service instance is created based on one of the BI application archive (BAR) files that are included with the BI installation. Each BI application contains an application role that is tagged as the administration application role. The name of this administration application role is determined by the developer or author of the BI application archive. In the case of the sample, starter and empty applications available with the BI installation this administration application role is called BIServiceAdministrator. The authors of these applications have assigned specific permission sets and privileges to this application role to enable members of this application role to administer the system. When the BI service instance is created the BI system adminstrator specifies an owner (a user) for the service instance. The system will assign the administration application role to the service instance owner whenever a BI archive file is imported into the service instance.
Note:
When importing an 11g upgrade bundle into a 12c service instance, the system will automatically tag the application role 'BIAdministrator' as the administration application role.For more information, see Oracle Fusion Middleware Installation Guide for Oracle Business Intelligence and "importServiceInstance" in Oracle Fusion Middleware System Administrator's Guide for Oracle Business Intelligence Enterprise Edition.
You can use the sample application roles to deploy security. You can then create your own groups and application roles to meet your business needs. For example:
-
If you want to enable an employee called Fred to create dashboards and reports, you might create a new user called Fred and assign Fred to the default BIContentAuthors group.
-
If you want user Fred to be a Sales dashboard author, you might create an application role called Sales_ Dashboard_ Author that has permissions to see Sales subject areas in the repository and edit Sales dashboards.
-
If you want to enable user Fred to perform BIContentAuthors and Sales_Dashboard_Author duties, you might create a new application role called BIManager, which has both BIContentAuthors privileges and Sales_Dashboard_Author privileges.
For detailed information about the sample application roles, see Appendix B, "Understanding the Default Security Configuration."
2.2 An Example Security Setup of Users, Groups, and Application Roles
This example uses a small set of users, groups, and application roles to illustrate how you might set up a security model. In this example, you want to implement the following:
-
Three users named User1, User2, and User3, who need to view business intelligence reports.
-
Two users named User4 and User5, who need to create business intelligence reports.
-
Two users named User6 and User7, who administer Oracle Business Intelligence.
Figure 2-2 shows the users, groups, and application roles that you would deploy to implement this example security model.
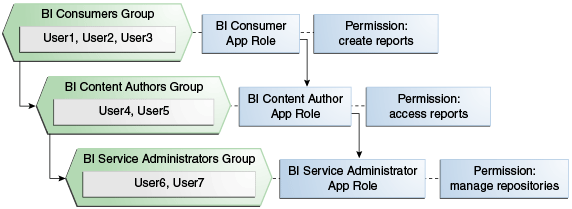
Figure 2-2 shows the following:
-
The group named BIConsumers contains User1, User2, and User3. Users in the group BIConsumers are assigned to the application role named BIConsumer, which enables the users to view reports.
-
The group named BIContentAuthors contains User4 and User5. Users in the group BIContentAuthors are assigned to the application role named BIContentAuthor, which enables the users to create reports.
-
The group named BIServiceAdministrators contains User6 and User7. Users in the group BIServiceAdministrators are assigned to the application role named BIServiceAdministrator, which enables the users to manage repositories.
To implement this example security model:
-
Create seven users named User1 to User 7, as described in Section 2.3.2, "Creating a New User in the Embedded WebLogic LDAP Server".
-
Create the groups BIConsumers and BIContentAuthors and BIServiceAdministrators as described in Section 2.3.3, "Creating a New Group in the Embedded WebLogic LDAP Server".
-
Assign the users to the default groups, as follows:
-
Assign User1, User2, and User3 to the group named BIConsumers.
-
Assign User4 and User5 to the group named BIContentAuthors.
-
Assign User6 and User7 to the group named BIServiceAdministrators.
For more information, see Section 2.3.4, "Assigning a User to a Group in the Embedded WebLogic LDAP Server".
-
-
Assign the groups to the sample application roles as follows:
-
Make the BIConsumers group a member of the BIConsumer application role.
-
Make the BIContentAuthors group a member of the BIContentAuthor application role.
-
Make the BIServiceAdministrators group a member of the BIServiceAdministrator application role.
For more information, see Section 2.4.2.3, "Assigning a Group to an Application Role".
-
2.3 Managing Users and Groups in the Embedded WebLogic LDAP Server
This section explains how to manage users and groups in the Embedded WebLogic LDAP Server, and contains the following topics:
-
Section 2.3.1, "Assigning a User to a New Group, and a New Application Role"
-
Section 2.3.2, "Creating a New User in the Embedded WebLogic LDAP Server"
-
Section 2.3.3, "Creating a New Group in the Embedded WebLogic LDAP Server"
-
Section 2.3.4, "Assigning a User to a Group in the Embedded WebLogic LDAP Server"
-
Section 2.3.5, "(Optional) Changing a User Password in the Embedded WebLogic LDAP Server"
2.3.1 Assigning a User to a New Group, and a New Application Role
This section describes how to extend the security model by creating your own users, and assigning them to new groups, and new application roles.
For example, you might want to create a user called Jim and assign Jim to a new group called BIMarketingGroup that is assigned to a new application role named BIMarketingRole.
To create a new user and assign the user to a new group and a new application role:
-
Launch WebLogic Administration Console as described in Section 1.6.1, "Using Oracle WebLogic Server Administration Console".
-
Create a new user as described in Section 2.3.2, "Creating a New User in the Embedded WebLogic LDAP Server".
-
Create a new group as described in Section 2.3.3, "Creating a New Group in the Embedded WebLogic LDAP Server".
-
Assign the new user to the new group as described in Section 2.3.4, "Assigning a User to a Group in the Embedded WebLogic LDAP Server".
-
Create a new application role and assign it to the new group as described in Section 2.4.2.2, "Creating an Application Role".
If you simply want to assign a group to an application role, follow the steps in Section 2.4.2.3, "Assigning a Group to an Application Role".
-
Edit the Oracle BI repository and set up the privileges for the new application role as described in Section 2.5.2, "Setting Repository Privileges for an Application Role".
-
Edit the Oracle BI Presentation Catalog and set up the privileges for the new user and group as described in Section 2.6.3, "Setting Presentation Services Privileges for Application Roles".
2.3.2 Creating a New User in the Embedded WebLogic LDAP Server
You typically create a separate user for each business user in your Oracle Business Intelligence environment. For example, you might plan to deploy 30 report consumers, 3 report authors, and 1 administrator. In this case, you would use Oracle WebLogic Server Administration Console to create 34 users, which you would then assign to appropriate groups.
Repeat this task for each user that you want to deploy.
Note:
About the built-in Authenticated User application role.All users who are able to log in are given a basic level of operational permissions conferred by the built-in Authenticated User application role. . The author of the BI application that is imported into your service instance may have designed the security policy so that all authenticated users are members of an application role that grants them privileges in the BI application. For more information, see Appendix B, "Security Configuration Using the Sample Application"
.
To create a new user in the embedded WebLogic LDAP server:
-
Log in to the Oracle WebLogic Server Administration Console.
For more information, see Section 1.6.1, "Using Oracle WebLogic Server Administration Console".
-
In Oracle WebLogic Server Administration Console, select Security Realms from the left pane and click the realm you are configuring. For example, myrealm.
-
Select Users and Groups tab, then Users. Click New.
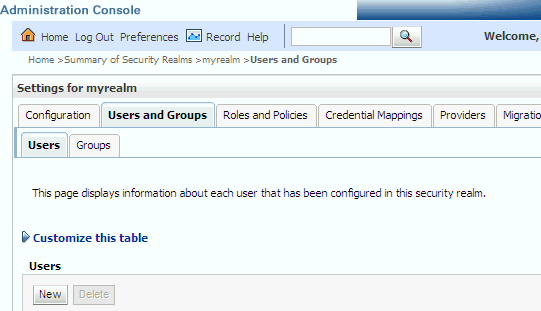
Description of the illustration ''wls_usertab.gif''
-
In the Create a New User page provide the following information:
-
Name: Enter the name of the user. See the online help for a list of invalid characters.
-
(Optional) Description: Enter a description.
-
Provider: Select the authentication provider from the list that corresponds to the identity store where the user information is contained. DefaultAuthenticator is the name for the default authentication provider.
-
Password: Enter a password for the user that is at least 8 characters long.
-
Confirm Password: Re-enter the user password.
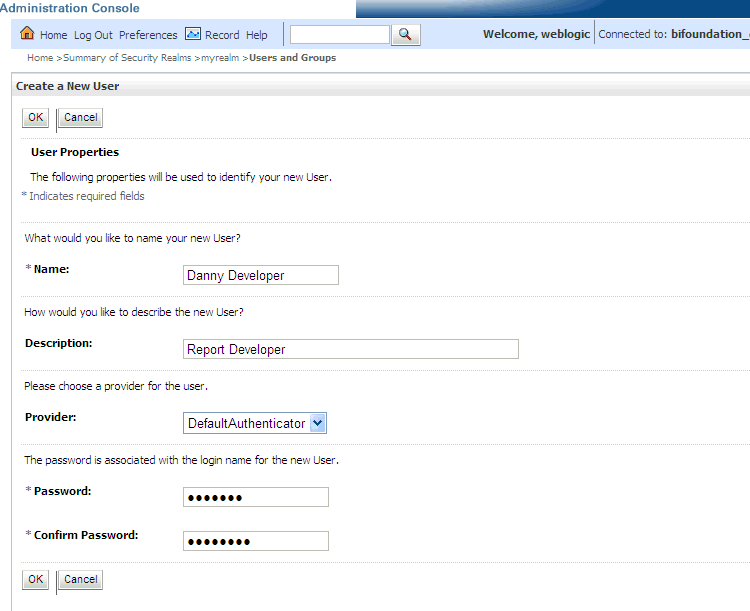
Description of the illustration ''wls_newuser.gif''
-
-
Click OK.
The user name is added to the User table.
2.3.3 Creating a New Group in the Embedded WebLogic LDAP Server
You typically create a separate group for each functional type of business user in your Oracle Business Intelligence environment. For example, a typical deployment might require three groups: BIConsumers, BIContentAuthors, and BIServiceAdministrators. In this case, you could create groups named BIConsumers, BIContentAuthors, and BIServiceAdministrators that you can configure to use with Oracle Business Intelligence, or you might create your own custom groups.
Tip:
For an example security model showing a set of users, groups, and application roles, see Section 2.2, "An Example Security Setup of Users, Groups, and Application Roles".Repeat this task for each new group that you want to deploy
To create a new group in the embedded WebLogic LDAP server:
-
Launch Oracle WebLogic Server Administration Console.
For more information, see Section 1.6.1, "Using Oracle WebLogic Server Administration Console".
-
In Oracle WebLogic Server Administration Console, select Security Realms from the left pane and click the realm you are configuring. For example, myrealm.
-
Select Users and Groups tab, then Groups. Click New
-
In the Create a New Group page provide the following information:
-
Name: Enter the name of the group. Group names are case insensitive but must be unique. See the online help for a list of invalid characters.
-
(Optional) Description: Enter a description.
-
Provider: Select the authentication provider from the list that corresponds to the identity store where the group information is contained. DefaultAuthenticator is the name for the default authentication provider.
-
-
Click OK
The group name is added to the Group table.
2.3.4 Assigning a User to a Group in the Embedded WebLogic LDAP Server
You typically assign each user to an appropriate group. For example, a typical deployment might require user IDs created for report consumers to be assigned to a group named BIConsumers. In this case, you could either assign the users to the default group named BIConsumers, or you could assign the users to your own custom group that you have created.
Tip:
For an example security model showing a set of users, groups, and application roles, see Section 2.2, "An Example Security Setup of Users, Groups, and Application Roles".Repeat this task to assign each user to an appropriate group.
To add a user to a group in the embedded WebLogic LDAP server:
-
Launch Oracle WebLogic Server Administration Console.
For more information, see Section 1.6.1, "Using Oracle WebLogic Server Administration Console".
-
In Oracle WebLogic Server Administration Console, select Security Realms from the left pane and click the realm you are configuring. For example, myrealm.
-
Select Users and Groups tab, then Users.
-
In the Users table select the user you want to add to a group.
Description of the illustration ''wls_usertogroup.gif''
-
Select the Groups tab.
-
Select a group or groups from the Available list box.
Description of the illustration ''wls_group.gif''
-
Click Save.
2.3.5 (Optional) Changing a User Password in the Embedded WebLogic LDAP Server
Perform this optional task if you want to change the default password for a user.
To change a user password in the embedded WebLogic LDAP server:
-
In Oracle WebLogic Server Administration Console, select Security Realms from the left pane and click the realm you are configuring. For example, myrealm.
-
Select Users and Groups tab, then Users
-
In the Users table select the user you want to change the password for. The user's Settings page displays.
Description of the illustration ''wls_settings.gif''
-
Select the Passwords tab and enter the password in the New Password and Confirm Password fields.
-
Click Save.
Note:
If you change the password of the system user, you also need to change it in the credential store.
2.4 Managing Application Roles and Application Policies Using Fusion Middleware Control
In Oracle Business Intelligence, you use Fusion Middleware Control to manage application roles and application policies that provide permissions for users and groups. For detailed information about using Fusion Middleware Control, see Oracle Fusion Middleware Administrator's Guide.
-
Section 2.4.2, "Creating and Deleting Application Roles Using Fusion Middleware Control"
-
Section 2.4.3, "Creating Application Policies Using Fusion Middleware Control"
-
Section 2.4.4, "Modifying Application Roles Using Fusion Middleware Control"
Tip:
After creating a new service instance or importing a BI application archive (BAR) file into a service instance, you should first check the security policy in the service instance to ensure that the users and groups from your Identity Store are mapped correctly to the application roles defined in the service instance. Each BI application archive file can contain its own security policy. Therefore it is good practice to check the security policy on your service instance after importing a BI application archive file..Typically a BI application archive file that contains the BI metadata for an application will contain pre-defined application roles that can be used to provision users with permission to use BI functionality and access BI folders, analyses, subject areas etc. For example, the sample application contains the sample application roles BIConsumer, BIContentAuthor and BIServiceAdministrator. In order to provisin users with permissions and privileges, you map users and (where possible) groups from the Identity Store (usually an LDAP directory) to the defined application roles. You use Enterprise Manager Fusion Middleware Control or WLST to perform this task.
If you want to create a more complex or fine grained security model, you might create your own application roles and application policies as described in this section. For example, you might want report authors in a Marketing department to only have write-access to the Marketing area of the metadata repository and Oracle BI Presentation Catalog. To achieve this, you might create a new application role called BIContentMarketing, and provide it with appropriate privileges.
To set up the application roles that you want to deploy, do the following:
-
If required, create new application roles. For more information, see Section 2.4.2, "Creating and Deleting Application Roles Using Fusion Middleware Control".
Note:
You can create application roles based on preconfigured Application policies, or you can create your own Application policies. For more information about the default users, groups, and application roles, see Section 2.1, "Working with Users, Groups, and Application Roles". -
If required, create new Application policies. For more information, see Section 2.4.3, "Creating Application Policies Using Fusion Middleware Control".
-
(Optional) If required, modify the permission grants or membership for an application role. For more information, see Section 2.4.4, "Modifying Application Roles Using Fusion Middleware Control".
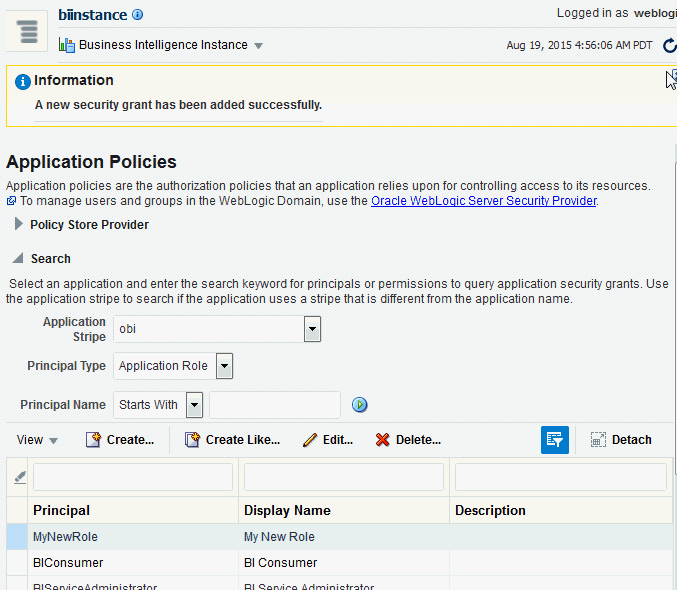
2.4.1 Displaying Application Policies and Application Roles Using Fusion Middleware Control
This section explains how to use Fusion Middleware Control to access the pages that manage application roles and application policies.
To display application policies and application roles using Fusion Middleware Control:
This method explains how to display application policies or application roles for Oracle Business Intelligence
-
Log in to Fusion Middleware Control.
For more information, see Section 1.6.2, "Using Oracle Fusion Middleware Control".
-
Select the Target Navigation icon to open the navigation pane.
-
From the navigation pane expand the Business Intelligence folder and select biinstance.
-
Choose one of the following options:
-
Right-click biinstance and choose Security from the menu, then Application Policies or Application Roles.

Description of the illustration ''coreapp_security_navigation.gif''
-
Alternatively from the content pane, click Business Intelligence Instance to display a menu, then choose Security, and Application Policies or Application Roles.
Other Fusion Middleware Control Security menu options are not available from these menus.
-
-
(Optional) An alternative option to Steps 3 and 4 is to expand the WebLogic Domain folder, right-click on the domain name (or click the WebLogic Domain menu).
A Security menu displays with appropriate menu options.
Other Fusion Middleware Control menu options are available from this menu.
-
Choose Application Policies or Application Roles to display either the Application Policies page or the Application Roles page.
-
If the
obiapplication stripe is displayed by defaultOracle Business Intelligence policies or roles are displayed.
-
If the
obiapplication stripe is not displayed by defaultYou must search using the
obiapplication stripe to display Oracle Business Intelligence policies or roles.
Figure 2-3 shows the Application Policies page.
Figure 2-4 shows the Application Roles page.
-
2.4.2 Creating and Deleting Application Roles Using Fusion Middleware Control
This section explains how to create, delete, and manage application roles using Oracle Fusion Middleware Control, and contains the following topics:
2.4.2.1 Overview
In a new Oracle Business Intelligence deployment, you typically create an application role for each type of business user activity in your Oracle Business Intelligence environment. For example, a typical deployment based on either the sample application or the starter application might include three application roles: BIConsumer, BIContentAuthor, and BIServiceAdministrator. As a BI system administrator or service administrator, you should not change the application roles or the permission sets assigned to the application roles that have been delivered in a BAR file.
Oracle Business Intelligence application roles represent a role that a user has. For example, having the Sales Analyst application role might grant a user access to view, edit and create reports on a company's sales pipeline. The administrator of a service instance can create and modify application roles in your service instance. Keeping application roles separate and distinct from the directory server groups enables you to better accommodate authorization requirements. You can create new application roles to match business roles for your environment without needing to change the groups defined in the corporate directory server. To control authorization requirements more efficiently, you can then assign existing groups of users from the directory server to application roles.
Note:
Before creating a new application role and adding it to the your Oracle Business Intelligence service instance, familiarize yourself with how permission and group inheritance works. It is important when constructing a role hierarchy that circular dependencies are not introduced. For more information, see Section B.5, "Granting Permissions To Users Using Groups and Application Roles".For more information about creating application roles, see "Managing the Policy Store" in Oracle Fusion Middleware Application Security Guide.
Note:
For advanced-level information about using a BI repository in offline mode, see Section 2.5.3, "Managing Application Roles in the Metadata Repository - Advanced Security Configuration Topic".2.4.2.2 Creating an Application Role
There are two methods for creating a new application role:
-
Create New - Creates a new application role. You can add members at the same time or you can save the new role after naming it, and add members later.
-
Copy Existing - Creates an application role by copying an existing application role. The copy contains the same members as the original, and is made a grantee of the same application policy as is the original. Modifications can be made as needed to the copy to further customize the new application role.
Membership for an application role is controlled using the Application Roles page in Fusion Middleware Control. Valid members of an application role are users, groups, and other application roles.
Permission and permission set grants are controlled in the Application Policies page in Fusion Middleware Control. The permission and permission set grant definitions are set in the application policy, then the application policy is granted to the application role. For more information, see Section 2.4.3, "Creating Application Policies Using Fusion Middleware Control".
To create a new application role:
-
Log in to Fusion Middleware Control, and display the Application Roles page.
For information, see Section 2.4.1, "Displaying Application Policies and Application Roles Using Fusion Middleware Control".
-
Ensure the Application Stripe is obi, and click the search icon next to Role Name.
The Oracle Business Intelligence application roles display. Figure 2-5 shows some application roles.
Figure 2-5 Application Roles in Fusion Middleware Control
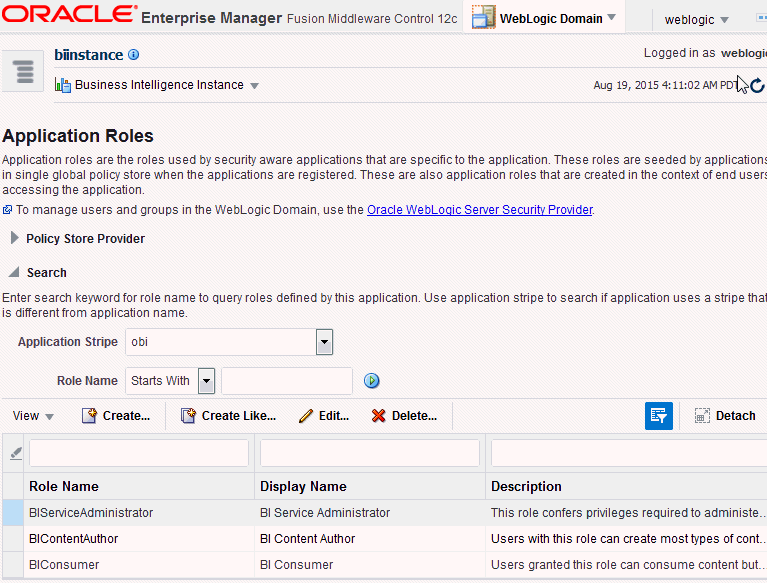
Description of ''Figure 2-5 Application Roles in Fusion Middleware Control''
-
Click Create to display the Create Application Role page. You can enter all information at once or you can enter a Role Name, save it, and complete the remaining fields later. Complete the fields as follows:
In the General section:
-
Role Name - Enter the name of the application role avoiding any invalid characters including spaces (see "Characters in Application Role Names" in Oracle Fusion Middleware Application Security Guide).
-
(Optional) Display Name - Enter the display name for the application role.
-
(Optional) Description - Enter a description for the application role.
-
-
In the Members section, click Add to display the Add Principal page.
-
In the Add Principal page search for members to assign to the current application role, as follows:
-
Select Application Role, Group, or Users from the Type field drop down list.
-
Optionally enter search details into Principal Name and Display Name fields.
-
Click the search button.
-
Select from the results returned in the Searched Principals box.
-
Click OK to return to the Create Application Role page.
-
Repeat the steps until all desired members are added to the application role.
-
-
Click OK to return to the Application Roles page.
The application role just created displays in the table at the bottom of the page.
To create an application role based on an existing one:
-
Log in to Fusion Middleware Control, and display the Application Roles page.
For information, see Section 2.4.1, "Displaying Application Policies and Application Roles Using Fusion Middleware Control".
Whether or not the obi application stripe is pre-selected and the application policies are displayed depends upon the method used to navigate to the Application Roles page.
-
If necessary select Application Stripe and obi from the list, then click the search icon next to Role Name.
The Oracle Business Intelligence application roles display.
-
Select the application role you want to copy from the list to enable the action buttons.
-
Click Create Like to display the Create Application Role Like page.
The Members section displays the same application roles, groups, or users that are assigned to the original role. Complete the fields as follows:
In the General section:
-
Role Name - Enter the name of the application role avoiding any invalid characters including spaces (see "Characters in Application Role Names" in Oracle Fusion Middleware Application Security Guide).
-
(Optional) Display Name - Enter the display name for the application role.
-
(Optional) Description - Enter a description for the application role.
-
-
In the Members section, click Add to display the Add Principal page.
-
In the Add Principal page you search for members to assign to the current application role, as follows:
-
Select Application Role, Group, or Users from the Type field drop down list.
-
Optionally enter search details into Principal Name and Display Name fields.
-
Click the search button.
-
Select from the results returned in the Searched Principals box.
-
Click OK to return to the Create Application Role page.
-
Repeat the steps until all desired members are added to the application role.
Figure 2-6 shows creation of the new application role MyNewRole, based upon the BIContentAuthor application role.
Figure 2-6 New Application Role Based on Existing Role
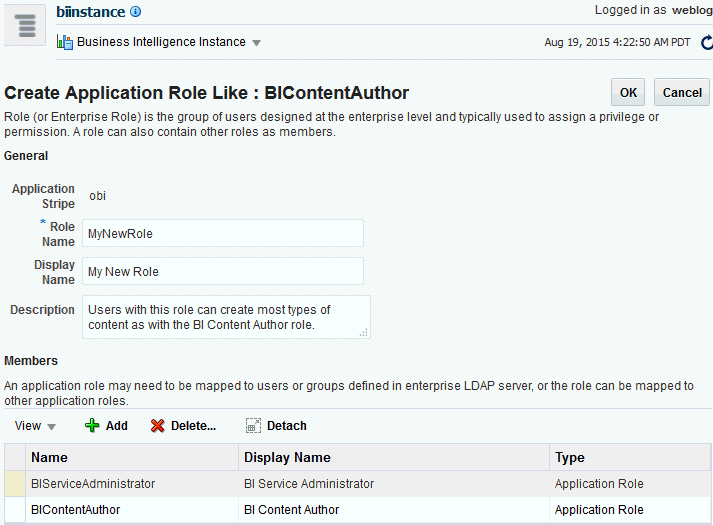
Description of ''Figure 2-6 New Application Role Based on Existing Role''
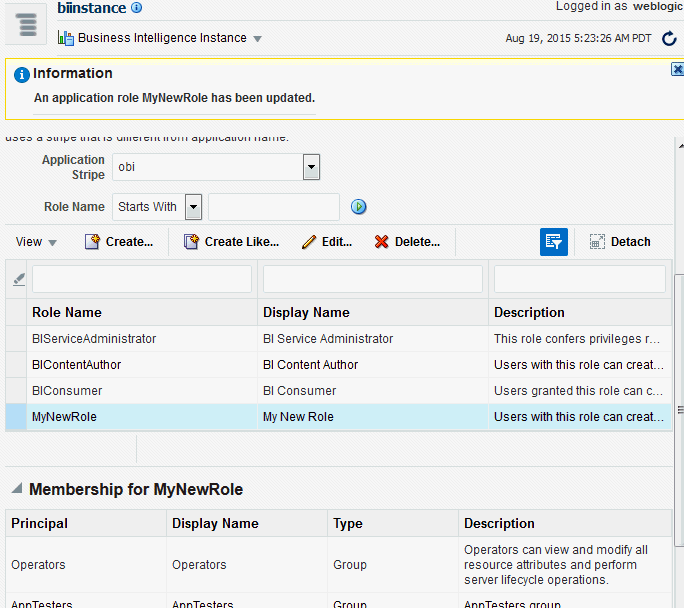
The newly-created application role displays in the table at the bottom of the page. Figure 2-7 shows the newly-created application role named MyNewRole based upon an existing application role.
Figure 2-7 Newly Created Application Role

Description of ''Figure 2-7 Newly Created Application Role''
-
-
Modify the members as appropriate and click OK.
2.4.2.3 Assigning a Group to an Application Role
You assign a group to an application role to provide users in that group with appropriate security privileges. For example, a group for marketing report consumers named BIMarketingGroup might require an application role called BIConsumerMarketing, in which case you assign the group named BIMarketingGroup to the application role named BIConsumerMarketing.
To assign a group to an application role:
-
Log in to Fusion Middleware Control, and display the Application Roles page.
For information, see Section 2.4.1, "Displaying Application Policies and Application Roles Using Fusion Middleware Control".
Whether or not the obi application stripe is pre-selected and the application policies are displayed depends upon the method used to navigate to the Application Roles page.
-
If necessary, select Application Stripe and obi from the list, then click the search icon next to Role Name.
The Oracle Business Intelligence application roles display. Figure 2-8 shows the current application roles.
-
Select an application role in the list and click Edit to display the Edit Application Role dialog, and complete the fields as follows:
In the General section:
-
Role Name - The name of the application role, this field is read only.
-
Display Name - The display name for the application role.
-
Description - A description for the application role.
-
-
In the Members section, click Add to add the group that you want to assign to the Roles list.
For example, if a group for marketing report consumers named BIMarketingGroup require an application role called BIConsumerMarketing, then add the group named BIMarketingGroup to Roles list.
-
Click OK to return to the Application Roles page.
2.4.2.4 Deleting an Application Role
You must not delete an application role without first consulting your system administrator.
To delete an application role:
-
Log in to Fusion Middleware Control, and display the Application Roles page.
For information, see Section 2.4.1, "Displaying Application Policies and Application Roles Using Fusion Middleware Control".
-
Select the application role you want to delete.
-
Click Delete, then click Yes, to confirm deletion of the application role.
2.4.3 Creating Application Policies Using Fusion Middleware Control
You can create application roles based on the default application policies, or you can create your own application policies.
Application policies do not apply privileges to the metadata repository or Oracle BI Presentation Catalog objects and functionality.
All Oracle Business Intelligence permissions and permission sets are provided as part of the installation and you cannot create new permissions. The application policy is the mechanism that defines the permission set and permissions grants. Permission set and permissions grants are controlled in the Fusion Middleware Control Application Policies page. The permission set and permission grants are defined in an application policy. An application role, user, or group, is then assigned to an application policy. This process makes the application role a grantee of the application policy.
There are two methods for creating a new application policy:
-
Create New - Create a new application policy and permissions are added to it.
-
Copy Existing - Create new application policy by copying an existing application policy. The copy is named and existing permissions are removed or permissions are added.
Note:
Oracle Business Intelligence 12c makes use of permission sets as well as permissions. A permission set is a collection of permissions. It is also known as an entitlement. All of the permissions available with BI 12c are grouped into permission sets. When the either the sample or starter application is imported into a service instance you will see the permission sets that have been assigned to the application roles. When an 11g upgrade bundle is imported into a service instance you will see the permissions from your 11g system, supplemented by new permission sets assigned to the migrated application rolesNote:
Fusion Middleware Control only allows you to view permission set grants. It does not allow you to change the permission set grants against an application role. Fusion Middleware Control does allow you to modify permission grants against application roles. In 12c, if you need to update permission set grants against an application role you need to use the WLST command line (see "Managing Application Policies with WLST Commands" in Oracle Fusion Middleware Application Security Guide.
For more information about creating application policies, see "Managing Policies with Fusion Middleware Control" in Oracle Fusion Middleware Application Security Guide.
To create a new application policy:
-
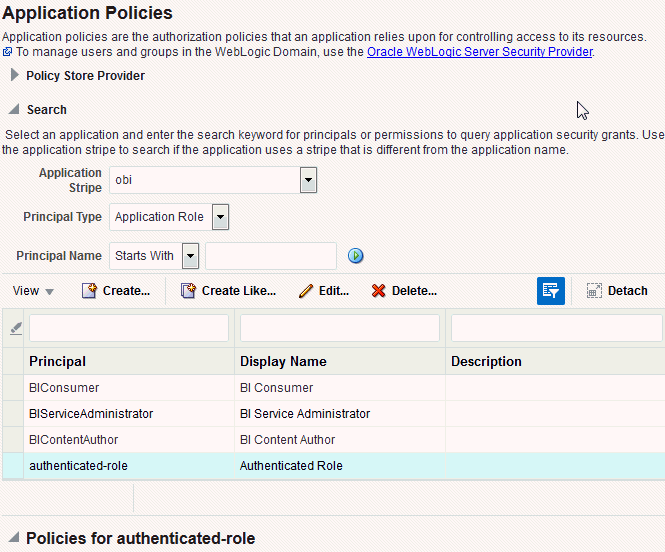
Log in to Fusion Middleware Control, and display the Application Policies page.
For information, see Section 2.4.1, "Displaying Application Policies and Application Roles Using Fusion Middleware Control".
-
Select the obi from the Application Stripe list, then click the search icon next to Name.
The Oracle Business Intelligence application policies are displayed. The Principal column displays the name of the policy grantee.
Description of the illustration ''em_createpolicy.gif''
-
Click Create to display the Create Application Grant page.
-
To add permissions to the policy being created, click Add in the Permissions area to display the Add Permission dialog.
-
Complete the Search area and click the blue search button next to the Resource Name field.
All permissions for the selected class are displayed.
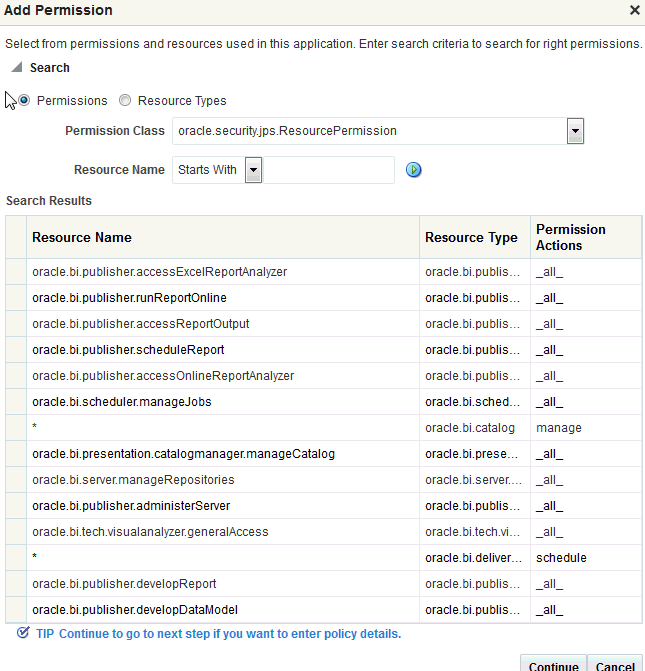
Description of the illustration ''em_newpolicypermission.gif''
-
Select the desired Oracle Business Intelligencer permission and click Continue.
-
Modify permission details if required in the Customize page, then click Select to add the permission.
You are returned to the Create Application Grant page. The selected permissions display in the Permissions area.
-
Repeat until all desired permissions are selected.
Selecting non-Oracle Business Intelligence permissions have no effect in the policy.
-
To remove a permission, select it and click Delete.
-
-
To add an application role, group, or user to the policy being created, click Add in the Grantee area to display the Add Principal page.
-
Complete the Search area and click the blue search button next to the Display Name field.
-
Select a principal from the Searched Principals list.
-
Click OK to display the Create Application Grant page.
-
Click OK.
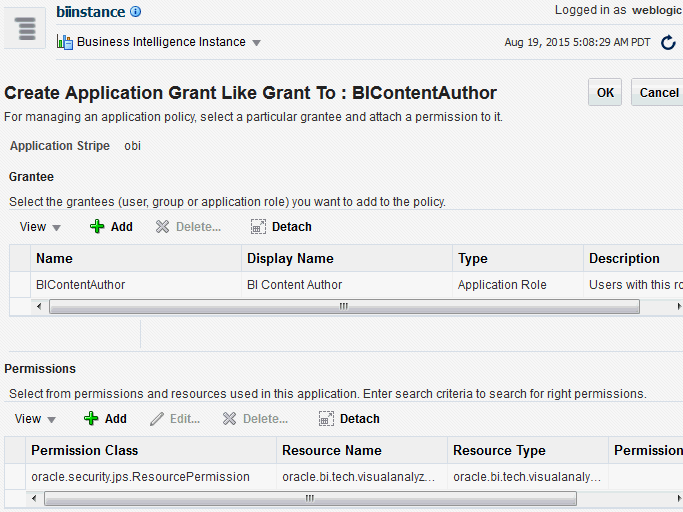
You are returned to the Application Policies page. The Principal and Permissions of the policy created are displayed in the tables. The following figure shows the new application policy just created with MyNewRole application role as the grantee (Principal).
Description of the illustration ''em_newpolicy06.gif''
-
To create an application policy based on an existing one:
-
Log in to Fusion Middleware Control, and display the Application Policies page.
For information, see Section 2.4.1, "Displaying Application Policies and Application Roles Using Fusion Middleware Control".
-
Select obi from the Application Stripe list, then click the search icon next to Name.
The Oracle Business Intelligence application policies are displayed. The Principal column displays the name of the policy grantee.
-
Select an existing policy from the table.
The following figure shows the BIContentAuthor Principal selected with the Create Like button activated, which is used as an example in this procedure.
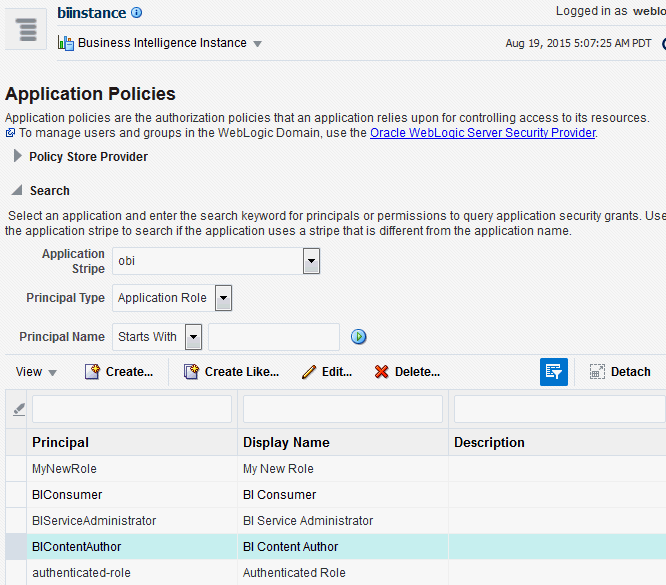
Description of the illustration ''em_newpolicy01.gif''
-
Click Create Like to display the Create Application Grant Like page. The Permissions table automatically displays permissions granted by the policy selected.
The following figure shows the Create Application Grant Like dialog after the BIContentAuthor policy has been selected. Note that the Permissions section displays the permission grants for the BIContentAuthor policy.
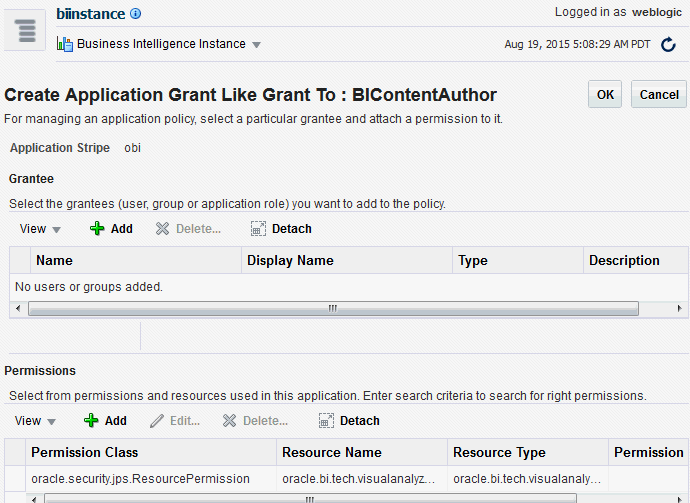
Description of the illustration ''em_newpolicycopy.gif''
-
To remove any items, select it and click Delete.
-
To add application roles to the policy, click Add Application Role in the Grantee area to display the Add Application Role dialog.
The following figures use the MyNewRole application role as an example.
-
Complete the Search area and click the blue search button next to the Display Name field. The application roles matching the search are displayed.
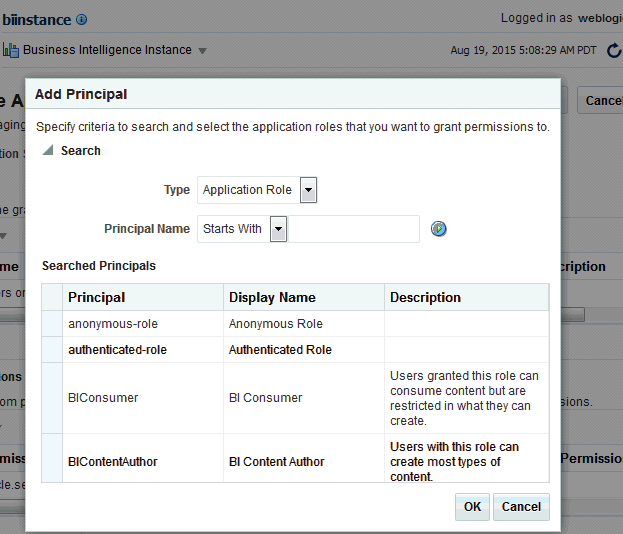
Description of the illustration ''em_newpolicy03.gif''
-
Select from the Searched Principals list and click OK.
The Create Application Grant Like page displays with the selected application role added as Grantee.
-
Click OK to return to the Application Policies page.
The Principal and Permissions of the application policy just created are displayed in the table.
-
Description of the illustration ''em_newpolicy06.gif''
2.4.4 Modifying Application Roles Using Fusion Middleware Control
You can modify an application role by changing permission grants of the corresponding application policy (if the application role is a grantee of the application policy), or by changing its members, and by renaming or deleting the application role as follows:
-
Section 2.4.4.1, "Adding or Removing Permission Grants from an Application Role"
-
Section 2.4.4.2, "Adding or Removing Members from an Application Role"
For more information about managing application policies and application roles, see "Managing Policies with Fusion Middleware Control" in Oracle Fusion Middleware Application Security Guide.
2.4.4.1 Adding or Removing Permission Grants from an Application Role
Use this procedure if you want to change the permission grants for an application role. This is done by adding or removing the permission grants for the application policy which the application role is a grantee of.
To add or remove permission grants from an application policy:
-
Log in to Fusion Middleware Control, and display the Application Policies page.
For more information, see Section 2.4.1, "Displaying Application Policies and Application Roles Using Fusion Middleware Control".
Whether or not the obi stripe is pre-selected and the application policies are displayed depends upon the method used to navigate to the Application Policies page.
-
If necessary, select Application Stripe and obi from the list, then click the search icon next to Role Name.
The Oracle Business Intelligence application policies are displayed. The Principal column displays the name of the policy grantee.
-
Select the application role from the Principal column and click Edit.
-
Add or delete permissions from the Edit Application Grant view and click OK to save the changes.
2.4.4.2 Adding or Removing Members from an Application Role
Members can be added to or deleted from an application role using Fusion Middleware Control. You must perform these tasks in the WebLogic Domain where Oracle Business Intelligence is installed (for example, in bifoundation_domain). Valid members of an application role are users, groups, or other application roles. Being assigned to an application role is to become a member of an application role. Best practice is to assign groups instead of individual users to application roles.
Note:
Be very careful when changing the permission grants and membership for the application role that is tagged as the administration application role, as changes to the permissions assigned to this application role could leave your system in an unusable state.To add or remove members from an application role:
-
Log in to Fusion Middleware Control, and display the Application Roles page.
For information, see Section 2.4.1, "Displaying Application Policies and Application Roles Using Fusion Middleware Control".
-
If not already displayed, select Application Stripe and obi from the list, then click the search icon next to Role Name.
The Oracle Business Intelligence application roles are displayed.
-
Select the cell next to the application role name and click Edit to display the Edit Application Role page.
You can add or delete members from the Edit Application Role page. Valid members are application roles, groups, and users.
-
To delete a member, select the Name of the member to activate the Delete button, then click Delete.
-
To add a member click the Add button to display the Add Principal page.
Search for members to assign to the current application role, as follows:
-
Select Application Role, Group, or Users from the Type field drop down list.
-
Optionally enter search details into Principal Name and Display Name fields.
-
Click the search button.
-
Select from the results returned in the Searched Principals box.
-
Click OK to return to the Create Application Role page.
-
Repeat the steps until all desired members are added to the application role.
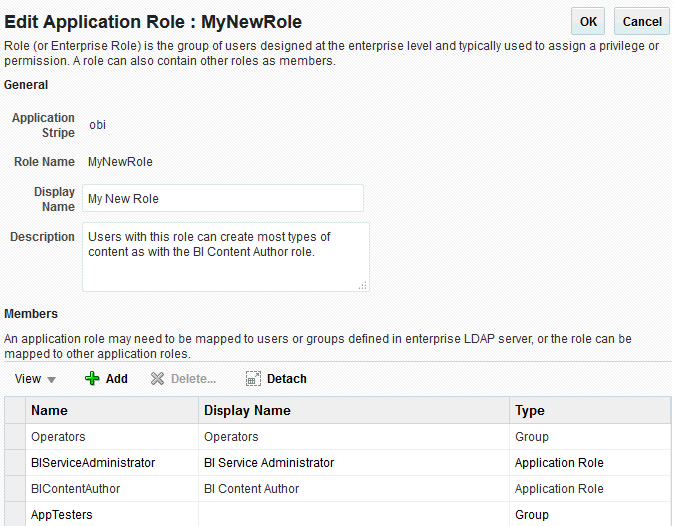
The added member displays in the Members section corresponding to the application role modified in the Application Roles page. For example, the following figure shows the Edit Application Role page for the MyNewRole application role after the Operators group has been added.
-
-
Click OK in the Edit Application Role page to return to the Application Roles page.
The members just added to the application role display in the Membership for section. If members were deleted, they no longer display.
The following figure shows the MyNewRole application role with the recently added member Operators group displaying.
For additional information, see "Managing Application Roles" in Oracle Fusion Middleware Application Security Guide.
2.4.4.3 Renaming an Application Role
You cannot directly rename an existing application role; you can only update the display name. To rename an application role you must create a new application role (using the same application policies used for the deleted application role), and delete the old application role. When you create the new application role, you specify a new name. You must also update any references to the old application role with references to the new application role in both the Oracle BI Presentation Catalog and the metadata repository.
To rename an application role in the catalog and the metadata repository use the renameAppRoles command, as described in "Rename Application Role Command" in Oracle Fusion Middleware Metadata Repository Builder's Guide for Oracle Business Intelligence Enterprise Edition.
2.5 Managing Metadata Repository Privileges Using the Oracle BI Administration Tool
This section explains how to use the Oracle BI Administration Tool to configure security in the Oracle BI repository, and contains the following topics:
2.5.1 Overview
You use Identity Manager in the Oracle BI Administration Tool to manage permissions for application roles, and set access privileges for objects such as subject areas and tables. For an overview about using the Oracle BI Administration Tool to configure security, see Section 1.6.3, "Using Oracle BI Administration Tool".
Note:
Oracle Business Intelligence Applications customers should read this section to understand the basics about security and setting up authentication, and then refer to the security and configuration information provided in Oracle Fusion Middleware Reference Guide for Oracle Business Intelligence Applications.2.5.2 Setting Repository Privileges for an Application Role
The data model for your service instance includes a security policy to define permissions for accessing different parts of the data model such as data columns and subject areas. The author of your data model uses the administration tool to maintain this security policy including assigning data model permissions to application roles. When you create a service instance or import a BI application archive file into a service instance, the security policy for the data model is imported from the BI application archive file.
Note:
In addition to setting repository privileges, you might assign Oracle BI Presentation Catalog privileges to a new application role. For more information, see Section 2.6.3, "Setting Presentation Services Privileges for Application Roles".Note:
You can also set repository permissions programmatically using command line tools. For more information, see "Setting Permissions Using Command-Line Tools" in Oracle Fusion Middleware XML Schema Reference for Oracle Business Intelligence Enterprise Edition.To set repository permissions for an application role:
-
Open the repository in the Oracle BI Administration Tool (in Online mode).
For more information, see Section 1.6.3, "Using Oracle BI Administration Tool".
-
In the Presentation panel, navigate to the subject area or sub-folder for which you want to set permissions.
-
Right-click the subject area or sub-folder and select Properties to display the properties dialog.
For example, to provide access to the Paint subject area, right-click Paint.
-
Click Permissions to display the Permissions <Name> dialog.
Note:
Ensure that the Show all users/application roles check box is selected.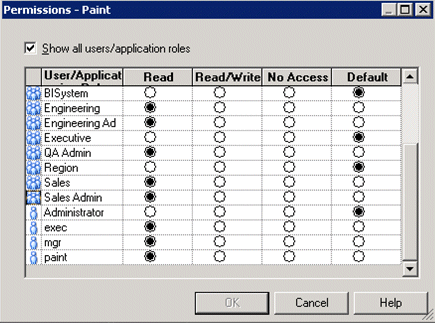
-
Use the Permissions <Name> dialog to change the security permissions for application roles in the User/Application Role list.
For example, to enable users to create dashboards and reports, you might change the repository permissions for an application role named BISalesAnalysis from 'Read' to 'Read/Write'.
Note:
Best practice is to modify permissions for application roles, not modify permissions for individual users.To see all permissions for an object in the Presentation pane, right-click the object and choose Permission Report to display a list of users and application roles and what permissions that have for the selected object.
2.5.3 Managing Application Roles in the Metadata Repository - Advanced Security Configuration Topic
Application role definitions are maintained in the policy store and any changes must be made using the administrative interface. The repository maintains a copy of the policy store data to facilitate repository development. The Oracle BI Administration Tool displays application role data from the repository's copy; you are not viewing the policy store data in real time. Policy store changes made while you are working with an offline repository are not available in the Administration Tool until the policy store next synchronizes with the repository. The policy store synchronizes data with the repository copy whenever the BI Server restarts; if a mismatch in data is found, an error message is displayed.
While working with a repository in offline mode, you might discover that the available application roles do not satisfy the membership or permission grants needed at the time. A placeholder for an Application Role definition can be created in the Administration Tool to facilitate offline repository development. But this is just a placeholder visible in the Administration Tool and is not an actual application role. You cannot create an actual application role in the Administration Tool. You can create an application role only in the policy store, using the administrative interface available for managing the policy store.
An application role must be defined in the policy store for each application role placeholder created using the Administration Tool before bringing the repository back online. If a repository with role placeholders created while in offline mode is brought online before valid application roles are created in the policy store, then the application role placeholder disappears from the Administration Tool interface. Always create a corresponding application role in the policy store before bringing the repository back online when using role placeholders in offline repository development.
For more information about how to create a placeholder for an application role during repository development, see Oracle Fusion Middleware Metadata Repository Builder's Guide for Oracle Business Intelligence Enterprise Edition.
2.6 Managing Presentation Services Privileges Using Application Roles
This section explains how to manage Presentation Services privileges using application roles in Presentation Services Administration Manage Privileges page, and contains the following topics:
2.6.1 Overview
The catalog for your service instance includes security policy for Presentation Service privileges. These privileges confer permissions for accessing specific Presentation Services functionality such as access to answers, access to dashboards as well as permissions on catalog objects such as folders and analyses. When you create a service instance or import a BI application archive file into a service instance, the security policy for the catalog (Presentation Services Privileges) is imported from the BI application archive file. The service administrator can modify the catalog security policy.
Systems upgraded from a previous release can continue to use Catalog groups to grant these privileges, but this is not considered a best practice (see Section D.2.2.1, "Migrating Catalog Groups to Application Roles"). Best practice is to use application roles to manage privileges, which streamlines the security management process. For example, using the same set of application roles throughout the system eliminates the need to manage a separate set of Catalog groups and member lists. For more information regarding how to continue using upgraded Catalog groups to manage Presentation Services privileges, see Section A.2.1, "Changes Affecting Security in Presentation Services".
Note:
Assigning an application role to be a member of a Catalog group creates complex group inheritance and maintenance situations and is not considered a best practice.When groups are assigned to application roles, the group members are automatically granted associated privileges in Presentation Services. This is in addition to the Oracle Business Intelligence permissions.
Tip:
A list of application roles that a user is a member of is available from the Roles and Groups tab in the My Account dialog in Presentation Services.2.6.2 About Presentation Services Privileges
Presentation Services privileges are maintained in the Presentation Services Administration Manage Privileges page, and they grant or deny access to Presentation Services features, such as the creation of analyses and dashboards. Presentation Services privileges have no effect in other Oracle Business Intelligence components.
Being a member of an application role that has been assigned Presentation Services privileges will grant those privileges to the user. The Presentation Services privileges assigned to application roles can be modified by adding or removing privilege grants using the Manage Privileges page in Presentation Services Administration.
Presentation Services privileges can be granted to users both explicitly and by inheritance. However, explicitly denying a Presentation Services privilege takes precedence over user access rights either granted or inherited as a result of group or application role hierarchy.
2.6.3 Setting Presentation Services Privileges for Application Roles
If you create an application role, you must set appropriate Presentation Services privileges to enable users with the application role to perform various functional tasks. For example, you might want users with an application role named BISalesAdministrator to be able to create Actions in Oracle Business Intelligence. In this case, you would grant them a privilege named Create Invoke Action.
Presentation Services privileges cannot be assigned using the administrative interfaces used to manage the policy store. If you create a new application role to grant Oracle Business Intelligence permissions, then you must set Presentation Services privileges for the new role in addition to any Oracle Business Intelligence permissions.
Note:
Presentation Services privileges can be assigned to a new application role programmatically using SecurityService Service. For more information, see "SecurityService Service" in Oracle Fusion Middleware Integrator's Guide for Oracle Business Intelligence Enterprise EditionTo set Presentation Services privileges for an application role:
-
Log in to Oracle BI Presentation Services as a user with Administrator privileges.
For more information, see Section 1.6.4, "Using Presentation Services Administration".
-
From the Home page in Presentation Services, select Administration.

Description of the illustration ''biadmin_admin_nav.gif''
Note:
If you log in as a user without Administrator privileges, the Administration option is not displayed.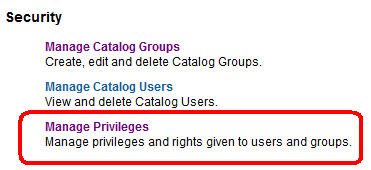
Description of the illustration ''biadmin_security.gif''
-
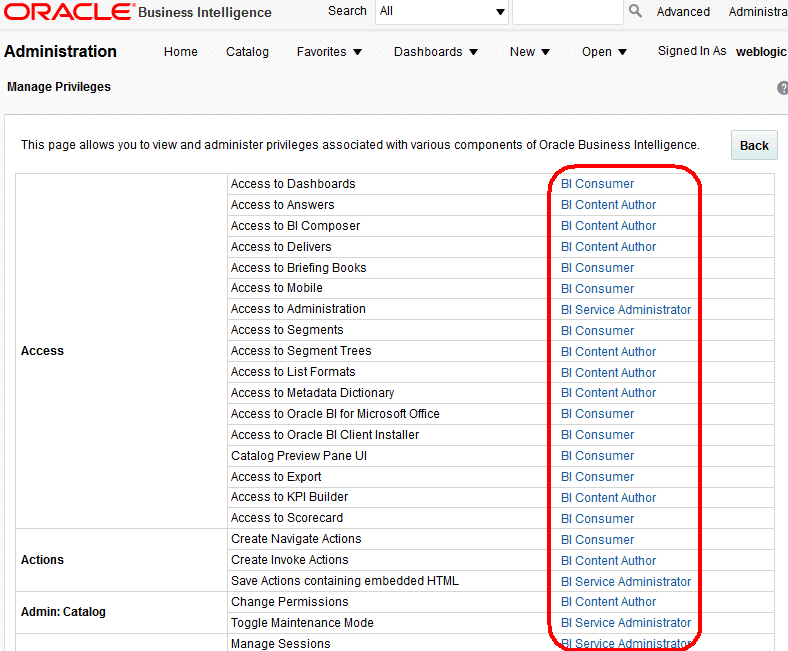
In the Security area, click Manage Privileges to display the Manage Privileges page.
This page enables you to view application roles for Presentation Services privileges.
Description of the illustration ''biadmin_pspriv.gif''
-
Click an application role next to the privilege that you want to administer.
For example, to administer the privilege named Access to Scorecard for the application role named BIConsumer, you would click the BIConsumer link next to Access to Scorecard.
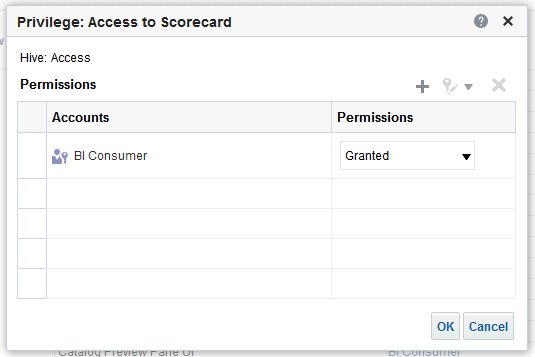
Description of the illustration ''admin_per6.gif''
Use the Privilege <privilege_name> dialog to add application roles to the list of permissions, and grant and revoke permissions from application roles. For example, to grant the selected privilege to an application role, you must add the application role to the Permissions list.
-
Add an application role to the Permissions list, as follows:
-
Click Add Users/Roles.
-
Select Application Roles from the list and click Search.
-
Select the application role from the results list.
-
Use the shuttle controls to move the application role to the Selected Members list.
-
Click OK.
-
-
Set the permission for the application role by selecting Granted or Denied in the Permission list.
Note:
Explicitly denying a Presentation Services permission takes precedence over user access rights either granted or inherited as a result of group or application role hierarchy. -
Save your changes.
Note:
Existing Catalog groups are migrated during the upgrade process. Moving an existing Oracle BI Presentation Catalog security configuration to the role-based Oracle Fusion Middleware security model based requires that each Catalog group be replaced with a corresponding application role. To duplicate an existing Presentation Services configuration, replace each Catalog group with a corresponding application role that grants the same Oracle BI Presentation Catalog privileges. You can then delete the original Catalog group from Presentation Services.2.6.4 Encrypting Credentials in BI Presentation Services - Advanced Security Configuration Topic
The BI Server and Presentation Services client support industry-standard security for login and password encryption. When an end user enters a user name and password in the web browser, the BI Server uses the Hypertext Transport Protocol Secure (HTTPS) standard to send the information to a secure Oracle BI Presentation Services port. From Oracle BI Presentation Services, the information is passed through ODBC to the BI Server, using Triple DES (Data Encryption Standard). This provides a high level of security (168 bit), preventing unauthorized users from accessing data or Oracle Business Intelligence metadata.
At the database level, Oracle Business Intelligence administrative users can implement database security and authentication. Finally, a proprietary key-based encryption provides security to prevent unauthorized users from accessing the metadata repository.
2.7 Managing Data Source Access Permissions Using Oracle BI Publisher
This section discusses managing the data source access permissions that are stored in Oracle BI Publisher, using the Oracle BI Publisher Administration pages. Data source access permissions control application role access to data sources. A user must be assigned to an application role which is granted specific data source access permissions to enable the user to perform the following tasks:
-
Create a data model against the data source.
-
Edit a data model against a data source.
-
View a report created with a data model built from the data source.
For more information regarding data source security in published reporting, see "Granting Access to Data Sources" in the Oracle Fusion Middleware Administrator's and Developer's Guide for Oracle Business Intelligence Publisher.
2.8 Enabling High Availability of the Default Embedded Oracle WebLogic Server LDAP Identity Store
This section is only applicable if using the default Weblogic LDAP in a HA environment.
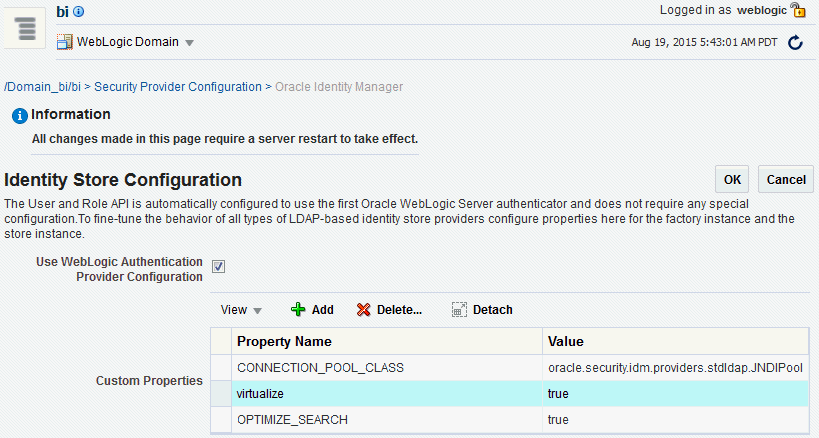
To enable high availability of the default embedded Oracle WebLogic Server LDAP identity store in a clustered environment, you configure the virtualize attribute. When you set the virtualize attribute value to true, BI processes will look to their local Managed Server where they can authenticate and perform lookups against a local copy of the embedded default Oracle WebLogic Server LDAP identity store.
To enable high availability of the default embedded Oracle WebLogic Server LDAP identity store:
-
Log in to Fusion Middleware Control.
For more information, see Section 1.6.2, "Using Oracle Fusion Middleware Control".
-
From the navigation pane expand the WebLogic Domain folder and select bi.
-
Right-click bi and select Security, then Security Provider Configuration to display the Security Provider Configuration page.
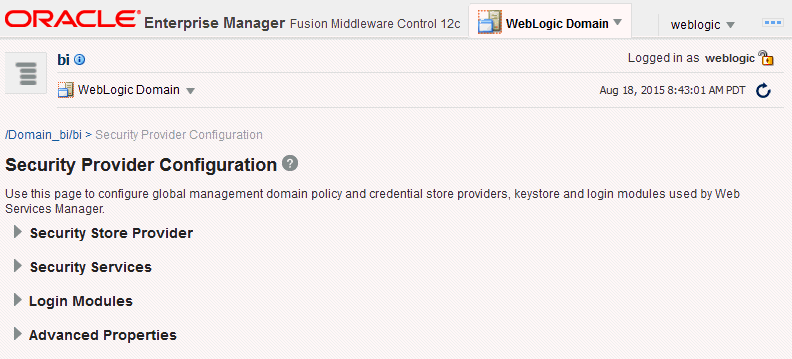
-
Expand Security Store Provider, and Identity Store Provider area, and click Configure to display the Identity Store Configuration page.
-
In the Custom Properties area, use the Add option to add the following custom properties:
-
Property Name=
virtualizeValue=
true -
Property Name=
OPTIMIZE_SEARCHValue=
true
Note:
The Property Namevirtualizemust be lowercase, and OPTIMIZE_SEARCH must be uppercase.Figure 2-9 shows an example set of Custom Properties including a new property called virtualize with its value set to true.
-
-
Click OK to save the changes.
-
Restart the Administration Server, any Managed Servers, and Oracle BI EE components.
2.9 Deleting a User
When a user is no longer required you must completely remove their user ID from the system to prevent an identical, newly-created user from inheriting the old user's access permissions. This situation can occur because authentication and access permissions are associated with user ID.
You delete a user by removing them from the policy store, the Oracle BI Presentation Catalog, the metadata repository, and the identity store.
To delete a user:
-
Delete the user from the policy store.
If you have assigned the user directly to any application roles, you must remove all references to that user.
-
Delete the user from the Oracle BI Presentation Catalog, and the metadata repository using the command line utility.
-
Delete Users command
To delete a user from the catalog and the metadata repository use the deleteusers command.
For more information, see "Delete Users Command" in Oracle Fusion Middleware Metadata Repository Builder's Guide for Oracle Business Intelligence Enterprise Edition.
-
-
If you are using Oracle WebLogic Server LDAP as your identity store, complete the following steps to delete a user:
-
Log in to the Oracle WebLogic Server Administration Console.
For more information, see Section 1.6.1, "Using Oracle WebLogic Server Administration Console".
-
In Oracle WebLogic Server Administration Console, select Security Realms from the left pane and click the realm you are configuring. For example, myrealm.
-
Select Users and Groups tab, then Users.
-
Select a user. Click Delete.
-
In the Delete Users page click Yes.
-
Click OK.
The user name is removed from the User table in the embedded WebLogic LDAP server.
-
-
If you are using an identity store other than Oracle WebLogic Server LDAP, follow the appropriate instructions for your identity store.
2.10 Using the runcat Command Line Interface to Manage Security-Related Tasks in the Oracle BI Presentation Catalog
The runcat command line interface enables you to manage some security-related tasks in the Oracle BI Presentation Catalog.
You can invoke the command line utility on supported platforms for Oracle Business Intelligence such as Windows, Linux, IBM-AIX, Sun Solaris, and HP-UX. Enter a command such as the following one on Linux for assistance in using the command line utility:
./runcat.sh -help
Use the following syntax to convert a permission for a catalog group into a permission for an application role.
runcat.cmd/runcat.sh -cmd replaceAccountInPermissions -old <catalog_group_name> -oldType group -new <application_role_name> -newType role -offline <catalog_path>
For more information see "Opening an Oracle BI Presentation Catalog" in Oracle Fusion Middleware System Administrator's Guide for Oracle Business Intelligence Enterprise Edition.
Reporting on Users Privileges for a Set of Oracle BI Presentation Catalog Items
Use the following syntax to report on all privileges in the Oracle BI Presentation Catalog, and who has those privileges. For example:
runcat.cmd/runcat.sh -cmd report -online http://localhost:8080/analytics/saw.dll -credentials c:/oracle/catmancredentials.properties -outputFile c:/temp/report.txt -delimiter "\t" -folder "/system/privs" -mustHavePrivilege -type "Security ACL" -fields "Path:Accounts" "Must Have Privilege"
For help use the following command:
runcat.sh -cmd report -help
For more information, see Section 2.4.4.3, "Renaming an Application Role".