3 Setting Up and Using the Multiuser Development Environment
This chapter explains how to set up and use the multiuser development environment in Oracle Business Intelligence, including defining projects, setting up the multiuser development directory, checking out and publishing changes to projects, and merging metadata.
Multiuser development (MUD) provides a mechanism for concurrent development on overlapping code bases. Oracle Business Intelligence provides a MUD environment that manages subsets of metadata, in addition to multiple users, by providing a built-in versioning system for repository development.
See also the following resources:
-
"Managing the Repository Lifecycle in a Multiuser Development Environment" for additional information about working in a multiuser development environment
-
Chapter 4, "Using a Source Control Management System for Repository Development" for information about saving your repository in MDS XML format and integrating the Administration Tool with a third-party source control management system
This chapter contains the following topics:
About the Multiuser Development Environment
In Oracle Business Intelligence, multiuser development facilitates the development of application metadata in enterprise-scale deployments. Application metadata is stored in a centralized metadata repository (RPD) file. The Administration Tool is used to work with these repositories. You do not use a multiuser development environment with MDS XML-format repositories.
The following are examples of how you might use a multiuser development environment:
-
Several developers work concurrently on subsets of the metadata and then merge these subsets back into a master repository without their work conflicting with other developers. For example, after completing an implementation of data warehousing at a company, an administrator might want to deploy Oracle Business Intelligence to other functional areas.
Note:
In this chapter, "master repository" refers to the copy of a repository in the multiuser development directory -
A single developer manages all development. For simplicity and performance, this developer might want to use the multiuser development environment to maintain metadata code in smaller chunks instead of in a large repository.
In both examples, an administrator creates projects in the repository file in the Administration Tool, then copies this repository file to a shared network directory (called the multiuser development directory). Developers are able to check out projects, make changes and then merge the changes into the master repository. When developers check out projects using the Administration Tool, files are automatically copied and overwritten in the background. Therefore, it is important for the administrator to perform setup tasks and for the developers to perform check-out and merge/publish procedures carefully, paying close attention to the Administration Tool messages that appear.
When developers check out projects, repository files are not automatically copied or overwritten. Instead, the Administration Tool creates two new files when projects are checked out: one to hold the original project data, and one to hold the project changes.
For example, when a repository developer checks out project A from master.rpd in the C:\multiuser development directory, the Administration Tool extracts all metadata related to project A and prompts the developer for a new file name to save the data. When the developer chooses a new file name, for example Mychanges.rpd, the Administration Tool creates two new files:
-
A file called MyChanges.rpd that will contain the changes made by the developer
-
A file called originalMyChanges.rpd that contains the original project data
The Administration Tool determines the developer's changes by comparing the Mychanges.rpd with the originalChanges.rpd. This information about what has changed is needed during the multiuser development merge process.
Note:
To reduce storage needs, repositories in Oracle Business Intelligence Enterprise Edition 12c Release 1 (12.2.1) are stored in a compressed format. Because of this, you might notice that the size of an RPD file opened and saved in this release is significantly smaller than the size of RPD files from previous releases.About the Multiuser Development Process
Multiuser development presupposes a clear understanding of customer technical and business objectives. It also requires that you follow clearly defined development processes and adhere rigorously to those processes, including consistent merging and reconciliation practices.
The following procedure shows the general steps to follow when deploying a multiuser development environment. The first three steps are usually performed by an administrator, and the remaining steps are usually performed by one or more developers.
Tip:
Oracle recommends that developers merge their changes as soon as possible or as often as possible. Frequent merges makes conflict resolution easier and simplifies the merge.To deploy a multiuser development environment:
-
Define projects to organize voluminous metadata into manageable components. See "Creating Projects" for more information. Consider these tips:
-
Use smaller RPDs to shorten and simplify development effort and unit testing.
-
Organize development resources by projects to spread workload and reduce inconsistencies and overwrites.
-
-
Set up a shared network directory to use as the multiuser development directory.
-
Copy the master repository to the multiuser development directory.
-
Extract one or more projects or the entire repository for local development.
-
Merge repository objects and resolve conflicts.
-
Because metadata objects are often highly interrelated, several developers could be working on the same objects.
-
You can perform regular subset refreshes to merge your local changes with the latest version of the master. When configuration conflicts occur during the merge process, developers are prompted for the correct process.
-
-
Publish changes to the network.
-
A final subset refresh (merge) is performed during the publishing step. Many developers can simultaneously work on the same objects, but only one can publish at a time. The repository is locked during the publishing step.
-
-
Use Logging and Backup features to identify points of erroneous or incorrect configuration.
-
The log file tracks multi-development activity, along with comments.
-
The master repository and developer repositories are automatically backed up for future reference and for use in manual rollback.
-
Setting Up Projects
Projects are the central enabler of metadata management. A project consists of a discretely-defined subset of the repository metadata, in the form of groups of logical stars with associated metadata. A project has the following characteristics:
-
Is largely defined by logical fact tables in the applicable business model
-
Automatically adds related logical dimension tables and other metadata during extract
-
Can have one to many logical fact tables
For projects that are just beginning, the best practice is to begin with a repository containing all the necessary physical table and join definitions. In this repository, you create a logical fact table as a placeholder in the Business Model and Mapping layer and a subject area as a placeholder in the Presentation layer. As you add business model and subject area metadata, new projects based on individual subject areas and logical facts can be created.
Follow these guidelines when setting up projects:
-
Only one person at a time can create projects in a master repository.
-
Do not delete projects unless they are no longer under active development.
-
Choose your project name carefully when creating a project. Do not rename projects.
-
Use care when removing objects from projects to avoid problems with repository extract/check-out.
This section contains the following topics:
About Projects
Projects can consist of Presentation layer subject areas and their associated business model logical facts, dimensions, groups, users, variables, and initialization blocks. Administrators can create projects so that developers and groups of developers can work on projects in their area of responsibility.
The primary reason to create projects is to support multiuser development. During the development process, you can split up the work (metadata) between different teams within your company by extracting the metadata into projects so that each project group can access a different part of the metadata.
In addition to multiuser development, you may want to create projects for licensing reasons. Before releasing a new software version, you may want to ensure that only the metadata that is relevant to the licensed application is in a project and that everything is consistent and complete. You can accomplish this by adding only the fact tables that are relevant to the application.
Project extractions are fact table centric. This ensures that project extracts are consistent and makes licensing much easier to manage.
About the Project Dialog
In the Project dialog, the left pane contains objects that you can use to create a project. The objects in the right pane are all the objects you chose (directly or indirectly) that reflect the complete set of data that makes each addition consistent. For example, if you select a subject area from the top node of the left-hand tree to add to your project, underlying fact tables of other subject areas are automatically added if needed to make the extract consistent.
The following describes the left pane of the Project dialog:
-
You can choose to group fact tables by Business Model or Subject Area, to help select the fact tables you want. Typically, grouping fact tables according to which ones are used by a particular subject area is a more convenient way to choose fact tables for your project. Note that a fact table can be associated with multiple subject areas, but belongs to one and only one business model.
Although it appears that you can add a subject area from the top node when you group facts by subject area, you are actually adding only the underlying fact tables. The subject areas only appear as choices to help you to add the elements you want in your project. Additionally, it adds any other objects that are necessary to make the extract consistent. To add an actual subject area, use the Presentation node at the bottom of the tree.
-
When grouped by business model, the left pane displays only facts that belong to the business model.
-
The Presentation node contains presentation layer objects. You must explicitly include these objects in your project if you want to work with them; they are not added automatically.
If you add presentation objects that are not related to any fact tables in the project, a warning appears when you click OK. The consistency checker also notes this discrepancy.
The right pane of the Project dialog shows the objects you select to be extracted, such as fact tables (under the Business Models folder), Presentation layer objects (under the Presentation folder), users, application roles, variables, and initialization blocks. These objects are extracted when you click OK.
Figure 3-1 shows the Project dialog.
Figure 3-1 Project Dialog with Fact Tables Grouped by Business Model
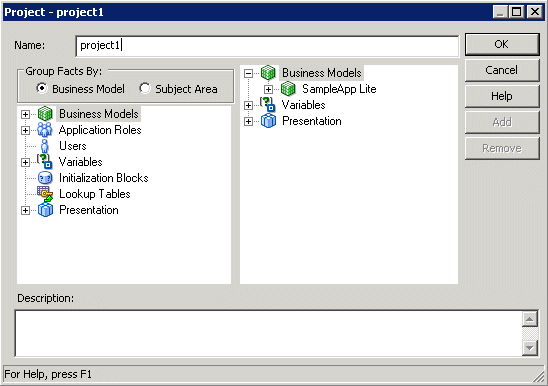
Description of ''Figure 3-1 Project Dialog with Fact Tables Grouped by Business Model''
Creating Projects
When creating a project, you typically select a subject area or a subset of logical fact tables related to the selected subject area, and the Administration Tool automatically adds any business model and Physical layer objects that are related. An object can be part of multiple projects. Alternatively, if you choose to group facts by business model, you can select a particular business model or a set of logical fact tables that are part of a business model. You also need to explicitly add any Presentation layer objects if you want them to be part of your project.
Note that although the project definition itself does not include Physical layer objects, these objects are extracted and determined through the project definition.
After you create projects, they become part of the metadata and are available to multiple developers who need to perform development tasks on the same master repository. When defined this way, projects typically become a consistent repository after a developer checks out the projects and saves them as a new repository file.
To create a project for a multiuser development environment:
-
In the Administration Tool, choose File > Open > Offline.
-
In the Open dialog, select the repository that you want to make available for multiuser development, then click OK. Provide the repository password, then click OK again.
-
Select Manage, then select Projects.
-
In the Project Manager dialog, in the right pane, right-click and then select New Project.
The left pane contains the objects that are available to be placed in a project. The right pane contains the objects that you select to be part of the project.
-
In the Project dialog, type a name for the project.
-
Choose whether to group facts by business model, or subject area. It is typically more convenient to group facts by subject area.
-
Perform one or more of the following steps to add fact tables to your project:
-
In the left pane, select a subject area or business model and then click Add. The Administration Tool automatically adds all the associated logical fact tables.
-
In the left pane, expand the subject areas or business models and select one or more logical fact tables that are related to the subject area or that are within the business model, then click Add.
The project is defined as explicitly containing the selected logical fact tables and implicitly containing all logical dimension tables that are joined to the selected logical fact tables (even though they do not appear in the right pane).
See "About the Project Dialog" for more information about the objects that appear in the left and right panes.
-
-
To remove fact tables from the project, in the right pane, select a fact table and click Remove. You can also remove all fact tables associated with a subject area or business model by selecting a subject area or business model and clicking Remove.
-
Optionally, add any application roles, users, variables, initialization blocks, or lookup tables needed for the project. Although objects like variables and initialization blocks that are directly referenced by other extracted objects are included automatically, you might want to include objects in your project that are not referenced. For example:
-
If you are using initialization blocks for authentication, include any necessary initialization blocks.
-
Include repository variables or other objects that are not yet referenced by other objects, but that you might want to use in future repository development.
-
Include users and application roles that are currently being used, or will be used in the future, as part of your data access security settings.
Tip: You may want to add the top node for each object type (for example, Variables), then selectively remove individual objects from the right pane.
-
-
Select the Presentation layer objects that you want to include in your project from the left pane and click Add. You must add these objects to see them in the project; they are not added automatically.
You can also remove particular presentation tables or columns from the project definition by double-clicking the object in the right pane, or selecting the object and clicking Remove.
Note:
If you do not see the set of subject areas you expect after the project is created, edit the project to explicitly add the subject areas you need. -
Click OK.
About Converting Older Projects During Repository Upgrade
When you upgrade a repository from Oracle Business Intelligence versions before 10.1.3.2, the project definition is upgraded. During the upgrade, the project definition, subject areas, target levels, list catalogs, and existing fact tables are automatically converted into simple fact tables in the following way:
-
Get presentation columns related to the target levels through the qualifying keys.
-
Get presentation columns related to the list catalogs through the qualifying keys.
-
Get presentation columns related to the subject areas.
-
Get all the logical columns from all the presentation columns.
-
Get all the logical columns from the fact tables in the project.
-
Get the fact tables from all the logical columns.
After the upgrade, projects contain only simple fact tables. All the security objects remain unchanged.
In addition, projects in repositories from any version before 12c Release 1 (12.2.1) are upgraded so that they explicitly contain Presentation layer objects. In previous releases, Presentation layer objects were implicitly included based on the permissions of the users included in the project.
Setting Up the Multiuser Development Directory
To prepare for multiuser development, an administrator performs the following tasks:
-
Identify or create a shared network directory that will be dedicated to multiuser development.
-
After creating all projects, copy the repository file in which you created the projects to the multiuser development directory where it will be used as your master repository for multiuser development.
After the administrator has identified the multiuser development directory and copied the repository file, developers must set up the Administration Tool to point to the multiuser development directory before they can check out projects.
This section contains the following topics:
Identifying the Multiuser Development Directory
After defining all projects, the administrator must identify or create a shared network directory (called the multiuser development directory) that all developers can access, and then upload the new master repository to that location. This shared network directory should be used only for multiuser development. This directory typically contains copies of repositories that need to be maintained by multiple developers. The multiuser development directory must be on a Windows system.
Developers create a pointer to the multiuser development directory when they set up the Administration Tool on their computers.
Caution:
The administrator must set up a separate, shared network directory that is dedicated to multiuser development. If not set up and used as specified, critical repository files can be unintentionally overwritten and repository data can be lost.Copying the Master Repository to the Multiuser Development Directory
After the multiuser development directory is identified, the administrator must copy the master repository file to the multiuser development directory. Projects from this master repository will be extracted and downloaded by the developers who will make changes and then merge these changes back into the master repository.
After you copy the repository to the multiuser development network directory, notify developers that the multiuser development environment is ready.
Even after starting repository development, it might be necessary to make manual changes to the master repository from time to time. See "Manually Updating the Master MUD Repository" for specific instructions on how to do this.
Setting Up a Pointer to the Multiuser Development Directory
Before checking out projects, developers working in the multiuser development environment must set up their local copies of the Administration Tool to point to the multiuser development directory on the network. The Administration Tool uses this location when the developer checks out and checks in objects in the multiuser development directory.
Note:
Until the pointer is set up, the multiuser options are not available in the Administration Tool.Initially, the network directory contains the master repositories. The repositories in this location are shared with other developers. Later, the network directory contains additional multiuser development history files, including historical subsets and repository versions. Do not manually delete any files in the multiuser development directory; these files are important and are used by the system.
When setting up the pointer, the developer can also complete the Full Name field. Although the field is optional, it is recommended that the developer complete this field to allow other developers to know who has locked the repository.
To set up a pointer to the multiuser development directory:
-
From the Administration Tool menu, choose Tools > Options.
-
In the Options dialog, click the Multiuser tab.
-
In the Multiuser tab, for Multiuser development directory, enter the full path to the network directory.
Alternatively, click Browse, select the multiuser development directory, and then click OK.
-
In the Full Name field, type your complete name, then click OK.
Making Changes in a Multiuser Development Environment
During check-out, refresh, and publish, a copy of the master repository is temporarily copied to the developer's local repository directory (typically, ORACLE_INSTANCE\bifoundation\OracleBIServerComponent\coreapplication_obisn\repository by default). After checking out projects or the entire repository and making changes in a local repository file, each developer can publish (merge) changes into the master repository or discard the changes.
This section contains the following topics:
About Changing and Testing Metadata
Most types of changes that can be made to standard repository files are also supported for local repository files. Developers can add new logical columns, add new logical tables, change table definitions, change logical table sources, and so on. Developers might also work simultaneously on the same projects or entire repository locally. Keep in mind, however, that Oracle Business Intelligence assumes the individual developer understands the implications that these changes might have on the master repository. For example, if a developer deletes an object in a local repository, this change is propagated to the master repository when local changes are merged without a warning prompt.
To ensure metadata integrity, do not remove a physical column unless there are no logical table source mappings to that physical column. Because of this, if you use a multiuser development environment, you cannot delete a logical column and its associated physical column at the same time. Instead, you must first delete the logical column and perform a merge. Then, you can delete the physical column and perform another merge to safely remove the object.
In some cases, logical column types can change over the course of MUD development, which results in unexpected logical column types. When this occurs, you can generate a list of logical columns and their types using the Generate Logical Column Type Document utility in the Administration Tool or biservergentypexml. Then use the Compare Logical Column Types utility for subsequent MUD versions to ensure that the logical column types match as expected. For example, you can generate a logical column type list for repository version 20, and use the Compare Logical Column Types utility to compare the list against repository version 30. See "Generating a List of Logical Column Types" and "Comparing Logical Column Types" for more information.
Changes to physical connection settings are not propagated to the master repository upon merge and publish. This ensures that developers can apply settings for their local test data sources to perform unit testing of their model changes without impacting other developers.
In addition to physical connection settings, security settings and database feature table changes are not retained in a multiuser development merge to prevent developers from overwriting passwords and other important objects in the master repository.
After making changes to a local repository, the developer uploads the repository and tests the edited metadata.
Note:
DSNs that are specified in the metadata must exist on the developer's workstation.Making Changes to a Repository Using Projects
The following sections provide information on making changes in a multiuser development environment using projects:
Checking Out Repository Projects
After setting up a pointer to the multiuser development default directory, a developer can check out projects, change metadata, and test the metadata. In the File > Multiuser submenu, the Checkout option is available only when there is a multiuser development directory defined in the Multiuser tab of the Options dialog.
This section contains the following topics:
About Repository Project Checkout
During checkout, the Administration Tool performs the following tasks:
-
In the developer's local repository directory, the Administration Tool makes a temporary copy of the master repository.
Note:
If a repository with that name exists in this location, the developer is asked to confirm overwriting the existing repository. If the developer clicks Yes, the existing local repository is immediately overwritten in the background and after the new repository is saved, the temporary master repository file is automatically deleted. -
In the developer's local repository directory, the Administration Tool saves a local copy of the selected projects in a new repository, such as Metadata1.rpd. The developer provides a name for the local copy. The developer makes metadata changes in this file. The number is incremented for each checkout for that session.
-
In the developer's local repository directory, the Administration Tool saves a second local copy of the new repository, adding "original" as the prefix (for example, originalMetadata1.rpd).
-
After the developer saves the new repository file, check out is complete. In the developer's local repository directory, the temporary copy of the master repository is automatically deleted.
Caution:
When the developer selects and saves the projects to a local repository file, the Administration Tool does not place a lock on the projects in the master repository on the shared network drive. Therefore, nothing physically prevents others from working on the same project. To determine if a project has been checked out, you need to look in the log file in the multiuser development directory on the shared network drive.
Checking Out Projects
This section explains how to check out projects using the Administration Tool.
To check out projects:
-
From the Administration Tool menu, choose File > Multiuser > Checkout.
-
If there is more than one repository in the multiuser development directory, then the Multiuser Development Checkout dialog is displayed. Select the appropriate repository, and click OK.
This dialog is not displayed if there is only one repository in the multiuser development directory.
-
In the Extract from dialog, type the repository password, and click OK.
If no projects exist in the repository, then a message is displayed and the repository does not open.
-
If there is more than one project in the master repository, then the Browse dialog is displayed. Select the projects that you want to be part of your project extract, and click OK.
Figure 3-2 shows the Browse dialog for selecting projects.
Figure 3-2 Browse Dialog for Selecting Projects

Description of ''Figure 3-2 Browse Dialog for Selecting Projects''
If only one project exists in the master repository, then it is selected automatically and the Browse dialog is not displayed.
-
In the Create new subset repository dialog, type a name for the new repository (for example, Metadata1.rpd) and click Save.
A working project extract repository is saved on your local computer. The name is exactly as you specified and is opened in offline mode. A log file is also created.
Caution:
A second copy of the project extract repository is saved in the same location. The name of this version contains the word "original" added to the beginning of the name that you assigned to the repository extract. Do not change the original project extract repository. It is used during the multiuser development merge process, and when you want to compare your changes to the original projects.
Using the extractprojects Utility to Extract Projects
You can use the Oracle BI Server utility extractprojects to extract projects from a given repository without the overhead of the MUD environment. The extractprojects utility is available on both Windows and UNIX systems. You can use extractprojects only with binary repositories in RPD format.
The extractprojects utility generates an RPD file that includes the set of projects that you specify. The utility does not perform other tasks that are performed when you check out projects using the Administration Tool, such as saving an original repository file or tracking the extract as a check-out in the MUD directory.
The location of the extractprojects utility is:
ORACLE_HOME/user_projects/domains/bi/bitools/bin
The extractprojects utility takes the following parameters:
extractprojects -B base_repository_name -O output_repository_name {-I input_project_name} [-P repository_password] [-L] [-E project_list_file_name]
Where:
base_repository_name is the name and path of the repository from which you want to extract projects.
output_repository_name is the name and path of the repository generated by the utility.
input_project_name is the name of a project you want to extract. You can enter multiple projects. Be sure to precede each project entry with -I (for example, -I project1 -I project2). If the project name contains spaces, enclose it in double quotes (for example, "project 1").
repository_password is the password for the repository from which you want to extract projects.
Note that the repository_password argument is optional. If you do not provide the password argument, you are prompted to enter the password when you run the command. To minimize the risk of security breaches, Oracle recommends that you do not provide password arguments either on the command line or in scripts. Note that the password argument is supported for backward compatibility only, and will be removed in a future release. For scripting purposes, you can pass the password through standard input.
- L enables logging. When logging is enabled, a log file in the format ProjExtr.YYYYMMDD.HHMMSS.xml is created in the Oracle BI Server logging directory. For example:
ORACLE_INSTANCE/diagnostics/logs/OracleBIServerComponent/coreapplication_obisn/ProjExtr.20100616.082904.xml
-E is an optional argument that lets you print a list of all projects contained in a repository into a file. Specify project_list_file_name after the option to specify the file name and location in which you want to store the project names. -E is only used with -B and -P and does not actually perform a project extract.
Note that -U and -F are visible in the syntax list, but are for internal use only.
The following example extracts project1 and project2 from my_repos.rpd and creates a new repository called extract_repos.rpd:
extractprojects -B my_repos.rpd -O extract_repos.rpd -I project1 -I project2
Give password: my_rpd_password
Note:
Be sure to provide the full pathnames to your repository files, both the input file and the output file, if they are located in a different directory.Refreshing the Local Project Extract
Use the Refresh Subset option to refresh the local project extract with any changes that were made to the master repository. This option also merges the latest changes with the local project extract. Perform this task as an incremental step during development before publishing your final changes at the end of your development session.
It is a best practice to refresh your local project extract frequently so that conflicts during merge can be identified and dealt with on an incremental basis. If too many changes are merged at one time, then making the appropriate merge decisions for conflicts can be confusing and error-prone.
Making Changes to an Entire Repository
The preferred method for making changes to a repository in a multiuser development environment is to use projects. You might encounter situations during which you want to make changes that involve you accessing the entire repository at one time.
If you want to access the entire repository, including objects not assigned to projects, then select the Whole Rpd Checkout option in the File > Multiuser submenu. Multiple developers can access the entire repository at one time. Use this method only when necessary, because system performance will likely decrease, especially during merges of large repositories.
About Multiuser Development Menu Options
After the local developer makes changes, tests the changes, and saves the repository locally, the local developer can perform the following tasks from the File > Multiuser submenu:
-
Compare with Original. Compares the working extracted local repository to the original extracted repository. When you select this option, the Compare repositories dialog is displayed and lists all the changes that were made to the working extracted repository since you checked out the projects or the entire repository.
-
Refresh Subset. Refreshes the local project extract with any changes that were made to the master repository. The changes from the master are merged with your local changes.
If changes have been made to the master repository, then the old project extract file (originalfilename.rpd) is replaced with a new project extract file called currentfilename.rpd.
-
Publish to Network. Publishes changes made to the local project extract or the entire repository to the master repository. A lock is acquired to lock the master repository during the publish step. Publishing the changes automatically performs a Refresh Subset operation to merge the local changes with any additional changes from the master. Then, the merged changes are published to the master repository, the lock is released, and the local repository is closed.
-
Undo Publishing. Used when mandatory consistency checks are enforced during the publishing step, and errors occur. When you are notified of consistency check errors during publishing, you can choose to fix the errors immediately, as part of the publishing step. The master repository is locked during this process. If you need to release the lock on the master and fix the changes later, then select Undo Publishing to release the lock and return to the latest subset extract repository.
-
Discard Local Changes. Any time after check out and before publishing, you can discard your changes. When you select this option, the working repository closes without giving you an opportunity to save your work.
Caution:
If you select this option, there is no opportunity to change your mind. For example, no confirmation dialog is displayed.
Publishing Changes to Multiuser Development Repositories
After changing and testing the metadata on a local computer, the developer must publish local changes to the master repository in the multiuser development directory.
The Oracle BI repository development process uses a three-way merge to manage concurrent development. Metadata merges are done first on local environments and then merged with the master repository. A three-way merge identifies local changes based on the following repository characteristics:
-
The Master RPD
-
The Baseline RPD or Master RPD snapshot at time of project extraction
-
The current locally developed and changed RPD
Changes are managed by merge and reconciliation. Most of the merging process is automatic, and changes do not conflict. In case of any conflicting metadata sources, developers can locate and resolve them.
An administrator can also merge the changes from multiple repositories manually, or import objects from different repositories outside of a particular MUD environment.
Ensure that you merge changes frequently. The merge process is very complex and can become difficult if there are too many changes. See Appendix D, "Merge Rules" for more information about how objects are merged during the merge process.
It is a best practice to refresh your subset repository regularly to identify conflicts early. Refreshing your subset performs a subset remerge with the latest version of the master, then leaves the repository open for you to continue making changes until you are ready to publish.
This section contains the following topics:
About the Multiuser Development Merge Process
The merge process involves the following files:
-
Local (subset) repository, either original or current (refreshed). The local subset repository can be one of the following:
-
If no subset refresh has been performed, contains the state of the projects or the entire repository as originally extracted. This repository name begins with "original" (for example, originalDevelopment2.rpd).
-
If a subset refresh has been performed, contains the state of the projects or the entire repository since the last merge that occurred during the subset refresh. The repository name begins with "current" (for example, currentDevelopment2.rpd).
-
-
Modified local (subset) repository. Contains the extracted projects after being modified by the developer. This version is stored in the same location as the original or current version of the local subset repository.
-
Latest master repository. The latest master is copied locally for the merge, then published to the multiuser development directory after the merge. Note that this file might have been modified by other developers before this merge.
During the merge, the Administration Tool checks for added objects and if found, a warning message is displayed. The following list describes what happens during this step:
-
Warning about added objects. A developer who checks out a project has the ability to modify that project in any way and check it back in. Deletions and modifications are ways in which the integrity of the project is maintained. However, adding objects might introduce objects into the repository that do not belong to any project. Therefore, all project-related objects are checked and if a new object is found, a warning message is displayed.
Caution:
You must add newly created metadata to the project definition in the master repository for it to be visible in future extracted versions of the project. For example, if a developer checks out a project, adds a new object, and checks it in, then the new object is not visible in extracted versions of the project until it is explicitly added to the project definition. See "Creating Projects" for instructions. -
Aggregation of related objects. In the warning message, only the parent object is reported. The Administration Tool aggregates all the objects to make the message more usable. For example, if a developer added a new business model, only the business model name is included in the warning message to the user, not the names of the tables, columns, dimensions, and so on.
When a developer publishes changes to the network, the following actions occur:
-
The master repository in the multiuser development directory is overwritten with the repository that contains the developer's changes.
-
The master_repository.lck file is deleted. If another developer checks out the changed project from the master repository or checks out the entire repository, then the changes made by the first developer are exposed to the other developer.
How Are Multiuser Merges Different from Standard Repository Merges?
The multiuser development publishing process uses the same technology as the standard repository merge process with a few important differences. For example, for MUD merges, you typically do not want to retain changes to security settings and data sources, to prevent developers from overwriting passwords and other important objects in the master repository. Because of this, changes to security settings and data source connections are not retained when you perform a MUD merge. In addition, inserts (created objects) are applied automatically.
See "Merge Rules and Behavior for Multiuser Development Merges" for full details.
Publishing to the Network
When the publishing process begins, the Administration Tool automatically copies the current version of the master repository from the multiuser development directory to the local repository directory on the developer's computer (typically ORACLE_INSTANCE\bifoundation\OracleBIServerComponent\coreapplication_obisn\repository) and updates the log files in the local and multiuser development directories. This is necessary because the master repository in the multiuser development directory might have changed after the developer checked out the projects, or since the last subset refresh.
To publish local changes to the master repository:
-
In the Administration Tool, select File > Multiuser > Publish to Network, then click Yes if prompted to save changes.
-
In the Lock Information dialog, in the Comment field, type a description of the changes that you made, then click OK.
Figure 3-3 shows the Lock Information dialog.
-
If there are any conflicts, then the Merge Repository Wizard opens and the Define Merge Strategy screen is displayed. Make merge decisions about whether to include or exclude objects by selecting Current or Modified from the Decision list. When you select an object in the decision table, the read-only text box below the decision table describes what changes were made to that object in the current repository. You can also click View Change Statistics to see a summary of changes. Click Finish when you are finished making merge decisions.
See "Performing Full Repository Merges" for additional information about the Define Merge Strategy screen.
A lack of conflicts does not mean that there are no differences between the repositories. Instead, it means that there are no decisions that have to be explicitly made by the developer to publish changes. See "How Are Multiuser Merges Different from Standard Repository Merges?" for information about conflicts that are resolved automatically in a MUD merge.
In both cases, a CSV file is created in the local directory that contains details of the merged changes.
-
After you confirm all the changes, click Save.
The master repository in the multiuser development directory is overwritten with the copy of the repository containing the developer's changes.

Enforcing Consistent Repositories When Publishing Changes
You can enforce a mandatory consistency check during the Publish to Network step by setting the Mandatory Consistency Check option to Yes in the multiuser development options file. See "Setting Multiuser Development Options" for more information about the options file.
When this option is set to Yes, the Consistency Checker runs as part of the publishing process. Publishing cannot proceed unless no errors exist in the given repository.
If consistency errors occur, then a message is displayed. Select one of the following options:
-
Yes: Select this option to fix the consistency check errors immediately. The master repository remains locked during this process.
If you select this option and change your mind (such as when you need to release the lock on the master, or when fixing the changes is more complex than you anticipated), then select File > Multiuser > Undo Publishing. This option unlocks the master repository and returns you to your latest subset repository (as an extract from the currently merged master repository).
-
No: Select this option to cancel the publishing step and fix the consistency check errors later. The master repository is unlocked, and you are returned to your latest subset extract repository.
Branching in Multiuser Development
Branching is a further refinement of the merging development process. Branching can provide higher efficiencies over large development teams that have overlapping releases, but it requires significant administrative overhead.
This section contains the following topics:
About Branching
In branching, developers work on private branches to isolate their code from other developers and merge changes back to the main branch. Different strategies can be followed, depending on the size of the development team.
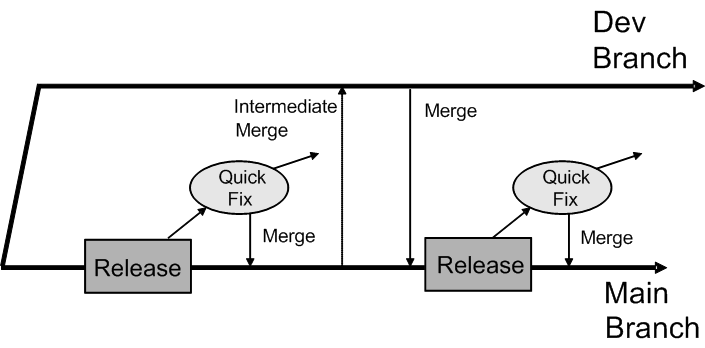
In the Simple Development Model, all development occurs on a single main branch. This strategy has the following characteristics:
-
Only for emergency fixes
-
Checkouts might not be the most current code
-
Carries a stability risk for the mainline branch
Figure 3-4 shows the Simple Development Model.

In the Small Team Development Model, development occurs on a single Dev branch, with a separate Main branch strictly for releases. This strategy has the following characteristics:
-
The Mainline is the official release branch
-
Development occurs on a separate branch
-
Stable code is merged back to Main at key milestones
-
Branches are synchronized periodically
Figure 3-5 shows the Small Team Development Model.
In the Multi-Team, Multi-Release Model, development occurs on multiple Dev branches, again with a separate Main branch strictly for releases. This strategy has the following characteristics:
-
Supports more efficiency over disparate teams
-
Development occurs on separate branches
-
Stable code is merged back to Main at key milestones
-
Branches are synchronized periodically
Figure 3-6 shows the Multi-Team, Multi-Release Model.
Figure 3-6 Multi-Team, Multi-Release Model
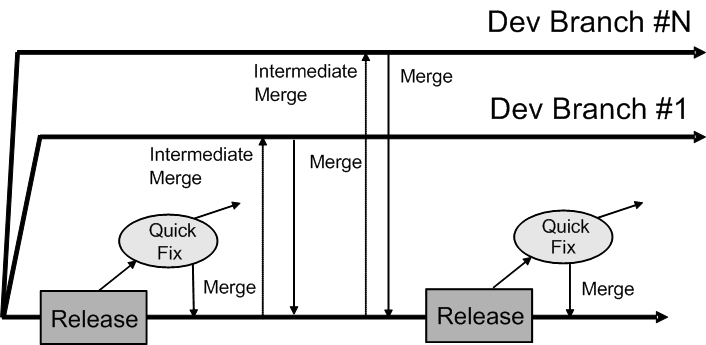
Description of ''Figure 3-6 Multi-Team, Multi-Release Model''
Using the Multi-Team, Multi-Release Model in Oracle Business Intelligence
Using complex branching strategies in Oracle Business Intelligence requires attentive organization of repository files, as well as altering the Multiuser setting in the Administration Tool.
The following procedure provides an overview of the required steps.
To use the multi-team, multi-release model branching strategy:
-
Create a Main repository (Master Repository) and store it in the Master multiuser development directory.
-
Projects must be explicitly defined.
-
Branch developers should not have access to the Master directory.
-
-
Create a subset of branch repositories by extracting from Main and storing them as the Team1 and Team2 multiuser development directories. The Main and Team RPDs must be stored and secured in separate directories on the network.
-
Developers must check out, develop, merge, and publish from their respective Team RPDs. Developers A1 through A3 and B1 through B3 should manage their metadata work and merge to their Team repository.
-
Teams 1 and 2 must maintain their own repositories and periodically synchronize from Main to Team branches.
-
The Team repositories must be merged back into and published in the Main repository.
-
-
One specific group (for example, release management) should manage all project definitions, perform merges, publish, and synchronize the Team RPDs back to Main.
Synchronizing RPD Branches
For large development teams, it is a good practice to perform periodic branch synchronization as Main changes, in order to ease the ultimate Team publishing step.
Use the Administration Tool to synchronize repositories in a three-way merge.
To synchronize repository branches:
-
Publish all changes from your Team development branch and open the RPD in the Administration Tool. This the current repository.
-
Extract a fresh Branch subset from Main. This is the modified repository.
-
In the Administration Tool, select File, then select Merge and browse to the backup of the previous Branch subset. This is the original repository.
-
Resolve all issues and perform the merge.
The RPD named in the Save merged repository as field becomes the new branch development RPD and is called the Original in future synchronizations.
Viewing and Deleting History for Multiuser Development
You can view and delete the development history of a multiuser development repository.
This section contains the following topics:
Viewing Multiuser Development History
You can view the development history of a multiuser development repository. In the Administration Tool, multiuser development history is only available when no repository is open and after the administrator sets up the shared network directory. This prevents the confusion that could occur if a user opened a history log that did not match an open, unrelated repository.
To view multiuser development history:
-
Open the Administration Tool.
-
Without opening a repository, select File > Multiuser > History.
-
In the Multiuser Development History dialog, select a repository.
A list of all master repositories in the multiuser development directory appears. If the directory contains only one master repository, it is selected by default, and no list appears.
-
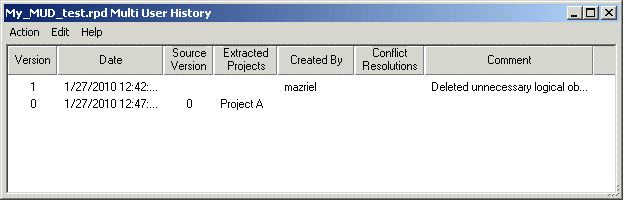
In the Open Offline dialog, type the password for the repository. The Multi User History dialog appears.
Figure 3-7 shows the Multi User History dialog.
-
In the Multi User History dialog, right-click a row and select an option. Table 3-1 describes the options in the Multi User History dialog.
Tip: To see details for all revisions, right-click in the background with no rows selected and select View > Details.
Table 3-1 Options in the Multi User History Dialog
Action Description View > Repository
Loads the selected master version of the repository in the Administration Tool in read-only mode.
View > Prior to Merge > Projects
Loads the selected version of a modified subset repository in the Administration Tool in read-only mode.
View > Conflict Resolution
Loads all necessary repositories of the selected version. Also shows the Merge dialog in read-only mode with all selected decisions as they were during the Merge Local Changes activity at that time. Double-clicking a row for a version with conflict resolutions has the same effect as selecting this menu item.
Note: This menu item is only enabled for versions that had conflict resolutions.
View > Details
Displays a log with details for the selected versions, or displays details for all versions if no specific versions are selected.
View > Prior to Merge > Changes
Compares the modified subset repository of the selected version with the original subset repository and shows all changes made by the user in the selected version.
Find and Find Again
Lets you search the list.
Select All
Selects all items displayed in the dialog.
Delete
Available only to multiuser development administrators.
Deleting Multiuser Development History
Only multiuser development administrators can delete history. Administrators are defined in a special hidden option file in the multiuser development directory. See "Setting Multiuser Development Options" for more information.
An administrator can delete the entire MUD history, or the oldest 1 to n versions. It is not possible to delete versions in the middle of the range. For example, an administrator cannot delete version 3 if there are still versions 1 and 2. If an administrator deletes the entire MUD history, newly assigned version numbers restart at version 1.
If an administrator deletes a MUD history version from which a developer has checked out a subset, and the developer is still working on it, the developer will not be able to publish to the MUD directory. As a result, deleting all MUD history prevents any developer who has currently checked out a subset from publishing it. Because of this, administrators should communicate with developers before the MUD history is cleared.
Setting Multiuser Development Options
You can create a multiuser development option file to specify options for multiuser development. The option file is a text file, in standard Windows INI format.
The option file has the following properties and characteristics:
-
The option file must be placed in the multiuser development directory. The file has the same name as the corresponding master repository, but with an .opt extension. For example, for \\network\MUD\sales.rpd, create an option file called \\network\MUD\sales.opt.
-
The file should have the Hidden flag turned on.
-
In general, the option file should be managed only by multiuser development administrators. To ensure this, you may want to change the sharing permissions for the file.
The following example shows a multiuser development option file:
[Options]
BuildNumber = Yes
Enforce Build Number = 11.1.1.7.0
Enforce MUD Protocol Version Number = 1
Prevent Rpd Upgrade = Yes
Admin = admin1;admin2
Mandatory Consistency Check = Yes
Equalize During Merge = Yes
Options that are not explicitly set are turned off by default. To turn an option on, set its value to Yes. To turn an option off, either remove it from the option file, or set its value to No.
Table 3-2 explains the options in the multiuser development option file.
Table 3-2 Options in the Multiuser Development Option File
| Option | Description |
|---|---|
|
BuildNumber |
When set to Yes, the build version of the Administration Tool is displayed in the MUD history. |
|
Enforce Build Number |
When specified, ensures that only users with an exact match of the given version of the Administration Tool can perform MUD operations. Select the Help menu, then select About to view the Administration Tool version. This option can be used in conjunction with Enforce MUD Protocol Version Number and Prevent Rpd Upgrade. Remove this line if you do not want to enforce Administration Tool version consistency for MUD operations. |
|
Enforce MUD Protocol Version Number |
When specified, ensures that only users with an exact match of the given MUD version can perform MUD operations. Select the Help menu, then select About to view the MUD version. This option can be used in conjunction with Enforce Build Number and Prevent Rpd Upgrade. Remove this line if you do not want to enforce MUD version consistency for MUD operations. |
|
Prevent Rpd Upgrade |
When specified, ensures that only users with an exact match of the given repository version can perform MUD operations. Select the Help menu, then select About to view the repository version. This option can be used in conjunction with Enforce Build Number and Enforce MUD Protocol Version Number. Remove this line if you do not want to enforce repository version consistency for MUD operations. |
|
Admin |
Lists multiuser development administrators. Administrators must be defined in the option file before they can delete MUD history. Administrators are defined by their computer/network login names. When multiple administrators exist, separate administrator names by semicolons. For example: Admin=jsmith;mramirez;plafleur |
|
Mandatory Consistency Check |
When set to Yes, the publish step performs a consistency check. Publishing cannot proceed unless there are no errors in the given repository. |
|
Equalize During Merge |
When set to Yes, the multiuser development merge process performs mandatory equalization during MUD merges. Note that setting this option to Yes affects the performance of the merge process. |