33 Working with Adaptive Case Management
This chapter describes how to create and configure a case management definition.
This chapter includes the following sections:
33.1 Introduction to Adaptive Case Management
Adaptive case management is a way of modeling very flexible and data intensive business processes.
Use adaptive case management to model a pattern of work with the following characteristics:
-
Complex interaction of people, content and policies
-
Complex decision making and judgments
-
The progress of the case depends on user decisions, actions, events, and policies
-
Changes at runtime, for example, adding new stakeholders enables new actions
-
Context-driven assignments, for example, assignments based on the number of cases resolved by a certain analyst and the time it took them to resolve them
Case management enables you to handle unstructured ad-hoc processes. It relies on the content and information of the process so that the user can make informed business decisions. It focuses on unpredictable business processes which rely on worker knowledge and involve human participants.
Case management involves:
-
People, often referred to as case workers or knowledge workers
-
Data
-
Documents
-
Collaboration
-
Reporting
-
History
-
Events
-
Policies
-
Processes
A case is a collection of information, processes, tasks, rules, services. It requires the worker's knowledge, their involvement and active collaboration to move the case forward.
Adaptive case management enables you to define only the activities a user performs to achieve a goal without defining the workflow process. However, it does supports dynamic workflows, structured processes and a combination of both.
A case definition contains various case activities that represent the different work that users can perform in the context of a case. Oracle BPM allows you to define case activities based on:
-
a Human Task
-
a BPMN process
-
a custom Java class
33.1.1 Differences Between Adaptive Case Management and Business Processes
Adaptive case management allows the end user to define the case flow at runtime, while business processes require you to define the flow at design time. Adaptive case management uses documents and contextual information to determine the flow of the case at runtime.
Table 33-1 illustrates the differences between adaptive case management and business processes.
Table 33-1 Differences between adaptive case management and business processes
| Adaptive Case Management | Business Process |
|---|---|
|
Data centric |
Process centric |
|
Adhoc, unstructured progress of a case from creation to its final state |
The process instance follows a predefined workflow |
|
Non-deterministic - the case flow is dynamically determined at runtime |
The process flow logic is defined at design time |
|
The case consists of a collection of processes and isolated tasks |
The flow logic is expressed in a process model |
|
The flow is determined by objectives, the case workers choose actions to meet a certain goal |
The flow is designed to automate and improve processes to increase efficiency |
|
Knowledge work based |
Routine work based |
|
Collaborative environment |
Collaboration requirements are not a priority |
|
Strongly relies on documents |
Uses structure data |
33.1.2 Adaptive Case Management Artifacts
The key artifacts in adaptive case management are:
-
Case: a collection of structured, semi-structured, un-structured processes, information and interactions used to make a business decision.
-
Case Model: models the definition of the case. The case has multiple attributes such as name, type, various milestones. It also has associations like the behavior container and root folder. The definition of the case is the collection of these attributes and associations.
-
Case Instance: a collection of documents, data and case activities that are used to process the case and audit the progress of the case.
-
Case Folder: the folder(s) in the Content Management System where the case information is stored.
-
Case Data: the data for the case stored in the BPM database.
-
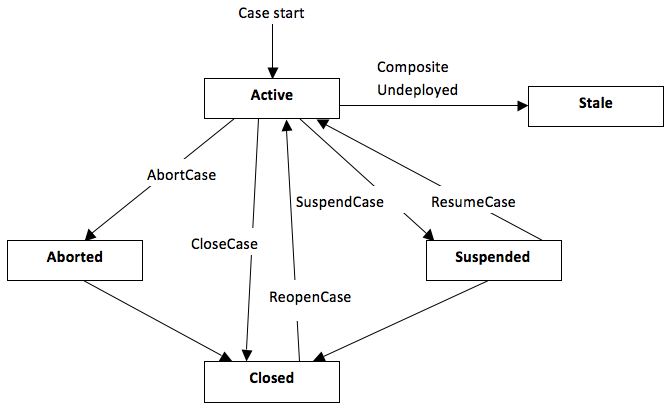
Case Lifecycle: the case lifecycle is reflected by the case state, which can be one of active, stale, suspended, aborted, or closed.
-
Milestones: checkpoints that indicate the progress of a case and represent the completion of a deliverable or a set of related deliverables. Stakeholders can use milestones to obtain a high level view of the status of the case.
-
Case Activity: the work that can be performed in the context of a case. Case activities have various properties that define their behavior. Case activities can be mandatory, conditional, or optional. Case activities can be manual or automatic. Manual case activities require a case worker to initiate them while automatic case activities are initiated by the case runtime. You implement case activities using a BPMN process, a Human Task or a custom java class.
-
Sub Case: a child task of a case, used when additional activities must be spawned as part of the processing of the parent case. Sub cases are instantiated at run time and are similar to case activities, except that they only inherit data from the parent case.
-
Case Event: include case lifecycle changes, case milestone changes, case activity changes and other manual case events. Manual case events are events modeled in the case corresponding to various manual actions that can occur during the case processing.
33.1.3 Use Cases
Adaptive case management is suitable to model business processes in many different industries and scenarios:
-
Financial Services: loan origination, credit and debit card dispute management, financial crime management (suspicious activity reporting), wealth management, brokerage, trading, new business account opening, e-bank account opening, accounts payable, accounts receivable, and B2B order management.
-
Insurance: P&C claims processing, policy management, policy servicing, underwriting, fraud prevention, customer on-boarding.
-
Health Care: payer claims processing, policy and procedure management, virtual patient records management, member service management, provider service management, group sales management, health plan insight, clinical and operational insight.
-
Energy & Utilities: process safety management, FERC e-tariff, transmittal process, SOP processing.
-
Public Sector: citizen benefits eligibility and benefit's enrollment, grant management, public safety, tax and custom filling, court solution and judicial matters.
-
Human Resources: employee on-boarding, employee off-boarding, employee performance review, employee benefits administration.
-
Legal: contract management, legal matter management, auditing and compliance.
-
Customer Service: customer correspondence, call center, constituent services.
33.2 Creating a Case
A case can be added to an already existing BPM project that doesn't already include one, or you can create a new BPM project for a case.
You can define only one case per BPM project.
33.2.1 How to Create a Case
To create a case you must open or create a BPM project and then create the case. For more information on how to create a BPM project, see Creating and Working with Projects.
To create a case:
33.3 Configuring a Case
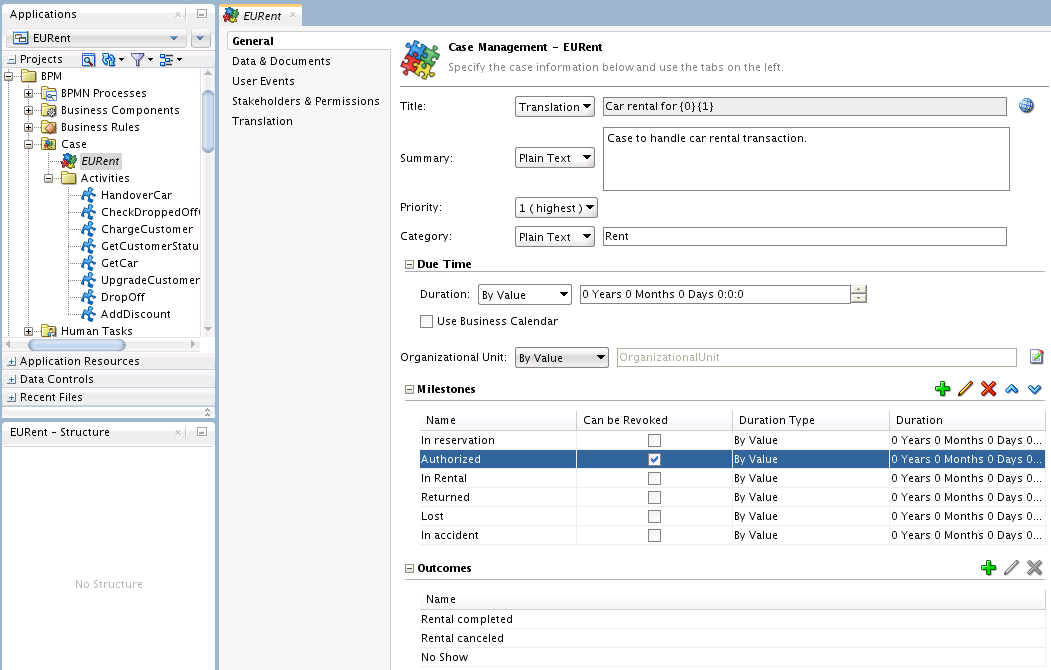
Use the Case Management editor to configure cases.
Figure 33-2 shows the Case Management Editor.
33.4 Configuring Case General Properties
Use the General tab to configure the general properties of a case.
The General tab includes the following sections:
-
General properties - use this section to configure properties for a case including Title, Summary, a text summary of what the case does, Priority, a value from 1 (high) through 5 (low), and a Category, set as Plain Text or Translation. See How to Configure the Case General Properties
-
Due Time - specifies the case due date using the Duration value.
The Duration can be expressed as a static value (select By Value) or as an XPath expression (select By Expression). The case due date is calculated from when a case starts.
If Use Business Calendar is selected, and an organizational unit is specified (see below), the case due date is calculated using the business calendar associated with the organizational unit. Otherwise the normal calendar is used. See Case Deadlines.
-
Organizational Unit - select an organizational unit to be associated with the case. It can be expressed as a static value (select By Value) or as an XPath expression (select By Expression). Only members of the organizational unit specified are able to access the case, even if they are also specified as stakeholders.
-
Milestones - specifies milestones and their properties for the case.
Milestones represent the completion of a deliverable or a set of related deliverables. They are checkpoints that indicate the progress of a case. Stakeholders can use them to obtain a high level idea of the status of the case.
There is no direct activity or work associated with milestones.
Use the Can Be Revoked checkbox to indicate that a milestone can be revoked. Only milestones that have been achieved can be revoked. This does not affect other achieved milestones for the case.
The milestone Duration can be set using a value or an XPath expression. This is used to calculate the milestone deadline, based on when the milestone started. See Case Deadlines.
Add, edit, delete, and re-order milestones using the controls in the panel. Use the panel to configure the Name, Can be Revoked value, Duration Type, and Duration for milestones. See How to Add Case Milestones.
-
Outcomes - create, edit, and delete case outcomes in this section.
Outcomes are user-defined values that are assigned to the case when it is completed. For example in a medical treatment case, possible outcomes might be: admitted, discharged, referred.
Each outcome includes a name, and a display name. See How to Define Case Outcomes
33.4.1 Case Deadlines
Cases support two types of deadlines - case due dates, and milestone deadlines. Both of these are expressed as a duration, specified as either a value or an XPath expression. Durations are configured in the General tab in the Case Management editor.
Case due dates are calculated using the value specified in the Duration field in the Due Time panel, based on the starting date and time of the case. When the case due date is reached, a case deadline event is raised.
If Use Business Calendar is selected, and an organizational unit is specified, the case due date is calculated using the business calendar associated with the organizational unit. Otherwise the normal calendar is used.
Milestone deadlines are calculated using value specified in the Duration field for the milestone in the Milestones panel, based on the starting date and time of the milestone. If a milestone is still active when the milestone deadline is reached, a milestone deadline event is raised.
33.4.2 How to Configure the Case General Properties
Specify general case information using the General tab of the Case Management editor.
To configure the general properties:
33.4.3 How to Add Case Milestones
Create milestones to track progress in cases. Do not include spaces in milestone names.
To add a milestone:
- Edit the case.
- Select the General tab.
- Expand the Milestones section.
- Click Add.
- Enter the name of the milestone.
- Click OK.
33.5 Configuring Case Data and Documents
Data and document storage is configured in the Data & Documents tab in the Case Management editor.
Cases can be configured to store documents in an enterprise content manager.
33.5.1 Case Document Operations
A case can contain one or more related documents. Stakeholders can upload case documents that only other stakeholders with the appropriate permissions can view or delete.
To perform operations on documents, use the CaseStreamService as described in the Oracle Fusion Middleware Business Process Management Suite Java API Reference.
33.5.2 Specifying Permission Tags for Case Documents
You can configure who can read and update documents using permission tags. For more information about permission tags, see Defining Case Tag Permissions.
You can specify permission tags in the following situations:
-
When creating a new document using the method
uploadDocument()from theCaseDocumentStreamServiceclass. -
By changing the permission on an existing document using the method
setPermissionTag()from theCaseServiceclass, passing the appropriate value in the permission tag parameter.
The support for permission tags on documents depends on the type of document store:
-
Non Oracle Content Management Systems
This feature is not supported for content management systems that are not Oracle WebCenter Content.
-
BPM Database
If you use BPM DB as the document store, then you can set permission tags on case documents without having to configure anything. See Using the BPM Database for Data Storage.
-
Oracle WebCenter Content
When you set a permission tag for a document this value is stored in the metadata information field for the CaseManagementPermissionTag. You must create the CaseManagementPermissionTag information field before using permission tags on a document. To create the field, see Creating Case Fields in Oracle WebCenter Content. When you try to set a permission tag on an existing document, it fails.
33.5.3 Using the BPM Database for Data Storage
There are some differences in behavior when using the BPM database for data storage:
-
If the parent root folder and the instance folder are not specified in the case design, the folder used to store documents is shown as a slash, similar to a root folder (for example,
/). -
If the parent root folder and the instance folder are not specified in the case design, and while invoking the case, you override the use of the ecmFolder tag in the caseHeader payload (for example,
caseroot), the folder used to store documents is shown as a folder under the root (for example,/caseroot). -
If the parent and instance folders are specified in the case design, the folder used to store documents is
/parentFolderName/InstanceFolderName. However, if the parent and instance folders are overridden from the payload, the folder specified in the payload is shown.
33.5.4 Case Links in WebCenter Case Documents
Case documents stored in WebCenter can be include a web browser link to view the details of the originating case.
Before using this facility, you must create a custom attribute named CaseManagementLink in WebCenter. See Creating Case Fields in Oracle WebCenter Content.
When case documents are uploaded to WebCenter, the CaseManagementLink is populated.
33.5.5 Customizing Case Links in WebCenter Case Documents
The value of the CaseManagementLink property can be changed in Enterprise Manager in the Workflow property configuration to support different usages in custom Case Management user interfaces.
Placeholders can be used for live values to be substituted in when documents are stored and the CaseManagementLink property is populated. For example, $host could be used to represent the host name and $port could be used to represent the port number. These placeholder values must be defined in mdm-url-resolver.xml.
The values $caseId and $caseNumber will be replaced with their respective values without any additional configuration in mdm-url-resolver.xml.
33.5.6 Creating Case Fields in Oracle WebCenter Content
You must create the fields to support case information in Oracle WebCenter before using them. This applies to the CaseManagementPermissionTag and CaseManagement Link fields. See Specifying Permission Tags for Case Documents and Case Links in WebCenter Case Documents.
To create a field in Oracle WebCenter Content:
33.5.7 How to Configure Case Data
The data represents the payload of the case and defines the input parameters of the case. The data represents part of the information in the case.
Note:
-
Case data created based on a XSD or a business object is not initialized with the default values defined in the XSD or business object.
-
Basing case data on system schema types or on system types such as StartCaseInputMessage is not supported. This can cause corruption of the Adaptive Case Management project.
To configure the case data:
33.5.8 Configuring Case Flex Fields
You can configure flex fields to map to case payload data. Use the Flex Fields section of the Data & Documents tab of the Case Management editor to create and edit flex field mappings that link flex field variables with data in the case.
Flex fields can be set to be unchangeable by clearing the Updatable checkbox to support data that does not change after creation, such as a serial number.
When case data is persisted, flex field mappings are checked and the linked data is also persisted.
You must map a flex field to a task field in the run-time task configuration as well as create the mapping to the case payload data.
33.5.10 How to Configure the Document Location
Use the Documents section of the Data & Documents tab of the Case Management editor to configure document locations. The document location is the folder in the enterprise content management system where all the documents related to the case instance are stored. This folder may contain other folders.
The case document folder name is created by concatenating the parent folder name and the case instance folder name you provide. You must provide a case instance folder name, or an exception is triggered at runtime.
To configure the documents location:
33.5.11 How to Configure Enterprise Content Management
By default Oracle BPM Suite is configured to use an Oracle Database document store. You can use the default configuration while developing your project if you do not have access to an enterprise content manager. This does not require any configuration in the Oracle SOA Server.
You can use the following enterprise content managers for storing case documents:
-
Oracle WebCenter
-
Alfresco CMIS
To use this content managers you must manually configure them using EM after installing BPM.
The following list shows the configuration for the supported enterprise content managers:
-
Oracle WebCenter
The endpoint URL must have the following format
idc://ucm_host:4444The administrator user can be
weblogic -
Alfresco CMIS
The endpoint URL must have the following format
http://alfresco_host:8080/alfresco/cmisatomThe administrator user can be
weblogic
33.6 Configuring Case User Events
You can define custom user events that represent manual actions that occur while processing the case.
Case workers raise events to indicate that something occurred. The occurrence of an event may trigger the activation of a case activity or mark a milestone as completed. For example, if waiting for a fax is part of a case, when it arrives, the case worker can raise an appropriate event to indicate this has occurred.
33.6.2 How to Publish Case User Events
The case management engine publishes events to Oracle EDN. These events capture system and user events in the case. System events include case lifecycle, case activity lifecycle, milestone, document, and comment related events.
You can design your process to listen to these events and react to them. For more information on how to use events in Oracle BPM, see How to Configure Your Process React to a Specific Signal.
To publish case events:
- Open the case in the Case Management editor.
- Select the User Events tab.
- Select Publish Case Events.
Note:
The case event definition is available at oramds:/soa/shared/casemgmt/CaseEvent.edl
To view the case event schema, see CaseEvent.edl.
33.7 Defining Case Stakeholders and Permissions
Use the Stakeholders & Permissions tab of the Case Management editor to create, edit, and delete stakeholders and their associated permissions. The permission model enables you to define both stakeholder permissions and tag permissions.
You can define multiple stakeholders for each case you define. Only stakeholders can perform actions on case objects. Note that if an organizational unit is specified for the case, only members of the organizational unit are able to access the case, even if they are also specified as stakeholders.
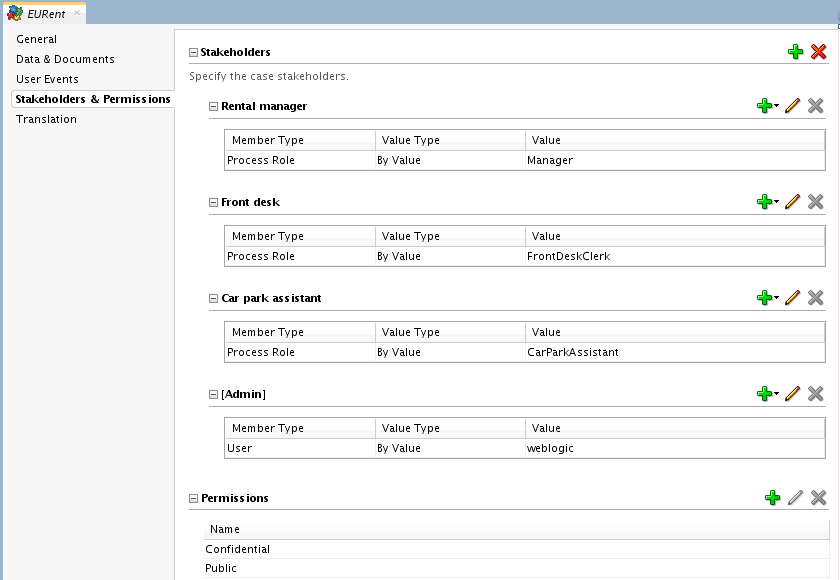
Stakeholder Member Types can be configured to be Users, Groups, Application Roles, or Process Roles. The Value for these stakeholders are appropriate to the Member Type. For example, a User stakeholder might specify a particular user ID, whereas a Group stakeholder might specify a particular user group from your LDAP directory.
Stakeholder Values can be specified by providing a specific value, or by XPATH expression.
Note:
weblogic stakeholder is a part of BPMOrganizationAdmin role and has all permissions. Any user who is part of this role has administrator privileges. weblogic stakeholder will be able to see the case and perform actions on the case even if the user is not added to the case.Future redeployments of a case project may add new stakeholder application roles and new permission tag roles, but existing ones will not be affected if this happens. Undeploying a case does not affect any grants or application roles.
Table 33-2 shows the default permissions by case object.
Table 33-2 Permissions by Case Object
| Number | Resource (Case Object) | Allowed Actions |
|---|---|---|
|
1 |
CASE |
READ, UPDATE |
|
2 |
COMMENT |
READ, UPDATE |
|
3 |
DOCUMENT |
READ, UPDATE |
|
4 |
DATA |
READ, UPDATE |
|
5 |
EVENT |
INVOKE |
|
6 |
ACTIVITY |
INVOKE |
|
7 |
MILESTONE |
READ, UPDATE |
|
8 |
STAKEHOLDER |
READ, UPDATE |
|
9 |
HEADER |
READ, UPDATE Note: The READ permission for case header is not used anywhere, and changing the permission does not affect anything. |
33.7.1 How to Add Case Stakeholders
The stakeholders are the different persons involved in the processing of the case. They are case workers that can view the case and work on it.
Figure 33-3 shows the Stakeholders and Permissions tab in the Case Management Editor.
To add a stakeholder:
Note:
When you remove a case stakeholder definition, the underlying user, role, group or role in the organization is not removed.
Figure 33-3 Stakeholder Tab in Case Management Editor
Description of "Figure 33-3 Stakeholder Tab in Case Management Editor"
33.7.2 How to Add Case Permissions
Use the Permissions section of the Stakeholders and Permissions tab of the Case Management editor to define permissions specific to a case.
You specify which users can update the case by tagging case objects with appropriate permission values. Only users with read/write OPSS permission can see or update case objects tagged with permissions.
You can attach permissions to case objects such as documents and data.
You can define your own set of permissions. The UI shows the default permissions PUBLIC and RESTRICTED. You can modify these default permissions.
Some examples of regularly used permissions are: internal, public, press release.
Note:
E-mail and simple workflow are global case activities thus their permission tag is global.
To add a permission:
- Edit the case.
- Select the Stakeholders & Permissions tab.
- Expand the Permissions section.
- Click Add.
- Enter a Name and a Display Name to identify the permission.
- Click OK.
33.7.3 How to Manage Case Permissions
You can manage the permissions assigned to each stakeholder using Oracle Enterprise Manager.
To manage permissions:
-
In Oracle Enterprise manager from Weblogic Domain, right click soainfra, then select Security and then select Application Policies.
-
In the Application Policies page, run a search with the following search criteria:
-
In the Application Stripe field, enter OracleBPMPRocessRolesApp.
-
In the Principal Type field, enter Application Role.
-
In the Name Starts With field, enter the name of the case or leave it blank.
-
-
From the search result, select one of the application roles corresponding to the stakeholder whose permissions you want to edit.
-
Click the Edit button.
The Edit Application Grant dialog box appears.
-
From the Permissions table, select a permission and click Edit.
Note:
Oracle Enterprise Manager does not validate action strings so you must provide the exact action string.
Note:
To assign multiple actions, separate them with commas without spaces. For example: READ,UPDATE.
33.8 Defining Case Tag Permissions
Stakeholders can assign additional permissions to case objects during runtime. For this option to be available, you must create permission tags when you design the case in Oracle BPM Studio.
For example, you can define a case with the following permission tags: PUBLIC, RESTRICTED, HIGHLY_CONFIDENTIAL.
During deployment Oracle Business Process Manager creates the application roles that correspond to the permission tags defined in the case.
For example, in a case named EURent, if you use the EURent.RESTRICTED.UPDATE action to grant a user the role EURent.RESTRICTED.UPDATE.Role, you can assign a document the RESTRICTED permission tag. Only users with the role EURent.RESTRICTED.READ.Role can access that document.
Note:
Tag permissions work together with stakeholder permissions. For example, to read or update a case object a stakeholder must have the READ/UPDATE permission and the case object must have the appropriate tags that allow reading or updating it.
For more information about stakeholder permissions, see Defining Case Stakeholders and Permissions.
33.8.1 How to Manage Case Tag Permissions
-
In Oracle Enterprise manager, from Weblogic Domain, right click soainfra, then select Security and then select Application Policies.
-
In the Application Policies page provide the following:
-
In the Application Stripe field, enter OracleBPMPRocessRolesApp.
-
In the Name Starts With field, enter the name of the case or leave it blank.
-
-
In the Application Roles page, select a permission tag role then click Edit.
The Edit Application Role dialog box appears.
-
Click Add to add user, groups, or application role members to this application role.
33.9 Localizing a Case
You can configure a case to use different languages for display at run-time.
The following case artifacts can be localized:
-
case title
-
case category
-
milestone name
-
outcome
-
data
-
user event
-
stakeholder
-
permission
You can define display names for all the above artifacts except case title, and case categories. Display names are stored in the default locale resource bundle.
Note:
Multiple artifacts can be configured to have the same display name. However, it is a good practice to use unique display names that are descriptive and help the user quickly identify the displayed data.
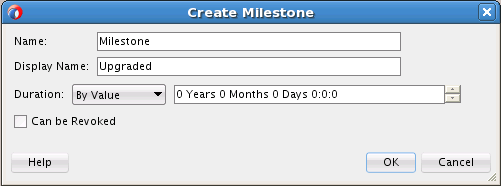
Figure 33-4 shows the creation dialog box for a milestone that enables you to configure the display name.
Figure 33-4 Display Name Configuration When Creating a Milestone
Description of "Figure 33-4 Display Name Configuration When Creating a Milestone"
Case Title
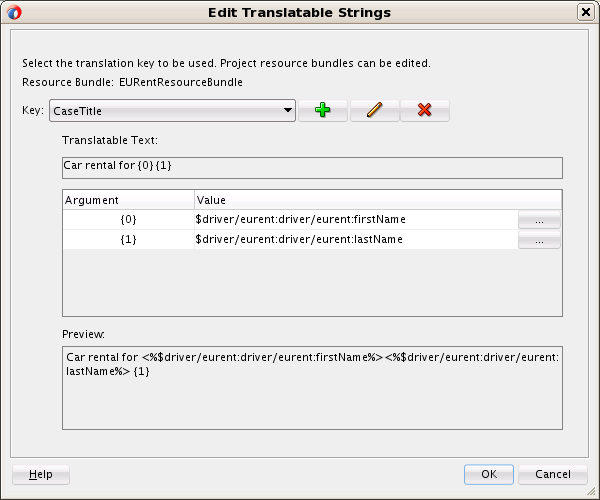
You can specify the case title using plain text or the translation option. When you choose the translation option you must define the following:
-
the key in the resource bundle
-
the text to translate
-
the parameters to make the title dynamic, if applicable
Figure 33-5 shows a title specified using the translation option. In this example the key in the resource bundle is CaseTitle. The text to be translated contains two parameters: Car rental for %0 %1. The parameter values are specified in the Argument table.
Case Category
You can specify the case category using plain text or the translation option. The translation option only supports a simple translation string.
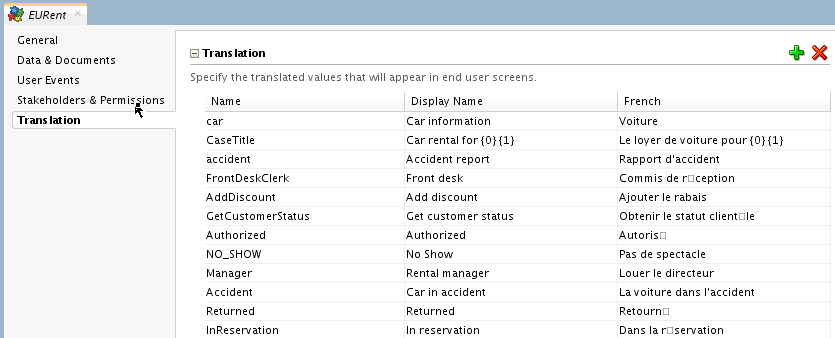
33.9.1 How to Configure Case Localization
You can specify and localize each of the keys defined in a case.
To add a localization key:
33.9.2 Localizing Case Objects
The following classes are types of the class CaseObject:
-
CaseData
-
CaseDocumentObject
-
CaseEvent
-
CaseHeader
-
CaseMilestone
-
CaseStakeHolder
-
Comment
-
DatabaseDocument
The class CaseObject contains the following attributes that are shared with its types:
-
Id
-
CaseId
-
ObjectName
-
ObjectDisplayName
-
ObjectType
-
UpdatedBy
-
UpdatedByDisplayName
-
UpdatedDate
-
PermissionTag
From this list, ObjectDisplayName contains the localized value of ObjectName, and UpdatedByDisplayName contains the localized value of UpdatedBy
Note:
Initially UpdateBy and UpdatedByDisplayName contain the name of the user that created the CaseObject. After the user updates the case, these fields contain the name of the user that last updated the case.
33.10 Case Activities and Sub Cases
Case activities model tasks that can be executed by the end user as part of a case. Case activities can be human tasks, BPMN processes or a custom case activities. A case activity represents a specific piece of work that case workers must perform.
Case activities can model Sub Cases. See Creating Sub Cases.
Cases are composed of various case activities. You can create these case activities based on a BPM process, or a Human Task, or you can create a custom case activity.
You can create case activities by:
-
promoting a BPMN process to a case activity
-
promoting a Human Task to a case activity
-
creating a custom case activity
33.10.1 Case Activity and Sub Case Attributes
Case activities and sub cases are defined by the following attributes:
-
Manually Activated/Automatically Activated
Manually activated case activities are available in the case and can be invoked by users. Automatically activated case activities are invoked by the system.
-
Required
Required activities must be invoked at least once before a case is closed.
-
Repeatable
Repeatable case activities can be invoked more than once in a case. Non repeatable case activities can be invoked only once. Already invoked manual case activities do not appear in the library.
-
Conditionally Available
Conditionally available manual activities are available in the library if they are activated through a business rule. Non-conditionally available manual activities are available in the library by default until you invoke them.
After invocation, repeatable activities are still shown in the library. Non conditional automatic activities are invoked after Oracle BPM starts a case.
-
Permission
The Permission value specifies access to the case activity, for example, PUBLIC or PRIVATE.
You can specify input and output parameters for case activities. For additional information, see How to Add a Case Activity Input Parameter and How to Add a Case Activity Output Parameter.
Note that sub cases do not support data mapping - they inherit data only from their parent case. See Creating Sub Cases
33.10.2 Predefined Case Activities
By default the cases contain the following case activities:
-
Simple Workflow
You can use this activity to create simple human tasks. You can configure the task title, priority, due date, comment, assignment type and assignees. The supported assignment types are: simple, sequential, parallel, FYI.
You must pass the payload input to the method
initiateCaseActivitywith the keySimpleWFActivityPayload. You must use a payload from the schema in Simple Workflow Payload Schema. -
Email Notifications
You can use this activity to send an email notification. You must configure the workflow notification with EMAIL for email notifications to work properly.
You must pass the payload input to the method
initiateCaseActivitywith the keyEmailActivityPayload. You must use a payload from the schema in Email Notification Payload Schema.Note:
You can only send case documents as attachments in global case activity email notification activities. Documents located in your file system are not supported.
33.10.3 Specifying the Order of Case Activities
If you want a case activity to run after another case activity, then you must define a condition in the second activity that indicates it runs after the first activity completes.
For more information on defining conditions, see Using Business Rules with Cases.
33.10.4 How to Promote a BPMN Process to a Case Activity
You can create a case activity based on a BPMN process. This exposes the BPMN process as a case activity. A case activity is one single item that the case worker can perform.
When you create a case activity Oracle BPM Studio generates output arguments for all the arguments in the multiple end points of the BPMN process. However if you want to cover the input arguments of a process that contains multiple start points, then you must create a case activity for each of the start points.
The BPMN process must already exist. You can use synchronous and asynchronous BPMN processes. The case activity only supports message start and end points.
To promote a BPMN process to case activity:
Note:
The case activity can pass input parameters to the underlying BPMN process. You can also configure the case activity to read the output arguments of the BPMN process and store their value.
For more information, see Defining Input Parameters for Case Activitiesand Defining Output Parameters for Case Activities.
33.10.5 How to View the BPMN Process
The Advanced tab shows the service reference and the operation used to create the case activity.
To view the human task operation:
-
Open the case.
-
Select the Advanced tab.
Figure 33-7 shows the Advanced tab for a BPMN process based case activity.
-
To open the BPMN process, click the service reference.
-
To change the operation, click the Refresh button.
Figure 33-7 Advanced Tab of a BPMN Process Based Case Activity

Description of "Figure 33-7 Advanced Tab of a BPMN Process Based Case Activity"
33.10.6 How to Promote a Human Task to a Case Activity
You can create case activities based on a Human Task.
The Human Task must already exist.
To promote a BPMN process to case activity:
Note:
The case activity can pass input parameters to the underlying Human Task. You can also configure the case activity to read the output parameters of the Human Task and store their value.
For more information, see Defining Input Parameters for Case Activitiesand Defining Output Parameters for Case Activities.
33.10.7 How to View the Human Task
The Advanced tab shows the Human Task used to create the case activity.
To view the human task operation:
- Open the case.
- Select the Advanced tab.
- To open the Human Task, click the service reference.
33.10.8 How to Create a Custom Case Activity
You can create a custom case activity based on a Java class.
Custom case activities enable users to create their own case activities, for example a scheduler. To the end user there is no difference from the other types of case activities.
To create a case activity:
Note:
You can add input and output parameters to a custom case activity. You can assign input parameters the value of case data or user input. You can choose to store the value of output parameters as case data.
33.10.9 Creating Sub Cases
Use sub cases to manage activities that contribute to the resolution of a parent case. Sub cases are similar to case activities, are instantiated at runtime within the context of a parent case.
For example, a power outage case might have a sub case for a line repair. As the parent power outrage case evolves one or a number of line repair sub cases might be kicked off to facilitate needed repairs that are discovered as the parent case is worked.
Sub cases are deployed as a separate composite from the parent case project. They are linked to the parent using the case link mechanism. The sub case composite version is always the active version of the parent composite.
Sub cases do not support data mapping - they inherit data only from their parent case.
When a sub case completes, an activity completion event is raised. The same the constraints that apply to case activities also apply to sub case activities.
33.11 Defining Input Parameters for Case Activities
Input parameters can be case data or user input.
By default, input parameters take their values from case data. You can change this so that they take their values from user input.
You must also define the case data in the .case file. If you do not define the case data, Oracle BPM Studio creates a new case data of the required type when you create the case activity.
You must define case activity input parameters in the same order of the BPMN process or Human Task input arguments.
If the input parameter is of the type user input, you can save this value as case data.
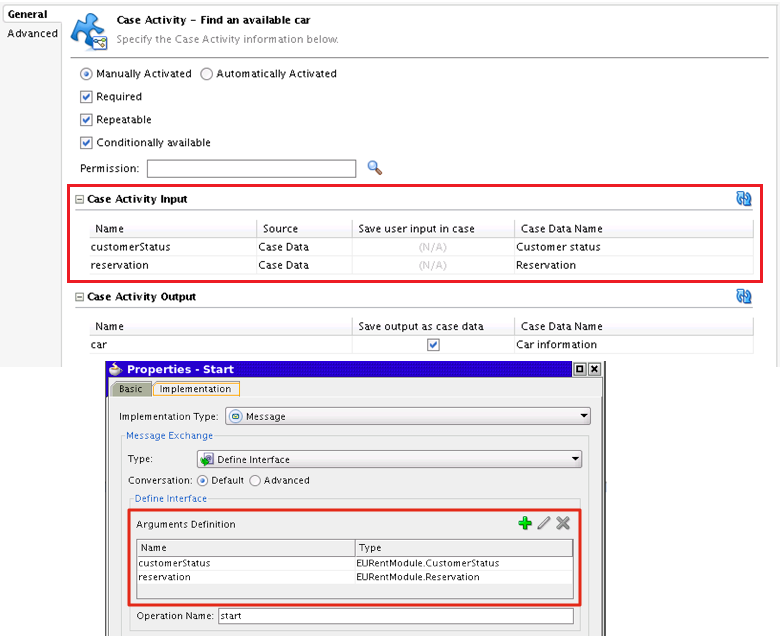
Figure 33-8 shows the input arguments of a BPMN process based case activity input parameters and the arguments of the start event of a BPMN process. Note that the name of the input parameters of the case activity matches the name of the arguments in the BPMN process.
Figure 33-8 BPMN Process Based Case Activity Input Parameters
Description of "Figure 33-8 BPMN Process Based Case Activity Input Parameters"
33.12 Defining Output Parameters for Case Activities
By default Oracle BPM Studio creates the output arguments based on the BPMN process or Human Task arguments. Only editable human workflow arguments appear as output arguments in a case activity.
You can save the value of output parameters as case data.To do this, the name of the case activity output parameter must match the root element name of the BPMN process or Human Task argument. After you create the case, you can change the name of the output parameters.
Figure 33-9 shows the output arguments of a BPMN process based case activity output parameters and the arguments of the end event of a BPMN process. Note that the name of the output parameters of the case activity matches the name of the arguments in the BPMN process.
You can save the output as case data. By default the Case Activity editor populates the case data fields, if a case data of the same type is not available. Otherwise the Case Activity editor creates a new case data of the type in the .case file.
Figure 33-9 BPMN Process Based Case Activity Output Parameters
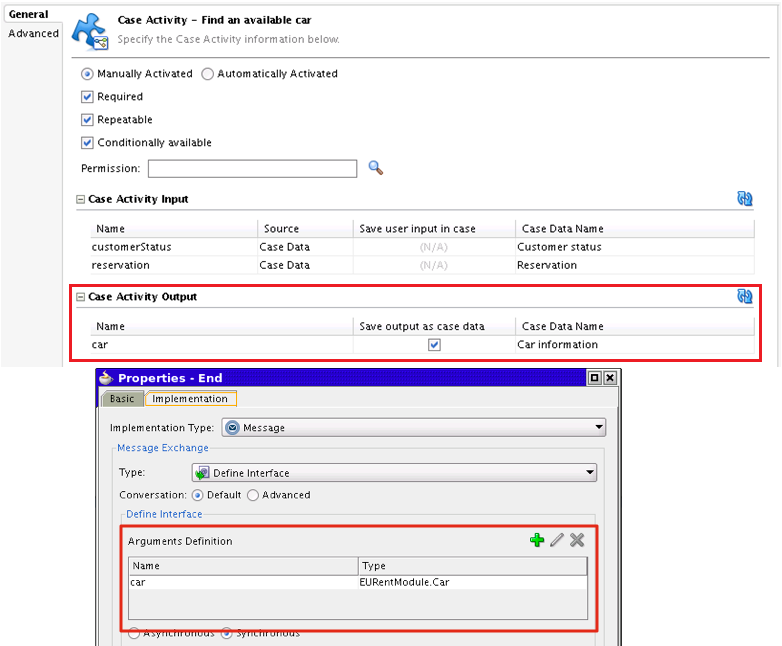
Description of "Figure 33-9 BPMN Process Based Case Activity Output Parameters"
33.13 Configuring Case Activities
After you create a case activity BPM Studio opens the case in the Case Activity editor for you to configure it.
You can configure a case activity to behave in different ways during the case workflow by configuring the case activity properties.
33.13.2 Configuring Case Activity Basic Properties
You can configure the following basic properties for the case activity you created:
-
Automatic
-
Required
-
Repeatable
-
Conditionally Available
For a detailed description of these attributes, see Case Activity and Sub Case Attributes.
You can also add input and output parameters for the case activity. See How to Add a Case Activity Input Parameter and How to Add a Case Activity Output Parameter.
33.14 Creating a Global Case Activity
Global case activities are custom case activities that are global in scope and not part of any composite. They apply to all cases regardless of their type.
They are identified by global flag true. You cannot design global activities using Oracle BPM Studio.
You must add the callback Java class for a global activity to the workflow customization classpath.
Example of Global Case Activity Metadata Schemashows an example of the metadata for a global activity metadata. Note that the value of the isGlobal attribute is set to true.
After creating the global case activity you must register it using the registerCaseActivity class from the Oracle Fusion Middleware Business Process Management Suite Java API Reference. To do this you must unmarshall the case activity document and pass the CaseActivity as a parameter.
Example 33-1 shows how to register a global case activity.
Example 33-1 Registering a Global Case Activity
InputStream  is = classLoader.getResourceAsStream(<file>);

public static CaseActivity unmarshall(InputStream inputStream)
throws JAXBException, IOException {
       try {
           // create a document
           DOMParser p = new DOMParser();
           p.retainCDATASection(true);
           p.parse(inputStream);
           Document    doc = p.getDocument();

           JAXBContext jaxbContext = JAXBContext.newInstance(JAXB_CONTEXT);

           //return unmarshal(doc);
           return (CaseActivity) jaxbContext.createUnmarshaller().unmarshal(doc);

       } catch (oracle.xml.parser.v2.XMLParseException e) {
           throw new JAXBException(e);
       } catch (org.xml.sax.SAXException e) {
           throw new JAXBException(e);
       }
}

private static final String JAXB_CONTEXT = "oracle.bpm.casemgmt.metadata.activity.model";
33.15 Using Business Rules with Cases
You can use business rules to decide which case activities to activate for automatic or manual initiation, or to withdraw manual case activities. You can also use rules to mark a milestone as achieved or revoked.
When you create a case, Oracle BPM Studio automatically generates an associated business rule dictionary.
It is a good practice to define case management rules on events. Case management rules are fired on an event in rules. Hence it is advisable to define rules which happen on an event instead of a condition.
Oracle BPM fires business rules on every case event. Case events are logical events that occur while running the case. The following list enumerates the available case events:
-
Life cycle events
-
Milestone events
-
Activity events
-
Data events
-
Document events
-
Comment events
-
User events
Note:
Model rules in the following sequence-
Event Type
-
Activity Name
-
Activity State
33.15.1 Defining the Condition of a Case Business Rule
You can define the condition of the business rule base on the following:
-
The event that fired the business rule
Table 33-3 describes the different events that can fire a business rule.
-
The case instance
-
Case data
The case data configured in the case is available as facts in the business rule dictionary. You can create rules based on case data combined with case management related facts.
Table 33-3 Case Events
| Name | Description | Attributes |
|---|---|---|
|
CaseLifeCycleEvent |
Life cycle event |
state, lifecycleEvent |
|
CaseMilestoneEvent |
Milestone event |
milestone, type |
|
CaseActivityEvent |
Activity event |
activityName, type |
|
CaseDataEvent |
Data event |
dataName |
|
CaseDocumentEvent |
Document event |
document, documentName, type |
|
CaseCommentEvent |
Comment event |
comment |
|
UserDefinedEvent |
User event |
eventName, event |
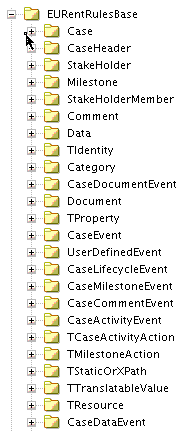
Figure 33-10 shows the facts you can use to define the condition of a business rule based on a case Management system related data.
33.15.2 Understanding the Case Business Rule Dictionary
The business rule dictionary created when you create the case is linked to a common base dictionary in Oracle MDS. The common base dictionary includes all the facts show in Figure 33-10. The base dictionary name is CaseManagementBaseDictionary.
The business rule dictionary of a case supports the following operations:
-
Automatically invoke conditional automatic activities from a business rule
-
Publish conditional manual activities to the case from a business rule
-
Withdraw an activity from a business rule
Note:
Non-conditional manual activity cannot be withdrawn. You can withdraw only conditional manual activity. -
Achieve and revoke milestones from a business rule
For a detailed description of the functions used to perform these operations, see Table 33-4.
33.15.3 How to Generate a Case Business Rule Dictionary
When you create a case, Oracle BPM automatically generates an associated business rule dictionary. This case business rule dictionary enables you to define business rules with rule conditions based on the case.
To generate a case business rule dictionary:
Table 33-4 Rule Functions
| Rule Function | Description | Parameters |
|---|---|---|
|
|
Invokes conditional automatic case activities and conditional manual case activities. |
activityName: the name of the activity to invoke. |
|
|
Withdraws a case activity. |
activityName: the name of the activity to withdraw. |
|
|
Rates a case activity, including a reason for the rating. |
activityName: the name of the activity to withdraw. comments: reason for the rating. relevance: rating of the case activity (NONE, LOW, NORMAL or HIGH) caseAction: populated by the function on return |
|
|
Sets the repeatability (true, false) of a case activity. |
activityName: the name of the case activity. value: TRUE - case activity can be repeated, FALSE - case activity can not be repeated. caseAction: populated by the function on return |
|
|
Sets whether a case activity is required or not. |
activityName: the name of the case activity. value: TRUE - required case activity, FALSE, not required caseAction: populated by the function on return |
|
|
Sets whether a case activity is automatically initiated or not. |
activityName: the name of the case activity. value: TRUE - initiate automatically, FALSE, initiate manually caseAction: populated by the function on return |
|
|
Marks a milestone as achieved. |
milestoneName: the name of the milestone to mark as achieved. comments: a comment stating the reason to mark this milestone as achieved. |
|
|
Revokes a milestone. |
milestoneName: the name of the milestone to revoke. comments: a comment stating the reason to revoke this milestone. |
33.16 Closing Cases
Any stakeholder can close a case, if all required activities in the case are completed. Users with additional privileges can force closure of a case even if there are pending required activities.
Closing a case is a logical operation that marks its status as closed. You can close a case by invoking the closeCase method in the CaseInstanceService class. You can provide an optional outcome parameter and a comment when you close a case.
You can close a case regardless of its current state and the state of its case activities.
Closing a case sets it state to CLOSED. The list of cases for a user that you obtain using the queryCase API it includes closed cases.
Note:
You can still achieve and revoke milestones after you close or suspend a case.
33.17 Integrating with Oracle BPM
You can integrate with Oracle BPM by invoking a case from a BPMN process or by publishing case events to Oracle EDN.
You then create a process that reacts to these events.
33.17.1 Invoking a Case From a BPMN Process
You can invoke a case from BPMN process.
To invoke a case from a BPMN process:
33.17.2 How to Use Correlations with Case Events
If you want to use correlations with a particular event, then you can trigger a BPMN process from a BPMN based case activity. You must pass the caseId to the message that initiates the process and use it as a correlation key.
To use correlations with case events:
33.18 Schema Reference
This section contains the simple workflow schema, the email notification schema, and an example of a global case activity metadata schema.
-
Simple Workflow Payload Schema
This schema contains the list of payloads that you can pass to the method initiateCaseActivity to create a simple human task. For more information, see Predefined Case Activities.
-
Email Notification Payload Schema
This schema contains the list of payloads that you can pass to the method initiateCaseActivity to send an email notification. For more information, see Predefined Case Activities.
-
Example of Global Case Activity Metadata Schema
This schema is an example of the metadata for a global activity. For more information on global activities, see Creating a Global Case Activity.
-
This schema defines the case events that you can publish to Oracle EDN. For more information, see How to Publish Case User Events.
33.18.1 Simple Workflow Payload Schema
Example 33-2 Simple Workflow Payload Schema
<?xml version="1.0" ?>
<xsd:schema xmlns:xsd="http://www.w3.org/2001/XMLSchema"
            xmlns:extension="http://xmlns.oracle.com/bpm/case/metadata/extension"
            xmlns="http://xmlns.oracle.com/bpm/case/activity/custom"
            targetNamespace="http://xmlns.oracle.com/bpm/case/activity/custom"
            xmlns:jaxb="http://java.sun.com/xml/ns/jaxb" jaxb:version="2.0"
            elementFormDefault="qualified" blockDefault="#all">
 <xsd:annotation>
  <xsd:documentation>Simple WF Activity Schema</xsd:documentation>
  <xsd:appinfo>
   <jaxb:schemaBindings>
    <jaxb:package name="oracle.bpm.casemgmt.customactivity.simplewf.model"/>
   </jaxb:schemaBindings>
   <jaxb:globalBindings generateElementClass="true" generateIsSetMethod="true">
    <jaxb:serializable uid="123456"/>
   </jaxb:globalBindings>
  </xsd:appinfo>
 </xsd:annotation>
 <xsd:import namespace="http://xmlns.oracle.com/bpm/case/metadata/extension"
             schemaLocation="ExtensibleElements.xsd"/>

<xsd:element name="SimpleWorkflowPayload" type="tSimpleWorkflowPayload"/>

<xsd:complexType name="tSimpleWorkflowPayload">
  <xsd:complexContent>
    <xsd:extension base="extension:tExtensibleElements">
       <xsd:sequence>
         <xsd:choice minOccurs="1" maxOccurs="1">
           <xsd:element name="simpleAssignmentType" type="tSimpleAssignmentType"/>
           <xsd:element name="sequentialAssignmentType" type="tSequentialAssignmentType"/>
           <xsd:element name="parallelAssignmentType" type="tParallelAssignmentType"/>
           <xsd:element name="fyiAssignmentType" type="tFyiAssignmentType"/>
         </xsd:choice>
         <xsd:element name="title" type="xsd:string" minOccurs="0" maxOccurs="1"/>
         <xsd:element name="dueDate" type="xsd:date" minOccurs="0" maxOccurs="1"/>
         <xsd:element name="priority" type="xsd:integer" minOccurs="0" maxOccurs="1"/>
         <xsd:element name="comment" type="xsd:string" minOccurs="0" maxOccurs="1"/>
         <xsd:element name="payloadType" type="tPayloadType" minOccurs="0" maxOccurs="1"/>
       </xsd:sequence>
    </xsd:extension>
  </xsd:complexContent>
</xsd:complexType>

<xsd:complexType name="tSimpleAssignmentType">
   <xsd:complexContent>
    <xsd:extension base="extension:tExtensibleElements">
      <xsd:sequence>
         <xsd:element name="assigneeType" type="tAssigneeType" minOccurs="1" maxOccurs="1"/>
      </xsd:sequence>
    </xsd:extension>
 </xsd:complexContent>
</xsd:complexType>

<xsd:complexType name="tSequentialAssignmentType">
    <xsd:complexContent>
     <xsd:extension base="extension:tExtensibleElements">
       <xsd:sequence>
          <xsd:element name="assigneeType" type="tAssigneeType" minOccurs="1" maxOccurs="unbounded"/>
       </xsd:sequence>
     </xsd:extension>
    </xsd:complexContent>
</xsd:complexType>

<xsd:complexType name="tFyiAssignmentType">
    <xsd:complexContent>
     <xsd:extension base="extension:tExtensibleElements">
        <xsd:sequence>
             <xsd:element name="assigneeType" type="tAssigneeType" minOccurs="1" maxOccurs="unbounded"/>
        </xsd:sequence>
     </xsd:extension>
    </xsd:complexContent>
</xsd:complexType>

<xsd:complexType name="tParallelAssignmentType">
    <xsd:complexContent>
     <xsd:extension base="extension:tExtensibleElements">
        <xsd:sequence>
          <xsd:element name="assigneeType" type="tAssigneeType" minOccurs="1" maxOccurs="unbounded"/>
          <xsd:element name="defaultOutcome" type="tOutcomeTypeEnum" minOccurs="1" maxOccurs="1"/>
          <xsd:element name="completionCriteriaType" type="tCompletionCriteriaType" minOccurs="1" maxOccurs="unbounded"/>
        </xsd:sequence>
        <xsd:attribute name="waitForAllVotes" type="xsd:boolean"/>
      </xsd:extension>
    </xsd:complexContent>
</xsd:complexType>

<xsd:complexType name="tCompletionCriteriaType">
 <xsd:complexContent>
  <xsd:extension base="extension:tExtensibleElements">
   <xsd:sequence>
      <xsd:element name="outcome" type="tOutcomeTypeEnum" minOccurs="1" maxOccurs="1"/>
      <xsd:element name="outcomePercentage" type="xsd:integer" minOccurs="1" maxOccurs="1"/>
   </xsd:sequence>
  </xsd:extension>
 </xsd:complexContent>
</xsd:complexType>

<xsd:simpleType name="tOutcomeTypeEnum">
    <xsd:restriction base="xsd:string">
        <xsd:enumeration value="APPROVE"/>
        <xsd:enumeration value="REJECT"/>
    </xsd:restriction>
</xsd:simpleType>

<xsd:complexType name="tAssigneeType">
    <xsd:complexContent>
     <xsd:extension base="extension:tExtensibleElements">
       <xsd:sequence>
           <xsd:element name="identityName" type="xsd:string" minOccurs="1" maxOccurs="1"/>
           <xsd:element name="identityType" type="tIdentityTypeEnum" minOccurs="1" maxOccurs="1"/>
       </xsd:sequence>
     </xsd:extension>
   </xsd:complexContent>
</xsd:complexType>

<xsd:simpleType name="tIdentityTypeEnum">
    <xsd:restriction base="xsd:string">
      <xsd:enumeration value="USER"/>
      <xsd:enumeration value="GROUP"/>
      <xsd:enumeration value="APPROLE"/>
    </xsd:restriction>
</xsd:simpleType>


<xsd:complexType name="tPayloadType">
    <xsd:complexContent>
     <xsd:extension base="extension:tExtensibleElements">
       <xsd:sequence>
           <xsd:element name="parameter" type="tParameterType" minOccurs="1" maxOccurs="unbounded"/>
       </xsd:sequence>
     </xsd:extension>
    </xsd:complexContent>
</xsd:complexType>


<xsd:complexType name="tParameterType">
    <xsd:complexContent>
     <xsd:extension base="extension:tExtensibleElements">
       <xsd:sequence>
           <xsd:element name="name" type="xsd:string" minOccurs="1" maxOccurs="1"/>
           <xsd:element name="value" type="xsd:string" minOccurs="1" maxOccurs="1"/>
       </xsd:sequence>
     </xsd:extension>
    </xsd:complexContent>
</xsd:complexType>

</xsd:schema>
33.18.2 Email Notification Payload Schema
Example 33-3 Email Notification Payload Schema
<?xml version="1.0" ?>
<xsd:schema xmlns:xsd="http://www.w3.org/2001/XMLSchema"
            xmlns:extension="http://xmlns.oracle.com/bpm/case/metadata/extension"
            xmlns="http://xmlns.oracle.com/bpm/case/activity/custom"
            targetNamespace="http://xmlns.oracle.com/bpm/case/activity/custom"
            xmlns:jaxb="http://java.sun.com/xml/ns/jaxb" jaxb:version="2.0"
            elementFormDefault="qualified" blockDefault="#all">
 <xsd:annotation>
  <xsd:documentation>Email Activity Schema</xsd:documentation>
  <xsd:appinfo>
   <jaxb:schemaBindings>
    <jaxb:package name="oracle.bpm.casemgmt.customactivity.notification.model"/>
   </jaxb:schemaBindings>
   <jaxb:globalBindings generateElementClass="true" generateIsSetMethod="true">
    <jaxb:serializable uid="123456"/>
   </jaxb:globalBindings>
  </xsd:appinfo>
 </xsd:annotation>
 <xsd:import namespace="http://xmlns.oracle.com/bpm/case/metadata/extension"
             schemaLocation="ExtensibleElements.xsd"/>

 <xsd:element name="emailPayload" type="tEmailPayload"/>
  <xsd:complexType name="tEmailPayload">
   <xsd:complexContent>
    <xsd:extension base="extension:tExtensibleElements">
     <xsd:sequence>
       <xsd:element name="from" type="xsd:string" minOccurs="1" maxOccurs="1"/>
       <xsd:element name="to" type="xsd:string" minOccurs="1" maxOccurs="1"/>
       <xsd:element name="replyTo" type="xsd:string" minOccurs="0" maxOccurs="1"/>
       <xsd:element name="cc" type="xsd:string" minOccurs="0" maxOccurs="1"/>
       <xsd:element name="bcc" type="xsd:string" minOccurs="0" maxOccurs="1"/>
       <xsd:element name="ject" type="xsd:string" minOccurs="0" maxOccurs="1"/>
       <xsd:element name="message" type="xsd:string" minOccurs="0" maxOccurs="1"/>
       <xsd:element name="attachments" type="tAttachment" minOccurs="0" maxOccurs="unbounded"/>
     </xsd:sequence>
    </xsd:extension>
  </xsd:complexContent>
 </xsd:complexType>

 <xsd:complexType name="tAttachment">
  <xsd:complexContent>
   <xsd:extension base="extension:tExtensibleElements">
    <xsd:sequence>
       <xsd:element name="name" type="xsd:string" minOccurs="1" maxOccurs="1"/>
       <xsd:element name="mimeType" type="xsd:string" minOccurs="1" maxOccurs="1"/>
    </xsd:sequence>
   </xsd:extension>
  </xsd:complexContent>
 </xsd:complexType>
</xsd:schema>
33.18.3 Example of Global Case Activity Metadata Schema
Example 33-4 Example of Global Case Activity Metadata Schema
<caseActivity targetNamespace="http://xmlns.oracle.com/bpm/case/activity"
              xmlns:xsi="http://www.w3.org/2001/XMLSchema-instance"
              xsi:schemaLocation="http://xmlns.oracle.com/bpm/case/activity ../../../../../interface/src/main/resources/schemas/CaseActivity.xsd"
              xmlns="http://xmlns.oracle.com/bpm/case/activity">
 <documentation xmlns="http://xmlns.oracle.com/bpm/case/metadata/extension"/>
 <name>SimpleWorkflowActivity</name>
 <activityDefinitionId>http://xmlns.oracle.com/bpm/case/activity/SimpleWFActivityDefinition</activityDefinitionId>
 <activityType>CUSTOM</activityType>
 <repeatable>true</repeatable>
 <required>false</required>
 <manual>true</manual>
 <isGlobal>true</isGlobal>
 <isConditional>false</isConditional>
 <caseAssociations>
   <documentation xmlns="http://xmlns.oracle.com/bpm/case/metadata/extension"/>
   <allCases/>
  </caseAssociations>
 <globalActivity>
  <definition>
   <documentation xmlns="http://xmlns.oracle.com/bpm/case/metadata/extension"/>
   <className>oracle.bpm.casemgmt.customactivity.simplewf.SimpleWFActivityCallback</className>
  </definition>
 </globalActivity>
</caseActivity>
33.18.4 CaseEvent.edl
Example 33-5 CaseEvent.edl
<?xml version="1.0" encoding="UTF-8" standalone="yes"?>
<definitions xmlns="http://schemas.oracle.com/events/edl" targetNamespace="http://xmlns.oracle.com/bpm/case/event">
    <schema-import location="oramds:/soa/shared/casemgmt/CaseEvent.xsd" namespace="http://xmlns.oracle.com/bpm/case/event"/>
    <event-definition name="CaseEvent">
        <content xmlns:ns0="http://xmlns.oracle.com/bpm/case/event" element="ns0:caseEvent"/>
    </event-definition>
</definitions>
