A Using Multi Data Sources with Oracle RAC
This appendix provides information about multi data sources and Oracle RAC and procedure for configuring multi data sources for an Enterprise Deployment.
- About Multi Data Sources and Oracle RAC
A multi data source provides an ordered list of data sources to use to satisfy connection requests. - Typical Procedure for Configuring Multi Data Sources for an Enterprise Deployment
You configure data sources when you configure a domain. If you want to use Multi Data Sources instead of GridLink data sources, replace the GridLink instructions with the instructions provided in this section.
A.1 About Multi Data Sources and Oracle RAC
A multi data source provides an ordered list of data sources to use to satisfy connection requests.
Normally, every connection request to this kind of multi data source is served by the first data source in the list. If a database connection test fails and the connection cannot be replaced, or if the data source is suspended, a connection is sought sequentially from the next data source on the list.
For more information about configuring Multi Data Sources with Oracle RAC, see "Using Multi Data Sources with Oracle RAC" in the Oracle Fusion Middleware Configuring and Managing JDBC Data Sources for Oracle WebLogic Server.
A.2 Typical Procedure for Configuring Multi Data Sources for an Enterprise Deployment
You configure data sources when you configure a domain. If you want to use Multi Data Sources instead of GridLink data sources, replace the GridLink instructions with the instructions provided in this section.
For example, when you are configuring the initial Administration domain for an Enterprise Deployment reference topology, you use the configuration wizard to define the characteristics of the domain, as well as the data sources.
The procedures for configuring the topologies in this Enterprise Deployment Guide include specific instructions for defining GridLink data sources with Oracle RAC. If you want to use Multi Data Sources instead of GridLink data sources, replace the GridLink instructions with the following:
-
In the Configure JDBC Component Schema screen:
-
Select the appropriate schemas.
-
For the RAC configuration for component schemas, Convert to RAC multi data source.
-
Ensure that the following data source appears on the screen with the schema prefix when you ran the Repository Creation Utility.
-
Click Next.
-
-
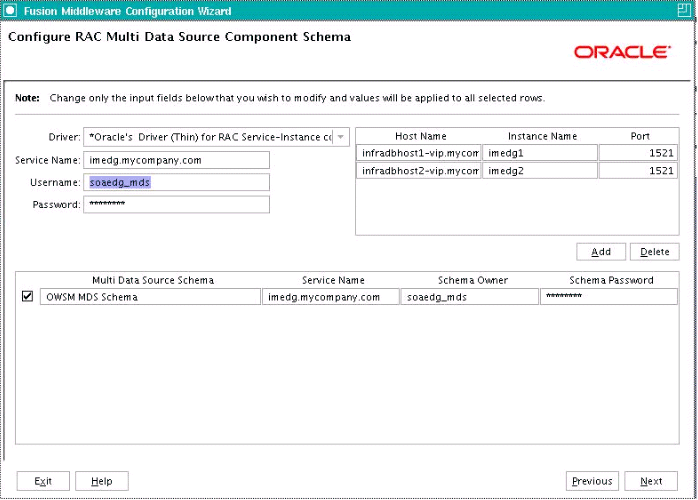
The Configure RAC Multi Data Sources Component Schema screen appears (Figure A-1 ).
Figure A-1 Configure RAC Multi Data Source Component Schema Screen

Description of "Figure A-1 Configure RAC Multi Data Source Component Schema Screen"In this screen, do the following:
-
Enter values for the following fields, specifying the connect information for the Oracle RAC database that was seeded with RCU.
-
Driver: Select Oracle driver (Thin) for RAC Service-Instance connections, Versions:10, 11.
-
Service Name: Enter the service name of the database.
-
Username: Enter the complete user name (including the prefix) for the schemas.
-
Password: Enter the password to use to access the schemas.
-
-
Enter the host name, instance name, and port.
-
Click Add.
-
Repeat this for each Oracle RAC instance.
-
Click Next.
-
-
In the Test JDBC Data Sources screen, the connections are tested automatically. The Status column displays the results. Ensure that all connections were successful. If not, click Previous to return to the previous screen and correct your entries.
Click Next when all the connections are successful.