6 Creating a Thin Client Application
The thin client application is typically used to submit jobs, query status and optionally used to host EJB job implementations. A thin client application uses the Oracle Enterprise Scheduler thin client library for Oracle Enterprise Scheduler APIs. This chapter describes the thin client library and how to use Oracle JDeveloper to develop a thin client application.
This chapter contains the following sections:
6.1 Introduction
Client applications are J2EE applications that execute in the same WebLogic domain as Oracle Enterprise Scheduler.
Client applications can use the Oracle Enterprise Scheduler APIs to do the following:
-
Submit jobs
-
Query job status
-
Look at job output and logs
-
Optionally, perform updates to Oracle Enterprise Scheduler metadata
-
Host an EJB job implementation that the Oracle Enterprise Scheduler invokes remotely
The Oracle Enterprise Scheduler thin client library is used by client applications to access Oracle Enterprise Scheduler APIs (for example, the metadata service API or the runtime service API). The thin client library is a thin layer that remotely invokes an Oracle Enterprise Scheduler hosting application to perform all operations. The thin client application may optionally have an Oracle Enterprise Scheduler metadata MAR archive with Oracle Enterprise Scheduler metadata developed using Oracle JDeveloper. This metadata is automatically loaded into the Oracle Enterprise Scheduler MDS when the application is deployed. Alternatively, the application can use APIs to create the metadata dynamically.
The thin client shared library differs from the client shared library in the following ways:
-
The client shared library includes local EJBs that do all the Oracle Enterprise Scheduler work by directly accessing the MDS and runtime databases. The thin client library does not include the data sources or EJBs, but instead remotely accesses a hosting application that hosts the EJB and accesses the databases.
-
The thin client library more cleanly hides Oracle Enterprise Scheduler internal functionality from the application.
-
Because it accesses the databases directly, the client shared library works even if the Oracle Enterprise Scheduler server or cluster is down.
-
The thin client library is also useful when deployment of the Oracle Enterprise Scheduler is optional in an embedding product.
-
All of the documented APIs exposed by the client shared library are available in the thin client library. Therefore, thin client applications can:
-
Request submission using the runtime service APIs
-
Operate on requests using the runtime service APIs
-
Update metadata artifacts using the Metadata Service API
-
Remotely complete asynchronous requests
-
-
Because the thin client library remotely invokes an Oracle Enterprise Scheduler hosting application to perform all operations, it has to look up remote Oracle Enterprise Scheduler beans instead of local beans. There is some overhead in obtaining the
InitialContextof a remote Oracle Enterprise Scheduler server. TheRemoteConnectorAPI provides the following assistance for the callback of Oracle Enterprise Scheduler beans:-
Helper classes use
RemoteConnectorsto easily connect back to Oracle Enterprise Scheduler beans (for example,RuntimeServiceandMetadataService) -
Log and output can be handled from a remote implementation
-
Asynchronous requests can be completed easily
-
Invocations and callbacks can be secured
-
6.2 Implementation
This topic lists some considerations to keep in mind when you use the thin client library to implement a remote EJB job.
Consider the following when you use the thin client library to implement a remote EJB job:
-
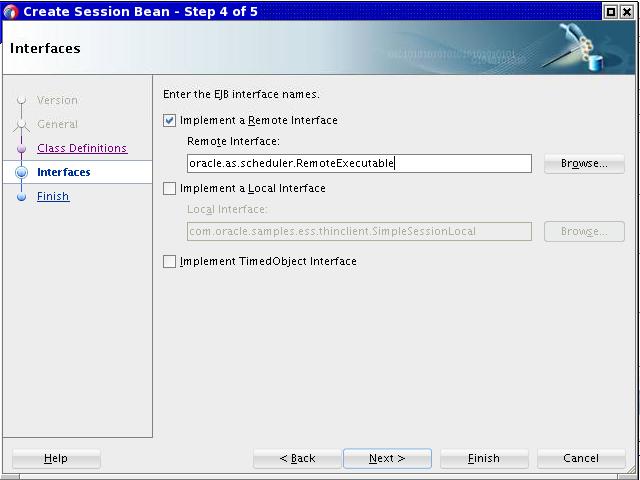
Make sure the bean implements the
RemoteExecutableinterface for execution only, or theRemoteCancellableExecutableinterface for both the execute and cancel operations. -
Use predefined system properties such as
EJB_OPERATION_NAMEinstead of defining specific properties such asSOA_BEAN_NAME. -
The
ejb-jar.xmlfile should define theoracle.security.jps.ee.ejb.JpsInterceptorinterceptor. Use the interceptor to obtain the subject propagated from the Oracle Enterprise Scheduler layer and use it in other operations. -
It's best to move the job implementation out of the
ejb-jar.xmlfile to ensure that the EJBs are not redeployed when the job logic changes.
Tip:
The application throws a javax.naming.NamingException exception if the JNDI context cannot be created with the passed in values. Alternatively, the ScehdulerException exception can be thrown when there is a problem with look-ups that involve the credential key store.
6.2.1 Secured Invocation
Secured invocation of the remote EJB is required when the JNDI tree of its server is authenticated. This is also the case when a remote EJB uses secure lookup to call back to Oracle Enterprise Scheduler EJBs. The following sections provides some guidance.
6.2.1.1 Forward Invocation
The following apply to forward invocation.
-
When Oracle Enterprise Scheduler invokes a remote EJB, the subject of the executing job is always propagated.
-
When Oracle Enterprise Scheduler executes a job, the
JndiProviderUrlof the current Oracle Enterprise Scheduler Server is always supplied to the remote EJB throughRequestParameters. -
If the JNDI tree of the remote server is authenticated, the
JNDI_CSF_KEYproperty must be specified in the request parameters or theEssConfigurationof the hosting application. -
Oracle Enterprise Scheduler looks up the keystore for the
CsfKeyto retrieve thePasswordCredentialand connects to the remote server.
6.2.1.2 Callback Invocation
The following apply to callback invocation.
-
If the remote EJB must call back to Oracle Enterprise Scheduler beans, the following properties can be specified:
-
The JNDI names of Oracle Enterprise Scheduler
Runtime,MetadataandAsyncRequestbeans exposed inHostingAppmust be specified in request parameters or theEssConfigurationof the hosting application. IfEssNativeHostingAppis used, these entries are not required. -
If the JNDI tree of the Oracle Enterprise Scheduler server is authenticated, the
ESS_JNDI_CSF_KEY_NAMEproperty must be specified in the request parameters orEssConfigurationof the hosting application. Oracle Enterprise Scheduler ensures that this property is available to the remote EJB throughRequestParameters.
-
-
A remote EJB can make use of the
RemoteConnectorAPI to get the remote instances of Oracle Enterprise Scheduler beans. This can be done by passing the following:-
RequestParameters -
RequestParametersandJndiMappedNameof the bean (for hosting applications other than the native hosting application) -
RequestParameters, user name and password (if the Oracle Enterprise Scheduler server is authenticated) -
InitialContext(primarily for Java SE clients withEssNativeHostingApp) -
InitialContextandjndiMappedName(primarily for Java SE clients with other hosting applications)
-
6.2.2 RemoteConnector API and the Server Affinity Property
If your code implementation relies on accessing Oracle Enterprise Scheduler EJBs, use the methods exposed in the RemoteConnector API class. The Oracle Enterprise Scheduler requires the server affinity property to be set in the InitialContext environment before doing a JNDI lookup and the RemoteConnector API class sets this property for you. Note that this is especially important in multi-node cluster scenarios. The RemoteConnector class is packaged in the Oracle Enterprise Scheduler client libraries.
If for some reason the RemoteConector class cannot be used, you can set the environment map property to the InitialContext before doing the look-up for the Oracle Enterprise Scheduler EJBs as shown in the following example.
if(PlatformUtils.isWebLogic())
   envProps.put("weblogic.jndi.enableServerAffinity", "true");
In a multi-node cluster environment, it is best to set the cluster algorithm to "round-robin-affinity".
6.2.3 Examples
This section contains examples that illustrate how to use the thin client library.
6.2.3.1 Java EE Application That Uses RemoteConnector
The following code example shows a snippet from a Java EE application that uses RemoteConnector through the pre-deployed native hosting application.
RemoteConnector essConnector = newRemoteConnector();
//RequestParameters contains the JndiProviderURL of Oracle Enterprise Scheduler
//Server which is auto-populated from the Oracle Enterprise Scheduler end while
//invoking an EJB. The CSF key is auto-populated in RequestParameters from the
//Oracle Enterprise Scheduler end if configured for the
//Oracle Enterprise Scheduler Server and specified in the EssConfig of HostingApp.
//If CSF key is present, the CSF lookup is done from RemoteConnector to resolve
//authentication.

RuntimeService rts = essConnector.getRuntimeServiceEJB(requestParameters);

//Sample invocation using RuntimeServiceBean.
RuntimeServiceHandle handle = rts.open();
RequestDetail reqDetail = rts.getRequestDetail(handle,
requestExecutionContext.getRequestId());
6.2.3.2 Implementation
The following example shows a skeletal implementation of an EJB job that uses the thin client library. See Creating and Using EJB Jobs for more information about implementing EJB jobs.
@Stateless(name = "JMXAdapter")
public class JMXAdapterBean implements RemoteCancellableExecutable
{
@Resource
private SessionContext sctx;
public JMXAdapterBean() {
}

public void execute(RequestExecutionContext requestExecutionContext,
RequestParameters requestParameters) throws
ExecutionErrorException,
ExecutionWarningException,
ExecutionPausedException,
ExecutionCancelledException
{
//"ESS RequestId:" + requestExecutionContext.getRequestId();
//"EJB Operation:" + requestParameters.getValue(SystemProperty.EJB_OPERATION_NAME);
//"Invoke Message:" + requestParameters.getValue(SystemProperty.INVOKE_MESSAGE);
}
public void cancel(RequestExecutionContext requestExecutionContext,
RequestParameters requestParameters)
{
//"ESS RequestId:" + requestExecutionContext.getRequestId();
//"EJB Operation:" + requestParameters.getValue(SystemProperty.EJB_OPERATION_NAME);
//"Invoke Message:" + requestParameters.getValue(SystemProperty.INVOKE_MESSAGE);
}
}
6.2.3.3 Subject Propagation
When the Oracle Enterprise Scheduler invokes an EJB job, the subject associated with the hosting application is always propagated to the job. This ensures that the subject that executes the job is available in the business operation of the bean. Add the following code to the ejb-jar.xml file to retrieve the subject from within the bean.
<interceptors>
<interceptor>
<interceptor-class>oracle.security.jps.ee.ejb.JpsInterceptor</interceptor-class>
<env-entry>
<env-entry-name>application.name</env-entry-name>
<env-entry-type>java.lang.String</env-entry-type>
<env-entry-value>NAME_OF_ENTERPRISE_APPLICATION</env-entry-value>
<injection-target>
<injection-target-class>oracle.security.jps.ee.ejb.JpsInterceptor</injection-target-class>
<injection-target-name>application_name</injection-target-name>
</injection-target>
</env-entry>
</interceptor>
</interceptors>
<assembly-descriptor>
<interceptor-binding>
<ejb-name>*</ejb-name>
<interceptor-class>oracle.security.jps.ee.ejb.JpsInterceptor</interceptor-class>
</interceptor-binding>
</assembly-descriptor>
You can use the following code to invoke an MBean from an EJB operation in the privileged context of the current subject:
AccessControlContext accContext = AccessController.getContext();
Subject currentSubject = Subject.getSubject(accContext);
String currentUsername = SubjectUtil.getUserName(currentSubject);
Subject.doAs(currentSubject, new PrivilegedExceptionAction() {
public Object run() {
//logic to invoke MBean
}
});
6.3 Using JDeveloper to Build a Thin Client Application for MAR Deployment
If your job uses the Oracle Enterprise Scheduler pre-deployed native hosting application, you can simplify the creation of custom job metadata by building a client application that assists in the creation of the metadata and deploys it to the pre-deployed native hosting application MDS partition (essUserMetadata).
The following instructions show how to use Oracle JDeveloper to create a thin client application that:
-
Adds job metadata
-
Creates an enterprise archive (EAR)
-
Packages the metadata archive (MAR) in the EAR
-
Deploys the metadata to the pre-deployed native hosting application
The instructions in Using JDeveloper to Create and Configure an EJB and its Job Definition Metadata describe how to create an EJB that can be invoked by the EJB job definition added to the pre-deployed native hosting application.
The ADF infrastructure is used to deploy the metadata to a specific partition when an application gets deployed. The MDS partition for the pre-deployed native hosting application is essUserMetadata.
JDeveloper provides accessibility options, such as support for screen readers, screen magnifiers, and standard shortcut keys for keyboard navigation. You can also customize JDeveloper for better readability, including the size and color of fonts and the color and shape of objects. For information and instructions on configuring accessibility in JDeveloper, see "Oracle JDeveloper Accessibility Information" in Developing Applications with Oracle JDeveloper.
Note:
Be sure to set the MW_HOME environment variable before you start JDeveloper. For example: export MW_HOME=/scratch/prh/12c/jdev If this variable is not set, the Job Type dropdown menu is not populated.
6.3.1 Create and Deploy a Thin Client Application for the Standalone Environment
The following steps describe how to use JDeveloper to create and deploy a thin client application.
-
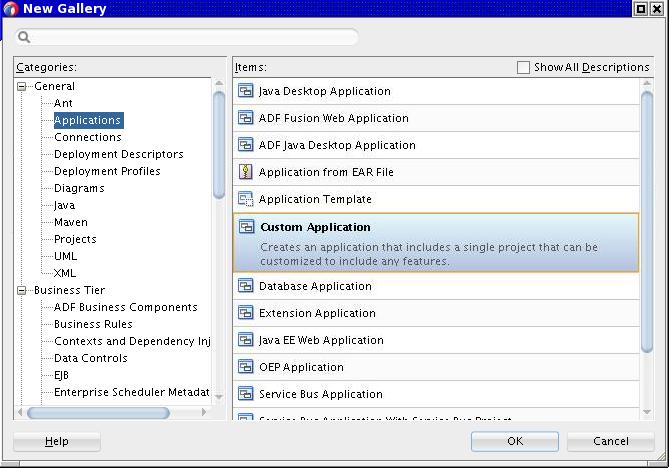
In the New Gallery dialog, create a custom application and project as shown in Figure 6-1.
-
In the Create Custom Application dialog, enter the application name and application package prefix as shown in Figure 6-2.
Figure 6-2 Create Custom Application Dialog - Step 1 of 3
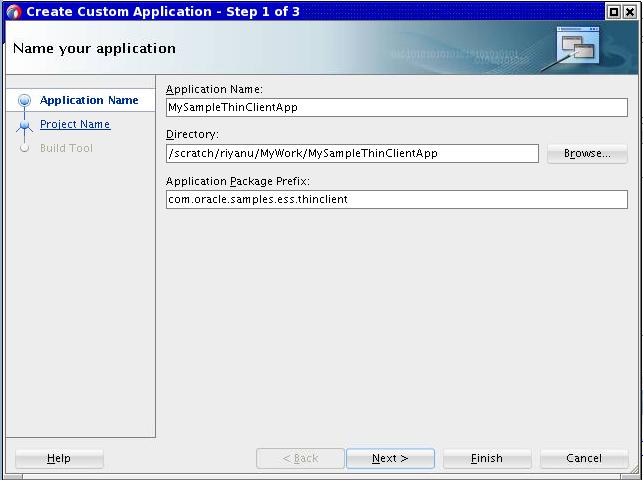
Description of "Figure 6-2 Create Custom Application Dialog - Step 1 of 3" -
Enter the project name, then add ESS Job Support, ESS Client Support and EJB into the project features as shown in Figure 6-3.
Figure 6-3 Create Custom Application Dialog - Step 2 of 5
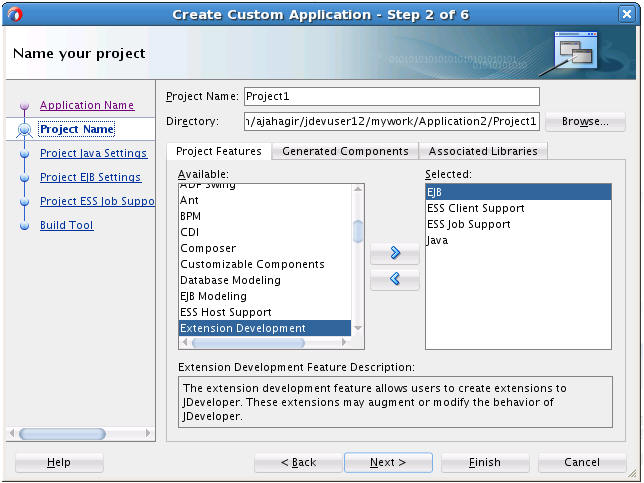
Description of "Figure 6-3 Create Custom Application Dialog - Step 2 of 5" -
Configure the EJB settings as shown in Figure 6-4.
Figure 6-4 Create Custom Application Dialog - Step 4 of 5
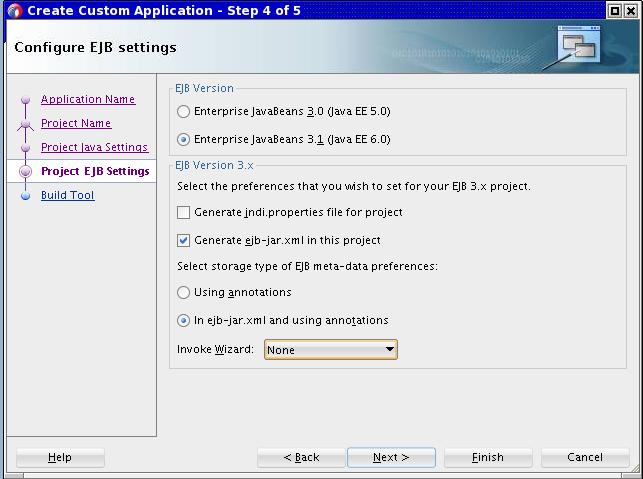
Description of "Figure 6-4 Create Custom Application Dialog - Step 4 of 5" -
Configure the application ID value as shown in Figure 6-5
Figure 6-5 Configure ESS Job Support Settings
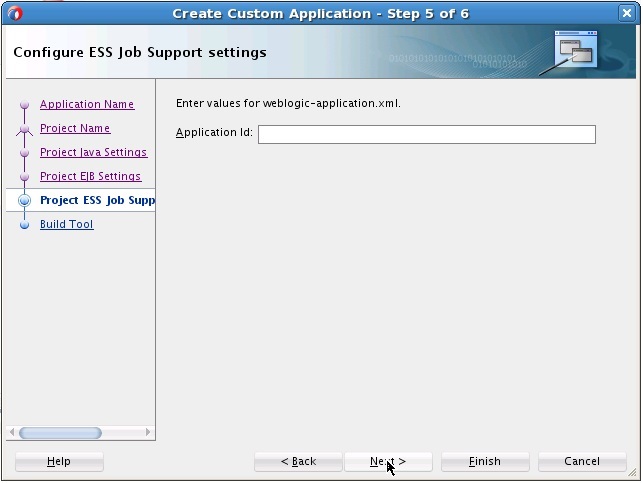
Description of "Figure 6-5 Configure ESS Job Support Settings" -
Click Next.
-
Click Finish to complete the steps to create a new application.
-
Edit the MANIFEST.MF file generated in the previous step and remove the following lines:
essclientapi-Specification-Version: 12
Extension-List: essruntime, essclientapi
Weblogic-Application-Version: 3.0
essclientapi-Extension-Name: oracle.ess.client.api
essruntime-Extension-Name: oracle.ess.runtime
essruntime-Specification-Version: 12
-
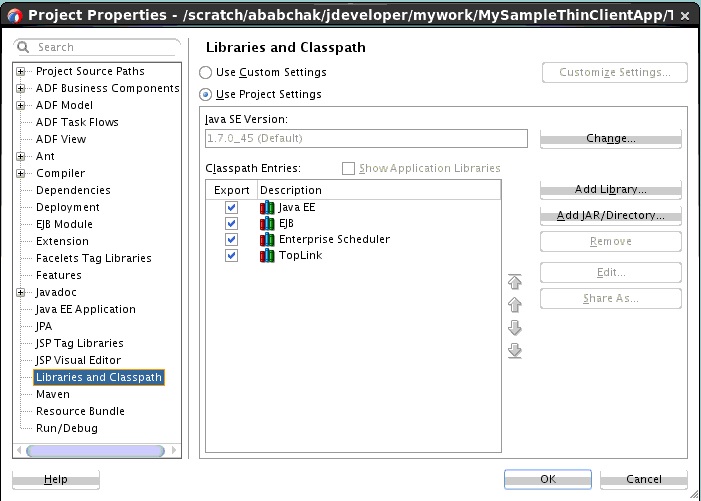
Right click the project node in the left tree panel, then select project properties and click “Libraries and Classpath" as shown in Figure 6-6. Make sure to only select “Java EE" and “Enterprise Scheduler" in the Classpath Entries pane.
-
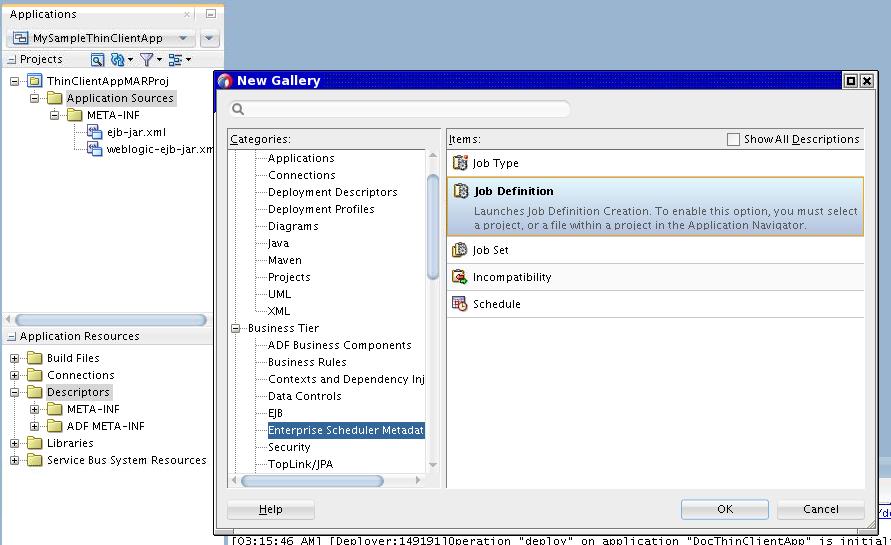
In the New Gallery dialog, select “Enterprise Scheduler Metadata" and “Job Definition" as shown in Figure 6-7.
-
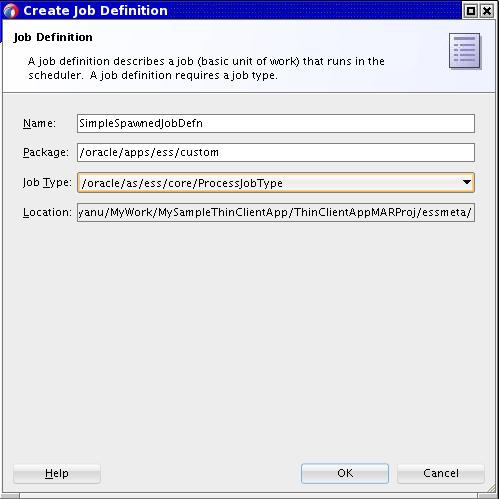
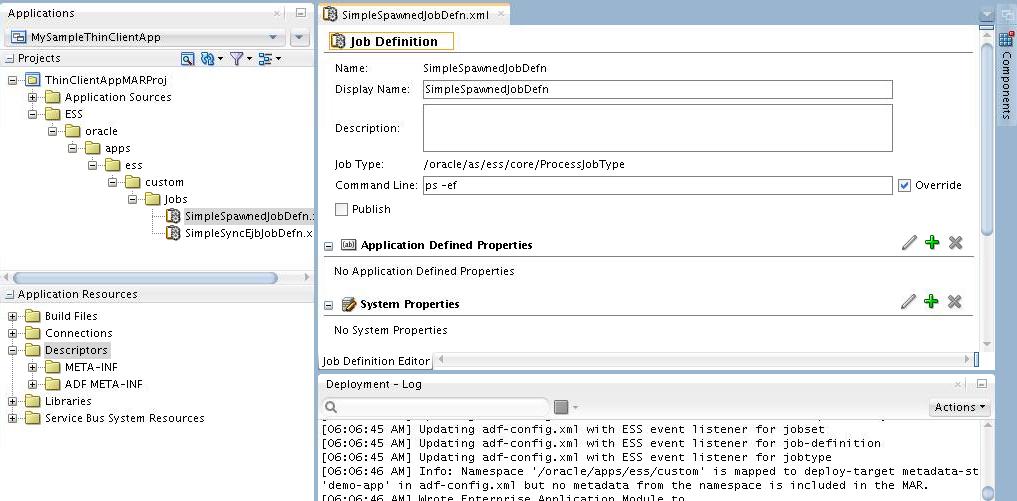
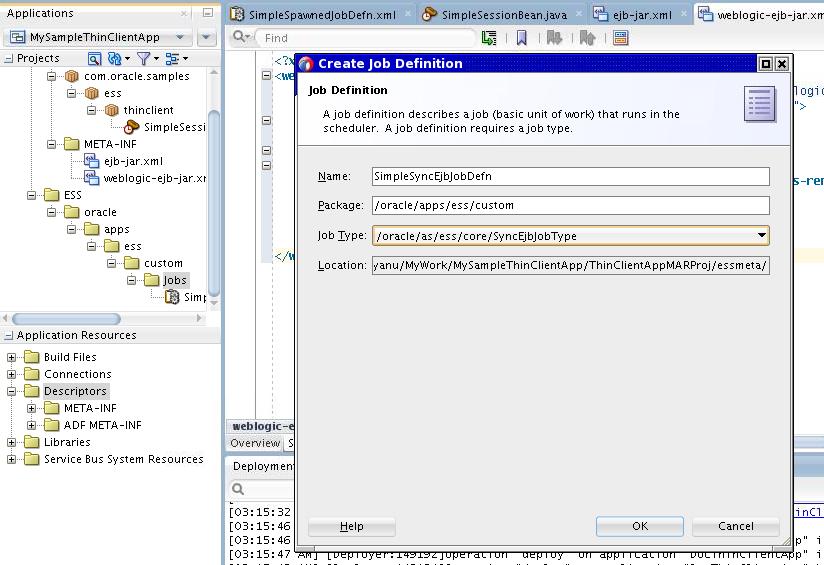
In the Create Job Definition dialog, select
/oracle/as/ess/core/ProcessJobTypefrom the Job Type dropdown to add simple spawned job definition metadata as shown in Figure 6-8. -
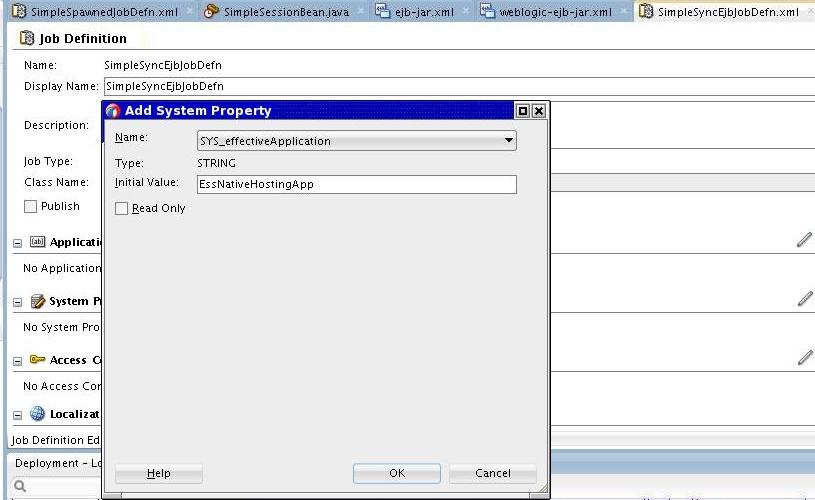
To complete the addition of spawned job definition metadata, select the Override check box and enter a value for the Command Line entry. Add a system property named
SYS_effectiveApplicationwith a value ofEssNativeHostingApp. -
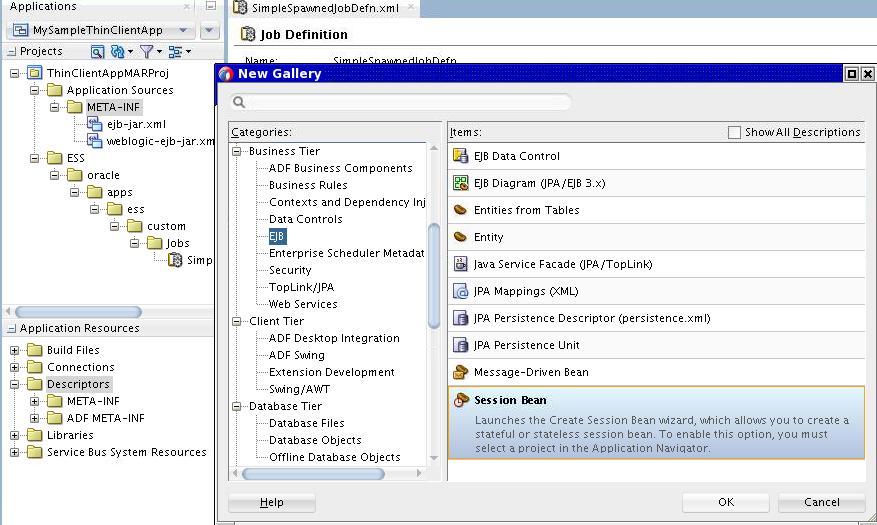
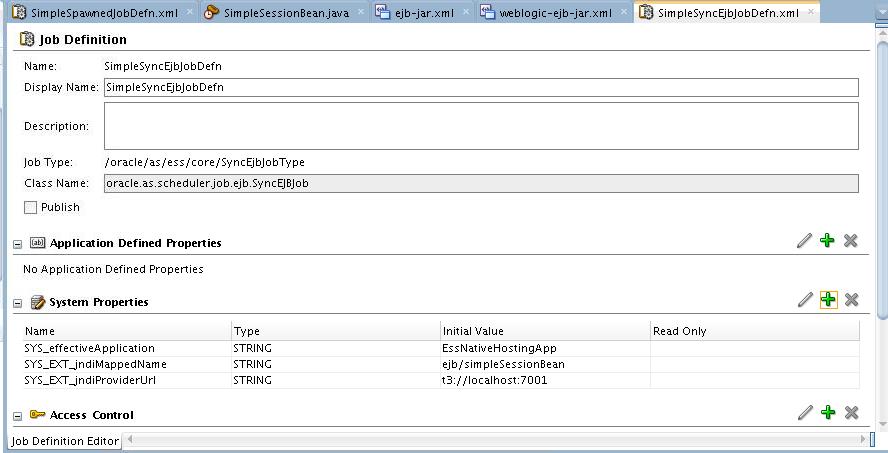
Add EJB job definition Metadata. Follow the steps in Using JDeveloper to Create and Configure an EJB and its Job Definition Metadata.
-
Configure the MAR profile.
-
Select “Application Properties" and click “Deployment Node".
-
Select “MAR Module" in the right side panel and click Edit.
-
Select “User Metadata" in the Edit MAR Deployment Properties dialog as shown in Figure 6-10.
-
Make sure that the
essmetadirectory (under the path of the project created above) is available. If it is not available, add the directory by manually navigating to theessmetadirectory.
Figure 6-10 Edit MAR Deployment Profile Properties Dialog
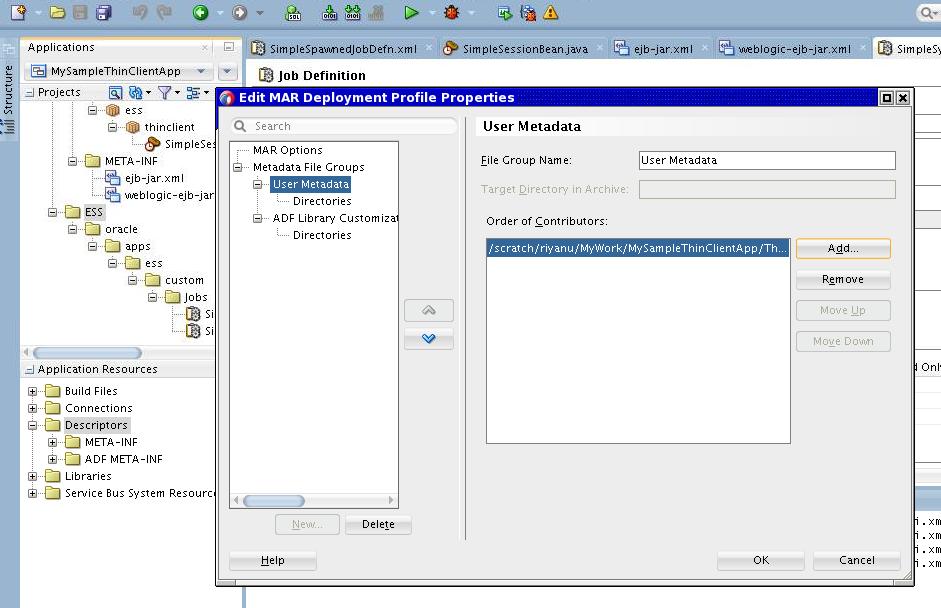
Description of "Figure 6-10 Edit MAR Deployment Profile Properties Dialog" -
-
Select the appropriate metadata to package in the MAR. click the “Directories" node under “User Metadata" and make sure that the newly added job definitions are selected as shown in Figure 6-11.
Figure 6-11 Edit MAR Deployment Profile Properties Dialog
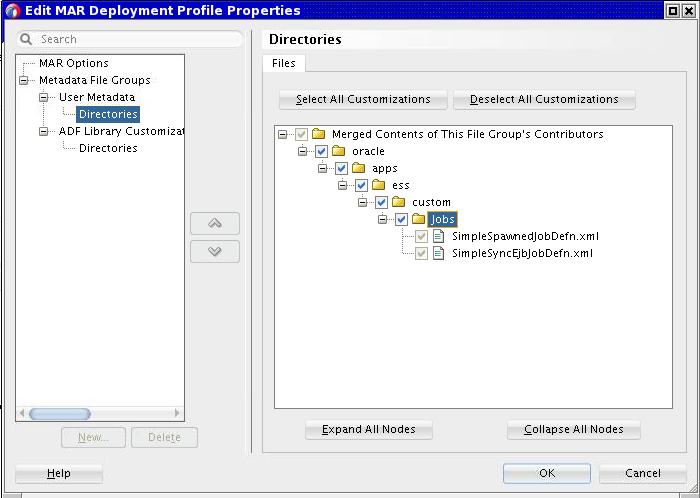
Description of "Figure 6-11 Edit MAR Deployment Profile Properties Dialog" -
Create a deployment profile for an enterprise archive (EAR).
-
Select “Application Properties" and click the deployment node.
-
Click New in the right panel to invoke the Create Deployment Profile dialog. Choose “EAR File" from the Profile Type dropdown as shown in Figure 6-12.
Figure 6-12 Create Deployment Profile Dialog
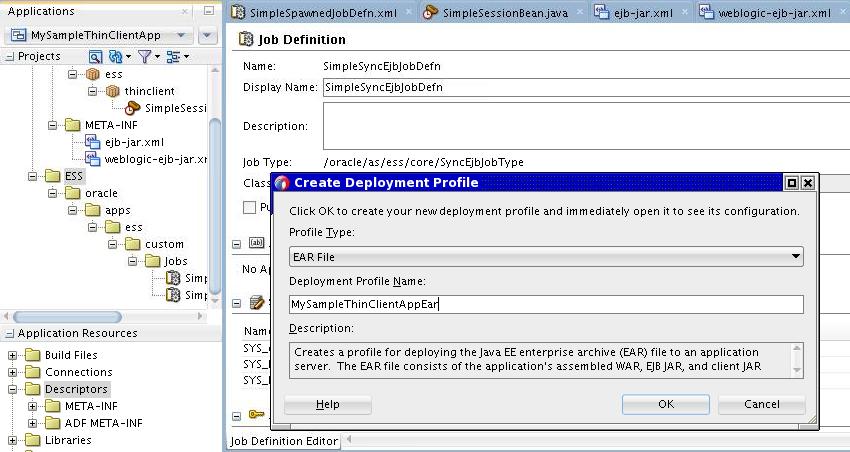
Description of "Figure 6-12 Create Deployment Profile Dialog"
-
-
Configure the application assembly for the EAR. In the dialog, make sure the following two profiles are selected:
-
The MAR profile you previously created
-
The EJB profile. This profile is automatically created. If it is not automatically created, create a new “EJB JAR" deployment profile for the project as previously described beginning in step 2.
To create the EJB-JAR deployment profile:
-
In the Application Navigator, in the Projects panel, right-click the Application project, then click Project Properties.
-
In the Project Properties window navigator, click Deployment.
-
Under Deployment Profiles, delete all profiles listed in the window, then click New.
-
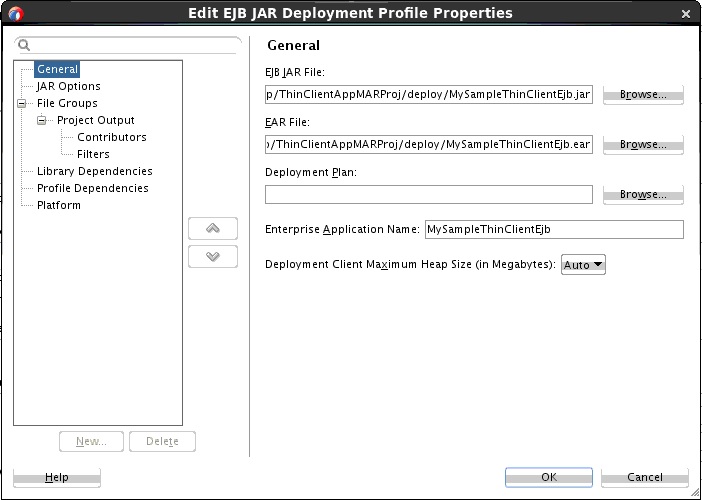
In the Create Deployment Profile dialog, from the Profile Type dropdown list, select EJB JAR file.
-
In the Name field, enter a name for the EJB. For this example, enter
MySampleThinClientEjb. -
Click OK.
Figure 6-13 Create the EJB-JAR Deployment Profile
Description of "Figure 6-13 Create the EJB-JAR Deployment Profile" -
In the Edit EJB JAR Deployment Profile Properties dialog navigator on the left, click General.
-
In the General window, in the Enterprise Application Name field, enter
MySampleThinClientApp. -
In the navigator, expand to File Groups > Project Output > Contributors.
-
In the Contributors window, select the following check boxes:
-
Project Output Directory
-
Project Source Path
-
Project Dependencies
-
-
In the navigator, expand to File Groups > Project Output > Filters.
Figure 6-14 Edit EAR Deployment Profile Properties Dialog
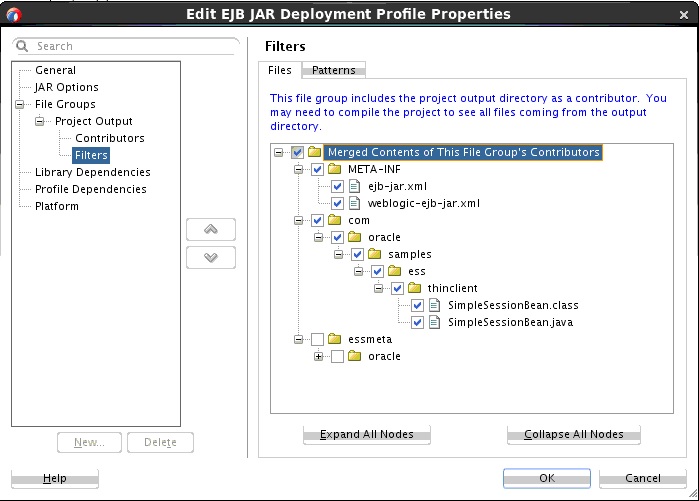
Description of "Figure 6-14 Edit EAR Deployment Profile Properties Dialog" -
In the Filters window, in the Files tab, ensure that the following folders are selected:
-
META-INF (and its contents)
-
oracle (and its contents)
-
-
In the JAR Option window, deselect the Include Manifest File item.
-
Click OK.
-
In the Project Properties dialog, click OK.
-
-
Configure the library dependencies for the EAR. Be sure that none of the items are selected in the Libraries Selected for Deployment pane.
Figure 6-15 Edit EAR Deployment Profile Properties Dialog
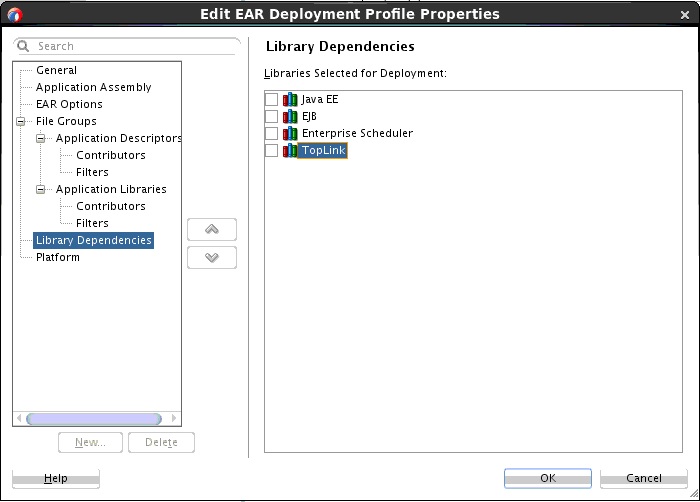
Description of "Figure 6-15 Edit EAR Deployment Profile Properties Dialog" -
Configure the
adf-config.xmlfile. When you deploy an ADF-based application from JDeveloper, there is a dialog that asks you to select the MDS partition into which the metadata is to be deployed. If the EAR file generated from this application is to be deployed from the WLS console, certain MDS partition entries must be specified in theadf-config.xmlfile. If this is the case, ensure that theadf-config.xmlfile contains the entries shown in Example 6-1. You can find theadf-config.xmlfile in the Application Resources > Descriptors > ADF META-INF section in bottom of the left panel. -
Configure the
weblogic-application.xmlfile. Make sure the contents of theweblogic-application.xmlfile are as shown in Example 6-2. -
Deploy the application. To complete the deployment of the EAR, select
essUserMetadatain the Partition Name dropdown in the Deployment Configuration dialog and click Deploy.Figure 6-16 Oracle Deployment Configuration Dialog
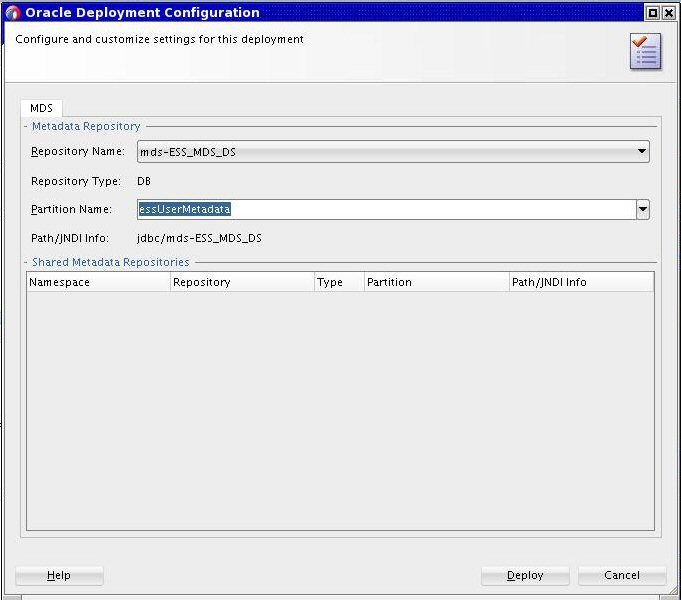
Description of "Figure 6-16 Oracle Deployment Configuration Dialog"
Example 6-1 Contents of the adf-config.xml File
<?xml version="1.0" encoding="UTF-8" ?>
<adf-config xmlns="http://xmlns.oracle.com/adf/config">
    <adf-mds-config xmlns="http://xmlns.oracle.com/adf/mds/config">
        <mds-config xmlns="http://xmlns.oracle.com/mds/config"           version="11.1.1.000">
            <persistence-config>
                <metadata-namespaces>
                    <namespace path="/oracle/apps/ess/custom"                       metadata-store-usage="ess_custom_metadata"/>
                </metadata-namespaces>
                <metadata-store-usages>
                    <metadata-store-usage id="ess_custom_metadata"                       deploy-target="true" default-cust-store="true">
                        <ns3:metadata-store                      class-name="oracle.mds.persistence.stores.db.DBMetadataStore"                     xmlns:ns3="http://xmlns.oracle.com/mds/config">
                            <ns3:property name="repository-name"                               value="mds-ESS_MDS_DS" />
                            <ns3:property name="partition-name"                               value="essUserMetadata" />
                            <ns3:property name="jndi-datasource"                               value="jdbc/mds-ESS_MDS_DS" />
                        </ns3:metadata-store>
                    </metadata-store-usage>
                </metadata-store-usages>
            </persistence-config>
        </mds-config>
    </adf-mds-config>
</adf-config>
Example 6-2 Contents of the weblogic-application.xml File
<?xml version = '1.0' encoding = 'UTF-8' ?>
<weblogic-application xmlns:xsi="http://www.w3.org/2001/XMLSchema-instance"                                                                                                                               xsi:schemaLocation="http://xmlns.oracle.com/weblogic/weblogic-application               http://xmlns.oracle.com"                                 xmlns="http://xmlns.oracle.com/weblogic/weblogic-application">
<listener>
   <listener-class>oracle.mds.lcm.weblogic.WLLifecycleListener</listener-class>
</listener>
<library-ref>
   <library-name>oracle.ess.thin.client</library-name>
</library-ref>
</weblogic-application>
6.4 Using JDeveloper to Create and Configure an EJB and its Job Definition Metadata
You use JDeveloper to create and configure an EJB and its job definition metadata.
The following steps describe how to:
-
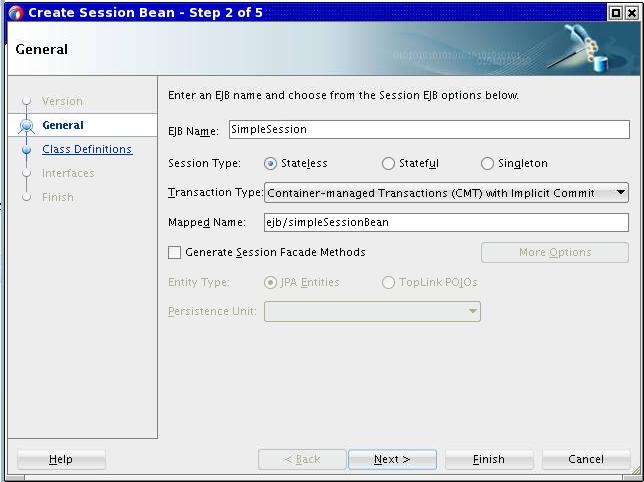
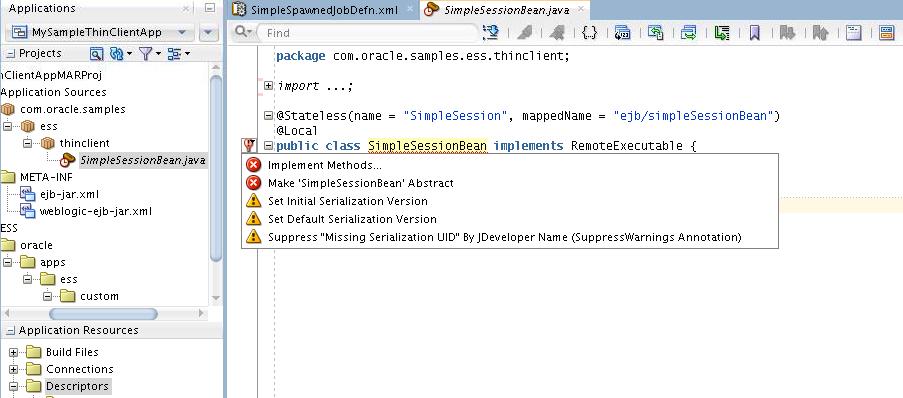
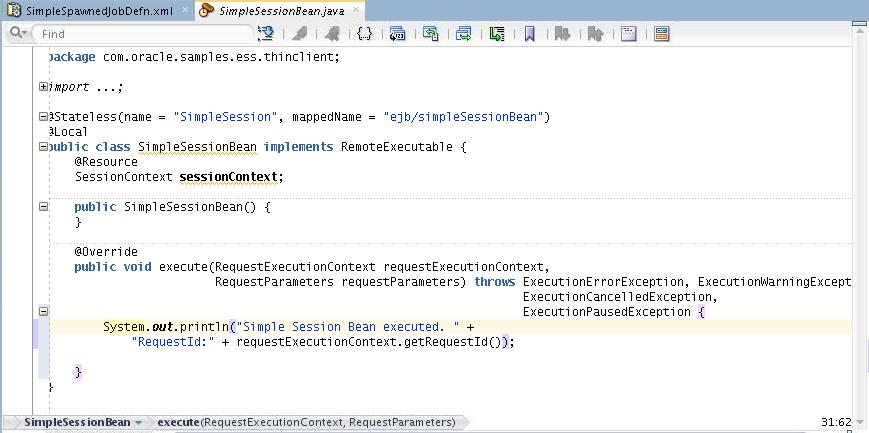
Create a simple synchronous EJB that conforms to Oracle Enterprise Scheduler's job implementation requirements.
-
Create EJB job definition metadata and deploy it as a part of the enterprise application.
Example 6-3 Contents of the ejb-jar.xml File
<?xml version = '1.0' encoding = 'UTF-8' ?>
<ejb-jar xmlns:xsi="http://www.w3.org/2001/XMLSchema-instance"
         xsi:schemaLocation="http://java.sun.com/xml/ns/javaee           http://java.sun.com/xml/ns/javaee/ejb-jar_3_0."
         version="3.0" xmlns="http://java.sun.com/xml/ns/javaee">
  <enterprise-beans>
     <session>
        <description>Simple Session Bean</description>
        <ejb-name>SimpleSession</ejb-name>                    <ejb-class>oracle.com.samples.ess.thinclient.SimpleSessionBean
        </ejb-class>
        <session-type>Stateless</session-type>
        <transaction-type>Container</transaction-type>
        <security-identity>
           <use-caller-identity/>
        </security-identity>
     </session>
   </enterprise-beans>
</ejb-jar>
Example 6-4 Contents of the weblogic-ejb-jar.xml File
<?xml version = "1.0" encoding = 'UTF-8' ?>
<weblogic-ejb-jar xmlns:xsi="http://www.w3.org/2001/XMLSchema-instance"                                xsi:schemaLocation="http://xmlns.oracle.com/weblogic/weblogic-ejb-jar               http://xmlns.oracle.com"
             xmlns="http://xmlns.oracle.com/weblogic/weblogic-ejb-jar">
  <weblogic-enterprise-bean>
     <ejb-name>SimpleSession</ejb-name>
     <stateless-session-descriptor>
        <business-interface-jndi-name-map>
           <business-remote>oracle.as.scheduler.RemoteExecutable</business-remote>
           <jndi-name>ejb/simpleSessionBean</jndi-name>
        </business-interface-jndi-name-map>
      </stateless-session-descriptor>
   </weblogic-enterprise-bean>
</weblogic-ejb-jar>
