13 Oracle JCA Adapter for Microsoft Message Queueing

Get an overview of Oracle JCA Adapter for Microsoft MQ concepts, features, configuration and use cases.

Learn how to use the Oracle JCA Adapter for Microsoft Message Queueing, which provides access to MSMQ functionality and works with the Oracle BPEL Process Manager (Oracle BPEL PM) and Oracle Service Bus (OSB). The Adapter also supports processing of various message formats from MSMQ through the Native Format Translation framework (nXSD).

13.1 Oracle JCA Adapter for MSMQ Concepts and Features

Microsoft Message Queueing (MSMQ) is a message infrastructure and a development platform for creating distributed, loosely-coupled messaging applications for the Microsoft Windows operating system.

Message queuing applications use message queuing to communicate across heterogeneous networks with computers that might be offline. Microsoft message queuing provides guaranteed message delivery, routing, security, transaction support and priority based routing.

Message Queues are logical containers that MSMQ uses to store and later forward those messages, thus providing the basis for loosely-coupled aspects of Message Queuing. Queuing applications send messages to the queue without needing to know when the messages are processed and which receiving application actually processes the message.

Applications that use MSMQ create/locate a queue, connect to the queue, navigate the queue, send/receive messages from a queue and use the MSMQ queue properties to define the behavior of the queue where applicable and needed.

13.1.1 MSMQ Terminology

In addition to having familiarity with basic MSMQ concepts, it is important to understand basic MSMQ terminology as background to using the MSMQ Adapter. While you should consult the relevant Microsoft documentation for a thorough understanding of the MSMQ technology, the following definitions help you understand the MSMQ product at a level that complement your use of the MSMQ Adapter.

  • Public Queues – A queue registered in the directory service that can be located by any Message Queuing application. This enables the MSMQ application to locate and open a queue anywhere within its domain. Public queues enable multi-hop scenarios, where messages are replicated throughout the Active Directory Service.

  • Private Queues–A queue registered on the local computer (and not in the directory service) that typically cannot be located by other applications.

  • MSMQ queue – A temporary storage location from where messages can be sent and received reliably, as and when conditions permit.

  • MSMQ user message queues – Queues that are either private or public.

  • Remote Queue – A queue manager is a Message Queuing service that delivers, receives, authenticates, and routes messages, and maintains information in the directory service. For an application, a remote queue is a queue that is hosted by a queue manager other than the one with which the application communicates.

  • Distribution Lists – Distribution lists are public lists of destinations that are stored in Active Directory Domain Services (ADDS).

  • ADDS – Active Directory Domain Services is a directory service implemented by Microsoft for Windows domain networks. It is included in most Windows Server operating systems.

  • Transactional Queues – A queue that contains transactional messages. Transactional queues can only contain transactional messages, which are messages sent within a transaction. You can use transactional messages to pair the sending or receiving of any message with an action in another operation. Using transactional messages ensures that the unit of work is carried out as an atomic operation.

  • NonTransactional Queues – A queue that contains only non-transactional messages. Message Queuing does not allow transactional messages in non-transactional queues.

  • Foreign Queue – A queue that resides on a computer that does not run Message Queuing (a foreign computer).

13.1.1.1 jCOM and the MSMQ Adapter

The MSMQ Adapter uses Oracle WebLogic jCOM to enable interaction with MSMQ v5.0. jCOM assists in providing Java-to-COM integration.

13.1.1.1.1 Background

Specifically, WebLogic jCOM provides a runtime component that implements both COM/DCOM over Distributed Computing Environment Remote Procedure Call, and Remote Method Invocation (RMI) over the Java Remote Method protocol/Internet Inter-ORB Protocol distributed components infrastructures. This makes the objects on the other side of an interaction appear as if they were native objects for each environment.

The DCOM (Distributed Component Object Model) mode uses the Component Object Model (COM) to support communication among objects on different computers.

In a WebLogic jCOM application running in DCOM mode, the COM client communicates with WebLogic Server DCOM protocol.

In native mode, COM clients make native calls to WebLogic Servers (COM-to-WLS) and WebLogic Servers make native calls to COM applications.

For both COM-to-WLS and WLS-to-COM applications, because native mode uses native code dynamically loaded libraries (DLLs)—compiled and optimized specifically for the local operating system and CPU—using Native mode results in better performance.

13.1.1.1.2 Implications for the MSMQ Adapter

The implications for use with the MSMQ Adapter are that you can use Native Mode when the MSMQ server and the SOA server are installed on the same machine. The SOA server installed must be a Windows Platform and not another platform, such as a Linux Platform.If the MSMQ Adapter and MSMQ are installed on the same system, you can enable Native Mode at both the jCOM protocol level and at the MSMQ Adapter level. When you use Native Mode, the MSMQ Adapter can directly interact with the MSMQ server because they are on the same system, rather than your having to use DCOM protocols to communicate (which are used when the MSMQ adapter and the MSMQ server are on two different machines). Ensuring that MSMQ Adapter does not use the DCOM protocol to interact with MSMQ COM components provides you with performance benefits.

13.1.1.2 Security

When the MSMQ Adapter needs to make an outbound connection to the MSMQ server, it must sign on with valid security credentials. In accordance with the J2CA 1.5 Specification, the WebLogic Server supports both container-managed and application-managed sign-on for outbound connections. The MSMQ Adapter can leverage either of these methods to sign on to the Enterprise Information System.

13.1.1.2.1 Component-managed Sign-On

With component-managed sign-on, the component itself supplies the necessary security credentials when making the call to obtain a connection to an Enterprise Information System.The application server invokes the createManagedConnection method of ManagedConnectionFactory by passing a null Subject instance.

13.1.1.2.2 Container-Managed Sign-On

Container managed sign-on enables a user to sign-on to Oracle WeblogicServer and also to access the Enterprise Information System through the resource adapter without having to sign-in separately to the Enterprise Information System.

Because the Oracle WebLogic server and MSMQ maintain independent security realms, this is achieved by using credentials mapping. Oracle WebLogic Server security principals are mapped to the corresponding credentials required to access the Enterprise Information System.

13.1.1.3 Logging and Diagnosability

The MSMQ Adapter employs the MSMQ Adapter logging framework provided by the Adapter Framework component to capture any runtime logs.

The MSMQ adapter produces the following logs:

  • oracle.soa.adapter.msmq

  • oracle.soa.adapter.msmq.transaction

  • oracle.soa.adapter.msmq.connection

  • oracle.soa.adapter.msmq.inbound

  • oracle.soa.adapter.msmq.outbound

Each logger can be set to TRACE:32 to enable debug logging for that area or the oracle.soa.adapter.msmq logger can be set to TRACE:32 to enable complete logging for the MSMQ Adapter. Any exception emanating from the MSMQ Adapter has a corresponding error code and error message

13.1.1.4 MSMQ Adapter and High Availability

The MSMQ Adapter is deployable in an active-active topology. As part of its implementation, the MSMQ Adapter enables each poller thread to poll the queue for the next available message. Each poller thread uses the receive API; on a successful read the message is removed from the queue. This ensures there is no message duplication when the MSMQ Adapter is deployed in an active/active topology.

13.1.2 Set Up MSMQ on Windows Server 2008

To use MSMQ on a Windows Server 2008 installation, enable the following features for a Windows Server on which MSMQ is to be installed. Consult the relevant Microsoft documentation for more setup and configuration information.

  • Message Queuing Server. For more information on installation, see the Microsoft document Installing Message Queuing (MSMQ) at http://msdn.microsoft.com/en-us/library/aa967729.aspx

  • Directory Service Integration (for Public Queues and Distribution Lists). The prerequisite specifically requires Active Directory Domain Services (AD_DS) configured on a Windows 2008 Server system. Active Directory Domain Services is required to access MSMQ public queues, otherwise only private queues are available for MSMQ Adapter use cases.

  • Message Queuing DCOM Proxy

After successful installation, Message Queuing appears under the Features link in the Microsoft Server Manager console window.

13.1.3 Setup Oracle Weblogic Server for COM

To set up the Oracle WebLogic server for use with COM:

  • Enable jCOM for the server that deploys the SOA MSMQ Adapter. For complete information on enabling jCOM, see the online version of the help at Oracle Fusion Middleware Oracle WebLogic Server Administration Console Online Help 12c Release 1 (12.1.3).

    Note that if jCOM is enabled on the SOA server, while activating the MSMQ Adapter, the target on which it should be deployed must be the SOA server itself. The jCOM must be enabled on the managed server to which the adapter is targeted.

  • When Weblogic is installed on a Windows machine which is running Microsoft Message Queuing, you can configure native mode though the configuration option ‘Enable Native Mode' as outlined in this documentation: http://docs.oracle.com/cd/E24329_01/apirefs.1211/e24401/pagehelp/Corecoreserverserverprotocolsjcomtitle.html

    Enable Native Mode for jCOM. For more information on enabling Native Mode for jCOM, see http://docs.oracle.com/cd/E15051_01/wls/docs103/jcom/comtowls.html#wp1074435

  • Finally, enabling jCOM requires a restart of the corresponding server that deploys the SOA MSMQ Adapter; restart the WebLogic Server.

13.1.3.1 Transaction Management and Error Handling

For more information on Transaction Management and Error handling as it applies to Adapters in general, see Adapter Framework.

13.1.3.1.1 Transaction Management

MSMQ Adapter transaction support defaults to LocalTransaction. The MSMQ Adapter does not support XA Transactions. Transactional queues are supported when used in local transaction semantics.

For both inbound and outbound error cases, the MSMQ Adapter starts an internal MSMQ transaction if the TransactionMode property of the JCA-managed connection factory is set to Single.

If the TransactionMode property of the JCA-managed connection factory is set to None, the MSMQ Adapter does not start a transaction on the MSMQ side; the messages are produced and consumed in a non-transactional way.

The TransactionMode property value of None is required when receiving and sending messages to or from a Non-transactional queue.

13.1.3.1.2 Fault Handling

The MSMQ Adapter can handle faults encountered when producing or consuming a message to or from an MSMQ queue

If a fault occurs, the message is delivered to a BPEL recovery queue and/or is retried based on the nature of the fault, and depending if the error is retriable or non-retriable. For more information on handling Adapter Faults, see Error Handling.

Because the MSMQ Adapter does not support XA transactions, XA-retriable errors are not supported.

XA retriable errors refer to the errors that occur in context of an XA transaction. The adapters can throw PCRetriable or XARetriable exceptions. However, because there is no XA when used with MSMQ Adapter, the MSMQ Adapter does not allow for XA errors.

13.1.3.1.3 Outbound Retriable Errors

The MSMQ Adapter performs retries according to configured binding properties. If these binding properties are not specified, the retry is carried out by fault policies, if they are included as part of the composite application.

For more information on MSMQ binding properties, see the Adapter Properties chapter, Table 13-3.

13.1.3.1.4 Outbound Non-Retriable Errors

Fault policies are executed if an outbound non-retriable fault occurs.

13.1.4 MSMQ Adapter Features

The Oracle MSMQ Adapter provides the following features:

  • Sending Messages to MSMQ Private Queues

    • The MSMQ Adapter enables sending a message to a local private queue. When using the MSMQ Adapter Configuration Wizard to model an MSMQ Adapter reference, you can model an enqueue operation that is used to send (or Put) a message to an MSMQ queue.

    • The MSMQ Adapter enables sending a message to a local transactional private queue. When using the MSMQ Adapter Configuration Wizard to model an MSMQ Adapter reference, you can model an enqueue operation that is used to send a message to a local transactional MSMQ queue.

    Note:

    It is important to understand the relevance of the MSMQ TransactionMode property, which indicates if the connection participates in a transaction when sending and receiving a message. Values for this property are [Single|None].

    If the value is Single, the local and remote MSMQ queues to which the message is sent should be transactional. If the value is Single, the local MSMQ queue from which the message is retrieved should be Transactional.

    If the value is None and the queues to which the message is sent are transactional, a ResourceException occurs.

  • Sending messages to MSMQ Public Queues

    • The MSMQ Adapter enables sending a message to a local public queue. When using the MSMQ Adapter Configuration Wizard to model an MSMQ Adapter reference, you can model an enqueue operation. You can use this enqueue operation to send a message to a public MSMQ queue.

    • The MSMQ Adapter enables you to send a message to a local transactional public queue. When using the MSMQ Adapter Configuration Wizard to model an MSMQ Adapter reference, you can model an enqueue operation. You can use this enqueue operation to send a message to a MSMQ queue.

  • Sending Messages to MSMQ Distribution Lists

    • The MSMQ Adapter enables you to send a message to a Distribution List. When using the MSMQ Adapter Configuration Wizard to model an MSMQ Adapter reference, you can configure an enqueue operation to send a message to a MSMQ distribution list.

  • Consuming or Receiving Messages from a Private MSMQ Queue

    • The MSMQ Adapter enables you to consume or receive of a message from a local private MSMQ queue. The default behavior is for the next available message on the queue to be available for consumption.

      To do this, use the MSMQ Adapter Configuration wizard to model a Dequeue operation that enables consumption of a message from an MSMQ private queue.The MSMQ Adapter enables message consumption from a local private transactional MSMQ queue and supports an operation called dequeue.

      To do this, use the Configuration Wizard to create the dequeue that consumes or receives a message from a transactional MSMQ queue.

  • Receiving Messages from a Public MSMQ Queue

    • The MSMQ Adapter enables reception of a message from a public MSMQ queue. The MSMQ Adapter supports an operation called dequeue that you configure when modeling an adapter service and is used to consume or receive a message from a MSMQ queue.

    • The MSMQ Adapter enables reception of a message from a public transactional MSMQ queue. You can use the MSMQ Adapter Configuration Wizard operation called dequeue that is used to receive a message from a transactional MSMQ queue.

13.1.5 MSMQ Properties Supported

The MSMQ Adapter includes several JCA properties. They are provided here and in the properties appendix for your convenience.

See Table 13-1 for a list of JCA properties.

Table 13-1 MSMQ Adapter JCA Properties

Property Description Default Value Required

DestinationType

Indicates if the message is sent to a public queue, private queue or a group of queues as identified by the distribution list name. The values are;

PUBLIC_QUEUE

PRIVATE_QUEUE

DISTRIBUTION_LIST

None

Yes

DestinationName

Name of the MSMQ queue.

None

Yes, if UseActiveDirectoryPath is False

DestinationPath

The string that identifies a DistributionList or Public queue as represented in ActiveDirectory. An example string is listed below;

LDAP://MyLDAPServer/CN=MyQueue,CN=msmq,CN=MyComputer,CN=Computers,DC=MyDomain,DC=MyCompany,DC=COM

None

Yes, if UseActiveDirectoryPath is True

UseActiveDirectoryPath

Boolean that allows for Active Directory Path to be used to identify a public queue instead of queue name. This property is applicable when DestinationType is ‘DISTRIBUTION_LIST' or ‘PUBLIC_QUEUE'

False

-

UseDirectFormatName

Boolean that allows for Direct Format name to be used for public and private queues.

False

-

Priority

Priority can be set to any integer value between 7 and 0 (the default is 3). 7 means higher priority. 0 means lowest priority. Highest priority implies faster processing

3

-

TimeToLive

This property specifies a time limit (in seconds) for the message to be retrieved from the target queue. The value is assigned to MaxTimeToReceive property for a given MSMQ message.

-1 (infinite

-

Delivery

The property is used to specify express (non-persistent) or recoverable (persistent) messaging. Express messaging provides faster throughput. Recoverable messaging guarantees that the message is delivered even if a computer crashes while the message is en route to the queue. The values are: Persistent, Non-Persistent.

Persistent

-

OperationType

The operation to be carried out. The supported values for OperationType are enqueue and dequeue.

None

Yes

BodyType

Values are String (default) and ByteArray. When opaque (schema) processing option is selected that would imply BodyType value of ByteArray.

String

Yes

EnableStreaming

Boolean that enables payload to be streamed

False

-

See Table 13-2 for a list of Normalized Properties related to the MSMQ Adapter. Also indicated is the Adapter processing direction for each property.

Table 13-2 MSMQ Adapter Normalized Properties

Property Name Description Direction

jca.msmq.message.SentTime

The property indicates when a message is sent.

Inbound

jca.msmq.message.Priority

The property specifies a message's priority. This overrides Priority in MSMQInteractionSpec.

Inbound/Outbound

jca.msmq.message.TimeToLive

The property specifies a time limit (in seconds) for the message to be retrieved from the target queue. This overrides TimeToLive in the MSMQInteractionSpec.

Inbound/Outbound

jca.msmq.message.MaxTimeToReachQueue

The property specifies a time limit (in seconds) for the message to reach the queue. Message Queuing uses the enterprise-wide setting for the time-to-reach-queue interval if none is specified here.

Inbound/Outbound

jca.msmq.message.Id

Identifies the message using an MSMQ-generated message identifier.

Inbound

jca.msmq.message.Delivery

The property specifies how Message Queuing delivers the message. This overrides Delivery in MSMQInteractionSpec

Inbound/outbound

jca.msmq.message.BodyLength

The property provides the length of the message body in bytes.

Inbound

jca.msmq.message.ArrivedTime

The property indicates when the message arrived at the queue.

Inbound

See Table 13-3 for a list of Binding Properties that apply to the MSMQ Adapter.

Table 13-3 MSMQ Adapter Binding Properties

Property Name Description

adapter.msmq.receive.timeout

The time (in milliseconds) that Message Queuing waits for a message to arrive before starting another poll-cycle. The default value is one second (1).

adapter.msmq.dequeue.threads

Number of poller threads that is initialized when endpoint activation occurs. This enables the adapter to wait for a specified time to receive a message before next poll cycle is initiated. When specified, the value of adapter.msmq.dequeue.threads is used to spawn multiple inbound poller threads; multiple inbound threads can be used to improve performance The default value is 1.

Use the Connection Factory Configuration properties when you configure Connection Factories for the MSMQ Adapter. See Table 13-4. Also indicated is the processing direction for each property.

Table 13-4 MSMQ Adapter Connection Factory Configuration

Property Name Description Default

Host

IP Address of the MSMQ host.

-

AccessMode

Identifies if the connection factory allows for native access or not. Values are [Native | DCOM]. If Native, the Oracle WebLogic Server should be installed on the same host as MSMQ.

DCOM

TransactionMode

Indicates if the connection participates in a transaction when sending and receiving a message. Values are [Single|None].If Single, the local and remote MSMQ queues to which the message is sent should be transactional. If Single, the local MSMQ queue from which the message is retrieved should be Transactional.If None and the queues to which the message is sent are transactional, there is a ResourceException.

-

User

Identifies a user.

-

Password

Password for the specified user.

-

Domain

Domain of the MSMQ host.

-

13.2 MSMQ Adapter Configuration Wizard Flow

Use the MSMQ Adapter Configuration Wizard to create and configure an MSMQ Adapter.

13.2.1 Creating an Enqueue Operation

In this example walkthrough, you create an Enqueue Operation.

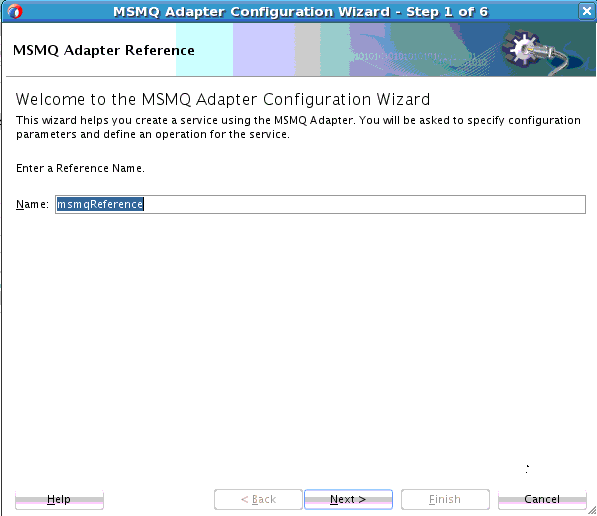
  1. When you drag and drop MSMQ Adapter from the Component Palette of JDeveloper BPEL Designer, the Adapter Configuration Wizard starts with a Adapter Configuration Wizard Welcome page. Click Next.
  2. The MSMQ Adapter Configuration Wizard prompts you to enter a service or reference name, as shown in Figure 13-1

    Figure 13-1 MSMQ Configuration Wizard Service or Reference Name Screen

    Description of Figure 13-1 follows
    Description of "Figure 13-1 MSMQ Configuration Wizard Service or Reference Name Screen"
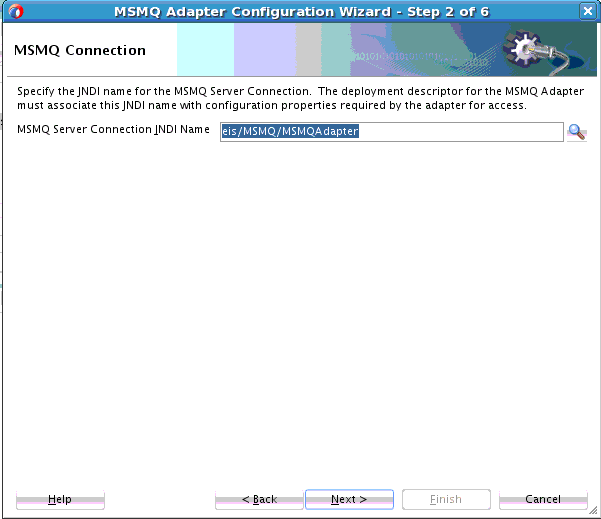
  3. Next, specify a the JNDI name for the MSMQ Service connection, as shown in Figure 13-2.

    Figure 13-2 MSMQ Adapter Configuration Wizard MSMQ Connection Screen

    Description of Figure 13-2 follows
    Description of "Figure 13-2 MSMQ Adapter Configuration Wizard MSMQ Connection Screen"
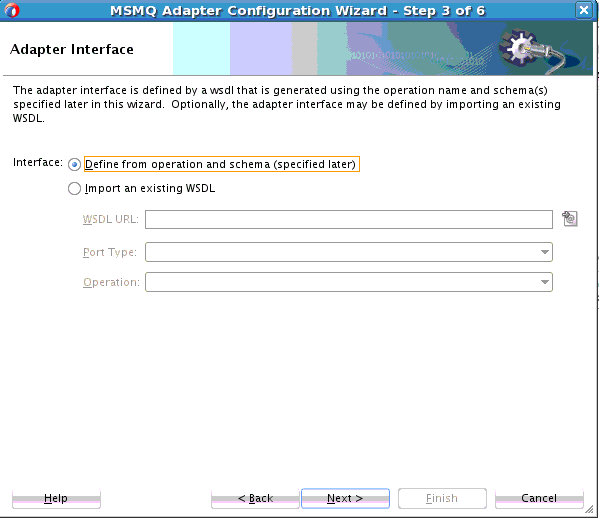
  4. On the MSMQ Configuration Wizard Adapter Interface page, you can either create a new MSMQ adapter WSDL file using the selected operation, or import an existing WSDL that already specifies the operation.

    Figure 13-3 MSMQ Adapter Configuration Wizard Adapter Interface Screen

    Description of Figure 13-3 follows
    Description of "Figure 13-3 MSMQ Adapter Configuration Wizard Adapter Interface Screen"
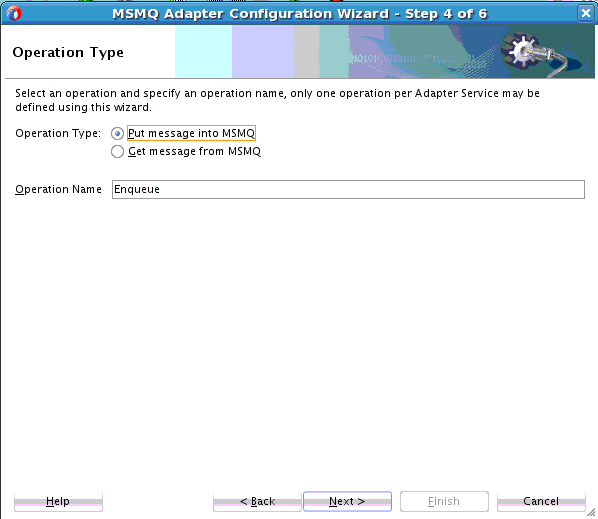
  5. On the MSMQ Adapter Configuration Wizard Operation type page, you can select a valid operation for the MSMQ adapter configuration. If you are updating the operation, the operation is pre-selected on this page and the operation name is pre-populated. If you have imported an existing WSDL, the operation name on this page is pre-populated.

    Figure 13-4 MSMQ Adapter Operation Type Screen

    Description of Figure 13-4 follows
    Description of "Figure 13-4 MSMQ Adapter Operation Type Screen"
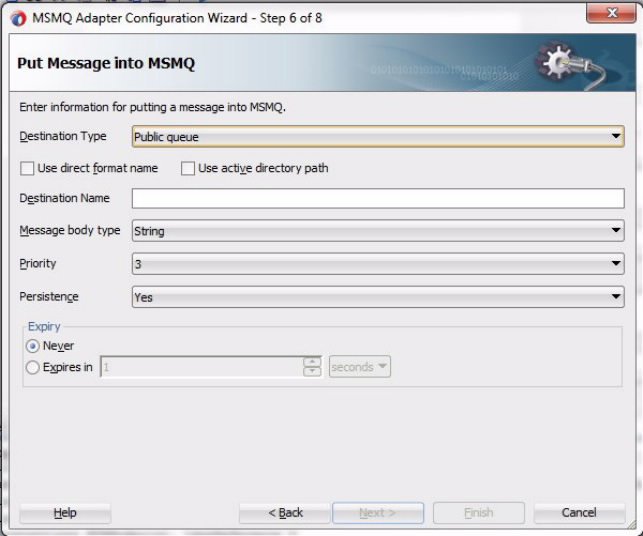
  6. The next step is to create an Enqueue Operation. This page captures the configuration parameters for the Enqueue operation.

    Figure 13-5 Enqueue Operation

    Description of Figure 13-5 follows
    Description of "Figure 13-5 Enqueue Operation"

    Enter the following:

    • In the Destination Type field, specify Public Queue, Private Queue or Distribution List.

    • If Public queue or Distribution List is selected, the Use active directory path checkbox is enabled, and Private queue is disabled.

    • If Use active directory path checkbox is selected, you can specify the Destination Path of the queue, otherwise you can specify the Destination Name of the queue.

    • Values for Message Body Type are String (default) and ByteArray.

    • Values for Priority are from 0 (lowest priority) to 7 (highest priority). The default priority is 3.

    • Values for Persistence: are Yes (default), or No.

    • Expiry units are seconds, minutes, hours and day. The MSMQ Adapter Configuration Wizard converts Units other than seconds into seconds, while setting the value for the TimeToLive interaction spec property value.

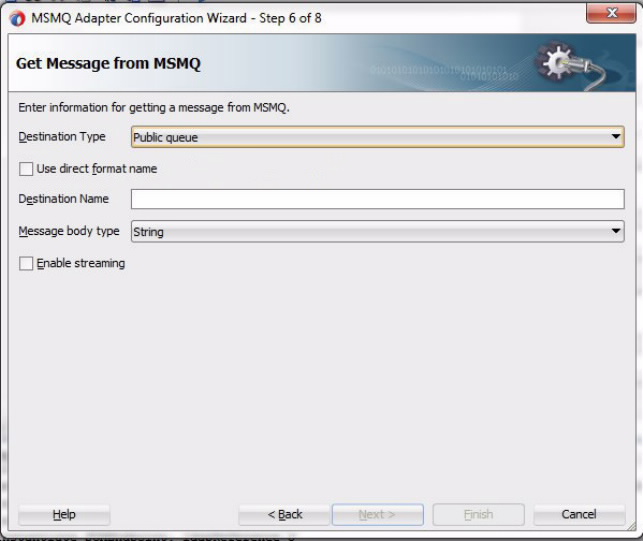
  7. If you had chosen the Dequeue, or Get Message, Operation, the Dequeue message appears. On this screen, you can enter the parameters to dequeue message.

    There is a checkbox for direct format name. Direct format names are used to reference public or private queues without accessing the directory service. Direct format names are used when sending messages directly to a computer, to computers over the Internet, sending messages to any queue while operating in domain, workgroup, or offline mode, reading messages while operating in domain, workgroup, or offline mode, or sending messages across forest boundaries.

    Figure 13-6 Dequeue Operation (Get Message from MSMQ) Screen

    Description of Figure 13-6 follows
    Description of "Figure 13-6 Dequeue Operation (Get Message from MSMQ) Screen"

    On this screen, you can specify the following:

    • Specify the Destination Type, Public Queue or Private Queue.

    • Specify the Destination Name of the queue.

    • Choose either String (the default) or ByteArray as the Message Body Type.

    • Enable streaming by checking the Enable streaming checkbox. When you enable this feature, the payload is streamed to a database rather than being manipulated in SOA runtime as in a memory DOM. You use this feature while handling large payloads. When you select the Enable streaming check box, a corresponding Boolean property StreamPayload is appended to the Activation Spec properties defined in the respective .jca file

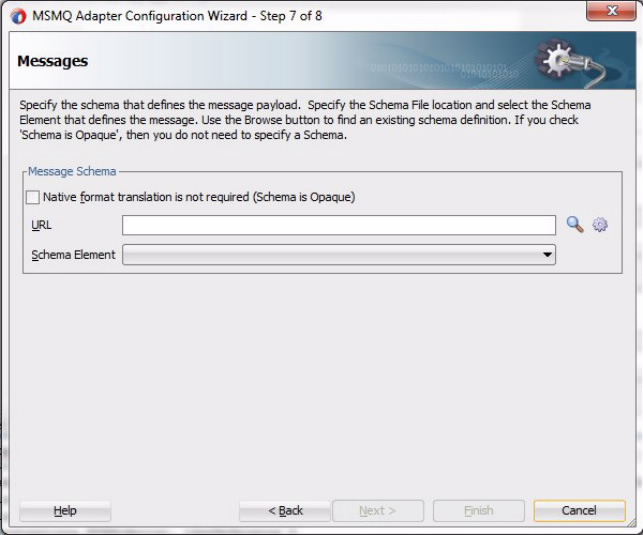
  8. The Adapter Configuration Wizard displays the Schema Page. If you need the message payload translated using a certain schema, enter the schema details, which define the incoming notification body content. Use the Native Format builder to define the Schema for native format. If the message payload is opaque, you can choose the Schema is Opaque option.

    Figure 13-7 MSMQ Adapter Configuration Wizard Messages Screen

    Description of Figure 13-7 follows
    Description of "Figure 13-7 MSMQ Adapter Configuration Wizard Messages Screen"
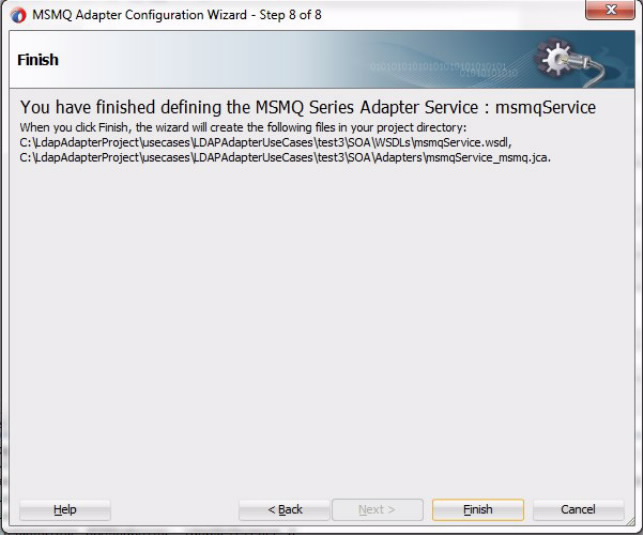
  9. Click Next. The MSMQ Adapters Finish Page appears. Click Finish to create the indicated files in your project directory.

    Figure 13-8 The MSMQ Adapter Configuration Wizard Finish Page

    Description of Figure 13-8 follows
    Description of "Figure 13-8 The MSMQ Adapter Configuration Wizard Finish Page "

13.2.2 Sample MSMQ Adapter Connection Factory Properties

The following are sample MSMQ Adapter connection factory properties, within Fusion Middleware Control, to see them proceed to Home >Summary of Deployments >MSMQAdapter > Configuration> Outbound Connection Pools. Select the New option and provide the JNDI a name, for example, eis/MSMQ/MSMQAdapter_NonTrans1

Properties include:

MSMQ_AccessMode=DCOM
MSMQ_Domain=adapter.test.msmq
MSMQ_Host=slc04lya.us.mydomain.com 
MSMQ_Password=Welcome12
MSMQ_TransactionMode= NONE
MSMQ_User=Administrator 

13.2.3 MSMQ Adapter Design-time Artifacts

The Adapter configuration Wizard generates the JCA, WSDL and the XML Schema artifacts based on the interaction and message definition.

13.2.3.1 Sample JCA File for an MSMQ Enqueue Operation

Following is the sample JCA file, specifying a WSDL for an MSMQ Enqueue Operation.

Example - Sample JCA File for an MSMQ Enqueue Operation

<adapter-config name="enqueueOp" adapter="msmq" wsdlLocation="../WSDLs/enqueueOp.wsdl" 
                xmlns="http://platform.integration.oracle/
                      blocks/adapter/fw/metadata">
  <connection-factory location="eis/MSMQ/MSMQAdapter"/>
  <endpoint-interaction portType="EnqueueOperation_ptt" operation="EnqueueOperation">
    <interaction-spec 
                className="oracle.tip.adapter.msmq.v2.jca.
                           MSMQInteractionSpec">
      <property name="BodyType" value="ByteArray"/>
      <property name="DestinationPath" value="dest"/>
      <property name="TimeToLive" value="-1"/>
      <property name="Delivery" value="Persistent"/>
      <property name="DestinationType" value="PUBLIC_QUEUE"/>
      <property name="UseDirectFormatName" value="true"/>
      <property name="OperationType" value="Enqueue"/>
      <property name="Priority" value="5"/>
      <property name="UseActiveDirectoryPath" value="true"/>
    </interaction-spec>
  </endpoint-interaction>
</adapter-config>

13.2.3.2 Sample JCA for an MSMQ Dequeue Operation

The following sample JCA, specifying for a WSDL for a Dequeue Operation.

Example - Sample JCA for an MSMQ Dequeue Operation

<adapter-config name="dequeueOp" adapter="msmq" 
   wsdlLocation="../WSDLs/dequeueOp.wsdl" 
  xmlns="http://platform.integration.oracle/blocks/adapter/
    fw/metadata">
  <connection-factory location="eis/MSMQ/MSMQAdapter"/>
  <endpoint-activation portType="DequeueOperation_ptt"
    operation="DequeueOperation">
    <activation-spec
      className="oracle.tip.adapter.msmq.v2.
                   jca.MSMQActivationSpec">
      <property name="BodyType" value="String"/>
      <property name="DestinationType" 
                   value="PUBLIC_QUEUE"/>
      <property name="UseDirectFormatName" value="false"/>
      <property name="DestinationName" value="dest"/>
      <property name="OperationType" value="Dequeue"/>
      <property name="EnableStreaming" value="false"/>
    </activation-spec>
  </endpoint-activation>
</adapter-config>

13.2.3.3 Design-Time WSDL Artifacts

A WSDL file is generated when you click Finish in the MSMQ Adapter Configuration Wizard. The schema you specified within the Schema Page is imported in the generated WSDL.

13.2.3.3.1 WSDL for MSMQ Enqueue Operation

The following WSDL is generated for a Base64Binary Enqueue operation.

Example - MSMQ Adapter WSDL for Enqueue Operation

<wsdl:definitions
     name="msmqService"      targetNamespace="http://xmlns.oracle.com/
                           pcbpel/adapter/msmq/         MSMQAdapterUseCases/Project1/msmqReference"
     xmlns:jca="http://xmlns.oracle.com/pcbpel/wsdl/jca/"
     xmlns:wsdl="http://schemas.xmlsoap.org/wsdl/"
     xmlns:tns="http://xmlns.oracle.com/pcbpel/adapter/          msmq/MSMQAdapterUseCases/Project1/msmqReference"
     xmlns:opaque="http://xmlns.oracle.com/
                    pcbpel/adapter/opaque/"
     xmlns:plt="http://schemas.xmlsoap.org/ws/2003/05/
                              partner-link/">
  <plt:partnerLinkType name="Enqueue_plt" >
    <plt:role name="Enqueue_role" >
      <plt:portType name="tns:Enqueue_ptt" />
    </plt:role>
  </plt:partnerLinkType>
    <wsdl:types>
      <schema targetNamespace="http://xmlns.oracle.com/
                              pcbpel/adapter/opaque/"
            xmlns="http://www.w3.org/2001/XMLSchema" >
        <element name="opaqueElement" 
                        type="base64Binary" />
      </schema>
    </wsdl:types>
    <wsdl:message name="Enqueue_msg">
        <wsdl:part name="opaque" element=
                        "opaque:opaqueElement"/>
    </wsdl:message>
    <wsdl:portType name="Enqueue_ptt">
        <wsdl:operation name="Enqueue">
            <wsdl:input message="tns:Enqueue_msg"/>
        </wsdl:operation>
   </wsdl:portType>
</wsdl:definitions>
13.2.3.3.2 WSDL for MSMQ Adapter Dequeue Operation

The following example shows a WSDL for an MSMQ Adapter Dequeue Operation.

MSMQ Adapter Dequeue Operation WSDL

<wsdl:definitions
     name="mqService"
targetNamespace="http://xmlns.oracle.com/pcbpel/adapter
     /msmq/MSMQAdapterUseCases/Project1/msmqService"
     xmlns:jca="http://xmlns.oracle.com/pcbpel/wsdl/jca/"
     xmlns:wsdl="http://schemas.xmlsoap.org/wsdl/"
     xmlns:tns="http://xmlns.oracle.com/pcbpel/adapter           /msmq/MSMQAdapterUseCases/
                   Project1/msmqService"
     xmlns:pc="http://xmlns.oracle.com/pcbpel/"
     xmlns:imp1="http://platform.integration.oracle/
                   blocks/adapter/fw/metadata/
                       msmqSchema"
     xmlns:plt="http://schemas.xmlsoap.org/ws/
                       2003/05/partner-link/">
       <plt:partnerLinkType name="Dequeue_plt" >
         <plt:role name="Dequeue_role" >
         <plt:portType name="tns:Dequeue_ptt" />
         </plt:role>
  </plt:partnerLinkType>
    <wsdl:types>
      <schema xmlns="http://www.w3.org/
                          2001/XMLSchema" >
        <import namespace="http://platform.integration.oracle/
                                      blocks/adapter             /fw/metadata/msmqSchema" 
                   schemaLocation="../Schemas/msmqSchema.xsd" />
      </schema>
    </wsdl:types>
    <wsdl:message name="Dequeue_msg">
        <wsdl:part name="body" element="imp1:message"/>
    </wsdl:message>
    <wsdl:portType name="Dequeue_ptt">
        <wsdl:operation name="Dequeue">
            <wsdl:input message="tns:Dequeue_msg"/>
        </wsdl:operation>
    </wsdl:portType>
</wsdl:definitions>

13.3 MSMQ Use Cases

The following use cases provide a description and walkthrough of various uses of the MSMQ Adapter.

13.3.1 Enqueue/Dequeue Message from Public Queue

This use case consists of the following steps

13.3.1.1 Designing the SOA Composite

You must create a JDeveloper application to contain the SOA composite. To create an application and a project for the use case, perform the following steps:

  1. In the Application Navigator of JDeveloper, click New Application. The select SOA Application - Name your application page is displayed.
  2. Enter Enq_Deq_PublicApp in the Application Name field, and click Next. Name your project page is displayed.
  3. Enter Enq_Deq_Public in the Project Name field, and click Next.
  4. Select Composite With BPEL in the Composite Template box, and click Finish. The MSMQ Adapter Configuration Wizard displays the Create BPEL Process - BPEL Process page.
  5. Enter BPELPublic in the Name field, select Define Service Later from the Template list.
  6. Click OK. The Enq_Deq_PublicApp application and the Enq_Deq_Public project appear in the design area.

13.3.1.2 Creating the Inbound Oracle MSMQ Adapter Service

Perform the following steps to create an inbound Oracle MSMQ Adapter service to dequeue message from Microsoft messaging queue.

  1. Drag and drop MSMQ Adapter from the Components to the Exposed Services swim lane. The Adapter Configuration Wizard Welcome page is displayed.
  2. Enter PublicIn in the Service Name field.
  3. Click Next. The Adapter Connection page is displayed.
  4. Provide the JNDI connection name of the MSMQ Server. It can be used to either to connect for Transactional queues or for Non-Transactional queues. For example, in this use case, the JNDI used for the Non-Transactional Queue is eis/MSMQ/MSMQAdapter_NonTrans.
  5. Click Next. The MSMQ Adapter Configuration Wizard displays the Adapter Interface page.
  6. Click Next. The Adapter Operation Type page is displayed.
  7. Select Operation Type as Get message from MSMQ and Operation Name as Dequeue.
  8. Click Next. The MSMQ Adapter Configuration Wizard Get Message from MSMQ page is displayed.
  9. Select Destination Type as Public Queue. Enter Public_Queue_Deq in the Destination Name field.
  10. Click Next. The wizard displays the Messages page.
  11. Select the Native format translation is not required (Schema is Opaque) checkbox. Note: If you have a schema, you can provide the schema for translation.
  12. Click Next. The wizard displays the Finish page.
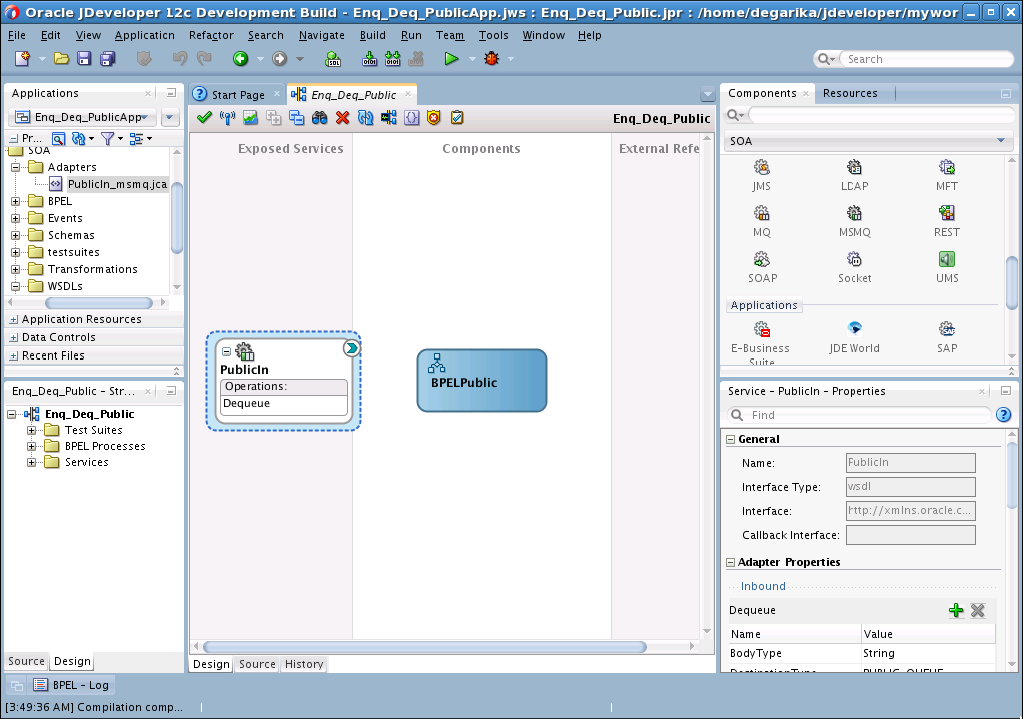
  13. Click Finish. You have now configured the inbound Oracle MSMQ Adapter and the composite.xml appears, as shown in Figure 13-9.

    Figure 13-9 The composite.xml for the Enqueue-Dequeue from Public Queue Use Case

    Description of Figure 13-9 follows
    Description of "Figure 13-9 The composite.xml for the Enqueue-Dequeue from Public Queue Use Case"

13.3.1.3 Creating the Outbound Oracle MSMQ Adapter Service

Perform the following steps to create an outbound Oracle MSMQ Adapter service to enqueue the message from one Microsoft messaging queue to the other Microsoft messaging queue.

  1. Drag and drop MSMQ Adapter from the Components to the External References swim lane. The Adapter Configuration Wizard Welcome page is displayed.
  2. Enter PublicOut in the Reference Name field.
  3. Click Next. The MSMQ Adapter Configuration Wizard indicates the Connection.
  4. Provide the JNDI connection name of the MSMQ Server. It can be used to either connect for Transactional queues or Non-Transactional queues. For example, in this use case the JNDI is used for the Non-Transactional Queue is eis/MSMQ/MSMQAdapter_NonTrans.
  5. Click Next. The Adapter Interface page is displayed.
  6. Click Next. The Adapter Operation Type page is displayed.
  7. Select Put message into MSMQ for Operation Type and Enqueue for Operation Name.
  8. Click Next. The Adapter Put Message into MSMQ page is displayed.
  9. Select Destination Type as Public Queue. Enter Public_Queue_Enq in the Destination Name field.

    Note:

    If you have the active directory path of the queue, you must select the Use active directory path checkbox and provide the appropriate value. Also, if you have the direct format name of the queue, you must provide the direct format name of the queue by selecting the checkbox Use direct format name.

  10. Click Next. The MSMQ Adapter Messages page is displayed
  11. Select the Native format translation is not required (Schema is Opaque) checkbox. Note that if you have a schema, you can provide the schema for translation
  12. Click Next. The Adapter Configuration Wizard displays the Finish page.
  13. Click Finish. The outbound Oracle MSMQ Adapter is now configured and the composite.xml appears.

13.3.1.4 Wiring Services and Activities

You have to assemble or wire the three components that you have created: Inbound adapter service, BPEL process, Outbound adapter reference. Perform the following steps to wire the components.

  1. Drag the small triangle in the PublicIn in the Exposed Services area to the drop zone that appears as a green triangle in the BPEL process in the Components area.
  2. Choose Delivery Type as async.persist.
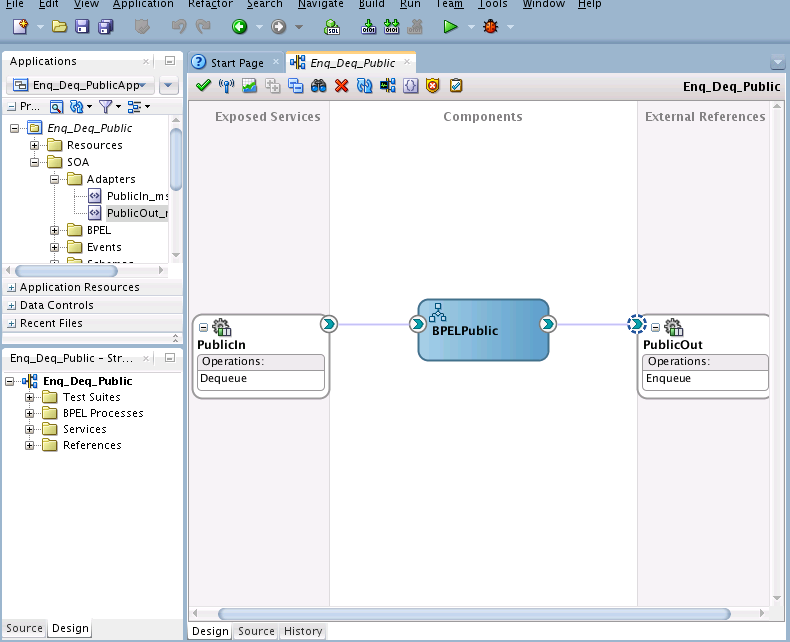
  3. Drag the small triangle in the BPEL process in the Components area to the drop zone that appears as a green triangle in the PublicOut in the External References area. The JDeveloper composite.xml appears, as shown in Figure 13-10.

    Figure 13-10 Wiring the composite.xml

    Description of Figure 13-10 follows
    Description of "Figure 13-10 Wiring the composite.xml"
  4. Click File, Save All.

13.3.1.5 Add a Receive Activity

Follow these steps to add a Receive Activity.

  1. Double-click BPELPublic. The BPELPublic.bpel page is displayed.
  2. Drag and drop a Receive activity from the Components area to the design area.
  3. Double-click the Receive activity. The Receive dialog is displayed.
  4. Enter ReceiveInput in the Name field.
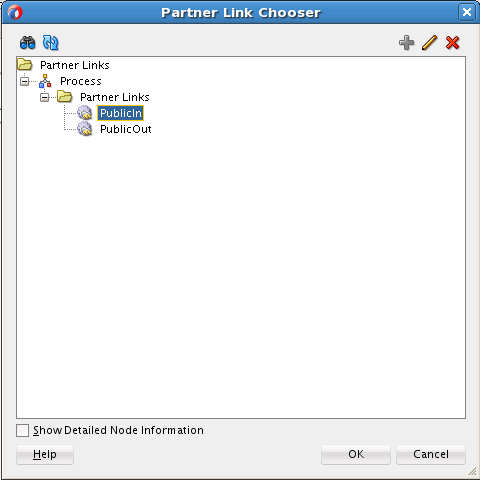
  5. Click Browse Partner Links at the end of the Partner Link field. The Partner Link Chooser dialog is displayed.
  6. Select PublicIn, as shown in Figure 13-11 and click OK.

    Figure 13-11 Selecting PublicIn in Partner Link Chooser

    Description of Figure 13-11 follows
    Description of "Figure 13-11 Selecting PublicIn in Partner Link Chooser"
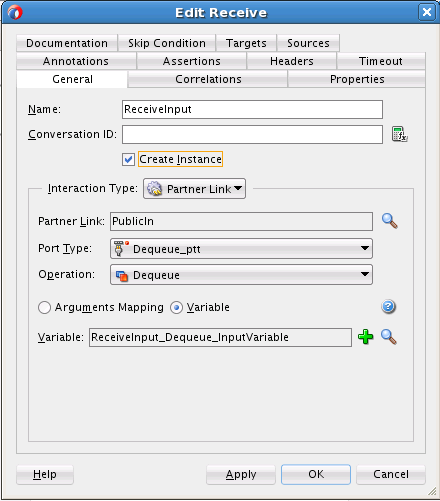
  7. Click the Auto-Create Variable icon to the right of the Variable field in the Receive dialog, as shown in Figure 13-12. The Create Variable dialog is displayed.

    Figure 13-12 Clicking Auto-Create Variable Icon in Receive Dialog

    Description of Figure 13-12 follows
    Description of "Figure 13-12 Clicking Auto-Create Variable Icon in Receive Dialog "
  8. Select the default variable name and click OK. The Variable field is populated with the default variable name.
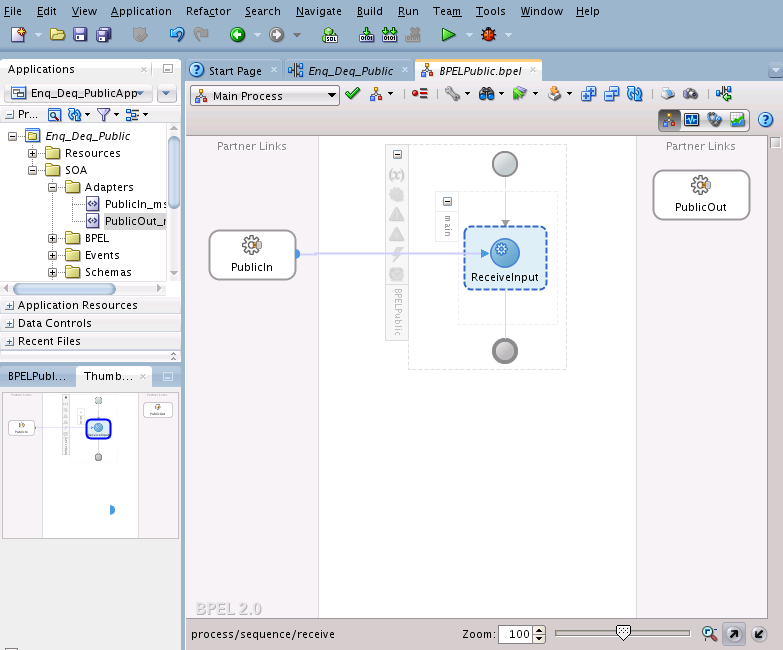
  9. Check Create Instance, and click OK. The JDeveloper BPELPublic.bpel page appears, as shown in Figure 13-13.

    Figure 13-13 The JDeveloper BPELPublic.bpel Page

    Description of Figure 13-13 follows
    Description of "Figure 13-13 The JDeveloper BPELPublic.bpel Page"

13.3.1.6 Add an Invoke Activity

Next step is to add an invoke activity.

  1. Drag and drop an Invoke activity from the Components area to the design area.
  2. Double-click the Invoke activity. The Invoke dialog is displayed.
  3. Enter Enqueue_Message in the Name field.
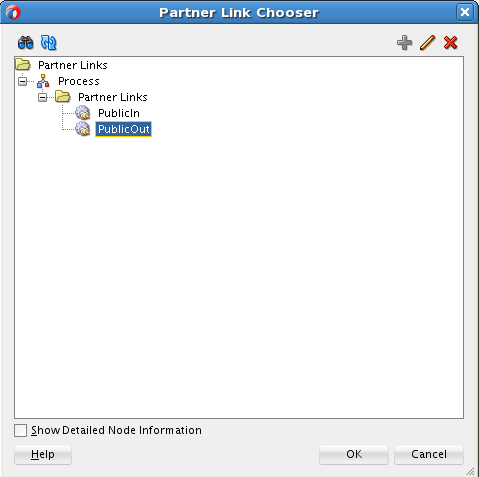
  4. Click Browse Partner Links at the end of the Partner Link field. The Partner Link Chooser dialog is displayed.
  5. Select PublicOut, as shown in Figure 13-14, and click OK.

    Figure 13-14 Partner Link Chooser Dialog with PublicOut Selected

    Description of Figure 13-14 follows
    Description of "Figure 13-14 Partner Link Chooser Dialog with PublicOut Selected"
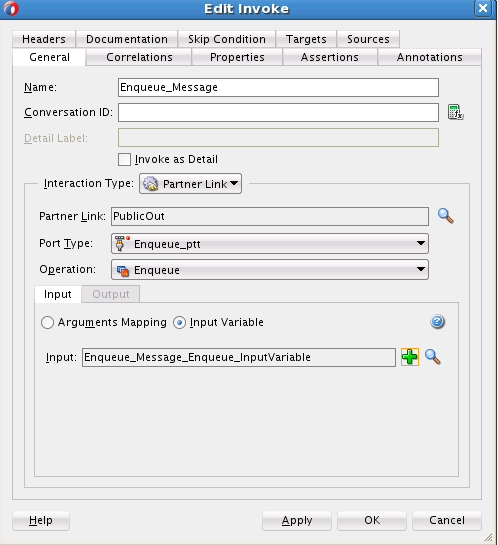
  6. Click the Automatically Create Input Variable icon to the right of the Input variable field in the Invoke dialog. The Create Variable dialog is displayed.
  7. Select the default variable name and click OK. The Variable field is populated with the default variable name. The Invoke dialog is displayed, as shown in Figure 13-15.

    Figure 13-15 Invoke Dialog for Enqueue Message

    Description of Figure 13-15 follows
    Description of "Figure 13-15 Invoke Dialog for Enqueue Message"
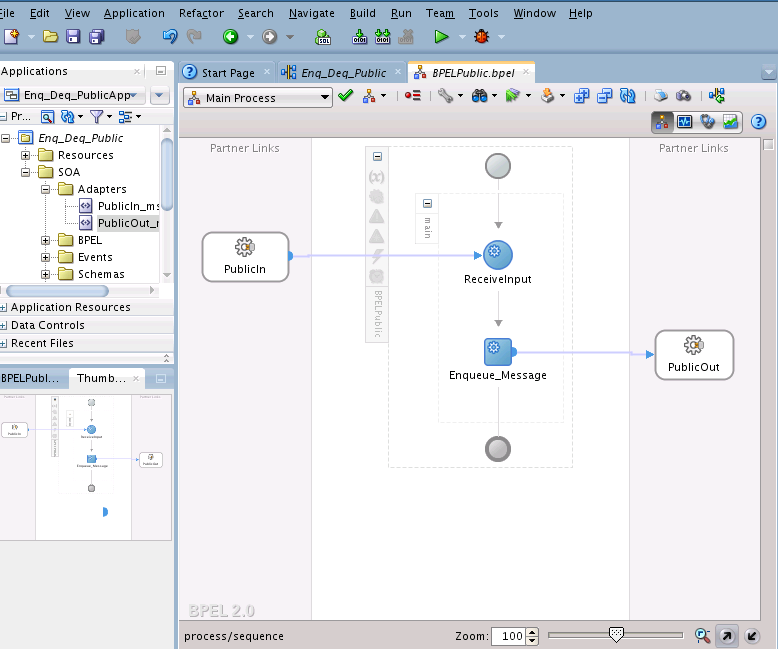
  8. Click OK. The JDeveloper BPELPublic.bpel page appears. See Figure 13-16.

    Figure 13-16 The BPELPublic.bpel Page after Invoke Has Been Added

    Description of Figure 13-16 follows
    Description of "Figure 13-16 The BPELPublic.bpel Page after Invoke Has Been Added"

13.3.1.7 Add an Assign Activity

Next, you add an Assign activity. Follow these steps to do so.

  1. Drag and drop an Assign activity from the Components area in between the Receive and Invoke activities in the design area.
  2. Double-click the Assign activity. The Assign dialog is displayed.
  3. Click the General tab and enter AssignReference in the Name field.
  4. Click the Copy Rules tab.
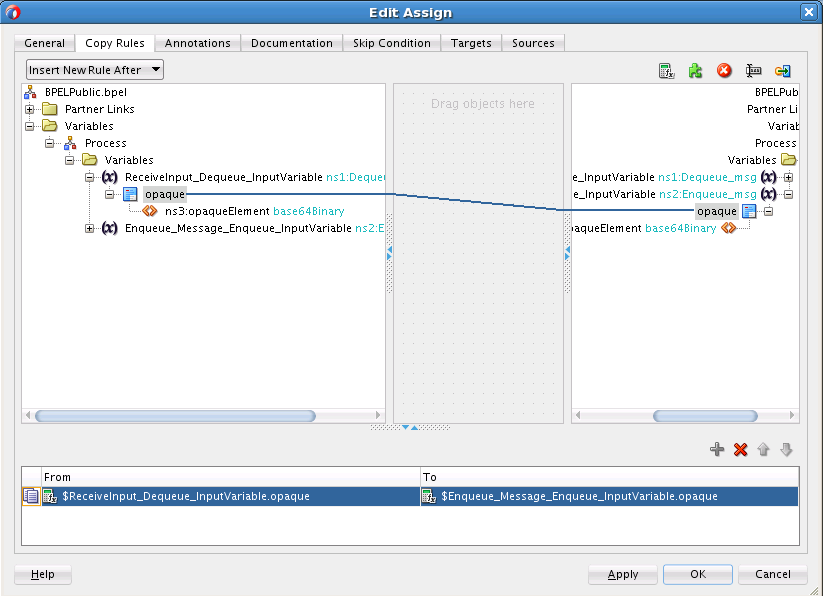
  5. Wire between the opaque element of the variable ReceiveInput_Dequeue_InputVariable to opaque element of the variable Enqueue_Message_Enqueue_InputVariable as shown in Figure 13-17.

    Figure 13-17 Using the Assign Dialog to Wire Elements

    Description of Figure 13-17 follows
    Description of "Figure 13-17 Using the Assign Dialog to Wire Elements"
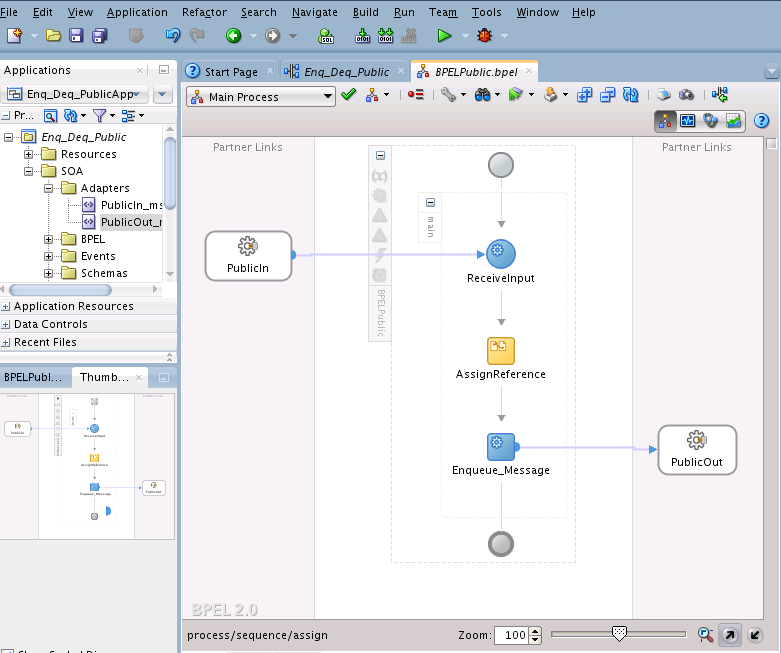
  6. Click OK, the JDeveloper BPELPublic.bpel page is displayed, as shown in Figure 13-18.

    Figure 13-18 The BPELPublic.bpel Page After the Assign Dialog has Wired Elements

    Description of Figure 13-18 follows
    Description of "Figure 13-18 The BPELPublic.bpel Page After the Assign Dialog has Wired Elements "

13.3.2 Enqueue/Dequeue Message from Private Queue

In this use case, you create an application that enqueues and dequeues messages from an MSMQ private queue.,

13.3.2.1 Designing the SOA Composite

You must create a JDeveloper application to contain the SOA composite. To create an application and a project for the use case, perform the following:

  1. In the Application Navigator of JDeveloper, click New Application. Then select SOA Application. The Name your application page is displayed. Enter Enq_Deq_PrivateApp in the Application Name field, and click Next.
  2. Name your project page is displayed. Enter Enq_Deq_Private in the Project Name field, and click Next.
  3. Select Composite With BPEL in the Composite Template box, and click Finish. The Create BPEL Process - BPEL Process page is displayed.
  4. Enter BPELPrivate in the Name field, select Define Service Later from the Template list.
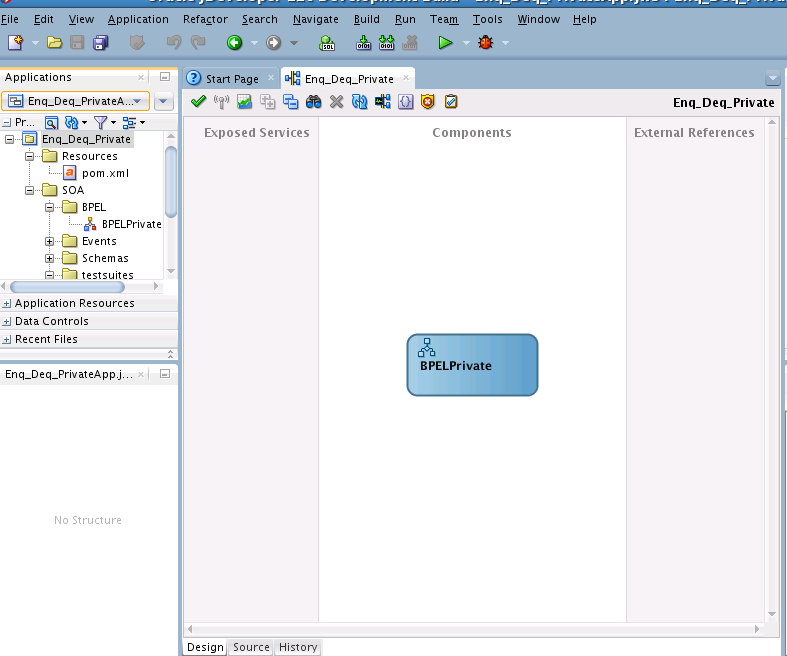
  5. Click OK. The Enq_Deq_PrivateApp application and the Enq_Deq_Private project appear in the design area, as shown in Figure 13-19.

    Figure 13-19 The Enq_Deq_PrivateApp and the Enq_Deq_Private Project in the Design Area

    Description of Figure 13-19 follows
    Description of "Figure 13-19 The Enq_Deq_PrivateApp and the Enq_Deq_Private Project in the Design Area"

13.3.2.2 Creating the Inbound Oracle MSMQ Adapter Service

Perform the following steps to create an inbound Oracle MSMQ Adapter service to dequeue message from Microsoft messaging queue.

  1. Drag and drop the MSMQ Adapter from the Components area to the Exposed Services swim lane. The Adapter Configuration Wizard Welcome page is displayed.
  2. Enter PrivateIn in the Service Name field.
  3. Click Next. The Adapter Connection page is displayed.
  4. Provide the JNDI connection name of the MSMQ Server. It can be to connect for Transactional queues or for Non-Transactional queues. In this use case, the JNDI used for Non-Transactional Queue is eis/MSMQ/MSMQAdapter_NonTrans.
  5. Click Next. The Adapter Interface page is displayed.
  6. Click Next. The Adapter Operation Type page is displayed
  7. Select Operation Type as Get message from MSMQ and Operation Name as Dequeue. See
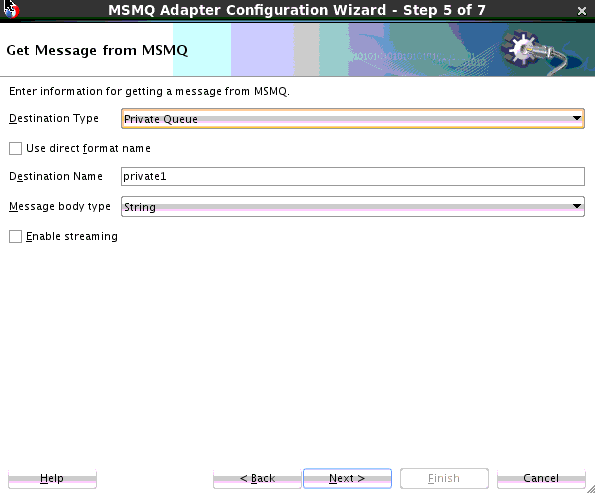
  8. Click Next. The Adapter Get Message from MSMQ page is displayed.

    Figure 13-20 MSMQ Adapter Configuration Wizard Get Message Screen

    Description of Figure 13-20 follows
    Description of "Figure 13-20 MSMQ Adapter Configuration Wizard Get Message Screen"
  9. Select Destination Type as Private Queue. Enter Private_Queue_Deq in the Destination Name field. (You might have indicated that the MSMQ adapter uses direct format name to access the private queue. If that option is preferred, you would have to check the Use Direct Format Name checkbox.
  10. Click Next. The Adapter Configuration Wizard displays the Messages page.
  11. Select the Native format translation is not required (Schema is Opaque) checkbox. Note: If you have a schema, you can provide the schema for translation.
  12. Click Next. The MSMQ Adapter Configuration Wizard displays the Finish page.
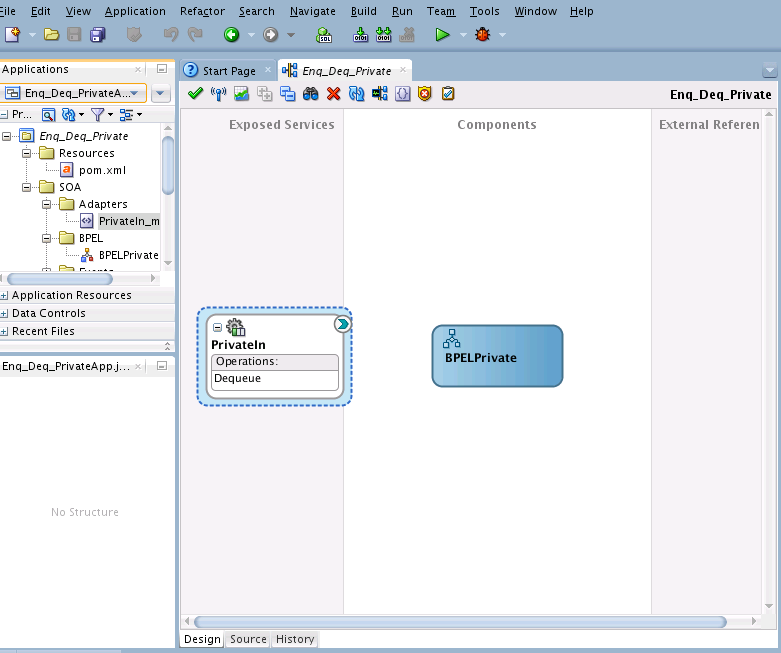
  13. Click Finish. You have now configured the inbound Oracle MSMQ Adapter and the composite.xml appears, as shown in Figure 13-21

    Figure 13-21 Inbound MSMQ Adapter Configured with composite.xml

    Description of Figure 13-21 follows
    Description of "Figure 13-21 Inbound MSMQ Adapter Configured with composite.xml"

13.3.2.3 Creating the Outbound Oracle MSMQ Adapter Service

Perform the following steps to create an outbound Oracle MSMQ Adapter service to enqueue the message from one Microsoft messaging queue to other Microsoft messaging queue.

  1. Drag and drop MSMQ Adapter from the Components area to the External References swim lane. The Adapter Configuration Wizard Welcome page is displayed.
  2. Enter PrivateOut in the Reference Name field.
  3. Click Next. The Adapter Connection page is displayed.
  4. Provide the JNDI connection name of the MSMQ Server. It can be either to connect for Transactional queues or Non-Transactional queues. For example, in this use case the JNDI used for Non-Transactional Queue is eis/MSMQ/MSMQAdapter_NonTrans.
  5. Click Next. The Interface page is displayed.
  6. Click Next. The Operation Type page is displayed.
  7. Select Operation Type as Put message into MSMQ and Operation Name as Enqueue.
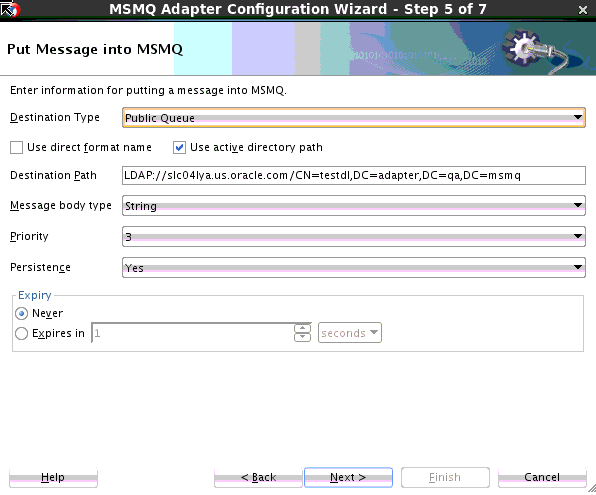
  8. Click Next. The Adapter Put Message into MSMQ page is displayed.
  9. Select Destination Type as Private Queue. Enter Private_Queue_Enq in the Destination Name. Note: If you have the direct format name of the queue, provide direct format name of the queue by selecting the checkbox Use direct format name.

    Figure 13-22 MSMQ Adapter Configuration Wizard Put Message Into MSMQ Screen

    Description of Figure 13-22 follows
    Description of "Figure 13-22 MSMQ Adapter Configuration Wizard Put Message Into MSMQ Screen"
  10. Click Next. Messages page is displayed.
  11. Select Native format translation is not required (Schema is Opaque) checkbox. Note: If you have a schema, you can provide the schema for translation.
  12. Click Next. The MSMQ Adapter Configuration Wizard displays the Finish page.
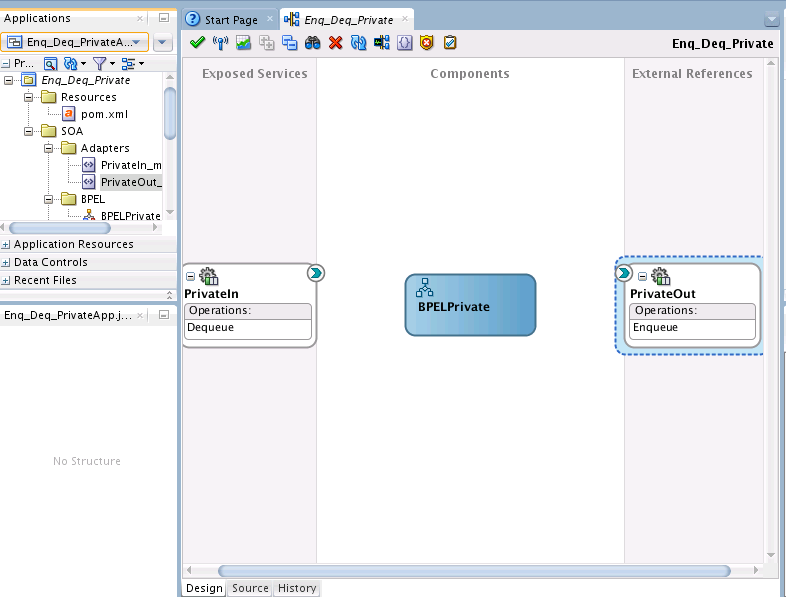
  13. Click Finish. The outbound Oracle MSMQ Adapter is now configured and the composite.xml appears, as shown in Figure 13-23.

    Figure 13-23 MSMQ Outbound Adapter Configured with Private Out External Reference

    Description of Figure 13-23 follows
    Description of "Figure 13-23 MSMQ Outbound Adapter Configured with Private Out External Reference"

13.3.2.4 Wiring Services and Activities

You must assemble or wire the three components that you have created: Inbound Adapter service, BPEL process, Outbound Adapter reference. Perform the following steps to wire the components.

  1. Drag the small triangle in the PrivateIn in the Exposed Services area to the drop zone that appears as a green triangle in the BPEL process in the Components area.
  2. Choose async.persist for Delivery Type.
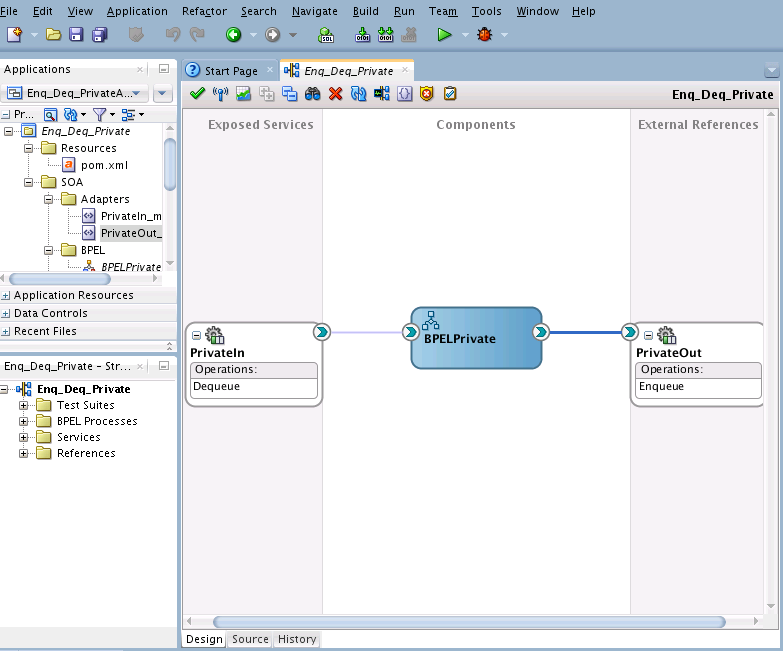
  3. Drag the small triangle in the BPEL process in the Components area to the drop zone that appears as a green triangle in the PrivateOut in the External References area. The JDeveloper composite.xml appears, as shown in Figure 13-24.

    Figure 13-24 The MSMQ Adapter JDeveloper composite.xml Wired

    Description of Figure 13-24 follows
    Description of "Figure 13-24 The MSMQ Adapter JDeveloper composite.xml Wired"
  4. Click File, Save All.

13.3.2.5 Adding a Receive Activity

The next step is to add a Receive activity to the composite application.

  1. Double-click BPELPrivate. The BPELPrivate.bpel page is displayed.
  2. Drag and drop a Receive activity from the Components area to the design area.
  3. Double-click the Receive activity. The Receive dialog is displayed.
  4. Enter ReceiveInput in the Name field.
  5. Click Browse Partner Links at the end of the Partner Link field. The Configuration Wizard displays the Partner Link Chooser dialog.
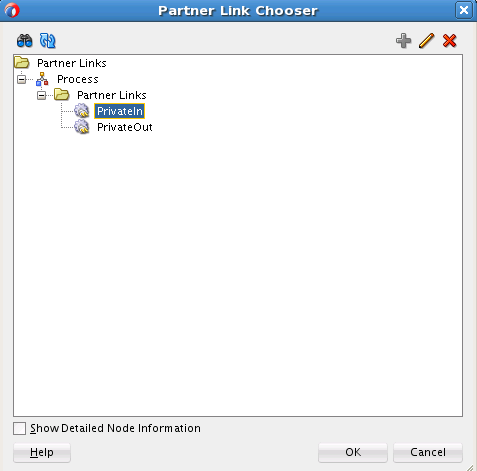
  6. Select PrivateIn, as shown in Figure 13-25 and click OK.

    Figure 13-25 Private Link Chooser Dialog with PrivateIn Selected as Partner LInk

    Description of Figure 13-25 follows
    Description of "Figure 13-25 Private Link Chooser Dialog with PrivateIn Selected as Partner LInk"
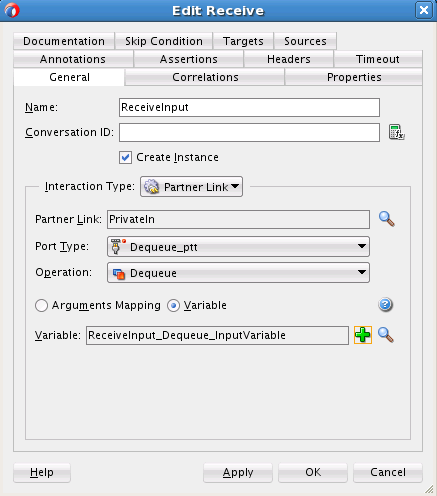
  7. Click the Auto-Create Variable icon to the right of the Variable field in the Receive dialog, as shown in Figure 13-26. The Adapter Configuration Wizard displays the Create Variable dialog.

    Figure 13-26 The Edit Receive Create Variable Dialog

    Description of Figure 13-26 follows
    Description of "Figure 13-26 The Edit Receive Create Variable Dialog"
  8. Select the default variable name and click OK. The Variable field is populated with the default variable name.
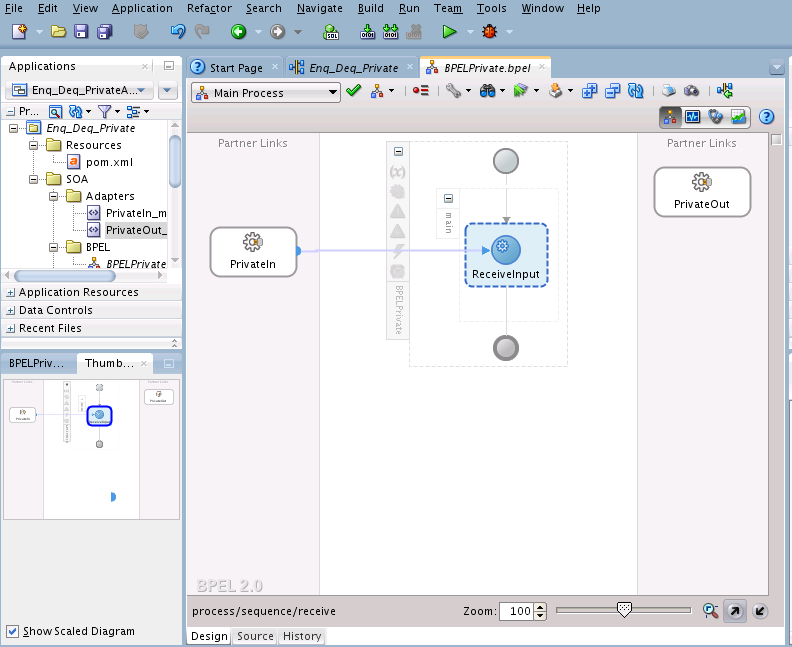
  9. Check Create Instance, and click OK. The JDeveloper BPELPrivate.bpel page appears, as shown in Figure 13-27.

    Figure 13-27 The BPELPrivate.bpel Page, Showing the PrivateIn Partner Link Wired to the Receive Activity

    Description of Figure 13-27 follows
    Description of "Figure 13-27 The BPELPrivate.bpel Page, Showing the PrivateIn Partner Link Wired to the Receive Activity"

13.3.2.6 Adding an Invoke Activity

The next step is to add an Invoke Activity.

  1. Drag and drop an Invoke activity from the Components area to the design area.
  2. Double-click the Invoke activity. The Invoke dialog is displayed.
  3. Enter Enqueue_Message in the Name field.
  4. Click Browse Partner Links at the end of the Partner Link field. The Partner Link Chooser dialog is displayed
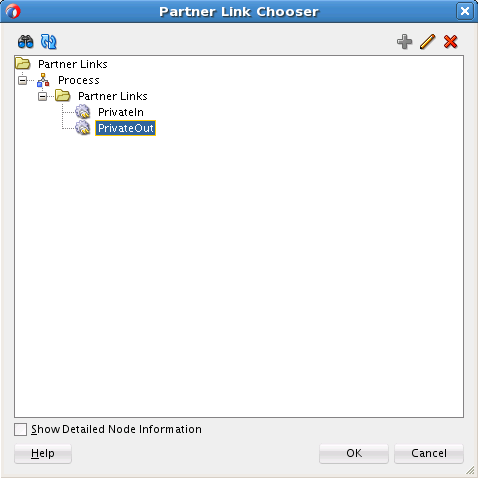
  5. Select PrivateOut, as shown in Figure 13-28, and click OK.

    Figure 13-28 The Partner Link Chooser Dialog, with PrivateOut Selected

    Description of Figure 13-28 follows
    Description of "Figure 13-28 The Partner Link Chooser Dialog, with PrivateOut Selected"
  6. Click the Automatically Create Input Variable icon to the right of the Input variable field in the Invoke dialog. The Create Variable dialog is displayed.
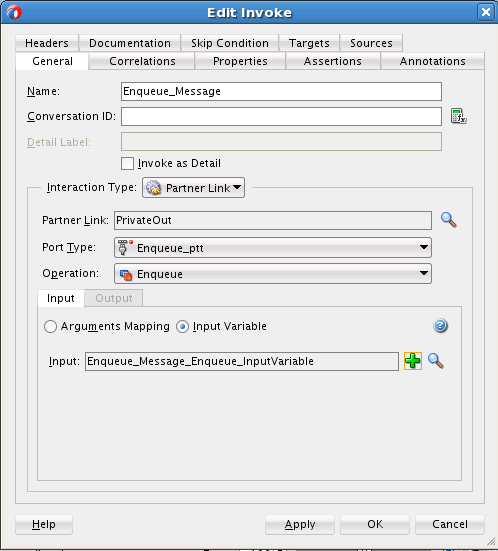
  7. Select the default variable name and click OK. The Variable field is populated with the default variable name. The Invoke dialog is displayed, as shown in Figure 13-29.

    Figure 13-29 The Edit Invoke Dialog

    Description of Figure 13-29 follows
    Description of "Figure 13-29 The Edit Invoke Dialog"
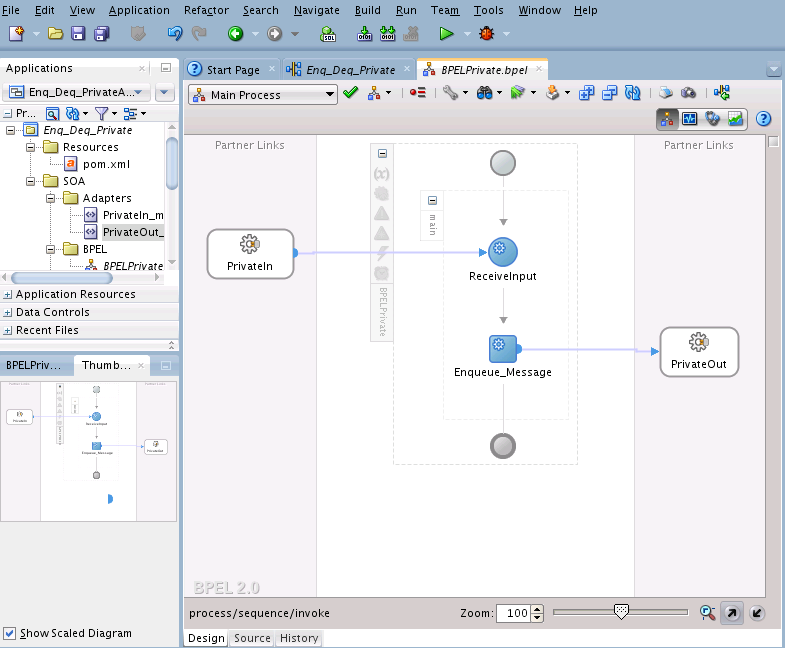
  8. Click OK. The JDeveloper BPELPrivate.bpel page appears, as shown in Figure 13-30.

    Figure 13-30 BPELPrivate.bpel Page After Invoke Activity Has Been Added

    Description of Figure 13-30 follows
    Description of "Figure 13-30 BPELPrivate.bpel Page After Invoke Activity Has Been Added "

13.3.2.7 Adding an Assign Activity

The final step is to add an Assign activity.

  1. Drag and drop an Assign activity from the Components area in between the Receive and Invoke activities in the design area.
  2. Double-click the Assign activity. The Assign dialog is displayed.
  3. Click the General tab and enter AssignReference in the Name field.
  4. Click the Copy Rules tab.
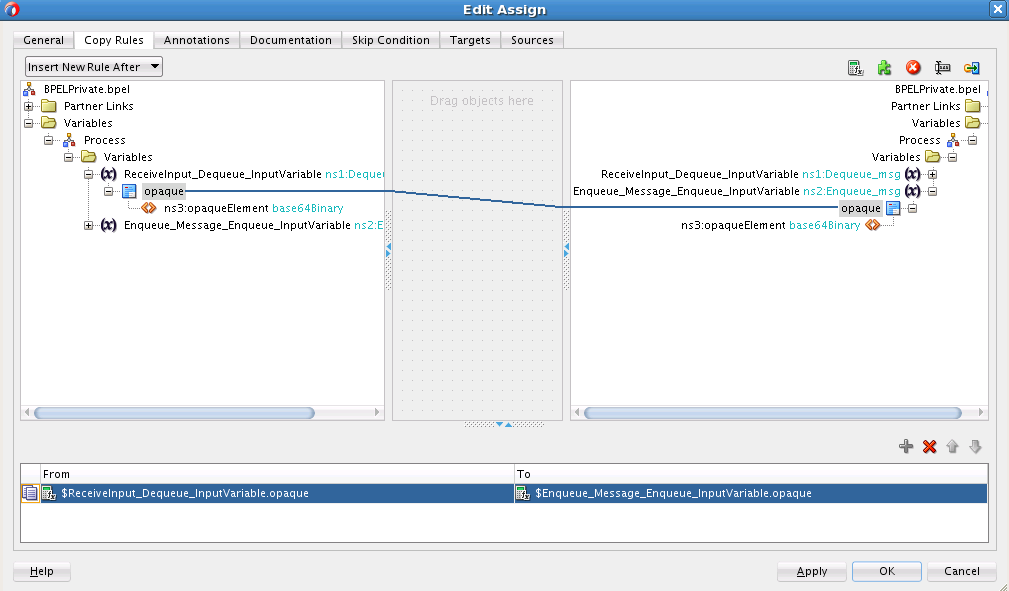
  5. Wire between the opaque element of the variable ReceiveInput_Dequeue_InputVariable to the opaque element of the variable Enqueue_Message_Enqueue_InputVariable as shown in Figure 13-31.

    Figure 13-31 Editing the Assign Activity to Wire Variables

    Description of Figure 13-31 follows
    Description of "Figure 13-31 Editing the Assign Activity to Wire Variables "
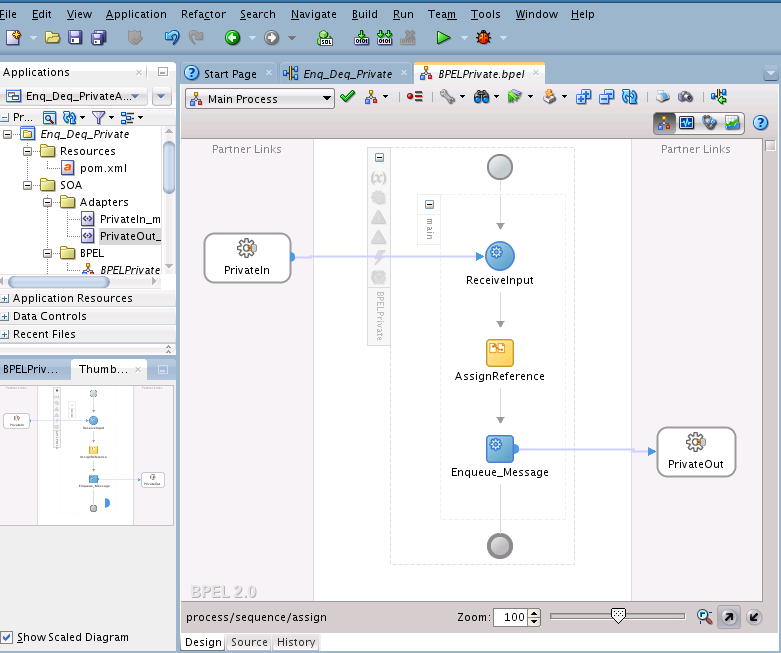
  6. Click OK, the JDeveloper BPELPrivate.bpel page is displayed.

    Figure 13-32 The BPELPrivate.bpel Page After the Variables Are Assigned

    Description of Figure 13-32 follows
    Description of "Figure 13-32 The BPELPrivate.bpel Page After the Variables Are Assigned"
  7. Click File, Save All.

13.3.3 Enqueuing a Message to a Distribution List

Follow these steps to design a use case that includes enqueueing MSMQ messages to a distribution list.

13.3.3.1 Designing the SOA Composite

You must create a JDeveloper application to contain the SOA composite. To create an application and a project for the use case, perform the following:

  1. In the Application Navigator of JDeveloper, click New Application. Then select SOA Application. The Adapter Configuration Wizard displays the Name your application page.
  2. Enter Enq_DistListApp in the Application Name field, and click Next. The Adapter Configuration Wizard displays Name your project page.
  3. Enter Enq_DistList in the Project Name field, and click Next.
  4. Select Composite With BPEL in the Composite Template box, and click Finish. The Create BPEL Process - BPEL Process page is displayed.
  5. Enter BPELDistList in the Name field, select Define Service Later from the Template list.
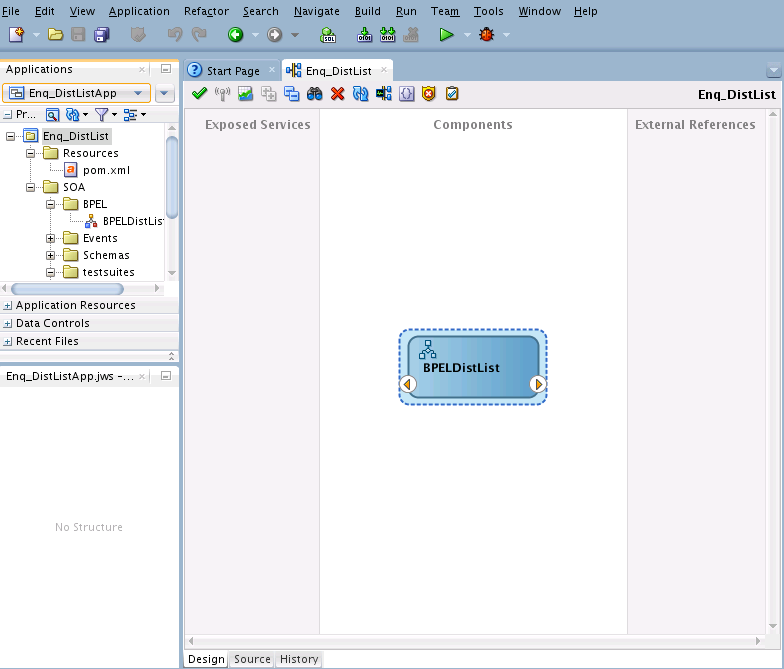
  6. Click OK. The Enq_DistListApp application and the Enq_DistList project appear in the design area, as shown in Figure 13-33.

    Figure 13-33 The Enq_DistListApp Application and the Enq_DistList Project in the Design Area

    Description of Figure 13-33 follows
    Description of "Figure 13-33 The Enq_DistListApp Application and the Enq_DistList Project in the Design Area"

13.3.3.2 Creating the Inbound Oracle File Adapter Service

Perform the following steps to create an inbound Oracle File Adapter service to read file from local directory.

  1. Drag and drop a File Adapter from the Components area to the Exposed Services swim lane. The Adapter Configuration Wizard Welcome page is displayed.
  2. Enter FileIn in the Service Name field.
  3. Click Next. The File Adapter Configuration Wizard displays the File Server Connection page is displayed.
  4. Click Next. The File Adapter Configuration Wizard displays the Operation page.
  5. Select Operation Type as Read File.
  6. Click Next. The File Directories page is displayed.
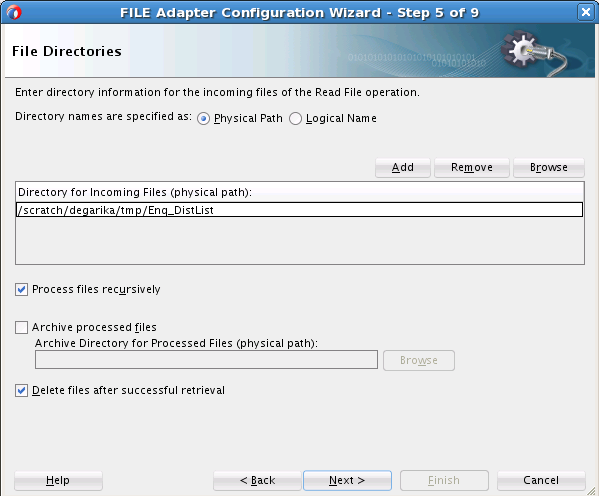
  7. Enter the physical path for the input directory as shown in Figure 13-34.

    Figure 13-34 The File Adapter Configuration Wizard File Directories Page

    Description of Figure 13-34 follows
    Description of "Figure 13-34 The File Adapter Configuration Wizard File Directories Page "
  8. Click Next. The File Adapter Configuration Wizard displays the File Filtering page.
  9. Enter *.txt in the Include Files With Name Pattern field.
  10. Click Next. The File Adapter Configuration Wizard displays the File Polling page.
  11. Click Next. The File Adapter Configuration Wizard displays the Messages page.
  12. Select the Native format translation is not required (Schema is Opaque) checkbox.
  13. Click Next. The File Adapter Configuration Wizard displays the Finish page.
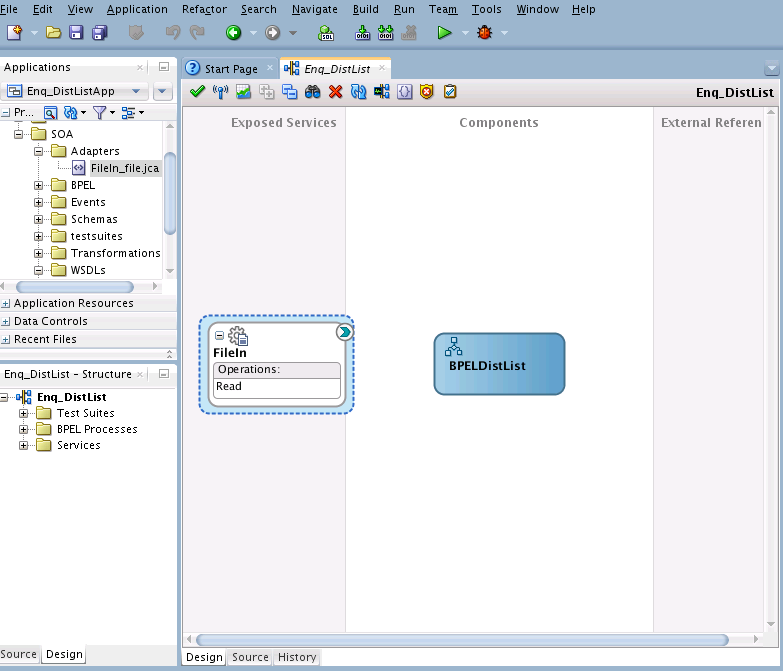
  14. Click Finish. The inbound Oracle File Adapter is now configured and composite.xml appears, as shown in Figure 13-35.

    Figure 13-35 The Configured Inbound File Adapter with the composite.xml

    Description of Figure 13-35 follows
    Description of "Figure 13-35 The Configured Inbound File Adapter with the composite.xml"

13.3.3.3 Creating the Outbound Oracle MSMQ Adapter Service

Perform the following steps to create an outbound Oracle MSMQ Adapter service to enqueue the message from a local directory to distribution list:

  1. Drag and drop the MSMQ Adapter from the Components area to the External References swim lane. The Adapter Configuration Wizard displays the Welcome page.
  2. Enter DistListOut in the Reference Name field.
  3. Click Next. The Adapter Configuration Wizard displays the Connection page.
  4. Provide the JNDI connection name of the MSMQ Server. You can use the name to connect either Transactional queues or Non-Transactional queues. In this use case, the JNDI used for Non-Transactional Queue is eis/forMSMQ/MSMQAdapter_NonTrans.
  5. Click Next. The Adapter Configuration Wizard displays the Interface page.
  6. Click Next. The Adapter Configuration Wizard displays the Operation Type page.
  7. Select Operation Type as Put message into MSMQ and Operation Name as Enqueue.
  8. Click Next. The Adapter Configuration Wizard displays the Put Message into MSMQ page.
  9. Select Destination Type as Distribution List. Enter DistList_Enq in the Destination Name.

    Note:

    : If you have active directory path of the distribution list, you must select the Use active directory path checkbox and provide the value. Also, if you have the direct format name of the distribution list you can provide direct format name of the queue by selecting the checkbox Use direct format name.

  10. Click Next. The Adapter Configuration Wizard displays the Messages page.
  11. Select Native format translation is not required (Schema is Opaque) checkbox. Note: If you have a schema, you can provide the schema for translation.
  12. Click Next. The Adapter Configuration Wizard displays the Finish page.
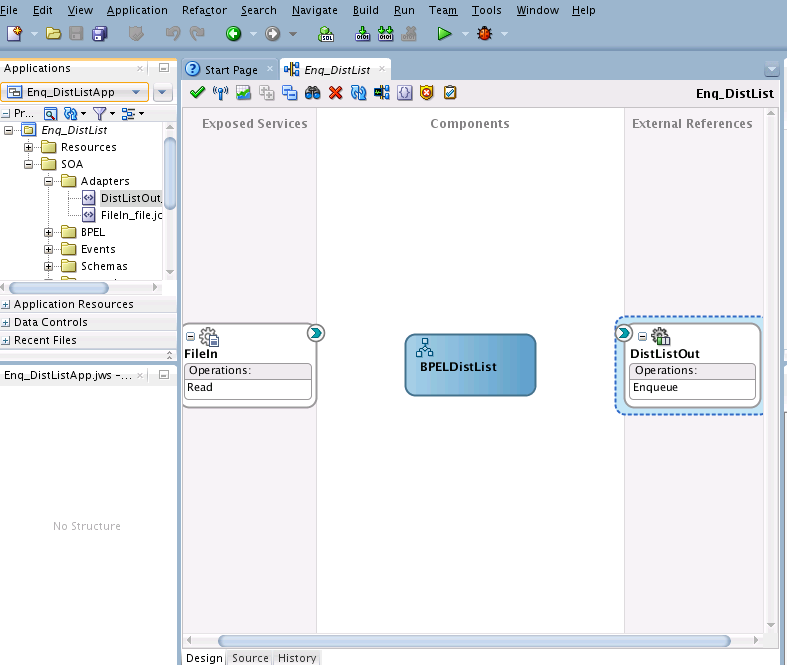
  13. Click Finish. You have configured the outbound Oracle MSMQ Adapter and the composite.xml appears, as shown in Figure 13-36.

    Figure 13-36 The Configured Outbound File Adapter with the composite.xml

    Description of Figure 13-36 follows
    Description of "Figure 13-36 The Configured Outbound File Adapter with the composite.xml"

13.3.3.4 Wiring Services and Activities

You have to assemble or wire the three components that you have created: Inbound adapter service, the BPEL process, and the Outbound adapter reference. Perform the following steps to wire the components:
  1. Drag the small triangle in the FileIn in the Exposed Services area to the drop zone that appears as a green triangle in the BPEL process in the Components area.
  2. Choose Delivery Type as async.persist.
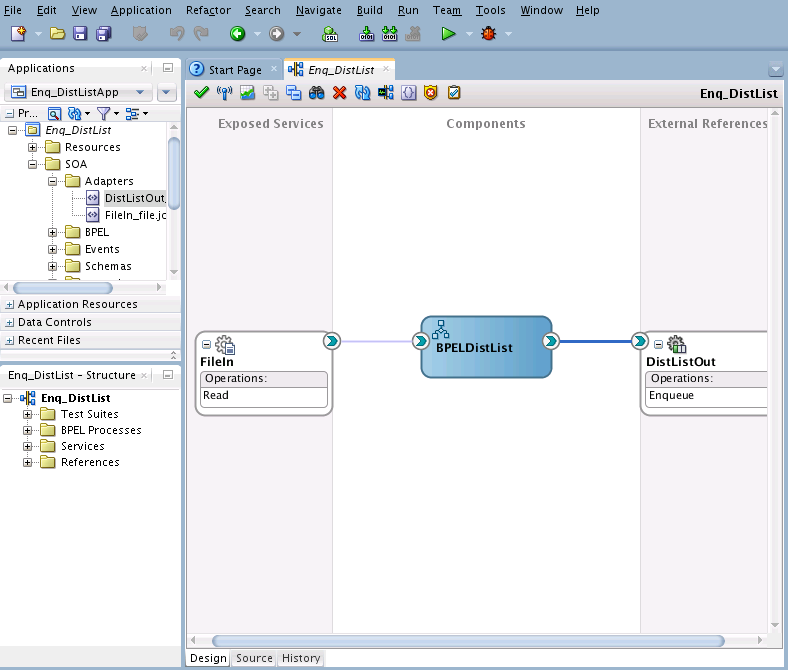
  3. Drag the small triangle in the BPEL process in the Components area to the drop zone that appears as a green triangle in the DistListOut in the External References area. The JDeveloper composite.xml appears, as shown in Figure 13-37.

    Figure 13-37 The composite.xml for the Distribution List Use Case After Wiring

    Description of Figure 13-37 follows
    Description of "Figure 13-37 The composite.xml for the Distribution List Use Case After Wiring"
  4. Click File, Save All.

13.3.3.5 Adding a Receive Activity

Follow these steps to add a Receive Activity.

  1. Double-click BPELDistList. The BPELDistList.bpel page is displayed.
  2. Drag and drop a Receive activity from the Component area to the design area.
  3. Double-click the Receive activity. The MSMQ Adapter Configuration Wizard displays the Receive dialog.
  4. Enter ReceiveInput in the Name field.
  5. Click Browse Partner Links at the end of the Partner Link field. The Partner Link Chooser dialog is displayed.
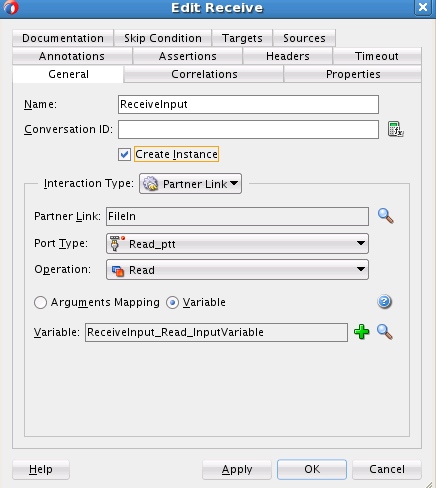
  6. Select FileIn, as shown in Figure 13-38 and click OK.

    Figure 13-38 The Partner Link Chooser Dialog with the Inbound File Adapter Selected

    Description of Figure 13-38 follows
    Description of "Figure 13-38 The Partner Link Chooser Dialog with the Inbound File Adapter Selected"
  7. Select the Auto-Create Variable icon to the right of the Variable field in the Receive dialog, as shown in Figure 13-39. The Create Variable dialog is displayed.

    Figure 13-39 The Receive Dialog

    Description of Figure 13-39 follows
    Description of "Figure 13-39 The Receive Dialog"
  8. Select the default variable name and click OK. The Variable field is populated with the default variable name.
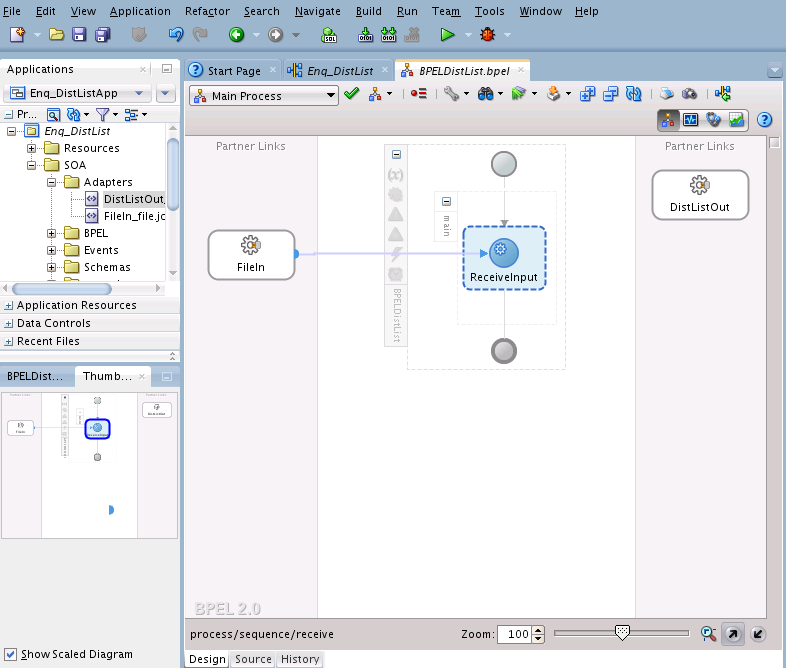
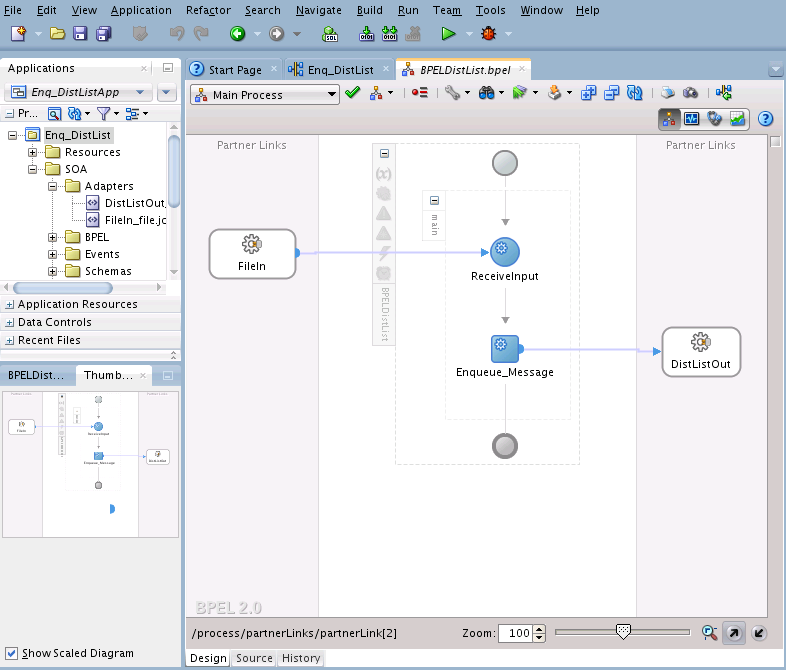
  9. Check Create Instance, and click OK. The JDeveloper BPELDistList.bpel page appears, as shown in Figure 13-40.

    Figure 13-40 BPELDistList.bpel Page after ReceiveInput Created

    Description of Figure 13-40 follows
    Description of "Figure 13-40 BPELDistList.bpel Page after ReceiveInput Created"

13.3.3.6 Adding an Invoke Activity

Follow these steps to add an Invoke activity.

  1. Drag and drop an Invoke activity from the Component area to the design area.
  2. Double-click the Invoke activity. The Invoke dialog is displayed.
  3. Enter Enqueue_Message in the Name field.
  4. Click Browse Partner Links at the end of the Partner Link field. The Partner Link Chooser dialog is displayed.
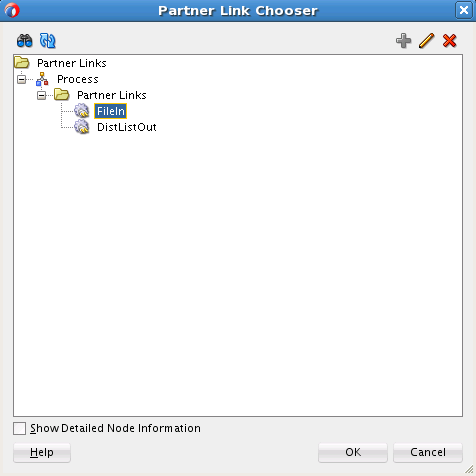
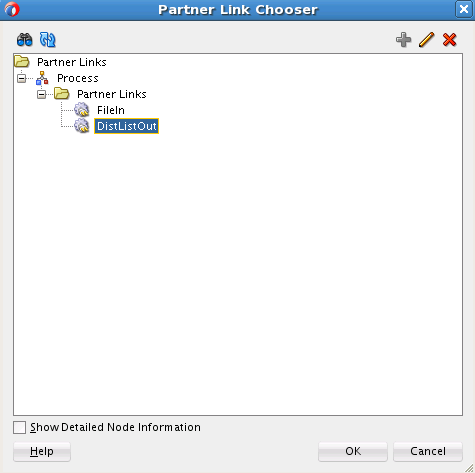
  5. Select DistListOut, as shown in Figure 13-41 and click OK.

    Figure 13-41 The Partner Link Chooser, with DistListOut Selected

    Description of Figure 13-41 follows
    Description of "Figure 13-41 The Partner Link Chooser, with DistListOut Selected"
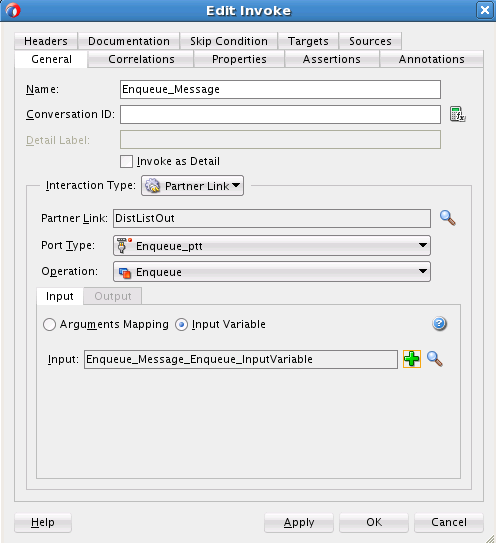
  6. Select the Automatically Create Input Variable icon to the right of the Input variable field in the Invoke dialog. The Create Variable dialog is displayed.
  7. Select the default variable name and click OK. The Variable field is populated with the default variable name. The JDeveloper Invoke dialog is displayed, as in Figure 13-42

    Figure 13-42 The JDeveloper Invoke Dialog with the Enqueue_Message_Enqueue_inputVariable

    Description of Figure 13-42 follows
    Description of "Figure 13-42 The JDeveloper Invoke Dialog with the Enqueue_Message_Enqueue_inputVariable "
  8. Click OK. The JDeveloper BPELDistList.bpel page appears, as shown in Figure 13-45.

    Figure 13-43 The BPELDistList.bpel Page After the Invoke Activity is Created

    Description of Figure 13-43 follows
    Description of "Figure 13-43 The BPELDistList.bpel Page After the Invoke Activity is Created"

13.3.3.7 Adding an Assign Activity

Follow these steps to add an Assign activity.

  1. Drag and drop an Assign activity from the Component area in between the Receive and Invoke activities in the JDeveloper design area.
  2. Double-click the Assign activity. The Assign dialog is displayed.
  3. Click the General tab and enter AssignReference in the Name field.
  4. Click the Copy Rules tab.
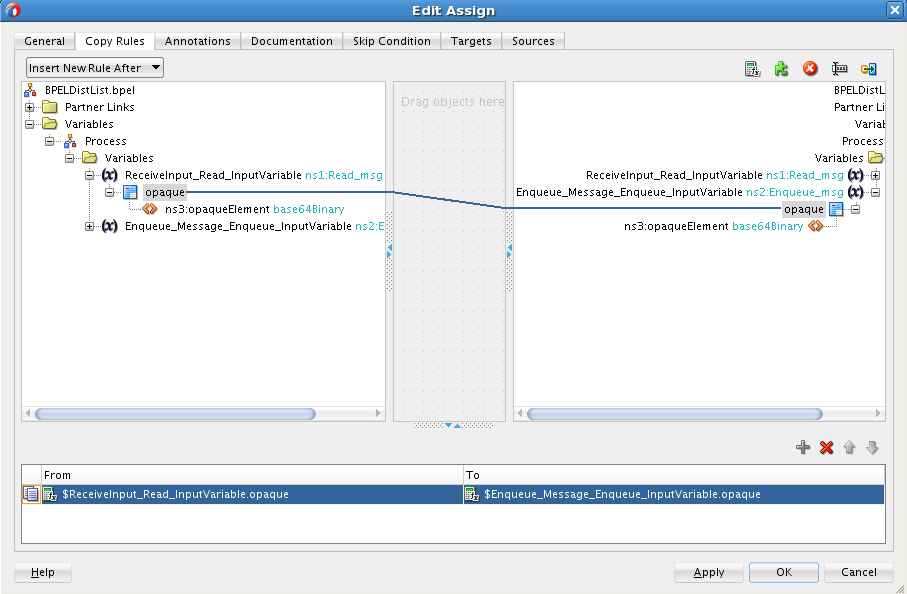
  5. Wire between the opaque element of the variable ReceiveInput_Dequeue_InputVariable to the opaque element of the variable Enqueue_Message_Enqueue_InputVariable as shown in Figure 12.

    Figure 13-44 The Jdeveloper Edit Assign Dialog, Wiring ReceiveInput_Dequeue_InputVariable to Enqueue_Message_Enqueue_InputVariable

    Description of Figure 13-44 follows
    Description of "Figure 13-44 The Jdeveloper Edit Assign Dialog, Wiring ReceiveInput_Dequeue_InputVariable to Enqueue_Message_Enqueue_InputVariable "
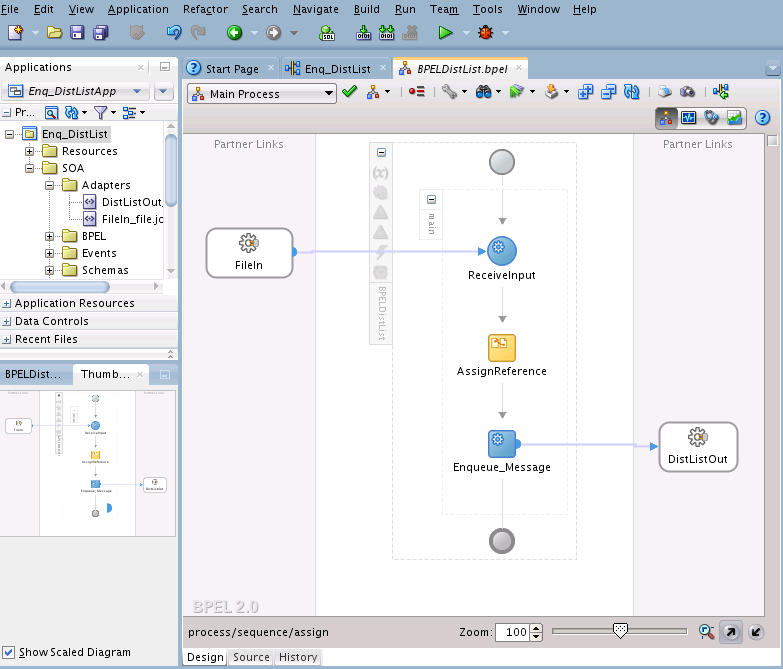
  6. Click OK, the JDeveloper BPELDistList.bpel page is displayed, as shown in Figure 13

    Figure 13-45 The Completed BPELDistList.bpel Page

    Description of Figure 13-45 follows
    Description of "Figure 13-45 The Completed BPELDistList.bpel Page"
  7. Click File, Save All.